MERCEDES-BENZ G-CLASS SUV 2018 Owners Manual
Manufacturer: MERCEDES-BENZ, Model Year: 2018, Model line: G-CLASS SUV, Model: MERCEDES-BENZ G-CLASS SUV 2018Pages: 549, PDF Size: 10.22 MB
Page 361 of 549
Selecting picture settings
Multimedia sy
stem:
4 Media 5
à Media sources 5
TV
5 Z Options #
Select Picture format. #
Select a picture form at.
Ad justing the brightness manually
If th eAutomatic pictureform at is swit ched off,
yo u can adjust the brightness yourself. #
Select Brightness. #
Adjust the brightness. HD prog
rammes Re
ceiving encryp ted HD prog rammes
* NO
TEDama getothe CI+ module and
Smart Card The CI+ module is designed
for use in the
home. The CI+ module can overheat and be
damaged bycontinuous exposure tohigh
outside temp eratures. #
Make sure that the CI+ module is not
subject tohigh temp eratures forex ten‐
ded pe riods of time.
If th e CI+ module is damaged, no
encryp tedch annels can be recei ved. The
TVtuner is In the boot, at there ar right-
hand side in the trim. #
Ifre qu ired (countr y-dependent), insert the
Smart Ca rdinto the CI+ module slot. #
Remo vethe pr otective cap from theTV tune r. #
Insert the CI+ module into theTV tuner sl ot. #
Replace the pr otective cap on theTV tune r.
When the CI+ module is inser ted cor rectly,
encryp ted HD programmes can be recei ved
according toCI+ standard.
If th e CI+ module is not compatible, an er ror
messa geappears. Calling up
the CI+ module menu
Multimedia sy stem:
4 Media 5
à Media sources 5
TV
5 Z Options #
Select CA module. #
Select a menu option.
% You can view the subscription number in the
CI+ menu. You need this to extend the sub‐
scription, forex ample.
If playback is malfunctioning, you can try to
re sol vethe problem with Restart CI+ mod-
ule.
Fu rther information (see the manufacturer's
operating instructions). Sound
To
ne settings Information about
the sound sy stem
The sound sy stem has a total output of 100 W
and is equipped with 6 spea kers. It is available
fo r all functions in thera dio and media modes. 358
Multimedia sy stem
Page 362 of 549
Calling up
the sound menu
Multimedia sy stem:
4 Media 5
à Sound
The following functions are available:
R Equaliser
R Balance and Fader
R Automatic volume adjustment
R Other sound settings #
Select a sound menu.
Ad justing treble, mid- range and bass set‐
tings
Multimedia sy stem:
4 Media 5
à Sound 5
Equaliser #
Select Treble, MidorBass. #
Change the settings. Ac
tivating/deactivating automatic volume
adjustment
Multimedia sy stem:
4 Media 5
à Sound
5 Automatic volume adjustment
Au tomatic volume adjustment compensates for
dif fering volumes when changing between audio
sources. #
Activate Oor deacti vate ª the function.
Ad justing the balance/ fader
Multimedia sy stem:
4 Media 5
à Sound
5 Balance and Fader #
Adjust the balance and fader. #
Toexitth e menu: pressthe% button. Burmes
ter®
sur round sound sy stem Information about
the Bu rmester ®
sur round
sound sy stem
The Burmes ter®
sur round sound sy stem has a
to ta l output of 590 W and is equipped with 15speakers. It is
available for all functions in the
ra dio and media modes.
Calling up the sound menu in the
Bu rm ester ®
sur round sound sy stem
Multimedia sy stem:
4 Media 5
à Sound
The following functions are available:
R Equaliser
R Balance and Fader
R Automatic volume adjustment
R Surround sound
R Sound focus
R Other sound settings #
Select a function.
Ad justing the treble, mid and bass settings
on the Burmes ter®
sur round sound sy stem
Multimedia sy stem:
4 Media 5
à Sound 5
Equaliser #
Select Treble, MidorBass. #
Set the desired values. Multimedia sy
stem 359
Page 363 of 549
Ac
tivating/deactivating volume adjustment
in the Bu rmester ®
sur round sound sy stem
Multimedia sy stem:
4 Media 5
à Sound
5 Automatic volume adjustment
Au tomatic volume adjustment compensates for
dif fering volumes when changing between audio
sources. #
Activate Oor deacti vate ª the function.
Ad justing the balance/ fader in the
Burmes ter®
sur round sound sy stem
Multimedia sy stem:
4 Media 5
à Sound
5 Balance and Fader #
Adjust the balance and fader. #
Toexitth e menu: pressthe% button. Switching sur
round sound on/off in the
Burmes ter®
sur round sound sy stem
Multimedia sy stem:
4 Media 5
à Sound
5 Surround sound #
Activate Oor deacti vate ª the function.
Ad justing the sound focus in the Bu rmester ®
sur round sound sy stem
Multimedia sy stem:
4 Media 5
à Sound 5
Sound focus #
Adjust the sound focus. Re
ar Seat Entertainment Sy stem Note
s on operating saf ety &
WARNING Risk of accident or inju rydue
to the driver operating theRe ar Seat
En tertainment Sy stem
If yo u operate theRe ar Seat En tertainment
Sy stem when driving you could lose cont rol
of theve hicle. #
Only ha vetheRe ar Seat En tertainment
Sy stem operated byrear compartment
passengers when they have their seat
belts fastened. #
Set thevo lume on the Blue tooth ®
speakers so that sounds, in particular
from outside theve hicle, can alw ays be
heard. &
WARNING Risk of accident or inju rydue
to incor rect modifications of theRe ar
Seat En tertainment Sy stem
The Rear Seat En tertainment Sy stem con‐
ta ins no parts that can be main tained by yo u.
Modi fications totheRe ar Seat En tertainment
Sy stem can impair its function and/or the
function of additionally networ ked compo‐
nents. #
Alw ays ha vemaintenance workand
re pairs car ried out at a qualified spe‐
cialist workshop. 360
Multimedia sy stem
Page 364 of 549
&
WARNING Risk of inju ryfrom unsecu red
items in theve hicle
If objects such as headphones/headsets or
ex tern al audio/video sources are not
secured in theve hicle interior, they can be
fl ung around and hit vehicle occupants. #
Alw aysstow these items or similar
objects carefully so that they cannot be
fl ung around, forex ample in a loc kable
ve hicle stowage compartment. Obse
rveth e no tes on loading theve hicle. &
WARNING Risk of accident and inju ry
caused byspilling liquids on a display
Spilled liquids could result in a fire or an
electric shoc k. #
Do not pour or sp ray any liquids on to
th e displa y. *
NO
TEDama getothere ar display and/or
th ere ar ben chseat The
rear displa ysoftheRe ar Seat En tertain‐
ment Sy stem and/or there ar ben chseat can
be damaged when folding there ar ben ch
seat forw ards. #
Make sure that when folding there ar
ben chseat forw ards it does not come
into con tact wi th there ar displa ysand
th e front seats. *
NO
TEDama getocomponent pa rts when
adjusting the front seats The
rear displa ysoftheRe ar Seat En tertain‐
ment Sy stem, the front seats or other com‐
ponent parts can be damaged when adjust‐
ing the front seats. #
When adjusting the front seats and the
fi tted rear displa ysmake sure that they
do not come into con tact wi thother
component parts. Obser
vethe no tes on adjusting the front seats. Fu
nction restrictions
Ra dio-based elect ronic devices, e.g. mobile
phones, can inter fere with theRe ar Seat En ter‐
ta inment Sy stem and adversely af fect thequ ality
of the playbac k.Ke ep the number of these devi‐
ces in theve hicle tothe minimum necessar y.
Note s ontemp eratures: intheev ent that a
re ar display overheats a saf ety shutoff is car ried
out. Pr otect there ar displa ysfrom cons tant
di re ct sunlight.
If th ete mp erature fluctuates widel y,condensa‐
tion could occur on the inside of the screen. This
can adversely af fect the function. Only switch on
th ere ar displa yswhen they have adjus tedto the
ambient temp erature.
Declarations of conformity
Obser vethe no tes on thefo llowing topics:
R Elect romagnetic compatibility (/ page 22)
R Wireless vehicle components (/ page 22) Multimedia sy
stem 361
Page 365 of 549
Count
ryDesignation
Ru ssia Product description: Mercedes-
Benz
Article code: A2
13820 43 03
Vo ltage: 12V negative ear th
Manufacturer: Centurion Elec‐
tronics
Country of origin: Taiwan
Scope of application: Rear Seat
En tertainment Sy stem Re
ar Seat Entertainment Sy stem overview The
Rear Seat En tertainment Sy stem can be
operated bo thintheve hicle as well as outside
th eve hicle. The
Rear Seat En tertainment Sy stem includes:
R Twore ar displa ys(Dual Sy stem) or one rear
display (Sin gle Sy stem)
R Connection for corded headphones for each
re ar display
R Connections for USB (type A) and HDMI on
th ere ar display
% For playback ,yo u can use commercially
av ailable corded headphones, Blue tooth®
headphones or Blue tooth®
speakers (see the
manufacturer's operating instructions).
When using headsets disturbance toplay‐
back may occur.
% The Rear Seat En tertainment Sy stem can be
connected and operated with an extern al
re mo tecontrol via Blu etoo th®
(see the man‐
ufacturer's operating instructions).
% Tooperate theRe ar Seat En tertainment Sys‐
te m outside theve hicle, a 12V (1.5 A)
adapte r cable for po wer supply is required
(see the manufacturer's operating instruc‐
tions). %
The functions of there mo tecontrol, the
cordless headphones or speakers can be
impaired by otherradio-based elect ronic
devices, e.g. mobile phones. Re
ar displa ys Overview of
there ar displa ys
Control elements 1
Increases thevo lume
2 Touchsc reen
Display type: TFT LCD wi th25.7 cm screen
size 362
Multimedia sy stem
Page 366 of 549
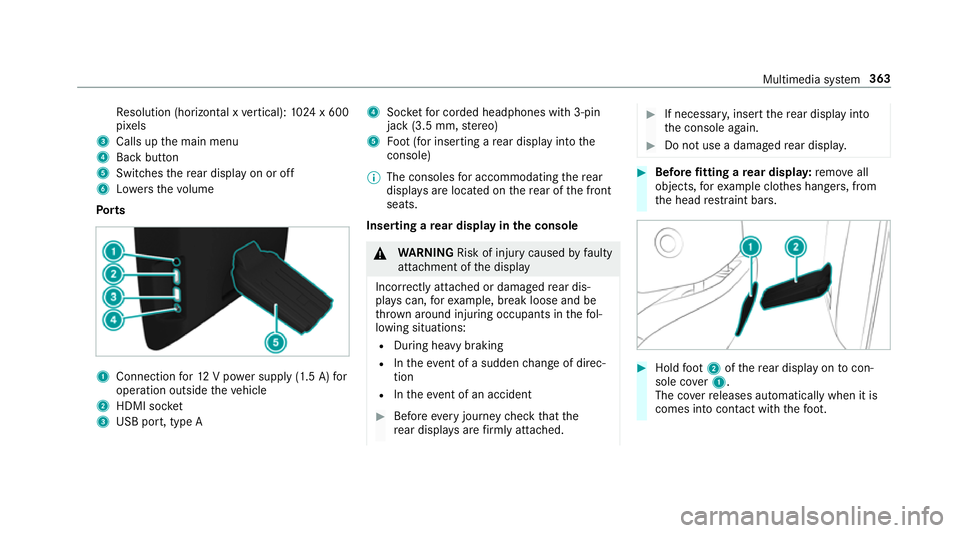
Re
solution (horizontal x vertical): 1024 x 600
pi xe ls
3 Calls up the main menu
4 Back button
5 Switches there ar display on or off
6 Lowe rsthevo lume
Po rts 1
Connection for12 V po wer supp ly(1.5 A) for
operation outside theve hicle
2 HDMI soc ket
3 USB port, type A 4
Socketfo r corded headphones with 3-pin
jack (3.5 mm, stereo)
5 Foot (for inserting a rear display into the
console)
% The consoles for accommodating there ar
displa ysare located on there ar of the front
seats.
Inserting a rear display in the console &
WARNING Risk of inju rycaused byfaulty
attachment of the display
Incor rectly attached or damaged rear dis‐
pla yscan, forex ample, break loose and be
th ro wn around injuring occupants in thefo l‐
lowing situations:
R During heavy braking
R Intheeve nt of a sudden change of direc‐
tion
R Intheeve nt of an accident #
Before every journey check that the
re ar displa ysare firm lyattached. #
If necessar y,inse rtthere ar display into
th e console again. #
Do not use a damaged rear displa y. #
Before fitting a rear displa y:remo veall
objects, forex ample clo thes hangers, from
th e head restra int bars. #
Hold foot 2 ofthere ar display on tocon‐
sole co ver1.
The co verre leases automatically when it is
comes into con tact wi th thefo ot. Multimedia sy
stem 363
Page 367 of 549
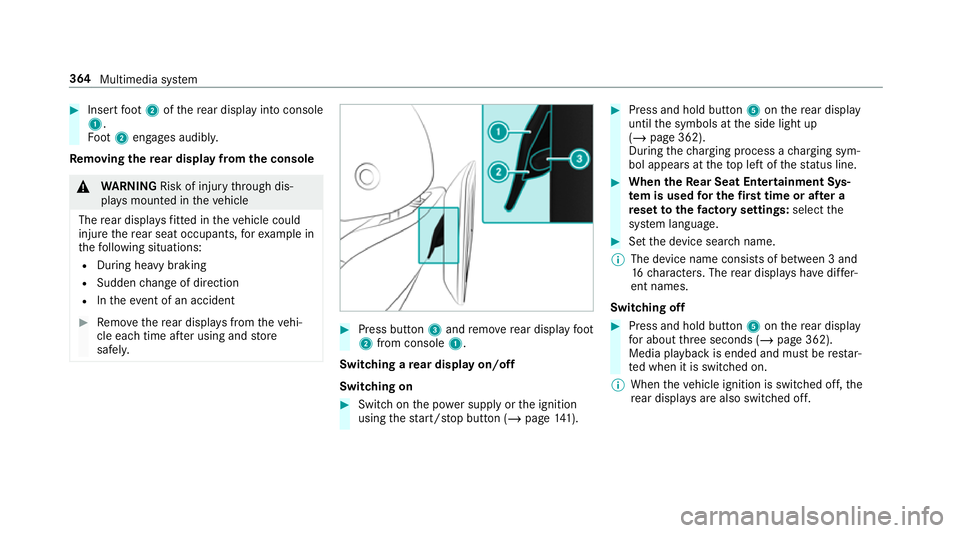
#
Insert foot 2 ofthere ar display into console
1.
Fo ot 2 engages audibly.
Re moving the rear display from the console &
WARNING Risk of inju rythro ugh dis‐
pla ysmounted in theve hicle
The rear displa ysfitted in theve hicle could
injure there ar seat occupants, forex ample in
th efo llowing situations:
R During heavy braking
R Sudden change of direction
R Intheev ent of an accident #
Remo vethere ar displa ysfrom theve hi‐
cle each time af ter using and store
safel y. #
Press button 3and remo verear display foot
2 from console 1.
Switching a rear display on/off
Switching on #
Switch on the po wer supp lyor the ignition
using thest art/ stop button (/ page141). #
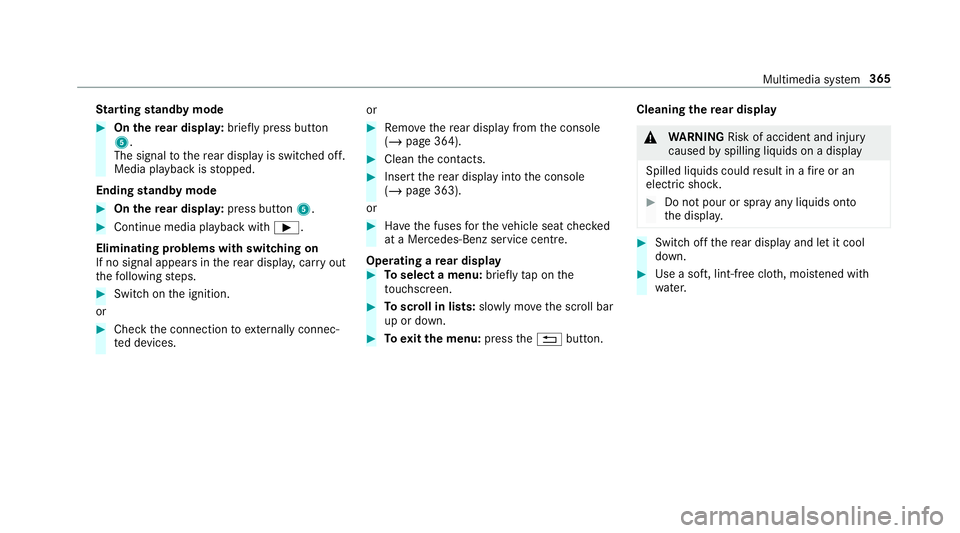
Press and hold but ton5 onthere ar display
until the symbols at the side light up
(/ page 362).
During thech arging process a charging sym‐
bol appears at theto p left of thest atus line. #
When theRe ar Seat Entertainment Sys‐
te m is used for the firs t time or af ter a
re set tothefa ctory settings: selectthe
sy stem language. #
Set the device sear chname.
% The device name consi sts of between 3 and
16 characters. The rear displa yshave differ‐
ent names.
Switching off #
Press and hold button 5onthere ar display
fo r about thre e seconds (/ page 362).
Media playback is ended and must be restar‐
te d when it is switched on.
% When theve hicle ignition is switched off, the
re ar displa ysare also swit ched off. 364
Multimedia sy stem
Page 368 of 549
St
arting standby mode #
On there ar displa y:brief lypress button
5.
The signal tothere ar display is swit ched off.
Media playback is stopped.
Ending standby mode #
On there ar displa y:press button 5. #
Continue media playback with Ì.
Eliminating problems with switching on
If no signal appears in there ar displa y,car ryout
th efo llowing steps. #
Switch on the ignition.
or #
Check the connection toextern ally connec‐
te d devices. or #
Remo vethere ar display from the console
(/ page 364). #
Clean the conta cts. #
Insert there ar display into the console
(/ page 363).
or #
Have the fuses forth eve hicle seat checked
at a Mercedes-Benz service centre.
Operating a rear display #
Toselect a menu: brieflytap on the
to uchsc reen. #
Toscroll in lists: slowly movethe scroll bar
up or down. #
Toexitth e menu: pressthe% button. Cleaning
there ar display &
WARNING Risk of accident and inju ry
caused byspilling liquids on a display
Spilled liquids could result in a fire or an
electric shoc k. #
Do not pour or sp ray any liquids on to
th e displa y. #
Switch off there ar display and let it cool
down. #
Use a soft, lint-f ree clo th, mois tened wi th
wate r. Multimedia sy
stem 365
Page 369 of 549
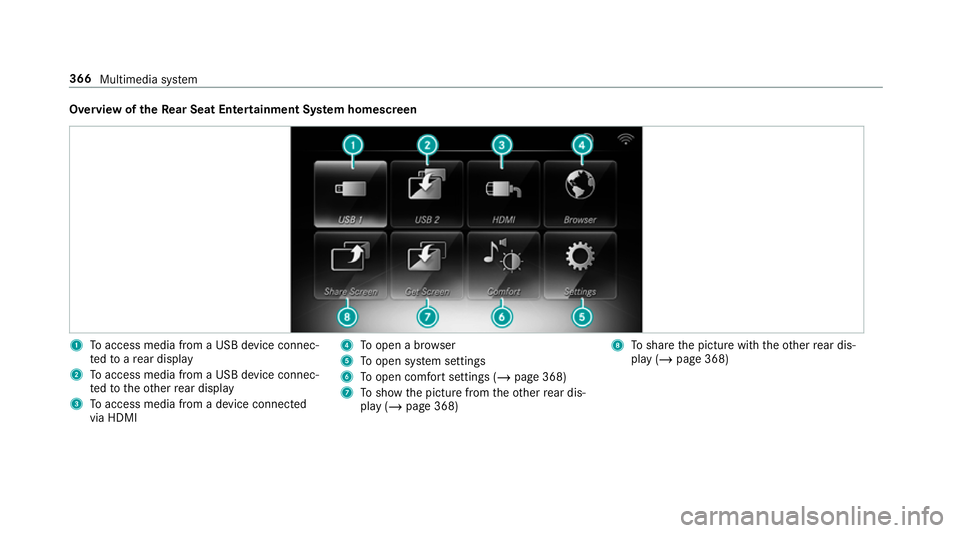
Overview of
theRe ar Seat Entertainment Sy stem homescreen 1
Toaccess media from a USB device connec‐
te dto are ar display
2 Toaccess media from a USB device connec‐
te dto theot her rear display
3 Toaccess media from a device connec ted
via HDMI 4
Toopen a br owser
5 Toopen sy stem settings
6 Toopen comfort settings (/ page 368)
7 Toshow the picture from theot her rear dis‐
play (/ page 368) 8
Toshare the picture with theot her rear dis‐
play (/ page 368) 366
Multimedia sy stem
Page 370 of 549
Headphones
Overview of
the headphones for the Rear
Seat Entertainment Sy stem &
WARNING Risk of inju rydue tohigh vol‐
ume of the headphones
Yo ur hearing can be damaged when exposed
to high volumes. #
Make sure that thevo lumes at there ar
displa ysare set toa com fortable vol‐
ume before putting on the headphones. Fo
r each rear display you can connect thefo l‐
lowing accessories:
R Blue tooth ®
headphones or a Blue tooth®
speaker
R Corded headphones via a 3-pin stereo jac k,
3.5 mm
% The accessories can be obtained at a spe‐
cialist shop (see the manufacturer's operat‐
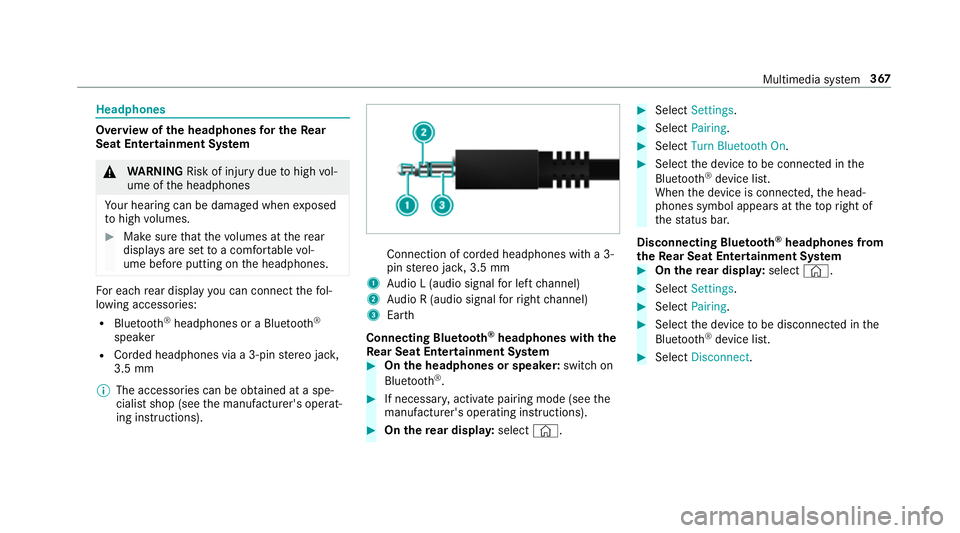
ing instructions). Connection of corded headphones with a 3-
pin
stereo jac k,3.5 mm
1 Audio L (audio signal for left channel)
2 Audio R (audio signal forright channel)
3 Earth
Connecting Blu etoo th®
headphones with the
Re ar Seat Entertainment Sy stem #
On the headphones or spea ker:swit chon
Blue tooth ®
. #
If necessar y,activate pairing mode (see the
manufacturer's operating instructions). #
On there ar displa y:select ©. #
Select Settings . #
Select Pairing. #
Select Turn Bluetooth On. #
Select the device tobe connec ted in the
Blu etoo th®
device list.
When the device is connected, the head‐
phones symbol appears at theto pright of
th est atus bar.
Disconnecting Blu etoo th®
headphones from
th eRe ar Seat Entertainment Sy stem #
On there ar displa y:select ©. #
Select Settings . #
Select Pairing. #
Select the device tobe disconnec ted in the
Blu etoo th®
device list. #
Select Disconnect. Multimedia sy
stem 367