MERCEDES-BENZ G-CLASS SUV 2018 Owners Manual
Manufacturer: MERCEDES-BENZ, Model Year: 2018, Model line: G-CLASS SUV, Model: MERCEDES-BENZ G-CLASS SUV 2018Pages: 549, PDF Size: 10.22 MB
Page 371 of 549
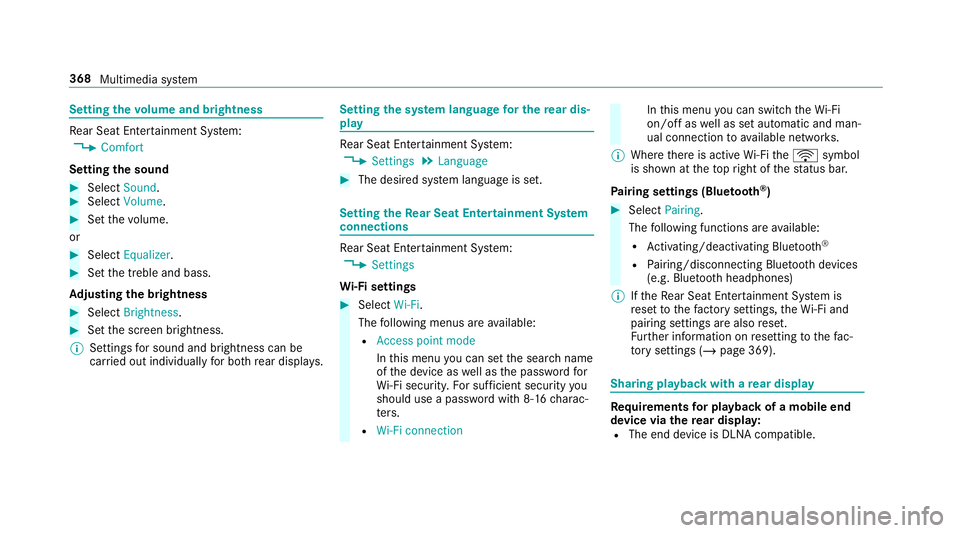
Setting
thevo lume and brightness Re
ar Seat En tertainment Sy stem:
4 Comfort
Setting the sound #
Select Sound. #
Select Volume . #
Set thevo lume.
or #
Select Equalizer. #
Set the treble and bass.
Ad justing the brightness #
Select Brightness . #
Set the screen brightness.
% Settings for sound and brightness can be
car ried out individually for bo threar displa ys. Setting
the sy stem language for the rear dis‐
play Re
ar Seat En tertainment Sy stem:
4 Settings 5
Language #
The desired sy stem language is set. Setting
theRe ar Seat Entertainment Sy stem
connections Re
ar Seat En tertainment Sy stem:
4 Settings
Wi -Fi settings #
Select Wi-Fi.
The following menus are available:
R Access point mode
Inthis menu you can set the sear chname
of the device as well as the password for
Wi -Fi secu rity. For suf ficient secu rity you
should use a password with 8-16 charac‐
te rs.
R Wi-Fi connection In
this menu you can swit chtheWi -Fi
on/o ffas well as set automatic and man‐
ual connection toavailable networ ks.
% Where there is active Wi-Fi theö symbol
is shown at theto pright of thest atus bar.
Pa iring settings (Blue tooth ®
) #
Select Pairing.
The following functions are available:
R Activating/deactivating Blu etoo th®
R Pairing/disconnecting Blue tooth devices
(e.g. Blue tooth headphones)
% Ifth eRe ar Seat En tertainment Sy stem is
re set tothefa ctory settings, theWi -Fi and
pairing settings are also reset.
Fu rther information on resetting tothefa c‐
to ry settings (/ page 369). Sharing playback with a
rear display Re
quirements for playba ckof a mobile end
device via there ar displa y:
R The end device is DLNA compatible. 368
Multimedia sy stem
Page 372 of 549
R
A DLNA compatible app is ins talled on the
end device.
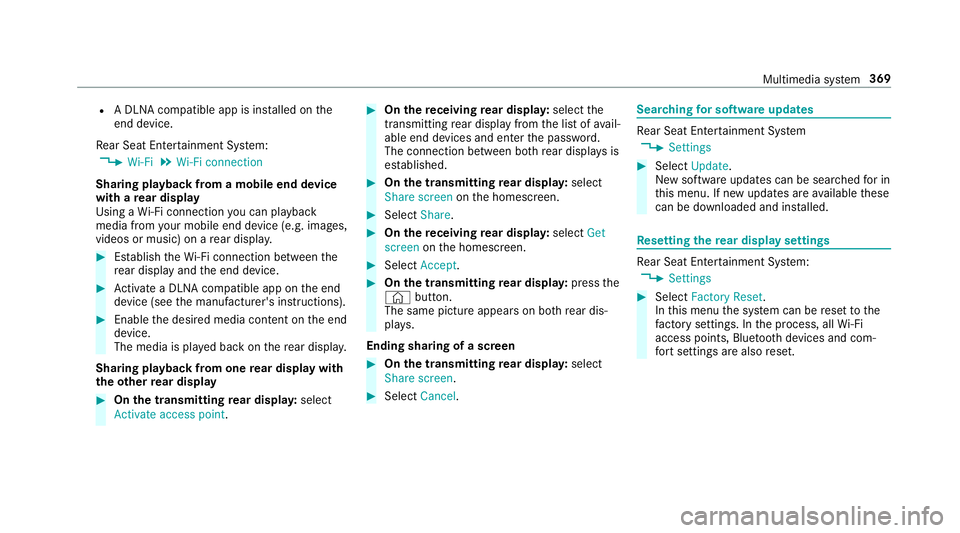
Re ar Seat En tertainment Sy stem:
4 Wi-Fi 5
Wi-Fi connection
Sharing playback from a mobile end device
with a rear display
Using a Wi-Fi connection you can playback
media from your mobile end device (e.g. images,
videos or music) on a rear displa y. #
Establish theWi -Fi connection between the
re ar display and the end device. #
Activate a DLNA compatible app on the end
device (see the manufacturer's instructions). #
Enable the desired media conte nt onthe end
device.
The media is pla yed back on there ar displa y.
Sharing playback from one rear display with
th eot her rear display #
On the transmitting rear displa y:select
Activate access point. #
On there ceiving rear displa y:select the
transmitting rear display from the list of avail‐
able end devices and enter the password.
The connection between bo threar displa ysis
es tablished. #
On the transmitting rear displa y:select
Share screen onthe homescreen. #
Select Share. #
On there ceiving rear displa y:select Get
screen onthe homescreen. #
Select Accept . #
On the transmitting rear displa y:press the
© button.
The same picture appears on bo threar dis‐
pla ys.
Ending sha ring of a screen #
On the transmitting rear displa y:select
Share screen. #
Select Cancel. Sear
ching for so ftwa reupdates Re
ar Seat En tertainment Sy stem
4 Settings #
Select Update.
New software updates can be sear ched for in
th is menu. If new updates are available these
can be downloaded and ins talled. Re
setting there ar display settings Re
ar Seat En tertainment Sy stem:
4 Settings #
Select Factory Reset.
In this menu the sy stem can be reset tothe
fa ctory settings. In the process, all Wi-Fi
access points, Blu etoo th devices and com‐
fo rt settings are also reset. Multimedia sy
stem 369
Page 373 of 549
Showing sy
stem information for the rear dis‐
play Re
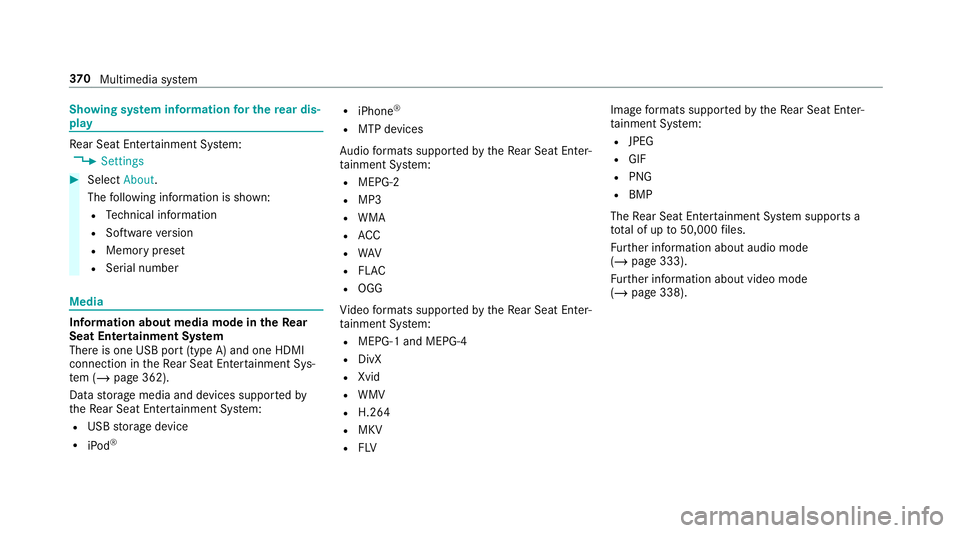
ar Seat En tertainment Sy stem:
4 Settings #
Select About.
The following information is shown:
R Tech nical information
R Software version
R Memory preset
R Serial number Media
Information about media mode in
theRe ar
Seat Entertainment Sy stem
There is one USB port (type A) and one HDMI
connection in theRe ar Seat En tertainment Sys‐
te m (/ page 362).
Data storage media and devices suppor tedby
th eRe ar Seat En tertainment Sy stem:
R USB storage device
R iPod ® R
iPhone ®
R MTP devices
Au dio form ats suppo rted bytheRe ar Seat En ter‐
ta inment Sy stem:
R MEPG-2
R MP3
R WMA
R ACC
R WAV
R FLAC
R OGG
Vi deo form ats suppo rted bytheRe ar Seat En ter‐
ta inment Sy stem:
R MEPG-1 and MEPG-4
R DivX
R Xvid
R WMV
R H.264
R MKV
R FLV Image
form ats suppo rted bytheRe ar Seat En ter‐
ta inment Sy stem:
R JPEG
R GIF
R PNG
R BMP
The Rear Seat En tertainment Sy stem supports a
tot al of up to50,000 files.
Fu rther information about audio mode
(/ page 333).
Fu rther information about video mode
(/ page 338). 37 0
Multimedia sy stem
Page 374 of 549
Manufactured under licence from Dolby Labora‐
to
ries. Dolb y,Dol byAudio and the double-D sym‐
bol are trademar ksof Dolby Laboratories.
Playback is car ried out via USB storage media,
th e HDMI connection or via the Internet. The
term s HDMI and HDMI High-Definition Multi‐
media Inter face, and the HDMI Logo are trade‐
mar ksorregis tere d trademar ksof HDMI Licens‐
ing LLC in theUn ited States and other countries.
Playback is car ried out via devices with an HDMI
connection.
% Playback via Apple ®
devices, e.g. an
iPhone ®
,requ ires an MHL adap ter.
MHL stands forMobile High-Definition Link. Fo
rDT SPa tents, see http://pa tents.dts.com.
Manufactu red under licence from DTS Licensing
Limited. DTS,DT S-HD, the Symbol, & DTS and
th e Symbol toge ther are regis tere d trademar ks
of DT S, Inc. ©
DT S, Inc. All rights reser ved.
Playback take s place is via USB storage media,
th e HDMI connection or via the Internet.
Switching tomedia mode on the Rear Seat
Entertainment Sy stem
Media can be pla yed back on one rear display or
on two rear displa ysoftheRe ar Seat En tertain‐
ment Sy stem. Multimedia sy
stem 371
Page 375 of 549
#
Switch on one Rear Seat En tertainment Sys‐
te m screen.
The homescreen appears. #
Select a data source. #
Select theMusic ,Videos orPhotos categor y.
All files in the desired category are shown in
alphabetical order.
% The Rear Seat En tertainment Sy stem can be
operated with the buttons on the
screen(/ page 362) or with the
to uchsc reen.
Media playback via HDMI devices can only
be controlled using the buttons on the
screen as well as on the end device connec‐
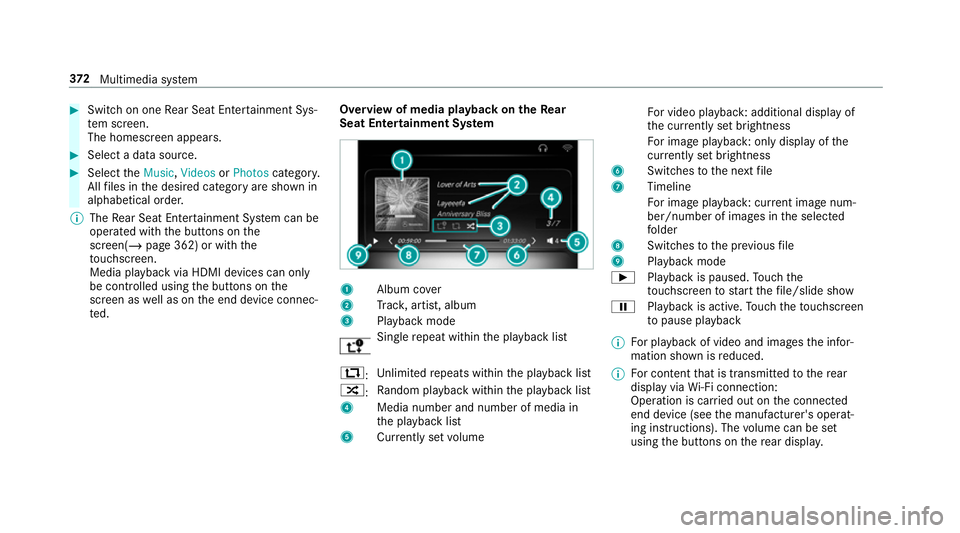
te d. Overview of media playback on
theRe ar
Seat Entertainment Sy stem 1
Album co ver
2 Trac k, artist, album
3 Playback mode Sin
gle re peat within the playback list
:: Un
limited repeats within the playback list
9: Ra
ndom pl ayback within the playback list
4 Media number and number of media in
the playback list
5 Currently set volume Fo
r video playback : additional displ ayof
th e cur rently set brightness
Fo r image playback : only displayofthe
cur rently set brightness
6 Switches tothe next file
7 Timeline
Fo r image playback : current ima genum‐
ber/number of ima ges in the selected
fo lder
8 Switches tothe pr evious file
9 Playback mode
Ì Playback is paused. Touch the
to uchsc reen tostart thefile/slide show
Ë Playback is active. Touch theto uchsc reen
to pause playback
% For playback of video and images the infor‐
mation shown is reduced.
% For content that is transmitted tothere ar
display via Wi-Fi connection:
Ope ration is car ried out on the connected
end device (see the manufacturer's operat‐
ing instructions). The volume can be set
using the buttons on there ar displa y. 372
Multimedia sy stem
Page 376 of 549
Controlling media playba
ckintheRe ar Seat
Entertainment Sy stem
St arting/ stopping playback #
Tap; ontheto uchsc reen.
Playback starts. #
TapË ontheto uchsc reen.
Playback pauses.
Fa st rewind/for ward #
Movetheye llow playback bar on the
to uchsc reen tothe left or right.
Playback of thefile is continued from the
selected position.
Playing the pr evious or next file #
Tapq (back) or r(forwards) on the
to uchsc reen.
Wi th eve rytapyo u skip one file backwards or
fo rw ards.
Ad justing the volume #
Tap on
theto uchsc reen. #
Taps (quieter) or 4 (louder) toadjust
th evo lume.
Ad justing the brightness #
Tap on
theto uchsc reen. #
Taps (brighter) or 4(darker)to
adjust the brightness. Multimedia sy
stem 373
Page 377 of 549
ASS
YST PLUS se rvice inter val display Fu
nction of the ASS YST PLUS se rvice inter val
displ ay The ASS
YST PLUS service inter val display on the
instrument display pr ovides information on the
re maining time or dis tance be fore the next
service due date.
Yo u can hide this service message using the
back button on the left-hand side of thesteering
wheel.
Depending on how theve hicle is used, the
ASS YST PLUS service inter val display may
shor tenth e service inter val, e.g. in thefo llowing
cases:
R mainly short-dis tance driving
R when the engine is of ten le ftidling for long
periods
R intheeve nt of frequent cold start phases
R Vehicles with a diesel particulate filter: in
th eev ent of frequently inter rupted rege nera‐
tion of the diesel particulate filter Mercedes-Benz
recommends avoiding such
operating conditions.
Yo u can obtain fur ther information concerning
th e servicing of your vehicle from a qualified
specialist workshop, e.g. a Mercedes-Benz
Service Centre. Displaying
the service due da te On-board computer:
4 Service 5
ASSYST PLUS
The next service due date is displa yed. #
Toexitth e displa y:press the back button
on the left-hand side of thesteering wheel.
Make sure toobser vethefo llowing fur ther rela‐
te d subjec t:
R Operating the on-board computer
(/ page 226). Information on
regular maintenance work *
NO
TEPremature wearthro ugh failure to
obser veservice due dates Service
workwhich is not car ried out at the
ri ght time or incomple tely can lead to
inc reased wear and damage totheve hicle. #
Alw ays obser vethe prescribed service
inter vals. #
Alw ays ha vethe prescribed service
wo rkcar ried out at a qualified specialist
wo rkshop. Special service
requ irements The prescribed service inter
val is based on nor‐
mal operation of theve hicle. Maintenance work
will need tobe per form ed more of ten if theve hi‐
cle is operated under arduous conditions or
increased loads.
The ASS YST PLUS service inter val display is only
an aid. The driver of theve hicle bears responsi‐
bility as rega rdsto whe ther maintenance work
needs tobe per form ed more of tenth an speci‐ 374
Maintenance and care
Page 378 of 549
fi
ed based on the actual operating conditions
and/or loads.
Examples of arduous operating conditions:
R regular city driving with frequent intermedi‐
ate stops
R mainly short-dis tance driving
R frequent operation in mountainous terrain or
on poor road sur faces
R when the engine is of ten le ftidling for long
periods
R operation in particula rly dusty conditions
and/or if air-recirculation mode is frequently
used
In these or similar operating conditions, ha vethe
interior air filter, engine air cleaner, engine oil
and oil filter etc. changed more frequent ly. The
ty re s must be checked more frequently if the
ve hicle is operated under increased loads. Fur‐
th er information can be obtained at a qualified
specialist workshop. Battery disconnection periods
The ASS
YST PLUS se rvice inter val display
can only calculate the service due da tewhen
th e bat tery is connected. #
Notedown the service due date displa yed on
th e instrument display before disconnecting
th e battery (/ page374). Engine com
partment Opening/closing the bonnet
&
WARNING Risk of accident due todriv‐
ing with the engine bonn etunlo cked
An unloc ked engine bonn etmay open up
when theve hicle is in motion and block your
vie w. #
Never unlock the engine bonn etwhen
driving. #
Before every trip, ensure that the
engine bonn etis loc ked. &
WARNING Risk of accident and inju ry
when opening and closing the engine
bonn et
When opening or closing the engine bonn et,
it may suddenly drop into the end position.
There is a risk of injury for an yone in the
engine bonn et's range of mo vement. #
Only open or close the engine bonn et
when there are no persons in the
engine bonn et's range of mo vement. &
WARNING Danger of bu rns when open‐
ing the bonn et
If yo u open the engine bonn etwhen the
engine has overheated or during a fire inthe
engine compartment, you could come into
contact with hot gases or other escaping
operating fluids. #
Before opening the bonn et, allow the
engine tocool down. Maintenance and care
375
Page 379 of 549
#
Intheeve nt of a fire inthe engine com‐
partment, keep the engine bonn et
closed and call thefire service. &
WARNING Risk of inju rydue tomoving
parts
Cer tain components in the engine compart‐
ment may continue tomo veor suddenly
mo veagain even af terth e ignition has been
switched off, e.g. the cooler fan.
Ma kesure of thefo llowing before per form ing
ta sks in the engine compartmen t:#
Switch the ignition off. #
Neverto uch the danger zone sur round‐
ing moving co mponent parts, e.g. the
ro tation area of thefa n. #
Remo vejewe llery and watches. #
Keep items of clo thing and hair away
from moving parts. &
WARNING Risk of inju ryfrom touching
co mp onent parts under voltage
The ignition sy stem and the fuel injection
sy stem workunder high voltage. If youto uch
co mp onent parts which are under voltage,
yo u could recei vean electric shoc k. #
Neverto uch co mponents of the ignition
sy stem or the fuel injection sy stem
when the ignition is switched on. &
WARNING Risk of bu rns from hot com‐
ponent parts in the engine compartment
Cer tain components in the engine compart‐
ment can be very hot, e.g. the engine, the
ra diator and parts of theex haust sy stem. #
Allow the engine tocool down and only
to uch co mponent parts described in
th efo llowing. &
WARNING Risk of inju ryfrom using the
windscreen wipers while the engine bon‐
net is open
When the engine bonn etis open, and the
windscreen wipers are set in motion, you can
be trapped bythe wiper linkage. #
Alw ays switch off the windscreen wip‐
ers and ignition before opening the
engine bonn et. 376
Maintenance and care
Page 380 of 549
#
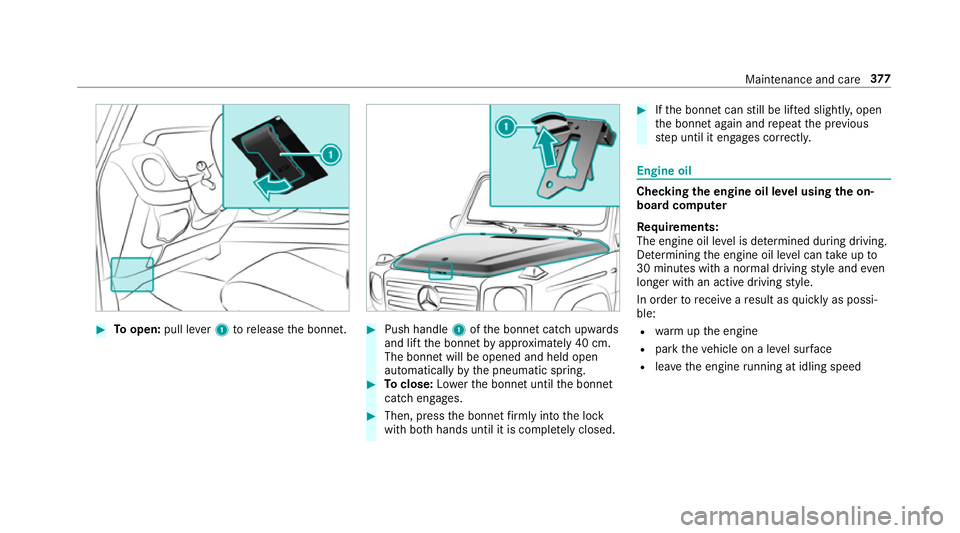
Toopen: pull lever1 torelease the bonn et. #
Push handle 1ofthe bonn etcatch up wards
and lift the bonn etby appr oximately 40 cm.
The bonn etwill be opened and held open
automatically bythe pneumatic spring. #
Toclose: Lowe rth e bonn etuntil the bonn et
catch engages. #
Then, press the bonn etfirm lyinto the lock
with bo thhands until it is comple tely closed. #
Ifth e bonn etcan still be lif ted slightl y,open
th e bonn etagain and repeat the pr evious
st ep until it engages cor rectl y. Engine oil
Checking
the engine oil le vel using the on-
board compu ter
Re quirements:
The engine oil le vel is de term ined during driving.
De term ining the engine oil le vel can take up to
30 minutes with a normal driving style and even
longer with an active driving style.
In order torecei veare sult as quickly as possi‐
ble:
R warm upthe engine
R park theve hicle on a le vel sur face
R leave the engine running at idling speed Maintenance and care
377