wheel size MERCEDES-BENZ G500 2002 W463 Owner's Manual
[x] Cancel search | Manufacturer: MERCEDES-BENZ, Model Year: 2002, Model line: G500, Model: MERCEDES-BENZ G500 2002 W463Pages: 385, PDF Size: 30.37 MB
Page 73 of 385

70 Restraint systems
Te ch n i c a l
data Instruments
and controlsOperationDrivingInstrument
cluster displayPractical hints Car care Index
• Sit properly belted in an upright position with
your back against the backrest.• Adjust the driver’s seat as far as possible
rearward, still permitting proper operation of
vehicle controls. The distance from the center
of the driver’s breastbone to the center of the
airbag cover on the steering wheel must be at
least ten inches (25 cm) or more. You should be
able to accomplish this by a combination of
adjustments to the seat and steering wheel. If
you have any problems, please see your
authorized Mercedes-Benz Light Truck Center.• Do not lean with your head or chest close to the
steering wheel or dashboard.• Keep hands on the outside of steering wheel
rim. Placing hands and arms inside the rim
can increase the risk and potential severity of
hand / arm injury when the driver front airbag
inflates.• Adjust the front passenger seat as far as
possible rearward from the dashboard when
the seat is occupied.
• Always sit upright, properly use the seat belts
and appropriate size infant or child restraint
system.• Children 12 years old and under must never
ride in the front seat, except in a
Mercedes-Benz authorized BabySmart
TM
compatible child seat, which operates with the
BabySmart
TM system installed in the vehicle to
deactivate the passenger side front airbag
when it is properly installed. Otherwise they
will be struck by the airbag when it inflates in
a crash. If this happens, serious or fatal injury
can result.
• Accident research shows that the safest place
for children in an automobile is in the rear
seat. Should you choose to place a child 12
years old or under in the front passenger seat
of your vehicle, you must properly use a
BabySmart
TM chi ld restrai nt whi ch w il l turn of f
the passenger side front airbag.
Failure to follow these instructions can result in
severe or fatal injuries to you or other occupants.
J_G463.book Seite 70 Mittwoch, 19. September 2001 8:06 08
Page 247 of 385

244 Driving systems
Te ch n i c a l
data Instruments
and controlsOperationDrivingInstrument
cluster displayPractical hints Car care Index
If the ESP warning lampv comes on continuously
and warning messages appears in the multifunction
display with the engine running, a malfunction has
been detected in either system. Only partial engine
output will be available.
If the BAS malfunctions, the brake system functions in
the usual manner, but without BAS, ESP and 4-ETS.
If the ESP warning lampv and the
Émalfunction indicator lamp come on and warning
messages appears in the multifunction display, have the
BAS or ESP checked at your authorized Mercedes-Benz
Light Truck Center as soon as possible.
With the ABS malfunctioning, the BAS, ESP and 4-ETS
are also switched off.
For warn in g m ess ages and malfun ction in d icator lamps ,
see page 264 and page 272.
Driving the vehicle with varied size tires will cause the
wheels to rotate at different speeds, therefore the ESP
may activate (yellow ESP warning lampv in
speedometer dial comes on). For this reason, all wheels,
including the spare wheel, must have the same tire
outside diameter.When testing the parking brake on a brake test
dynamometer, the engine must be shut off. Otherwise,
the ESP will immediately be engaged and will apply the
rear wheel brakes.
In winter operation, the maximum effectiveness of the
ESP is on ly achieved wit h Me rced es -B enz re comm end ed
M+S rated radial-ply tires and / or snow chains.
Synchronizing ESP
If the power supply was interrupted (battery
disconnected or empty), the ESP warning lampv
and warning messages appears in the multifunction
display with the engine running.
Turn steering wheel completely to the left and then to
the right. The ESP warning lampv and the warning
messages in the multifunction display should go out.
J_G463.book Seite 244 Mittwoch, 19. September 2001 8:06 08
Page 313 of 385

310 Tires, Wheels
Te ch n i c a l
data Instruments
and controlsOperation DrivingInstrument
cluster displayPractical hintsCar care Index
Wheels
Replace rims or tires with the same designation,
manufacturer and type as shown on the original part.
See your authorized Mercedes-Benz Light Truck Center
for further information.
See your authorized Mercedes-Benz Light Truck Center
for information on tested and recommended rims and
tires for summer and winter operation. They can also
offer advice concerning tire service and purchase.Tire replacement
Front and rear tires should be replaced in sets. Rims
and tires must be of the correct size and type. For
dimensions, see technical data on page 359.
We recommend that you break in new tires for
approximately 60 miles (100 km) at moderate speed.
It is imperative that the wheel mounting bolts be
fastened to a tightening torque of 97 ft.lb. (130 Nm)
whenever wheels are mounted.
For rim and tire specif ications, refer to technical data on
page 359.
Wa r n i n g !
Do not mix different tire construction types (i.e.
radial, bias, bias-belted) on your vehicle because
handling may be adversely affected and may result
in loss of control.
Wa r n i n g !
Worn, old tires can cause accidents. If the tire tread
is badly worn, or if the tires have sustained
damage, replace them.When replacing rims, use only genuine
Mercedes-Benz wheel bolts specified for the
particular rim type. Failure to do so can result in
the bolts loosening and possibly an accident.
J_G463.book Seite 310 Mittwoch, 19. September 2001 8:06 08
Page 316 of 385

313 Tires, Wheels
Te ch n i c a l
data Instruments
and controlsOperation DrivingInstrument
cluster displayPractical hintsCar care Index Spare wheel
Important!
The spare wheel rim is mounted with a full size tire of
the same type as on the vehicle, and is fully functional.
In the case of a flat tire, you may use the spare wheel.
For rim and tire specifications, refer to “Technical data”
on page 359.
Note:
Repair or replace damaged tire at your earliest
convenience.
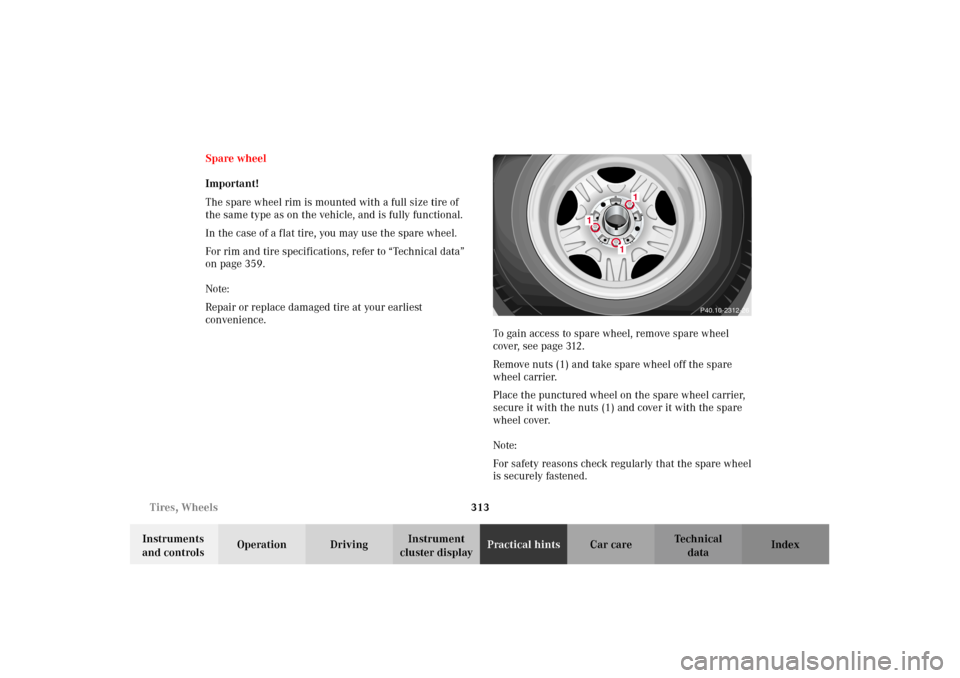
To gain access to spare wheel, remove spare wheel
cover, see page 312.
Remove nuts (1) and take spare wheel off the spare
wheel carrier.
Place the punctured wheel on the spare wheel carrier,
secure it with the nuts (1) and cover it with the spare
wheel cover.
Note:
For safety reasons check regularly that the spare wheel
is securely fastened.
P40.10-2312-26
1
1
1
J_G463.book Seite 313 Mittwoch, 19. September 2001 8:06 08