fuse MERCEDES-BENZ GL 2010 Owners Manual
[x] Cancel search | Manufacturer: MERCEDES-BENZ, Model Year: 2010, Model line: GL, Model: MERCEDES-BENZ GL 2010Pages: 380, PDF Size: 9.81 MB
Page 7 of 380
Ashtrays ............................................. 211
Aspect ratio (tires) ............................ 255
Audio/DVD menu .............................. 129
Auto-dimming rear view mirrors ........ 94
Automatic central locking .......... 74, 138
Automatic headlamp mode ................ 98
Automatic interior lighting control .. 101
Automatic locking when driving ...... 138
Automatic transmission ................... 114
Emergency operation (limp-home
mode) ............................................ 119
Gear range indicator ......................118
Gear ranges ................................... 118
Gear selector lever ........................114
Hill-start assist system ..................155
Kickdown ....................................... 117
One-touch gearshifting ..................118
Shifting procedure .........................116
Steering wheel gearshift control ....118
Towing a trailer .............................. 118
Transmission position indicator .....116
Transmission positions ..................116
AUX socket ........................................ 207
Axle oils .............................................. 369
B
BabySmart™
Air bag deactivation system .............46
Self-test ........................................... 47
Backrest
see Seats
Backup lamps
Messages in the multifunction
display ........................................... 310
Bar (air pressure unit) ....................... 255
BAS (Brake Assist System) ................. 63
Batteries, SmartKey
Checking condition ..........................73
Replacing ....................................... 326
Battery, Vehicle ................................. 348
Charging ........................................ 350
Jump starting ................................. 350
Messages in the multifunction
display ................................... 296, 308
Bead (tire) .......................................... 255
Beverage holders see Cup holders
Bleeding the fuel system (diesel
engine) ............................................... 345
BlueTEC
AdBlue ®
tank ................................. 346
AdBlue ®
tank capacity ...................369
Brake fluid
Checking level ............................... 233
Messages in the multifunction
display ........................................... 300
Brake lamps
Cleaning lenses ............................. 277
Brake pads
Messages in the multifunction
display ........................................... 299
Brakes ................................................ 260
Parking brake ........................ 112, 261
Warning lamp ................................. 316
Break-in period .................................. 226
Bug cover (Radiator) ......................... 230
Bulbs see Replacing bulbs
C
CAC (Customer Assistance Center) ... 23
California retail buyers and
lessees, important notice for ............. 21
Calls (phone) ...................................... 142
Can holders see Cup holders
Capacities and recommended
fuel/lubricants .................................. 368
Cargo compartment
Cargo net ....................................... 206
Cargo volume, expanding ..............201
Cover blind .................................... 205
Fuse box ........................................ 357
Hooks ............................................ 201
Tie-down rings ............................... 200
Cargo compartment cover blind ...... 205
Cargo net ........................................... 206
Cargo tie-down rings ......................... 200
Carpets, cleaning .............................. 280
Carriers .............................................. 196
Center console
Lower part ....................................... 33
Upper part ....................................... 31
Index5X164_AKB; 5; 31, en-USd2ureepe,Version: 2.11.8.12009-09-11T12:30:16+02:00 - Seite 5
Page 11 of 380
ETD (Emergency Tensioning
Device) ................................................. 52
Safety guidelines ............................. 39
Express operation
Power windows .............................. 105
Tilt/sliding sunroof ........................192
Exterior lamp switch ........................... 97
Exterior rear view mirrors .................. 94
Fold-in function ........................ 95, 140
Parking position ............................... 95
Power-folding ................................... 95
Exterior view of vehicle ...................... 26
F
Fastening the seat belts ..................... 50
First aid kit ......................................... 284
Flat tire ............................................... 336
Lowering the vehicle ......................344
Mounting the spare wheel .............340
Preparing the vehicle .....................336
Spare wheel ........................... 336, 368
TIREFIT (tire repair kit) ...................337
Floormats ........................................... 223
Fluids
AdBlue ®
......................................... 369
Automatic transmission fluid .........369
Brake fluid ..................................... 369
Capacities ...................................... 368
Engine coolant ............................... 369
Engine oil ....................................... 369
Power steering fluid .......................369
Washer and headlamp cleaning
system ........................................... 370
Fog lamps ............................................. 99
Messages in the multifunction
display ................................... 310, 312
Fold-in function for exterior rear
view mirrors ................................ 95, 140
Four-wheel drive see All-wheel drive (4MATIC)
Front air bags
see Air bags
Front axle oil ...................................... 369
Front lamps see Headlamps
Front passenger front air bag ............ 40
Messages in the multifunction
display ........................................... 291
Front passenger front air bag off
indicator lamp (Canada only) ..... 46, 322
Front passenger front air bag off
indicator lamp (USA only) .......... 42, 322
Front seat head restraints see Head restraints
Fuel ..................................................... 226
Additives ........................................ 372
Capacity, fuel tank .........................369
Diesel fuel ............................. 369, 372
Drive sensibly–safe fuel .................259
Fuel consumption statistics ...........141
Fuel filler flap and cap ...................227
Fuel tank reserve warning
lamp ........................................ 29, 320
Premium unleaded gasoline ... 369, 371
Refueling ........................................ 226
Requirements ................................ 371
Fuel filler flap ..................................... 227
Opening manually ..........................324
Fuels, coolants, lubricants etc.
Capacities ...................................... 368
Fuel system, bleeding (diesel
engine) ............................................... 345
Fuel tank
Capacity ........................................ 369
Fuel filler flap and cap ...................227
Refueling ........................................ 226
Fuses .................................................. 355
G
Garage door opener .................... 33, 219
Gasoline see Fuel
GAWR (Gross Axle Weight Rating) ... 255
Gear range ......................................... 118
Indicator ........................................ 118
Limiting .......................................... 119
Shifting into optimal ......................119
Transfer case ................................. 120
Gear selector lever ............................ 114
Cleaning ......................................... 280
Gearshift pattern ........................... 114
Shifting procedure .........................116
Index9X164_AKB; 5; 31, en-USd2ureepe,Version: 2.11.8.12009-09-11T12:30:16+02:00 - Seite 9
Page 196 of 380
closing the tilt/sliding sunroof with greater
force or without automatic reversal function.
If the movement of the tilt/sliding sunroof is
blocked during the closing procedure (e.g. by
ice or pollution), the tilt/sliding sunroof will
stop and open slightly.XImmediately after the tilt/sliding sunroof
has stopped and opened because it was
blocked, pull and hold the sunroof switch
in direction of arrow = until the tilt/sliding
sunroof is fully closed.
The tilt/sliding sunroof closes with greater
force.
If the tilt/sliding sunroof is blocked again and
opens slightly:
XImmediately after the tilt/sliding sunroof
was blocked and has opened, pull and hold
the sunroof switch in direction of arrow
= until the tilt/sliding sunroof is fully
closed.
The tilt/sliding sunroof closes without
automatic reversal function.GWarning!
Pulling and holding the sunroof switch to
close the tilt/sliding sunroof immediately
after it had been blocked two times will cause
the tilt/sliding sunroof to close without any
reversal function for as long as you hold the
sunroof switch.
Synchronizing
The tilt/sliding sunroof must be synchronized
R after the battery has been disconnected or
discharged
R after a malfunction
R if the tilt/sliding sunroof does not open
smoothly
! If the tilt/sliding sunroof cannot be closed
or synchronized, contact an authorized
Mercedes-Benz Center or call Roadside
Assistance.
XVehicles with SmartKey: Switch off the
ignition and remove the SmartKey from the
starter switch.XVehicles with KEYLESS-GO: Switch off the
ignition and open the driver’s door. This
puts the starter switch in position 0, same
as with the SmartKey removed from the
starter switch. The driver’s door then can
be closed again.XRemove the fuse for the tilt/sliding sunroof
from the fuse box ( Y page 355).XReinsert the fuse in the fuse box.XSwitch on the ignition.XPress and hold the sunroof switch in
direction of arrow : ( Y page 193) until the
tilt/sliding sunroof is fully raised at the
rear.XKeep holding the sunroof switch in
direction of arrow : for approximately
1 second.XCheck the express operation feature
( Y page 193).
If the tilt/sliding sunroof opens and closes
completely, the roof is synchronized.
Otherwise repeat the above steps.
Loading and storing
Loading instructions
GWarning!
Always fasten items being carried as securely
as possible. Use cargo tie-down rings and
fastening materials appropriate for the weight
and size of the load.
In an accident, during hard braking or sudden
maneuvers, loose items will be thrown around
inside the vehicle. This can cause injury to
vehicle occupants unless the items are
securely fastened in the vehicle.
To help avoid personal injury during a collision
or sudden maneuver, exercise care when
transporting cargo. Do not pile luggage or
cargo higher than the seat backrests.
194Loading and storingControls in detail
X164_AKB; 5; 31, en-USd2ureepe,Version: 2.11.8.12009-09-11T12:30:16+02:00 - Seite 194
Page 276 of 380
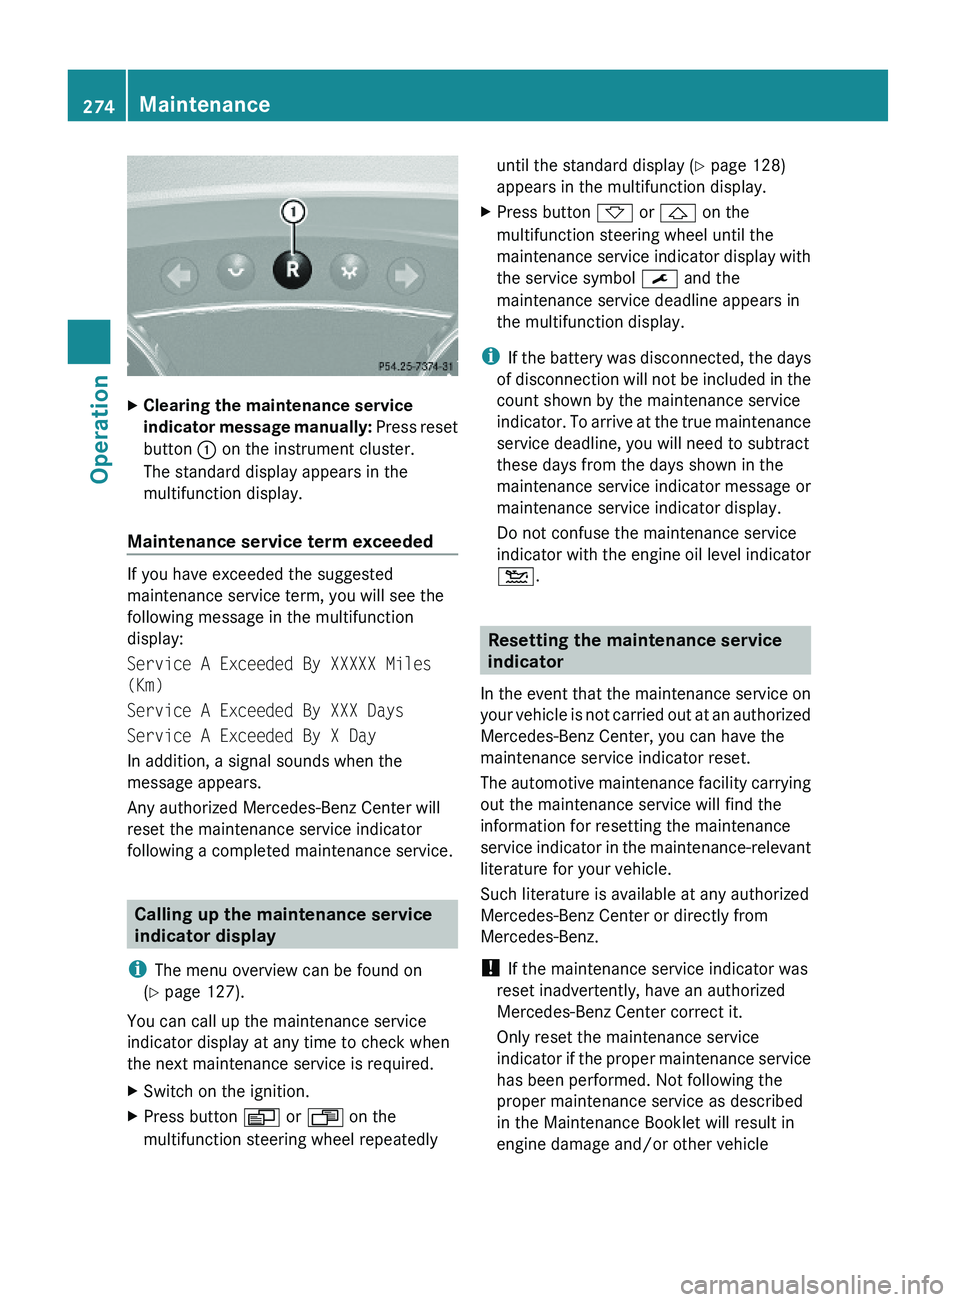
XClearing the maintenance service
indicator message manually: Press reset
button : on the instrument cluster.
The standard display appears in the
multifunction display.
Maintenance service term exceeded
If you have exceeded the suggested
maintenance service term, you will see the
following message in the multifunction
display:
Service A Exceeded By XXXXX Miles
(Km)
Service A Exceeded By XXX Days
Service A Exceeded By X Day
In addition, a signal sounds when the
message appears.
Any authorized Mercedes-Benz Center will
reset the maintenance service indicator
following a completed maintenance service.
Calling up the maintenance service
indicator display
iThe menu overview can be found on
(Y page 127).
You can call up the maintenance service
indicator display at any time to check when
the next maintenance service is required.
XSwitch on the ignition.XPress button V or U on the
multifunction steering wheel repeatedly
until the standard display (Y page 128)
appears in the multifunction display.
XPress button * or & on the
multifunction steering wheel until the
maintenance service indicator display with
the service symbol ¯ and the
maintenance service deadline appears in
the multifunction display.
iIf the battery was disconnected, the days
of disconnection will not be included in the
count shown by the maintenance service
indicator. To arrive at the true maintenance
service deadline, you will need to subtract
these days from the days shown in the
maintenance service indicator message or
maintenance service indicator display.
Do not confuse the maintenance service
indicator with the engine oil level indicator
4.
Resetting the maintenance service
indicator
In the event that the maintenance service on
your vehicle is not carried out at an authorized
Mercedes-Benz Center, you can have the
maintenance service indicator reset.
The automotive maintenance facility carrying
out the maintenance service will find the
information for resetting the maintenance
service indicator in the maintenance-relevant
literature for your vehicle.
Such literature is available at any authorized
Mercedes-Benz Center or directly from
Mercedes-Benz.
! If the maintenance service indicator was
reset inadvertently, have an authorized
Mercedes-Benz Center correct it.
Only reset the maintenance service
indicator if the proper maintenance service
has been performed. Not following the
proper maintenance service as described
in the Maintenance Booklet will result in
engine damage and/or other vehicle
274MaintenanceOperation
X164_AKB; 5; 31, en-USd2ureepe,Version: 2.11.8.12009-09-11T12:30:16+02:00 - Seite 274
Page 279 of 380
XThoroughly spray the vehicle with a
diffused jet of water.XDo not spray directly towards the
ventilation intake.XUse plenty of water and rinse the sponge
and chamois frequently.XRinse with clean water and dry with a
chamois thoroughly.
Do not allow cleaning agents to dry on the
finish.
Automatic car wash
You can have your vehicle washed in an
automatic car wash from the start. Brushless
car washes are preferable.
XTo protect the filter system, activate the air
recirculation mode using button d on
the climate control panel.
! Do not clean your vehicle in an automatic
touchless car wash which uses caustic
spray. Caustic spray will damage the paint
or ornamental moldings.
If the vehicle is very dirty, prewash it before
running it through the automatic car wash.
! Make sure the combination switch is set
to wiper setting $. Otherwise, the rain
sensor could activate and cause the wipers
to move unintentionally. This may lead to
vehicle damage.
Due to the width of the vehicle, fold in
exterior rear view mirrors prior to running
the vehicle through an automatic car wash
to prevent damage to the mirrors.
XWhen taking the vehicle through an
automatic conveyor-type car wash:
Make sure the automatic transmission
remains in neutral position N. Observe
instructions, see “Remaining in neutral
position N” ( Y page 115).
When leaving the automatic car wash, make
sure the mirrors are folded out.
After running the vehicle through an
automatic car wash, wipe any wax off of the
windshield and the wiper blade inserts. This
will prevent smears and reduce wiping noise
which can be caused by residual wax on the
windshield.
Ornamental moldingsXFor regular cleaning and care of ornamental
moldings, use a damp cloth.
! Do not use chrome cleaner on ornamental
moldings. Although ornamental moldings
may have chrome appearance, they could
be made of anodized aluminum that will be
damaged when cleaned with chrome
cleaner. Instead, use a damp cloth to clean
those ornamental moldings.
For very dirty ornamental moldings of
which you are sure are chrome-plated, use
a chrome cleaner. If in doubt whether an
ornamental molding is chrome-plated,
contact an authorized Mercedes-Benz
Center.
Headlamps, brake lamps, tail lamps,
side markers, turn signal lenses
XUse a mild vehicle wash detergent, such as
Mercedes-Benz approved Car Shampoo,
with plenty of water.
! Only use window cleaning solutions that
are suitable for plastic lamp lenses.
Window cleaning solutions which are not
suitable may damage the plastic lamp
lenses of the headlamps. Therefore, do not
use abrasives, solvents or cleaners that
contain solvents.
Vehicle care277OperationX164_AKB; 5; 31, en-USd2ureepe,Version: 2.11.8.12009-09-11T12:30:16+02:00 - Seite 277Z
Page 285 of 380
Vehicle equipment ............................284
Where will I find ...? ..........................284
Vehicle status messages in the
multifunction display .......................287
What to do if … ..................................314
Unlocking/locking manually ...........323
Resetting activated NECK-PRO
active front head restraints .............325
Replacing SmartKey batteries .........326
Replacing bulbs .................................328
Replacing wiper blades ....................334
Flat tire ..............................................336
Bleeding the fuel system (diesel
engine only) .......................................345
AdBlue® (diesel engine only) ...........346
Battery ...............................................348
Jump starting ....................................350
Towing the vehicle ............................352
Fuses ..................................................355
283Practical hintsX164_AKB; 5; 31, en-USd2ureepe,Version: 2.11.8.12009-09-11T12:30:16+02:00 - Seite 283
Page 286 of 380
Vehicle equipment
iThis Operator’s Manual describes all
features, standard or optional, potentially
available for your vehicle at the time of
purchase. Please be aware that your
vehicle might not be equipped with all
features described in this manual.
Where will I find ...?
First aid kit
iCheck expiration dates and contents for
completeness at least once a year and
replace missing/expired items.
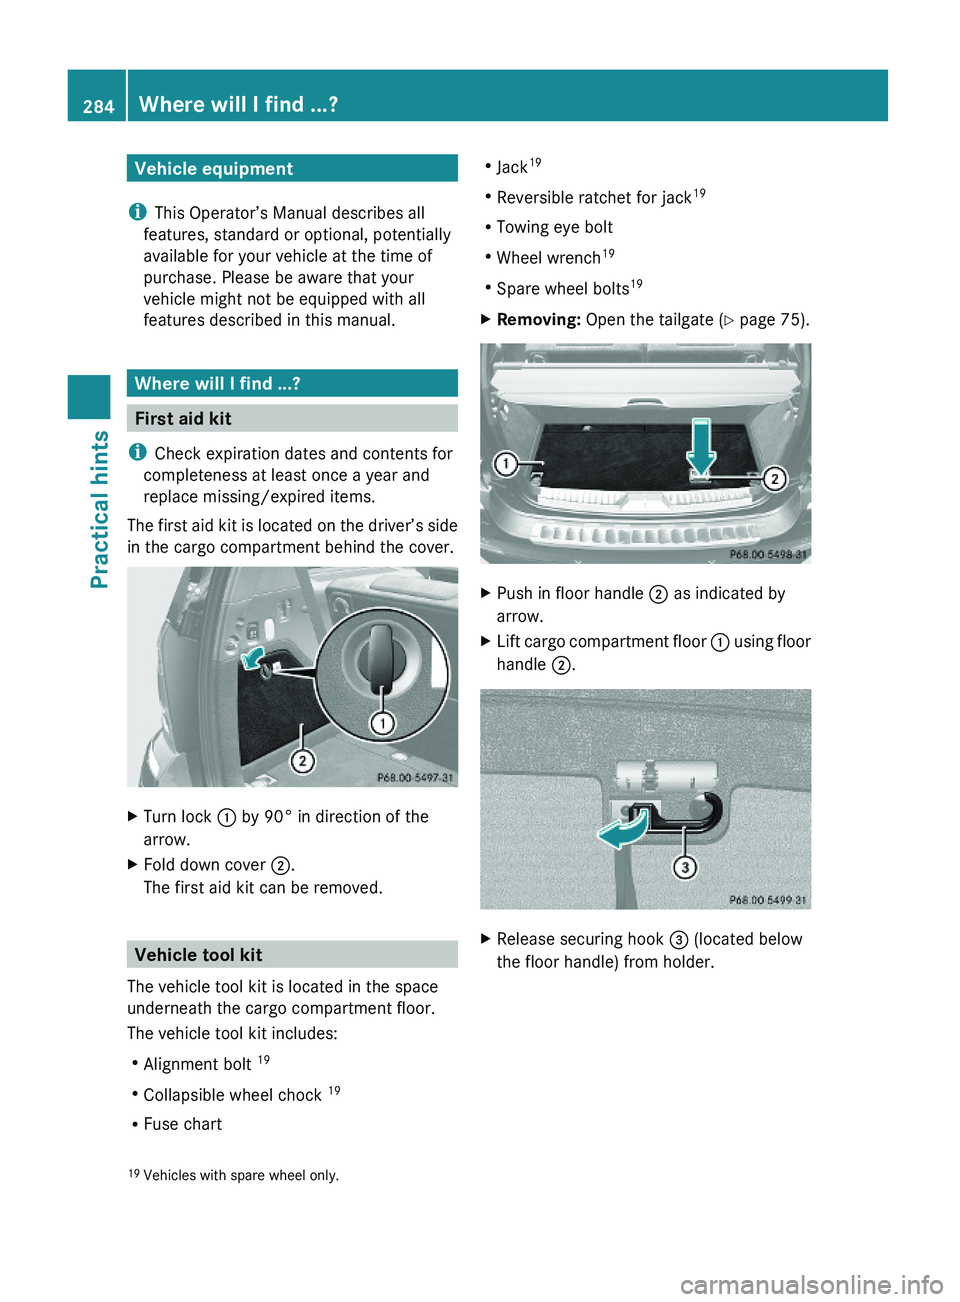
The first aid kit is located on the driver’s side
in the cargo compartment behind the cover.
XTurn lock : by 90° in direction of the
arrow.
XFold down cover ;.
The first aid kit can be removed.
Vehicle tool kit
The vehicle tool kit is located in the space
underneath the cargo compartment floor.
The vehicle tool kit includes:
RAlignment bolt 19
RCollapsible wheel chock 19
RFuse chart
RJack19
RReversible ratchet for jack19
RTowing eye bolt
RWheel wrench19
RSpare wheel bolts19
XRemoving: Open the tailgate (Y page 75).XPush in floor handle ; as indicated by
arrow.
XLift cargo compartment floor : using floor
handle ;.
XRelease securing hook = (located below
the floor handle) from holder.19Vehicles with spare wheel only.284Where will I find ...?Practical hints
X164_AKB; 5; 31, en-USd2ureepe,Version: 2.11.8.12009-09-11T12:30:16+02:00 - Seite 284
Page 287 of 380
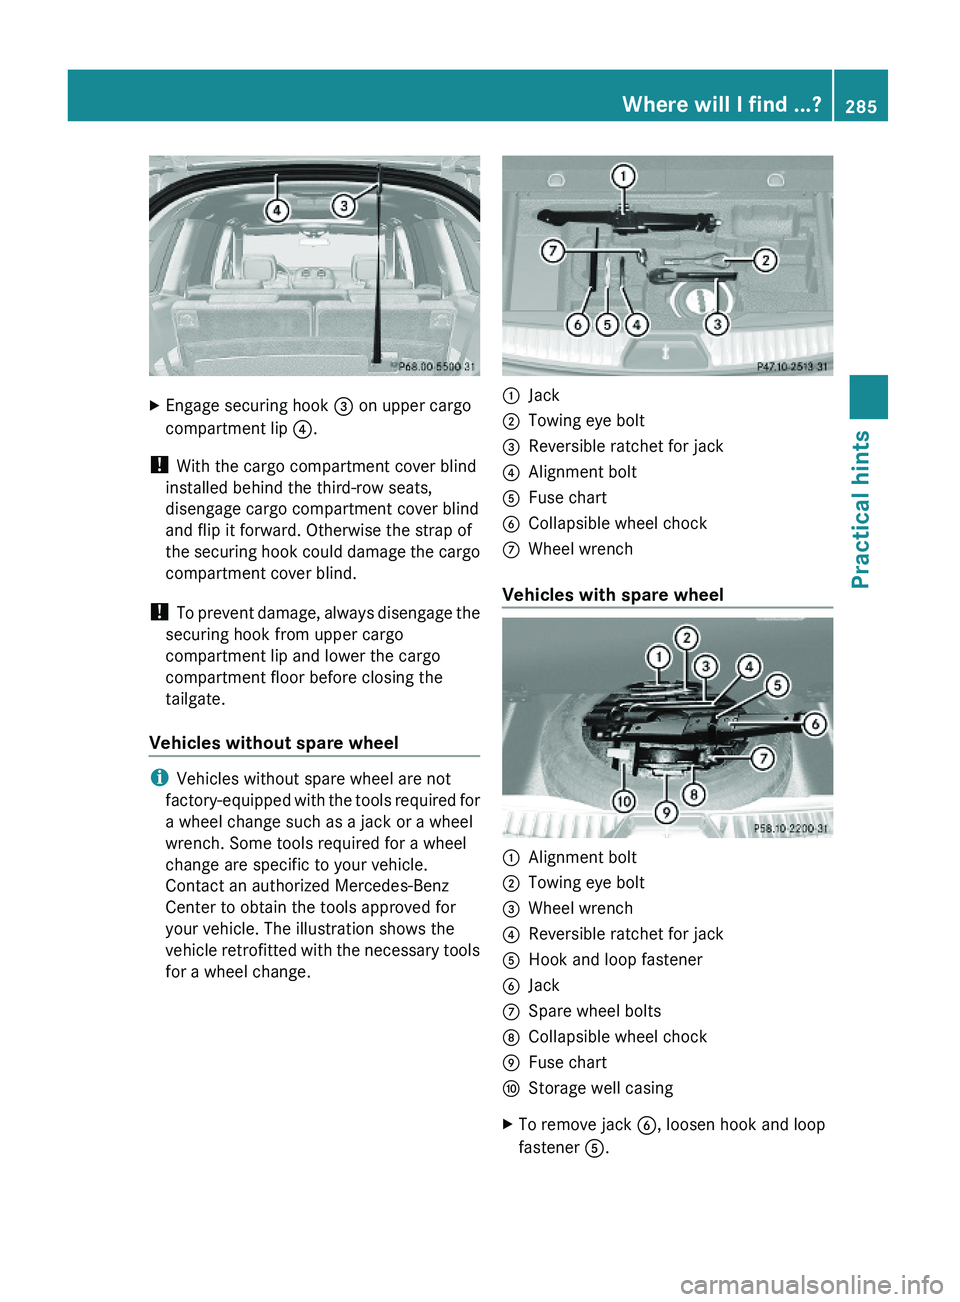
XEngage securing hook = on upper cargo
compartment lip ?.
! With the cargo compartment cover blind
installed behind the third-row seats,
disengage cargo compartment cover blind
and flip it forward. Otherwise the strap of
the securing hook could damage the cargo
compartment cover blind.
! To prevent damage, always disengage the
securing hook from upper cargo
compartment lip and lower the cargo
compartment floor before closing the
tailgate.
Vehicles without spare wheel
iVehicles without spare wheel are not
factory-equipped with the tools required for
a wheel change such as a jack or a wheel
wrench. Some tools required for a wheel
change are specific to your vehicle.
Contact an authorized Mercedes-Benz
Center to obtain the tools approved for
your vehicle. The illustration shows the
vehicle retrofitted with the necessary tools
for a wheel change.
:Jack;Towing eye bolt=Reversible ratchet for jack?Alignment boltAFuse chartBCollapsible wheel chockCWheel wrench
Vehicles with spare wheel
:Alignment bolt;Towing eye bolt=Wheel wrench?Reversible ratchet for jackAHook and loop fastenerBJackCSpare wheel boltsDCollapsible wheel chockEFuse chartFStorage well casingXTo remove jack B, loosen hook and loop
fastener A.
Where will I find ...?285Practical hintsX164_AKB; 5; 31, en-USd2ureepe,Version: 2.11.8.12009-09-11T12:30:16+02:00 - Seite 285Z
Page 357 of 380
XMake sure the ignition is switched on.XWith the vehicle at a standstill, depress the
brake pedal and keep it pressed.XShift the automatic transmission into
neutral position N.XRelease the brake pedal.XIf engaged, release the parking brake.XSwitch on the hazard warning flasher
( Y page 101).
!
Keep in mind that it is important to have
the ignition switched on. Removing the
SmartKey from the starter switch or
opening a front door with the ignition
switched off will automatically shift the
automatic transmission into park position
P .
! The vehicle may be towed only for
distances up to 30 miles (50 km) and at a
speed not to exceed 30 mph (50 km/h).
i While being towed with the hazard
warning flasher in use, use the combination
switch in the usual manner to signal turns.
Only the selected turn signal will operate.
Upon canceling the turn signal, the hazard
warning flasher will operate again.
Stranded vehicle
Freeing a stranded vehicle, on which the
wheels are dug into sand or mud, should be
done with the greatest of care, especially if
the vehicle is heavily loaded.
Note the following when freeing a stranded
vehicle:
R Avoid pulling the vehicle abruptly or
diagonally, since it could result in damage
to the chassis alignment.
R Never try to free a vehicle that is still
coupled to a trailer.
R If possible, a vehicle equipped with a trailer
hitch receiver should be pulled backward in
its own previously made tracks.
Fuses
Introduction
The electrical fuses in your vehicle serve to
switch off malfunctioning power circuits.
If a fuse is blown, the components and
systems secured by that fuse will stop
operating.
GWarning!
Only use fuses approved by Mercedes-Benz
with the specified amperage for the system in
question and do not attempt to repair or
bridge a blown fuse. Using other than
approved fuses or using repaired or bridged
fuses may cause an overload leading to a fire,
and/or cause damage to electrical
components and/or systems. Have the cause
determined and remedied by an authorized
Mercedes-Benz Center.
A blown fuse must be replaced by an
appropriate spare fuse (recognizable by its
color or the fuse rating given on the fuse) of
the amperage recommended in the fuse
chart. Any Mercedes-Benz Center will be glad
to advise you on this subject.
i In case of a blown fuse contact Roadside
Assistance or an authorized Mercedes-
Benz Center.
If a newly inserted fuse blows again, have the
cause determined and rectified by an
authorized Mercedes-Benz Center.
The fuse chart is located in the cargo
compartment with the vehicle tool kit
( Y page 284). The fuse chart explains the fuse
allocation and fuse amperages.
Before replacing fuses
XEngage the parking brake.XMake sure the automatic transmission is in
park position P.
The transmission position indicator in the
multifunction display should be on P.XSwitch off all electrical consumers.Fuses355Practical hintsX164_AKB; 5; 31, en-USd2ureepe,Version: 2.11.8.12009-09-11T12:30:16+02:00 - Seite 355Z
Page 358 of 380
XTurn off the engine.XRemove the SmartKey from the starter
switch.
XVehicles with KEYLESS-GO: Open the
driver’s door (this puts the starter switch in
position 0, same as with the SmartKey
removed from the starter switch). The
driver’s door then can be closed again.
Fuse box in passenger compartment
! Do not use sharp objects such as a
screwdriver to open the fuse box cover in
the dashboard. You could damage the fuse
box cover or the dashboard.
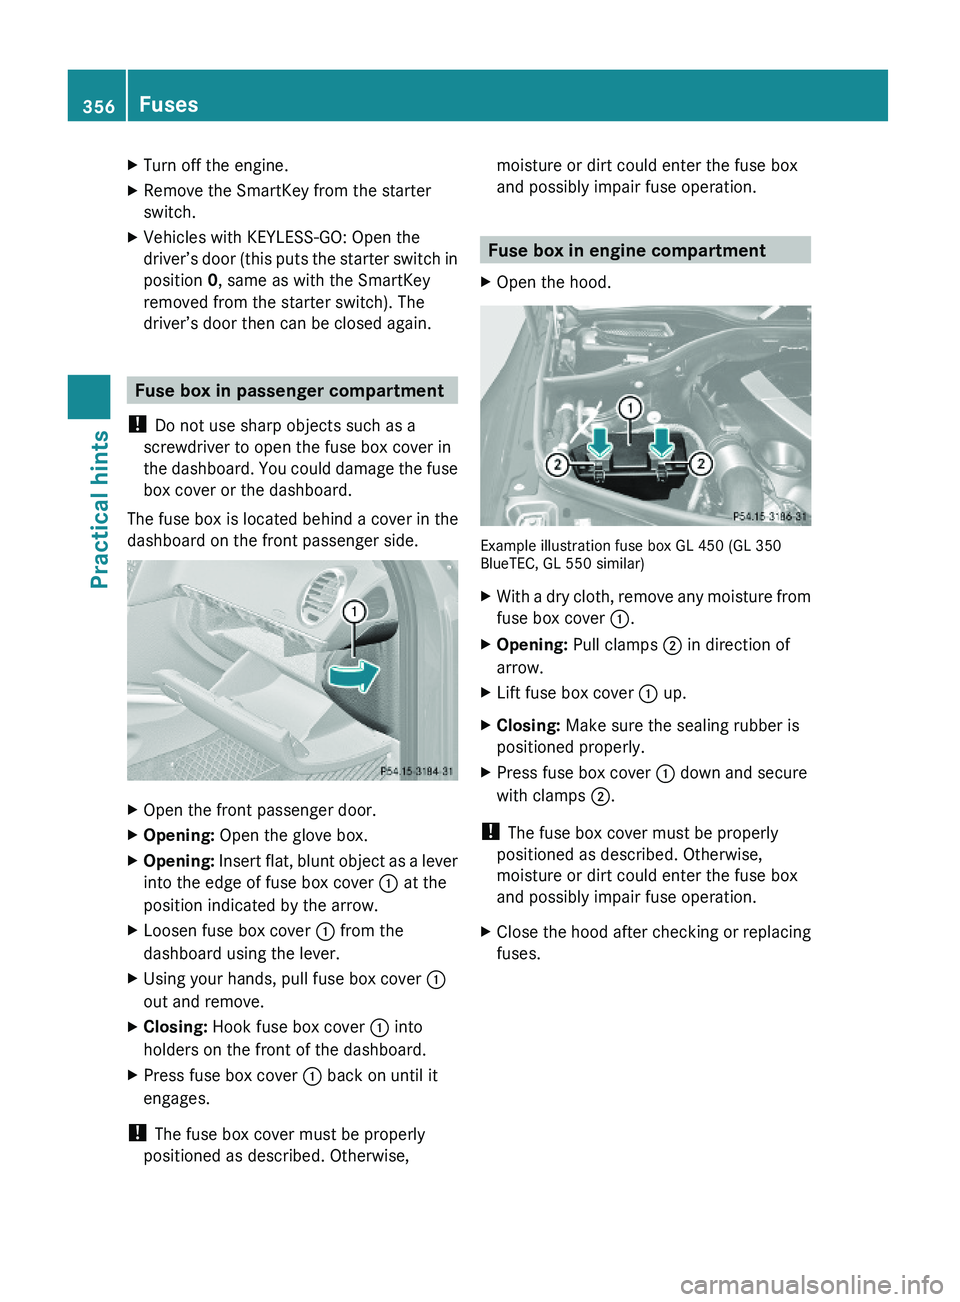
The fuse box is located behind a cover in the
dashboard on the front passenger side.
XOpen the front passenger door.XOpening: Open the glove box.XOpening: Insert flat, blunt object as a lever
into the edge of fuse box cover : at the
position indicated by the arrow.
XLoosen fuse box cover : from the
dashboard using the lever.
XUsing your hands, pull fuse box cover :
out and remove.
XClosing: Hook fuse box cover : into
holders on the front of the dashboard.
XPress fuse box cover : back on until it
engages.
! The fuse box cover must be properly
positioned as described. Otherwise,
moisture or dirt could enter the fuse box
and possibly impair fuse operation.
Fuse box in engine compartment
XOpen the hood.
Example illustration fuse box GL 450 (GL 350BlueTEC, GL 550 similar)
XWith a dry cloth, remove any moisture from
fuse box cover :.
XOpening: Pull clamps ; in direction of
arrow.
XLift fuse box cover : up.XClosing: Make sure the sealing rubber is
positioned properly.
XPress fuse box cover : down and secure
with clamps ;.
! The fuse box cover must be properly
positioned as described. Otherwise,
moisture or dirt could enter the fuse box
and possibly impair fuse operation.
XClose the hood after checking or replacing
fuses.
356FusesPractical hints
X164_AKB; 5; 31, en-USd2ureepe,Version: 2.11.8.12009-09-11T12:30:16+02:00 - Seite 356