wiper blades MERCEDES-BENZ GL 2010 Owners Manual
[x] Cancel search | Manufacturer: MERCEDES-BENZ, Model Year: 2010, Model line: GL, Model: MERCEDES-BENZ GL 2010Pages: 380, PDF Size: 9.81 MB
Page 21 of 380
Modifications and alterations,
Operating safety .............................. 23
Towing ........................................... 352
Unlocking/locking manually ..........323
Vehicle configuration menu ............. 140
Vehicle dimensions see Vehicle specification
Vehicle Identification Number
(VIN) ................................................... 360
Vehicle jack see Jack
Vehicle level control
see Air suspension program
Vehicle lighting .................................... 97
Vehicle loading
Cargo tie-down rings ...................... 200
Cargo volume, expanding ..............201
Carriers .......................................... 196
Instructions .................................... 194
Load limit ....................................... 243
Terminology ................................... 254
Vehicle maximum load on the tire ... 257
Vehicle specification
GL 350 BlueTEC ............................. 362
GL 450 ........................................... 362
GL 550 ........................................... 363
Vehicle status message memory .... 131
Vehicle tool kit .................................. 284
Vehicle washing see Vehicle care
Vehicle weights
see Vehicle specification
W
Warning lamps see Lamps, Indicator and warning
Warning sounds
Distance warning function .............155
Distronic ........................................ 149
Driver’s or passenger’s seat belt .....51
Parking brake ................................ 300
Parktronic system ..........................169
Seat belt telltale ............................ 317
Warranty coverage ............................ 360
Washer and headlamp cleaning
system ................................................ 375
Washer fluid
Messages in the multifunction
display ........................................... 305
Mixing ratio .................................... 375
Refilling .......................................... 232
Washing the vehicle .......................... 275
Wear pattern (tires) .......................... 249
Weights (vehicle) see Vehicle specification
Wheel
Changing ....................................... 336
Removing ....................................... 343
Spare ............................................. 336
Tightening torque ........................... 344
Wheels, sizes ..................................... 365
Wheels, Tires and .............................. 233
Window curtain air bags ..................... 42
Windows see Power windows
Windows, cleaning ............................ 278
Windshield
Cleaning wiper blades .................... 278
Infrared reflecting ..........................223
Washer fluid ................................... 375
Wipers ........................................... 103
Windshield wipers
Replacing wiper blades ..................334
Winter cover .............................. 230, 257
Winter driving
Instructions .................................... 258
Radiator cover ............................... 257
Snow chains .................................. 258
Tires ............................................... 257
Winter tires ................................ 257, 365
Wood trims, cleaning ........................ 280Index19X164_AKB; 5; 31, en-USd2ureepe,Version: 2.11.8.12009-09-11T12:30:16+02:00 - Seite 19
Page 28 of 380
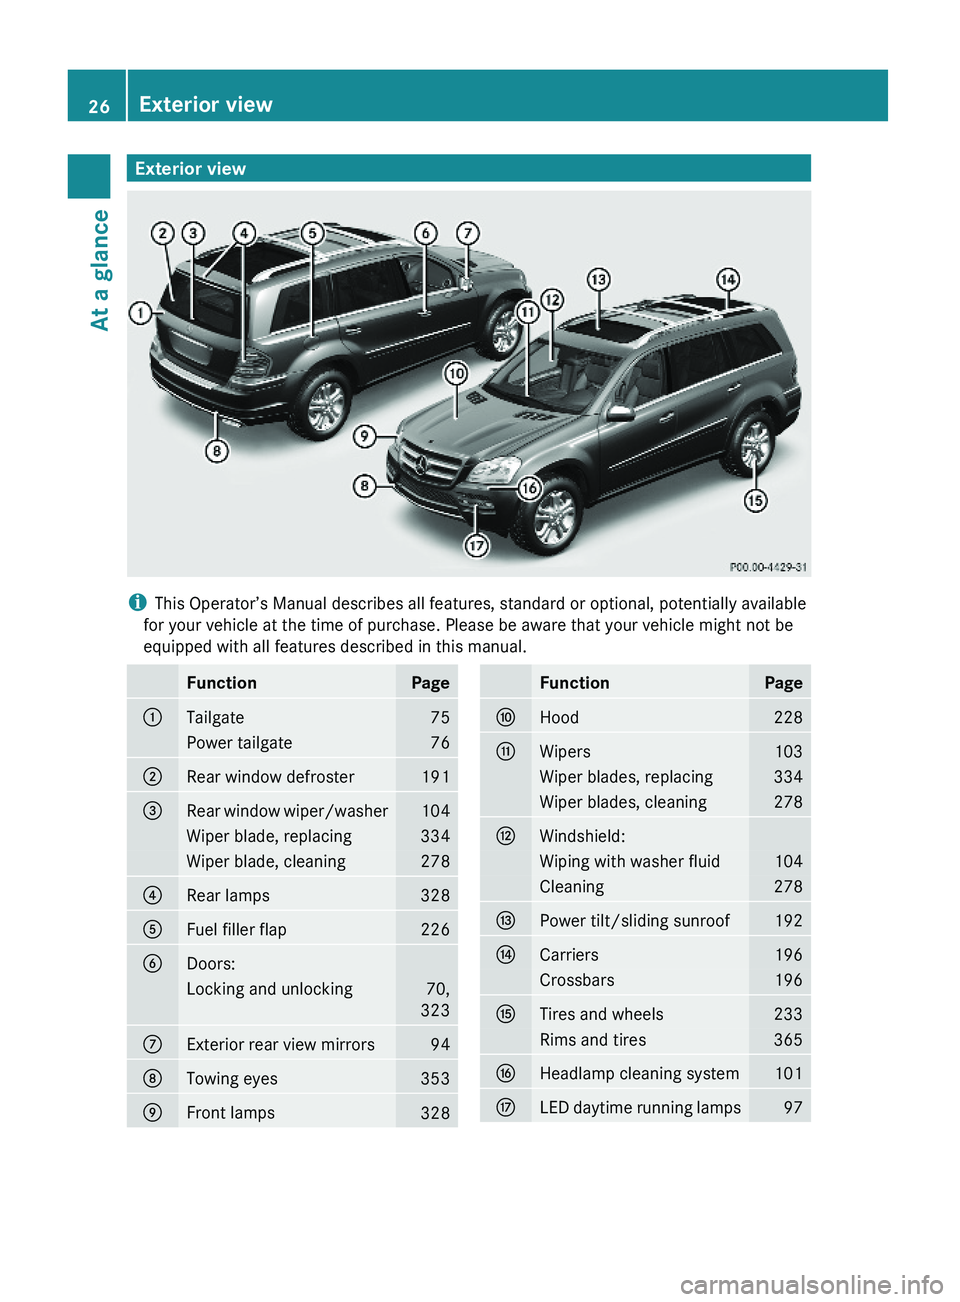
Exterior view
iThis Operator’s Manual describes all features, standard or optional, potentially available
for your vehicle at the time of purchase. Please be aware that your vehicle might not be
equipped with all features described in this manual.
FunctionPage:Tailgate75Power tailgate76;Rear window defroster191=Rear window wiper/washer104Wiper blade, replacing334Wiper blade, cleaning278?Rear lamps328AFuel filler flap226BDoors:Locking and unlocking70,
323
CExterior rear view mirrors94DTowing eyes353EFront lamps328FunctionPageFHood228GWipers103Wiper blades, replacing334Wiper blades, cleaning278HWindshield:Wiping with washer fluid104Cleaning278IPower tilt/sliding sunroof192JCarriers196Crossbars196KTires and wheels233Rims and tires365LHeadlamp cleaning system101MLED daytime running lamps9726Exterior viewAt a glance
X164_AKB; 5; 31, en-USd2ureepe,Version: 2.11.8.12009-09-11T12:30:16+02:00 - Seite 26
Page 105 of 380
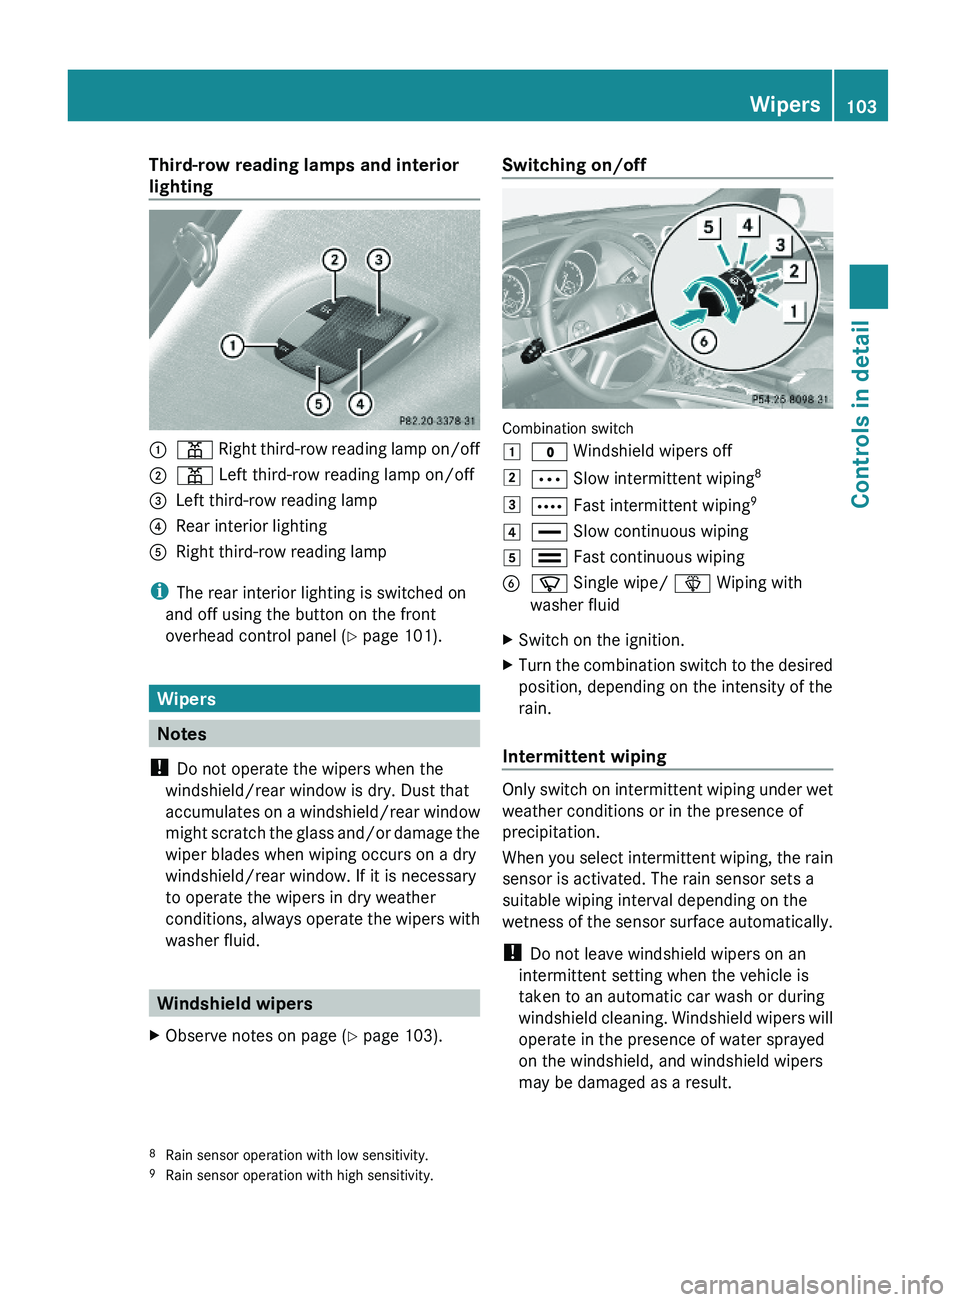
Third-row reading lamps and interior
lighting:p Right third-row reading lamp on/off;p Left third-row reading lamp on/off=Left third-row reading lamp?Rear interior lightingARight third-row reading lamp
iThe rear interior lighting is switched on
and off using the button on the front
overhead control panel (Y page 101).
Wipers
Notes
! Do not operate the wipers when the
windshield/rear window is dry. Dust that
accumulates on a windshield/rear window
might scratch the glass and/or damage the
wiper blades when wiping occurs on a dry
windshield/rear window. If it is necessary
to operate the wipers in dry weather
conditions, always operate the wipers with
washer fluid.
Windshield wipers
XObserve notes on page (Y page 103).Switching on/off
Combination switch
1$ Windshield wipers off2Ä Slow intermittent wiping83Å Fast intermittent wiping94° Slow continuous wiping5¯ Fast continuous wipingBí Single wipe/ î Wiping with
washer fluid
XSwitch on the ignition.XTurn the combination switch to the desired
position, depending on the intensity of the
rain.
Intermittent wiping
Only switch on intermittent wiping under wet
weather conditions or in the presence of
precipitation.
When you select intermittent wiping, the rain
sensor is activated. The rain sensor sets a
suitable wiping interval depending on the
wetness of the sensor surface automatically.
! Do not leave windshield wipers on an
intermittent setting when the vehicle is
taken to an automatic car wash or during
windshield cleaning. Windshield wipers will
operate in the presence of water sprayed
on the windshield, and windshield wipers
may be damaged as a result.
8Rain sensor operation with low sensitivity.9Rain sensor operation with high sensitivity.
Wipers103Controls in detailX164_AKB; 5; 31, en-USd2ureepe,Version: 2.11.8.12009-09-11T12:30:16+02:00 - Seite 103Z
Page 106 of 380
! If you have set intermittent wiping, dirt on
the surface of the rain sensor or optical
effects may cause the windshield wipers to
wipe in an undesired fashion. This could
then damage the windshield wiper blades
or scratch the windshield. You should
therefore switch off the windshield wipers
when weather conditions are dry.
XTurn the combination switch to position
Ä or Å.
After the initial wipe, pauses between
wipes are controlled by the rain sensor
automatically.
Intermittent wiping is interrupted when the
vehicle is at a standstill and a front door is
opened. This protects persons getting into or
out of the vehicle from being sprayed.
Intermittent wiping will be continued when all
doors are closed andRthe automatic transmission is in drive
position D or reverse gear R
or
Rthe wiper setting is changed using the
combination switch
Single wipe
XPress the combination switch briefly in
direction of arrow B to the resistance
point.
The windshield wipers wipe one time
without washer fluid.
Wiping with washer fluid
XPress the combination switch in direction
of arrow B past the resistance point.
The windshield wipers operate with washer
fluid.
iTo prevent smears on the windshield or
noisy/chattering wiper blades, wipe with
washer fluid every now and then even when
it is raining.
For information on filling up the washer
reservoir, see “Washer system and headlamp
cleaning system” (Y page 232).
For information on cleaning the headlamps
with washer fluid, see “Headlamp cleaning
system” (Y page 101).
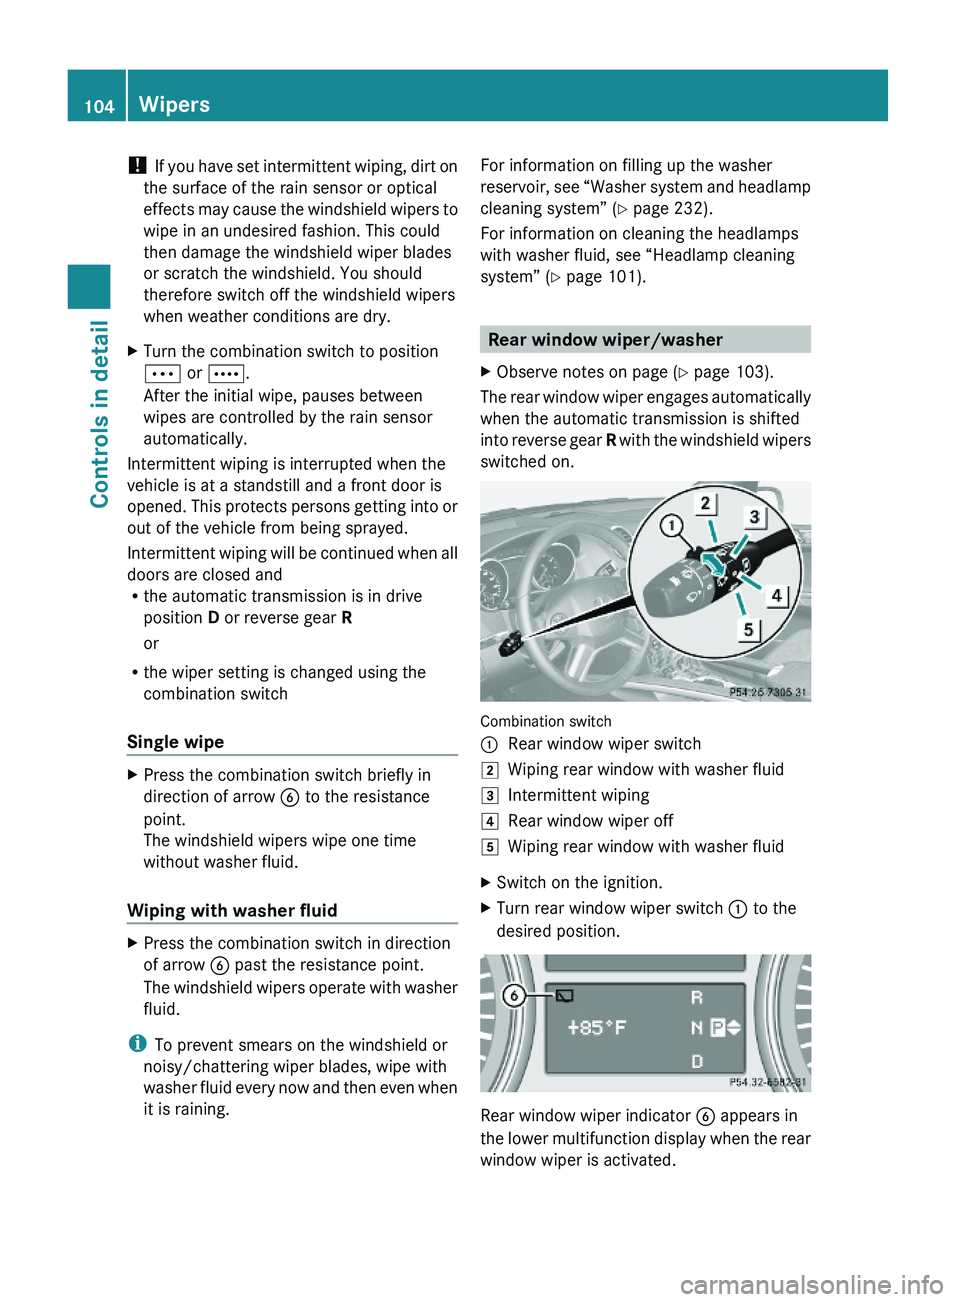
Rear window wiper/washer
XObserve notes on page (Y page 103).
The rear window wiper engages automatically
when the automatic transmission is shifted
into reverse gear R with the windshield wipers
switched on.
Combination switch
:Rear window wiper switch2Wiping rear window with washer fluid3Intermittent wiping4Rear window wiper off5Wiping rear window with washer fluidXSwitch on the ignition.XTurn rear window wiper switch : to the
desired position.
Rear window wiper indicator B appears in
the lower multifunction display when the rear
window wiper is activated.
104WipersControls in detail
X164_AKB; 5; 31, en-USd2ureepe,Version: 2.11.8.12009-09-11T12:30:16+02:00 - Seite 104
Page 231 of 380
GWarning!
You could be injured when the hood is open –
even when the engine is turned off.
Parts of the engine can become very hot. To
prevent burns, let the engine cool completely
before touching any components on the
vehicle. Comply with all relevant safety
precautions.
GWarning!
To help prevent personal injury, stay clear of
moving parts when the hood is open and the
engine is running.
The radiator fan may continue to run for
approximately 30 seconds or may even
restart after the engine has been turned off.
Stay clear of fan blades.
GWarning!
Vehicles with gasoline engine:
The engine is equipped with a transistorized
ignition system. Because of the high voltage
it is dangerous to touch any components
(ignition coils, spark plug sockets, diagnostic
socket) of the ignition system
Rwith the engine running
Rwhile starting the engine
Rwhen the ignition is switched on and the
engine is turned manually
GWarning!
Vehicles with diesel engine:
The engine is equipped with a high-voltage
electronic control unit for the injection
system. Because of the high voltage it is
dangerous to touch any components of the
injection system (injectors, electrical wires)
Rwith the engine running
Rwhile starting the engine
Rwhen the ignition is switched on
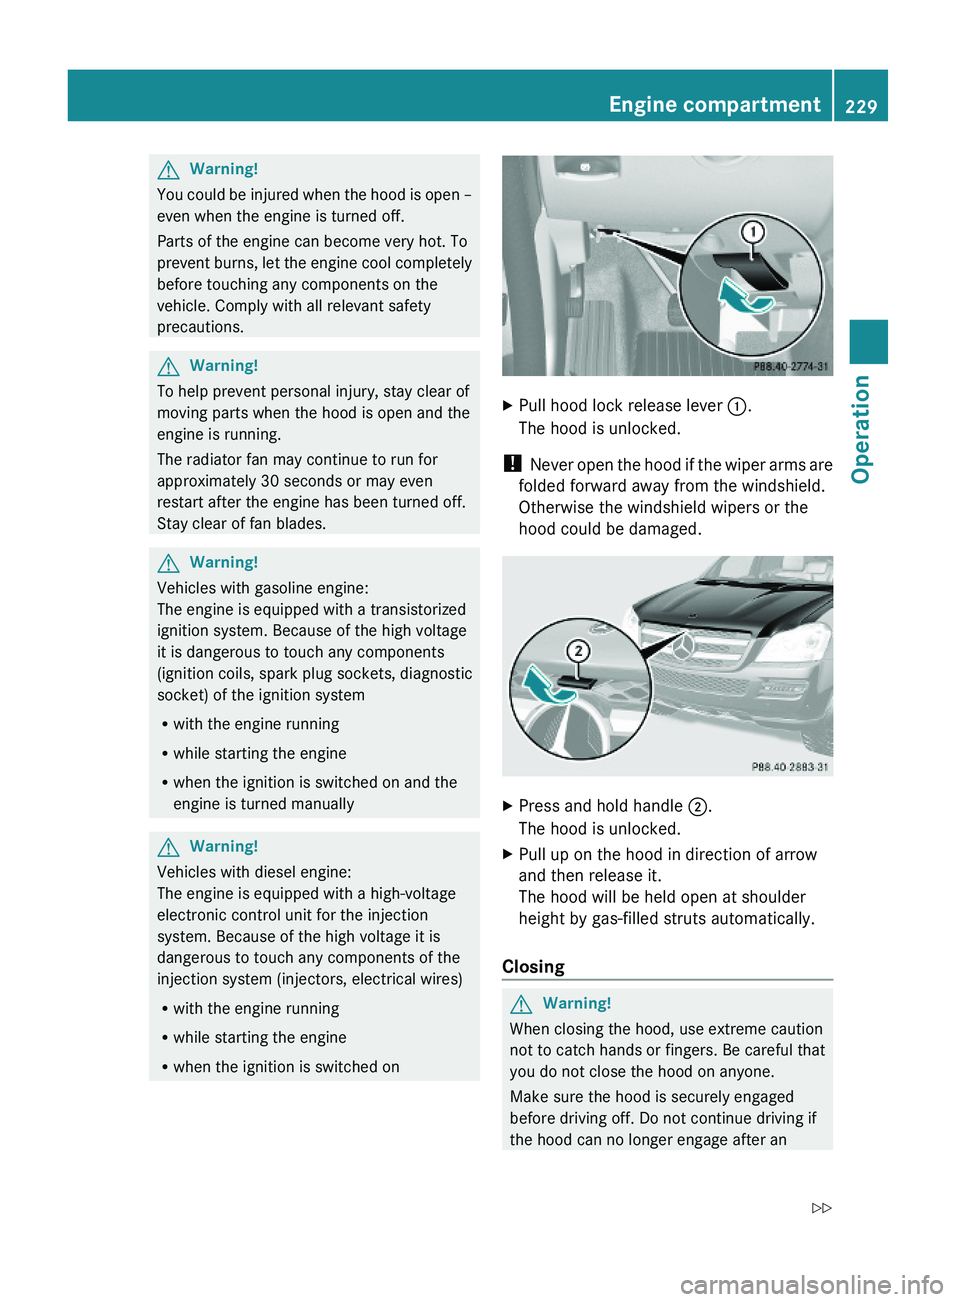
XPull hood lock release lever :.
The hood is unlocked.
! Never open the hood if the wiper arms are
folded forward away from the windshield.
Otherwise the windshield wipers or the
hood could be damaged.
XPress and hold handle ;.
The hood is unlocked.
XPull up on the hood in direction of arrow
and then release it.
The hood will be held open at shoulder
height by gas-filled struts automatically.
Closing
GWarning!
When closing the hood, use extreme caution
not to catch hands or fingers. Be careful that
you do not close the hood on anyone.
Make sure the hood is securely engaged
before driving off. Do not continue driving if
the hood can no longer engage after an
Engine compartment229OperationX164_AKB; 5; 31, en-USd2ureepe,Version: 2.11.8.12009-09-11T12:30:16+02:00 - Seite 229Z
Page 280 of 380
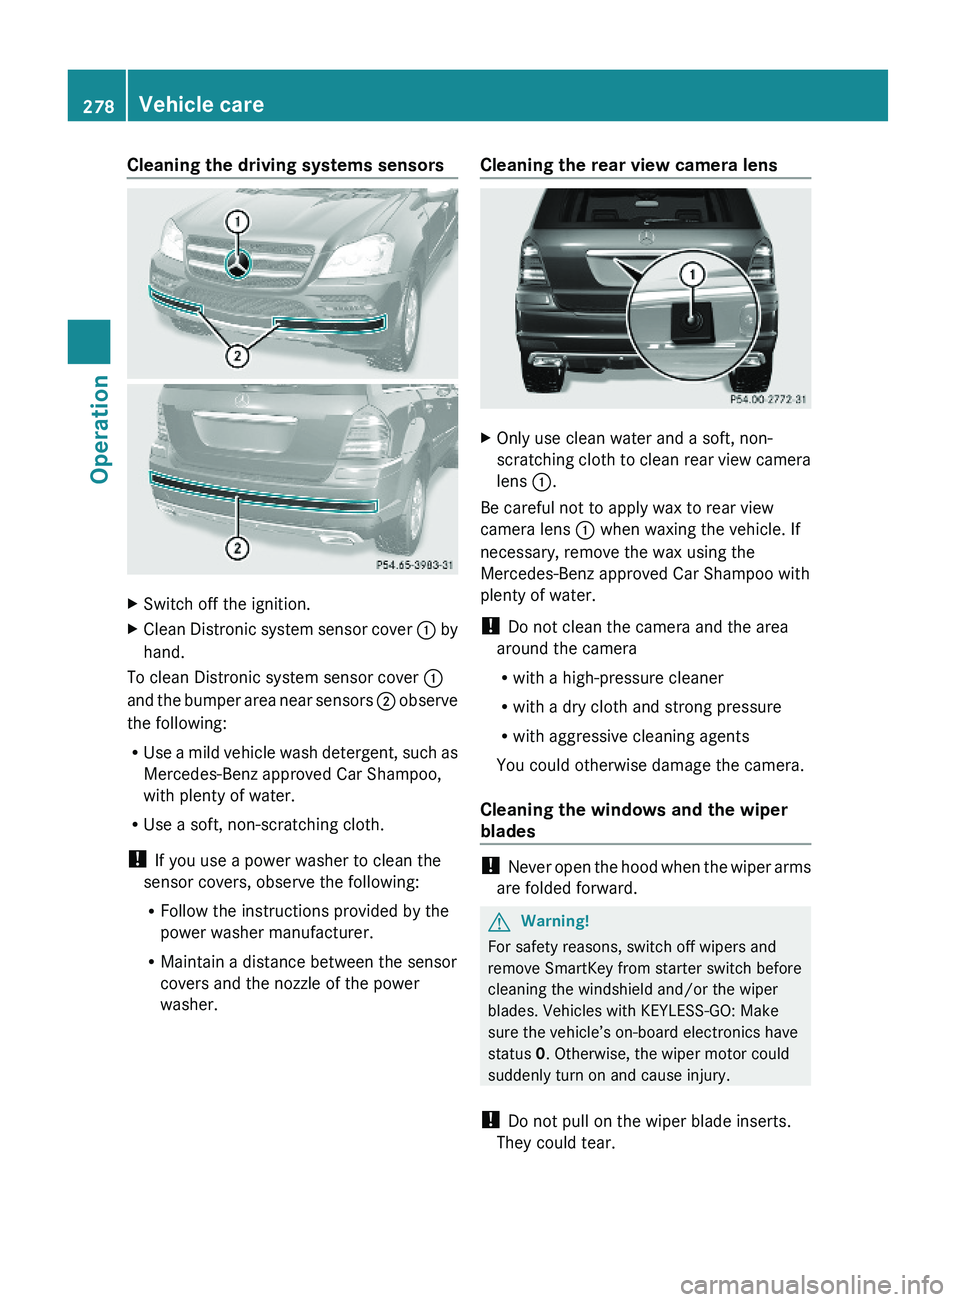
Cleaning the driving systems sensorsXSwitch off the ignition.XClean Distronic system sensor cover : by
hand.
To clean Distronic system sensor cover :
and the bumper area near sensors ; observe
the following:
RUse a mild vehicle wash detergent, such as
Mercedes-Benz approved Car Shampoo,
with plenty of water.
RUse a soft, non-scratching cloth.
! If you use a power washer to clean the
sensor covers, observe the following:
RFollow the instructions provided by the
power washer manufacturer.
RMaintain a distance between the sensor
covers and the nozzle of the power
washer.
Cleaning the rear view camera lensXOnly use clean water and a soft, non-
scratching cloth to clean rear view camera
lens :.
Be careful not to apply wax to rear view
camera lens : when waxing the vehicle. If
necessary, remove the wax using the
Mercedes-Benz approved Car Shampoo with
plenty of water.
! Do not clean the camera and the area
around the camera
Rwith a high-pressure cleaner
Rwith a dry cloth and strong pressure
Rwith aggressive cleaning agents
You could otherwise damage the camera.
Cleaning the windows and the wiper
blades
! Never open the hood when the wiper arms
are folded forward.
GWarning!
For safety reasons, switch off wipers and
remove SmartKey from starter switch before
cleaning the windshield and/or the wiper
blades. Vehicles with KEYLESS-GO: Make
sure the vehicle’s on-board electronics have
status 0. Otherwise, the wiper motor could
suddenly turn on and cause injury.
! Do not pull on the wiper blade inserts.
They could tear.
278Vehicle careOperation
X164_AKB; 5; 31, en-USd2ureepe,Version: 2.11.8.12009-09-11T12:30:16+02:00 - Seite 278
Page 285 of 380
Vehicle equipment ............................284
Where will I find ...? ..........................284
Vehicle status messages in the
multifunction display .......................287
What to do if … ..................................314
Unlocking/locking manually ...........323
Resetting activated NECK-PRO
active front head restraints .............325
Replacing SmartKey batteries .........326
Replacing bulbs .................................328
Replacing wiper blades ....................334
Flat tire ..............................................336
Bleeding the fuel system (diesel
engine only) .......................................345
AdBlue® (diesel engine only) ...........346
Battery ...............................................348
Jump starting ....................................350
Towing the vehicle ............................352
Fuses ..................................................355
283Practical hintsX164_AKB; 5; 31, en-USd2ureepe,Version: 2.11.8.12009-09-11T12:30:16+02:00 - Seite 283
Page 336 of 380
Correct headlamp adjustment is extremely
important. High beam adjustments
simultaneously aim the low beam. To check
and readjust a headlamp, follow the steps
described:
XPark the vehicle on a level surface 25 feet
(7.6 m) from a vertical test screen or wall.
XMake sure the vehicle has a normal tailgate
load.
XSwitch on the low beam headlamps L.
If the beam does not show a beam pattern as
indicated in the figure left, then follow the
steps below:
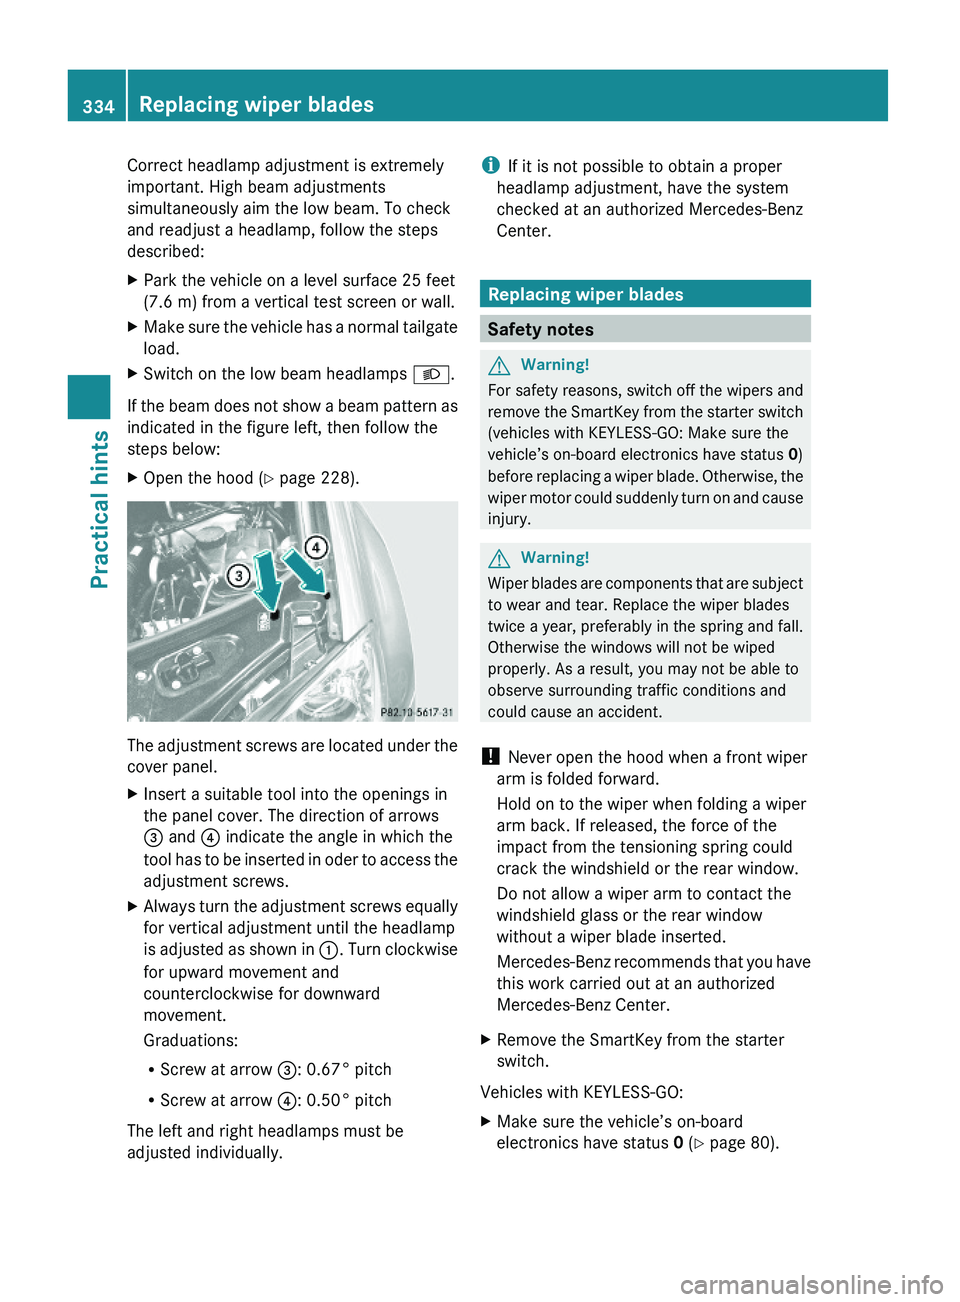
XOpen the hood (Y page 228).
The adjustment screws are located under the
cover panel.
XInsert a suitable tool into the openings in
the panel cover. The direction of arrows
= and ? indicate the angle in which the
tool has to be inserted in oder to access the
adjustment screws.
XAlways turn the adjustment screws equally
for vertical adjustment until the headlamp
is adjusted as shown in :. Turn clockwise
for upward movement and
counterclockwise for downward
movement.
Graduations:
RScrew at arrow =: 0.67° pitch
RScrew at arrow ?: 0.50° pitch
The left and right headlamps must be
adjusted individually.
iIf it is not possible to obtain a proper
headlamp adjustment, have the system
checked at an authorized Mercedes-Benz
Center.
Replacing wiper blades
Safety notes
GWarning!
For safety reasons, switch off the wipers and
remove the SmartKey from the starter switch
(vehicles with KEYLESS-GO: Make sure the
vehicle’s on-board electronics have status 0)
before replacing a wiper blade. Otherwise, the
wiper motor could suddenly turn on and cause
injury.
GWarning!
Wiper blades are components that are subject
to wear and tear. Replace the wiper blades
twice a year, preferably in the spring and fall.
Otherwise the windows will not be wiped
properly. As a result, you may not be able to
observe surrounding traffic conditions and
could cause an accident.
! Never open the hood when a front wiper
arm is folded forward.
Hold on to the wiper when folding a wiper
arm back. If released, the force of the
impact from the tensioning spring could
crack the windshield or the rear window.
Do not allow a wiper arm to contact the
windshield glass or the rear window
without a wiper blade inserted.
Mercedes-Benz recommends that you have
this work carried out at an authorized
Mercedes-Benz Center.
XRemove the SmartKey from the starter
switch.
Vehicles with KEYLESS-GO:
XMake sure the vehicle’s on-board
electronics have status 0 (Y page 80).
334Replacing wiper bladesPractical hints
X164_AKB; 5; 31, en-USd2ureepe,Version: 2.11.8.12009-09-11T12:30:16+02:00 - Seite 334
Page 337 of 380
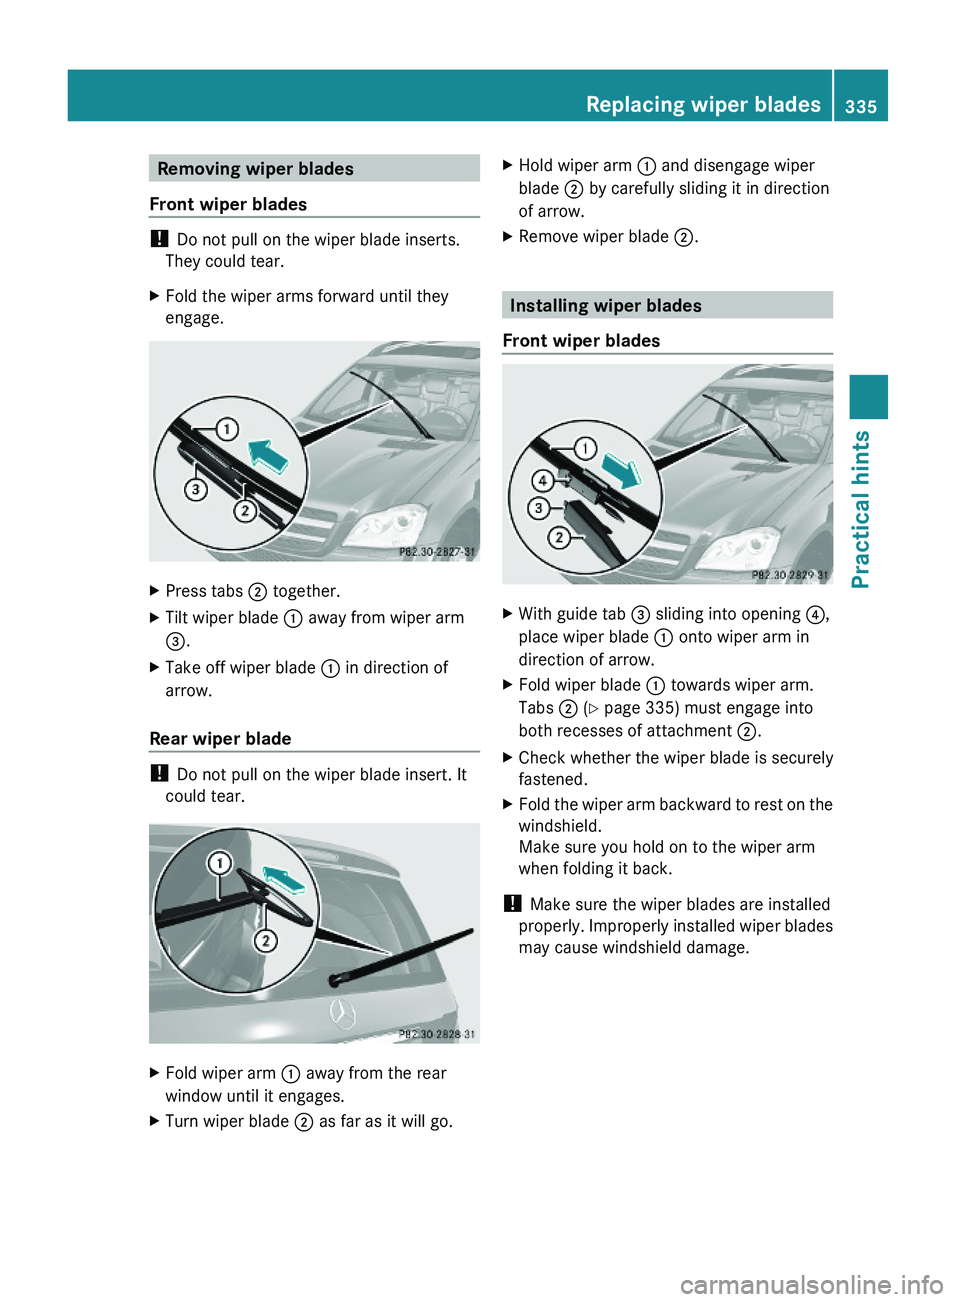
Removing wiper blades
Front wiper blades
! Do not pull on the wiper blade inserts.
They could tear.
XFold the wiper arms forward until they
engage.
XPress tabs ; together.XTilt wiper blade : away from wiper arm
=.
XTake off wiper blade : in direction of
arrow.
Rear wiper blade
! Do not pull on the wiper blade insert. It
could tear.
XFold wiper arm : away from the rear
window until it engages.
XTurn wiper blade ; as far as it will go.XHold wiper arm : and disengage wiper
blade ; by carefully sliding it in direction
of arrow.
XRemove wiper blade ;.
Installing wiper blades
Front wiper blades
XWith guide tab = sliding into opening ?,
place wiper blade : onto wiper arm in
direction of arrow.
XFold wiper blade : towards wiper arm.
Tabs ; (Y page 335) must engage into
both recesses of attachment ;.
XCheck whether the wiper blade is securely
fastened.
XFold the wiper arm backward to rest on the
windshield.
Make sure you hold on to the wiper arm
when folding it back.
! Make sure the wiper blades are installed
properly. Improperly installed wiper blades
may cause windshield damage.
Replacing wiper blades335Practical hintsX164_AKB; 5; 31, en-USd2ureepe,Version: 2.11.8.12009-09-11T12:30:16+02:00 - Seite 335Z