lights MERCEDES-BENZ GL 2013 Owner's Guide
[x] Cancel search | Manufacturer: MERCEDES-BENZ, Model Year: 2013, Model line: GL, Model: MERCEDES-BENZ GL 2013Pages: 454, PDF Size: 6.31 MB
Page 136 of 454

Tail lamp
0002
Brake lamp: P 21 W-L Changing the front bulbs
Removing and installing the cover in the
front wheel housing You must remove the cover from the front
wheel housing before you can change the
front bulbs. X
To remove: switch off the lights.
X Turn the front wheels inwards.
X Remove securing pin 0003using a suitable
tool.
X Slide cover 0002up and remove it.
X To install: insert cover 0002again and slide
it down until it engages.
X Insert securing pin 0003. Low-beam headlamps (halogen
headlamps) G
WARNING
These bulbs are pressurized.
They can explode when being changed if:
R they are still hot
R they hit an object when being removed
R they are dropped
There is a risk of injury.
You should wear eye protection and clean
gloves when you are changing a bulb. If
necessary, have bulbs changed at a qualified
specialist workshop. X
Remove the cover in the front wheel
housing (Y page 134).
X Turn housing cover 0002counter-clockwise
and pull it out.
X Turn bulb holder 0003counter-clockwise and
pull it out.
X Take the bulb out of bulb holder 0003.
X Insert the new bulb into bulb holder 0003.
X Insert bulb holder 0003into the lamp and turn
it clockwise.
X Align housing cover 0002and turn it
clockwise until it engages.
X Replace the cover in the front wheel
housing (Y page 134).134
Replacing bulbsLights and windshield wipers
Page 137 of 454

G
WARNING
These bulbs are pressurized.
They can explode when being changed if:
R they are still hot
R they hit an object when being removed
R they are dropped
T")
High-beam headlamps (halogen
headlamps)
G
WARNING
These bulbs are pressurized.
They can explode when being changed if:
R they are still hot
R they hit an object when being removed
R they are dropped
There is a risk of injury.
You should wea reye protection and clean
gloves when you are changin gabulb. If
necessary, have bulbs changed at a qualified
specialist workshop. X
Switch off the lights.
X Open the hood.
X Turn housing cover 0002counter-clockwise
and pull it out.
X Pull lever 0021upwards and remove bulb
holder 0003.
X Take the bulb out of bulb holder 0003.
X Inser tthe new bulb into bulb holder 0003.
X Simultaneously press bulb holder 0003and
pull lever 0021downwards.
X Align housing cover 0002and turn it
clockwise until it engages. Changing the rear bulbs
Opening and closing the service flap Left-hand service flap
Right-hand service flap
You must open the service flap in the cargo
compartment before you can change the
bulbs in the brake lamp.
X
To open: release service flap 0002at the top,
e.g. with a screwdriver, and swing it
downward in the direction of the arrow.
X Right side: remove the first-aid kit
beforehand and pull the parcel net down.
X To close: reinsert service flap 0002. Replacing bulbs
135Lights and windshield wipers Z
Page 138 of 454
.
X Turn bulb holder 0002counter-clockwise and
remove it.
X Take bulb out of bulb holder 0002.
X I")
Brake lamp
X
Switch off the lights.
X Open the cargo compartment.
X Ope nthe service flap (Y page 135).
X Turn bulb holder 0002counter-clockwise and
remove it.
X Take bulb out of bulb holder 0002.
X Insert the new bulb into bulb holder 0002.
X Insert bulb holder 0002into the lamp and turn
it clockwise.
X Close the service flap (Y page 135).Windshield wipers
Switching the windshield wipers on/
off
! Do not operate the windshield wipers
when the windshield is dry, as this could
damage the wiper blades. Moreover, dust
that has collected on the windshield can
scratch the glass if wiping takes place when
the windshield is dry.
If it is necessary to switch on the windshield
wipers in dry weather conditions, always
use washer fluid when operating the
windshield wipers.
! If the windshield wipers leave smears on
the windshield after the vehicle has been
washed in an automatic car wash, wax or
other residues may be the reason for this.
Cleant he windshield using washer fluid
after washing the vehicle in an automatic
car wash. !
Intermittent wiping with rain sensor: due
to optical influences and the windshield
becoming dirty in dry weather conditions,
the windshield wipers may be activated
inadvertently. This could then damage the
windshield wiper blades or scratch the
windshield.
For this reason, you should always switch
off the windshield wipers in dry weather. Combination switch
0004
0008 Windshield wiper off
0005 0001 Intermittent wipe, low (rain sensor
set to low sensitivity)
0006 0002 Intermittent wipe, high (rain sensor
set to high sensitivity)
000B 0018 Continuous wipe, slow
000C 0012 Continuous wipe, fast
001F 0007 Single wipe
0013 0008 To wipe with washer fluid
X Switch on the ignition.
X Turn the combination switch to the
corresponding position.
In the 0001or0002 position, the appropriate
wiping frequency is set automatically
according to the intensity of the rain. In
the 0002 position, the rain sensor is more
sensitive than in the 0001position, causing
the windshield wipers to wipe more
frequently.
If the wiper blades are worn, the windshield
will no longer be wiped properly. This could
prevent you from observing the traffic
conditions. Replace the wiper blades twice a
year, ideally in spring and fall. 136
Windshield wipersLights and windshield wipers
Page 139 of 454

Switching the rear window wiper on/
off
Combination switch
0002
0001 Rear window wiper switch
0005 0007 To wipe with washer fluid
0006 ITo switch on intermittent wiping
000B 0To switch off intermittent wiping
000C 000E To wipe with washer fluid
X Turn the SmartKey to position 1or 2in the
ignition lock (Y page 163).
X Turn switch 0002on the combination switch
to the corresponding position.
When the rear window wiper is switched on,
the icon appears in the instrumen tcluster. Replacing the wiper blades
Important safety notes G
WARNING
If the windshield wipers begin to move while
you are changing the wiper blades, you could
be trapped by the wiper arm. There is a risk
of injury.
Always switch off the windshield wipers and
ignition before changing the wiper blades.
! Neve ropen the hood/tailgate if a wiper
arm has been folded away from the
windshield/rear window.
Never fold a windshield wiper arm without
a wiper blade back onto the windshield/
rear window. Hold the windshield wiper arm firmly when
you change the wiper blade. If you release
the wiper arm without a wiper blade and it
falls onto the windshield/rear window, the
windshield/rear window may be damaged
by the force of the impact.
Mercedes-Benz recommends that you have
the wiper blades changed at
aqualified
specialist workshop.
! To avoid damaging the wiper blades,
make sure that you touch only the wiper
arm of the wiper.
Changing the windshield wiper blades Removing the wiper blades
X
Remove the SmartKey from the ignition
lock.
X Fold the wiper arm away from the
windshield. X
Firmly press release knob 0002and pull wiper
blade 0003upwards from the wiper arm in the
direction of the arrow. Windshiel
dwipers
137Lights and windshield wipers Z
Page 140 of 454

Installing the wiper blades
X
Positio nnew wiper blade 0002in the retainer
on the wiper arm and slide it into place in
the direction of the arrow.
The wiper blade audibly engages.
X Make sure that the wiper blade is seated
correctly.
X Fold the wiper arm back onto the
windshield.
Replacing the rear window wiper blade Removing
awiper blade X
Remove the SmartKey from the ignition
lock.
X Fold wiper arm 0002away from the rear
window until it engages.
X Position wiper blade 0003at a right angle to
wiper arm 0002.
X Hold wiper arm 0002and press wiper
blade 0003in the direction of the arrow until
it releases.
X Remove wiper blade 0003. Installing
awiper blade
X Place new wiper blade 0003onto wiper
arm 0002.
X Hold wiper arm 0002and press wiper
blade 0003in the opposite direction to the
arrow until it engages.
X Make sure that wiper blade 0003is seated
correctly.
X Position wiper blade 0003parallel to wiper
arm 0002.
X Fold wiper arm 0002back onto the rear
window. 138
Windshield wipersLights and windshield wipers
Page 141 of 454

Problems with the windshield wipers
Problem Possible causes/consequences and
0001 Solutions
The windshield wipers
are jammed. Leaves or snow, for example, may be obstructing the windshield
wiper movement.T
he wiper motor has been deactivated.
X For safety reasons, you should remove the SmartKey from the
ignition lock.
or
X Switch off the engine using the Start/Stop button and open the
driver's door.
X Remove the cause of the obstruction.
X Switch the windshield wipers back on. The windshield wipers
fail completely. The windshield wiper drive is malfunctioning.
X
Select another wiper speed on the combination switch.
X Have the windshield wipers checked at a qualified specialist
workshop. Windshield wipers
139Lights and windshield wipers Z
Page 152 of 454

001D Sets the temperature (Y page 153)
0023 Sets rear-compartment climate control to automatic (Y page 152)
0024 Directs the airflow through the rear air vents")
001C
Increases the airflow (Y page 154)
001D Sets the temperature (Y page 153)
0023 Sets rear-compartment climate control to automatic (Y page 152)
0024 Directs the airflow through the rear air vents (Y page 154)
0025 Directs the airflow through the footwell vents (Y page 154)
0026 Switches rear-compartment climate control on/off (Y page 150)
0027 Reduces the airflow (Y page 154)Information about using 3-zone
automatic climate control
The following contains instructions and
recommendations to enable you to get the
most out of your automatic climate control.
R Activate climate control using the 0006and
0007/0005 buttons. The indicator lamps
above the 0006and0007/0005 buttons
lightu p.
R In automatic mode, you can also use the
000C button to set a climate mode
(FOCUS/MEDIUM/DIFFUSE). The
MEDIUM level is recommended.
R Set the temperature to 72 ‡ (22 †).
R Only use the "Windshield defrosting"
function briefly until the windshield is clear
again.
R Only use air-recirculation mode briefly, e.g.
if there are unpleasant outside odors or
when in a tunnel. The windows could
otherwise fog up, since no fresh air is drawn
into the vehicle in air-recirculation mode.
R Use the ZONE function to adopt the
temperature settings on the driver's side
for the front-passenger side and the rear
compartment as well. The indicator lamp
above the 0004button goes out.
R Use the residual heat function if you want
to heat or ventilate the vehicle interior
when the ignition is switched off. The
residual heat function can only be activated
or deactivated with the ignition switched
off. Operating the climate control
systems
Switching climate control on/off
Points to observe before use When the climate contro
lis switched off, the
air supply and air circulation are also
switched off. The windows could fog up.
Therefore, switch off climate control only
briefly
i Switch on climate control primarily using
the 0006 button (Y page 152).
In the rear compartment, you can also switch
climate control on and off using the 0006and
000C buttons.
Activating/deactivating X
Turn the SmartKey to position 2in the
ignition lock (Y page 163).
X To activate: press the0006button.
The indicator lamp in the 0006button lights
up. Airflow and air distribution are set to
automatic mode.
or
X Press the 000Cbutton.
The indicator lamp in the 000Cbutton goes
out. The previously selected settings are
restored.
X To deactivate: press the000Cbutton.
The indicator lamp in the 000Cbutton lights
up. 150
Operating the climate control systemsClimate control
Page 153 of 454

Activating/deactivating cooling with
air dehumidification
Points to observe before use If you deactivate the "Cooling with air-
dehumidification" function, the air inside the
vehicle will no tbe cooled. The air inside the
vehicle will also not be dehumidified. The
windows can fog up more quickly. Therefore,
only deactivate the "Cooling with air-
dehumidification" function briefly.
The cooling with air dehumidification function
is only available when the engine is running.
The air inside the vehicle is cooled and
dehumidified according to the temperature
selected.
Condensation may drip from the underside of
the vehicle when it is in cooling mode. This is
normal and not a sign that there is a
malfunction.
Activating/deactivating Example:
0007button
X To activate: press the0007/0005 button.
The indicator lamp in the 0007/0005
button lights up.
X To deactivate: press the0007/0005
button.
The indicator lamp in the 0007/0005
button goes out. The "Cooling with air
dehumidification" function has a delayed
switch-off feature. Operating the climate control systems
151Climate control
Page 154 of 454

Problems with the "Cooling with air dehumidification" function
Problem Possible causes/consequences and
0001 Solutions
The indicator lamp in
the
0007/0005 button
flashes three times or
remains off. The
"Cooling with air
dehumidification"
function cannot be
switched on. Cooling with air dehumidification has been deactivated due to a
malfunction.
X
Visit a qualified specialist workshop. Setting climate control to automatic
Points to observe before use If you deactivate the "Cooling with air-
dehumidification" function, the air inside the
vehicle will not be cooled. The air inside the
vehicle will also not be dehumidified. The
windows can fog up more quickly. Therefore,
only deactivate the "Cooling with air-
dehumidification" function briefly.
In automatic mode, the set temperature is
maintained automatically at a constant level.
The system automatically regulates the
temperature of the dispensed air, the airflow
and the air distribution.
Automatic mode will achieve optimal
operation if cooling with air dehumidification
is also activated. If necessary, cooling with air
dehumidification can be deactivated.
In the rear compartment, you can also switch
climate control for the rear seats to automatic
mode using the
0006button. Activating/switching X
Turn the SmartKey to position 2in the
ignition lock (Y page 163).
X Set the desired temperature.
X To activate: press the0006button.
The indicator lamp in the 0006button lights
up. Automatic air distribution and airflow
are activated.
X To switch to manual mode: press the
0017 button.
or
X Press the 0018or0019 button.
The indicator lamp in the 0006button goes
out.
3-zone automatic climate control: when
automatic mode is activated, you can select
a climate mode (Y page 153).152
Operating the climate control systemsClimate control
Page 157 of 454
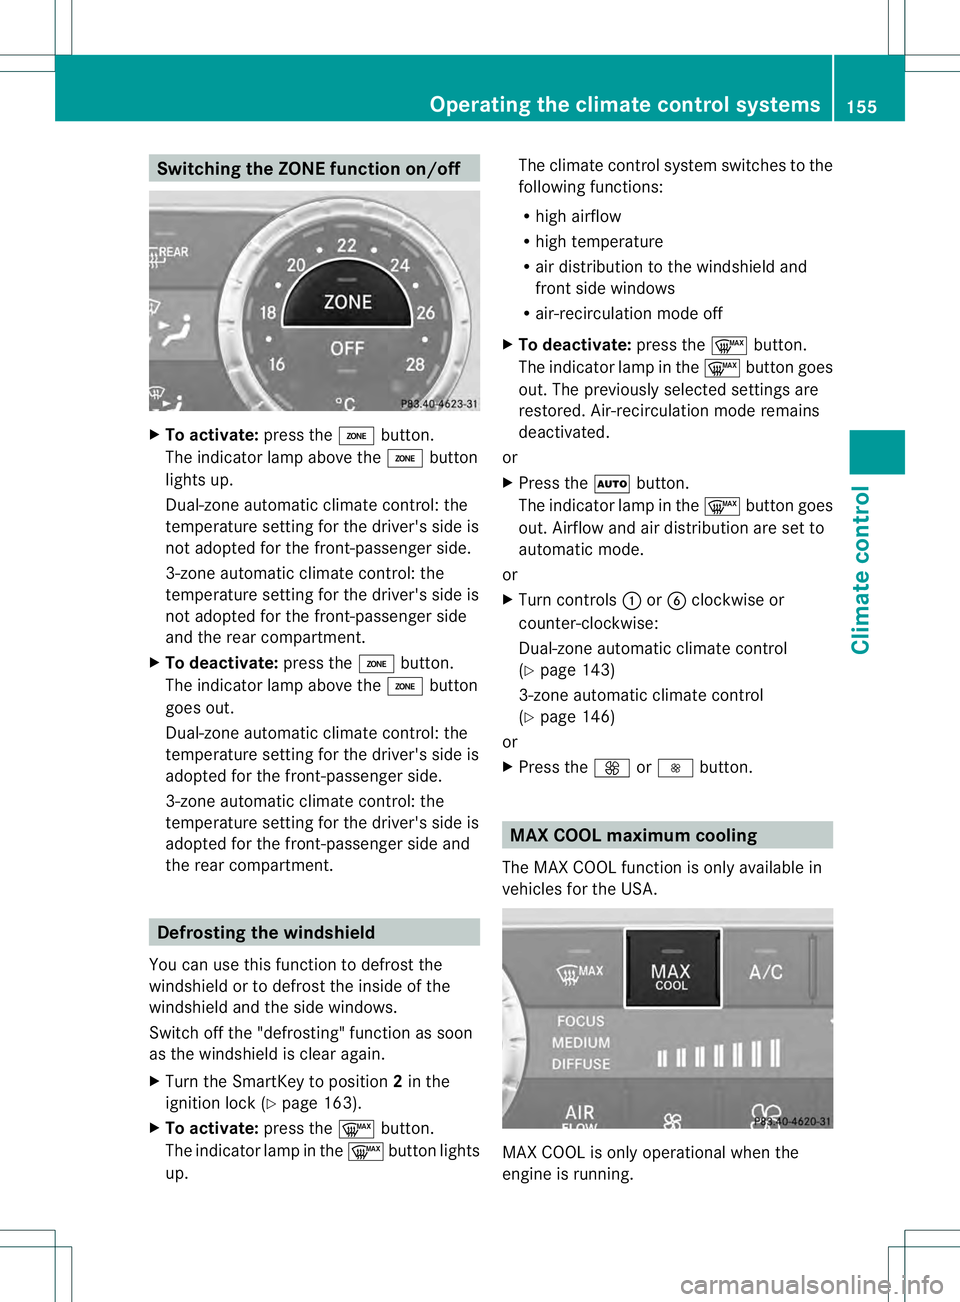
Switching the ZONE function on/off
X
To activate: press the0004button.
The indicator lamp above the 0004button
lights up.
Dual-zone automatic climate control: the
temperature setting for the driver's side is
not adopted for the front-passenger side.
3-zone automatic climate control: the
temperature setting for the driver's side is
not adopted for the front-passenger side
and the rear compartment.
X To deactivate: press the0004button.
The indicator lamp above the 0004button
goes out.
Dual-zone automatic climate control: the
temperature setting for the driver's side is
adopted for the front-passenger side.
3-zone automatic climate control: the
temperature setting for the driver's side is
adopted for the front-passenger side and
the rear compartment. Defrosting the windshield
You can use this function to defrost the
windshield or to defrost the inside of the
windshield and the side windows.
Switch off the "defrosting" function as soon
as the windshield is clear again.
X Turn the SmartKey to position 2in the
ignition lock (Y page 163).
X To activate: press the0009button.
The indicator lamp in the 0009button lights
up. The climate control system switches to the
following functions:
R
high airflow
R high temperature
R air distribution to the windshield and
front side windows
R air-recirculation mode off
X To deactivate: press the0009button.
The indicator lamp in the 0009button goes
out. The previously selected settings are
restored. Air-recirculation mode remains
deactivated.
or
X Press the 0006button.
The indicator lamp in the 0009button goes
out. Airflow and air distribution are set to
automatic mode.
or
X Turn controls 0002or001F clockwise or
counter-clockwise:
Dual-zone automatic climate control
(Y page 143)
3-zone automatic climate control
(Y page 146)
or
X Press the 0019or0018 button. MAX COOL maximum cooling
The MAX COOL function is only available in
vehicles for the USA. MAX COOL is only operational when the
engine is running.Operating the climate control systems
155Climate control