height MERCEDES-BENZ GL-Class 2014 X166 User Guide
[x] Cancel search | Manufacturer: MERCEDES-BENZ, Model Year: 2014, Model line: GL-Class, Model: MERCEDES-BENZ GL-Class 2014 X166Pages: 462, PDF Size: 32.46 MB
Page 122 of 462

Adjusting the steering wheel
electrically
:
To adjust the steering wheel height
; To adjust the steering wheel position
(fore-and-aft adjustment)
The steering wheel can also be adjusted when
the SmartKey is removed from the ignition
lock.
i Further related subjects:
R EASY-ENTRY/EXIT feature
(Y page 121)
R Storing settings (Y page 125)Steering wheel heating
Activating/deactivating X
Make sure that the SmartKey is in position
2 in the ignition lock.
X To switch on/off: turn the lever in the
direction of arrow :or;.
Indicator lamp =lights up or goes out. Vehicles without KEYLESS-GO: when you
remove the SmartKey from the ignition lock,
the steering wheel heating is deactivated.
Vehicles with KEYLESS-GO: when you switch
off the ignition and open the driver's door, the
steering wheel heating is deactivated.120
Steering wheelSeats
, steering wheel and mirrors
Page 200 of 462
R
Always keep the engine running and in gear
when driving on a downhill gradient.
Activate DSR (Y page 256).
R Always keep the doors, tailgate, windows
and sliding sunroof closed while driving.
R Adapt your speed to the terrain. The
rougher, steeper or more ruts on the
terrain, the slower your speed should be.
R Drive slowly and at an even speed through
the water. Ensure that a bow wave does not
form as you drive.
R Drive with extreme care on unfamiliar off-
road routes where visibility is poor. For
safety reasons, get out of the vehicle first
and survey the off-road route.
R Look out for obstacles, such as rocks,
holes, tree stumps and furrows.
R Check the depth of water before fording
rivers and streams.
R When fording, do not stop and do not
switch off the engine.
R On sand, drive quickly to overcome the
rolling resistance. Otherwise the vehicle's
wheels could become stuck in loose
ground.
R Do not jump with the vehicle as this will
interrupt the vehicle's propulsion.
R Always keep the engine running and in gear
when driving on a slope.
R Do not shift the automatic transmission to
transmission position N.
i Do not use the HOLD function when
driving off-road, on steep uphill or downhill
gradients or on slippery or loose surfaces.
The HOLD function cannot hold the vehicle
on such surfaces.
Checklist before driving off-road !
If the engine oil warning lamp lights up
while the vehicle is in motion, stop the
vehicle in a safe place as soon as possible.
Check the engine oil level. The engine oil
warning lamp warning must not be ignored.
Continuing the journey while the symbol is
displayed could lead to engine damage. X
Engine oil level: check the engine oil level
and add oil if necessary.
When driving on steep gradients, the
engine oil level must be sufficiently high to
ensure a correct oil supply in the vehicle.
X DEF tank (BlueTEC vehicles): check the
level and top up if necessary (Y page 186).
X Tire-changing tool kit: check that the jack
is working and make sure you have the lug
wrench, a robust tow cable and a folding
spade in the vehicle.
X Wheels and tires: check the tire tread
depth and tire pressure.
X Check for damage and remove any foreign
objects, e.g. small stones, from the
wheels/tires.
X Replace any missing valve caps.
X Replace dented or damaged wheels.
X Rims: dented or bent rims can result in a
loss of tire pressure and damage the tire
bead. Therefore, check your rims before
driving off-road and replace them as
required.
Checklist after driving off-road !
If you detect damage to the vehicle after
driving off-road, have the vehicle checked
immediately at a qualified specialist
workshop.
X Vehicles with the ON&OFFROAD
package: activate the on-road program
(Y page 258).
X Deactivate the LOW RANGE off-road gear
(Y page 259).
X Deactivate DSR ( Ypage 256).
X Vehicles with the AIRMATIC package:
lower the vehicle to a ride height suitable
for the road conditions, e.g. to the
highway/high-speed level.
X Clean the headlamps and rear lights and
check for damage.
X Clean the front and rear license plates.
X Clean the wheels/tires with a water jet and
remove any foreign objects. 198
Driving tipsDriving an
d parking
Page 215 of 462
height if the chassis is raised. There is a risk
of an accident.
Adjust the vehicle level before pulling away. G
WARNING
Due to the high center of gravity, the vehicle
may start to skid and roll over in the event of
an abrupt steering maneuver and/or when
the vehicle's speed is not adapted to the road
conditions. There is a risk of an accident.
Always adapt your speed and driving style to
the vehicle's driving characteristics and to the
prevailing road and weather conditions.
! When driving on extremely rough terrain,
select a high vehicle level in good time.
Make sure there is always sufficient ground
clearance. You will otherwise damage the
vehicle.
R Utility vehicles have a significantly higher
rollover rate than other types of vehicles.
Failure to operate this vehicle safely may
result in an accident, rollover of the vehicle,
and severe or fatal injury.
R In a rollover crash, an unbelted person is
significantly more likely to die than a
person wearing a seat belt.
You and all vehicle occupants should
always wear your seat belts.
Basic settings The extent to which the vehicle is raised or
lowered depends on the basic setting
selected.
Select:
R
highway/high-speed level for driving on
normal roads
R off-road level 1 for driving on easily
negotiable off-road terrain
R off-road level 2 for driving on normal off-
road terrain
R off-road level 3 for freeing the vehicle in
particularly rough terrain at low speeds
only The individual vehicle levels differ from
highway level as follows:
R
highway level: +/–0 in (+/–0 mm)
R high-speed level: –0.6 in (–15 mm)
R off-road level 1: + 1.2 in (+ 30 mm)
R off-road level 2: + 2.3 in (+ 60 mm)
R off-road level 3: + 3.6 in (+ 90 mm)
Highway/high-speed level !
Make sure that there is enough ground
clearance when the vehicle is being
lowered. It could otherwise hit the ground,
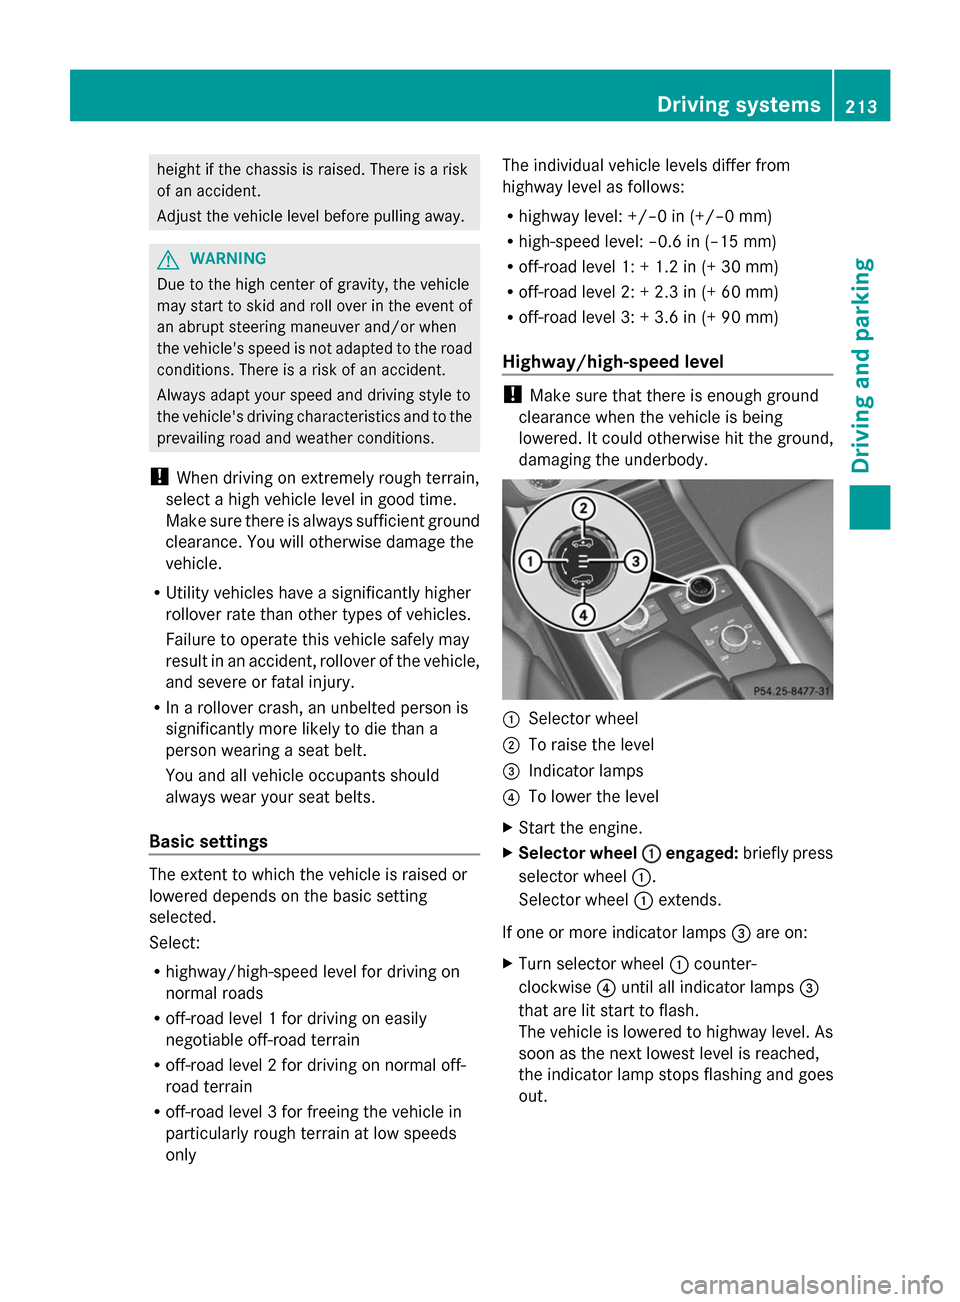
damaging the underbody. :
Selector wheel
; To raise the level
= Indicator lamps
? To lower the level
X Start the engine.
X Selector wheel :
: engaged: briefly press
selector wheel :.
Selector wheel :extends.
If one or more indicator lamps =are on:
X Turn selector wheel :counter-
clockwise ?until all indicator lamps =
that are lit start to flash.
The vehicle is lowered to highway level. As
soon as the next lowest level is reached,
the indicator lamp stops flashing and goes
out. Driving systems
213Driving and parking Z
Page 220 of 462
Comfort tuning
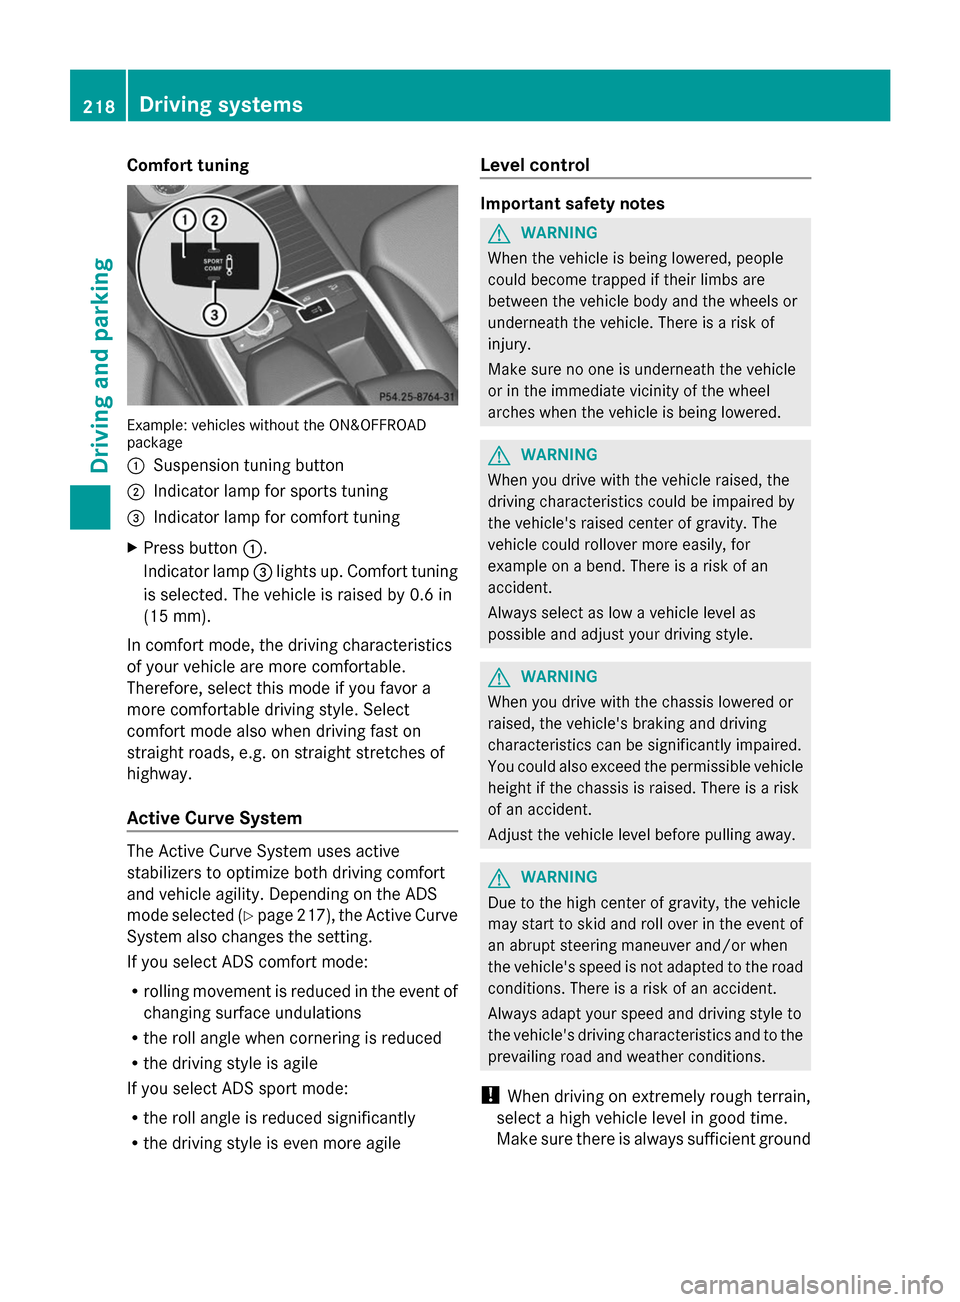
Example: vehicles without the ON&OFFROAD
package
: Suspension tuning button
; Indicator lamp for sports tuning
= Indicator lamp for comfort tuning
X Press button :.
Indicator lamp =lights up. Comfort tuning
is selected. The vehicle is raised by 0.6 in
(15 mm).
In comfort mode, the driving characteristics
of your vehicle are more comfortable.
Therefore, select this mode if you favor a
more comfortable driving style. Select
comfort mode also when driving fast on
straight roads, e.g. on straight stretches of
highway.
Active Curve System The Active Curve System uses active
stabilizers to optimize both driving comfort
and vehicle agility. Depending on the ADS
mode selected (Y page 217), the Active Curve
System also changes the setting.
If you select ADS comfort mode:
R rolling movement is reduced in the event of
changing surface undulations
R the roll angle when cornering is reduced
R the driving style is agile
If you select ADS sport mode:
R the roll angle is reduced significantly
R the driving style is even more agile Level control Important safety notes
G
WARNING
When the vehicle is being lowered, people
could become trapped if their limbs are
between the vehicle body and the wheels or
underneath the vehicle. There is a risk of
injury.
Make sure no one is underneath the vehicle
or in the immediate vicinity of the wheel
arches when the vehicle is being lowered. G
WARNING
When you drive with the vehicle raised, the
driving characteristics could be impaired by
the vehicle's raised center of gravity. The
vehicle could rollover more easily, for
example on a bend. There is a risk of an
accident.
Always select as low a vehicle level as
possible and adjust your driving style. G
WARNING
When you drive with the chassis lowered or
raised, the vehicle's braking and driving
characteristics can be significantly impaired.
You could also exceed the permissible vehicle
height if the chassis is raised. There is a risk
of an accident.
Adjust the vehicle level before pulling away. G
WARNING
Due to the high center of gravity, the vehicle
may start to skid and roll over in the event of
an abrupt steering maneuver and/or when
the vehicle's speed is not adapted to the road
conditions. There is a risk of an accident.
Always adapt your speed and driving style to
the vehicle's driving characteristics and to the
prevailing road and weather conditions.
! When driving on extremely rough terrain,
select a high vehicle level in good time.
Make sure there is always sufficient ground 218
Driving systemsDriving and parking
Page 229 of 462

Active Parking Assist may possibly indicate
parking spaces which are not suitable for
parking, for example:
R where parking or stopping is prohibited
R in front of driveways or entrances and exits
R on unsuitable surfaces
Parking tips:
R On narrow roads, drive as close to the
parking space as possible.
R Parking spaces that are littered or
overgrown might be identified or measured
incorrectly.
R Parking spaces that are partially occupied
by trailer drawbars might not be identified
as such or be measured incorrectly.
R Snowfall or heavy rain may lead to a parking
space being measured inaccurately.
R Pay attention to the PARKTRONIC
(Y page 224) warning messages during the
parking procedure.
R At any time, you can intervene in the
steering procedure to correct it. Active
Parking Assist will then be canceled.
R When transporting a load which protrudes
from your vehicle, you should not use
Active Parking Assist.
R Never use Active Parking Assist when snow
chains are installed.
R Make sure that the tire pressures are
always correct. This has a direct influence
on the parking characteristics of the
vehicle.
Use Active Parking Assist for parking spaces:
R that are parallel to the direction of travel
R that are on straight roads, not bends
R that are on the same level as the road, e.g.
not on the pavement
Detecting parking spaces Objects located above the height range of
Active Parking Assist will not be detected
when the parking space is measured. These
are not taken into account when the parking procedure is calculated, e.g. overhanging
loads, tail sections or loading ramps of goods
vehicles. G
WARNING
If there are objects above the detection range,
Active Parking Assist may turn prematurely.
You may cause a collision as a result. There is
a risk of an accident.
If there are objects above the detection range,
stop and deactivate Active Parking Assist.
For further information on the detection
range (Y page 223).
Active Parking Assist does not support you
with parking spaces parallel to the direction
of travel if:
R the parking space is on a curb
R the system reads the parking space as
being blocked, for example by foliage or
grass paving blocks
R the area is too small for the vehicle to
maneuver into
R the parking space is bordered by an
obstacle, e.g. a tree, a post or a trailer :
Detected parking space on the left
; Parking symbol
= Detected parking space on the right
Active Parking Assist is switched on
automatically when driving forwards. The
system is operational at speeds of up to
approximately 22 mph (35 km/h). While in
operation, the system independently locates
and measures parking spaces on both sides
of the vehicle. Driving systems
227Driving and parking Z
Page 236 of 462

:
Red guide line at a distance of
approximately 10 in (0.25 m) from the
rear of the vehicle
; White guide line without turning the
steering wheel
= End of parking space
X Back up carefully until you have reached
the final position.
Red guide line :is then at end of parking
space =. The vehicle is almost parallel in
the parking space.
"Coupling up a trailer" function !
The following distance specifications
refer to trailer tow hitches with ball
coupling that have been approved for this
vehicle by Mercedes-Benz. Distances may
differ if you use other ball couplings. In this
case, take into account that actual
distances will not match the following
distance specifications. Otherwise you
could damage the trailer and vehicle. :
Vehicle center point on the yellow guide
line at a distance of approximately 3 ft
(1.0 m) from the rear of the vehicle
; Trailer drawbar
= Ball coupling
This function is only available on vehicles with
a trailer tow hitch.
X Set the height of trailer drawbar ;so that
it is slightly higher than ball coupling =.
X Position the vehicle centrally in front of
trailer drawbar ;. :
Ball coupling
; Red guide line at a distance of
approximately 10 in (0.25 m)from the ball
coupling
= Trailer drawbar marker assistant
? Trailer drawbar
A Symbol for the "Coupling up a trailer"
function 234
Driving systemsDriving and parking
Page 373 of 462
!
Make sure that the windshield wipers are
not folded away from the windshield. You
could otherwise damage the windshield
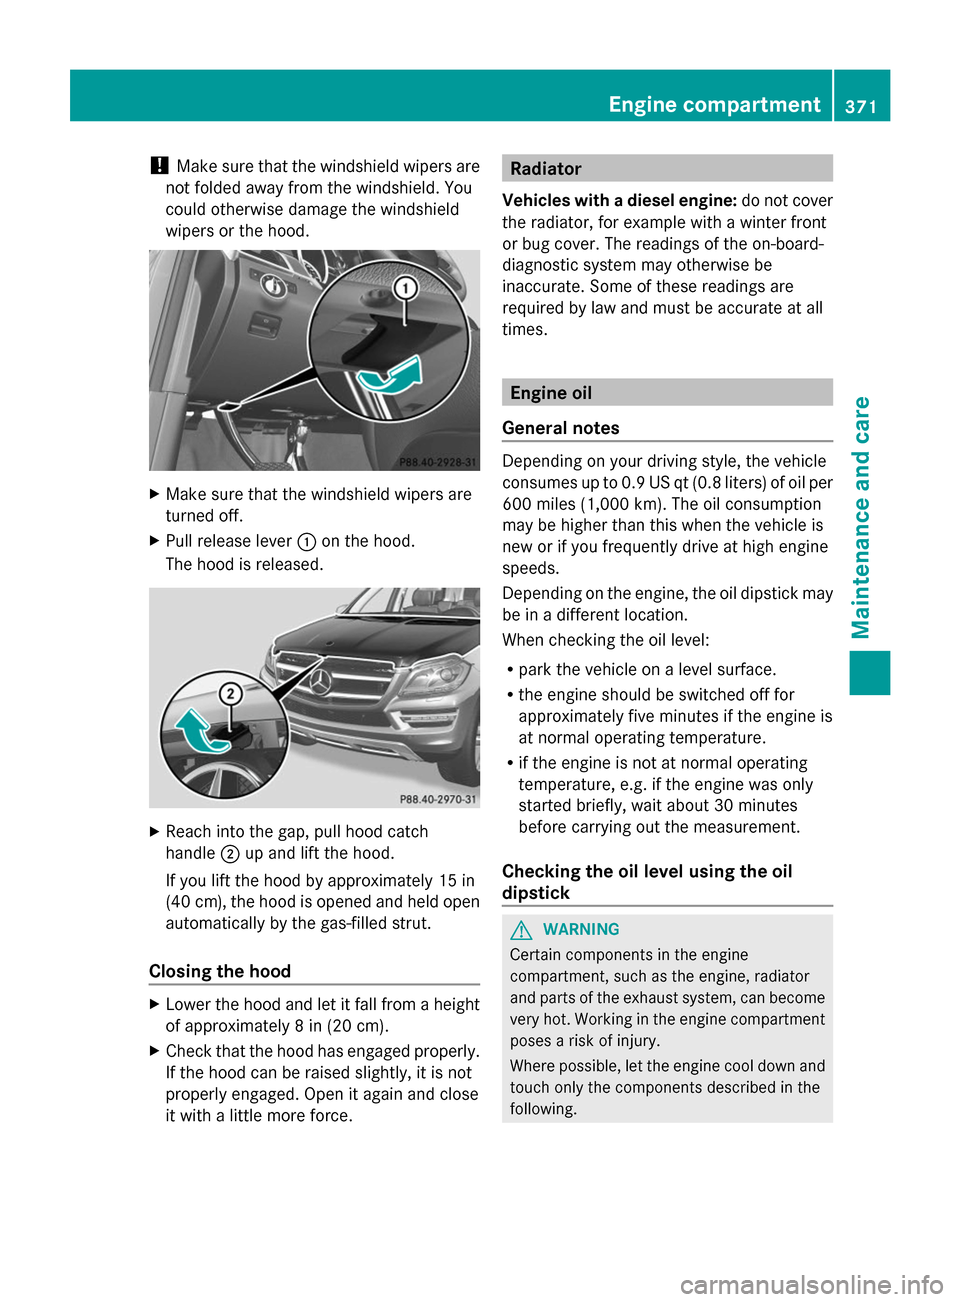
wipers or the hood. X
Make sure that the windshield wipers are
turned off.
X Pull release lever :on the hood.
The hood is released. X
Reach into the gap, pull hood catch
handle ;up and lift the hood.
If you lift the hood by approximately 15 in
(40 cm), the hood is opened and held open
automatically by the gas-filled strut.
Closing the hood X
Lower the hood and let it fall from a height
of approximately 8 in (20 cm).
X Check that the hood has engaged properly.
If the hood can be raised slightly, it is not
properly engaged. Open it again and close
it with a little more force. Radiator
Vehicles with a diesel engine: do not cover
the radiator, for example with a winter front
or bug cover. The readings of the on-board-
diagnostic system may otherwise be
inaccurate. Some of these readings are
required by law and must be accurate at all
times. Engine oil
General notes Depending on your driving style, the vehicle
consumes up to 0.9 US qt (0.8 liters) of oil per
600 miles (1,000 km). The oil consumption
may be higher than this when the vehicle is
new or if you frequently drive at high engine
speeds.
Depending on the engine, the oil dipstick may
be in a different location.
When checking the oil level:
R
park the vehicle on a level surface.
R the engine should be switched off for
approximately five minutes if the engine is
at normal operating temperature.
R if the engine is not at normal operating
temperature, e.g. if the engine was only
started briefly, wait about 30 minutes
before carrying out the measurement.
Checking the oil level using the oil
dipstick G
WARNING
Certain components in the engine
compartment, such as the engine, radiator
and parts of the exhaust system, can become
very hot. Working in the engine compartment
poses a risk of injury.
Where possible, let the engine cool down and
touch only the components described in the
following. Engine compartment
371Maintenance and care Z
Page 409 of 462

Only winter tires bearing the
isnowflake
symbol in addition to the M+S marking
provide the best possible grip in wintry road
conditions.
Only these tires will allow driving safety
systems such as ABS and ESP ®
to function
optimally in winter. These tires have been
developed specifically for driving in snow.
Use M+S tires of the same make and tread on
all wheels to maintain safe handling
characteristics.
Always observe the maximum permissible
speed specified for the M+S tires you have
mounted.
Once the winter tires are mounted:
X Check the tire pressures (Y page 411).
X Restart the tire pressure monitor
(Y page 412).
X Vehicles for Canada: restart the tire
pressure loss warning system
(Y page 412).
For more information on driving with the
emergency spare wheel, see (Y page 439).Snow chains
G
WARNING
If snow chains are installed to the front
wheels, they may drag against the vehicle
body or chassis components. This could
cause damage to the vehicle or the tires.
There is a risk of an accident.
To avoid hazardous situations:
R never install snow chains to the front
wheels
R always install snow chains in pairs to the
rear wheels.
! You must drive at raised vehicle level
(height 1) if snow chains have been
installed. The vehicle may otherwise be
damaged.
! Vehicles with Adaptive Damping
System (ADS): do not use the sports mode if you have installed snow chains. The
vehicle may otherwise be damaged.
! On some tire sizes there is not enough
space for snow chains. To avoid damage to
the vehicle or tires, observe the "Wheel and
tire combinations" section under "Tires and
wheels".
For safety reasons, Mercedes-Benz
recommends that you only use snow chains
that have been specially approved for your
vehicle by Mercedes-Benz, or are of a
corresponding standard of quality.
If you intend to mount snow chains, please
bear the following points in mind:
R Only use snow chains when driving on
roads completely covered by snow.
Remove the snow chains as soon as
possible when you come to a road that is
not snow-covered.
R Do not exceed the maximum permissible
speed of 30 mph (50 km/h).
R Local regulations may restrict the use of
snow chains. Observe the appropriate
regulations if you wish to mount snow
chains.
R Snow chains may not be mounted on all
wheel/tire combinations. Permissible
wheel-tire combinations (Y page 432).
i You may wish to deactivate ESP ®
(Y page 73) when pulling away with snow
chains installed. You can thereby allow the
wheels to spin in a controlled manner,
achieving an increased driving force
(cutting action).
For more information on driving with the
emergency spare wheel, see (Y page 439). Winter operation
407Wheels and tires Z
Page 423 of 462
Tire labeling
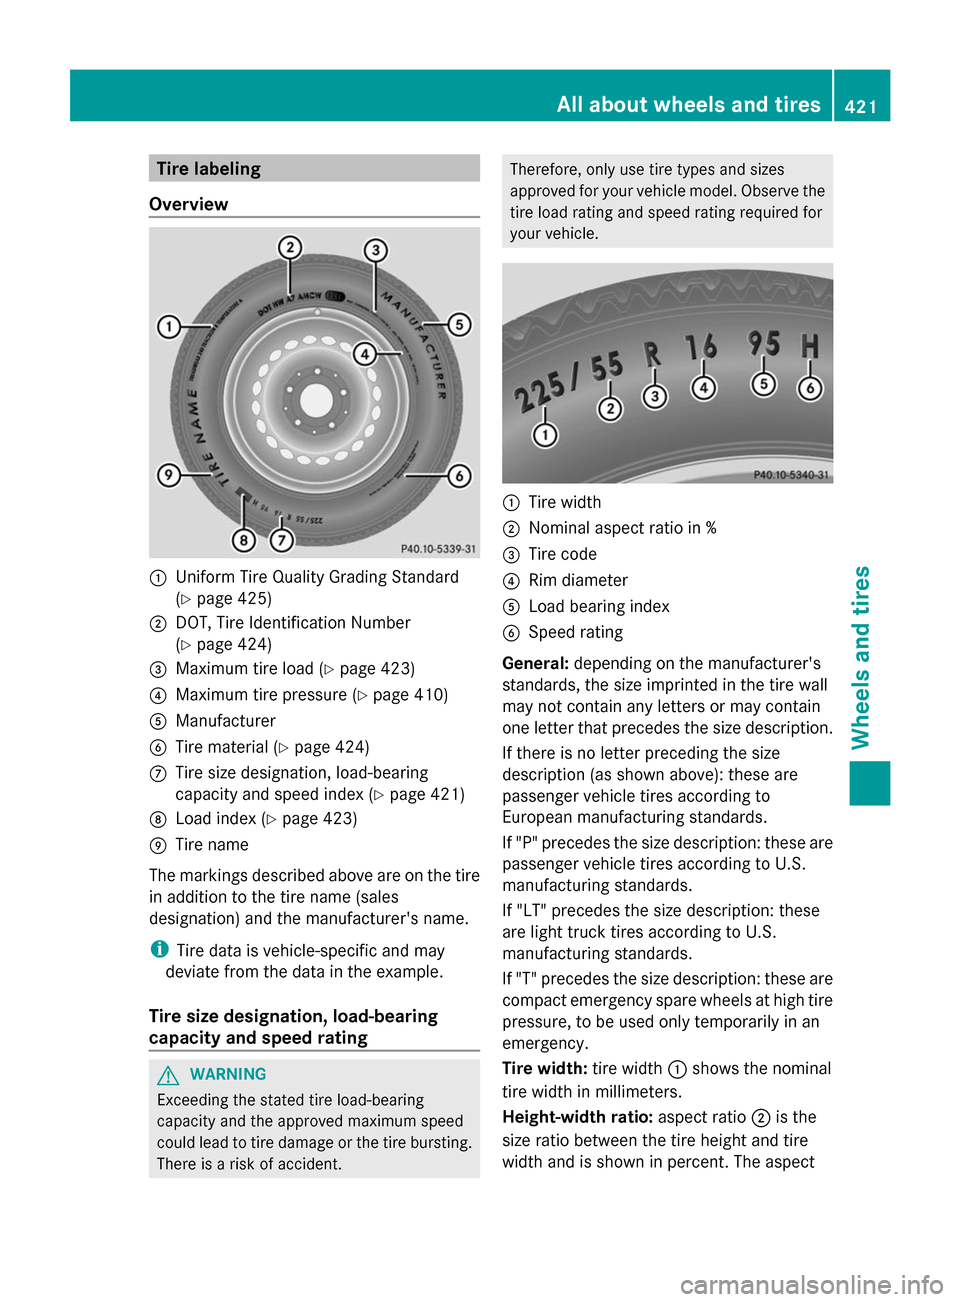
Overview :
Uniform Tire Quality Grading Standard
(Y page 425)
; DOT, Tire Identification Number
(Y page 424)
= Maximum tire load (Y page 423)
? Maximum tire pressure (Y page 410)
A Manufacturer
B Tire material (Y page 424)
C Tire size designation, load-bearing
capacity and speed index (Y page 421)
D Load index (Y page 423)
E Tire name
The markings described above are on the tire
in addition to the tire name (sales
designation) and the manufacturer's name.
i Tire data is vehicle-specific and may
deviate from the data in the example.
Tire size designation, load-bearing
capacity and speed rating G
WARNING
Exceeding the stated tire load-bearing
capacity and the approved maximum speed
could lead to tire damage or the tire bursting.
There is a risk of accident. Therefore, only use tire types and sizes
approved for your vehicle model. Observe the
tire load rating and speed rating required for
your vehicle.
:
Tire width
; Nominal aspect ratio in %
= Tire code
? Rim diameter
A Load bearing index
B Speed rating
General: depending on the manufacturer's
standards, the size imprinted in the tire wall
may not contain any letters or may contain
one letter that precedes the size description.
If there is no letter preceding the size
description (as shown above): these are
passenger vehicle tires according to
European manufacturing standards.
If "P" precedes the size description: these are
passenger vehicle tires according to U.S.
manufacturing standards.
If "LT" precedes the size description: these
are light truck tires according to U.S.
manufacturing standards.
If "T" precedes the size description: these are
compact emergency spare wheels at high tire
pressure, to be used only temporarily in an
emergency.
Tire width: tire width:shows the nominal
tire width in millimeters.
Height-width ratio: aspect ratio;is the
size ratio between the tire height and tire
width and is shown in percent. The aspect All about
wheels and tires
421Wheels and tires Z
Page 424 of 462
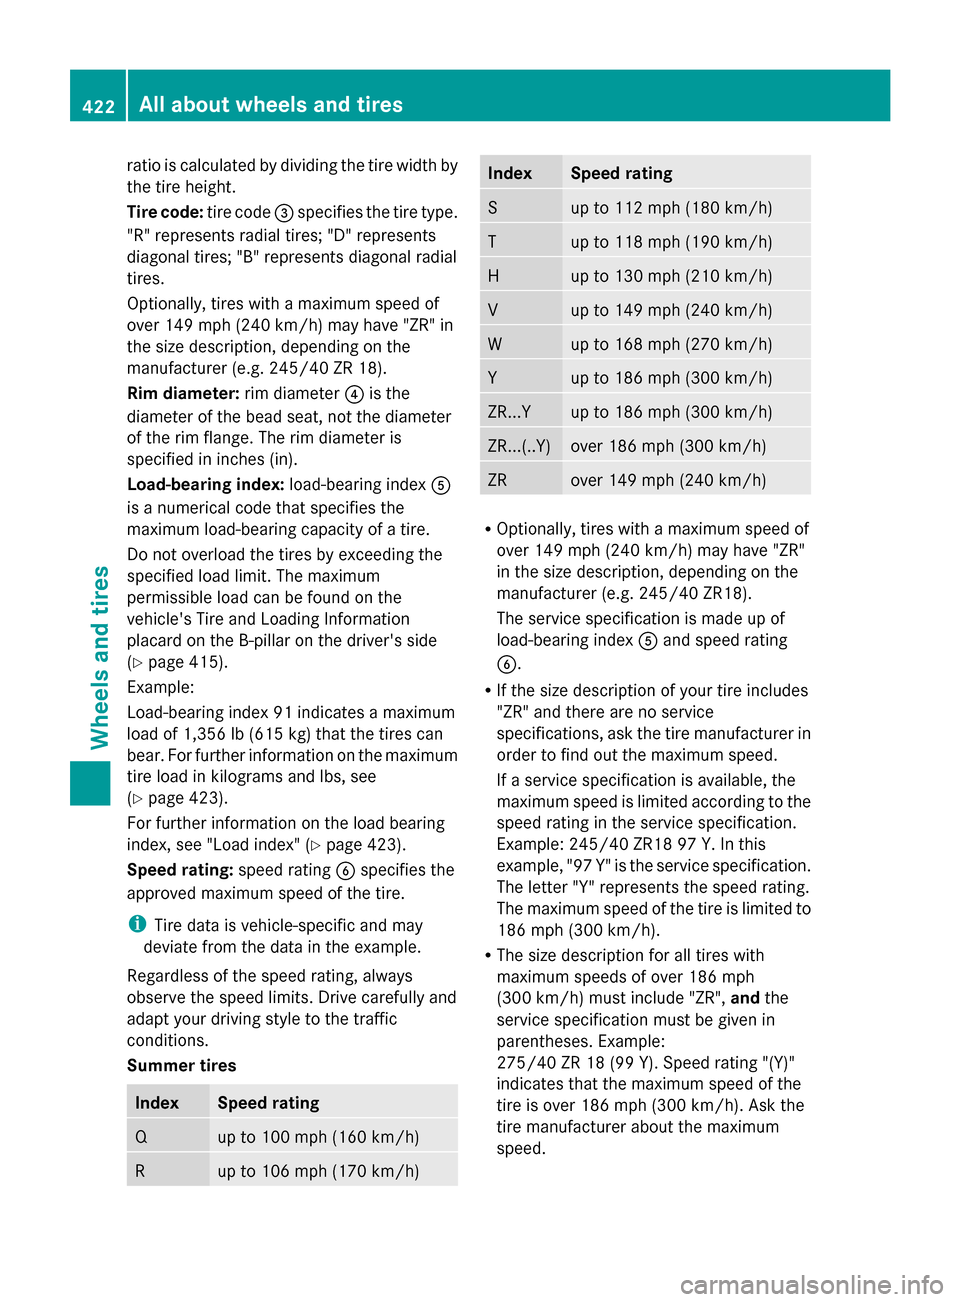
ratio is calculated by dividing the tire width by
the tire height.
Tire code: tire code=specifies the tire type.
"R" represents radial tires; "D" represents
diagonal tires; "B" represents diagonal radial
tires.
Optionally, tires with a maximum speed of
over 149 mph (240 km/h) may have "ZR" in
the size description, depending on the
manufacturer (e.g. 245/40 ZR 18).
Rim diameter: rim diameter?is the
diameter of the bead seat, not the diameter
of the rim flange. The rim diameter is
specified in inches (in).
Load-bearing index: load-bearing indexA
is a numerical code that specifies the
maximum load-bearing capacity of a tire.
Do not overload the tires by exceeding the
specified load limit. The maximum
permissible load can be found on the
vehicle's Tire and Loading Information
placard on the B-pillar on the driver's side
(Y page 415).
Example:
Load-bearing index 91 indicates a maximum
load of 1,356 lb (615 kg) that the tires can
bear. For further information on the maximum
tire load in kilograms and lbs, see
(Y page 423).
For further information on the load bearing
index, see "Load index" (Y page 423).
Speed rating: speed ratingBspecifies the
approved maximum speed of the tire.
i Tire data is vehicle-specific and may
deviate from the data in the example.
Regardless of the speed rating, always
observe the speed limits. Drive carefully and
adapt your driving style to the traffic
conditions.
Summer tires Index Speed rating
Q up to 100 mph (160 km/h)
R up to 106 mph (170 km/h) Index Speed rating
S up to 112 mph (180 km/h)
T up to 118 mph (190 km/h)
H up to 130 mph (210 km/h)
V up to 149 mph (240 km/h)
W up to 168 mph (270 km/h)
Y up to 186 mph (300 km/h)
ZR...Y up to 186 mph (300 km/h)
ZR...(..Y) over 186 mph (300 km/h)
ZR over 149 mph (240 km/h)
R
Optionally, tires with a maximum speed of
over 149 mph (240 km/h) may have "ZR"
in the size description, depending on the
manufacturer (e.g. 245/40 ZR18).
The service specification is made up of
load-bearing index Aand speed rating
B.
R If the size description of your tire includes
"ZR" and there are no service
specifications, ask the tire manufacturer in
order to find out the maximum speed.
If a service specification is available, the
maximum speed is limited according to the
speed rating in the service specification.
Example: 245/40 ZR18 97 Y.In this
example, "97 Y" is the service specification.
The letter "Y" represents the speed rating.
The maximum speed of the tire is limited to
186 mph (300 km/h).
R The size description for all tires with
maximum speeds of over 186 mph
(300 km/h) must include "ZR", andthe
service specification must be given in
parentheses. Example:
275/40 ZR 18 (99 Y). Speed rating "(Y)"
indicates that the maximum speed of the
tire is over 186 mph (300 km/h). Ask the
tire manufacturer about the maximum
speed. 422
All about wheels and tiresWheels and tires