interior lights MERCEDES-BENZ GL-Class 2014 X166 Owner's Manual
[x] Cancel search | Manufacturer: MERCEDES-BENZ, Model Year: 2014, Model line: GL-Class, Model: MERCEDES-BENZ GL-Class 2014 X166Pages: 462, PDF Size: 32.46 MB
Page 8 of 462
Belt
see Seat belts
Belt force limiter
Activation ......................................... 59
Function ........................................... 59
Blind Spot Assist
Activating/deactivating .................281
Display message ............................ 314
Notes/function .............................. 243
Trailer towing ................................. 245
see Active Blind Spot Assist
BlueTEC
Adding DEF .................................... 186
BlueTEC (DEF) .................................... 448
Brake Assist see BAS (Brake Assist System)
Brake fluid
Display message ............................ 297
Notes ............................................. 450
Brake lamps
Changing bulbs .............................. 140
Display message ............................ 304
Brakes
ABS .................................................. 67
Adaptive Brake Assist ......................71
BAS .................................................. 68
BAS PLUS ........................................ 68
Brake fluid (notes) .........................450
Display message ............................ 291
High-performance brake system ....195
Important safety notes ..................193
Maintenance .................................. 194
Parking brake ................................ 189
Riding tips ...................................... 193
Warning lamp ................................. 326
Breakdown
see Flat tire
see Towing away
Bulbs
see Replacing bulbs C
California Important notice for retail
customers and lessees ....................25
Calling up a malfunction
see Display messages Car
see Vehicle
Care
360° camera ................................. 380
Carpets .......................................... 383
Car wash ........................................ 376
Display ........................................... 381
Exhaust pipe .................................. 381
Exterior lights ................................ 379
Gear or selector lever ....................382
Interior ........................................... 381
Matte finish ................................... 378
Night View Assist Plus ...................381
Notes ............................................. 376
Paint .............................................. 378
Plastic trim .................................... 382
Power washer ................................ 377
Rear view camera .......................... 380
Roof lining ...................................... 383
Seat belt ........................................ 383
Seat cover ..................................... 383
Sensors ......................................... 380
Steering wheel ............................... 382
Trim pieces .................................... 382
Washing by hand ........................... 377
Wheels ........................................... 379
Windows ........................................ 379
Wiper blades .................................. 379
Wooden trim .................................. 382
Cargo compartment cover
Notes/how to use .........................346
Cargo compartment enlargement
Important safety notes ..................344
Cargo compartment floor
Opening/closing ............................ 347
Stowage well (under) .....................347
Cargo tie down rings .........................345
Car key see SmartKey
Car wash (care) ................................. 376
CD player/CD changer (on-board
computer) .......................................... 278
Center console Lower section .................................. 37
Upper section .................................. 366
Index
Page 10 of 462
Cornering light function
Display message ............................ 303
Function/notes ............................. 133
Crash-responsive emergency
lighting ............................................... 137
Crosswind driving assistance ............74
Cruise control Activating ....................................... 202
Activation conditions .....................202
Cruise control lever .......................201
Deactivating ................................... 203
Display message ............................ 317
Driving system ............................... 201
Function/notes ............................. 201
Important safety notes ..................201
Storing and maintaining current
speed ............................................ .202
Cup holder
Center console .............................. 349
Important safety notes ..................348
Rear compartment .........................349
Temperature controlled .................349
Third row of seats ..........................350
Customer Assistance Center (CAC) ...28
Customer Relations Department .......28 D
Data see Technical data
Daytime running lamps
Display message ............................ 305
Function/notes ............................. 128
Switching on/off (on-board
computer) ...................................... 283
Declarations of conformity ................. 27
DEF Adding ........................................... 186
Display message ............................ 309
Filling capacity ............................... 449
Important safety notes ..................448
Delayed switch-off
Exterior lighting (on-board
computer) ...................................... 284
Interior lighting .............................. 284
Diagnostics connection ......................27
Diesel ................................................. .447
Differential locks (display message) 311Digital speedometer
.........................276
DIRECT SELECT lever see Automatic transmission
Display message
ASSYST PLUS ................................ 374
Display messages
Calling up (on-board computer) .....290
Driving systems ............................. 309
Engine ............................................ 306
General notes ................................ 290
Hiding (on-board computer) ...........290
KEYLESS-GO .................................. 323
Lights ............................................ .303
Safety systems .............................. 291
SmartKey ....................................... 323
Tires ............................................... 318
Vehicle .......................................... .320
Distance recorder
see Odometer
see Trip odometer
Distance warning (warning lamp) ....336
Distance warning function Activating/deactivating .................281
Function/notes ................................ 69
Warning lamp ................................. 336
DISTRONIC PLUS
Activating ....................................... 206
Activation conditions .....................206
Cruise control lever .......................205
Deactivating ................................... 209
Display message ............................ 315
Displays in the multifunction
displa y........................................... 210
Driving tips .................................... 211
Function/notes ............................. 203
Important safety notes ..................204
Setting the specified minimum
distance ......................................... 209
Warning lamp ................................. 336
Doors
Automatic locking (on-board
computer) ...................................... 284
Automatic locking (switch) .............. .88
Central locking/unlocking
(SmartKey) ...................................... .80
Control panel ................................... 40
Display message ............................ 321
Emergency locking ........................... 88 8
Index
Page 15 of 462
Light function, active
Display message ............................ 305
Lighting
Light switch ................................... 128
Lights
Activating/deactivating the
interior lighting delayed switch-off .284
Active light function .......................133
Adaptive Highbeam Assist .............134
Automatic headlamp mode ............128
Cornering light function .................133
Driving abroad ............................... 128
Hazard warning lamps ...................132
High beam flasher .......................... 132
High-beam headlamps ...................132
Low-beam headlamps ....................129
Parking lamps ................................ 130
Rear fog lamp ................................ 130
Setting the brightness of the
ambient lighting (on-board
computer) ...................................... 283
Setting the color of the ambient
lighting (on-board computer) .........283
Standing lamps .............................. 131
Switching the daytime running
lamps on/off (on-board computer) 283
Switching the exterior lighting
delayed switch-off on/off (on-
board computer) ............................ 284
Switching the surround lighting
on/off (on-board computer) ..........284
Turn signals ................................... 131
see Interior lighting
see Replacing bulbs
Light sensor (display message) .......306
Loading guidelines ............................340
Locking see Central locking
Locking (doors)
Automatic ........................................ 88
Emergency locking ........................... 88
From inside (central locking
button) ............................................. 87
Locking centrally
see Central locking
Locking verification signal (on-
board computer) ............................... 285Low-beam headlamps
Changing bulbs .............................. 138
Display message ............................ 303
Setting for driving abroad
(symmetrical) ................................. 128
Switching on/off ........................... 129
LOW RANGE
Display message ............................ 312
Off-road gear ................................. 259
LOW RANGE off-road gear ................259
Lumbar support Adjusting (on the seat) ..................116
Luxury head restraints .....................109 M
M+S tires ............................................ 406
Malfunction message see Display messages
Matte finish (cleaning instructions) 378
mbrace Call priority .................................... 359
Display message ............................ 297
Downloading destinations
(COMAND) ..................................... 359
Downloading routes .......................363
Emergency call .............................. 356
General notes ................................ 355
Geo fencing ................................... 363
Locating a stolen vehicle ...............362
MB info call button ........................358
Remote vehicle locking ..................361
Roadside Assistance button ..........358
Search & Send ............................... 360
Self-test ......................................... 356
Speed alert .................................... 363
System .......................................... 356
Triggering the vehicle alarm ........... 364
Vehicle remote malfunction
diagnosis ....................................... 362
Vehicle remote unlocking ..............361
Mechanical key
Function/notes ................................ 82
Inserting .......................................... 83
Locking vehicle ................................ 88
Removing ......................................... 82
Unlocking the driver's door ..............88 Index
13
Page 45 of 462
SRS (Supplemental Restraint System)
Introduction SRS consists of:
R
6 SRS warning lamp
R Air bags
R The air bag control unit with crash sensors
R Emergency Tensioning Devices for the
front seat belts and the outer seat belts in
the rear
R Seat belt force limiters for the front seat
belts and the outer seat belts in the rear
SRS reduces the risk of vehicle occupants
coming into contact with parts of the
vehicle's interior in the event of an accident.
It can also reduce the forces to which vehicle
occupants are subjected during an accident.
SRS warning lamp G
WARNING
If SRS is malfunctioning, child restraint
system components may be triggered
unintentionally or might not be triggered at all
in the event of an accident with a high rate of
vehicle deceleration. There is an increased
risk of injury, possibly even fatal.
Have SRS checked and repaired immediately
at a qualified specialist workshop.
SRS functions are checked regularly when
you switch on the ignition and when the
engine is running. Therefore, malfunctions
can be detected in good time.
The 6 SRS warning lamp in the instrument
cluster lights up when the ignition is switched
on. It goes out no later than a few seconds
after the engine is started.
The SRS components are in operational
readiness when the 6SRS warning lamp
goes out while the engine is running. There is a malfunction if:
R
the 6 SRS warning lamp does not light
up when the ignition is switched on
R the engine is running and the 6SRS
warning lamp does not go out after a few
seconds
R the engine is running and the 6SRS
warning lamp lights up again
Safety guidelines for seat belts,
Emergency Tensioning Devices (ETDs)
and air bags G
WARNING
R Damaged seat belts or seat belts that have
been subjected to stress in an accident
must be replaced. Their anchoring points
must also be checked. Only use seat belts
installed or supplied by an authorized
Mercedes-Benz Center.
R Air bags and pyrotechnic Emergency
Tensioning Devices (ETDs) contain
perchlorate material, which may require
special handling and regard for the
environment. Check your national disposal
guidelines. California residents, see
www.dtsc.ca.gov/HazardousWaste/
Perchlorate/index.cfm .
R Air bags and ETDs are designed to function
on a one-time-only basis. An air bag or ETD
that has deployed must be replaced. PRE-
SAFE ®
has electrically operated reversible
belt tensioners in addition to the
pyrotechnic ETDs.
R Do not pass seat belts over sharp edges.
They could tear.
R Do not make any modification that could
change the effectiveness of the seat belts.
R Do not bleach or dye seat belts as this may
severely weaken them. In a crash they may
not be able to provide adequate protection.
R No modifications of any kind may be made
to any components or wiring of the SRS.
R Do not change or remove any component
or part of the SRS. Occupant safety
43Safety
Z
Page 47 of 462
vehicle. In order to prevent potential
breathing difficulties, you should leave the
vehicle as soon as it is safe to do so. If you
have any breathing difficulty but cannot get
out of the vehicle after the air bag inflates,
then get fresh air by opening a window or
door. G
WARNING
In order to reduce the potential danger of
injuries caused during the deployment of the
front air bags, the driver and front passenger
must always be correctly seated and wear
their seat belts.
For maximum protection in the event of a
collision, you must always be in the normal
seat position with your back against the
backrest. Fasten your seat belt and make sure
that it is correctly positioned on your body.
As the air bag inflates with considerable
speed and force, a proper seating position
and correct positioning of the hands on the
steering wheel will help to keep you at a safe
distance from the air bag. Occupants who are
not wearing their seat belt, are not seated
properly or are too close to the air bag can be
seriously injured or killed by an air bag, as it
inflates with great force instantaneously:
R sit with the seat belt fastened correctly and
in a position that is as upright as possible
with your back against the backrest.
R move the driver's seat as far back as
possible, still permitting proper operation
of vehicle controls. The distance from the
center of the driver's chest to the center of
the air bag cover on the steering wheel
must be at least 10 inches (25 cm). You
should be able to accomplish this by
adjusting the seat and steering wheel. If
you have any difficulties, please contact an
authorized Mercedes-Benz Center.
R do not lean your head or chest close to the
steering wheel or dashboard.
R only hold the steering wheel on the outside.
Placing hands and arms inside the rim can
increase the risk and potential severity of hand/arm injury if the driver front air bag
inflates.
R adjust the front-passenger seat as far back
as possible from the dashboard when the
seat is occupied.
R occupants, especially children, should
never place their bodies or lean their heads
in the area of the door where the side
impact air bag inflates. This could result in
serious or fatal injuries should the side
impact air bag be deployed. Always sit as
upright as possible, wear the seat belt
properly and use an appropriately sized
infant restraint, toddler restraint or booster
seat recommended for the size and weight
of the child.
Failure to follow these instructions can result
in severe injuries to you or other occupants.
If you sell your vehicle, it is important that you
make the buyer aware of this safety
information. Be sure to give the buyer this
Operator's Manual.
If the air bags are deployed, you will hear a
bang, and a small amount of powder may also
be released. Only in rare cases will the bang
affect your hearing. The powder that is
released generally does not constitute a
health hazard and does not indicate that there
is a fire in the vehicle. The dust might cause
some temporary breathing difficulty for
people with asthma or other breathing
trouble. To avoid this, you may wish to get out
of the vehicle as soon as it is safe to do so.
You can also open the window to allow fresh
air to enter the vehicle interior. The 6SRS
warning lamp lights up.
The air bag installation locations are
identified by the AIR BAG symbol.
The air bags are deployed if the air bag control
unit detects the need for deployment. Only in
the event of such a situation will the air bags
provide their supplemental protection.
If the driver and front passenger do not wear
their seat belts, it is not possible for the air Occupant safety
45Safety Z
Page 62 of 462
The ETDs are triggered depending on the type
and severity of an accident:
R in the event of a head-on or rear-end
collision if the vehicle decelerates or
accelerates rapidly in a longitudinal
direction during the initial stages of the
impact.
R in the event of a side impact if the vehicle
decelerates or accelerates rapidly in a
lateral direction on the side opposite to the
impact.
R in certain situations where the vehicle rolls
over if the system determines that it can
provide additional protection.
If the ETDs are deployed, you will hear a bang,
and a small amount of powder may also be
released. Only in rare cases will the bang
affect your hearing. The powder that is
released generally does not constitute a
health hazard and does not indicate that there
is a fire in the vehicle. The dust might cause
some temporary breathing difficulty for
people with asthma or other breathing
trouble. To avoid this, you may wish to get out
of the vehicle as soon as it is safe to do so.
You can also open the window to allow fresh
air to enter the vehicle interior. The 6SRS
warning lamp lights up. Children in the vehicle
Child restraint systems
Important safety notes G
WARNING
According to accident statistics, children are
safer when properly restrained in the rear
seating positions than in the front seating
position. Thus, we strongly recommend that
children be placed in the rear seats whenever
possible. Regardless of seating position,
children 12 years old and under must be
seated and properly secured in an appropriate
infant restraint, toddler restraint, or booster seat recommended for the size and weight of
the child.
The infant or child restraint must be properly
secured with the vehicle's seat belt, the seat
belt and top tether strap, or lower anchors and
top tether strap, fully in accordance with the
child seat manufacturer's instructions.
Occupants, especially children, should always
sit as upright as possible, wear the seat belt
properly and use an appropriately sized infant
restraint, toddler restraint, or booster seat
recommended for the size and weight of the
child.
Children can be killed or seriously injured by
an inflating air bag. Note the following
important information when circumstances
require you to place a child in the front
passenger seat:
R Your vehicle is equipped with air bag
technology designed to deactivate the front
passenger front air bag in your vehicle
when the system senses the weight of a
typical 12-month-old child or less along
with the weight of a standard appropriate
child restraint on the front passenger seat.
R For children larger than the typical
12-month-old child, the front passenger
front air bag may or may not be activated.
Always make sure the 45indicator
lamp is illuminated, indicating that the front
passenger front air bag is deactivated.
R A child in a rear-facing child restraint on the
front passenger seat will be seriously
injured or even killed if the front passenger
front air bag inflates in a collision which
could occur under some circumstances,
even with the air bag technology installed
in your vehicle. The only means to
completely eliminate this risk is to never
place a child in a rear-facing child restraint
in the front seat. We therefore strongly
recommend that you always place a child
in a rear-facing child restraint in a backseat.
R If you must install a rear-facing child
restraint on the front passenger seat
because circumstances require you to do 60
Children in the vehicleSafety
Page 129 of 462
Useful information
............................128
Exterior lighting ................................ 128
Interior lighting ................................. 135
Replacing bulbs ................................. 137
Windshield wipers ............................140 127Lights and windshield wipers
Page 137 of 462
X
To switch on: turn the light switch to
Ã.
X Press the combination switch beyond the
pressure point in the direction of
arrow :.
The _ indicator lamp in the
multifunction display lights up when it is
dark and the light sensor activates the low-
beam headlamps.
If you are driving at speeds above
approximately 16 mph (25 km/h):
The headlamp range is set automatically
depending on the distance between the
vehicle and other road users.
If you are driving at speeds above
approximately 19 mph (30 km/h) and no
other road users have been detected:
The high-beam headlamps are switched on
automatically. The Kindicator lamp in
the instrument cluster also lights up.
If you are driving at speeds below
approximately 16 mph (25 km/h) or other
road users have been detected or the roads
are adequately lit:
The high-beam headlamps are switched off
automatically. The Kindicator lamp in
the instrument cluster goes out. The _
indicator lamp in the multifunction display
remains lit.
X To switch off: move the combination
switch back to its normal position or move
the light switch to another position.
The _ indicator lamp in the instrument
cluster goes out. Headlamps fogged up on the inside
Certain climatic and physical conditions may
cause moisture to form in the headlamp. This
moisture does not affect the functionality of
the headlamp. Interior lighting
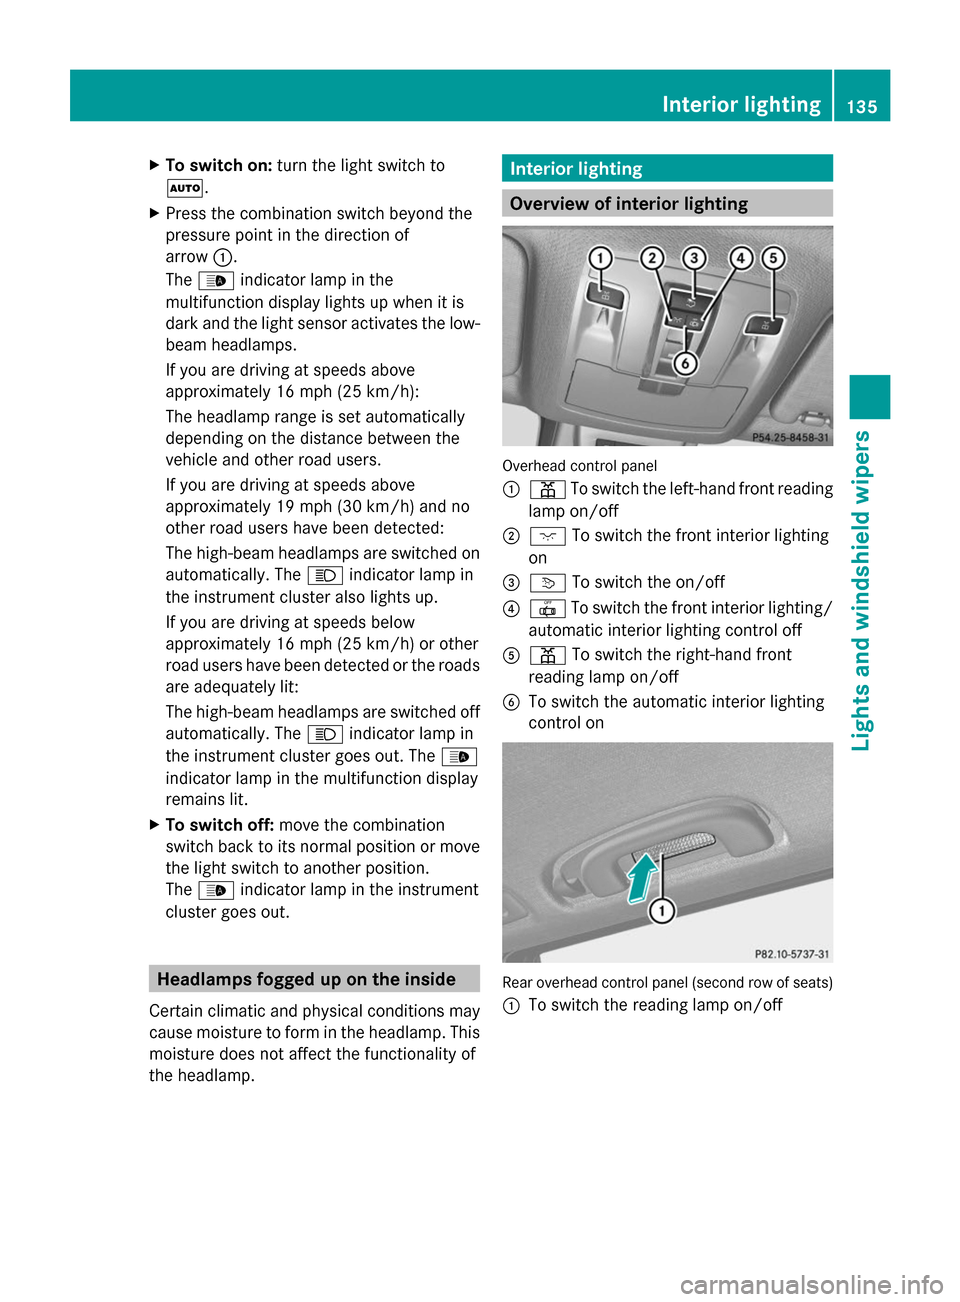
Overview of interior lighting
Overhead control panel
:
p To switch the left-hand front reading
lamp on/off
; c To switch the front interior lighting
on
= v To switch the on/off
? | To switch the front interior lighting/
automatic interior lighting control off
A p To switch the right-hand front
reading lamp on/off
B To switch the automatic interior lighting
control on Rear overhead control panel (second row of seats)
:
To switch the reading lamp on/off Interior lighting
135Lights andwindshield wipers Z
Page 138 of 462
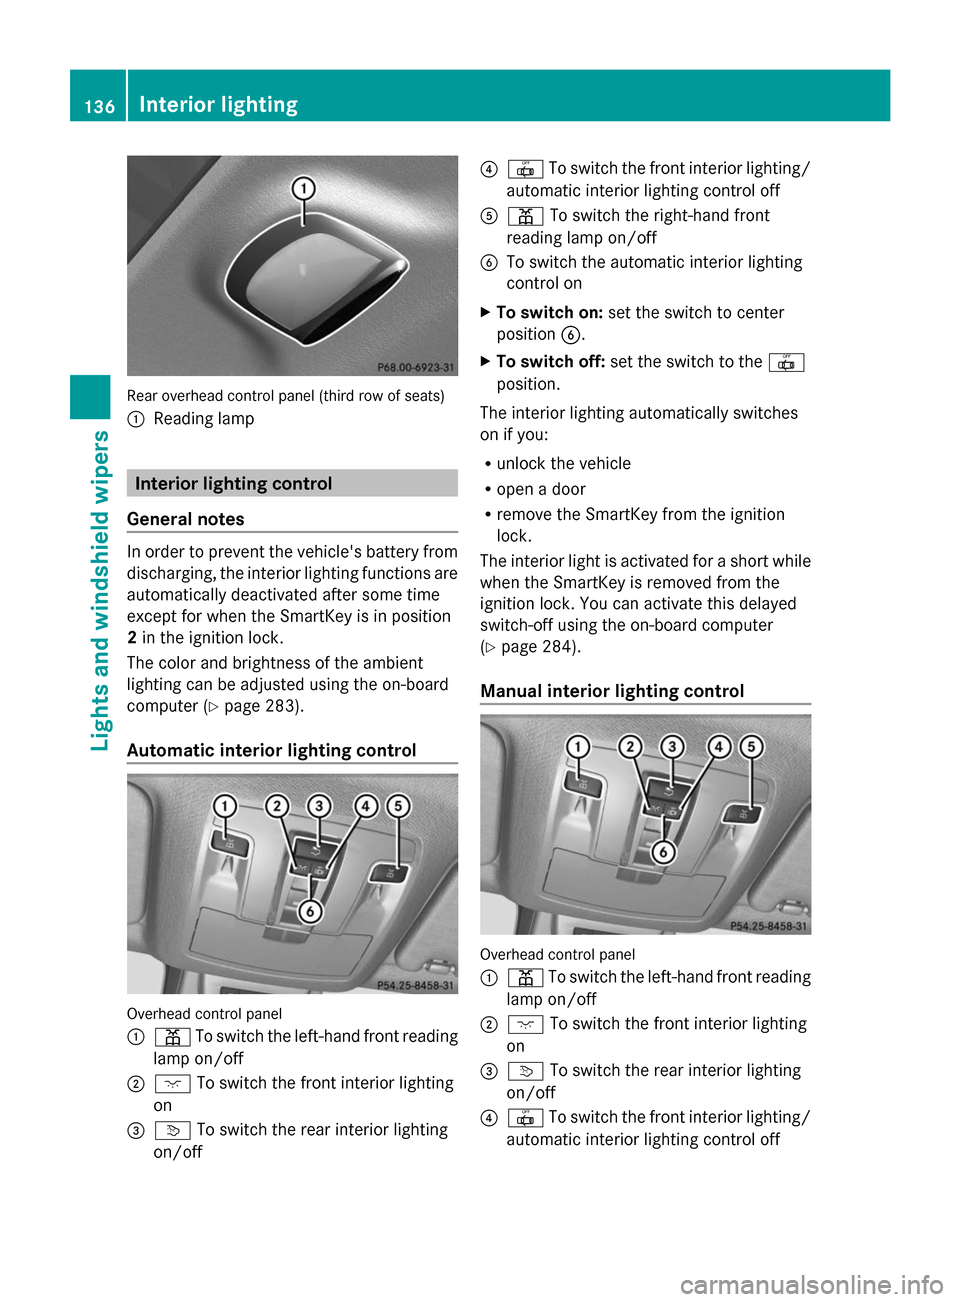
Rear overhead control panel (third row of seats)
: Reading lamp Interior lighting control
General notes In order to prevent the vehicle's battery from
discharging, the interior lighting functions are
automatically deactivated after some time
except for when the SmartKey is in position
2 in the ignition lock.
The color and brightness of the ambient
lighting can be adjusted using the on-board
computer (Y page 283).
Automatic interior lighting control Overhead control panel
:
p To switch the left-hand front reading
lamp on/off
; c To switch the front interior lighting
on
= v To switch the rear interior lighting
on/off ?
| To switch the front interior lighting/
automatic interior lighting control off
A p To switch the right-hand front
reading lamp on/off
B To switch the automatic interior lighting
control on
X To switch on: set the switch to center
position B.
X To switch off: set the switch to the |
position.
The interior lighting automatically switches
on if you:
R unlock the vehicle
R open a door
R remove the SmartKey from the ignition
lock.
The interior light is activated for a short while
when the SmartKey is removed from the
ignition lock. You can activate this delayed
switch-off using the on-board computer
(Y page 284).
Manual interior lighting control Overhead control panel
:
p To switch the left-hand front reading
lamp on/off
; c To switch the front interior lighting
on
= v To switch the rear interior lighting
on/off
? | To switch the front interior lighting/
automatic interior lighting control off 136
Interior lightingLights and windshield wipers
Page 139 of 462
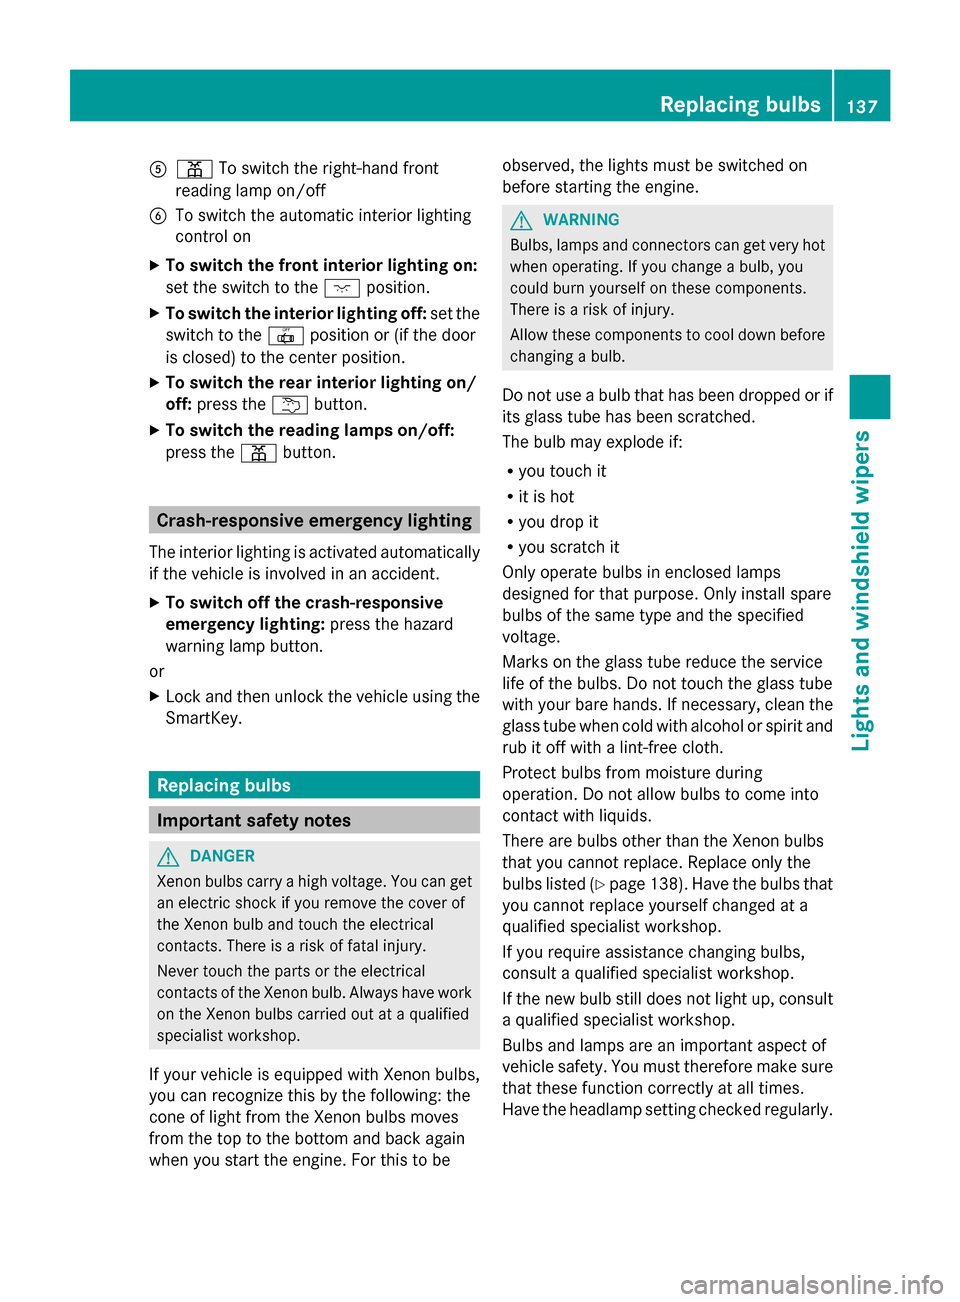
A
p To switch the right-hand front
reading lamp on/off
B To switch the automatic interior lighting
control on
X To switch the front interior lighting on:
set the switch to the cposition.
X To switch the interior lighting off: set the
switch to the |position or (if the door
is closed) to the center position.
X To switch the rear interior lighting on/
off: press the ubutton.
X To switch the reading lamps on/off:
press the pbutton. Crash-responsive emergency lighting
The interior lighting is activated automatically
if the vehicle is involved in an accident.
X To switch off the crash-responsive
emergency lighting: press the hazard
warning lamp button.
or
X Lock and then unlock the vehicle using the
SmartKey. Replacing bulbs
Important safety notes
G
DANGER
Xenon bulbs carry a high voltage. You can get
an electric shock if you remove the cover of
the Xenon bulb and touch the electrical
contacts. There is a risk of fatal injury.
Never touch the parts or the electrical
contacts of the Xenon bulb. Always have work
on the Xenon bulbs carried out at a qualified
specialist workshop.
If your vehicle is equipped with Xenon bulbs,
you can recognize this by the following: the
cone of light from the Xenon bulbs moves
from the top to the bottom and back again
when you start the engine. For this to be observed, the lights must be switched on
before starting the engine. G
WARNING
Bulbs, lamps and connectors can get very hot
when operating. If you change a bulb, you
could burn yourself on these components.
There is a risk of injury.
Allow these components to cool down before
changing a bulb.
Do not use a bulb that has been dropped or if
its glass tube has been scratched.
The bulb may explode if:
R you touch it
R it is hot
R you drop it
R you scratch it
Only operate bulbs in enclosed lamps
designed for that purpose. Only install spare
bulbs of the same type and the specified
voltage.
Marks on the glass tube reduce the service
life of the bulbs. Do not touch the glass tube
with your bare hands. If necessary, clean the
glass tube when cold with alcohol or spirit and
rub it off with a lint-free cloth.
Protect bulbs from moisture during
operation. Do not allow bulbs to come into
contact with liquids.
There are bulbs other than the Xenon bulbs
that you cannot replace. Replace only the
bulbs listed (Y page 138). Have the bulbs that
you cannot replace yourself changed at a
qualified specialist workshop.
If you require assistance changing bulbs,
consult a qualified specialist workshop.
If the new bulb still does not light up, consult
a qualified specialist workshop.
Bulbs and lamps are an important aspect of
vehicle safety. You must therefore make sure
that these function correctly at all times.
Have the headlamp setting checked regularly. Replacing bulbs
137Lights and windshield wipers Z