ESP MERCEDES-BENZ GL-Class 2014 X166 Owner's Guide
[x] Cancel search | Manufacturer: MERCEDES-BENZ, Model Year: 2014, Model line: GL-Class, Model: MERCEDES-BENZ GL-Class 2014 X166Pages: 462, PDF Size: 32.46 MB
Page 65 of 462
Observe the warning labels in the vehicle
interior or on the infant or child restraint.
Special seat belt retractor G
WARNING
If you release the seat belt when driving, the
special seat belt retractor is deactivated.
The released seat belt cannot be engaged
again while driving, because the inertia reel
pulls in the seat belt a small distance. The
child restraint system is no longer properly
secured. There is an increased risk of serious
injury or even fatal injury.
Always keep the seat belt of the activated
special seat belt retractor engaged when
driving.
All seat belts except the driver's seat belt are
equipped with a special seat belt retractor.
When activated, the special seat belt
retractor ensures that the seat belt will not
slacken once the child restraint system has
been secured.
Installing a child restraint system:
X Always comply with the manufacturer's
installation instructions.
X Pull the seat belt smoothly from the seat
belt retractor.
X Engage the seat belt tongue in the belt
buckle.
Activating the special seat belt retractor:
X Pull the seat belt out fully and let the seat
belt retractor retract it again.
While the seat belt is retracting, you should
hear a ratcheting sound. The special seat
belt retractor is activated.
X Push down on the child restraint system to
take up any slack. Removing a child restraint system/
deactivating the special seat belt retractor:
X
Always comply with the manufacturer's
installation instructions.
X Press the seat belt release button and
guide the belt tongue to the belt outlet.
The special seat belt retractor is
deactivated.
LATCH-type (ISOFIX) child seat anchors
in the rear G
WARNING
LATCH-type (ISOFIX) child restraint systems
do not offer sufficient protective effect for
children whose weight is greater than 48 lbs
(22 kg) who are secured using the safety belt
integrated in the child restraint system. In the
event of an accident, a child might not be
restrained correctly. This poses an increased
risk of injury or even fatal injury.
If the child weighs more than 48 lbs (22 kg),
only use LATCH-type (ISOFIX) child restraint
systems with which the child is also secured
with the vehicle seat belt. Also secure the
child restraint system with the Top Tether
belt, if available.
When installing a child restraint system, be
sure to observe the manufacturer's
installation instructions and the instructions
for correct use of the child restraint system.
To ensure that the LATCH-type (ISOFIX) child
restraint system can perform its protective
function as intended, the backrest of the
respective outer seat in the second row must
be in the upright position.
! When installing the LATCH-type (ISOFIX)
child restraint system, make sure that the
seat belt for the center seat does not get
trapped. Otherwise, the seat belt could be
damaged. Children in the vehicle
63Safety Z
Page 69 of 462
R
BAS PLUS ( BrakeAssist System Plus)
(Y page 68)
R COLLISION PREVENTION ASSIST (distance
warning function and adaptive Brake
Assist) (Y page 69)
R ESP ®
(Electronic StabilityProgram)
(Y page 72)
R EBD ( Electronic Brake force Distribution)
(Y page 74)
R ADAPTIVE BRAKE (Y page 75)
R PRE-SAFE ®
Brake (Y page 75)
R STEER CONTROL (Y page 76) Important safety notes
If you fail to adapt your driving style or
become distracted, the driving safety
systems can neither reduce the risk of
accident nor override the laws of physics.
Driving safety systems are merely aids
designed to assist driving. You are
responsible for the distance to the vehicle in
front, for vehicle speed and for braking in
good time. Always adapt your driving style to
suit the prevailing road and weather
conditions and maintain a safe distance from
the vehicle in front. Drive carefully.
i The driving safety systems described only
work as effectively as possible when there
is adequate contact between the tires and
the road surface. Please pay special
attention to the notes on tires,
recommended minimum tire tread depths,
etc. (Y page 404).
In wintry driving conditions, always use
winter tires (M+S tires) and if necessary,
snow chains. Only in this way will the
driving safety systems described in this
section work as effectively as possible. ABS (Anti-lock Braking System)
General information ABS regulates brake pressure in such a way
that the wheels do not lock when you brake.
This allows you to continue steering the
vehicle when braking.
The
! ABS warning lamp in the instrument
cluster lights up when the ignition is switched
on. It goes out when the engine is running.
Important safety notes i
Observe the "Important safety notes"
section (Y page 67). G
WARNING
If ABS is faulty, the wheels could lock when
braking. The steerability and braking
characteristics may be severely impaired.
Additionally, further driving safety systems
are deactivated. There is an increased danger
of skidding and accidents.
Drive on carefully. Have ABS checked
immediately at a qualified specialist
workshop.
When ABS is malfunctioning, other systems,
including driving safety systems, will also
become inoperative. Observe the information
on the ABS warning lamp ( Ypage 326) and
display messages which may be shown in the
instrument cluster (Y page 291).
ABS works from a speed of about 5 mph
(8 km/h), regardless of road-surface
conditions. ABS works on slippery surfaces,
even when you only brake gently.
Braking X
If ABS intervenes: continue to depress the
brake pedal vigorously until the braking
situation is over.
X To make a full brake application:
depress the brake pedal with full force.
If ABS intervenes when braking, you will feel
a pulsing in the brake pedal. Driving safety systems
67Safety Z
Page 74 of 462
R
a vehicle traveling in front on a different line
relative to the center of your vehicle
R new vehicles or after the COLLISION
PREVENTION ASSIST system has been
serviced
Observe the notes in the section on
breaking-in (Y page 166).
Following damage to the front end of the
vehicle, have the configuration and operation
of the radar sensor checked at a qualified
specialist workshop. This also applies to
collisions at low speeds where there is no
visible damage to the front of the vehicle. ESP
®
(Electronic Stability Program)
General notes i
Observe the "Important safety notes"
section (Y page 67).
ESP ®
monitors driving stability and traction,
i.e. power transmission between the tires and
the road surface.
If ESP ®
detects that the vehicle is deviating
from the direction desired by the driver, one
or more wheels are braked to stabilize the
vehicle. The engine output is also modified to
keep the vehicle on the desired course within
physical limits. ESP ®
assists the driver when
pulling away on wet or slippery roads. ESP ®
can also stabilize the vehicle during braking.
4ETS (Electronic Traction System) 4ETS traction control is part of ESP
®
.
Traction control brakes the drive wheels
individually if they spin. This enables you to
pull away and accelerate on slippery surfaces,
for example if the road surface is slippery on
one side. In addition, more drive torque is
transferred to the wheel or wheels with
traction.
Traction control remains active, even if you
deactivate ESP ®
.
In appropriate driving situations, activate the
off-road program (Y page 258). Off-road 4ETS (Electronic Traction
System) A 4ETS system specifically suited to off-road
terrain is activated automatically once the off-
road program is activated (Y
page 258).
Important safety notes G
WARNING
If ESP ®
is malfunctioning, ESP ®
is unable to
stabilize the vehicle. Additionally, further
driving safety systems are deactivated. This
increases the risk of skidding and an accident.
Drive on carefully. Have ESP ®
checked at a
qualified specialist workshop.
! Only operate the vehicle for a maximum
of ten seconds on a brake test
dynamometer. Switch off the ignition.
Application of the brakes by ESP ®
may
otherwise destroy the brake system.
! A function or performance test should
only be carried out on a two-axle
dynamometer. Before you operate the
vehicle on such a dynamometer, please
consult a qualified workshop. You could
otherwise damage the drive train or the
brake system.
ESP ®
is deactivated if the åwarning lamp
in the instrument cluster lights up
continuously when the engine is running.
If the ÷ warning lamp and the å
warning lamp are lit continuously, ESP ®
is not
available due to a malfunction.
Observe the information on warning lamps
(Y page 329) and display messages which
may be shown in the instrument cluster
(Y page 291).
i Only use wheels with the recommended
tire sizes. Only then will ESP ®
function
properly. 72
Driving safety systemsSafety
Page 75 of 462
Characteristics of ESP
®General information
If the
÷ ESP warning lamp goes out before
beginning the journey, ESP ®
is automatically
active.
If ESP ®
intervenes, the ÷ESP®
warning
lamp flashes in the instrument cluster.
If ESP ®
intervenes:
X Do not deactivate ESP ®
under any
circumstances.
X Only depress the accelerator pedal as far
as necessary when pulling away.
X Adapt your driving style to suit the
prevailing road and weather conditions.
ECO start/stop function
The ECO start/stop function switches the
engine off automatically when the vehicle
stops moving. The engine starts
automatically when the driver wants to pull
away again. ESP ®
remains in its previously
selected status. Example:if ESP®
was
deactivated before the engine was switched
off, ESP ®
remains deactivated when the
engine is switched on again.
Deactivating/activating ESP ®Important safety notes
You can select between the following states
of ESP ®
:
R ESP ®
is activated.
R ESP ®
is deactivated. G
WARNING
If you deactivate ESP ®
, ESP ®
no longer
stabilizes the vehicle. There is an increased
risk of skidding and an accident.
Only deactivate ESP ®
in the situations
described in the following. It may be best to deactivate ESP
®
in the
following situations:
R when using snow chains
R in deep snow
R on sand or gravel
i Activate ESP ®
as soon as the situations
described above no longer apply. ESP ®
will
otherwise not be able to stabilize the
vehicle if the vehicle starts to skid or a
wheel starts to spin.
! Avoid spinning the driven wheels for an
extended period with ESP ®
deactivated.
You could otherwise damage the drivetrain.
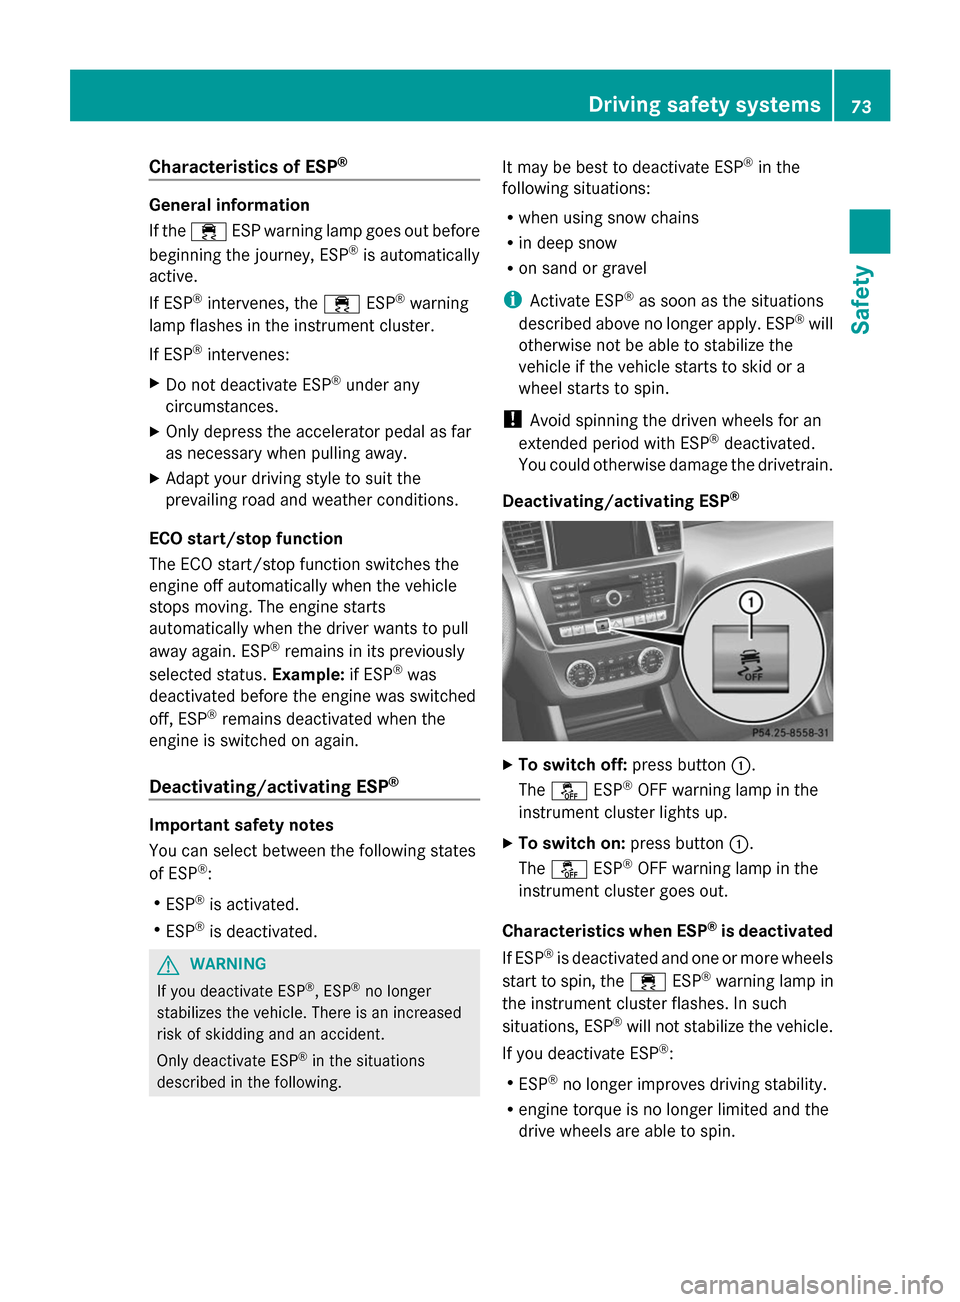
Deactivating/activating ESP ® X
To switch off: press button:.
The å ESP®
OFF warning lamp in the
instrument cluster lights up.
X To switch on: press button:.
The å ESP®
OFF warning lamp in the
instrument cluster goes out.
Characteristics when ESP ®
is deactivated
If ESP ®
is deactivated and one or more wheels
start to spin, the ÷ESP®
warning lamp in
the instrument cluster flashes. In such
situations, ESP ®
will not stabilize the vehicle.
If you deactivate ESP ®
:
R ESP ®
no longer improves driving stability.
R engine torque is no longer limited and the
drive wheels are able to spin. Driving safety systems
73Safety Z
Page 76 of 462
The spinning of the wheels results in a
cutting action for better traction on loose
surfaces.
R traction control is still activated.
R ESP ®
still provides support when you
brake.
Off-road ESP ® An ESP
®
system specifically suited to off-road
terrain is activated automatically once the off-
road program is activated (Y page 258).
Off-road ESP ®
intervenes with a delay if there
is oversteering or understeering, thus
improving traction.
ESP ®
trailer stabilization General information
ESP
®
trailer stabilization is not available in
AMG vehicles.
If your vehicle/trailer combination begins to
swerve, ESP ®
assists you in this situation.
ESP ®
slows the vehicle down by braking and
limiting the engine output until the vehicle/
trailer combination has stabilized.
Important safety notes G
WARNING
If road and weather conditions are poor,
trailer stabilization will not be able to prevent
the vehicle/trailer combination from
swerving. Trailers with a high center of gravity
can tip over before ESP ®
can detect this.
There is a risk of an accident.
Always adapt your driving style to the
prevailing road and weather conditions.
If your vehicle with trailer (vehicle/trailer
combination) begins to lurch, you can only
stabilize the vehicle/trailer combination by
depressing the brake firmly.
Trailer stabilisation is active above speeds of
about 37 mph (60 km/h). ESP
®
trailer stabilization does not work if
ESP ®
is deactivated or disabled because of a
malfunction.
Crosswind driving assistance General information
Strong crosswinds can cause your vehicle to
deviate from a straight course. The crosswind
driving assistance function integrated into
ESP ®
significantly reduces these effects.
ESP ®
intervenes automatically according to
the direction and intensity of the crosswinds
affecting your vehicle.
ESP stabilities the vehicle with braking
interventions to assist you in keeping the
vehicle in the lane.
Crosswind driving assistance is active at
vehicle speeds above 50 mph (80 km/h)
when driving straight ahead or cornering
gently.
Important safety notes
Crosswind driving assistance does not work
if ESP ®
is deactivated or disabled because of
a malfunction. EBD (electronic brake force
distribution)
General information EBD monitors and controls the brake
pressure on the rear wheels to improve
driving stability while braking.
Important safety notes i
Observe the "Important safety notes"
section for driving safety systems
(Y page 67). G
WARNING
If EBD has malfunctioned, the rear wheels can
still lock, e.g. under full braking. This
increases the risk of skidding and an accident. 74
Driving safety systemsSafety
Page 77 of 462
You should therefore adapt your driving style
to the different handling characteristics. Have
the brake system checked at a qualified
specialist workshop.
Observe information regarding indicator and
warning lamps ( Ypage 327) as well as
display messages (Y page 293). ADAPTIVE BRAKE
ADAPTIVE BRAKE enhances braking safety
and offers increased braking comfort. In
addition to the braking function, ADAPTIVE
BRAKE also has the HOLD function
(Y page 216) and hill start assist
(Y page 171). PRE-SAFE
®
Brake
General information i
Observe the "Important safety notes"
section (Y page 67).
PRE-SAFE ®
Brake is only available in vehicles
with DISTRONIC PLUS.
For PRE-SAFE ®
Brake to assist you when
driving, the radar sensor system must be
operational.
With the help of the radar sensor system,
PRE-SAFE ®
Brake can detect obstacles that
are in front of your vehicle for an extended
period of time.
PRE-SAFE ®
Brake can help you to minimize
the risk of a collision with a vehicle ahead, and
reduce the effects of such a collision. If PRE-
SAFE ®
Brake has detected a risk of collision,
you will be warned visually and acoustically
as well as by automatic braking. PRE-SAFE ®
Brake cannot prevent a collision without your
intervention. Important safety notes G
WARNING
PRE-SAFE ®
Brake will initially brake your
vehicle by a partial application of the brakes
if a danger of collision is detected. There may
be a collision unless you also brake.
Automatic emergency braking cannot prevent
a collision. There is a risk of an accident.
Always apply the brakes yourself and try to
take evasive action. G
WARNING
PRE-SAFE ®
Brake cannot always clearly
identify objects and complex traffic
conditions.
In these cases, PRE-SAFE ®
Brake may:
R give an unnecessary warning and then
brake the vehicle
R not give a warning or intervene
There is a risk of an accident.
Always pay particular attention to the traffic
situation and be ready to brake, especially if
PRE-SAFE ®
Brake warns you. Terminate the
intervention in a non-critical driving situation.
In order to maintain the appropriate distance
to the vehicle in front and thus prevent a
collision, you must apply the brakes yourself. G
WARNING
PRE-SAFE ®
Brake does not react:
R to people or animals
R to oncoming vehicles
R to crossing traffic
R when cornering
As a result, PRE-SAFE ®
Brake may neither
give warnings nor intervene in all critical
situations. There is a risk of an accident.
Always pay careful attention to the traffic
situation and be ready to brake.
In the event of snowfall or heavy rain, the
recognition can be impaired. Driving safety systems
75Safety Z
Page 79 of 462
Important safety notes
i
Observe the "Important safety notes"
section (Y page 67).
No steering support is provided from STEER
CONTROL, if:
R ESP ®
is malfunctioning.
R the lighting is faulty.
Power steering will, however, continue to
function. Theft deterrent locking system
Immobilizer
X To activate with the SmartKey: remove
the SmartKey from the ignition lock.
X To activate with KEYLESS-GO: switch the
ignition off and open the driver's door.
X To deactivate: switch on the ignition.
The immobilizer prevents your vehicle from
being started without the correct SmartKey.
When leaving the vehicle, always take the
SmartKey with you and lock the vehicle.
Anyone can start the engine if a valid
SmartKey has been left inside the vehicle.
i The immobilizer is always deactivated
when you start the engine.
In the event that the engine cannot be
started when the starter battery is fully
charged, the immobilizer may be faulty.
Contact an authorized Mercedes-Benz
Center or call 1-800-FOR-MERCedes (in the
USA) or 1-800-387-0100 (in Canada). ATA (anti-theft alarm system)
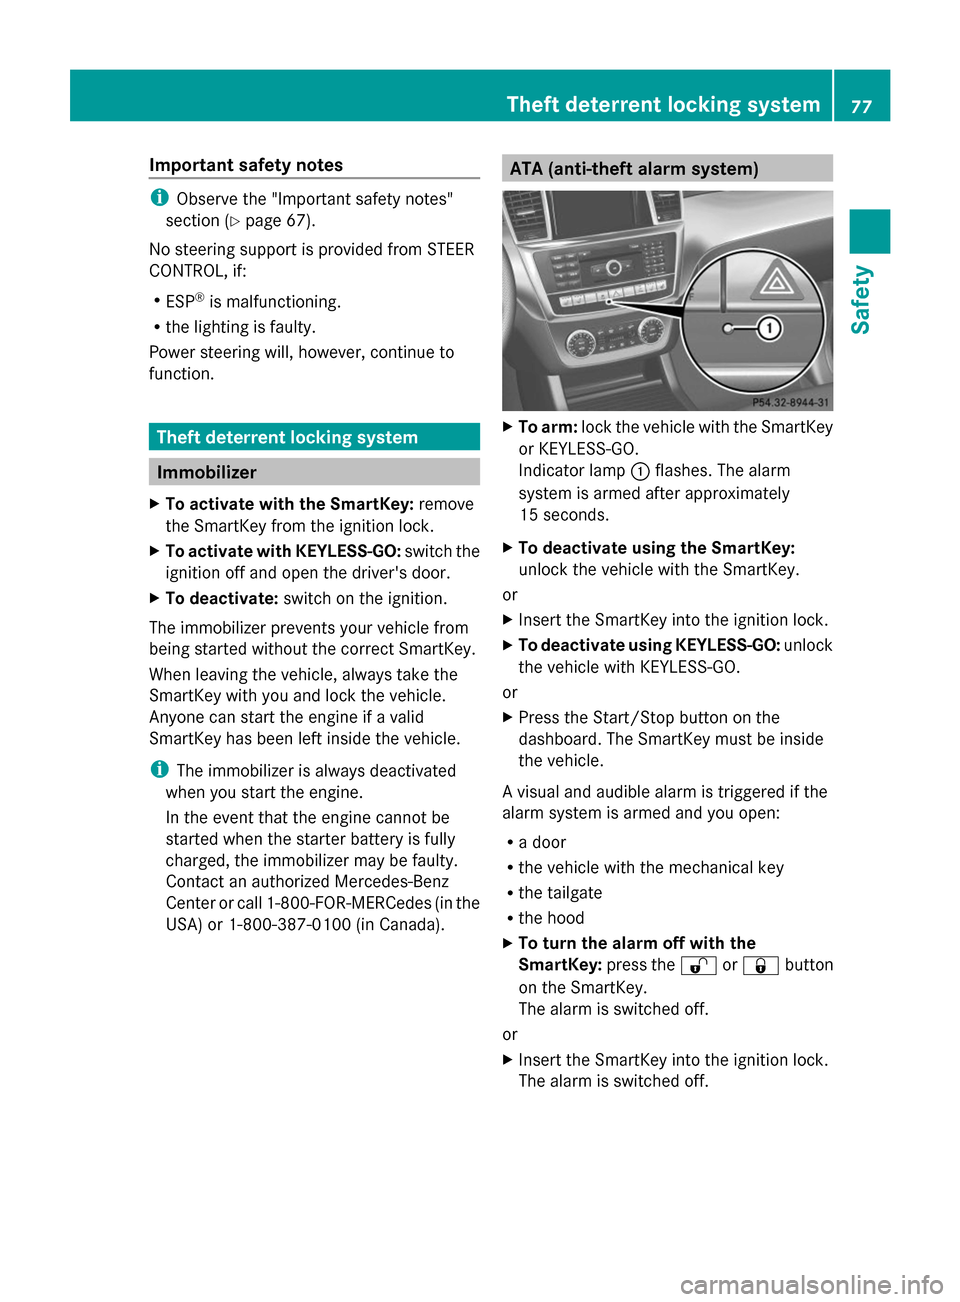
X
To arm: lock the vehicle with the SmartKey
or KEYLESS-GO.
Indicator lamp :flashes. The alarm
system is armed after approximately
15 seconds.
X To deactivate using the SmartKey:
unlock the vehicle with the SmartKey.
or
X Insert the SmartKey into the ignition lock.
X To deactivate using KEYLESS-GO: unlock
the vehicle with KEYLESS-GO.
or
X Press the Start/Stop button on the
dashboard. The SmartKey must be inside
the vehicle.
A visual and audible alarm is triggered if the
alarm system is armed and you open:
R a door
R the vehicle with the mechanical key
R the tailgate
R the hood
X To turn the alarm off with the
SmartKey: press the%or& button
on the SmartKey.
The alarm is switched off.
or
X Insert the SmartKey into the ignition lock.
The alarm is switched off. Theft deterrent locking system
77Safety Z
Page 83 of 462
X
To unlock centrally: press button=.
If you do not open the vehicle within
approximately 40 seconds of unlocking:
R the vehicle is locked again.
R the theft deterrent locking system is
armed again.
X To lock centrally: press button:.
The SmartKey centrally locks/unlocks:
R the doors
R the tailgate
R the fuel filler flap
The turn signals flash once when unlocking
and three times when locking.
You can also set an audible signal to confirm
that the vehicle has been locked. The audible
signal can be activated and deactivated using
the on-board computer (Y page 285).
When it is dark, the surround lighting also
comes on if it is activated in the on-board
computer (Y page 284). KEYLESS-GO
General notes Bear in mind that the engine can be started
by any of the vehicle occupants if there is a
KEYLESS-GO key in the vehicle.
Locking/unlocking centrally You can start, lock or unlock the vehicle using
KEYLESS-GO. To do this, you only need carry
the SmartKey with you. You can combine the
functions of KEYLESS-GO with those of a
conventional SmartKey. Unlock the vehicle
by using KEYLESS-GO, for instance, and lock
it using the &button on the SmartKey.
When locking or unlocking with KEYLESS-GO,
the distance between the SmartKey and the
corresponding door handle must not be
greater than 3 ft (1 m). KEYLESS-GO checks whether a valid
SmartKey is in the vehicle by periodically
establishing a radio connection between the
vehicle and the SmartKey. This happens:
R
when the external door handles are
touched
R when starting the engine
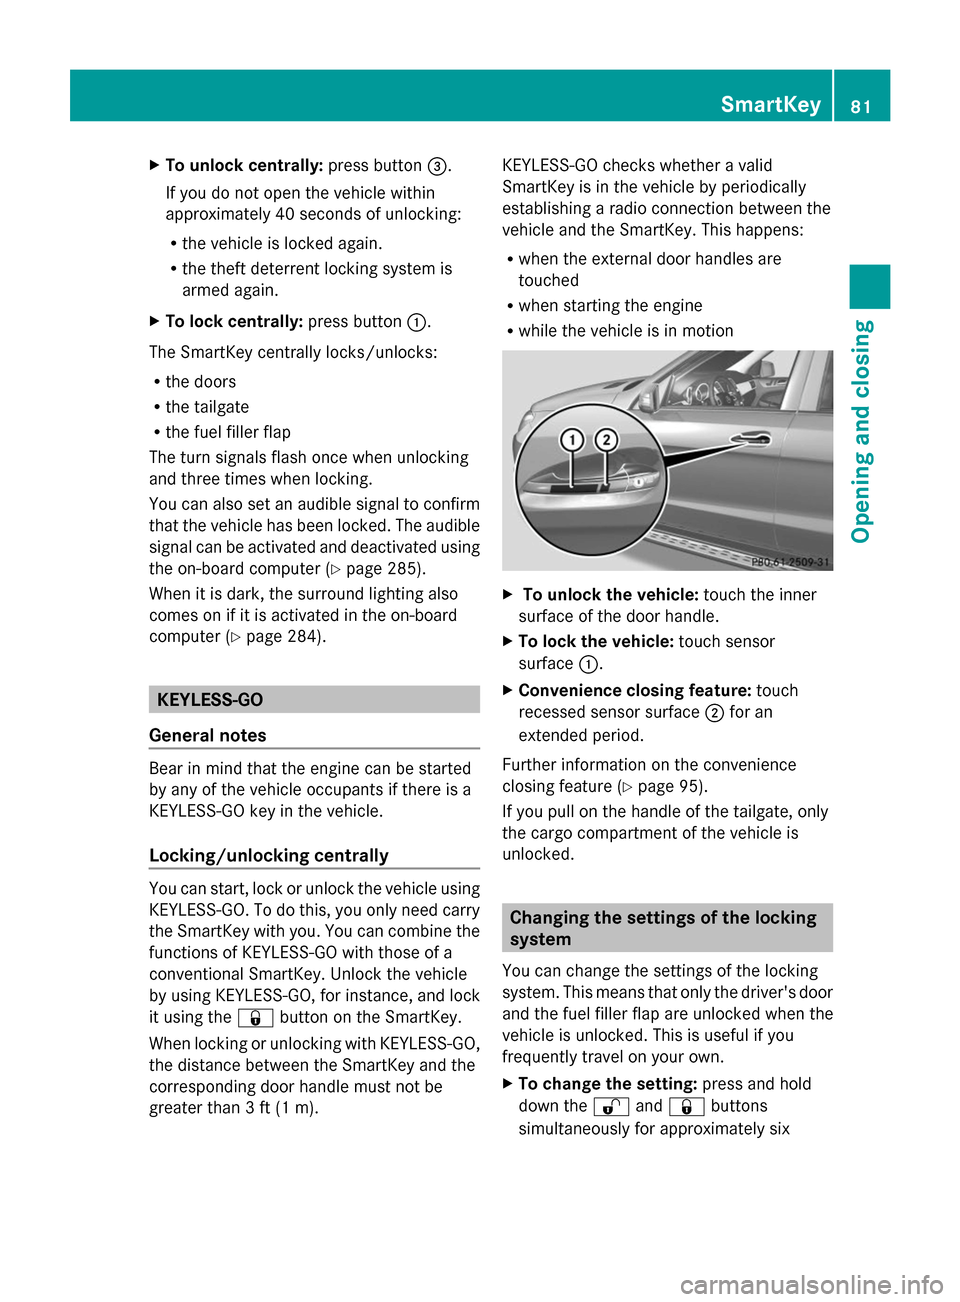
R while the vehicle is in motion X
To unlock the vehicle: touch the inner
surface of the door handle.
X To lock the vehicle: touch sensor
surface :.
X Convenience closing feature: touch
recessed sensor surface ;for an
extended period.
Further information on the convenience
closing feature (Y page 95).
If you pull on the handle of the tailgate, only
the cargo compartment of the vehicle is
unlocked. Changing the settings of the locking
system
You can change the settings of the locking
system. This means that only the driver's door
and the fuel filler flap are unlocked when the
vehicle is unlocked. This is useful if you
frequently travel on your own.
X To change the setting: press and hold
down the %and& buttons
simultaneously for approximately six SmartKey
81Opening and closing Z
Page 96 of 462

Side window reversing feature
The side windows are equipped with an
automatic reversing feature. If a solid object
blocks or restricts a side window during the
closing process, the side window opens again
automatically. However, the automatic
reversing feature is only an aid and does not
relieve you of the responsibility of paying
attention when closing a side window. G
WARNING
The reversing feature does not react:
R to soft, light and thin objects, e.g. small
fingers
R over the last 1/6 in(4 mm) of the closing
movement
R during resetting
R when closing the side window again
manually immediately after automatic
reversing
This means that the reversing feature cannot
prevent someone being trapped in these
situations. There is a risk of injury.
Make sure that no body parts are in close
proximity during the closing procedure. If
someone becomes trapped, press the switch
to open the side window again. Opening and closing the side
windows
The switches for all side windows are located
on the driver's door. There is also a switch on
each door for the corresponding side window.
The switches on the driver's door take
precedence. :
Front left
; Front right
= Rear right
? Rear left
X Turn the SmartKey to position 1or 2in the
ignition lock.
X To open: press the corresponding switch.
X To close: pull the corresponding switch.
i If you press the switch beyond the point
of resistance, an automatic opening/
closing process is started in the
corresponding direction. You can stop
automatic operation by operating the
switch again.
i You can continue to operate the side
windows after you switch off the engine or
remove the SmartKey. This function is
available for up to five minutes or until the
driver's or front-passenger door is opened.
i The side windows cannot be operated
from the rear when the override feature for
the side windows is activated (Y page 66). Opening and closing the hinged side
windows
Opening and closing The hinged side windows are operated
electrically from the from the driver's seat.94
Side windowsOpening and closing
Page 99 of 462

X
Pull the corresponding switch on the door
control panel until the side window is
completely closed. (Y page 94)
X Hold the switch for an additional second.
If the side window opens again slightly:
X Immediately pull the corresponding switch
on the door control panel until the side
window is completely closed (Y page 94).
X Hold the switch for an additional second.
X If the corresponding side window remains
closed after the button has been released,
the side window has been reset correctly.
If this is not the case, repeat the steps
above again. Side windows
97Opening and closing Z