mirror MERCEDES-BENZ GL-Class 2014 X166 Workshop Manual
[x] Cancel search | Manufacturer: MERCEDES-BENZ, Model Year: 2014, Model line: GL-Class, Model: MERCEDES-BENZ GL-Class 2014 X166Pages: 462, PDF Size: 32.46 MB
Page 352 of 462
X
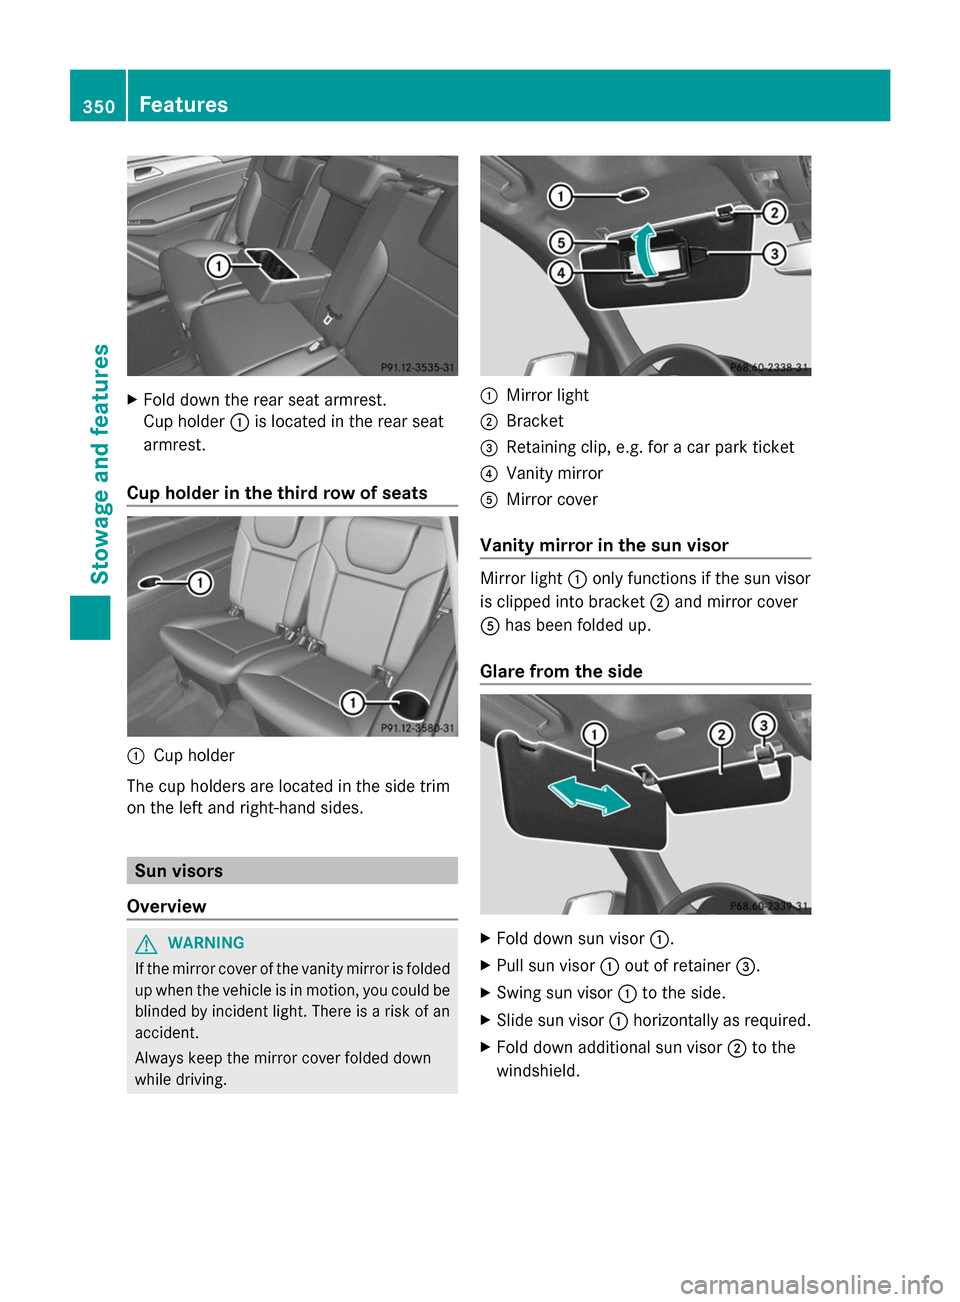
Fold down the rear seat armrest.
Cup holder :is located in the rear seat
armrest.
Cup holder in the third row of seats :
Cup holder
The cup holders are located in the side trim
on the left and right-hand sides. Sun visors
Overview G
WARNING
If the mirror cover of the vanity mirror is folded
up when the vehicle is in motion, you could be
blinded by incident light. There is a risk of an
accident.
Always keep the mirror cover folded down
while driving. :
Mirror light
; Bracket
= Retaining clip, e.g. for a car park ticket
? Vanity mirror
A Mirror cover
Vanity mirror in the sun visor Mirror light
:only functions if the sun visor
is clipped into bracket ;and mirror cover
A has been folded up.
Glare from the side X
Fold down sun visor :.
X Pull sun visor :out of retainer =.
X Swing sun visor :to the side.
X Slide sun visor :horizontally as required.
X Fold down additional sun visor ;to the
windshield. 350
FeaturesStowage and features
Page 366 of 462
Triggering the vehicle alarm
With this function, you can trigger the
vehicle's panic alarm via text message. An
alarm sounds and the exterior lighting
flashes. Depending on the setting, the panic
alarm lasts five or ten seconds. Afterwards,
the alarm switches off. Garage door opener
General notes The HomeLink
®
garage door opener
integrated in the rear-view mirror allows you
to operate up to three different door and gate
systems.
Use the integrated garage door opener only
on garage doors that:
R have safety stop and reverse features and
R meet current U.S. federal safety standards
Once programed, the integrated garage door
opener in the rear-view mirror will assume the
function of the garage door system's remote
control. Please also read the operating
instructions for the garage door system.
When programing a garage door opener, park
the vehicle outside the garage. Do not run the
engine while programing.
Certain garage door drives are incompatible
with the integrated garage door opener. If you
have difficulty programing the integrated
garage door opener, contact an authorized
Mercedes-Benz Center.
Alternatively, you can call the following
telephone assistance services:
R USA: Mercedes-Benz Customer Assistance
Center at 1-800-FOR-MERCedes
R Canada: Customer Service at
1-800-387-0100
R HomeLink ®
hotline 1-800-355-3515 (free
of charge)
More information on HomeLink ®
and/or
compatible products is also available online
at http://www.homelink.com. Notes on the declaration of conformity
(Y
page 27).
USA: FCC ID: CB2HMIHL4
Canada: IC: 279B-HMIHL4
Important safety notes G
WARNING
When you operate or program the garage door
with the integrated garage door opener,
persons in the range of movement of the
garage door can become trapped or struck by
the garage door. There is a risk of injury.
When using the integrated garage door
opener, always make sure that nobody is
within the range of movement of the garage
door. G
WARNING
Combustion engines emit poisonous exhaust
gases such as carbon monoxide. Inhaling
these exhaust gases leads to poisoning. There
is a risk of fatal injury. Therefore never leave
the engine running in enclosed spaces
without sufficient ventilation.
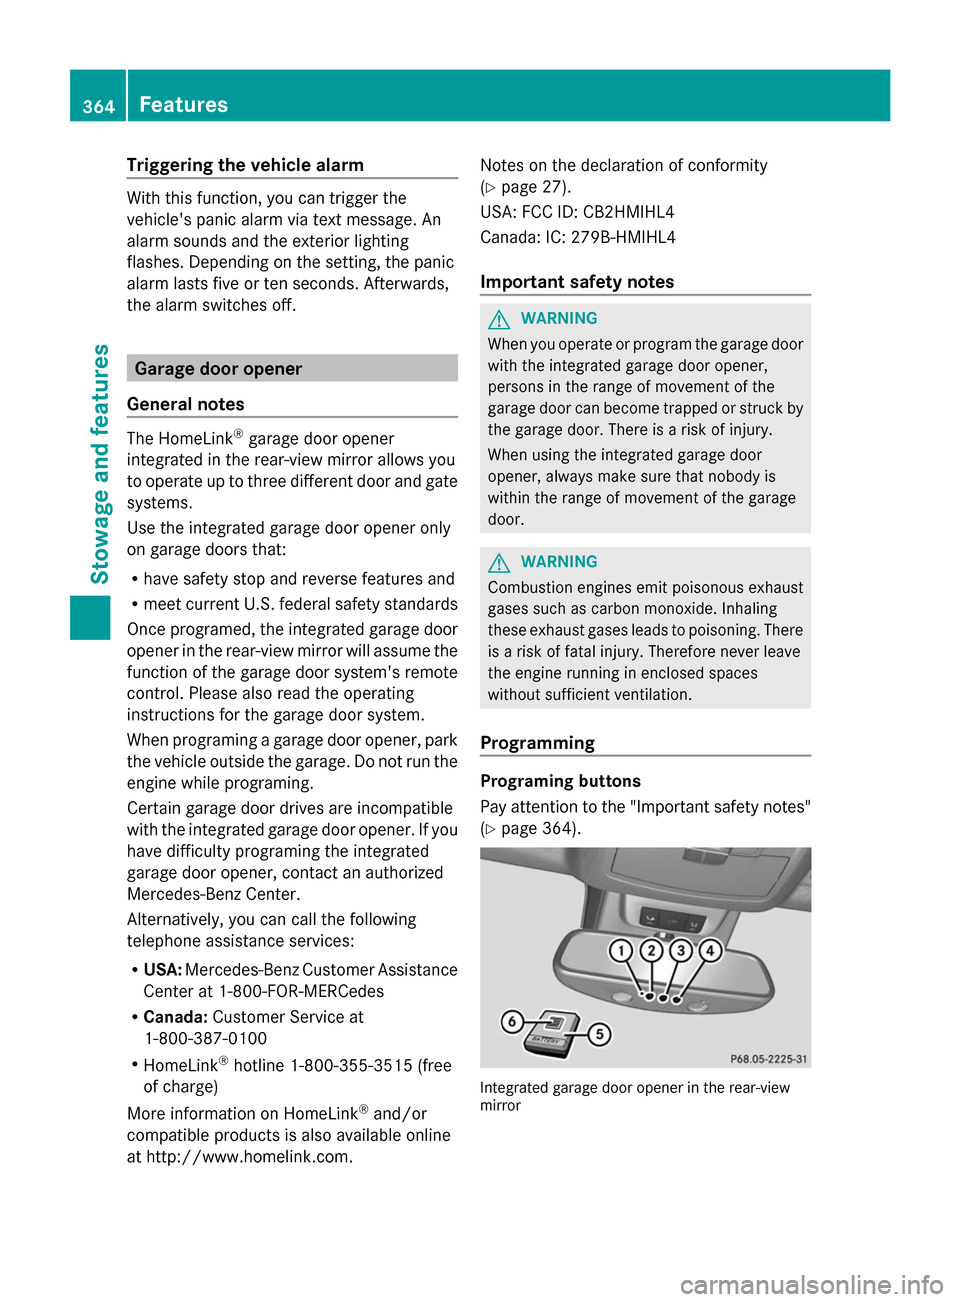
Programming Programing buttons
Pay attention to the "Important safety notes"
(Y
page 364). Integrated garage door opener in the rear-view
mirror 364
FeaturesSto
wage an d features
Page 367 of 462
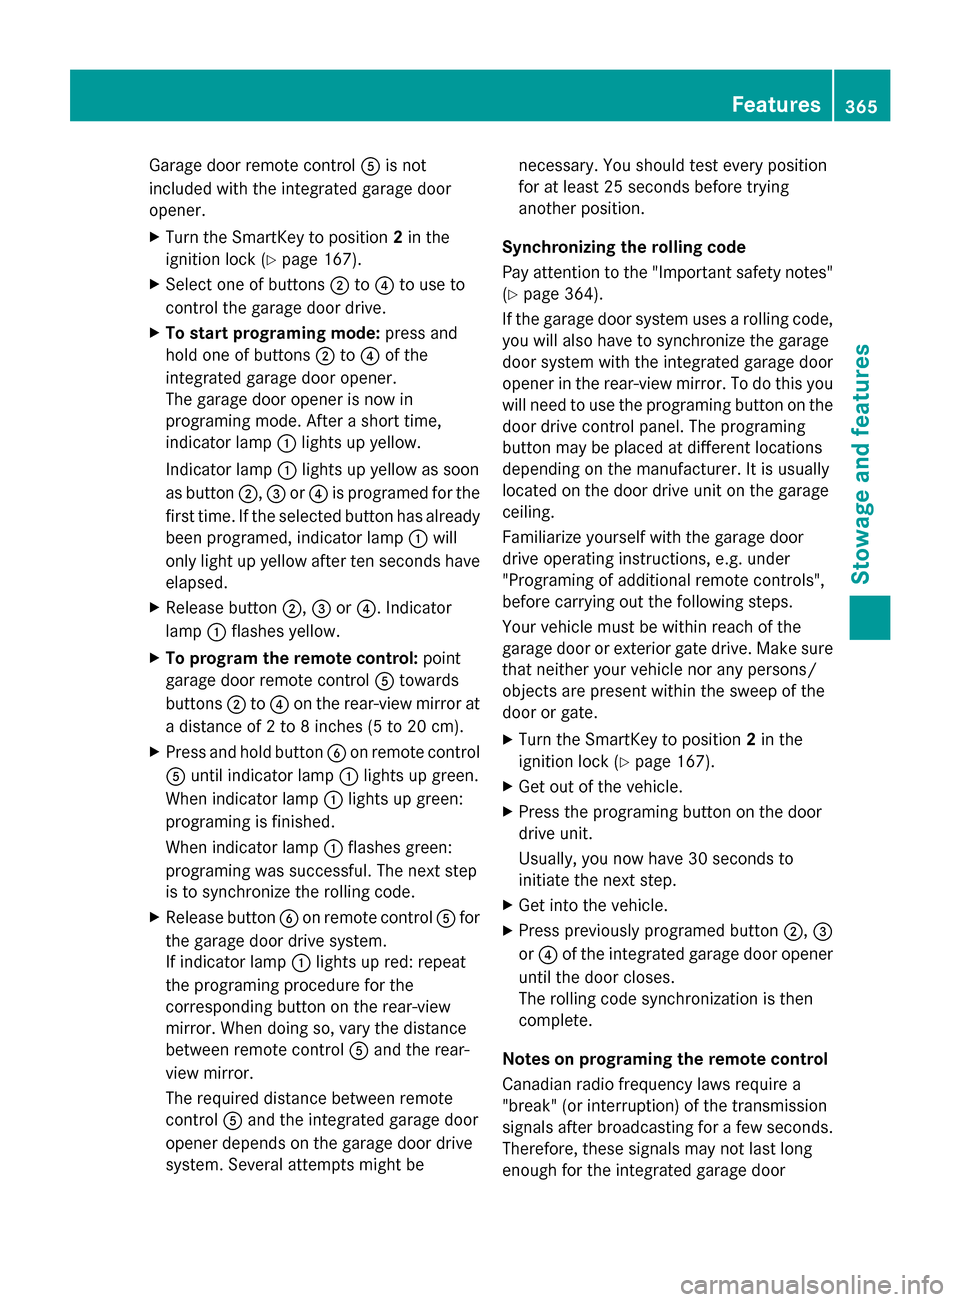
Garage door remote control
Ais not
included with the integrated garage door
opener.
X Turn the SmartKey to position 2in the
ignition lock (Y page 167).
X Select one of buttons ;to? to use to
control the garage door drive.
X To start programing mode: press and
hold one of buttons ;to? of the
integrated garage door opener.
The garage door opener is now in
programing mode. After a short time,
indicator lamp :lights up yellow.
Indicator lamp :lights up yellow as soon
as button ;,=or? is programed for the
first time. If the selected button has already
been programed, indicator lamp :will
only light up yellow after ten seconds have
elapsed.
X Release button ;,=or?. Indicator
lamp :flashes yellow.
X To program the remote control: point
garage door remote control Atowards
buttons ;to? on the rear-view mirror at
a distance of 2 to 8 inches (5 to 20 cm).
X Press and hold button Bon remote control
A until indicator lamp :lights up green.
When indicator lamp :lights up green:
programing is finished.
When indicator lamp :flashes green:
programing was successful. The next step
is to synchronize the rolling code.
X Release button Bon remote control Afor
the garage door drive system.
If indicator lamp :lights up red: repeat
the programing procedure for the
corresponding button on the rear-view
mirror. When doing so, vary the distance
between remote control Aand the rear-
view mirror.
The required distance between remote
control Aand the integrated garage door
opener depends on the garage door drive
system. Several attempts might be necessary. You should test every position
for at least 25 seconds before trying
another position.
Synchronizing the rolling code
Pay attention to the "Important safety notes"
(Y page 364).
If the garage door system uses a rolling code,
you will also have to synchronize the garage
door system with the integrated garage door
opener in the rear-view mirror. To do this you
will need to use the programing button on the
door drive control panel. The programing
button may be placed at different locations
depending on the manufacturer. It is usually
located on the door drive unit on the garage
ceiling.
Familiarize yourself with the garage door
drive operating instructions, e.g. under
"Programing of additional remote controls",
before carrying out the following steps.
Your vehicle must be within reach of the
garage door or exterior gate drive. Make sure
that neither your vehicle nor any persons/
objects are present within the sweep of the
door or gate.
X Turn the SmartKey to position 2in the
ignition lock (Y page 167).
X Get out of the vehicle.
X Press the programing button on the door
drive unit.
Usually, you now have 30 seconds to
initiate the next step.
X Get into the vehicle.
X Press previously programed button ;,=
or ? of the integrated garage door opener
until the door closes.
The rolling code synchronization is then
complete.
Notes on programing the remote control
Canadian radio frequency laws require a
"break" (or interruption) of the transmission
signals after broadcasting for a few seconds.
Therefore, these signals may not last long
enough for the integrated garage door Features
365Stowage and featu res Z
Page 368 of 462
opener. The signal is not recognized during
programing. Comparable with Canadian law,
some U.S. garage door openers also feature
a "break".
Proceed as follows:
R if you live in Canada
R if you have difficulties programing the
garage door opener (regardless of where
you live) when using the programing steps
X Press and hold one of buttons ;to? on
the integrated garage door opener.
After a short time, indicator lamp :lights
up yellow.
X Release the button.
Indicator lamp :flashes yellow.
X Press button Bof garage door remote
control Afor two seconds, then release it
for two seconds.
X Press button Bagain for two seconds.
X Repeat this sequence on button Bof
remote control Auntil indicator lamp :
lights up green.
When indicator lamp :lights up green:
programing is finished.
When indicator lamp :flashes green:
programing was successful. The next step
is to synchronize the rolling code.
X Release button Bof remote control Aof
the garage door drive.
If indicator lamp :blinks red: repeat the
programing process for the corresponding
button on the rear-view mirror. When doing
so, vary the distance between remote
control Aand the rear-view mirror.
The required distance between remote
control Aand the integrated garage door
opener depends on the garage door drive
system. Several attempts might be
necessary. You should test every position
for at least 25 seconds before trying
another position. Problems when programing
If you are experiencing problems programing
the integrated garage door opener on the
rear-view mirror, take note of the following
instructions:
R
Check the transmitter frequency used by
garage door drive remote control Aand
whether it is supported. The transmitter
frequency can usually be found on the back
of the garage door drive remote control.
The integrated garage door opener is
compatible with devices that have units
which operate in the frequency range of
280 to 433 MHz.
R Replace the batteries in garage door
remote control A. This increases the
likelihood that garage door remote control
A will transmit a strong and precise signal
to the integrated garage door opener in the
rear-view mirror.
R When programing, hold remote control A
at varying distances and angles from the
button that you are programing. Try various
angles at a distance between 2and
12 inches (5to 30 cm) or at the same angle
but at varying distances.
R If another remote control for the same
garage door drive is available, repeat the
same programing steps with this remote
control. Before performing these steps,
make sure that new batteries have been
installed in garage door drive remote
control A.
R Note that some remote controls only
transmit for a limited amount of time (the
indicator lamp on the remote control goes
out). Press button Bon remote control
A again before transmission ends.
R Align the antenna cable of the garage door
opener unit. This can improve signal
reception/transmission. 366
FeaturesStowage and features
Page 369 of 462
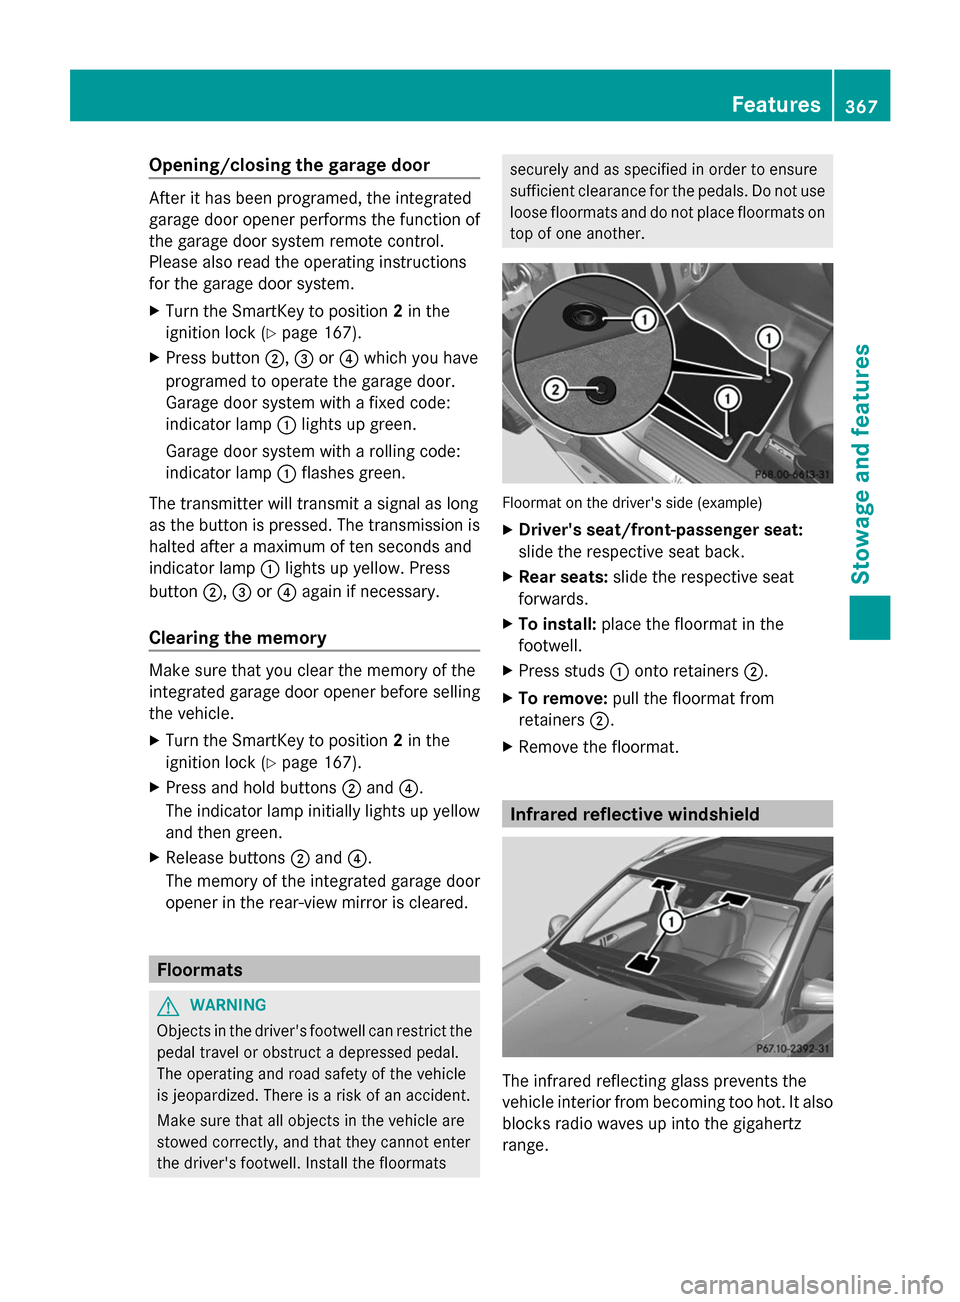
Opening/closing the garage door
After it has been programed, the integrated
garage door opener performs the function of
the garage door system remote control.
Please also read the operating instructions
for the garage door system.
X Turn the SmartKey to position 2in the
ignition lock (Y page 167).
X Press button ;,=or? which you have
programed to operate the garage door.
Garage door system with a fixed code:
indicator lamp :lights up green.
Garage door system with a rolling code:
indicator lamp :flashes green.
The transmitter will transmit a signal as long
as the button is pressed. The transmission is
halted after a maximum of ten seconds and
indicator lamp :lights up yellow. Press
button ;,=or? again if necessary.
Clearing the memory Make sure that you clear the memory of the
integrated garage door opener before selling
the vehicle.
X Turn the SmartKey to position 2in the
ignition lock (Y page 167).
X Press and hold buttons ;and ?.
The indicator lamp initially lights up yellow
and then green.
X Release buttons ;and ?.
The memory of the integrated garage door
opener in the rear-view mirror is cleared. Floormats
G
WARNING
Objects in the driver's footwell can restrict the
pedal travel or obstruct a depressed pedal.
The operating and road safety of the vehicle
is jeopardized. There is a risk of an accident.
Make sure that all objects in the vehicle are
stowed correctly, and that they cannot enter
the driver's footwell. Install the floormats securely and as specified in order to ensure
sufficient clearance for the pedals. Do not use
loose floormats and do not place floormats on
top of one another.
Floormat on the driver's side (example)
X
Driver's seat/front-passenger seat:
slide the respective seat back.
X Rear seats: slide the respective seat
forwards.
X To install: place the floormat in the
footwell.
X Press studs :onto retainers ;.
X To remove: pull the floormat from
retainers ;.
X Remove the floormat. Infrared reflective windshield
The infrared reflecting glass prevents the
vehicle interior from becoming too hot. It also
blocks radio waves up into the gigahertz
range. Features
367Stowage and features Z
Page 382 of 462
Mirror turn signals
!
Only use cleaning agents or cleaning
cloths that are suitable for plastic lenses.
Unsuitable cleaning agents or cleaning
cloths could scratch or damage the plastic
lenses of the mirror turn signals.
X Clean the plastic lenses of the mirror turn
signals in the exterior mirror housing using
a wet sponge and mild cleaning agent, e.g.
Mercedes-Benz car shampoo or cleaning
cloths.
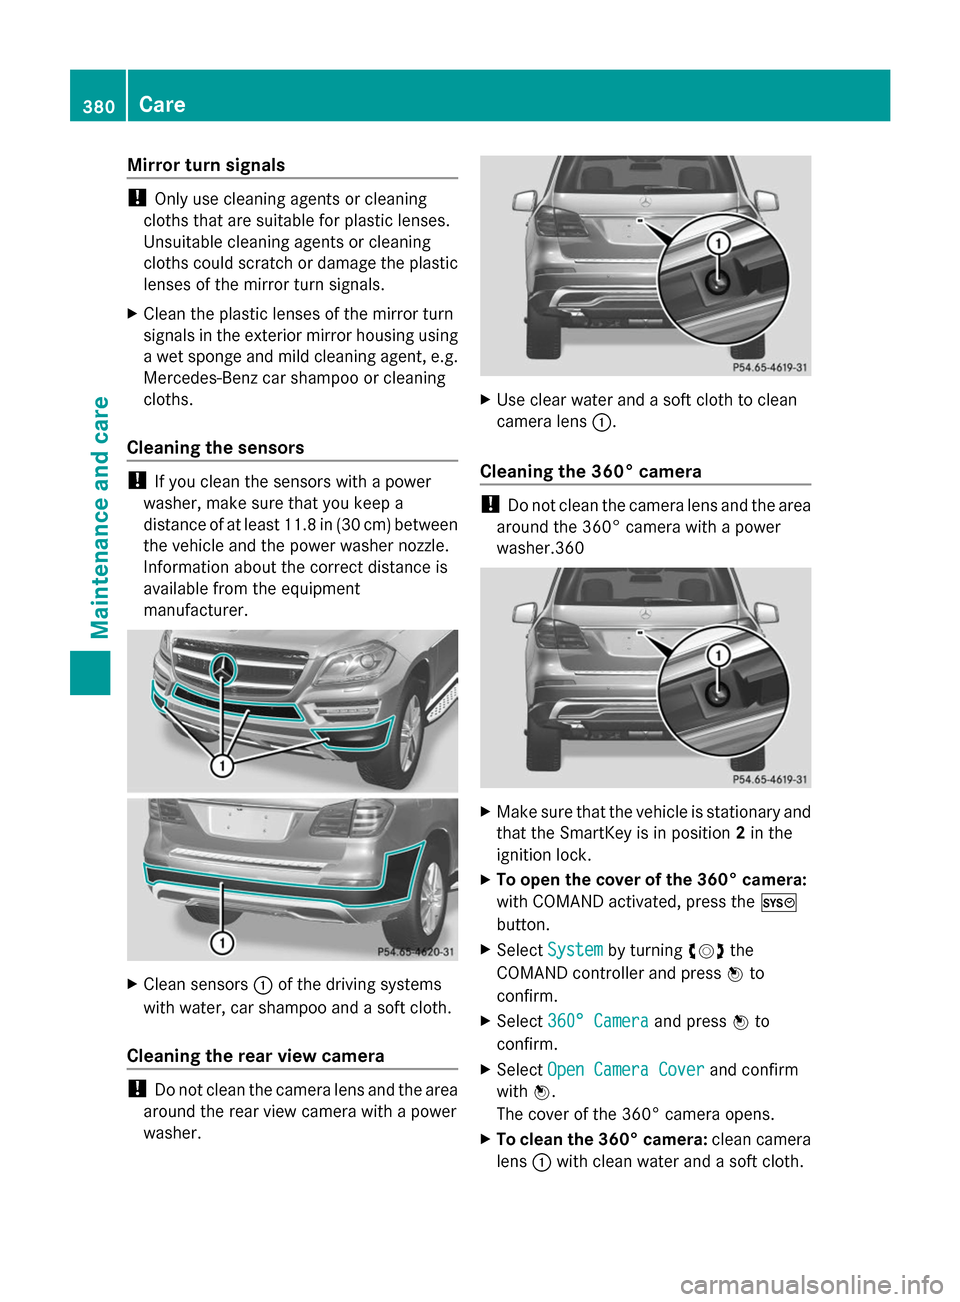
Cleaning the sensors !
If you clean the sensors with a power
washer, make sure that you keep a
distance of at least 11.8 in (30 cm) between
the vehicle and the power washer nozzle.
Information about the correct distance is
available from the equipment
manufacturer. X
Clean sensors :of the driving systems
with water, car shampoo and a soft cloth.
Cleaning the rear view camera !
Do not clean the camera lens and the area
around the rear view camera with a power
washer. X
Use clear water and a soft cloth to clean
camera lens :.
Cleaning the 360° camera !
Do not clean the camera lens and the area
around the 360° camera with a power
washer.360 X
Make sure that the vehicle is stationary and
that the SmartKey is in position 2in the
ignition lock.
X To open the cover of the 360° camera:
with COMAND activated, press the W
button.
X Select System System by turning cVdthe
COMAND controller and press Wto
confirm.
X Select 360° Camera
360° Camera and pressWto
confirm.
X Select Open Camera Cover
Open Camera Cover and confirm
with W.
The cover of the 360° camera opens.
X To clean the 360° camera: clean camera
lens :with clean water and a soft cloth. 380
CareMaintenance and care
Page 396 of 462
little energy, thus conserving battery
power.
i If the power supply has been interrupted,
e.g. if you reconnect the battery, you will
have to:
R set the clock. Information on setting the
clock can be found in the separate
operating instructions.
On vehicles with COMAND and a
navigation system, the clock is set
automatically.
R reset the function for folding the exterior
mirrors in/out automatically, by folding
the mirrors out once (Y page 123).Charging the battery
G
WARNING
During charging and jump-starting, explosive
gases can escape from the battery. There is a
risk of an explosion.
Particularly avoid fire, open flames, creating
sparks and smoking. Ensure there is sufficient
ventilation while charging and jump-starting.
Do not lean over a battery. G
WARNING
Battery acid is caustic. There is a risk of injury.
Avoid contact with the skin, eyes or clothing.
Do not inhale any battery gases. Do not lean
over the battery. Keep children away from
batteries. Wash battery acid immediately with
water and seek medical attention. G
WARNING
A discharged battery can freeze at
temperatures below freezing point. When
jump-starting the vehicle or charging the
battery, gases can escape from the battery.
There is a risk of an explosion.
Allow the frozen battery to thaw out before
charging it or jump-starting.
! Only use battery chargers with a
maximum charging voltage of 14.8 V. !
Only charge the battery using the jump-
starting connection point.
If, at low temperatures, the indicator lamps/
warning lamps in the instrument cluster do
not light up, it is highly likely that the
discharged battery has frozen. In this case
you may neither jump-start the vehicle nor
charge the battery. The service life of a
thawed-out battery may be shorter. The
starting characteristics can be impaired,
particularly at low temperatures. Have the
thawed-out battery checked at a qualified
specialist workshop.
Never charge a battery still installed in the
vehicle unless a battery charger unit
approved by Mercedes-Benz is being used. An
accessory battery charge unit specially
adapted for Mercedes-Benz vehicles and
tested and approved by Mercedes-Benz is
available. It permits the charging of the
battery in its installed position. Contact an
authorized Mercedes-Benz Center for further
information and availability. Charge the
battery in accordance with the separate
instructions for the battery charger.
The jump-starting connection point is in the
engine compartment (Y page 395).
Read the battery charger's operating
instructions before charging the battery.
X Open the hood.
X Connect the battery charger to the positive
terminal and ground point in the same
order as when connecting the donor
battery in the jump-starting procedure
(Y page 395). 394
Battery (vehicle)Breakdown assistance
Page 455 of 462
Vehicle data
General notes
Please note that for the specified vehicle
data:
R the heights specified may vary as a result
of:
- tires
- load
- condition of the suspension
- optional equipment
R optional equipment reduces the maximum
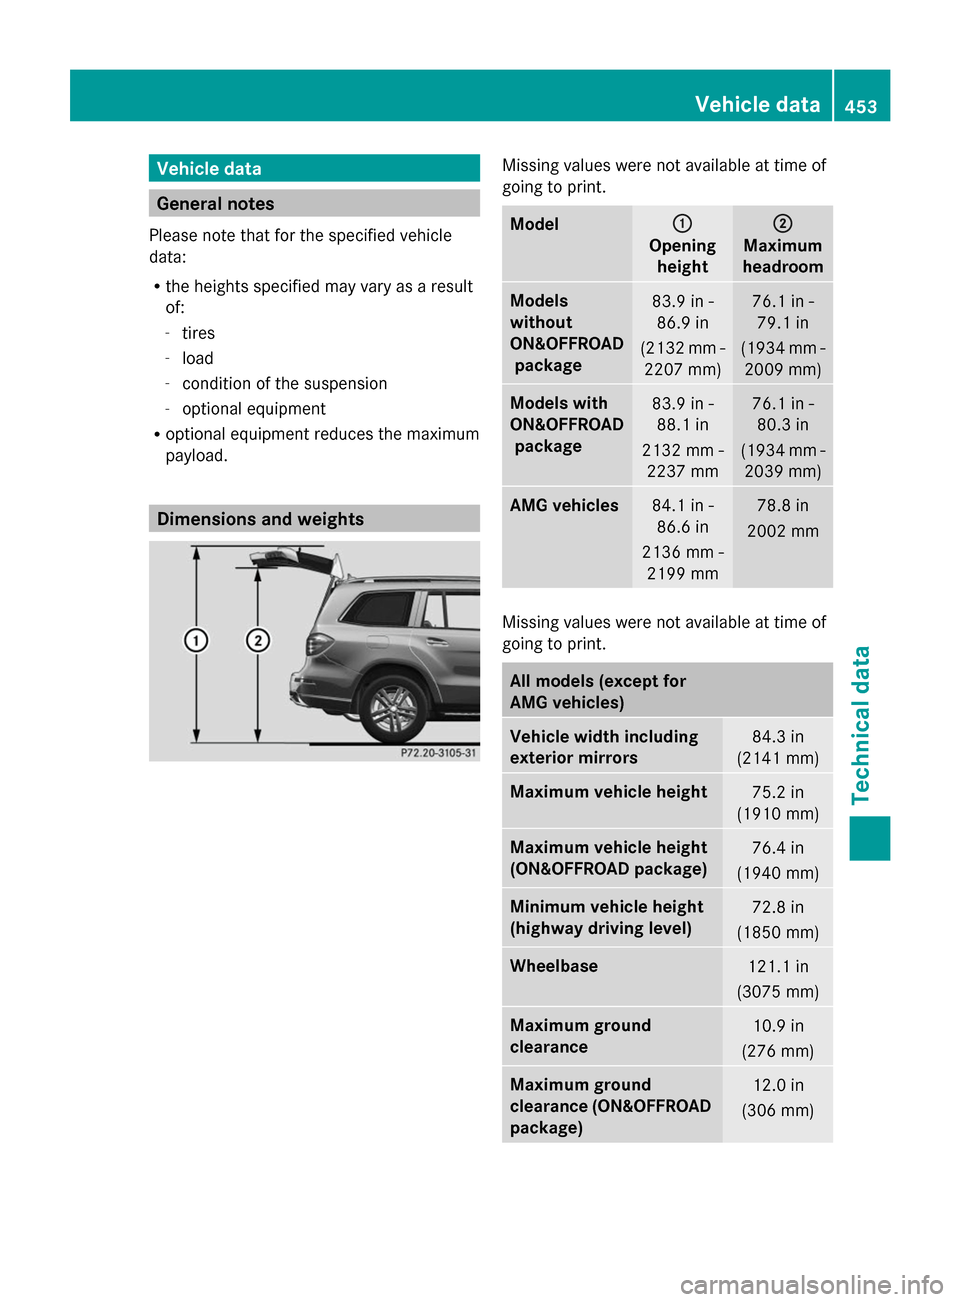
payload. Dimensions and weights Missing values were not available at time of
going to print.
Model : :
Opening height ;
;
Maximum
headroom Models
without
ON&OFFROAD
package 83.9 in -
86.9 in
(2132 mm - 2207 mm) 76.1 in -
79.1 in
(1934 mm - 2009 mm) Models with
ON&OFFROAD
package 83.9 in -
88.1 in
2132 mm - 2237 mm 76.1 in -
80.3 in
(1934 mm - 2039 mm) AMG vehicles
84.1 in -
86.6 in
2136 mm - 2199 mm 78.8 in
2002 mm Missing values were not available at time of
going to print.
All models (except for
AMG vehicles)
Vehicle width including
exterior mirrors
84.3 in
(2141 mm) Maximum vehicle height
75.2 in
(1910 mm) Maximum vehicle height
(ON&OFFROAD package)
76.4 in
(1940 mm) Minimum vehicle height
(highway driving level)
72.8 in
(1850 mm) Wheelbase
121.1 in
(3075 mm) Maximum ground
clearance
10.9 in
(276 mm) Maximum ground
clearance (ON&OFFROAD
package)
12.0 in
(306 mm) Vehicle data
453Technical data Z
Page 456 of 462
All models (except for
AMG vehicles)
Minimum ground
clearance
7.9 in
(201 mm) Turning radius
40.7 ft
(12.40 m) Maximum roof load
220 lb
(100 kg) Model (except AMG
vehicles) Vehicle
length GL 450 4MATIC
GL 350 BlueTEC 4MATIC
201.6 in
(5120 mm) GL 550 4MATIC
202.6 in
(5146 mm) AMG vehicles
Vehicle length
202.6 in
(5146 mm) Vehicle width including
exterior mirrors
84.3 in
(2141 mm) Vehicle width without
exterior mirrors
78.0 in
(1982 mm) Maximum vehicle height
74.9 in
(1902 mm) Minimum vehicle height
72.4 in
(1839 mm) Wheelbase
121.1 in
(3075 mm) Maximum ground
clearance
9.8 in
(249 mm) Minimum ground
clearance
7.4 in
(188 mm) Turning radius
40.8 ft
(12.45 m) Maximum roof load
220 lb
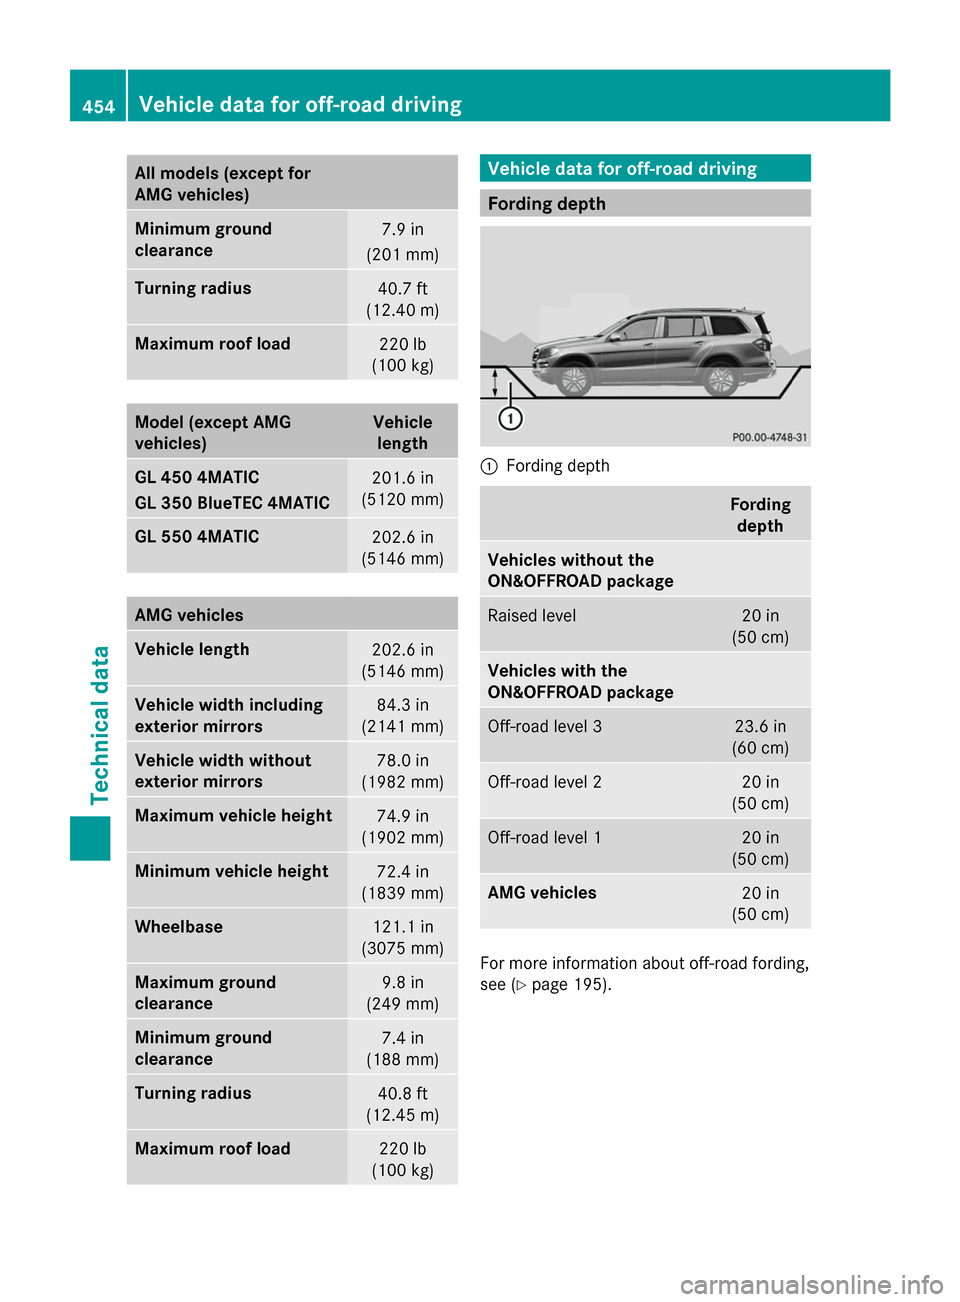
(100 kg) Vehicle data for off-road driving
Fording depth
:
Fording depth Fording
depth Vehicles without the
ON&OFFROAD package
Raised level 20 in
(50 cm) Vehicles with the
ON&OFFROAD package
Off-road level 3 23.6 in
(60 cm) Off-road level 2 20 in
(50 cm) Off-road level 1 20 in
(50 cm) AMG vehicles
20 in
(50 cm) For more information about off-road fording,
see (Y
page 195). 454
Vehicle data for off-road drivingTechnical data