mirror MERCEDES-BENZ GL-Class 2014 X166 User Guide
[x] Cancel search | Manufacturer: MERCEDES-BENZ, Model Year: 2014, Model line: GL-Class, Model: MERCEDES-BENZ GL-Class 2014 X166Pages: 462, PDF Size: 32.46 MB
Page 107 of 462
Useful information
............................106
Correct driver's seat position ..........106
Seats .................................................. 107
Steering wheel .................................. 119
Mirrors ............................................... 122
Memory function .............................. 125 105Seats, steering wheel and mirrors
Page 108 of 462
Useful information
i This Operator's Manual describes all
models and all standard and optional
equipment of your vehicle available at the
time of publication of the Operator's
Manual. Country-specific differences are
possible. Please note that your vehicle may
not be equipped with all features
described. This also applies to safety-
related systems and functions.
i Read the information on qualified
specialist workshops: (Y page 28).Correct driver's seat position
G
WARNING
You could lose control of your vehicle if you
do the following while driving:
R adjust the driver's seat, head restraint,
steering wheel or mirrors
R fasten the seat belt
There is a risk of an accident.
Adjust the driver's seat, head restraint,
steering wheel and mirror and fasten your
seat belt before starting the engine. X
Observe the safety guidelines on seat
adjustment (Y page 107).
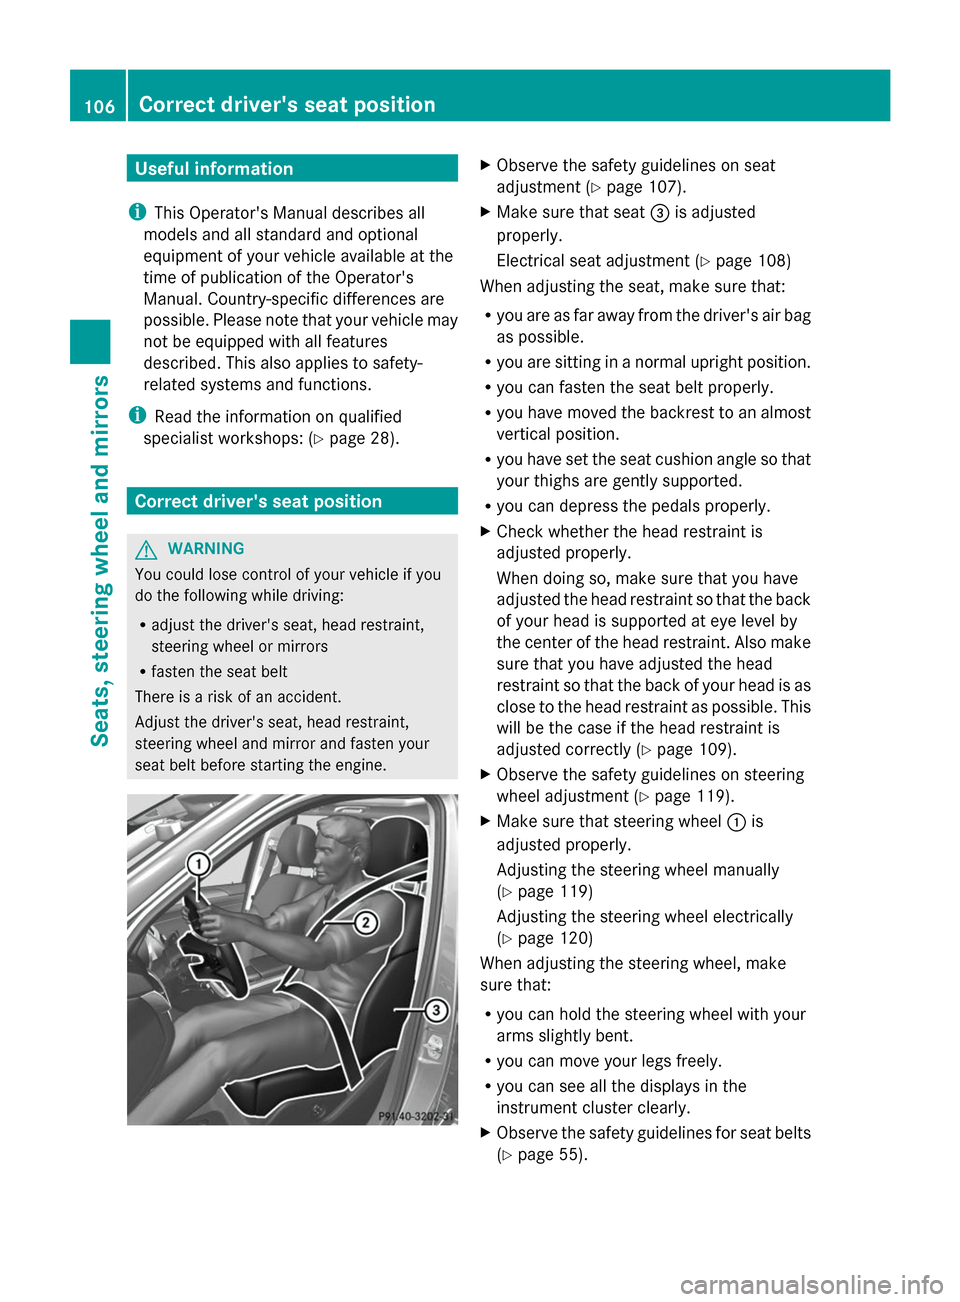
X Make sure that seat =is adjusted
properly.
Electrical seat adjustment (Y page 108)
When adjusting the seat, make sure that:
R you are as far away from the driver's air bag
as possible.
R you are sitting in a normal upright position.
R you can fasten the seat belt properly.
R you have moved the backrest to an almost
vertical position.
R you have set the seat cushion angle so that
your thighs are gently supported.
R you can depress the pedals properly.
X Check whether the head restraint is
adjusted properly.
When doing so, make sure that you have
adjusted the head restraint so that the back
of your head is supported at eye level by
the center of the head restraint. Also make
sure that you have adjusted the head
restraint so that the back of your head is as
close to the head restraint as possible. This
will be the case if the head restraint is
adjusted correctly (Y page 109).
X Observe the safety guidelines on steering
wheel adjustment (Y page 119).
X Make sure that steering wheel :is
adjusted properly.
Adjusting the steering wheel manually
(Y page 119)
Adjusting the steering wheel electrically
(Y page 120)
When adjusting the steering wheel, make
sure that:
R you can hold the steering wheel with your
arms slightly bent.
R you can move your legs freely.
R you can see all the displays in the
instrument cluster clearly.
X Observe the safety guidelines for seat belts
(Y page 55). 106
Correct driver's seat positionSeats, steering wheel and mirrors
Page 109 of 462
X
Check whether you have fastened seat
belt ;properly (Y page 57).
The seat belt should:
R fit snugly across your body
R be routed across the middle of your
shoulder
R be routed in your pelvic area across the hip
joints
X Before starting off, adjust the rear-view
mirror and the exterior mirrors in such a
way that you have a good view of road and
traffic conditions (Y page 122).
X Vehicles with a memory function: save
the seat, steering wheel and exterior mirror
settings with the memory function
(Y page 125). Seats
Important safety notes
G
WARNING
Children could become trapped if they adjust
the seats, particularly when unattended.
There is a risk of injury.
When leaving the vehicle, always take the
SmartKey with you and lock the vehicle. Never
leave children unsupervised in the vehicle. G
WARNING
You could lose control of your vehicle if you
do the following while driving:
R adjust the driver's seat, head restraint,
steering wheel or mirrors
R fasten the seat belt
There is a risk of an accident.
Adjust the driver's seat, head restraint,
steering wheel and mirror and fasten your
seat belt before starting the engine. G
WARNING
If you adjust the seat height carelessly, you or
other vehicle occupants could be trapped and
thereby injured. Children in particular could accidentally press the electrical seat
adjustment buttons and become trapped.
There is a risk of injury.
While moving the seats, make sure that your
hands or other body parts do not get under
the lever assembly of the seat adjustment
system.
G
WARNING
When you adjust a seat, you or other vehicle
occupants could become trapped, e.g. on the
seat guide rail. There is a risk of injury.
Make sure when adjusting a seat that no one
has any body parts in the sweep of the seat. G
WARNING
If head restraints are not installed and
adjusted correctly, they cannot provide
protection as intended. There is an increased
risk of injury in the head and neck area, e.g.
in the event of an accident or when braking.
Always drive with the head restraints
installed. Before driving off, make sure for
every vehicle occupant that the center of the
head restraint supports the back of the head
at about eye level. G
WARNING
The seat belt does not offer the intended level
of protection if you have not moved the
backrest to an almost vertical position. When
braking or in the event of an accident, you
could slide underneath the seat belt and
sustain abdomen or neck injuries, for
example. This poses an increased risk of
injury or even fatal injury.
Adjust the seat properly before beginning
your journey. Always ensure that the backrest
is in an almost vertical position and that the
shoulder section of your seat belt is routed
across the center of your shoulder. G
WARNING
According to accident statistics, children are
safer when properly restrained on the rear
seats than on the front-passenger seat. Thus, Seats
107Seats, steering wheel and mirrors
Z
Page 110 of 462
we strongly recommend that children be
placed in the rear seat whenever possible.
Regardless of seating position, children 12
years old and under must be seated and
properly secured in an appropriately sized
child restraint system or booster seat
recommended for the size and weight of the
child. For additional information, see the
"Children in the vehicle" section.
A child's risk of serious or fatal injuries is
significantly increased if the child restraints
are not properly secured in the vehicle and/
or the child is not properly secured in the child
restraint.
! To avoid damage to the seats and the seat
heating, observe the following information:
R keep liquids from spilling on the seats. If
liquid is spilled on the seats, dry them as
soon as possible.
R if the seat covers are damp or wet, do not
switch on the seat heating. The seat
heating should also not be used to dry
the seats.
R clean the seat covers as recommended;
see "Interior care".
R do not transport heavy loads on the
seats. Do not place sharp objects on the
seat cushions, e.g. knives, nails or tools.
The seats should only be occupied by
passengers, if possible.
R when the seat heating is in operation, do
not cover the seats with insulating
materials, e.g. blankets, coats, bags,
seat covers, child seats or booster seats.
! Make sure that there are no objects in the
footwell or behind the seats when resetting
the seats. There is a risk that the seats
and/or the objects could be damaged.
i It is not possible to remove the head
restraints from the front seats. The rear-
compartment head restraints, however,
can be removed (Y page 110).
For more information, contact a qualified
specialist workshop. i
Further related subjects:
R Important safety notes on air bags
(Y page 44)
R Cargo compartment enlargement
(folding down the rear bench seat)
(Y page 344)
R Securing children in the vehicle
(Y page 60) Adjusting the seats electrically
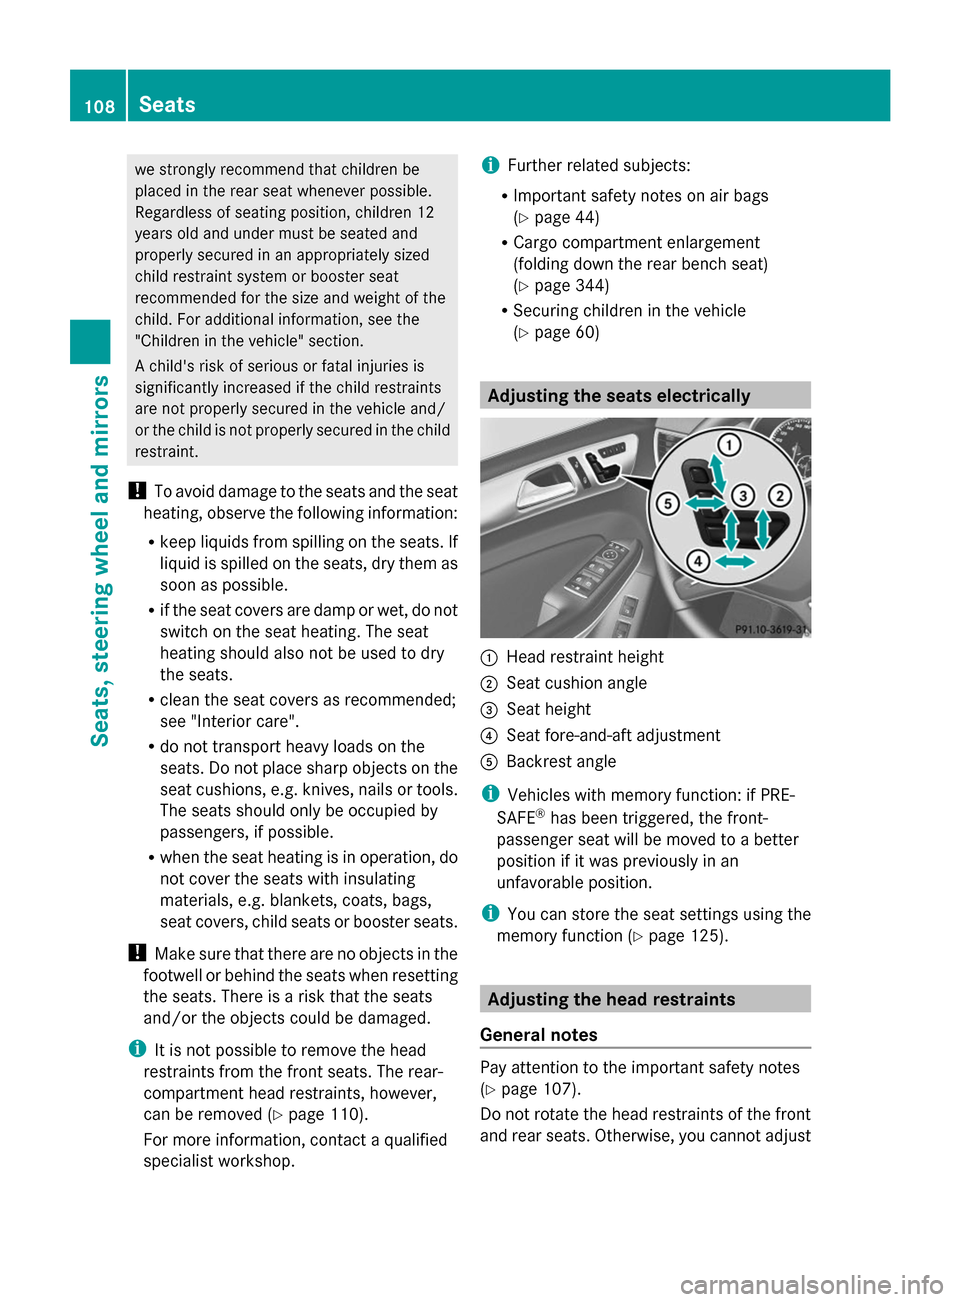
:
Head restraint height
; Seat cushion angle
= Seat height
? Seat fore-and-aft adjustment
A Backrest angle
i Vehicles with memory function: if PRE-
SAFE ®
has been triggered, the front-
passenger seat will be moved to a better
position if it was previously in an
unfavorable position.
i You can store the seat settings using the
memory function (Y page 125). Adjusting the head restraints
General notes Pay attention to the important safety notes
(Y
page 107).
Do not rotate the head restraints of the front
and rear seats. Otherwise, you cannot adjust 108
SeatsSeats, steering wheel and mirrors
Page 111 of 462
the height and angle of the head restraints to
the correct position.
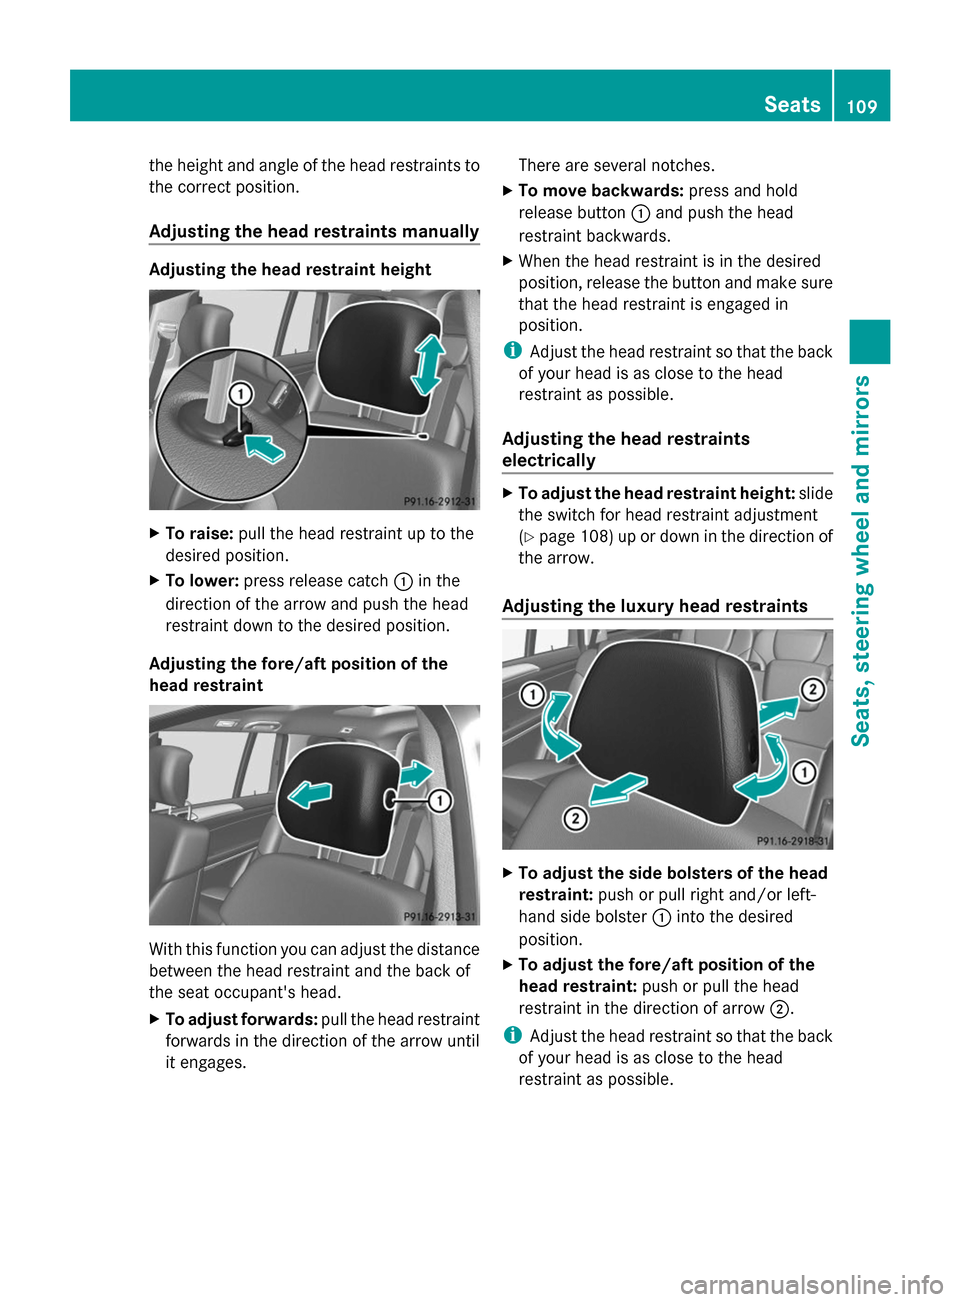
Adjusting the head restraints manually Adjusting the head restraint height
X
To raise: pull the head restraint up to the
desired position.
X To lower: press release catch :in the
direction of the arrow and push the head
restraint down to the desired position.
Adjusting the fore/aft position of the
head restraint With this function you can adjust the distance
between the head restraint and the back of
the seat occupant's head.
X To adjust forwards: pull the head restraint
forwards in the direction of the arrow until
it engages. There are several notches.
X To move backwards: press and hold
release button :and push the head
restraint backwards.
X When the head restraint is in the desired
position, release the button and make sure
that the head restraint is engaged in
position.
i Adjust the head restraint so that the back
of your head is as close to the head
restraint as possible.
Adjusting the head restraints
electrically X
To adjust the head restraint height: slide
the switch for head restraint adjustment
(Y page 108) up or down in the direction of
the arrow.
Adjusting the luxury head restraints X
To adjust the side bolsters of the head
restraint: push or pull right and/or left-
hand side bolster :into the desired
position.
X To adjust the fore/aft position of the
head restraint: push or pull the head
restraint in the direction of arrow ;.
i Adjust the head restraint so that the back
of your head is as close to the head
restraint as possible. Seats
109Seats, steering wheel and mirrors Z
Page 112 of 462

Rear seat head restraints
Adjusting the rear seat head restraint
height X
Once the head restraint is fully lowered,
press release catch :.
X To raise: pull the head restraint up to the
desired position.
X To lower: press release catch :and push
the head restraint down until it is in the
desired position.
Removing and installing the rear seat
head restraints X
To remove: pull the head restraint up to
the stop.
X Press release catch :and pull the head
restraint out of the guides.
X To re-install: insert the head restraint so
that the notches on the bar are on the left
when viewed in the direction of travel.
X Push the head restraint down until you hear
it engage in position. Rear seats (second and third row of
seats)
Important safety notes G
WARNING
If the seat and backrest are not engaged, they
can fold forwards, e.g. in the event of sudden
braking or an accident.
R This will cause the vehicle occupants to be
forced into the seat belt by a seat or
backrest which is not engaged. The seat
belt can no longer offer the intended level
of protection and could even cause injuries.
R A child restraint system would no longer be
anchored or positioned correctly and would
not be able to perform its required function.
R The seat backrests cannot restrain objects
or loads in the cargo compartment.
There is an increased risk of injury.
Always make sure that the seat and backrest
are engaged as described:
R before traveling with a passenger on a seat
with the EASY-ENTRY/EXIT feature
R after you have adjusted the seat
R after the EASY-ENTRY/EXIT feature has
been used
R after the cargo compartment enlargement
has been folded forwards G
WARNING
The seat does not engage in the entry/exit
position. The seat could fold back suddenly,
e.g. when accelerating, braking, changing
direction suddenly or in the event of an
accident. Persons in the sweep of the seat
could become trapped. There is a risk of
injury.
Always fold back a seat which has been folded
forwards before you pull away. Make sure that
the seat and backrest engage fully. 110
SeatsSeats, steering wheel and mirrors
Page 113 of 462
G
WARNING
Children could become trapped if they adjust
the seats, particularly when unattended.
There is a risk of injury.
When leaving the vehicle, always take the
SmartKey with you and lock the vehicle. Never
leave children unsupervised in the vehicle. G
WARNING
When you adjust a seat, you or other vehicle
occupants could become trapped, e.g. on the
seat guide rail. There is a risk of injury.
Make sure when adjusting a seat that no one
has any body parts in the sweep of the seat.
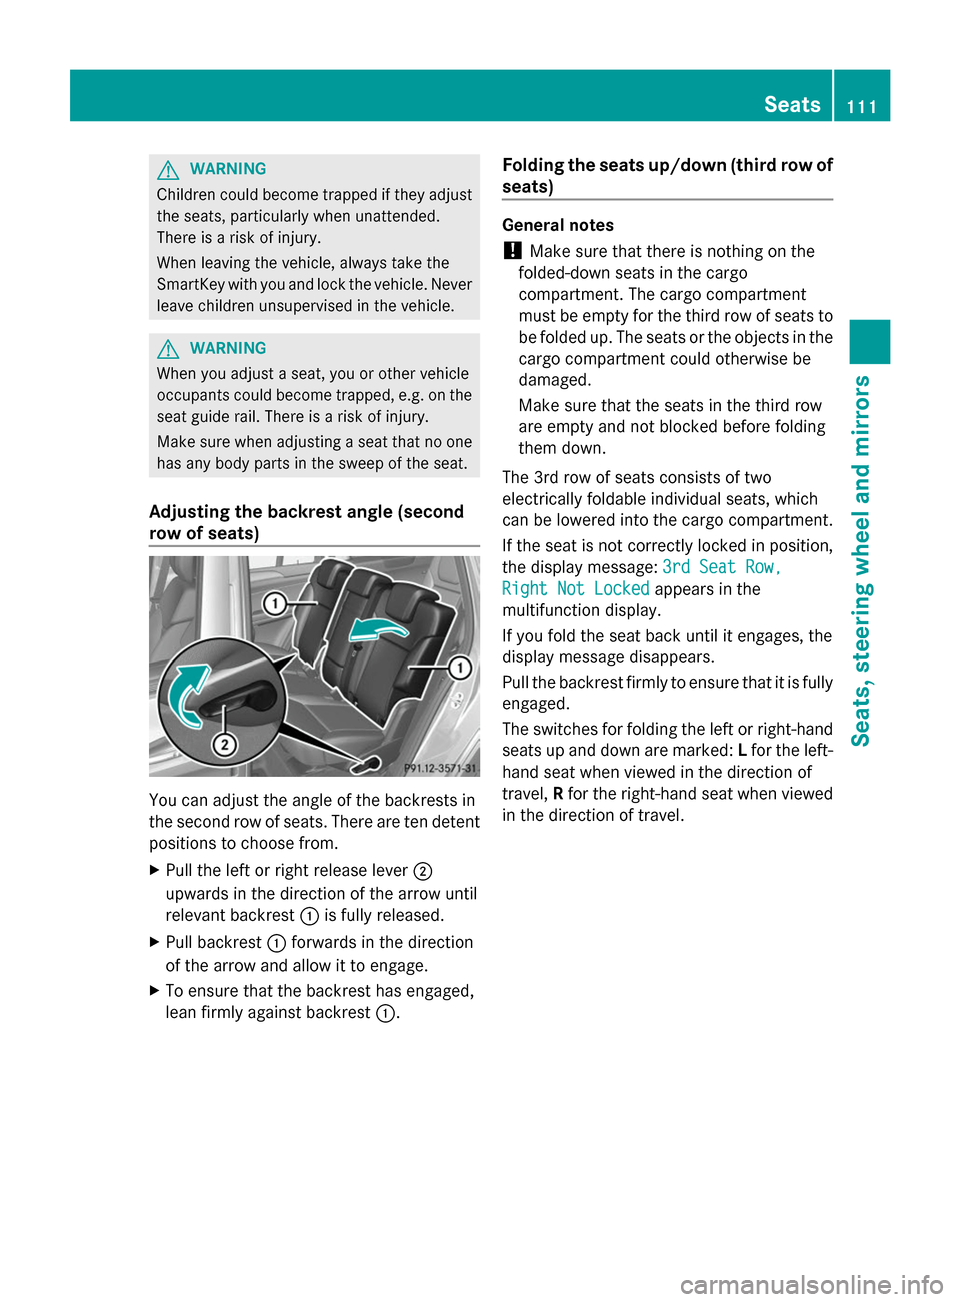
Adjusting the backrest angle (second
row of seats) You can adjust the angle of the backrests in
the second row of seats. There are ten detent
positions to choose from.
X
Pull the left or right release lever ;
upwards in the direction of the arrow until
relevant backrest :is fully released.
X Pull backrest :forwards in the direction
of the arrow and allow it to engage.
X To ensure that the backrest has engaged,
lean firmly against backrest :.Folding the seats up/down (third row of
seats) General notes
!
Make sure that there is nothing on the
folded-down seats in the cargo
compartment. The cargo compartment
must be empty for the third row of seats to
be folded up. The seats or the objects in the
cargo compartment could otherwise be
damaged.
Make sure that the seats in the third row
are empty and not blocked before folding
them down.
The 3rd row of seats consists of two
electrically foldable individual seats, which
can be lowered into the cargo compartment.
If the seat is not correctly locked in position,
the display message: 3rd Seat Row, 3rd Seat Row,
Right Not Locked
Right Not Locked appears in the
multifunction display.
If you fold the seat back until it engages, the
display message disappears.
Pull the backrest firmly to ensure that it is fully
engaged.
The switches for folding the left or right-hand
seats up and down are marked: Lfor the left-
hand seat when viewed in the direction of
travel, Rfor the right-hand seat when viewed
in the direction of travel. Seats
111Seats, steering wheel and mirrors Z
Page 114 of 462

Folding forwards/back in the rear
compartment Example:
Rswitch
X To fold down: fold the right-hand outer
seat in the second row of seats forwards
(Y page 113).
X Briefly pull switch :.
The seat folds up.
X To stop the automatic folding: briefly pull
switch :again.
X To fold down: briefly press switch :.
The seat folds down.
X To stop the automatic folding: briefly
press switch :again.
Folding down/up in the cargo
compartment Example:
Lswitch
X To fold down: fold the right-hand outer
seat in the second row of seats forwards
(Y page 113).
X Briefly press switch :.
The seat folds up. X
To stop the automatic folding: briefly
press switch :again.
X To fold down: briefly pull switch :.
The seat folds down.
X To stop the automatic folding: briefly pull
switch :again.
Detachable panel (third row of seats) !
If there are objects underneath the seat,
the seat can no longer be folded up or down
fully. The seat could be damaged.
Only drive with the panel completely
installed. If you drop objects underneath the seats in
the 3rd row, you can remove the panel in
order to reach beneath the seat.
X
To open: fold the corresponding seat up or
down (Y page 111).
X Once the seat is folded halfway up or down,
briefly press the button again to stop the
automatic movement.
X Grasp the panel recess.
X Pull the panel in the direction of the arrow
and remove it.
X To close: fold the corresponding seat up or
down (Y page 111).
X Once the seat is folded halfway up or down,
briefly press the button again to stop the
automatic movement.
X Attach the panel using the guide pins.
X Push the panel downwards until it engages.
X Fold the seat up and down fully to check
that the panel is seated correctly. 112
SeatsSeats, steering wheel and
mirrors
Page 115 of 462
Folding down the seats in the second
row manually Important safety notes
G
WARNING
If the seat and backrest are not engaged, they
can fold forwards, e.g. in the event of sudden
braking or an accident.
R This will cause the vehicle occupants to be
forced into the seat belt by a seat or
backrest which is not engaged. The seat
belt can no longer offer the intended level
of protection and could even cause injuries.
R A child restraint system would no longer be
anchored or positioned correctly and would
not be able to perform its required function.
R The seat backrests cannot restrain objects
or loads in the cargo compartment.
There is an increased risk of injury.
Always make sure that the seat and backrest
are engaged as described:
R before traveling with a passenger on a seat
with the EASY-ENTRY/EXIT feature
R after you have adjusted the seat
R after the EASY-ENTRY/EXIT feature has
been used
R after the cargo compartment enlargement
has been folded forwards G
WARNING
The seat does not engage in the entry/exit
position. The seat could fold back suddenly,
e.g. when accelerating, braking, changing
direction suddenly or in the event of an
accident. Persons in the sweep of the seat
could become trapped. There is a risk of
injury.
Always fold back a seat which has been folded
forwards before you pull away. Make sure that
the seat and backrest engage fully.
General notes
To enter or exit the third row of seats: the
outer left and right seats of the second row
can be folded down. One of the outer seats of the 2nd row is in the
entry/exit position: the multifunction display
shows, e.g. the
2nd 2ndSeat
Seat Row,
Row,Right
Right Not
Not
Locked
Locked display message.
If you fold the seat back until it engages, the
display message disappears.
Pull the backrest firmly to ensure that it is fully
engaged.
i Further related subjects:
R Cargo compartment enlargement
(folding the second row of seats
forwards) ( Ypage 344)
R Folding the seats in the third row
forwards/back (Y page 111)
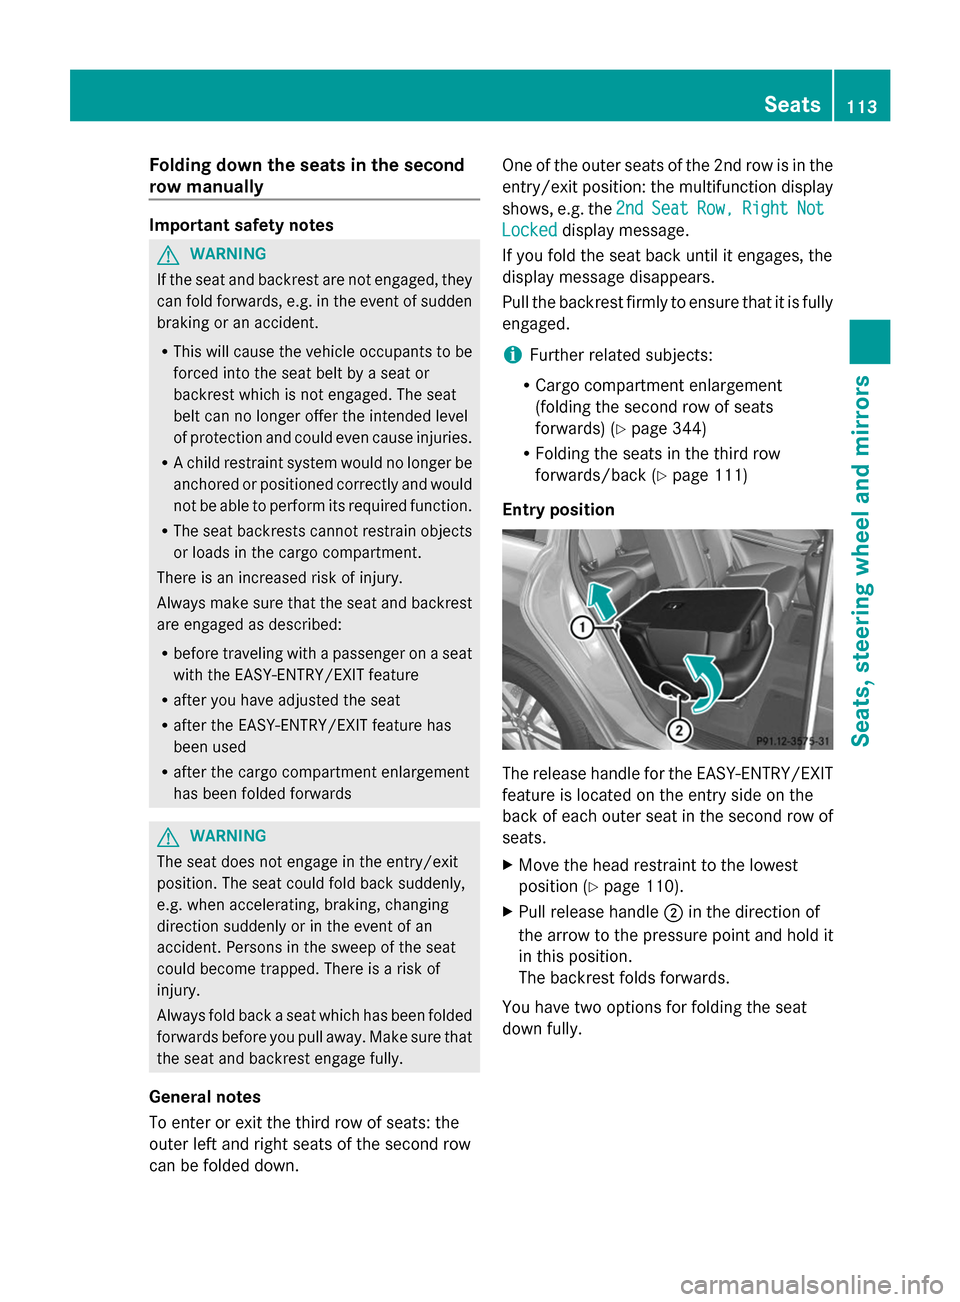
Entry position The release handle for the EASY-ENTRY/EXIT
feature is located on the entry side on the
back of each outer seat in the second row of
seats.
X
Move the head restraint to the lowest
position (Y page 110).
X Pull release handle ;in the direction of
the arrow to the pressure point and hold it
in this position.
The backrest folds forwards.
You have two options for folding the seat
down fully. Seats
113Seats, steering wheel and mirrors Z
Page 116 of 462
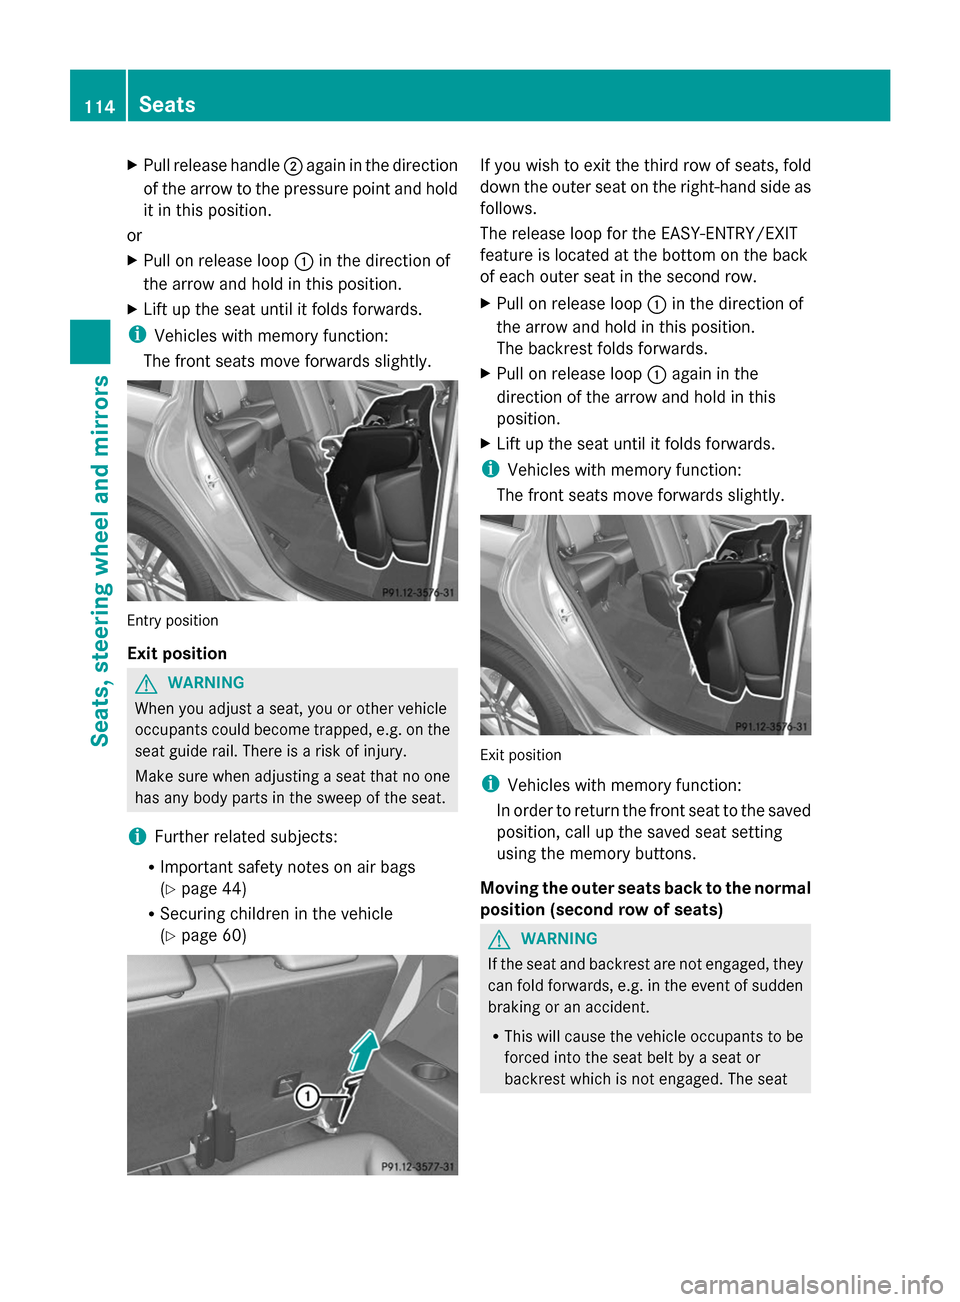
X
Pull release handle ;again in the direction
of the arrow to the pressure point and hold
it in this position.
or
X Pull on release loop :in the direction of
the arrow and hold in this position.
X Lift up the seat until it folds forwards.
i Vehicles with memory function:
The front seats move forwards slightly. Entry position
Exit position
G
WARNING
When you adjust a seat, you or other vehicle
occupants could become trapped, e.g. on the
seat guide rail. There is a risk of injury.
Make sure when adjusting a seat that no one
has any body parts in the sweep of the seat.
i Further related subjects:
R Important safety notes on air bags
(Y page 44)
R Securing children in the vehicle
(Y page 60) If you wish to exit the third row of seats, fold
down the outer seat on the right-hand side as
follows.
The release loop for the EASY-ENTRY/EXIT
feature is located at the bottom on the back
of each outer seat in the second row.
X
Pull on release loop :in the direction of
the arrow and hold in this position.
The backrest folds forwards.
X Pull on release loop :again in the
direction of the arrow and hold in this
position.
X Lift up the seat until it folds forwards.
i Vehicles with memory function:
The front seats move forwards slightly. Exit position
i
Vehicles with memory function:
In order to return the front seat to the saved
position, call up the saved seat setting
using the memory buttons.
Moving the outer seats back to the normal
position (second row of seats) G
WARNING
If the seat and backrest are not engaged, they
can fold forwards, e.g. in the event of sudden
braking or an accident.
R This will cause the vehicle occupants to be
forced into the seat belt by a seat or
backrest which is not engaged. The seat 114
SeatsSeats, steering wheel and mirrors