display MERCEDES-BENZ GL-Class 2014 X166 Manual PDF
[x] Cancel search | Manufacturer: MERCEDES-BENZ, Model Year: 2014, Model line: GL-Class, Model: MERCEDES-BENZ GL-Class 2014 X166Pages: 462, PDF Size: 32.46 MB
Page 216 of 462
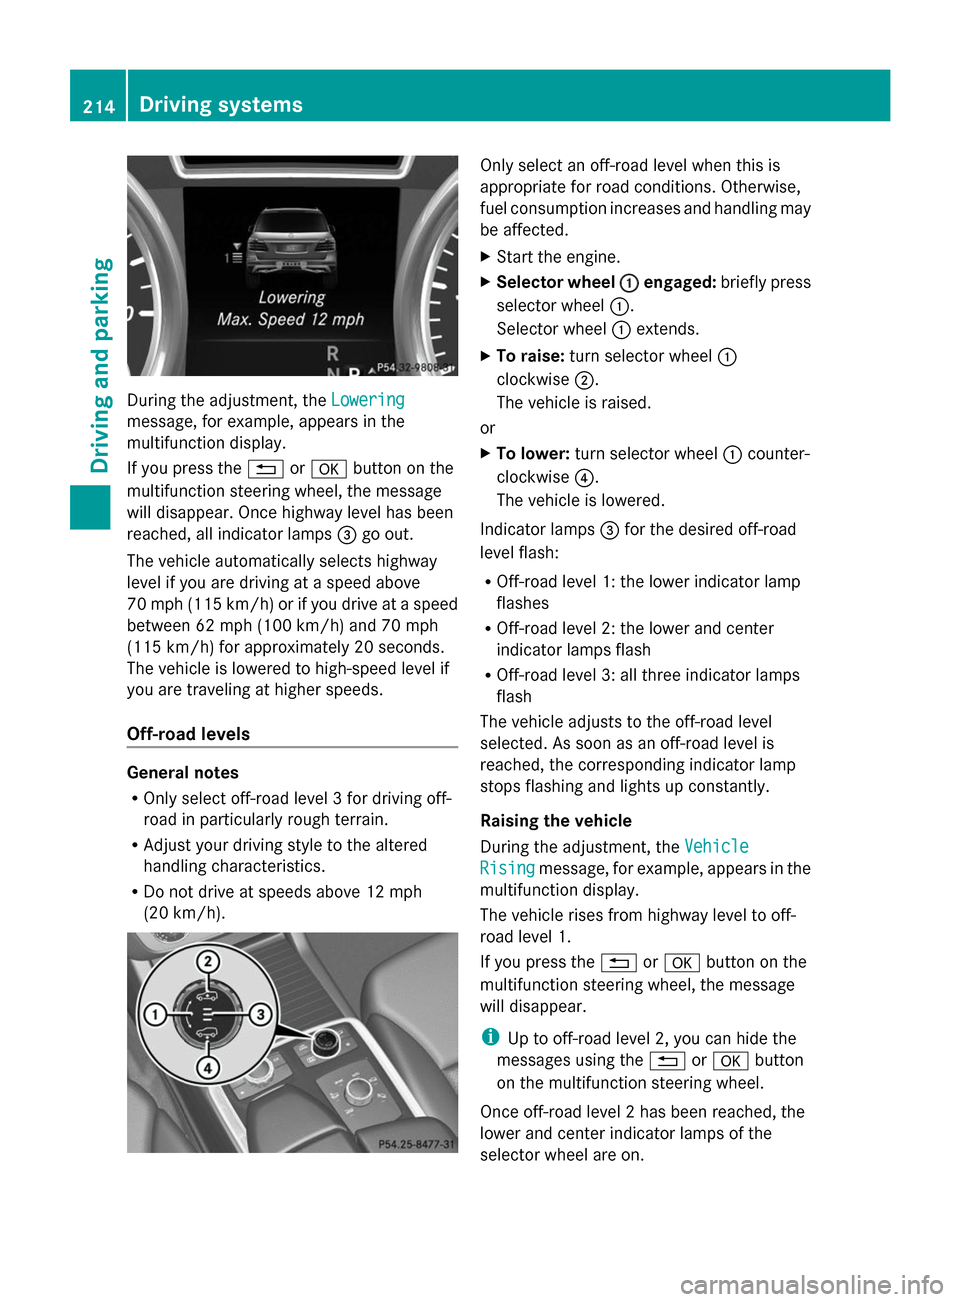
During the adjustment, the
Lowering
Lowering
message, for example, appears in the
multifunction display.
If you press the %ora button on the
multifunction steering wheel, the message
will disappear. Once highway level has been
reached, all indicator lamps =go out.
The vehicle automatically selects highway
level if you are driving at a speed above
70 mph (115 km/h) or if you drive at a speed
between 62 mph (100 km/h) and 70 mph
(115 km/h) for approximately 20 seconds.
The vehicle is lowered to high-speed level if
you are traveling at higher speeds.
Off-road levels General notes
R
Only select off-road level 3 for driving off-
road in particularly rough terrain.
R Adjust your driving style to the altered
handling characteristics.
R Do not drive at speeds above 12 mph
(20 km/h). Only select an off-road level when this is
appropriate for road conditions. Otherwise,
fuel consumption increases and handling may
be affected.
X
Start the engine.
X Selector wheel :
: engaged: briefly press
selector wheel :.
Selector wheel :extends.
X To raise: turn selector wheel :
clockwise ;.
The vehicle is raised.
or
X To lower: turn selector wheel :counter-
clockwise ?.
The vehicle is lowered.
Indicator lamps =for the desired off-road
level flash:
R Off-road level 1: the lower indicator lamp
flashes
R Off-road level 2: the lower and center
indicator lamps flash
R Off-road level 3: all three indicator lamps
flash
The vehicle adjusts to the off-road level
selected. As soon as an off-road level is
reached, the corresponding indicator lamp
stops flashing and lights up constantly.
Raising the vehicle
During the adjustment, the Vehicle
Vehicle
Rising Rising message, for example, appears in the
multifunction display.
The vehicle rises from highway level to off-
road level 1.
If you press the %ora button on the
multifunction steering wheel, the message
will disappear.
i Up to off-road level 2, you can hide the
messages using the %ora button
on the multifunction steering wheel.
Once off-road level 2 has been reached, the
lower and center indicator lamps of the
selector wheel are on. 214
Driving systemsDriving an
d parking
Page 217 of 462
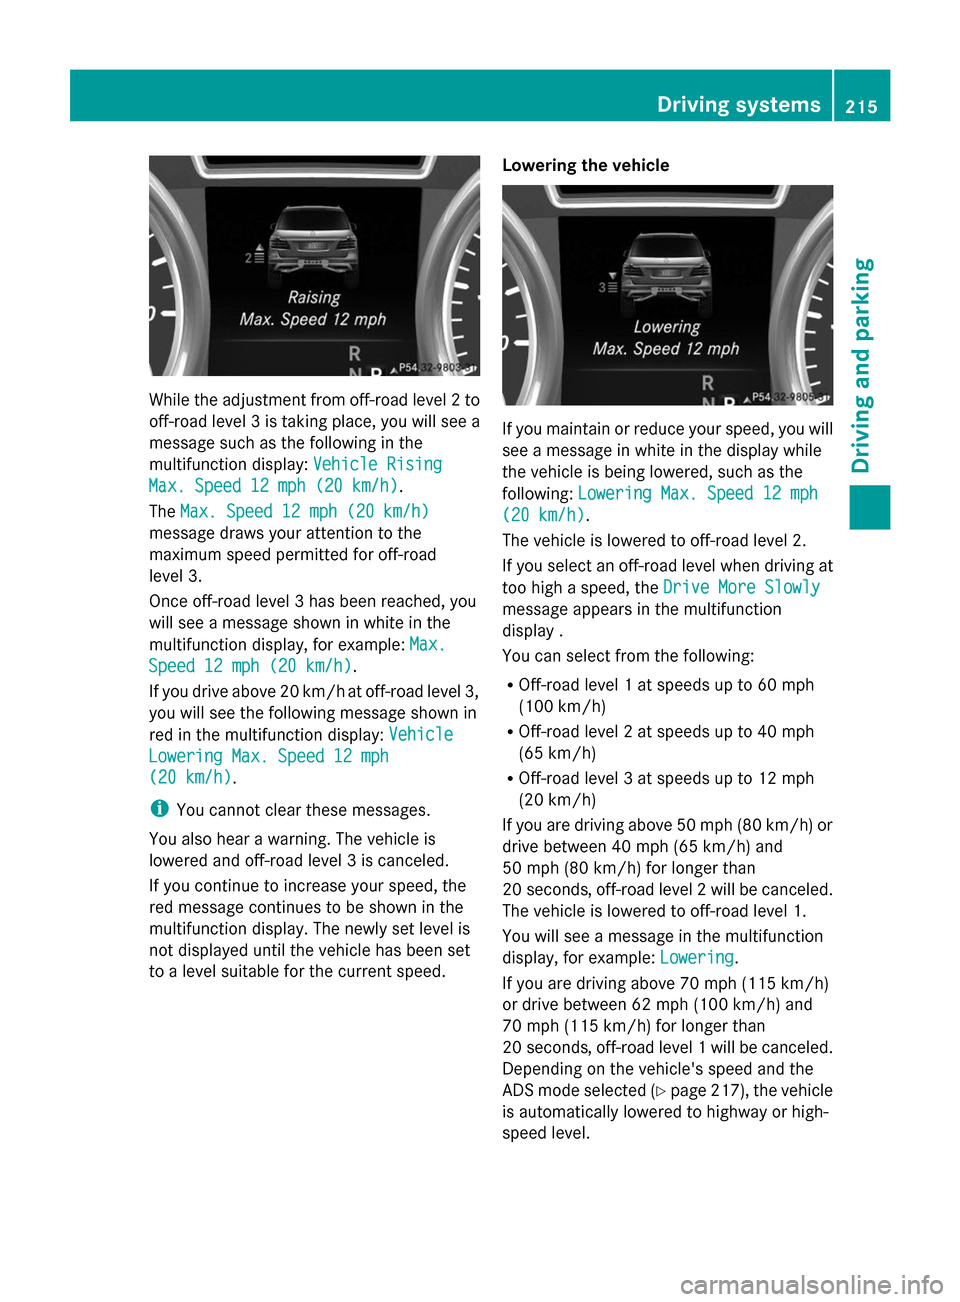
While the adjustment from off-road level 2 to
off-road level 3 is taking place, you will see a
message such as the following in the
multifunction display: Vehicle Rising
Vehicle Rising
Max. Speed 12 mph (20 km/h) Max. Speed 12 mph (20 km/h).
The Max. Speed 12 mph (20 km/h)
Max. Speed 12 mph (20 km/h)
message draws your attention to the
maximum speed permitted for off-road
level 3.
Once off-road level 3 has been reached, you
will see a message shown in white in the
multifunction display, for example: Max.
Max.
Speed 12 mph (20 km/h)
Speed 12 mph (20 km/h).
If you drive above 20 km/ha t off-road level 3,
you will see the following message shown in
red in the multifunction display: Vehicle
Vehicle
Lowering Max. Speed 12 mph
Lowering Max. Speed 12 mph
(20 km/h) (20 km/h).
i
You cannot clear these messages.
You also hear a warning. The vehicle is
lowered and off-road level 3 is canceled.
If you continue to increase your speed, the
red message continues to be shown in the
multifunction display. The newly set level is
not displayed until the vehicle has been set
to a level suitable for the current speed. Lowering the vehicle If you maintain or reduce your speed, you will
see a message in white in the display while
the vehicle is being lowered, such as the
following:
Lowering Max. Speed 12 mph Lowering Max. Speed 12 mph
(20 km/h)
(20 km/h).
The vehicle is lowered to off-road level 2.
If you select an off-road level when driving at
too high a speed, the Drive More Slowly Drive More Slowly
message appears in the multifunction
display .
You can select from the following:
R Off-road level 1 at speeds up to 60 mph
(100 km/h)
R Off-road level 2 at speeds up to 40 mph
(65 km/h)
R Off-road level 3 at speeds up to 12 mph
(20 km/h)
If you are driving above 50 mph (80 km/h) or
drive between 40 mph (65 km/h) and
50 mph (80 km/h) for longer than
20 second s,off-road level 2 will be canceled.
The vehicle is lowered to off-road level 1.
You will see a message in the multifunction
display, for example: Lowering
Lowering.
If you are driving above 70 mph (115 km/h)
or drive between 62 mph (100 km/h) and
70 mph (115 km/h) for longer than
20 seconds, off-road level 1 will be canceled.
Depending on the vehicle's speed and the
ADS mode selected (Y page 217), the vehicle
is automatically lowered to highway or high-
speed level. Driving systems
215Driving and parking Z
Page 218 of 462
You will see a message in the multifunction
display, for example: Lowering
Lowering . HOLD function
General notes The HOLD function can assist the driver in the
following situations:
R when pulling away, especially on steep
slopes
R when maneuvering on steep slopes
R when waiting in traffic
The vehicle is kept stationary without the
driver having to depress the brake pedal.
The braking effect is canceled and the HOLD
function deactivated when you depress the
accelerator pedal to pull away.
i Do not use the HOLD function when
driving off-road, on steep uphill or downhill
gradients or on slippery or loose surfaces.
The HOLD function cannot hold the vehicle
on such surfaces.
Important safety notes G
WARNING
When leaving the vehicle, it can still roll away
despite being braked by the HOLD function if:
R there is a malfunction in the system or in
the voltage supply.
R the HOLD function has been deactivated by
pressing the accelerator pedal or the brake
pedal, e.g. by a vehicle occupant.
R the electrical system in the engine
compartment, the battery or the fuses have
been tampered with.
R the battery is disconnected
There is a risk of an accident.
If you wish to exit the vehicle, always turn off
the HOLD function and secure the vehicle
against rolling away. !
If DISTRONIC PLUS or the HOLD function
is activated, the vehicle brakes
automatically in certain situations. To
prevent damage to the vehicle, deactivate
DISTRONIC PLUS and the HOLD function in
the following or other similar situations:
R when towing the vehicle
R in the car wash
Deactivating the HOLD function
(Y page 217).
Activation conditions You can activate the HOLD function if:
R
the vehicle is stationary
R the engine is running
R the driver's door is closed or your seat belt
is fastened
R the electric parking brake is released
R the transmission is in position D,Ror N
R DISTRONIC PLUS is deactivated
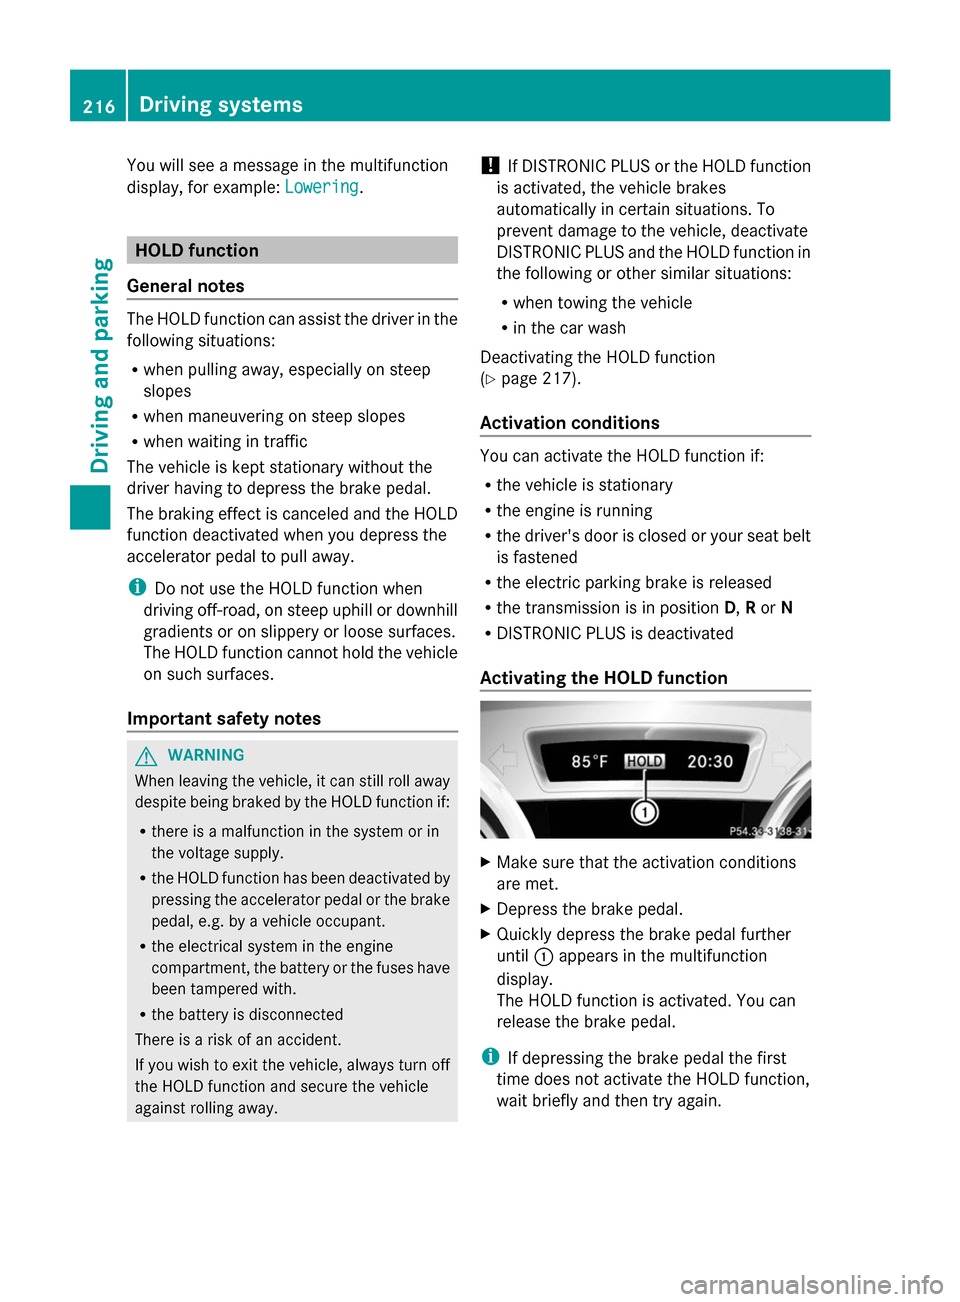
Activating the HOLD function X
Make sure that the activation conditions
are met.
X Depress the brake pedal.
X Quickly depress the brake pedal further
until :appears in the multifunction
display.
The HOLD function is activated. You can
release the brake pedal.
i If depressing the brake pedal the first
time does not activate the HOLD function,
wait briefly and then try again. 216
Driving systemsDriving and parking
Page 219 of 462
Deactivating the HOLD function
The HOLD function is deactivated
automatically if:
R
you accelerate and the transmission is in
position Dor R.
R you shift the transmission to position P.
R you depress the brake pedal again with a
certain amount of pressure until :
disappears from the multifunction display.
R you secure the vehicle using the electric
parking brake.
R you activate DISTRONIC PLUS.
i After a time, the electric parking brake
secures the vehicle and relieves the service
brake.
The electric parking brake automatically
secures the vehicle if the HOLD function is
activated and:
R the driver's door is open and the driver's
seat belt is unfastened.
R the engine is switched off.
R a system malfunction occurs.
R the power supply is not sufficient.
On steep uphill or downhill inclines or if there
is a malfunction, the transmission may also
be automatically shifted into position P.AIRMATIC package
General notes AIRMATIC regulates the level of your vehicle.
As well as level control ( Ypage 218), your
vehicle can be equipped with ADS (Adaptive
Damping System) (Y page 217) and ACTIVE
CURVE SYSTEM (Y page 218).
Observe the notes on driving with a trailer
(Y page 264). ADS (Adaptive Damping System) General notes
ADS adapts the damping characteristics to
the current operating and driving situation.
This depends on:
R
your driving style
R the road surface conditions
R the ADS setting
R the vehicle level setting
Your selection remains stored even if you
remove the SmartKey from the ignition lock.
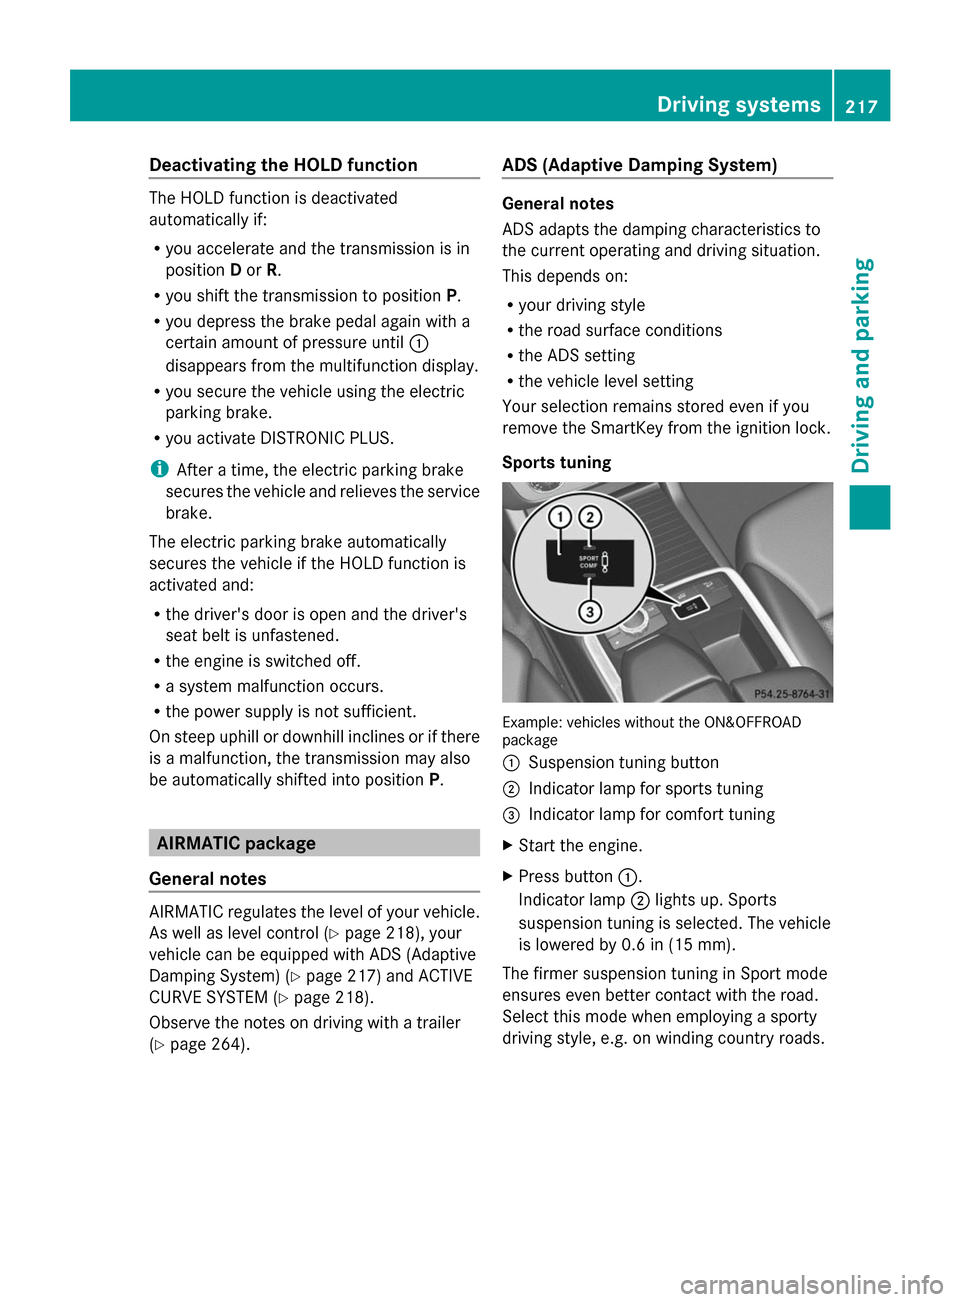
Sports tuning Example: vehicles without the ON&OFFROAD
package
:
Suspension tuning button
; Indicator lamp for sports tuning
= Indicator lamp for comfort tuning
X Start the engine.
X Press button :.
Indicator lamp ;lights up. Sports
suspension tuning is selected. The vehicle
is lowered by 0.6 in (15 mm).
The firmer suspension tuning in Sport mode
ensures even better contact with the road.
Select this mode when employing a sporty
driving style, e.g. on winding country roads. Driving syste
ms
217Driving an d parking Z
Page 222 of 462
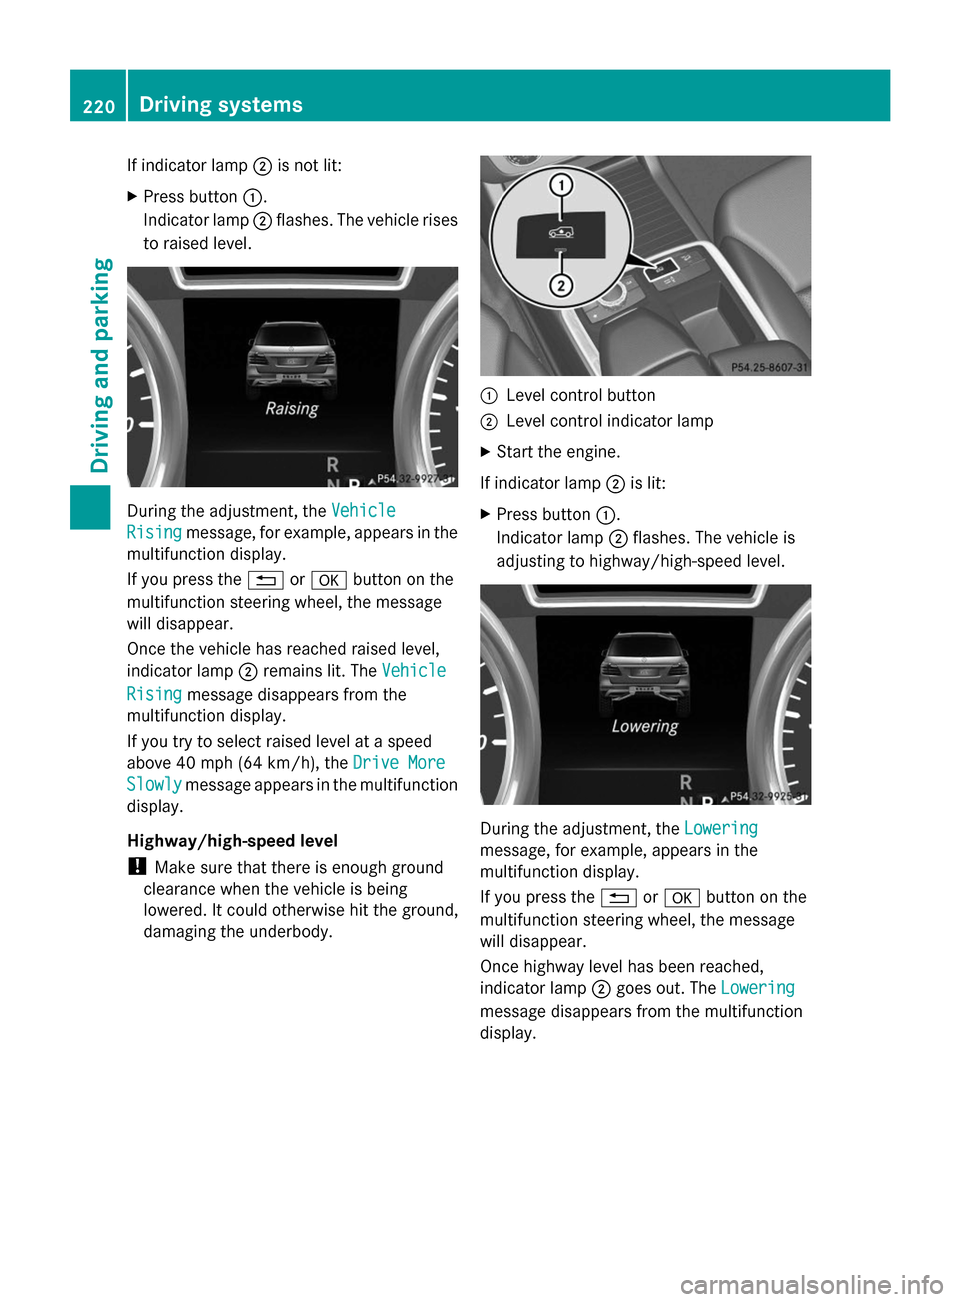
If indicator lamp
;is not lit:
X Press button :.
Indicator lamp ;flashes. The vehicle rises
to raised level. During the adjustment, the
Vehicle
Vehicle
Rising
Rising message, for example, appears in the
multifunction display.
If you press the %ora button on the
multifunction steering wheel, the message
will disappear.
Once the vehicle has reached raised level,
indicator lamp ;remains lit. The Vehicle
Vehicle
Rising Rising message disappears from the
multifunction display.
If you try to select raised level at a speed
above 40 mph (64 km/h), the Drive More Drive More
Slowly
Slowly message appears in the multifunction
display.
Highway/high-speed level
! Make sure that there is enough ground
clearance when the vehicle is being
lowered. It could otherwise hit the ground,
damaging the underbody. :
Level control button
; Level control indicator lamp
X Start the engine.
If indicator lamp ;is lit:
X Press button :.
Indicator lamp ;flashes. The vehicle is
adjusting to highway/high-speed level. During the adjustment, the
Lowering Lowering
message, for example, appears in the
multifunction display.
If you press the %ora button on the
multifunction steering wheel, the message
will disappear.
Once highway level has been reached,
indicator lamp ;goes out. The Lowering
Lowering
message disappears from the multifunction
display. 220
Driving systemsDriving and parking
Page 224 of 462
The damping is tuned individually to each
wheel and depends on:
R your driving style
R the road surface conditions
R your individual selection of Sport, Sport +
or Comfort
Your selection remains stored even if you
remove the SmartKey from the ignition lock.
Sport mode The firmer suspension tuning in Sport mode
ensures even better contact with the road.
Select this mode when employing a sporty
driving style, e.g. on winding country roads.
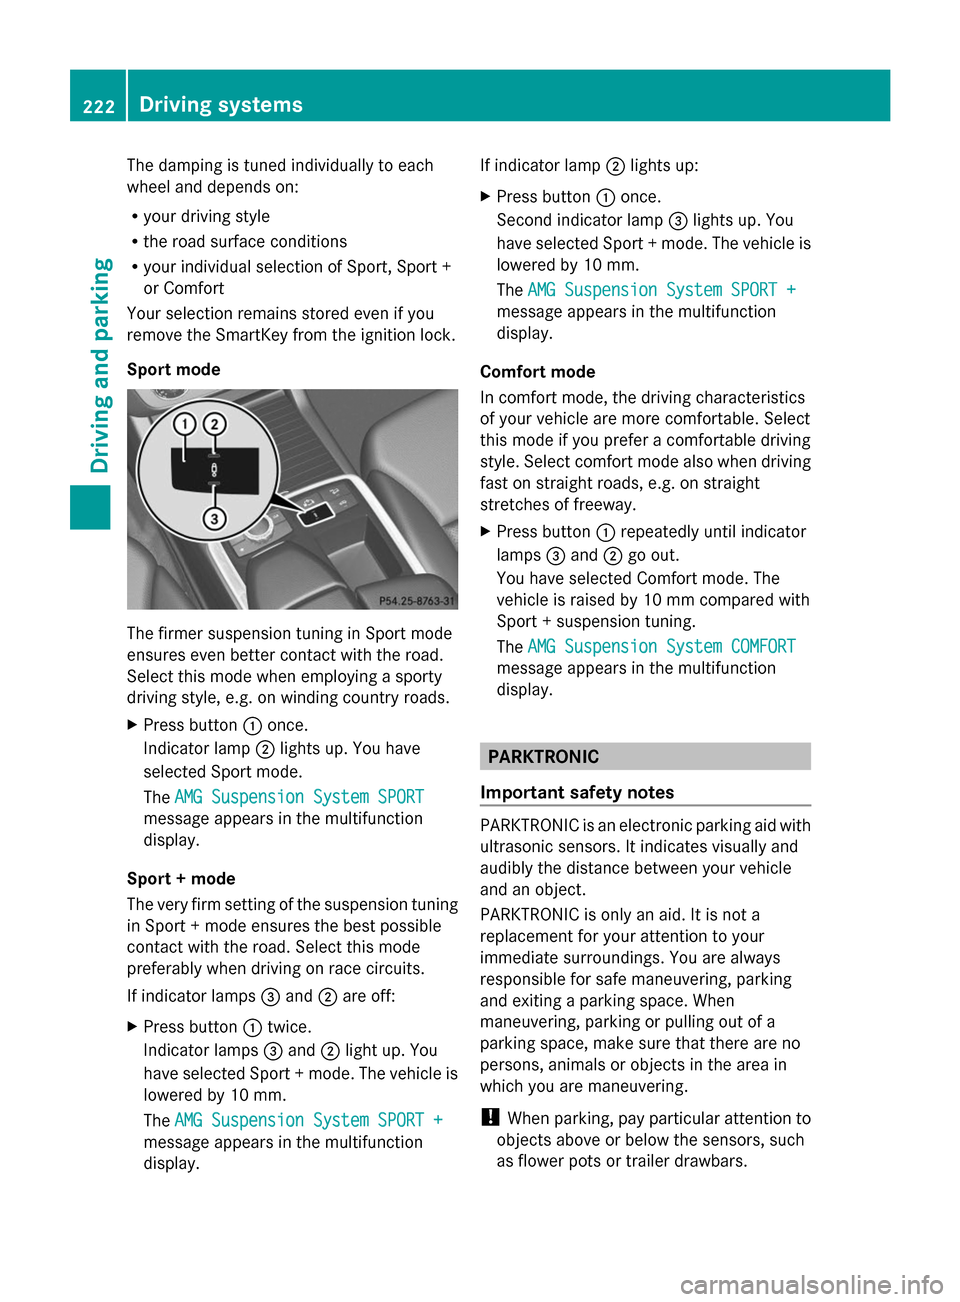
X Press button :once.
Indicator lamp ;lights up. You have
selected Sport mode.
The AMG Suspension System SPORT
AMG Suspension System SPORT
message appears in the multifunction
display.
Sport + mode
The very firm setting of the suspension tuning
in Sport + mode ensures the best possible
contact with the road. Select this mode
preferably when driving on race circuits.
If indicator lamps =and ;are off:
X Press button :twice.
Indicator lamps =and ;light up. You
have selected Sport + mode. The vehicle is
lowered by 10 mm.
The AMG Suspension System SPORT +
AMG Suspension System SPORT +
message appears in the multifunction
display. If indicator lamp
;lights up:
X Press button :once.
Second indicator lamp =lights up. You
have selected Sport + mode. The vehicle is
lowered by 10 mm.
The AMG Suspension System SPORT + AMG Suspension System SPORT +
message appears in the multifunction
display.
Comfort mode
In comfort mode, the driving characteristics
of your vehicle are more comfortable. Select
this mode if you prefer a comfortable driving
style. Select comfort mode also when driving
fast on straight roads, e.g. on straight
stretches of freeway.
X Press button :repeatedly until indicator
lamps =and ;go out.
You have selected Comfort mode. The
vehicle is raised by 10 mm compared with
Sport + suspension tuning.
The AMG Suspension System COMFORT AMG Suspension System COMFORT
message appears in the multifunction
display. PARKTRONIC
Important safety notes PARKTRONIC is an electronic parking aid with
ultrasonic sensors. It indicates visually and
audibly the distance between your vehicle
and an object.
PARKTRONIC is only an aid. It is not a
replacement for your attention to your
immediate surroundings. You are always
responsible for safe maneuvering, parking
and exiting a parking space. When
maneuvering, parking or pulling out of a
parking space, make sure that there are no
persons, animals or objects in the area in
which you are maneuvering.
! When parking, pay particular attention to
objects above or below the sensors, such
as flower pots or trailer drawbars. 222
Driving systemsDriving and parking
Page 226 of 462
Rear sensors
Center Approx. 48 in (approx.
120 cm)
Corners Approx. 32 in (approx.
80 cm)
Minimum distance
Center Approx. 8 in (approx.
20 cm)
Corners Approx. 6 in (approx.
15 cm)
If there is an obstacle within this range, the
relevant warning displays light up and a
warning tone sounds. If the distance falls
below the minimum, the distance may no
longer be shown.
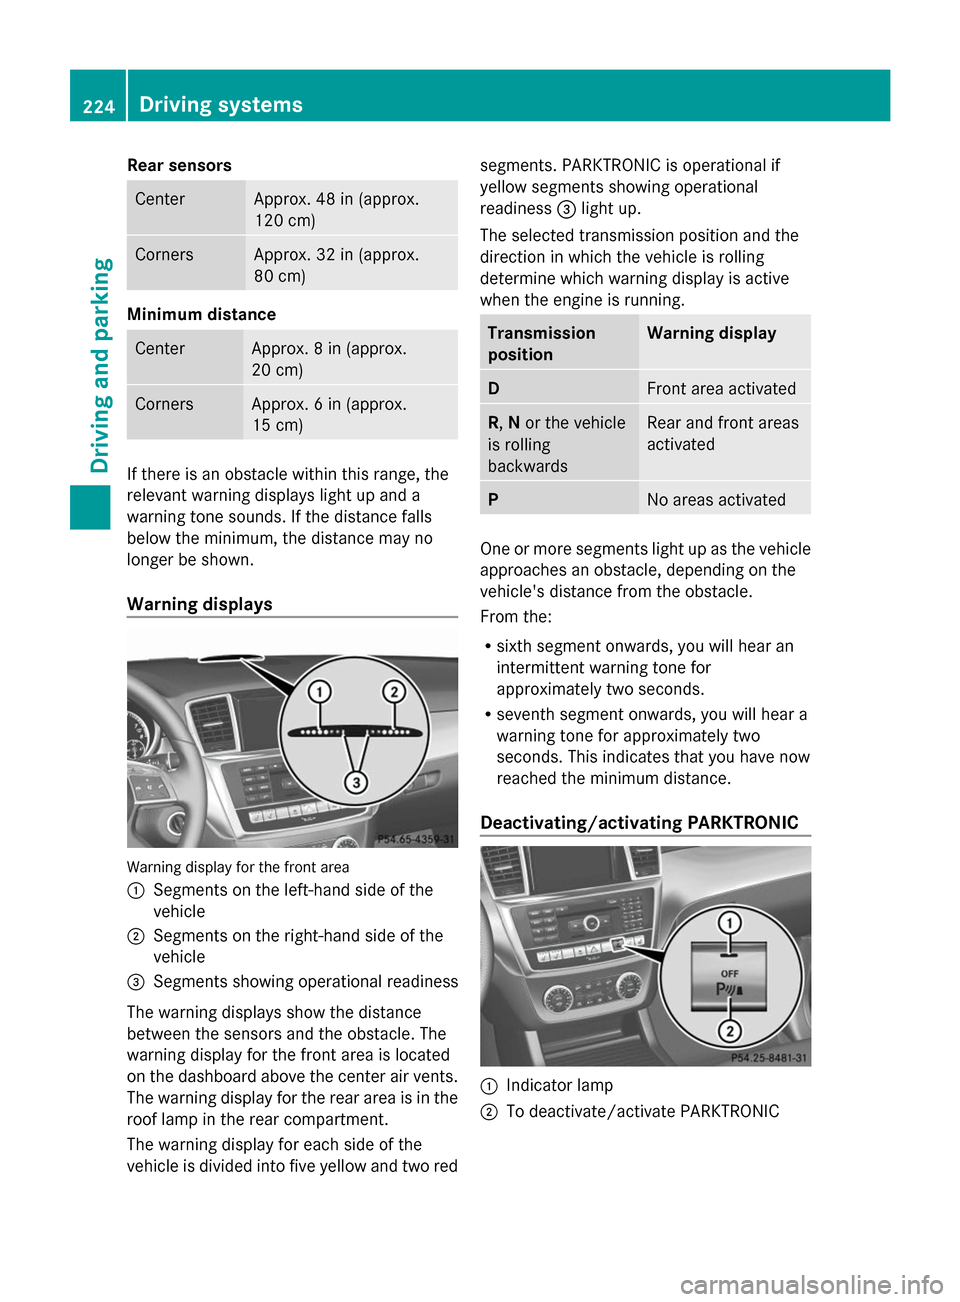
Warning displays Warning display for the front area
:
Segments on the left-hand side of the
vehicle
; Segments on the right-hand side of the
vehicle
= Segments showing operational readiness
The warning displays show the distance
between the sensors and the obstacle. The
warning display for the front area is located
on the dashboard above the center air vents.
The warning display for the rear area is in the
roof lamp in the rear compartment.
The warning display for each side of the
vehicle is divided into five yellow and two red segments. PARKTRONIC is operational if
yellow segments showing operational
readiness
=light up.
The selected transmission position and the
direction in which the vehicle is rolling
determine which warning display is active
when the engine is running. Transmission
position Warning display
D
Front area activated
R,
Nor the vehicle
is rolling
backwards Rear and front areas
activated
P
No areas activated
One or more segments light up as the vehicle
approaches an obstacle, depending on the
vehicle's distance from the obstacle.
From the:
R
sixth segment onwards, you will hear an
intermittent warning tone for
approximately two seconds.
R seventh segment onwards, you will hear a
warning tone for approximately two
seconds. This indicates that you have now
reached the minimum distance.
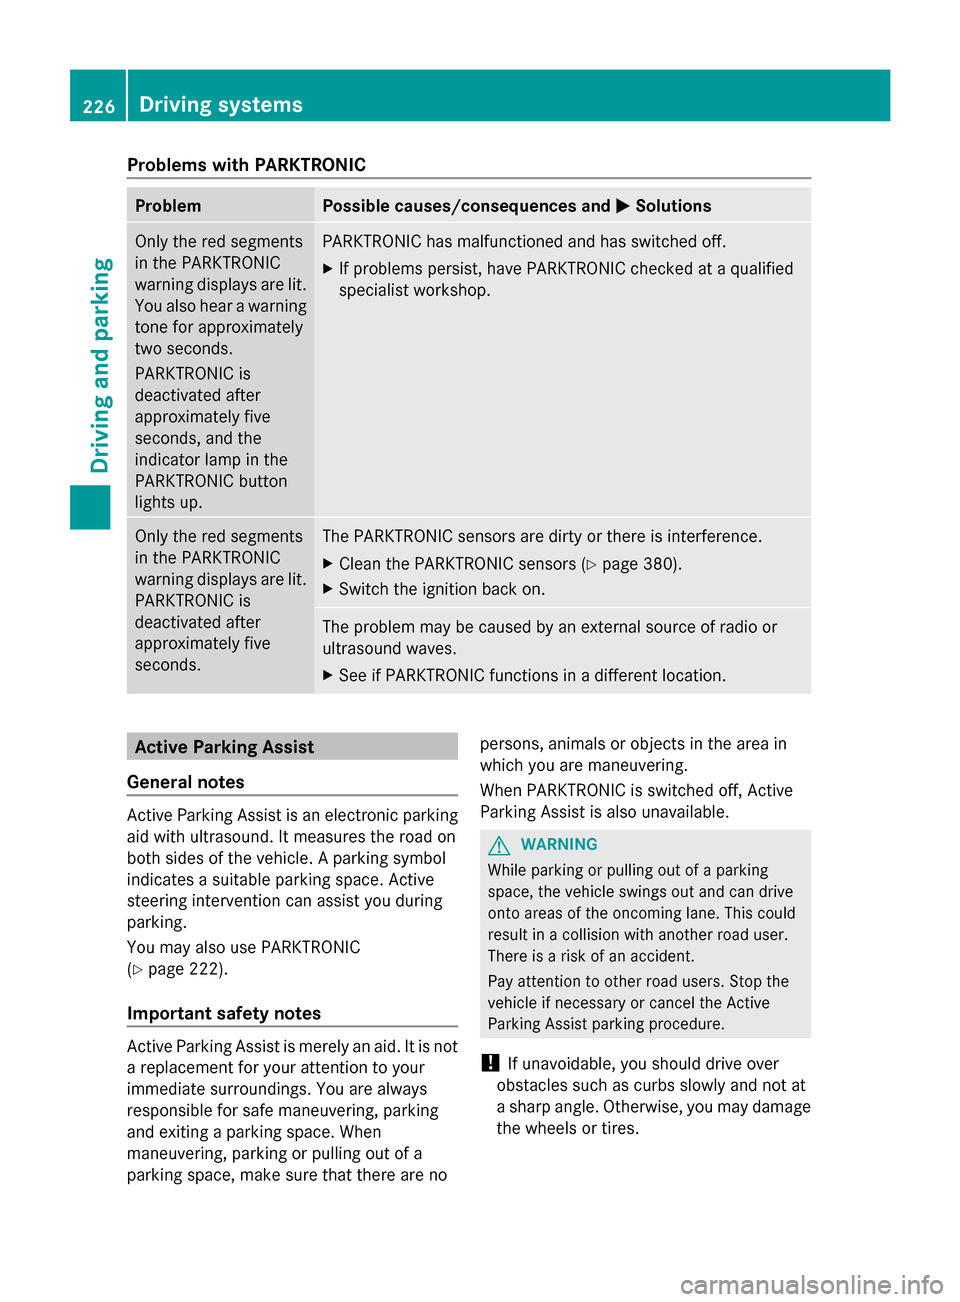
Deactivating/activating PARKTRONIC :
Indicator lamp
; To deactivate/activate PARKTRONIC 224
Driving systemsDriving and parking
Page 228 of 462
Problems with PARKTRONIC
Problem Possible causes/consequences and
M
MSolutions Only the red segments
in the PARKTRONIC
warning displays are lit.
You also hear a warning
tone for approximately
two seconds.
PARKTRONIC is
deactivated after
approximately five
seconds, and the
indicator lamp in the
PARKTRONIC button
lights up. PARKTRONIC has malfunctioned and has switched off.
X
If problems persist, have PARKTRONIC checked at a qualified
specialist workshop. Only the red segments
in the PARKTRONIC
warning displays are lit.
PARKTRONIC is
deactivated after
approximately five
seconds. The PARKTRONIC sensors are dirty or there is interference.
X
Clean the PARKTRONIC sensors (Y page 380).
X Switch the ignition back on. The problem may be caused by an external source of radio or
ultrasound waves.
X
See if PARKTRONIC functions in a different location. Active Parking Assist
General notes Active Parking Assist is an electronic parking
aid with ultrasound. It measures the road on
both sides of the vehicle. A parking symbol
indicates a suitable parking space. Active
steering intervention can assist you during
parking.
You may also use PARKTRONIC
(Y page 222).
Important safety notes Active Parking Assist is merely an aid. It is not
a replacement for your attention to your
immediate surroundings. You are always
responsible for safe maneuvering, parking
and exiting a parking space. When
maneuvering, parking or pulling out of a
parking space, make sure that there are no persons, animals or objects in the area in
which you are maneuvering.
When PARKTRONIC is switched off, Active
Parking Assist is also unavailable. G
WARNING
While parking or pulling out of a parking
space, the vehicle swings out and can drive
onto areas of the oncoming lane. This could
result in a collision with another road user.
There is a risk of an accident.
Pay attention to other road users. Stop the
vehicle if necessary or cancel the Active
Parking Assist parking procedure.
! If unavoidable, you should drive over
obstacles such as curbs slowly and not at
a sharp angle. Otherwise, you may damage
the wheels or tires. 226
Driving systemsDriving and parking
Page 230 of 462
Active Parking Assist will only detect parking
spaces:
R that are parallel to the direction of travel
R that are at least 59 in (1.5 m) wide
R that are at least 51 in (1.3 m) longer than
your vehicle
When driving at speeds below 19 mph
(30 km/h), you will see parking symbol as a
status indicator in the instrument cluster.
When a parking space has been detected, an
arrow towards the right or the left also
appears. By default, Active Parking Assist
only displays parking spaces on the front-
passenger side. Parking spaces on the
driver's side are displayed as soon as the turn
signal on the driver's side is activated. When
parking on the driver's side, this must remain
switched on until you acknowledge the use of
Active Parking Assist by pressing the a
button on the multifunction steering wheel.
A parking space is displayed while you are
driving past it, and until you are
approximately 50 ft (15 m) away from it.
Parking G
WARNING
Active Parking Assist merely aids you by
intervening actively in the steering. If you do
not brake there is a risk of an accident.
Always apply the brakes yourself when
maneuvering and parking.
X Stop the vehicle when the parking space
symbol shows the desired parking space in
the instrument cluster.
X Shift the transmission to position R.
The Start Park Assist? Yes: OK No:
Start Park Assist? Yes: OK No:
% message appears in the multifunction
display. X
To cancel the procedure: press the
% button on the multifunction steering
wheel or pull away.
or
X To park using Active Parking Assist:
press the abutton on the multifunction
steering wheel.
The Park Assist Active Accelerate Park Assist Active Accelerate
and Brake Observe Surroundings and Brake Observe Surroundings
message appears in the multifunction
display.
X Let go of the multifunction steering wheel.
X Back up the vehicle, being ready to brake
at all times. When backing up, drive at a
speed below approximately 6 mph
(10 km/h). Otherwise Active Parking Assist
will be canceled.
i In tight parking spaces, you will achieve
the best parking results by backing up as
far as possible. When doing so, also
observe the PARKTRONIC messages.
X Stop as soon as PARKTRONIC sounds the
continuous warning tone, if not before.
Maneuvering may be required in tight
parking spaces.
The Park Assist active Select D
Park Assist active Select D
Observe Observe surroundings
surroundings message appears in
the multifunction display.
X Shift the transmission to position Dwhile
the vehicle is stationary.
Active Parking Assist immediately steers in
the other direction.
The Park Assist active Accelerate Park Assist active Accelerate
and brake Observe surroundings
and brake Observe surroundings
message appears in the multifunction
display.
i You will achieve the best results by
waiting for the steering procedure to
complete before pulling away.
X Drive forwards and be ready to brake at all
times.
X Stop as soon as PARKTRONIC sounds the
continuous warning tone, if not before. 228
Driving systemsDriving an
d parking
Page 231 of 462

The
Park Assist active Select R
Park Assist active Select R
Observe
Observe surroundings
surroundings message appears in
the multifunction display.
As soon as the parking procedure is
complete, the Park Assist switched off
Park Assist switched off
message appears and a warning tone sounds.
Active Parking Assist no longer supports you
with steering interventions. When Active
Parking Assist is finished, you must steer
again yourself. PARKTRONIC is still available.
Parking tips:
R The way your vehicle is positioned in the
parking space after parking is dependent
on various factors. These include the
position and shape of the vehicles parked
in front and behind it and the conditions of
the location. It may be the case that Active
Parking Assist guides you too far into a
parking space, or not far enough into it. In
some cases, it may also lead you across or
onto the curb. If necessary, you should
cancel the parking procedure with Active
Parking Assist.
R You can also select preselect transmission
position D. The vehicle redirects and does
not drive as far into the parking space.
Should the gear change occur too soon to
achieve a sensible parking position, the
parking procedure will be aborted.
Exiting a parking space In order that Active Parking Assist can
support you when you exit the parking space:
R you need to have parked using Active
Parking Assist.
R the border of the parking space must be
high enough at the front and the rear. A
curb stone is too small, for example.
R the border of the parking space must not
be too wide, as the position of the vehicle
must not exceed an angle of 45° to the
starting position as it is maneuvered into
the parking space.
R a maneuvering distance of at least 3.3 ft
(1.0 m) must be available. X
Start the engine.
X Switch on the turn signal in the direction
you are pulling away.
X Shift the transmission to position Dor R.
The Start Park Assist? Yes: OK No:
Start Park Assist? Yes: OK No:
% message appears in the multifunction
display.
X To cancel the procedure: press the
% button on the multifunction steering
wheel or pull away.
or
X To exit a parking space using Active
Parking Assist: press theabutton on
the multifunction steering wheel.
The Park Assist active Accelerate Park Assist active Accelerate
and brake Observe surroundings
and brake Observe surroundings
message appears in the multifunction
display.
X Let go of the multifunction steering wheel.
X Reverse the vehicle or drive forwards, being
ready to brake at all times. Do not exceed
a maximum speed of approximately
6 mph (10 km/h) when exiting a parking
space. Otherwise Active Parking Assist will
be canceled.
X Stop as soon as PARKTRONIC sounds the
continuous warning tone, if not before.
X Shift the transmission to position Dor Ras
required while the vehicle is stationary.
Active Parking Assist immediately steers in
the other direction.
i You will achieve the best results by
waiting for the steering procedure to
complete before pulling away.
If you back up after activation, the steering
wheel is moved to the straight-ahead
position.
X Drive forwards or back up the vehicle, being
ready to brake at all times.
X Stop as soon as PARKTRONIC sounds the
continuous warning tone, if not before.
X Drive forwards and back up as prompted by
the PARKTRONIC warning displays, several
times if necessary. Driving systems
229Driving and parking Z