Low range MERCEDES-BENZ GL-Class 2015 X166 User Guide
[x] Cancel search | Manufacturer: MERCEDES-BENZ, Model Year: 2015, Model line: GL-Class, Model: MERCEDES-BENZ GL-Class 2015 X166Pages: 462, PDF Size: 9.09 MB
Page 137 of 462
light sensor activates the low-beam head-
lamps.
If you are driving at speeds above approx-
imately 16 mph (25 km/h):
The headlamp range is set automatically
depending on the distance between the
vehicle and other road users.
If you are driving at speeds above approx-
imately 19 mph (30 km/h) and no other
road users have been detected:
The high-beam headlamps are switched on
automatically. The 0057indicator lamp in
the instrument cluster also lights up.
If you are driving at speeds below approx-
imately 16 mph (25 km/h) or other road
users have been detected or the roads are adequately lit:
The high-beam headlamps are switched off
automatically. The 0057indicator lamp in
the instrument cluster goes out. The 00CE
indicator lamp in the multifunction display
remains lit.
X To switch off: move the combination
switch back to its normal position or move the light switch to another position.
The 00CE indicator lamp in the multifunc-
tion display goes out. Headlamps fogged up on the inside
Certain climatic and physical conditions may
cause moisture to form in the headlamp. This moisture does not affect the functionality of
the headlamp. Interior lighting
Overview of interior lighting
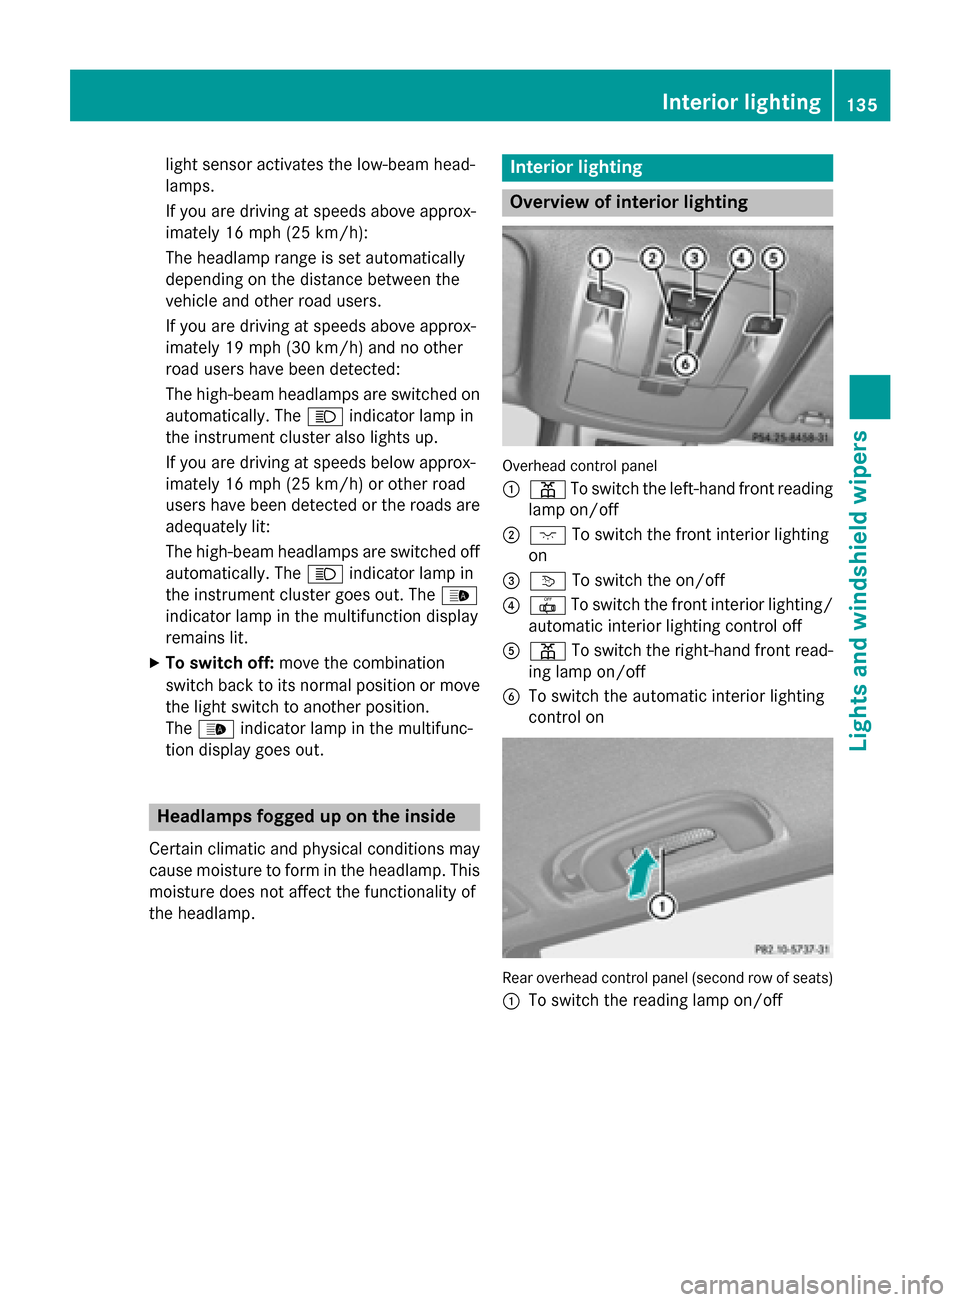
Overhead control panel
0043
003D To switch the left-hand front reading
lamp on/off
0044 004A To switch the front interior lighting
on
0087 0043 To switch the on/off
0085 0033 To switch the front interior lighting/
automatic interior lighting control off
0083 003D To switch the right-hand front read-
ing lamp on/off
0084 To switch the automatic interior lighting
control on Rear overhead control panel (second row of seats)
0043 To switch the reading lamp on/off Interior lighting
135Lights and windshield wipers Z
Page 174 of 462
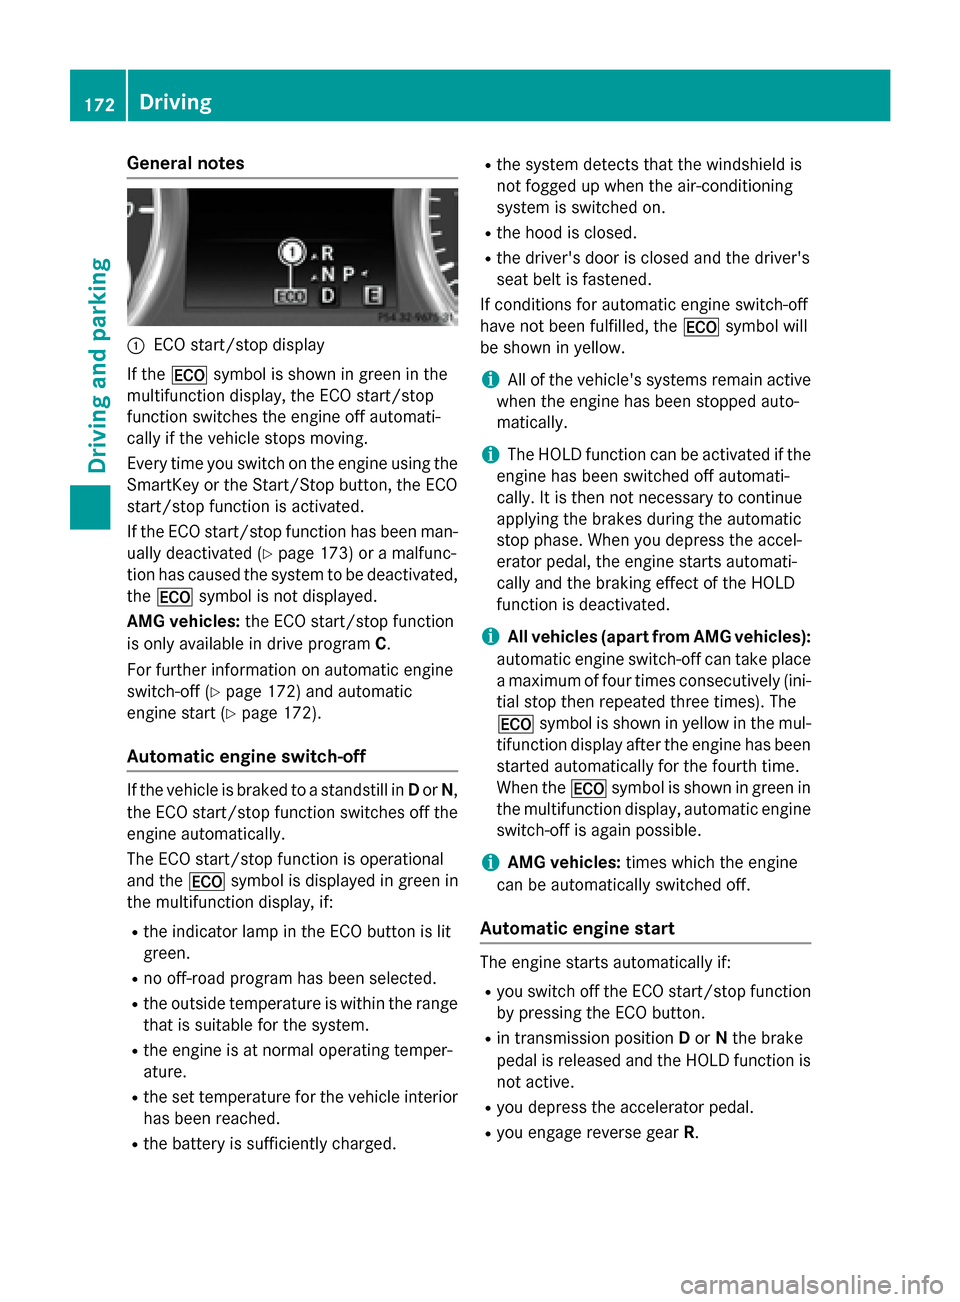
General notes
0043
ECO start/stop display
If the 00A7 symbol is shown in green in the
multifunction display, the ECO start/stop
function switches the engine off automati-
cally if the vehicle stops moving.
Every time you switch on the engine using the
SmartKey or the Start/Stop button, the ECO
start/stop function is activated.
If the ECO start/stop function has been man- ually deactivated (Y page 173) or a malfunc-
tion has caused the system to be deactivated, the 00A7 symbol is not displayed.
AMG vehicles: the ECO start/stop function
is only available in drive program C.
For further information on automatic engine
switch-off (Y page 172) and automatic
engine start (Y page 172).
Automatic engine switch-off If the vehicle is braked to a standstill in
Dor N,
the ECO start/stop function switches off the engine automatically.
The ECO start/stop function is operational
and the 00A7symbol is displayed in green in
the multifunction display, if:
R the indicator lamp in the ECO button is lit
green.
R no off-road program has been selected.
R the outside temperature is within the range
that is suitable for the system.
R the engine is at normal operating temper-
ature.
R the set temperature for the vehicle interior
has been reached.
R the battery is sufficiently charged. R
the system detects that the windshield is
not fogged up when the air-conditioning
system is switched on.
R the hood is closed.
R the driver's door is closed and the driver's
seat belt is fastened.
If conditions for automatic engine switch-off
have not been fulfilled, the 00A7symbol will
be shown in yellow.
i All of the vehicle's systems remain active
when the engine has been stopped auto-
matically.
i The HOLD function can be activated if the
engine has been switched off automati-
cally. It is then not necessary to continue
applying the brakes during the automatic
stop phase. When you depress the accel-
erator pedal, the engine starts automati-
cally and the braking effect of the HOLD
function is deactivated.
i All vehicles (apart from AMG vehicles):
automatic engine switch-off can take place a maximum of four times consecutively (ini-
tial stop then repeated three times). The
00A7 symbol is shown in yellow in the mul-
tifunction display after the engine has been started automatically for the fourth time.
When the 00A7symbol is shown in green in
the multifunction display, automatic engine switch-off is again possible.
i AMG vehicles:
times which the engine
can be automatically switched off.
Automatic engine start The engine starts automatically if:
R you switch off the ECO start/stop function
by pressing the ECO button.
R in transmission position Dor Nthe brake
pedal is released and the HOLD function is not active.
R you depress the accelerator pedal.
R you engage reverse gear R.172
DrivingDriving and parking
Page 175 of 462
R
you move the transmission out of position
P.
R you switch to drive program Sor M(AMG
vehicles).
R you switch to an off-road program (except
for AMG vehicles).
R you unfasten your seat belt or open the
driver's door.
R the vehicle starts to roll.
R the brake system requires this.
R the temperature in the vehicle interior devi-
ates from the set range.
R the system detects moisture on the wind-
shield when the air-conditioning system is
switched on.
R the battery's condition of charge is too low.
i Shifting the transmission to position
P
does not start the engine.
i If you shift the transmission from
Rto D,
the ECO start/stop function is available
again once the 00A7symbol reappears in
green in the multifunction display.
Deactivating/activating the ECO start/
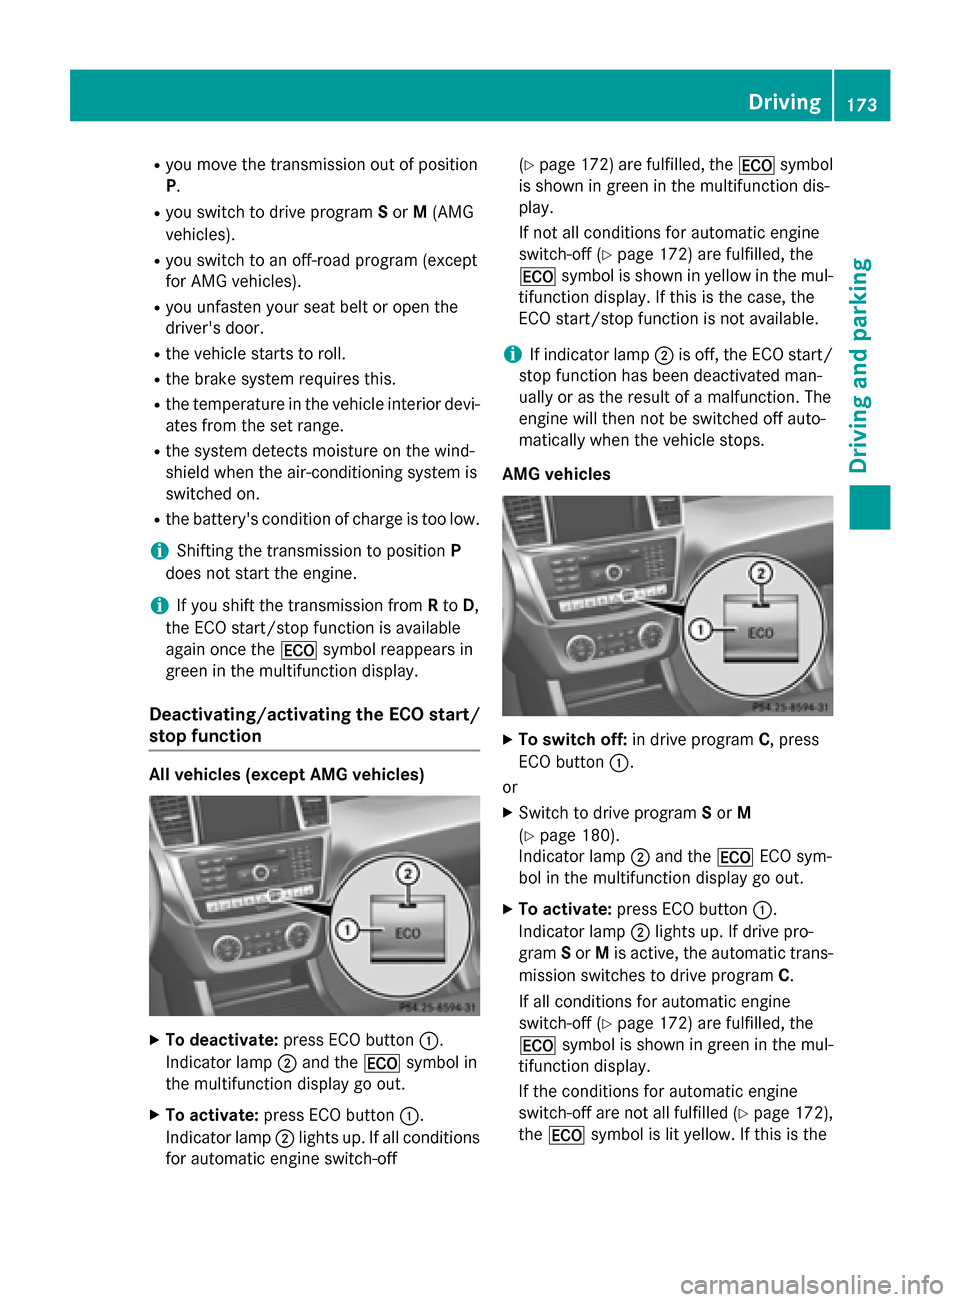
stop function All vehicles (except AMG vehicles)
X
To deactivate: press ECO button 0043.
Indicator lamp 0044and the 00A7symbol in
the multifunction display go out.
X To activate: press ECO button 0043.
Indicator lamp 0044lights up. If all conditions
for automatic engine switch-off (Y
page 172) are fulfilled, the 00A7symbol
is shown in green in the multifunction dis-
play.
If not all conditions for automatic engine
switch-off (Y page 172) are fulfilled, the
00A7 symbol is shown in yellow in the mul-
tifunction display. If this is the case, the
ECO start/stop function is not available.
i If indicator lamp
0044is off, the ECO start/
stop function has been deactivated man-
ually or as the result of a malfunction. The
engine will then not be switched off auto-
matically when the vehicle stops.
AMG vehicles X
To switch off: in drive program C, press
ECO button 0043.
or X Switch to drive program Sor M
(Y page 180).
Indicator lamp 0044and the 00A7ECO sym-
bol in the multifunction display go out.
X To activate: press ECO button 0043.
Indicator lamp 0044lights up. If drive pro-
gram Sor Mis active, the automatic trans-
mission switches to drive program C.
If all conditions for automatic engine
switch-off (Y page 172) are fulfilled, the
00A7 symbol is shown in green in the mul-
tifunction display.
If the conditions for automatic engine
switch-off are not all fulfilled (Y page 172),
the 00A7 symbol is lit yellow. If this is the Driving
173Driving and pa rking Z
Page 181 of 462
0044 Neutral
Do not shift the transmission to
N
while driving. Otherwise, the auto-
matic transmission could be dam-
aged.
No power is transmitted from the
engine to the drive wheels.
Releasing the brake pedal will allow
you to move the vehicle freely, e.g. to push it or tow it.
If ESP ®
is deactivated or faulty:
only shift the transmission to posi-
tion Nif the vehicle is in danger of
skidding, e.g. on icy roads.
If you switch off the engine using
the SmartKey or the Start/Stop
button, the automatic transmission shifts to neutral Nautomatically.
! Rolling in neutral
Ncan damage
the drive train. 003A Drive
The automatic transmission
changes gear automatically. All
forward gears are available.
Driving tips
Changing gear The automatic transmission shifts to the indi-
vidual gears automatically when it is in trans-
mission position D. This automatic gear shift-
ing behavior is determined by:
R the selected drive program (Y page 180)
R the position of the accelerator pedal
(Y page 179)
R the road speed
Accelerator pedal position Your style of driving influences how the auto-
matic transmission shifts gear:
R little throttle: early upshifts
R more throttle: late upshifts Kickdown Use kickdown for maximum acceleration.
X Depress the accelerator pedal beyond the
pressure point.
The automatic transmission shifts to a
lower gear depending on the engine speed.
X Ease off the accelerator pedal once the
desired speed is reached.
The automatic transmission shifts back up.
Rocking the vehicle free Shifting the transmission repeatedly between
gears Dand Rmay help to free the vehicle if it
has become stuck in slush or snow. The vehi-
cle's engine management system limits the
speed to a maximum of 5 mph (9 km/h) when shifting back and forth. To shift back and forth
between transmission positions Dand R,
move the DIRECT SELECT lever up and down past the point of resistance.
Towing a trailer X
Drive in the middle of the engine speed
range on uphill gradients.
X Depending on the uphill or downhill gradi-
ent, use left-hand steering wheel paddle
shifter (Y page 180) to select a lower gear,
even if cruise control or DISTRONIC PLUS
are activated. Automatic transmission
179Driving and parking Z
Page 199 of 462
Servicing the brakes
!
If the red brake warning lamp lights up in
the instrument cluster and you hear a warn- ing tone while the engine is running, the
brake fluid level may be too low. Observe
additional warning messages in the multi-
function display.
The brake fluid level may be too low due to brake pad wear or leaking brake lines.
Have the brake system checked immedi-
ately. This work should be carried out at a
qualified specialist workshop.
! A function or performance test should
only be carried out on a 2-axle dynamom-
eter. If you are planning to have the vehicle tested on such a dynamometer, contact an
authorized Mercedes-Benz Center to
obtain further information first. Otherwise,
you could damage the drive train or the
brake system.
! Because ESP ®
is an automatic system,
the engine and ignition must be switched
off (SmartKey in position 0or 1or Start/
Stop button in position 0or 1) when the
electric parking brake is being tested on a
brake dynamometer (maximum
10 seconds).
Braking triggered automatically by ESP ®
may seriously damage the brake system.
All checks and maintenance work on the
brake system must be carried out at a quali-
fied specialist workshop. Consult a qualified
specialist workshop to arrange this.
Have brake pads installed and brake fluid
replaced at a qualified specialist workshop.
If the brake system has only been subject to
moderate loads, you should test the function- ality of your brakes at regular intervals. To doso, depress the brake pedal firmly when driv-
ing at a high speed. This improves the grip of
the brake pads.
You can find a description of Brake Assist
(BAS) on (Y page 69) or of BAS PLUS on
(Y page 69). Mercedes-Benz recommends that you only
have brake pads/linings installed on your
vehicle which have been approved for
Mercedes-Benz vehicles or which correspond
to an equivalent quality standard. Brake
pads/linings which have not been approved
for Mercedes-Benz vehicles or which are not
of an equivalent quality could affect your vehi-
cle's operating safety.
Mercedes-Benz recommends that you only
use brake fluid that has been specially
approved for your vehicle by Mercedes-Benz,
or which corresponds to an equivalent quality standard. Brake fluid which has not been
approved for Mercedes-Benz vehicles or
which is not of an equivalent quality could
affect your vehicle's operating safety.
High-performance brake system for
AMG vehicles The high-performance brake system is only
available on AMG vehicles.
The high-performance brake system is
designed for heavy loads. This may lead to
noise when braking. This will depend on:
R speed
R braking force
R environmental conditions, such as temper-
ature and humidity
The wear of individual components of the
brake system, such as the brake pads/linings
or brake discs, depends on the individual driv-
ing style and operating conditions.
For this reason, it is impossible to state a
mileage that will be valid under all circum-
stances. An aggressive driving style will lead
to high wear. You can obtain further informa- tion about this from your authorized
Mercedes-Benz Center.
New and replaced brake pads and discs only
reach their optimum braking effect after sev-
eral hundred kilometers of driving. Compen-
sate for this by applying greater force to the
brake pedal. Keep this in mind, and adapt Driving tips
197Driving and parking Z
Page 202 of 462
Driving off-road increases the likelihood of
damage to the vehicle, which, in turn, can lead to failure of the mechanical assembly or sys-
tems. Adapt your driving style to suit the ter- rain conditions. Drive carefully. Have damage
to the vehicle rectified immediately at a quali-
fied specialist workshop.
Do not switch to transmission position N
when driving off-road. You could lose control
of the vehicle if you attempt to brake using
the service brake. If the gradient is too steep, drive backwards in reverse gear.
General notes Read this section carefully before driving your
vehicle off-road. Practice by driving over more gentle off-road terrain first.
Familiarize yourself with the characteristics
of your vehicle and the gear shift operation
before driving through difficult terrain.
The following driving systems are specially
adapted to off-road driving:
R Off-road program 1 and 2 (vehicles with the
ON&OFFROAD package) (Y page 259)
R LOW RANGE off-road gear (vehicles with
the ON&OFFROAD package)
(Y page 261)
R Differential lock (vehicles with the
ON&OFFROAD package) (Y page 260)
R Off-road ABS (Y page 69)
R Off-road 4ETS (Y page 73)
R AIRMATIC package (vehicle level)
(Y page 219)
R DSR (Downhill Speed Regulation)
(Y page 258)
Observe the following notes:
R Stop the vehicle before starting to drive
along an off-road route.
R For vehicles with the AIRMATIC pack-
age: select a vehicle level that is suitable
for the off-road terrain. To avoid damaging
the vehicle, make sure there is always suf-
ficient ground clearance. R
Check that items of luggage and loads are
stowed safely and are well secured
(Y page 347).
R Always keep the engine running and in gear
when driving on a downhill gradient. Acti-
vate DSR (Y page 258).
R Always keep the doors, tailgate, windows
and sliding sunroof closed while driving.
R Adapt your speed to the terrain. The
rougher, steeper or more ruts on the ter-
rain, the slower your speed should be.
R Drive slowly and at an even speed through
the water. Ensure that a bow wave does not
form as you drive.
R Drive with extreme care on unfamiliar off-
road routes where visibility is poor. For
safety reasons, get out of the vehicle first
and survey the off-road route.
R Look out for obstacles, such as rocks,
holes, tree stumps and furrows.
R Check the depth of water before fording
rivers and streams.
R When fording, do not stop and do not
switch off the engine.
R On sand, drive quickly to overcome the roll-
ing resistance. Otherwise the vehicle's
wheels could become stuck in loose
ground.
R Do not jump with the vehicle as this will
interrupt the vehicle's propulsion.
R Always keep the engine running and in gear
when driving on a slope.
R Do not shift the automatic transmission to
transmission position N.
i Do not use the HOLD function when driv-
ing off-road, on steep uphill or downhill gra-
dients or on slippery or loose surfaces. The HOLD function cannot hold the vehicle on
such surfaces.
Checklist before driving off-road !
If the engine oil warning lamp lights up
while the vehicle is in motion, stop the vehi-
cle in a safe place as soon as possible. 200
Driving
tipsDriving an d parking
Page 203 of 462
Check the engine oil level. The engine oil
warning lamp warning must not be ignored. Continuing the journey while the symbol is
displayed could lead to engine damage.
X Engine oil level: check the engine oil level
and add oil if necessary.
When driving on steep gradients, the
engine oil level must be sufficiently high to
ensure a correct oil supply in the vehicle.
X DEF tank (BlueTEC vehicles): check the
level and top up if necessary (Y page 188).
X Tire-changing tool kit: check that the jack
is working and make sure you have the lug
wrench, a robust tow cable and a folding
spade in the vehicle.
X Wheels and tires: check the tire tread
depth and tire pressure.
X Check for damage and remove any foreign
objects, e.g. small stones, from the
wheels/tires.
X Replace any missing valve caps.
X Replace dented or damaged wheels.
X Rims: dented or bent rims can result in a
loss of tire pressure and damage the tire
bead. Therefore, check your rims before
driving off-road and replace them as
required.
Checklist after driving off-road !
If you detect damage to the vehicle after
driving off-road, have the vehicle checked
immediately at a qualified specialist work-
shop.
X Vehicles with the ON&OFFROAD pack-
age: activate the on-road program
(Y page 259).
X Deactivate the LOW RANGE off-road gear
(Y page 261).
X Deactivate DSR (Y page 258).
X Vehicles with the AIRMATIC package:
lower the vehicle to a ride height suitable
for the road conditions, e.g. to the high-
way/high-speed level. X
Clean the headlamps and rear lights and
check for damage.
X Clean the front and rear license plates.
X Clean the wheels/tires with a water jet and
remove any foreign objects.
X Clean the wheels, wheel housings and the
vehicle underside with a water jet; check
for any foreign objects and damage.
X Check whether twigs or other parts of
plants have become trapped. These
increase the risk of fire and can damage
fuel pipes, brake hoses or the rubber bel-
lows of the axle joints and propeller shafts.
X After the trip, examine without fail the
entire undercarriage, wheels, tires, brakes,
bodywork structure, steering, chassis and
exhaust system for damage.
X After driving for extended periods across
sand, mud, gravel, water or in similarly dirty
conditions, have the brake discs, wheels,
brake pads/linings and axle joints checked
and cleaned.
X If you detect strong vibrations after off-road
travel, check for foreign objects in the
wheels and drive train and remove them if
necessary. Foreign objects can disturb the
balance and cause vibrations.
Driving over rough terrain places greater
demands on your vehicle than driving on nor-
mal roads. After driving off-road, check the
vehicle. This allows you to detect damage
promptly and reduce the risk of an accident to
yourself and other road users.
Driving on sand Observe the following rules when driving on
sand:
R Vehicles with the ON&OFFROAD pack-
age: select off-road program 1
(Y page 259).
R Vehicles with the AIRMATIC package:
select a raised vehicle level.
R Avoid high engine speeds. Driving tips
201Driving and pa rking Z
Page 204 of 462
R
Use the left-hand steering wheel paddle
shifter to shift to a lower gear appropriate
to the terrain.
R Drive quickly to overcome the rolling resist-
ance. Otherwise the vehicle's wheels could
become stuck in loose ground.
R Drive in the tracks of other vehicles if pos-
sible. Make sure that:
- the tire ruts are not too deep.
- the sand is sufficiently firm.
- the ground clearance of the vehicle is
sufficient.
Tire ruts and gravel roads !
Check that the ruts are not too deep and
that your vehicle has sufficient clearance.
Otherwise, your vehicle could be damaged
or bottom out and get stuck.
Observe the following rules when driving
along ruts in off-road terrain or on roads with loose gravel:
R Vehicles with the AIRMATIC package:
select a raised vehicle level.
R Avoid high engine speeds.
R Shift to a lower gear using the left-hand
steering wheel paddle shifter.
R Drive slowly.
R Where ruts are too deep, drive with the
wheels of one side on the center grassy
area, if possible.
Driving over obstacles !
Obstacles could damage the floor of the
vehicle or components of the chassis. Ask
passengers for guidance when driving over
large obstacles. The passenger should
always keep a safe distance from the vehi- cle when doing so in order to avoid injury as
a result of unexpected vehicle movements. After driving off-road or over obstacles,
check the vehicle for possible damage,
especially to the underbody and the com-
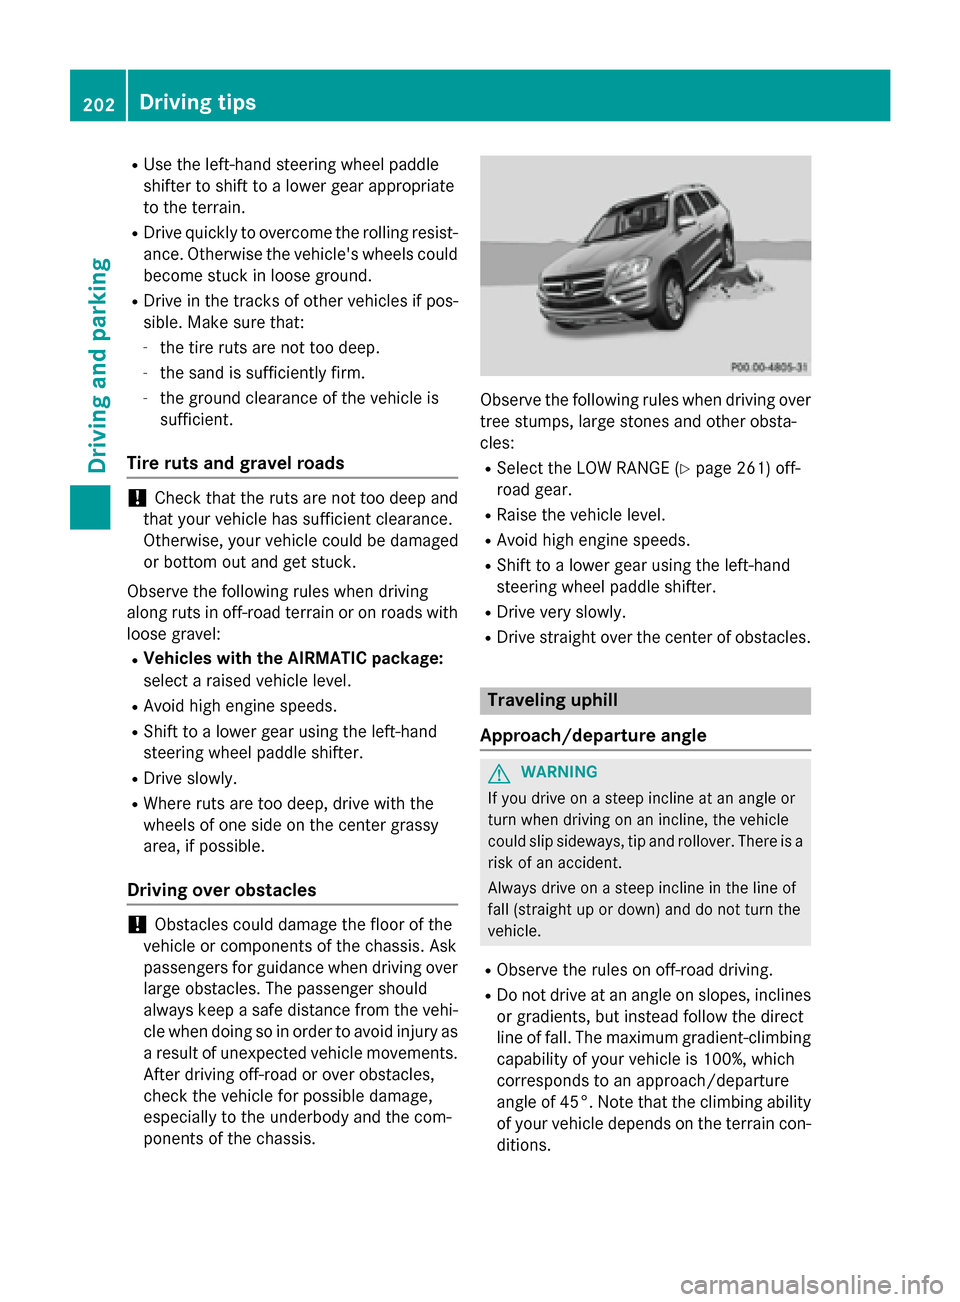
ponents of the chassis. Observe the following rules when driving over
tree stumps, large stones and other obsta-
cles:
R Select the LOW RANGE (Y page 261) off-
road gear.
R Raise the vehicle level.
R Avoid high engine speeds.
R Shift to a lower gear using the left-hand
steering wheel paddle shifter.
R Drive very slowly.
R Drive straight over the center of obstacles. Traveling uphill
Approach/departure angle G
WARNING
If you drive on a steep incline at an angle or
turn when driving on an incline, the vehicle
could slip sideways, tip and rollover. There is a risk of an accident.
Always drive on a steep incline in the line of
fall (straight up or down) and do not turn the
vehicle.
R Observe the rules on off-road driving.
R Do not drive at an angle on slopes, inclines
or gradients, but instead follow the direct
line of fall. The maximum gradient-climbing capability of your vehicle is 100%, which
corresponds to an approach/departure
angle of 45°. Note that the climbing ability
of your vehicle depends on the terrain con- ditions. 202
Driving tipsDriving and parking
Page 205 of 462
R
When driving down an incline, make use of
the engine's braking effect. Observe the
engine speed; do not overrev the engine.
R Before driving on extreme uphill and down-
hill gradients, select the LOW RANGE off-
road gear (Y page 261).
R Drive slowly.
R Avoid high engine speeds. Drive at appro-
priate engine speeds (maximum
3,000 rpm).
R Use the left-hand paddle shifter to shift into
a lower gear in good time on long and steep
downhill gradients.
R Check the brakes after prolonged off-road
driving.
i Hill start assist will aid you when pulling
away on a hill.
For further information about hill start
assist, see (Y page 171).
Do not switch to transmission position N
when driving off-road. If you try to brake the
vehicle using the service brake, you could
lose control of the vehicle. If the gradient is
too steep for your vehicle, drive back down in
reverse gear.
Always observe the approach/departure
angle values (Y page 457).
Maximum gradient-climbing capability Always observe the maximum gradient climb-
ing ability values (Y page 457).
Hilltops When driving up an uphill gradient, slightly
reduce pressure on the accelerator immedi-
ately before reaching the brow of the hill. Use
the vehicle's own impetus to drive over the
top of the hill.
This style of driving prevents:
R the vehicle from lifting off the ground on the
brow of a hill
R the vehicle from traveling too quickly down
the other side Driving downhill R
Drive slowly.
R Do not drive at an angle down steep
inclines. Steer into the line of fall and drive
with the front wheels aligned straight. Oth- erwise, the vehicle could slip sideways, tip
and rollover.
R Shift to a lower gear using the left-hand
paddle shifter before tackling steep down-
hill gradients.
R Activate DSR. If this is not sufficient, brake
gently. When doing so, make sure that the
vehicle is facing in the direction of the line
of fall.
R Check that the brakes are working normally
after a long downhill stretch.
i The special off-road ABS setting enables a
precise, brief and repeated locking of the
front wheels. This causes them to dig into
loose earth. Be aware that the front wheels easily skid across the ground surface if
completely braked and therefore lose their
ability to steer. Driving systems
Cruise control
General notes Cruise control maintains a constant road
speed for you. It brakes automatically in order
to avoid exceeding the set speed. You must
select a lower gear in good time on long and
steep downhill gradients, especially if the
vehicle is laden or towing a trailer. By doing
so, you will make use of the braking effect of
the engine. This relieves the load on the brake
system and prevents the brakes from over-
heating and wearing too quickly.
Use cruise control only if road and traffic con-
ditions make it appropriate to maintain a
steady speed for a prolonged period. You can store any road speed above 20 mph
(30 km/h). Driving systems
203Driving and parking Z
Page 208 of 462
Cruise control is automatically deactivated if:
R you engage the electric parking brake
R you are driving at less than 20 mph
(30 km/h)
R ESP ®
intervenes or you deactivate ESP ®
R you activate DSR
R you activate off-road program 2 on vehicles
with the ON&OFFROAD package
R you shift the transmission to position N
while driving
If cruise control is deactivated, you will hear a warning tone. You will see the Cruise Con‐
Cruise Con‐
trol Off
trol Off message in the multifunction dis-
play for approximately five seconds.
i When you switch off the engine, the last
speed stored is cleared. DISTRONIC PLUS
General notes DISTRONIC PLUS regulates the speed and
automatically helps you maintain the dis-
tance to the vehicle detected in front. DIS-
TRONIC PLUS brakes automatically so that
the set speed is not exceeded.
You must select a lower gear in good time on
long and steep downhill gradients, especially
if the vehicle is laden or towing a trailer. By
doing so, you will make use of the braking
effect of the engine. This relieves the load on
the brake system and prevents the brakes
from overheating and wearing too quickly.
If DISTRONIC PLUS detects a slower-moving
vehicle in front, your vehicle is braked in order
to maintain the preset distance to the vehicle in front.
If DISTRONIC PLUS detects that there is a risk
of a collision, you will be warned visually and acoustically. DISTRONIC PLUS cannot pre-
vent a collision without your intervention. An
intermittent warning tone will then sound and
the distance warning lamp will light up in the instrument cluster. Brake immediately in
order to increase the distance to the vehicle in front or take evasive action provided it is
safe to do so.
For DISTRONIC PLUS to assist you, the radar
sensor system must be operational.
If there is no vehicle in front, DISTRONIC
PLUS operates in the same way as cruise
control in the speed range between 20 mph
(Canada: 30 km/h) and 120 mph (Canada:
200 km/h). If a vehicle is driving in front of
you, it operates in the speed range between
0 mph (0 km/h) and 120 mph (Canada:
200 km/h).
Do not use DISTRONIC PLUS while driving on roads with steep gradients.
As DISTRONIC PLUS transmits radar waves, it
can resemble the radar detectors of the
responsible authorities. You can refer to the
relevant chapter in the Operator's Manual if
questions are asked about this.
i USA only:
This device has been approved by the FCC as a "Vehicular Radar System". The radar
sensor is intended for use in an automotiveradar system only. Removing, tampering
with, or altering the device will void any
warranties, and is not permitted by the
FCC. Do not tamper with, alter, or use in
any non-approved way.
Any unauthorized modification to this
device could void the user’s authority to
operate the equipment.
i Canada only: This device complies with
RSS-210 of Industry Canada. Operation is
subject to the following two conditions:
1. This device may not cause harmful inter-
ference, and
2. this device must accept any interference received, including interference that may
cause undesired operation of the device.
Removal, tampering, or altering of the
device will void any warranties, and is not
permitted. Do not tamper with, alter, or use in any non-approved way. 206
Driving systemsDriving and pa
rking