heating MERCEDES-BENZ GL-Class 2015 X166 User Guide
[x] Cancel search | Manufacturer: MERCEDES-BENZ, Model Year: 2015, Model line: GL-Class, Model: MERCEDES-BENZ GL-Class 2015 X166Pages: 462, PDF Size: 9.09 MB
Page 122 of 462
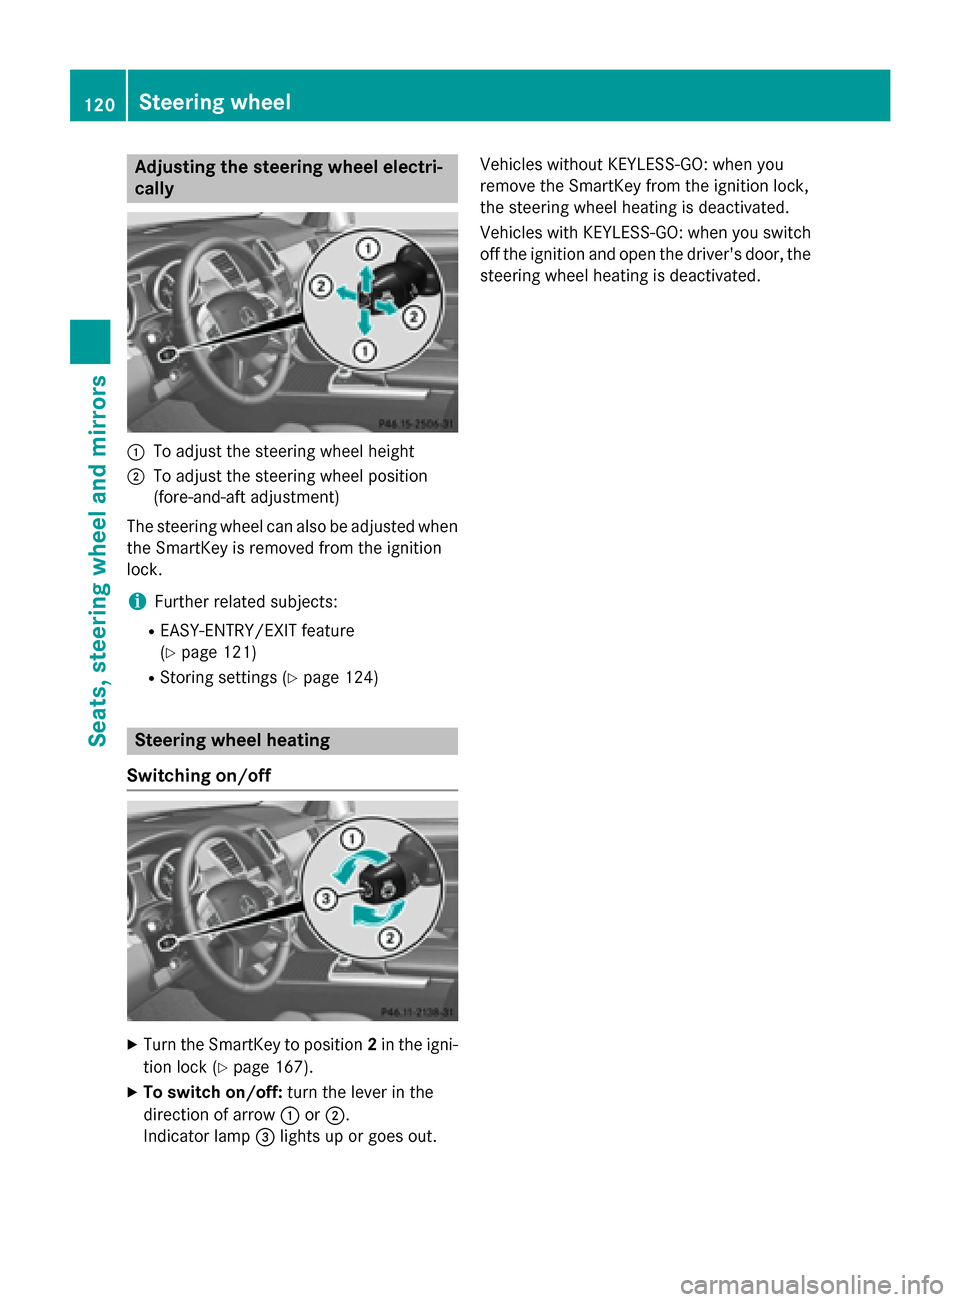
Adjusting the steering wheel electri-
cally 0043
To adjust the steering wheel height
0044 To adjust the steering wheel position
(fore-and-aft adjustment)
The steering wheel can also be adjusted when the SmartKey is removed from the ignition
lock.
i Further related subjects:
R EASY-ENTRY/EXIT feature
(Y page 121)
R Storing settings (Y page 124)Steering wheel heating
Switching on/off X
Turn the SmartKey to position 2in the igni-
tion lock (Y page 167).
X To switch on/off: turn the lever in the
direction of arrow 0043or0044.
Indicator lamp 0087lights up or goes out. Vehicles without KEYLESS-GO: when you
remove the SmartKey from the ignition lock,
the steering wheel heating is deactivated.
Vehicles with KEYLESS-GO: when you switch
off the ignition and open the driver's door, the steering wheel heating is deactivated. 120
Steering wheelSeats
, steering wheel and mirrors
Page 123 of 462
Problems with the steering wheel heating
Problem
Possible causes/consequences and
0050
0050Solutions The steering wheel
heating has switched
off prematurely or can-
not be switched on. The on-board voltage is too low because too many electrical con-
sumers are switched on.
X Switch off electrical consumers that you do not need, such as
the rear window defroster or interior lighting. EASY-ENTRY/EXIT feature
Important safety notes G
WARNING
When the EASY-ENTRY/EXIT feature adjusts
the steering wheel, you and other vehicle
occupants – particularly children – could
become trapped. There is a risk of injury.
While the EASY-ENTRY/EXIT feature is mak-
ing adjustments, make sure that no one has
any body parts in the sweep of the steering
wheel.
Move the steering wheel adjustment lever if
there is a risk of entrapment by the steering
wheel. The adjustment process is stopped.
Press one of the memory function position
buttons. This function is only available on
vehicles with memory function. G
WARNING
If children activate the EASY-ENTRY/EXIT fea- ture, they can become trapped, particularly
when unattended. There is a risk of injury.
When leaving the vehicle, always take the
SmartKey with you and lock the vehicle. Never leave children unsupervised in the vehicle. G
WARNING
If you drive off while the EASY-ENTRY/EXIT
feature is making adjustments, you could lose
control of the vehicle. There is a risk of an
accident.
Always wait until the adjustment process is
complete before driving off. The EASY-ENTRY/EXIT feature makes getting
in and out of your vehicle easier.
You can activate and deactivate the EASY-
ENTRY/EXIT feature in the on-board com-
puter (Y page 287).
Position of the steering wheel when the
EASY-ENTRY/EXIT feature is active The steering wheel swings upwards when
you:
R remove the SmartKey from the ignition lock
R open the driver's door with KEYLESS-GO in
position 1
R open the driver's door and the SmartKey is
in position 0or 1in the ignition lock
i The steering wheel only moves upwards if
it has not already reached the upper stop.
Position of the steering wheel for driv-
ing The steering wheel is moved to the last selec-
ted position when:
R the driver's door is closed
R you insert the SmartKey into the ignition
lock
or
R you press the Start/Stop button once on
vehicles with KEYLESS-GO
When you close the driver's door with the
ignition switched on, the steering wheel is
also automatically moved to the previously
set position.
The last position of the steering wheel is
stored when you switch off the ignition or Steering wheel
121Seats, steering wheel and mirrors Z
Page 163 of 462

Problems with the rear window defroster
Problem
Possible causes/consequences and
0050
0050Solutions The rear window
defroster has deactiva-
ted prematurely or can-
not be activated. The battery has not been sufficiently charged.
X Switch off any consumers that are not required, e.g. reading
lamps, interior lighting or the seat heating.
When the battery is sufficiently charged, the rear window
defroster can be activated again. Activating/deactivating air-recircula-
tion mode
General notes You can deactivate the flow of fresh air if
unpleasant odors are entering the vehicle
from outside. The air already inside the vehi-
cle will then be recirculated.
If you switch on air-recirculation mode, the
windows can fog up more quickly, in particu-
lar at low temperatures. Only use air-recircu-
lation mode briefly to prevent the windows
from fogging up.
Activating/deactivating The operation of air-recirculation mode is the
same for all control panels.
X Turn the SmartKey to position 2in the igni-
tion lock (Y page 167).
X To activate: press the0089button.
The indicator lamp in the 0089button lights
up.
i In the event of high pollution levels (3-
zone automatic climate control only) or at high outside temperatures, air-recircula-
tion mode is automatically activated. When
air-recirculation mode is activated auto-
matically, the indicator lamp in the 0089
button is not lit.
Outside air is added after about
30 minutes.
X To deactivate: press the0089button.
The indicator lamp in the 0089button goes
out.
i Air-recirculation mode deactivates auto-
matically:
R after approximately five minutes at out-
side temperatures below approximately
41 ‡ (5 †)
R after approximately five minutes if cool-
ing with air dehumidification is deactiva-
ted
R after approximately 30 minutes at out-
side temperatures above approximately
41 ‡ (5 †) if the "Cooling with air dehu-
midification" function is activated Activating/deactivating the residual
heat function
General notes The residual heat function is only available on
vehicles for Canada.
It is possible to make use of the residual heat
of the engine to continue heating the station- ary vehicle for up to 30 minutes after the
engine has been switched off. The heating
time depends on the set interior temperature. Operating the climate control systems
161Climate control
Page 165 of 462
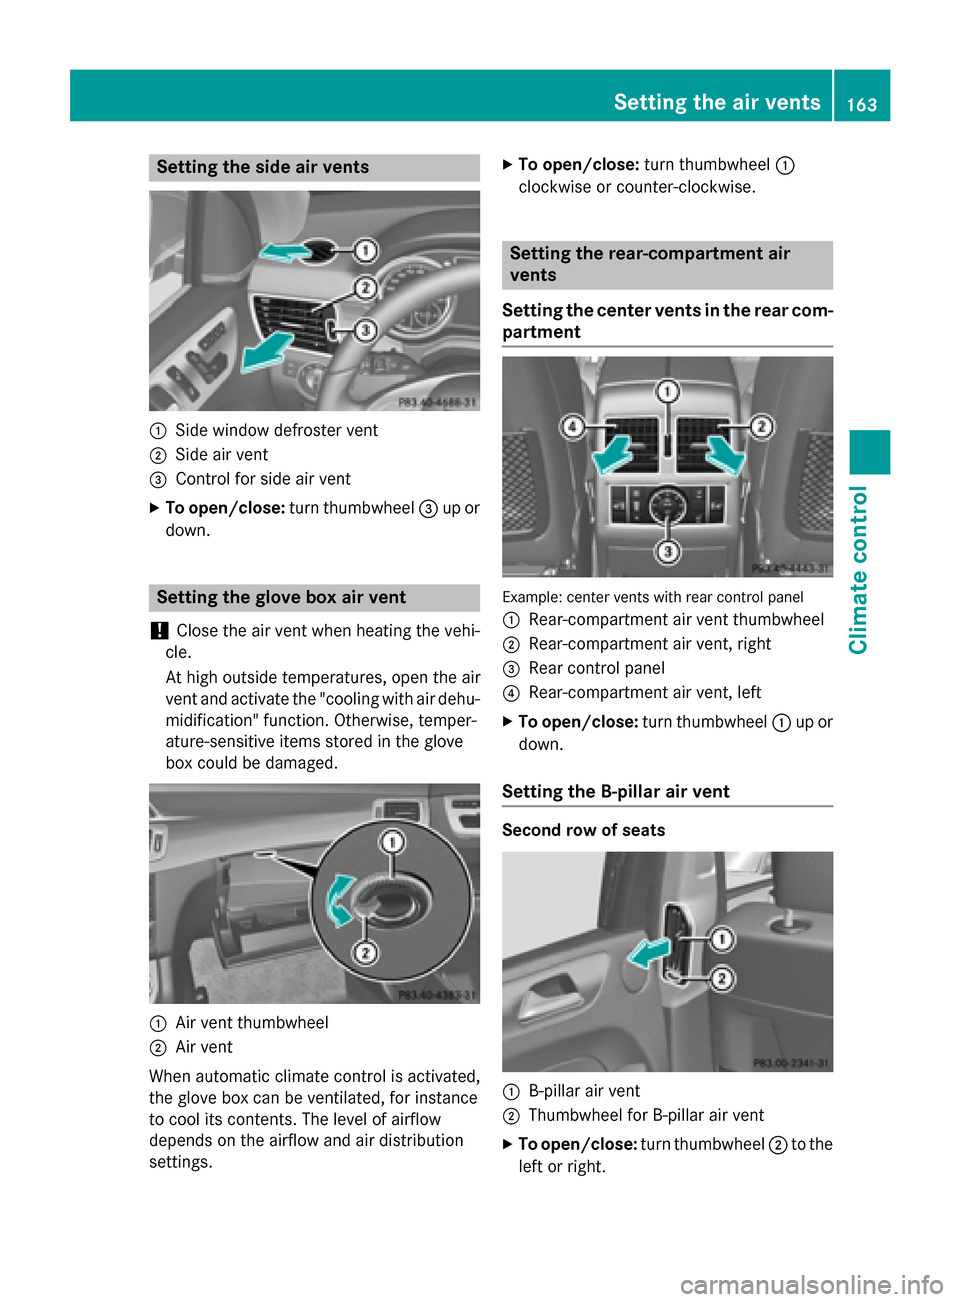
Setting the side air vents
0043
Side window defroster vent
0044 Side air vent
0087 Control for side air vent
X To open/close: turn thumbwheel 0087up or
down. Setting the glove box air vent
! Close the air vent when heating the vehi-
cle.
At high outside temperatures, open the air
vent and activate the "cooling with air dehu- midification" function. Otherwise, temper-
ature-sensitive items stored in the glove
box could be damaged. 0043
Air vent thumbwheel
0044 Air vent
When automatic climate control is activated,
the glove box can be ventilated, for instance
to cool its contents. The level of airflow
depends on the airflow and air distribution
settings. X
To open/close: turn thumbwheel 0043
clockwise or counter-clockwise. Setting the rear-compartment air
vents
Setting the center vents in the rear com-
partment Example: center vents with rear control panel
0043
Rear-compartment air vent thumbwheel
0044 Rear-compartment air vent, right
0087 Rear control panel
0085 Rear-compartment air vent, left
X To open/close: turn thumbwheel 0043up or
down.
Setting the B-pillar air vent Second row of seats
0043
B-pillar air vent
0044 Thumbwheel for B-pillar air vent
X To open/close: turn thumbwheel 0044to the
left or right. Setting the air vents
163Climate control Z
Page 187 of 462
Problems with the transmission
Problem
Possible causes/consequences and
0050
0050Solutions The transmission has
problems shifting gear. The transmission is losing oil.
X Have the transmission checked at a qualified specialist work-
shop immediately. The acceleration ability
is deteriorating.
The transmission no
longer changes gear. The transmission is in emergency mode.
It is only possible to shift into
secondgear and reverse gear.
X Stop the vehicle.
X Shift the transmission to position P.
X Switch off the engine.
X Wait at least ten seconds before restarting the engine.
X Shift the transmission to position Dor R.
If D is selected, the transmission shifts into secondgear; ifRis
selected, the transmission shifts into reverse gear.
X Have the transmission checked at a qualified specialist work-
shop immediately. Transfer case
! Performance tests may only be carried
out on a 2-axle dynamometer. The brake
system or transfer case could otherwise be
damaged. Contact a qualified specialist
workshop for a performance test.
! Because ESP ®
is an automatic system,
the engine and ignition must be switched
off (SmartKey in position 0or 1or Start/
Stop button in position 0or 1) when the
electric parking brake is being tested on a
brake dynamometer (maximum
10 seconds).
Braking triggered automatically by ESP ®
may seriously damage the brake system.
! Vehicles with 4MATIC must not be towed
with either the front or the rear axle raised,
as doing so will damage the transmission.
This section is only valid for vehicles with 4-
wheel drive (4MATIC). Power is always trans- mitted to both axles. Refueling
Important safety notes
G
WARNING
Fuel is highly flammable. If you handle fuel
incorrectly, there is a risk of fire and explo-
sion.
You must avoid fire, open flames, creating
sparks and smoking. Switch off the engine
and, if applicable, the auxiliary heating before refueling. G
WARNING
Fuel is poisonous and hazardous to health.
There is a risk of injury.
You must make sure that fuel does not come into contact with your skin, eyes or clothing
and that it is not swallowed. Do not inhale fuel
vapors. Keep fuel away from children. Refueling
185Driving and parking
Z
Page 198 of 462

fewer changes. For more dynamic changes,
carry out a manual reset.
For further information on the ECO display,
see (Y page 278). Braking
Important safety notes G
WARNING
If you shift down on a slippery road surface in an attempt to increase the engine's braking
effect, the drive wheels could lose their grip.
There is an increased danger of skidding and
accidents.
Do not shift down for additional engine brak-
ing on a slippery road surface.
Downhill gradients !
On long and steep gradients, you must
reduce the load on the brakes by shifting
early to a lower gear. This allows you to take advantage of the engine braking effect and
helps avoid overheating and excessive
wear of the brakes.
When you take advantage of the engine
braking effect, a drive wheel may not turn
for some time, e.g. on a slippery road sur-
face. This could cause damage to the drive train. This type of damage is not covered bythe Mercedes-Benz warranty.
Do not depress the brake pedal continuously while the vehicle is in motion, e.g. causing the
brakes to rub by constantly applying light
pressure to the pedal. This results in exces-
sive and premature wear to the brake pads.
Heavy and light loads G
WARNING
If you rest your foot on the brake pedal while
driving, the braking system can overheat. This increases the stopping distance and can even
cause the braking system to fail. There is a
risk of an accident. Never use the brake pedal as a footrest. Never
depress the brake pedal and the accelerator
pedal at the same time.
! Depressing the brake pedal constantly
results in excessive and premature wear to
the brake pads.
If the brakes have been subjected to a heavy load, do not stop the vehicle immediately.
Drive on for a short while. This allows the air-
flow to cool the brakes more quickly.
Wet roads If you have driven for a long time in heavy rain
without braking, there may be a delayed reac- tion from the brakes when braking for the first
time. This may also occur after the vehicle has been washed or driven through deep water.
You then have to depress the brake pedal
more firmly. Maintain a greater distance from
the vehicle in front.
After driving on a wet road or having the vehi- cle washed, brake firmly while paying atten-
tion to the traffic conditions. This will warm up the brake discs, thereby drying them more
quickly and protecting them against corro-
sion.
Limited braking performance on salt-
treated roads If you drive on salted roads, a layer of salt
residue may form on the brake discs and
brake pads. This can result in a significantly
longer braking distance.
R
Brake occasionally to remove any possible
salt residue. Make sure that you do not
endanger other road users when doing so.
R Carefully depress the brake pedal and the
beginning and end of a journey.
R Maintain a greater distance to the vehicle
ahead. 196
Driving tipsDriving and parking
Page 201 of 462

Do not shift down for additional engine brak-
ing on a slippery road surface. G
DANGER
If the exhaust pipe is blocked or adequate
ventilation is not possible, poisonous gases
such as carbon monoxide (CO) may enter the vehicle. This is the case, e.g. if the vehicle
becomes trapped in snow. There is a risk of
fatal injury.
If you leave the engine or the auxiliary heating
running, make sure the exhaust pipe and area
around the vehicle are clear of snow. To
ensure an adequate supply of fresh air, open a window on the side of the vehicle that is not
facing into the wind.
Have your vehicle winter-proofed at a quali-
fied specialist workshop at the onset of win-
ter.
Drive particularly carefully on slippery road
surfaces. Avoid sudden acceleration, steering and braking maneuvers. Do not use the cruise
control or DISTRONIC PLUS.
If the vehicle threatens to skid or cannot be
stopped when moving at low speed:
X Shift the transmission to position N.
Vehicles with the ON&OFFROAD package:
if driving in snow or with snow chains, select
the snow program (Y page 256) with the off-
road program selector wheel in the center
console.
i Vehicles with a diesel engine:
do not
cover the radiator, e.g. with a protective
cover. The measuring function of the
onboard diagnosis system may otherwise
provide inaccurate values. Some of these
values are required by law and must there-
fore always be accurate.
The outside temperature indicator is not
designed to serve as an ice-warning device
and is therefore unsuitable for that purpose.
Changes in the outside temperature are dis-
played after a short delay. Indicated temperatures just above the freez-
ing point do not guarantee that the road sur-
face is free of ice. The road may still be icy,
especially in wooded areas or on bridges. You
should pay special attention to road condi-
tions when temperatures are around the
freezing point.
For more information on driving with snow
chains, see (Y page 409).
For more information on driving with summer
tires, see (Y page 408).
Observe the notes in the "Winter operation"
section (Y page 408). Off-road driving
Important safety notes G
WARNING
If you drive on a steep incline at an angle or
turn when driving on an incline, the vehicle
could slip sideways, tip and rollover. There is a risk of an accident.
Always drive on a steep incline in the line of
fall (straight up or down) and do not turn the
vehicle. G
WARNING
If the vehicle level is high, the vehicle center of gravity is raised. This could cause the vehicleto tip over more easily on uphill or downhill
gradients. There is a risk of an accident.
Select the lowest possible vehicle level.
When driving off-road, sand, mud and water,
possibly mixed with oil, for example, could get
into the brakes. This could result in a reduced braking effect or in total brake failure and also
in increased wear and tear. The braking char- acteristics change depending on the materialingressing the brakes. Clean the brakes after
driving off-road. If you detect a reduced brak- ing effect or grinding noises, have the brake
system checked in a qualified specialist work-shop as soon as possible. Adapt your driving
style to the different braking characteristics. Driving
tips
199Driving an d parking Z
Page 205 of 462
R
When driving down an incline, make use of
the engine's braking effect. Observe the
engine speed; do not overrev the engine.
R Before driving on extreme uphill and down-
hill gradients, select the LOW RANGE off-
road gear (Y page 261).
R Drive slowly.
R Avoid high engine speeds. Drive at appro-
priate engine speeds (maximum
3,000 rpm).
R Use the left-hand paddle shifter to shift into
a lower gear in good time on long and steep
downhill gradients.
R Check the brakes after prolonged off-road
driving.
i Hill start assist will aid you when pulling
away on a hill.
For further information about hill start
assist, see (Y page 171).
Do not switch to transmission position N
when driving off-road. If you try to brake the
vehicle using the service brake, you could
lose control of the vehicle. If the gradient is
too steep for your vehicle, drive back down in
reverse gear.
Always observe the approach/departure
angle values (Y page 457).
Maximum gradient-climbing capability Always observe the maximum gradient climb-
ing ability values (Y page 457).
Hilltops When driving up an uphill gradient, slightly
reduce pressure on the accelerator immedi-
ately before reaching the brow of the hill. Use
the vehicle's own impetus to drive over the
top of the hill.
This style of driving prevents:
R the vehicle from lifting off the ground on the
brow of a hill
R the vehicle from traveling too quickly down
the other side Driving downhill R
Drive slowly.
R Do not drive at an angle down steep
inclines. Steer into the line of fall and drive
with the front wheels aligned straight. Oth- erwise, the vehicle could slip sideways, tip
and rollover.
R Shift to a lower gear using the left-hand
paddle shifter before tackling steep down-
hill gradients.
R Activate DSR. If this is not sufficient, brake
gently. When doing so, make sure that the
vehicle is facing in the direction of the line
of fall.
R Check that the brakes are working normally
after a long downhill stretch.
i The special off-road ABS setting enables a
precise, brief and repeated locking of the
front wheels. This causes them to dig into
loose earth. Be aware that the front wheels easily skid across the ground surface if
completely braked and therefore lose their
ability to steer. Driving systems
Cruise control
General notes Cruise control maintains a constant road
speed for you. It brakes automatically in order
to avoid exceeding the set speed. You must
select a lower gear in good time on long and
steep downhill gradients, especially if the
vehicle is laden or towing a trailer. By doing
so, you will make use of the braking effect of
the engine. This relieves the load on the brake
system and prevents the brakes from over-
heating and wearing too quickly.
Use cruise control only if road and traffic con-
ditions make it appropriate to maintain a
steady speed for a prolonged period. You can store any road speed above 20 mph
(30 km/h). Driving systems
203Driving and parking Z
Page 208 of 462
Cruise control is automatically deactivated if:
R you engage the electric parking brake
R you are driving at less than 20 mph
(30 km/h)
R ESP ®
intervenes or you deactivate ESP ®
R you activate DSR
R you activate off-road program 2 on vehicles
with the ON&OFFROAD package
R you shift the transmission to position N
while driving
If cruise control is deactivated, you will hear a warning tone. You will see the Cruise Con‐
Cruise Con‐
trol Off
trol Off message in the multifunction dis-
play for approximately five seconds.
i When you switch off the engine, the last
speed stored is cleared. DISTRONIC PLUS
General notes DISTRONIC PLUS regulates the speed and
automatically helps you maintain the dis-
tance to the vehicle detected in front. DIS-
TRONIC PLUS brakes automatically so that
the set speed is not exceeded.
You must select a lower gear in good time on
long and steep downhill gradients, especially
if the vehicle is laden or towing a trailer. By
doing so, you will make use of the braking
effect of the engine. This relieves the load on
the brake system and prevents the brakes
from overheating and wearing too quickly.
If DISTRONIC PLUS detects a slower-moving
vehicle in front, your vehicle is braked in order
to maintain the preset distance to the vehicle in front.
If DISTRONIC PLUS detects that there is a risk
of a collision, you will be warned visually and acoustically. DISTRONIC PLUS cannot pre-
vent a collision without your intervention. An
intermittent warning tone will then sound and
the distance warning lamp will light up in the instrument cluster. Brake immediately in
order to increase the distance to the vehicle in front or take evasive action provided it is
safe to do so.
For DISTRONIC PLUS to assist you, the radar
sensor system must be operational.
If there is no vehicle in front, DISTRONIC
PLUS operates in the same way as cruise
control in the speed range between 20 mph
(Canada: 30 km/h) and 120 mph (Canada:
200 km/h). If a vehicle is driving in front of
you, it operates in the speed range between
0 mph (0 km/h) and 120 mph (Canada:
200 km/h).
Do not use DISTRONIC PLUS while driving on roads with steep gradients.
As DISTRONIC PLUS transmits radar waves, it
can resemble the radar detectors of the
responsible authorities. You can refer to the
relevant chapter in the Operator's Manual if
questions are asked about this.
i USA only:
This device has been approved by the FCC as a "Vehicular Radar System". The radar
sensor is intended for use in an automotiveradar system only. Removing, tampering
with, or altering the device will void any
warranties, and is not permitted by the
FCC. Do not tamper with, alter, or use in
any non-approved way.
Any unauthorized modification to this
device could void the user’s authority to
operate the equipment.
i Canada only: This device complies with
RSS-210 of Industry Canada. Operation is
subject to the following two conditions:
1. This device may not cause harmful inter-
ference, and
2. this device must accept any interference received, including interference that may
cause undesired operation of the device.
Removal, tampering, or altering of the
device will void any warranties, and is not
permitted. Do not tamper with, alter, or use in any non-approved way. 206
Driving systemsDriving and pa
rking
Page 268 of 462

overheating and wearing too quickly. If you
need additional braking, depress the brake
pedal repeatedly rather than continuously.
Driving tips If the trailer swings from side to side:
X Do not accelerate.
X Do not counter-steer.
X Brake if necessary.
R Maintain a greater distance from the vehi-
cle in front than when driving without a
trailer.
R Avoid braking abruptly. If possible, brake
gently at first to allow the trailer to run on.
Then, increase the braking force rapidly.
R The values given for gradient-climbing
capabilities from a standstill refer to sea
level. When driving in mountainous areas,
note that the power output of the engine
and, consequently, the vehicle's gradient-
climbing capability, decreases with
increasing altitude. Installing the ball coupling
G
WARNING
If the ball coupling is not correctly installed
and secured, it can come loose during the
journey and endanger other road users. There is a risk of an accident and injury.
Always install and secure the ball coupling as
described. Before every journey, ensure that
the ball coupling is secured with the bolt and
the corresponding spring cotter. G
WARNING
If the ball coupling is not installed correctly or not secured with the bolt provided and the
corresponding spring cotter, the trailer may
come loose. There is a risk of an accident.
Always install and secure the ball coupling as
described. Before every journey, ensure that
the ball coupling is secured with the bolt and
the corresponding spring cotter. G
WARNING
If the ball coupling is not installed and secured
correctly the trailer may come loose. There is
a risk of an accident.
Install and secure the ball coupling as descri-
bed in the ball coupling installation instruc-
tions. Make sure that the ball coupling is
installed and secured correctly before every
journey. Cover cap
X Pull protective cap 0043in the direction of the
arrow, out of the ball coupling recess.
X Place protective cap 0043in the ball coupling
recess. 266
Towing a trailerDriving and parking