Washer MERCEDES-BENZ GL-Class 2015 X166 Owner's Manual
[x] Cancel search | Manufacturer: MERCEDES-BENZ, Model Year: 2015, Model line: GL-Class, Model: MERCEDES-BENZ GL-Class 2015 X166Pages: 462, PDF Size: 9.09 MB
Page 18 of 462
P
Paint code number ............................446
Paintwork (cleaning instructions) ... 379
Panic alarm .......................................... 44
Panorama roof with power tilt/
sliding panel
Important safety notes .................... 99
Opening/closing ............................ 101
Opening/closing the roller sun-
blind ............................................... 102
Problem (malfunction) ................... 103
Resetting ....................................... 102
Parking
Important safety notes .................. 190
Parking brake ................................ 192
Position of exterior mirror, front-
passenger side ............................... 124
Rear view camera .......................... 232
see PARKTRONIC
Parking aid
Active Parking Assist ..................... 228
see Exterior mirrors
see PARKTRONIC
Parking assistance
see PARKTRONIC
Parking brake
Display message ............................ 296
Electric parking brake .................... 192
Warning lamp ................................. 334
Parking lamps
Switching on/off ........................... 130
PARKTRONIC
Deactivating/activating ................. 227
Driving system ............................... 225
Function/notes ............................ .225
Important safety notes .................. 225
Problem (malfunction) ................... 228
Range of the sensors ..................... 225
Trailer towing ................................. 227
Warning displa y............................. 226
PASSENGER AIR BAG OFF
Indicator lamp .................................. 45
Problems (malfunction) .................. 303
Pets in the vehicle ............................... 67
Plastic trim (cleaning instruc-
tions) .................................................. 384 Power closing feature
......................... 90
Power washers .................................. 379
Power windows see Side windows
PRE-SAFE ®
(anticipatory occupant
protection) Display message ............................ 299
Operation ......................................... 60
PRE-SAFE ®
Brake
Activating/deactivating ................. 284
Display message ............................ 301
Function/note s................................ 76
Warning lamp ................................. 338
Program selector button .................. 180
Protection of the environment General notes .................................. 24
Pulling away
Trailer ............................................ 171
Pulling away (automatic transmis-
sion) .................................................... 170 Q
Qualified specialist workshop ........... 29 R
RACETIMER (on-board computer) .... 290
Radar sensor system Activating/deactivating ................. 287
Display message ............................ 315
Radiator cover ................................... 373
Radio Selecting a station ......................... 280
see separate operating instructions
Radio-controlled devices (instal-
ling) ..................................................... 369
Radio-wave reception/transmis-
sion in the vehicle
Declaration of conformity ................ 28
Reading lamp ..................................... 135
Rear compartment Exit/entry position (3rd row of
seats) ............................................. 112
Setting the air vents ...................... 163
Rear fog lamp
Switching on/of f........................... 130 16
Index
Page 20 of 462
Correct driver's seat position ........ 106
Entry position (3rd row of seats) .... 113
Exit position (3rd row of seats) ...... 114
Folding down/up (third row of
seats) ............................................ .111
Folding the 2nd row of seats
forward electrically ........................ 115
Folding the 2nd row of seats
forward manually ........................... 112
Folding the rear bench seat for-
wards/back ................................... 346
Important safety notes .................. 107
Overview ........................................ 107
Seat heating problem .................... 118
Seat ventilation problem ................ 119
Storing settings (memory func-
tion) ............................................... 124
Switching seat heating on/off ....... 116
Switching seat ventilation on/off .. 118
Selector lever
Cleaning ......................................... 384
Sensors (cleaning instructions) ....... 381
Service menu (on-board com-
puter) ................................................. .284
Service products Brake fluid ..................................... 452
Coolant (engine) ............................ 452
DEF special additives ..................... 450
Engine oil ....................................... 451
Fuel ................................................ 448
Important safety notes .................. 447
Refrigerant (air-conditioning sys-
tem) ............................................... 454
Washer fluid ................................... 453
Settings
Factory (on-board computer) ......... 289
On-board computer ....................... 285
Setting the air distribution ...............158
Setting the airflow ............................ 158
SETUP (on-board computer) ............. 289
Side impact air bag .............................52
Side marker lamp (display mes-
sage) ................................................... 307
Side windows Cleaning ......................................... 381
Convenience closing feature ............ 97
Convenience opening feature ..........97 Hinged side window
s....................... 96
Important safety information ........... 95
Opening/closing .............................. 96
Overview .......................................... 95
Problem (malfunction) ..................... 99
Resetting ......................................... 98
Sliding sunroof
Important safety notes .................... 99
Opening/closing ............................ 100
Problem (malfunction) ................... 103
Resetting ....................................... 100
see Panorama roof with power
tilt/sliding panel
SmartKey
Changing the battery ....................... 85
Changing the programming ............. 83
Checking the battery ....................... 85
Convenience closing feature ............ 98
Convenience opening feature .......... 97
Display message ............................ 325
Door central locking/unlocking ....... 82
Important safety notes .................... 82
Loss ................................................. 87
Mechanical key ................................ 84
Overview .......................................... 82
Positions (ignition lock) ................. 167
Problem (malfunction) ..................... 87
Starting the engine ........................ 170
Snow chains
Information .................................... 409
Snow drive program ....................... 256
Sockets
Center console .............................. 355
General notes ................................ 354
Luggage compartment ................... 355
Rear compartment ......................... 355
Specialist workshop ............................ 29
Special seat belt retractor .................. 61
Speed, controlling see Cruise control
Speedometer
Digital ............................................ 278
In the Instrument cluster ................. 35
Segments ...................................... 275
Selecting the unit of measure-
ment .............................................. 285
see Instrument cluster 18
Index
Page 24 of 462
Turn signals
Display message ............................ 305
Switching on/off ........................... 131
TWR (Tongue Weight Rating) (defi-
nition) ................................................. 428
Type identification plate see Vehicle identification plate U
Unlocking Emergency unlocking ....................... 90
From inside the vehicle (central
unlocking button) ............................. 89 V
Vanity mirror (in the sun visor) ........ 352
Vehicle Correct use ...................................... 29
Data acquisition ............................... 30
Display message ............................ 323
Equipment ....................................... 25
Individual settings .......................... 285
Limited Warranty ............................. 30
Loading .......................................... 418
Locking (in an emergency) ............... 90
Locking (SmartKey) .......................... 82
Lowering ........................................ 434
Maintenance .................................... 26
Parking for a long period ................ 193
Pulling away ................................... 170
Raising ........................................... 431
Reporting problems ......................... 29
Securing from rolling away ............ 430
Towing away .................................. 399
Transporting .................................. 401
Unlocking (in an emergency) ........... 90
Unlocking (SmartKey) ...................... 82
Vehicle data ................................... 455
Vehicle battery
see Battery (vehicle)
Vehicle data ....................................... 455
Vehicle data (off-road driving) Approach/departure angle ............ 457
Fording depth ................................ 456
Maximum gradient climbing abil-
ity .................................................. 457 Vehicle dimensions
........................... 455
Vehicle emergency locking ................ 90
Vehicle identification number see VIN
Vehicle identification plate .............. 446
Vehicle level AMG adaptive sport suspension
system ........................................... 224
Vehicle level (display message) ....... 312
Vehicle maintenance see ASSYST PLUS
Vehicle tool kit .................................. 388
Video Operating the DVD ........................ .281
VIN ...................................................... 446 W
Warning and indicator lamps ABS ................................................ 329
Brakes .......................................... .328
Check Engine ................................. 335
Coolant .......................................... 336
Distance warning ........................... 338
DISTRONIC PLUS ........................... 338
ESP ®
.............................................. 331
ESP ®
OFF ....................................... 332
Overview .......................................... 36
PASSENGER AIR BAG OFF .............. .45
Reserve fuel .................................. .335
Restraint system ............................ 334
Seat belt ........................................ 327
Tire pressure monitor .................... 339
Warranty .............................................. 25
Washer fluid Display message ............................ 325
Wheel and tire combination
see Tires
Wheel bolt tightening torque ........... 434
Wheel chock ...................................... 430
Wheels Changing a wheel .......................... 429
Checking ........................................ 407
Cleaning ......................................... 380
Cleaning (warning) ......................... 430
Emergency spare wheel ................. 440
Important safety notes .................. 406 22
Index
Page 25 of 462
Interchanging/changing ................ 429
Mounting a new wheel ................... 433
Mounting a wheel .......................... 430
Overview ........................................ 406
Removing a wheel .......................... 433
Storing ........................................... 430
Tightening torque ........................... 434
Wheel size/tire size ....................... 434
Window curtain air bag
Display message ............................ 302
Operation ......................................... 53
Windows
see Side windows
Windshield
Defrosting ...................................... 159
Infrared reflective .......................... 369
Windshield washer fluid
see Windshield washer system
Windshield washer system
Adding washer fluid ....................... 376
Notes ............................................. 453
Windshield wipers
Problem (malfunction) ................... 143
Rear window wipe r........................ 141
Replacing the wiper blades ............ 141
Switching on/of f........................... 140
Winter driving
Slippery road surfaces ................... 198
Snow chains .................................. 409
Winter operation
General notes ................................ 408
Overview ........................................ 408
Radiator cover ............................... 373
Snow drive program ....................... 256
Winter tires
M+S tire s....................................... 408
Wiper blades
Cleaning ......................................... 381
Important safety notes .................. 141
Replacing ....................................... 141
Replacing (rear window )................ 142
Replacing (windshield) ................... 141
Wooden trim (cleaning instruc-
tions) .................................................. 384
Workshop see Qualified specialist workshop Z
ZONE function Switching on/of f........................... 159 Index
23
Page 142 of 462
Brake lamp
X
Switch off the lights.
X Open the cargo compartment.
X Open the service flap (Y page 139).
X Turn bulb holder 0043counter-clockwise and
remove it.
X Take bulb out of bulb holder 0043.
X Insert the new bulb into bulb holder 0043.
X Insert bulb holder 0043into the lamp and turn
it clockwise.
X Close the service flap (Y page 139).Windshield wipers
Switching the windshield wipers
on/off
! Do not operate the windshield wipers
when the windshield is dry, as this could
damage the wiper blades. Moreover, dust
that has collected on the windshield can
scratch the glass if wiping takes place when the windshield is dry.
If it is necessary to switch on the windshield wipers in dry weather conditions, always
use washer fluid when operating the wind-
shield wipers.
! If the windshield wipers leave smears on
the windshield after the vehicle has been
washed in an automatic car wash, wax or
other residues may be the reason for this.
Clean the windshield using washer fluid
after washing the vehicle in an automatic
car wash. !
Intermittent wiping with rain sensor: due
to optical influences and the windshield
becoming dirty in dry weather conditions,
the windshield wipers may be activated
inadvertently. This could then damage the
windshield wiper blades or scratch the
windshield.
For this reason, you should always switch
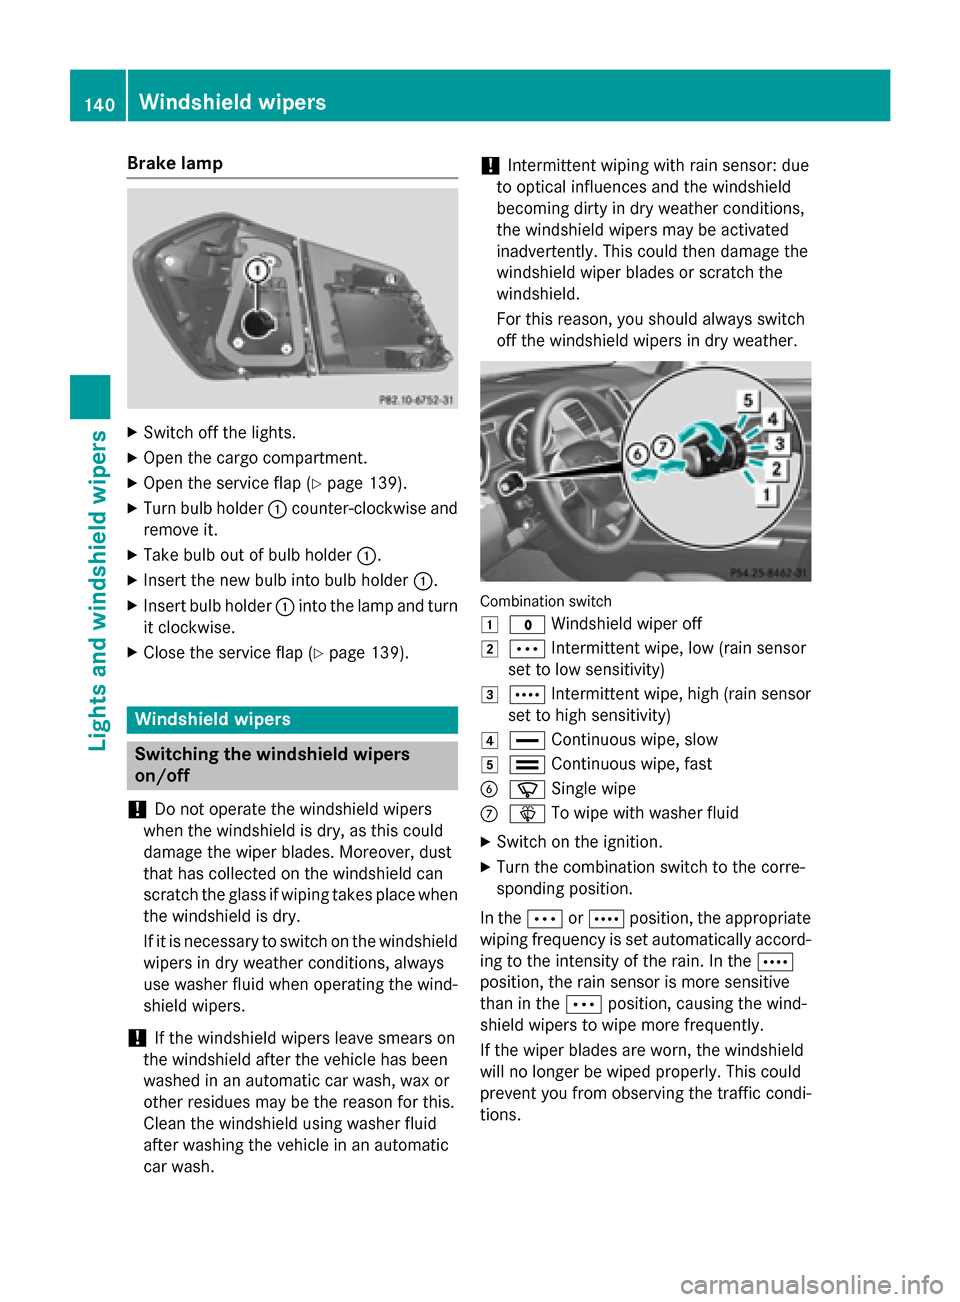
off the windshield wipers in dry weather. Combination switch
0047
003F Windshield wiper off
0048 0062 Intermittent wipe, low (rain sensor
set to low sensitivity)
0049 0063 Intermittent wipe, high (rain sensor
set to high sensitivity)
004A 00AA Continuous wipe, slow
004B 00A9 Continuous wipe, fast
0084 00D3 Single wipe
006B 00D4 To wipe with washer fluid
X Switch on the ignition.
X Turn the combination switch to the corre-
sponding position.
In the 0062or0063 position, the appropriate
wiping frequency is set automatically accord- ing to the intensity of the rain. In the 0063
position, the rain sensor is more sensitive
than in the 0062position, causing the wind-
shield wipers to wipe more frequently.
If the wiper blades are worn, the windshield
will no longer be wiped properly. This could
prevent you from observing the traffic condi-
tions. 140
Windshield wipersLights and
windshield wipers
Page 143 of 462
Switching the rear window wiper on/
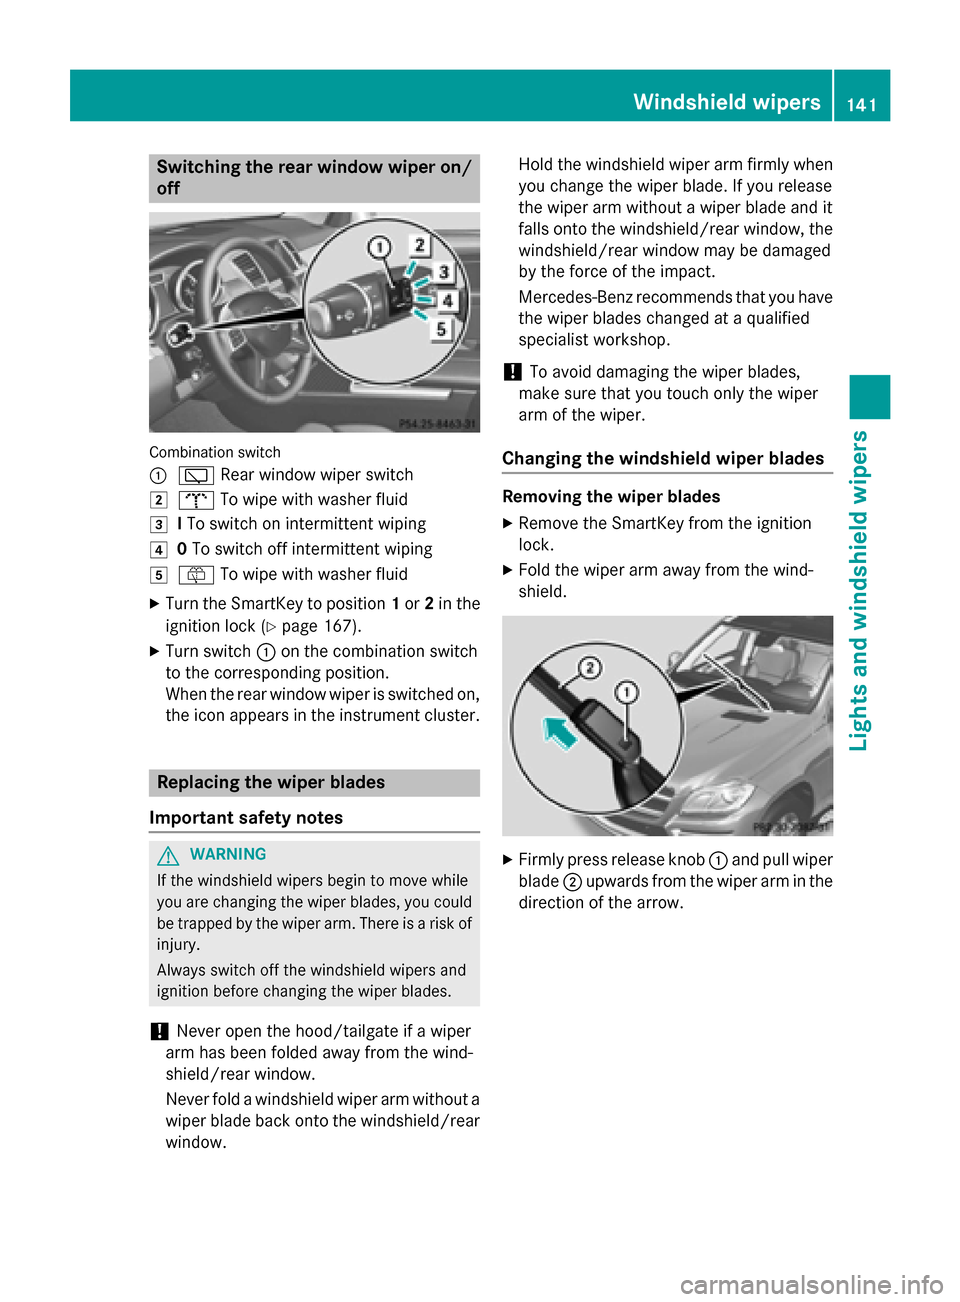
off Combination switch
0043
00C5 Rear window wiper switch
0048 008E To wipe with washer fluid
0049 ITo switch on intermittent wiping
004A 0To switch off intermittent wiping
004B 00E2 To wipe with washer fluid
X Turn the SmartKey to position 1or 2in the
ignition lock (Y page 167).
X Turn switch 0043on the combination switch
to the corresponding position.
When the rear window wiper is switched on,
the icon appears in the instrument cluster. Replacing the wiper blades
Important safety notes G
WARNING
If the windshield wipers begin to move while
you are changing the wiper blades, you could be trapped by the wiper arm. There is a risk of
injury.
Always switch off the windshield wipers and
ignition before changing the wiper blades.
! Never open the hood/tailgate if a wiper
arm has been folded away from the wind-
shield/rear window.
Never fold a windshield wiper arm without a
wiper blade back onto the windshield/rear window. Hold the windshield wiper arm firmly when
you change the wiper blade. If you release
the wiper arm without a wiper blade and it
falls onto the windshield/rear window, the
windshield/rear window may be damaged
by the force of the impact.
Mercedes-Benz recommends that you have the wiper blades changed at a qualified
specialist workshop.
! To avoid damaging the wiper blades,
make sure that you touch only the wiper
arm of the wiper.
Changing the windshield wiper blades Removing the wiper blades
X Remove the SmartKey from the ignition
lock.
X Fold the wiper arm away from the wind-
shield. X
Firmly press release knob 0043and pull wiper
blade 0044upwards from the wiper arm in the
direction of the arrow. Windshield wipers
141Lights and windshield wipers Z
Page 327 of 462
Display messages
Possible causes/consequences and
0050
0050Solutions 00CC
Power Power
Steering
Steering Mal‐
Mal‐
function See Oper‐
function See Oper‐
ator's Manual ator's Manual The power steering is malfunctioning.
A warning tone also sounds.
G WARNING
You will need to use more force to steer.
There is a risk of an accident. X Check whether you are able to apply the extra force required.
X If you are able to steer safely: carefully drive on to a qualified
specialist workshop.
X If you are unable to steer safely: do not drive on. Contact the
nearest qualified specialist workshop. No Service No Service Your vehicle is outside the network provider's transmitter/
receiver range.
X Wait until the mobile phone operational readiness symbol
appears in the multifunction display. 00B2
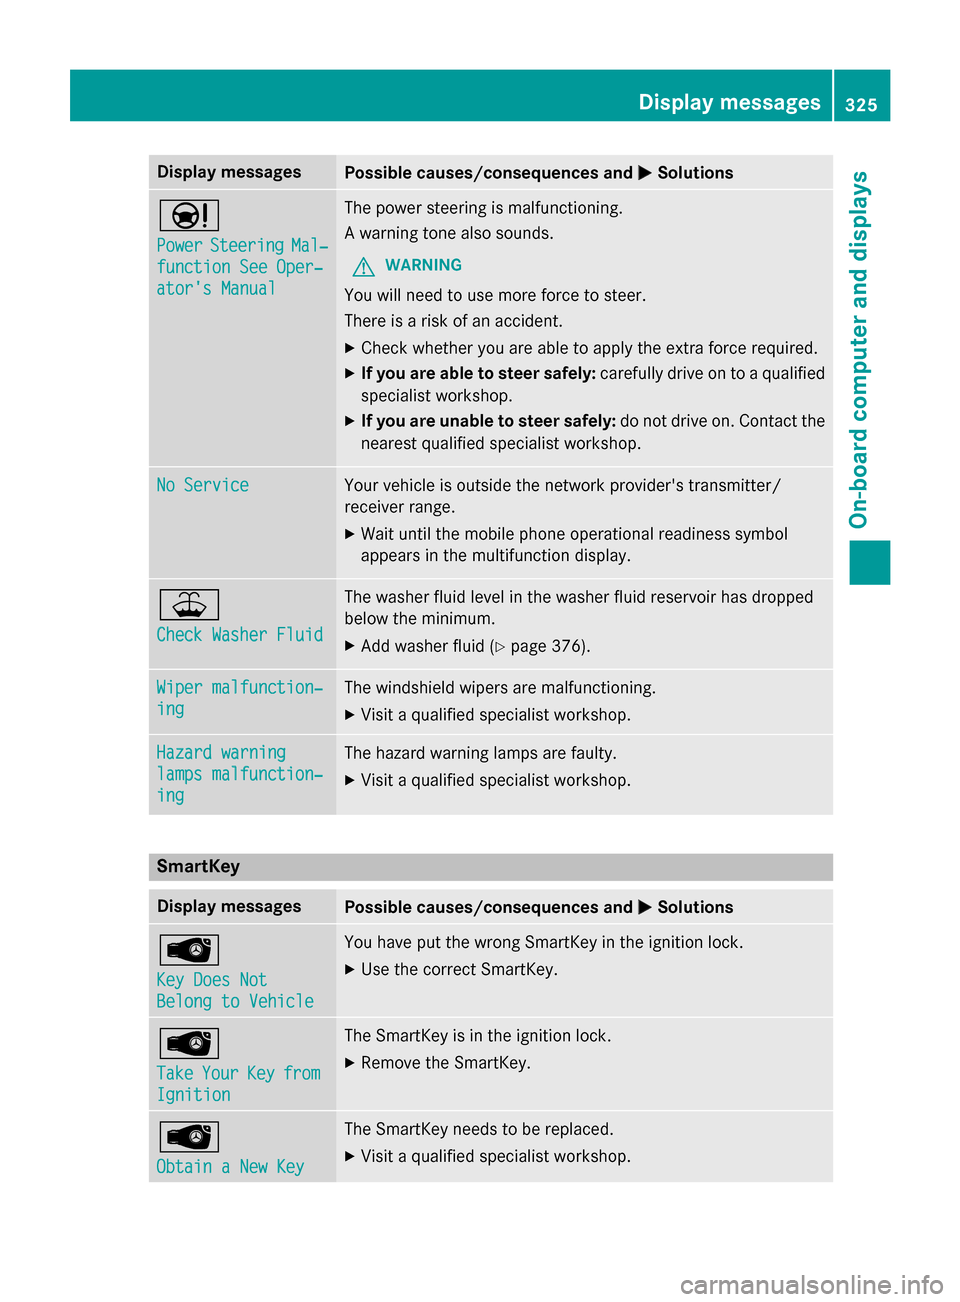
Check Washer Fluid Check Washer Fluid The washer fluid level in the washer fluid reservoir has dropped
below the minimum.
X Add washer fluid (Y page 376). Wiper malfunction‐ Wiper malfunction‐
ing ing The windshield wipers are malfunctioning.
X Visit a qualified specialist workshop. Hazard warning
Hazard warning
lamps malfunction‐ lamps malfunction‐
ing ing The hazard warning lamps are faulty.
X Visit a qualified specialist workshop. SmartKey
Display messages
Possible causes/consequences and
0050
0050Solutions 00AF
Key Does Not Key Does Not
Belong to Vehicle Belong to Vehicle You have put the wrong SmartKey in the ignition lock.
X Use the correct SmartKey. 00AF
Take Take
Your
YourKey
Keyfrom
from
Ignition
Ignition The SmartKey is in the ignition lock.
X Remove the SmartKey. 00AF
Obtain a New Key Obtain a New Key The SmartKey needs to be replaced.
X Visit a qualified specialist workshop. Display
messages
325On-board computer and displays Z
Page 378 of 462
For further information on coolant, see
(Y page 452).
Adding washer fluid to the windshield
washer system G
WARNING
Certain components in the engine compart-
ment, such as the engine, radiator and parts
of the exhaust system, can become very hot.
Working in the engine compartment poses a
risk of injury.
Where possible, let the engine cool down and touch only the components described in the
following. G
WARNING
Windshield washer concentrate is highly flam- mable. If it comes into contact with hot engine
components or the exhaust system it could
ignite. There is a risk of fire and injury.
Make sure that no windshield washer con-
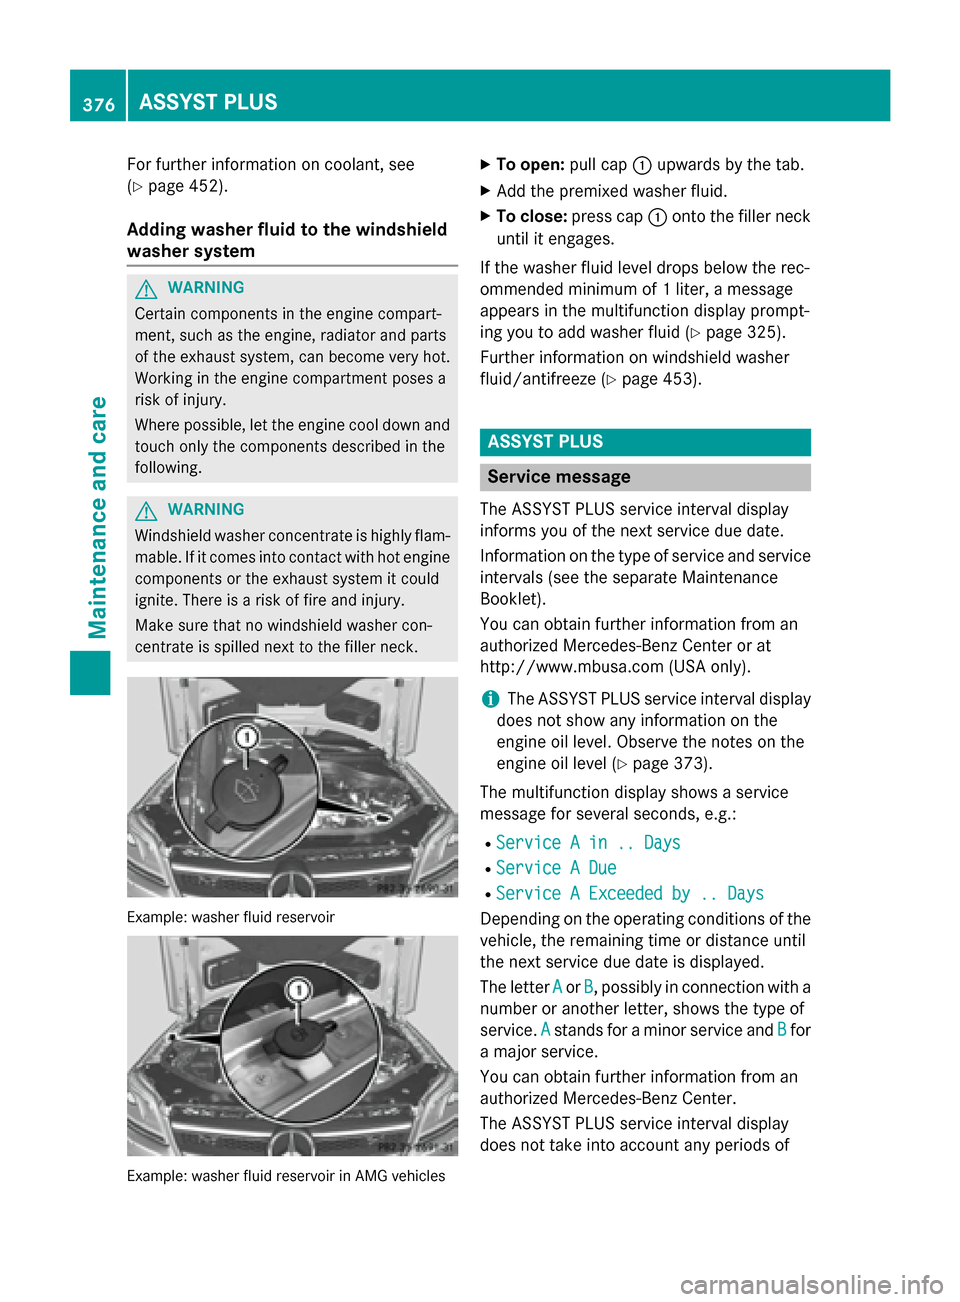
centrate is spilled next to the filler neck. Example: washer fluid reservoir
Example: washer fluid reservoir in AMG vehicles X
To open: pull cap0043upwards by the tab.
X Add the premixed washer fluid.
X To close: press cap 0043onto the filler neck
until it engages.
If the washer fluid level drops below the rec-
ommended minimum of 1 liter, a message
appears in the multifunction display prompt-
ing you to add washer fluid (Y page 325).
Further information on windshield washer
fluid/antifreeze (Y page 453). ASSYST PLUS
Service message
The ASSYST PLUS service interval display
informs you of the next service due date.
Information on the type of service and service
intervals (see the separate Maintenance
Booklet).
You can obtain further information from an
authorized Mercedes-Benz Center or at
http://www.mbusa.co m (USA only).
i The ASSYST PLUS service interval display
does not show any information on the
engine oil level. Observe the notes on the
engine oil level (Y page 373).
The multifunction display shows a service
message for several seconds, e.g.: R Service A in .. Days Service A in .. Days
R Service A Due
Service A Due
R Service A Exceeded by .. Days
Service A Exceeded by .. Days
Depending on the operating conditions of the vehicle, the remaining time or distance until
the next service due date is displayed.
The letter A Aor B
B, possibly in connection with a
number or another letter, shows the type of
service. A Astands for a minor service and B
Bfor
a major service.
You can obtain further information from an
authorized Mercedes-Benz Center.
The ASSYST PLUS service interval display
does not take into account any periods of 376
ASSYST PLUSMaintenance and care
Page 381 of 462
X
Make sure the vehicle is stationary and the
ignition is switched off.
X Turn the SmartKey to position
2(Y page 167) in the ignition lock.
Use the SmartKey instead of the Start/
Stop button on vehicles with KEYLESS-GO.
X Depress and hold the brake pedal.
X Shift the automatic transmission to posi-
tion N.
X Release the brake pedal.
X Release the electric parking brake.
X Switch off the ignition and leave the Smart-
Key in the ignition lock.
You can wash the vehicle in an automatic car wash from the very start.
If the vehicle is very dirty, pre-wash it before
cleaning it in an automatic car wash.
After using an automatic car wash, wipe off
wax from the windshield and the wiper
blades. This will prevent smears and reduce
wiping noises caused by residue on the wind- shield.
Washing by hand In some countries, washing by hand is only
allowed at specially equipped washing bays.
Observe the legal requirements in all coun-
tries concerned.
X Do not use hot water and do not wash the
vehicle in direct sunlight.
X Use a soft sponge to clean.
X Use a mild cleaning agent, such as a car
shampoo approved by Mercedes-Benz.
X Thoroughly hose down the vehicle with a
gentle jet of water.
X Do not point the water jet directly towards
the air inlets.
X Use plenty of water and rinse out the
sponge frequently.
X Rinse the vehicle with clean water and dry
thoroughly with a chamois.
X Do not let the cleaning agent dry on the
paintwork. When using the vehicle in winter, remove all
traces of road salt deposits carefully and as
soon as possible.
Power washers G
WARNING
The water jet from a circular jet nozzle (dirt
blasters) can cause invisible exterior damage to the tires or chassis components. Compo-
nents damaged in this way may fail unexpect-edly. There is a risk of an accident.
Do not use power washers with circular jet
nozzles to clean the vehicle. Have damaged
tires or chassis components replaced imme-
diately.
! Always maintain a distance of at least
11.8 in (30 cm) between the vehicle and the
power washer nozzle. Information about
the correct distance is available from the
equipment manufacturer.
Move the power washer nozzle around
when cleaning your vehicle.
Do not aim directly at any of the following:
R tires
R door gaps, roof gaps, joints, etc.
R electrical components
R battery
R connectors
R lights
R seals
R trim
R ventilation slots
Damaged seals or electrical components
can lead to leaks or failures.
Cleaning the paintwork !
Do not affix:
R stickers
R films
R magnetic plates or similar items
to painted surfaces. You could otherwise
damage the paintwork. Care
379Maintenance and care Z
Page 383 of 462
should drive for a few minutes after clean-
ing. Braking heats the brake discs and the
brake pads/linings, thus drying them. The
vehicle can then be parked.
Cleaning the windows G
WARNING
You could become trapped by the windshield wipers if they start moving while cleaning the
windshield or wiper blades. There is a risk of
injury.
Always switch off the windshield wipers and
the ignition before cleaning the windshield or
wiper blades.
! Do not use dry cloths, abrasive products,
solvents or cleaning agents containing sol- vents to clean the inside of the windows. Do
not touch the insides of the windows with
hard objects, e.g. an ice scraper or ring.
There is otherwise a risk of damaging the
windows.
! Clean the water drainage channels of the
windshield and the rear window at regular
intervals. Deposits such as leaves, petals
and pollen may under certain circumstan-
ces prevent water from draining away. This
can lead to corrosion damage and damage to electronic components.
X Clean the inside and outside of the win-
dows with a damp cloth and a cleaning
product that is recommended and
approved by Mercedes-Benz.
Cleaning wiper blades G
WARNING
You could become trapped by the windshield wipers if they start moving while cleaning the
windshield or wiper blades. There is a risk of
injury.
Always switch off the windshield wipers and
the ignition before cleaning the windshield or
wiper blades. !
Do not pull the wiper blade. Otherwise,
the wiper blade could be damaged.
! Do not clean wiper blades too often and
do not rub them too hard. Otherwise, the
graphite coating could be damaged. This
could cause wiper noise.
! Hold the wiper arm securely when folding
back. The windshield could be damaged if
the wiper arm smacks against it suddenly.
X Fold the windshield wiper arms away from
the windshield.
X Carefully clean the wiper blades with a
damp cloth.
X Fold the windshield wiper arms back again
before switching on the ignition.
Cleaning the exterior lighting !
Only use cleaning agents or cleaning
cloths which are suitable for plastic light
lenses. Unsuitable cleaning agents or
cleaning cloths could scratch or damage
the plastic light lenses.
X Clean the plastic lenses of the exterior
lighting using a wet sponge and a mild
cleaning agent, e.g. Mercedes-Benz car
shampoo or cleaning cloths.
Mirror turn signals !
Only use cleaning agents or cleaning
cloths that are suitable for plastic lenses.
Unsuitable cleaning agents or cleaning
cloths could scratch or damage the plastic lenses of the mirror turn signals.
X Clean the plastic lenses of the mirror turn
signals in the exterior mirror housing using
a wet sponge and mild cleaning agent, e.g.
Mercedes-Benz car shampoo or cleaning
cloths.
Cleaning the sensors !
If you clean the sensors with a power
washer, make sure that you keep a dis-
tance of at least 11.8 in (30 cm) between Care
381Maintenance and care Z