brake light MERCEDES-BENZ GL-Class 2016 X166 User Guide
[x] Cancel search | Manufacturer: MERCEDES-BENZ, Model Year: 2016, Model line: GL-Class, Model: MERCEDES-BENZ GL-Class 2016 X166Pages: 462, PDF Size: 10.44 MB
Page 139 of 462
Protect bulbs from moisture during opera-
tion. Do not allow bulbs to come into contact
with liquids.
There are bulbs other than the Xenon bulbs
that you cannot change. Replace only the
bulbs listed (
Ypage 137). Have the bulbs that
you cannot replace yourself changed at a
qualified specialist workshop.
If you require assistance changing bulbs, con-
sult a qualified specialist workshop.
If the new bulb still does not light up, consult
a qualified specialist workshop.
Bulbs and lamps are an important aspect of
vehicle safety. You must therefore make sure
that these function correctly at all times.
Have the headlamp setting checked regularly.
Overview: changing bulbs/bulb types
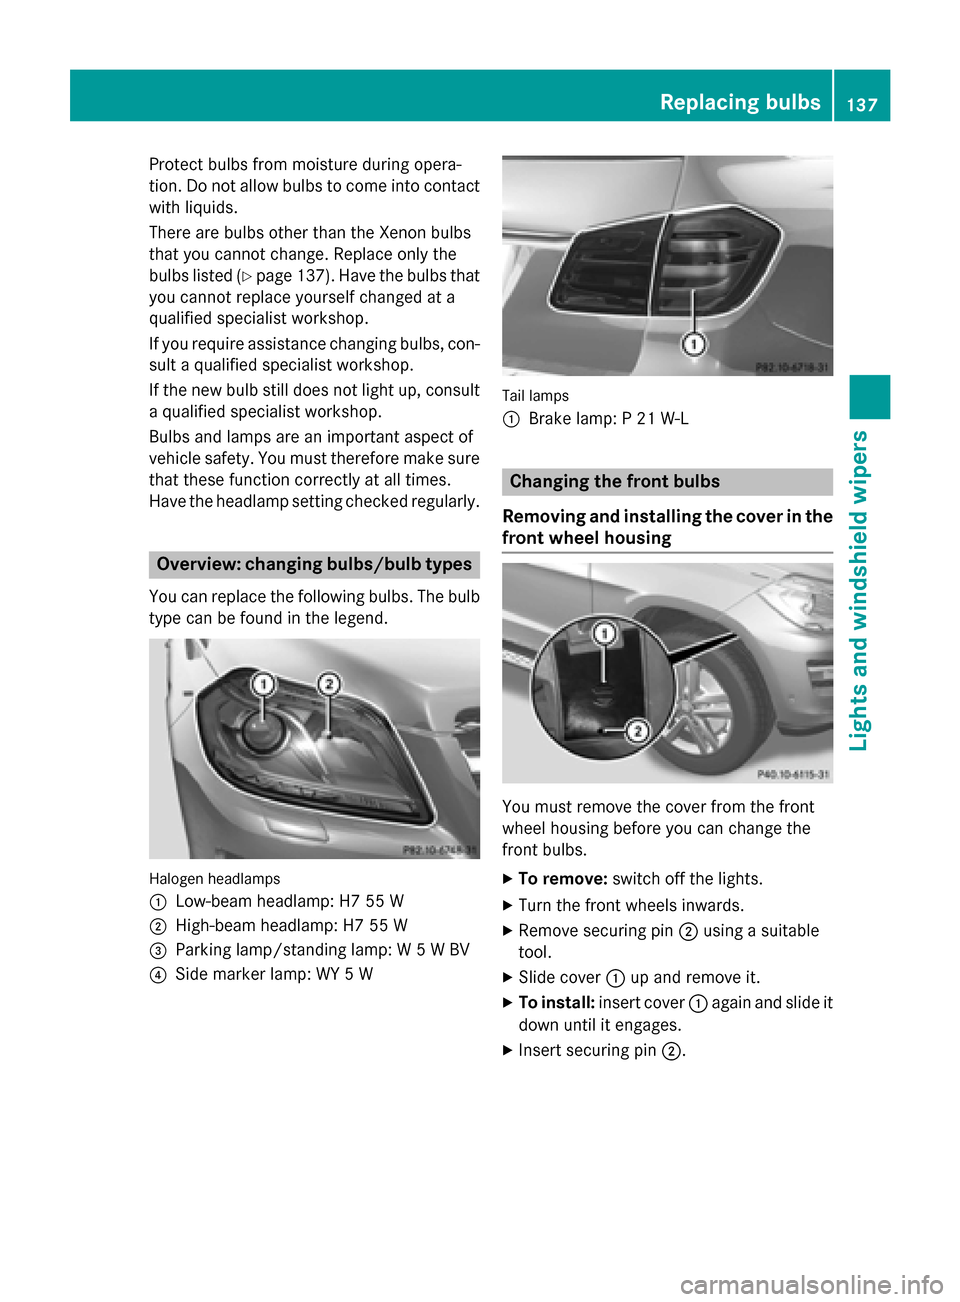
You can replace the following bulbs. The bulb
type can be found in the legend.
Halogen headlamps
:
Low-beam headlamp: H7 55 W
;High-beam headlamp: H7 55 W
=Parking lamp/standing lamp: W 5 W BV
?Side marker lamp: WY 5 W
Tail lamps
:
Brake lamp: P 21 W-L
Changing the front bulbs
Removing and installing the cover in the
front wheel housing
You must remove the cover from the front
wheel housing before you can change the
front bulbs.
XTo remove: switch off the lights.
XTurn the front wheels inwards.
XRemove securing pin ;using a suitable
tool.
XSlide cover :up and remove it.
XTo install: insert cover :again and slide it
down until it engages.
XInsert securing pin ;.
Replacing bulbs137
Lights and windshield wipers
Z
Page 141 of 462
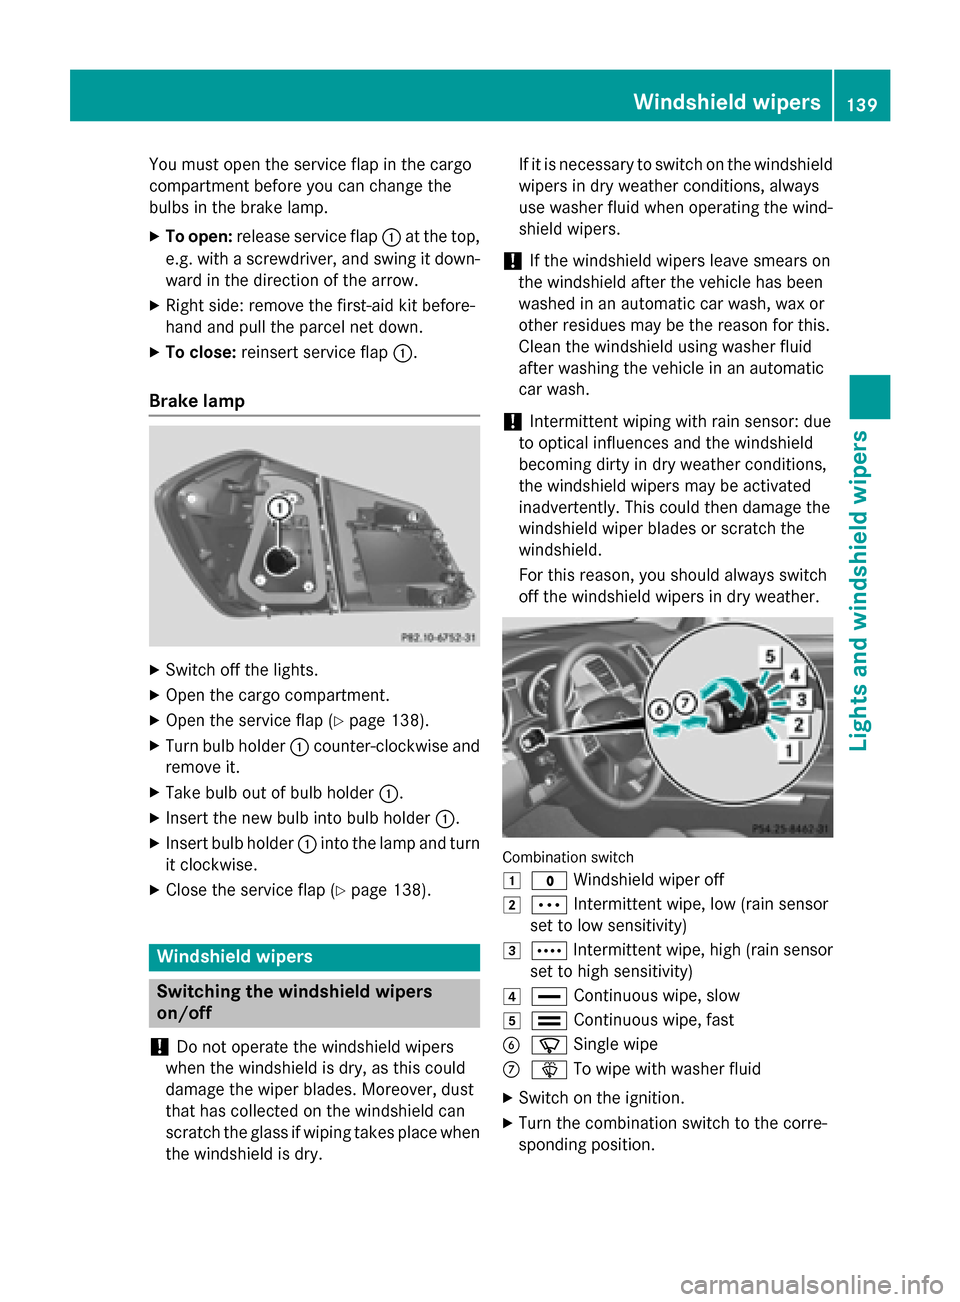
You must open the service flap in the cargo
compartment before you can change the
bulbs in the brake lamp.
XTo open:release service flap :at the top,
e.g. with a screwdriver, and swing it down- ward in the direction of the arrow.
XRight side: remove the first-aid kit before-
hand and pull the parcel net down.
XTo close: reinsert service flap :.
Brake lamp
XSwitch off the lights.
XOpen the cargo compartment.
XOpen the service flap (Ypage 138).
XTurn bulb holder:counter-clockwise and
remove it.
XTake bulb out of bulb holder :.
XInsert the new bulb into bulb holder :.
XInsert bulb holder:into the lamp and turn
it clockwise.
XClose the service flap (Ypage 138).
Windshield wipers
Switching the windshield wipers
on/off
!
Do not operate the windshield wipers
when the windshield is dry, as this could
damage the wiper blades. Moreover, dust
that has collected on the windshield can
scratch the glass if wiping takes place when
the windshield is dry. If it is necessary to switch on the windshield
wipers in dry weather conditions, always
use washer fluid when operating the wind-
shield wipers.
!If the windshield wipers leave smears on
the windshield after the vehicle has been
washed in an automatic car wash, wax or
other residues may be the reason for this.
Clean the windshield using washer fluid
after washing the vehicle in an automatic
car wash.
!Intermittent wiping with rain sensor: due
to optical influences and the windshield
becoming dirty in dry weather conditions,
the windshield wipers may be activated
inadvertently. This could then damage the
windshield wiper blades or scratch the
windshield.
For this reason, you should always switch
off the windshield wipers in dry weather.
Combination switch
1
$ Windshield wiper off
2ÄIntermittent wipe, low (rain sensor
set to low sensitivity)
3Å Intermittent wipe, high (rain sensor
set to high sensitivity)
4° Continuous wipe, slow
5¯Continuous wipe, fast
BíSingle wipe
CîTo wipe with washer fluid
XSwitch on the ignition.
XTurn the combination switch to the corre-
sponding position.
Windshield wipers139
Lights and windshield wipers
Z
Page 168 of 462
Pressing the Start/Stop button several times
in succession corresponds to the different
key positions in the ignition lock. This is only
the case if you are not depressing the brake
pedal.
If you depress the brake pedal and press the
Start/Stop button, the engine starts immedi-
ately.
To start the vehicle without actively using the
SmartKey:
Rthe Start/Stop button must be inserted in
the ignition lock.
Rthe SmartKey must be in the vehicle.
Rthe vehicle must not be locked with the
SmartKey or KEYLESS-GO (
Ypage 83).
Do not keep the SmartKey:
Rwith electronic devices, e.g. a mobile
phone or another SmartKey.
Rwith metallic objects, e.g. coins or metal
foil.
Rinside metallic objects, e.g. a metal case.
This can impair the functionality of the KEY-
LESS-GO key.
Do not keep the KEYLESS-GO key in the tem-
perature-controlled cup holder (
Ypage 349).
Otherwise, the KEYLESS-GO key will not be
recognized.
If you lock the vehicle with the SmartKey's
remote control or with KEYLESS-GO, after a
short time:
Ryou will not be able to switch on the ignition
with the Start/Stop button.
Ryou will not be able to start the engine with the Start/Stop button until the vehicle is
unlocked again.
If you lock the vehicle centrally using the but- ton on the front door (
Ypage 91), you can
continue to start the engine with the Start/
Stop button.
The engine can be switched off while the vehi-
cle is in motion by pressing and holding the
Start/Stop button for three seconds. This
function operates independently of the ECO start/stop automatic engine switch-off func-
tion.
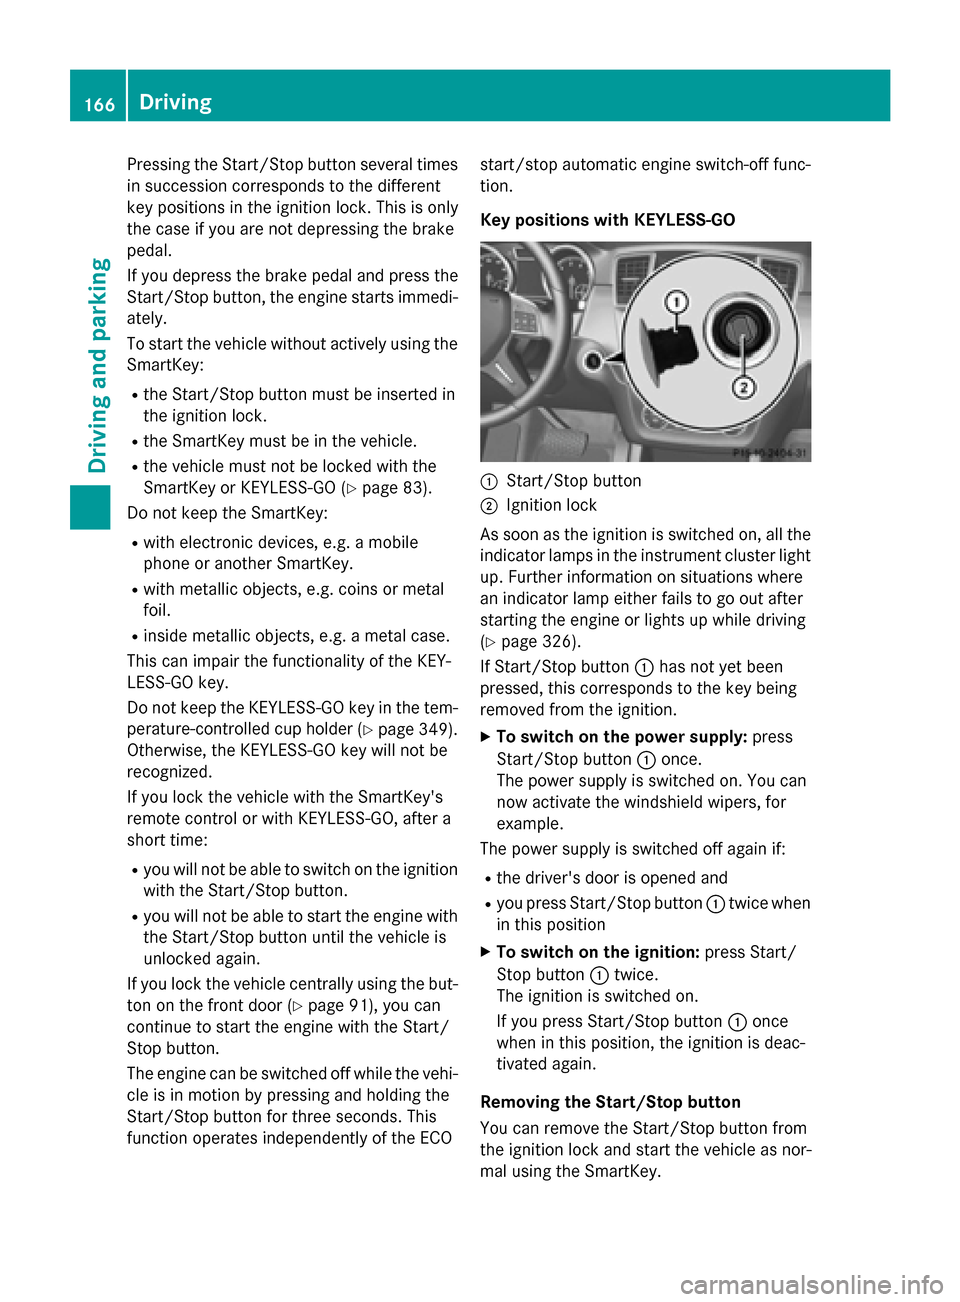
Key positions with KEYLESS-GO
:Start/Stop button
;Ignition lock
As soon as the ignition is switched on, all the
indicator lamps in the instrument cluster light
up. Further information on situations where
an indicator lamp either fails to go out after
starting the engine or lights up while driving
(
Ypage 326).
If Start/Stop button :has not yet been
pressed, this corresponds to the key being
removed from the ignition.
XTo switch on the power supply: press
Start/Stop button :once.
The power supply is switched on. You can
now activate the windshield wipers, for
example.
The power supply is switched off again if:
Rthe driver's door is opened and
Ryou press Start/Stop button :twice when
in this position
XTo switch on the ignition: press Start/
Stop button :twice.
The ignition is switched on.
If you press Start/Stop button :once
when in this position, the ignition is deac-
tivated again.
Removing the Start/Stop button
You can remove the Start/Stop button from
the ignition lock and start the vehicle as nor-
mal using the SmartKey.
166Driving
Driving and parking
Page 169 of 462
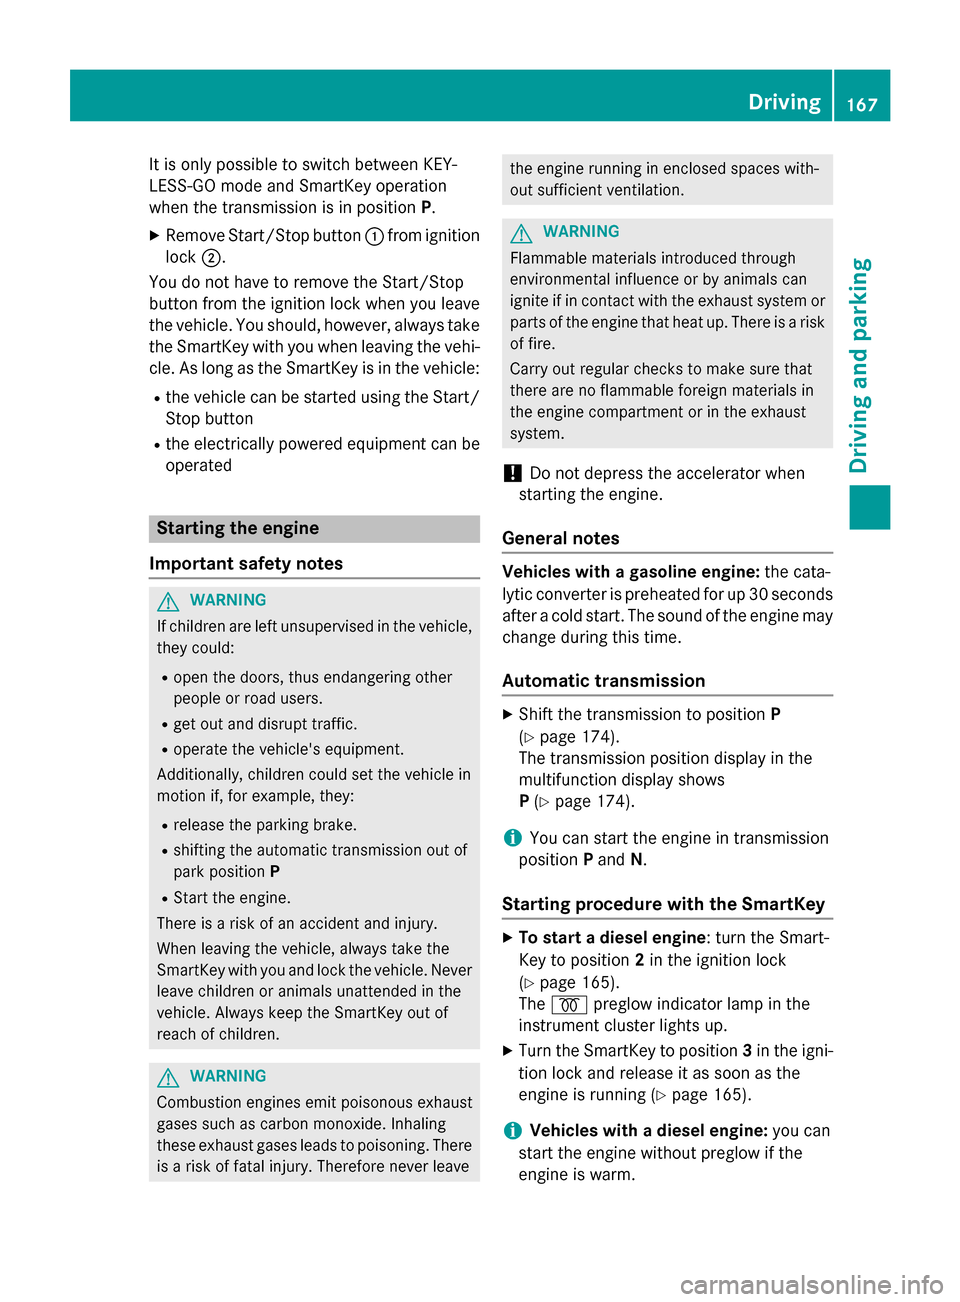
It is only possible to switch between KEY-
LESS-GO mode and SmartKey operation
when the transmission is in positionP.
XRemove Start/Stop button:from ignition
lock ;.
You do not have to remove the Start/Stop
button from the ignition lock when you leave
the vehicle. You should, however, always take
the SmartKey with you when leaving the vehi-
cle. As long as the SmartKey is in the vehicle:
Rthe vehicle can be started using the Start/
Stop button
Rthe electrically powered equipment can be
operated
Starting the engine
Important safety notes
GWARNING
If children are left unsupervised in the vehicle,
they could:
Ropen the doors, thus endangering other
people or road users.
Rget out and disrupt traffic.
Roperate the vehicle's equipment.
Additionally, children could set the vehicle in
motion if, for example, they:
Rrelease the parking brake.
Rshifting the automatic transmission out of
park position P
RStart the engine.
There is a risk of an accident and injury.
When leaving the vehicle, always take the
SmartKey with you and lock the vehicle. Never
leave children or animals unattended in the
vehicle. Always keep the SmartKey out of
reach of children.
GWARNING
Combustion engines emit poisonous exhaust
gases such as carbon monoxide. Inhaling
these exhaust gases leads to poisoning. There
is a risk of fatal injury. Therefore never leave
the engine running in enclosed spaces with-
out sufficient ventilation.
GWARNING
Flammable materials introduced through
environmental influence or by animals can
ignite if in contact with the exhaust system or
parts of the engine that heat up. There is a risk
of fire.
Carry out regular checks to make sure that
there are no flammable foreign materials in
the engine compartment or in the exhaust
system.
!Do not depress the accelerator when
starting the engine.
General notes
Vehicles with a gasoline engine: the cata-
lytic converter is preheated for up 30 seconds
after a cold start. The sound of the engine may
change during this time.
Automatic transmission
XShift the transmission to position P
(
Ypage 174).
The transmission position display in the
multifunction display shows
P (
Ypage 174).
iYou can start the engine in transmission
position Pand N.
Starting procedure with the SmartKey
XTo start a diesel engine : turn the Smart-
Key to position 2in the ignition lock
(
Ypage 165).
The % preglow indicator lamp in the
instrument cluster lights up.
XTurn the SmartKey to position 3in the igni-
tion lock and release it as soon as the
engine is running (
Ypage 165).
iVehicles with a diesel engine: you can
start the engine without preglow if the
engine is warm.
Driving167
Driving and parking
Z
Page 172 of 462

The HOLD function can also be activated if the
engine has been switched off automatically. It
is then not necessary to continue applying the
brakes during the automatic stop phase.
When you depress the accelerator pedal, the
engine starts automatically and the braking
effect of the HOLD function is deactivated.
All vehicles (except Mercedes-AMG vehi-
cles): automatic engine switch-off can take
place a maximum of four times in a row (initial
stop, then three subsequent stops).
Mercedes-AMG vehicles: the number of
consecutive automatic engine switch-offs is
unlimited.
Automatic engine start
The engine starts automatically if:
Ryou switch off the ECO start/stop function
by pressing the ECO button
Rin transmission position Dor Nthe brake
pedal is released and the HOLD function is
not active
Ryou depress the accelerator pedal
Ryou engage reverse gear R
Ryou move the transmission out of position
P
Ryou switch to drive program Sor M
(Mercedes-AMG vehicles)
Ryou switch to an off-road program (except
Mercedes-AMG vehicles)
Ryou unfasten your seat belt or open the
driver's door
Rthe vehicle starts to roll
Rthe brake system requires this
Rthe temperature in the vehicle interior devi-
ates from the set range
Rthe system detects moisture on the wind-
shield when the air-conditioning system is
switched on
Rthe battery's condition of charge is too low
Shifting the transmission to position Pdoes
not start the engine.
Deactivating or activating the ECO
start/stop function
All vehicles (except Mercedes-AMG vehi-
cles)
XTo deactivate: press ECO button :.
Indicator lamp ;goes out.
XTo activate: press ECO button :.
Indicator lamp ;lights up.
If the indicator lamp on the ECO button is off,
the ECO start/stop function has been deac-
tivated manually or as the result of a mal-
function.
Mercedes-AMG vehicles
XTo deactivate: in drive program C, press
ECO button :.
or
XSwitch to drive program Sor M
(
Ypage 177).
Indicator lamp ;goes out.
170Driving
Driving and parking
Page 175 of 462
ProblemPossible causes/consequences andMSolutions
Vehicles with a gaso-
line engine:
The engine is not run-
ning smoothly and is
misfiring.There is a malfunction in the engine electronics or in a mechanical
component of the engine management system.
XOnly depress the accelerator pedal slightly.
Otherwise, non-combusted fuel may get into the catalytic con-
verter and damage it.
XHave the cause rectified immediately at a qualified specialist
workshop.
The coolant tempera-
ture gage shows a value
above 248 ‡ (120 †).The coolant level is too low. The coolant is too hot and the engine
is no longer being cooled sufficiently.
XStop as soon as possible and allow the engine and the coolant to
cool down.
XCheck the coolant level (Ypage 373). Observe the warning
notes as you do so and add coolant if necessary.
Automatic transmission
Important safety notes
GWARNING
If the engine speed is above the idling speed
and you engage transmission position Dor R,
the vehicle could pull away suddenly. There is
a risk of an accident.
When engaging transmission position Dor R,
always firmly depress the brake pedal and do not simultaneously accelerate.
GWARNING
The automatic transmission switches to neu-
tral position Nwhen you switch off the engine.
The vehicle may roll away. There is a risk of an
accident.
After switching off the engine, always switch
to parking position P. Prevent the parked vehi-
cle from rolling away by applying the parking
brake.
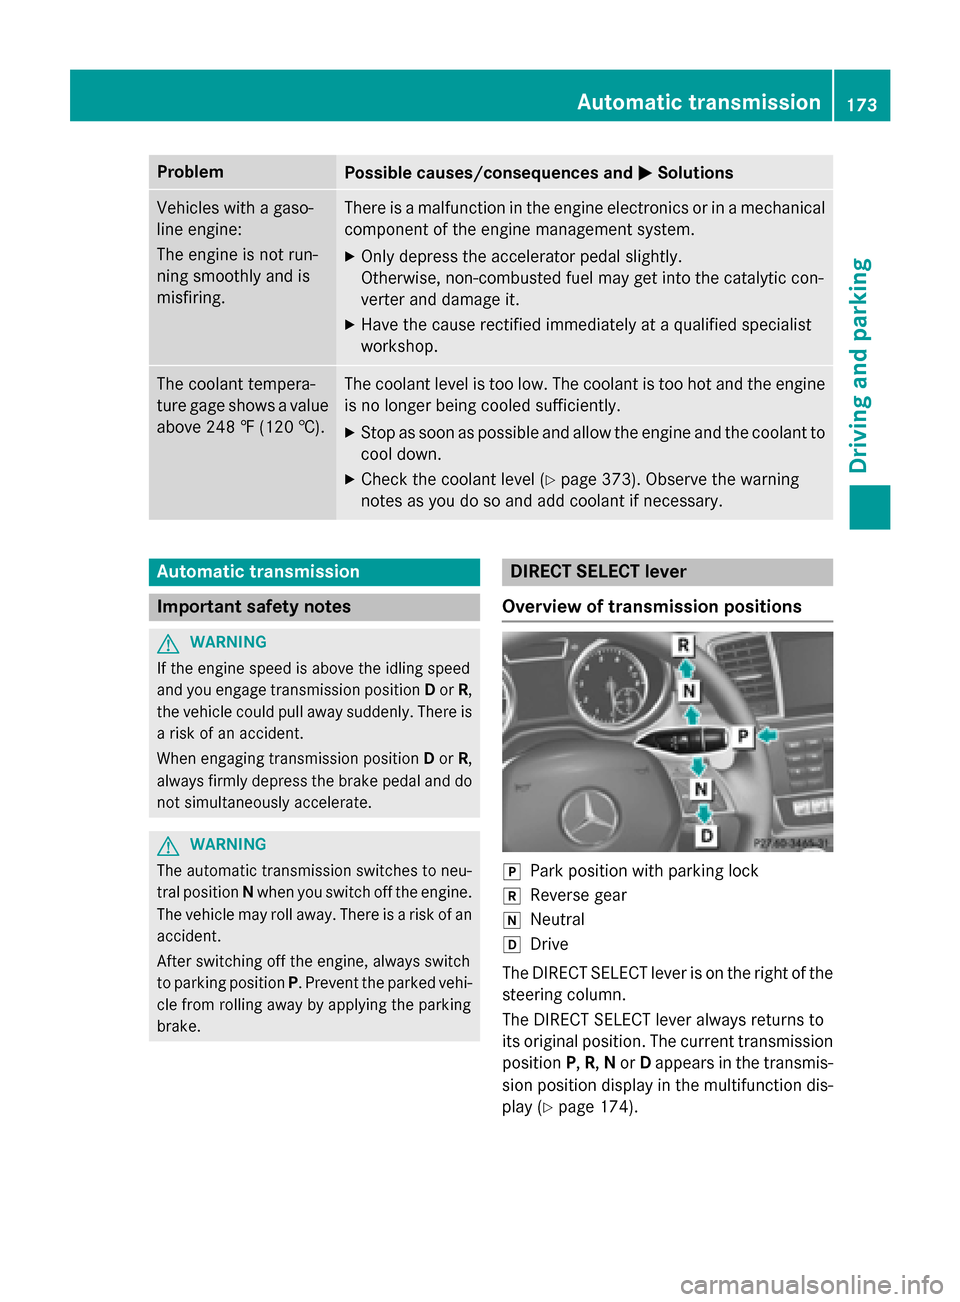
DIRECT SELECT lever
Overview of transmission positions
jPark position with parking lock
kReverse gear
iNeutral
hDrive
The DIRECT SELECT lever is on the right of the
steering column.
The DIRECT SELECT lever always returns to
its original position. The current transmission
position P,R, Nor Dappears in the transmis-
sion position display in the multifunction dis-
play (
Ypage 174).
Automatic transmission173
Driving and parking
Z
Page 193 of 462
The function of the electric parking brake is
dependent on the on-board voltage. If the on-
board voltage is low or there is a malfunction
in the system, it may not be possible to apply
the released parking brake.
XIf this is the case, only park the vehicle on
level ground and secure it to prevent it roll-
ing away.
XShift the automatic transmission to posi-
tionP.
It may not be possible to release an applied
parking brake if the on-board voltage is low or
there is a malfunction in the system. Contact
a qualified specialist workshop.
iThe electric parking brake performs a
function test at regular intervals while the
engine is switched off. The sounds that can
be heard while this is occurring are normal.
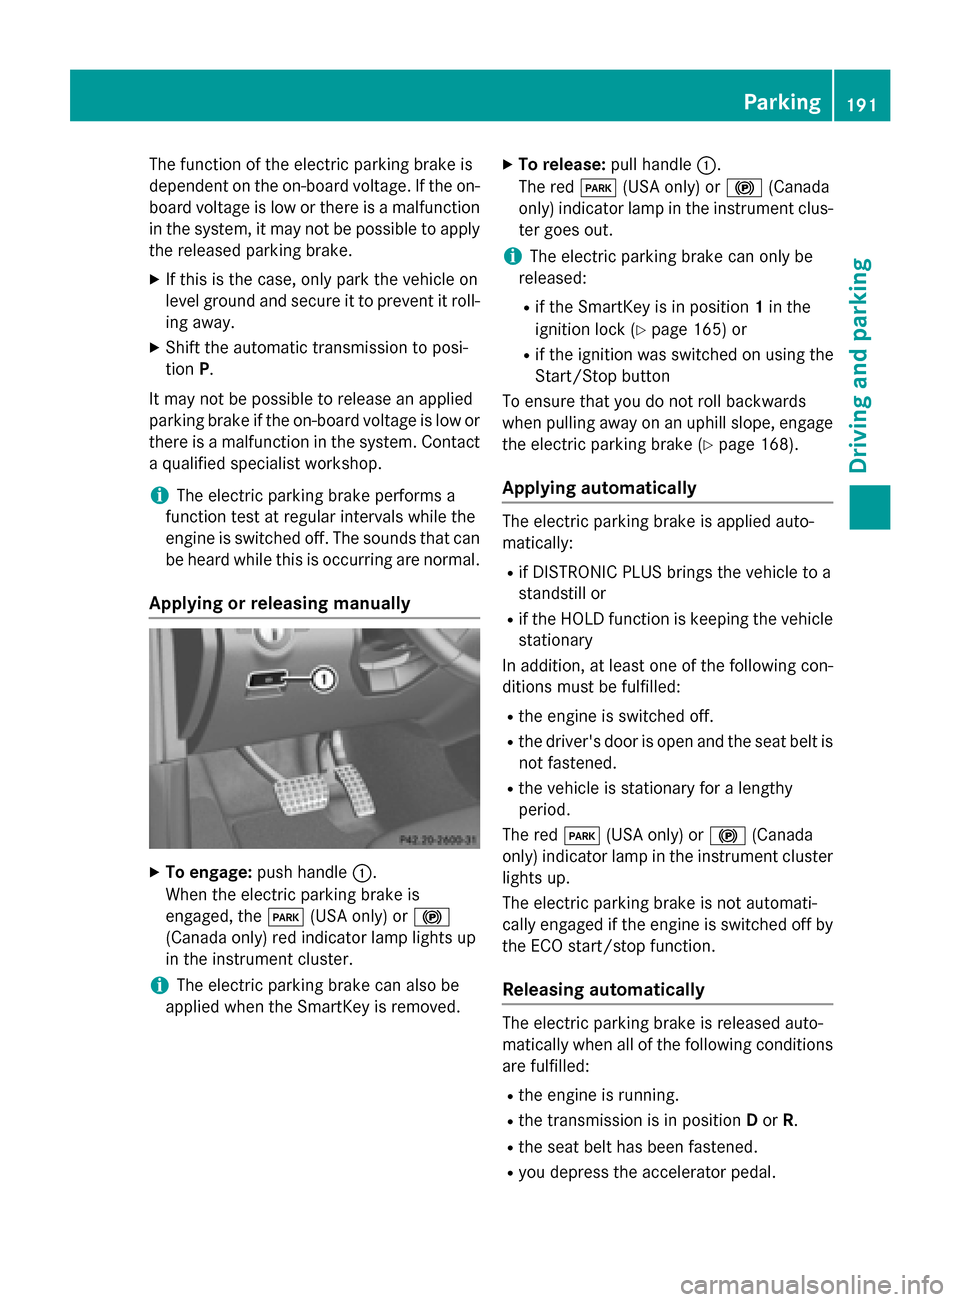
Applying or releasing manually
XTo engage: push handle :.
When the electric parking brake is
engaged, the F(USA only) or !
(Canada only) red indicator lamp lights up
in the instrument cluster.
iThe electric parking brake can also be
applied when the SmartKey is removed.
XTo release: pull handle:.
The red F(USA only) or !(Canada
only) indicator lamp in the instrument clus- ter goes out.
iThe electric parking brake can only be
released:
Rif the SmartKey is in position 1in the
ignition lock (
Ypage 165) or
Rif the ignition was switched on using the
Start/Stop button
To ensure that you do not roll backwards
when pulling away on an uphill slope, engage
the electric parking brake (
Ypage 168).
Applying automatically
The electric parking brake is applied auto-
matically:
Rif DISTRONIC PLUS brings the vehicle to a
standstill or
Rif the HOLD function is keeping the vehicle
stationary
In addition, at least one of the following con-
ditions must be fulfilled:
Rthe engine is switched off.
Rthe driver's door is open and the seat belt is not fastened.
Rthe vehicle is stationary for a lengthy
period.
The red F(USA only) or !(Canada
only) indicator lamp in the instrument cluster
lights up.
The electric parking brake is not automati-
cally engaged if the engine is switched off by the ECO start/stop function.
Releasing automatically
The electric parking brake is released auto-
matically when all of the following conditions
are fulfilled:
Rthe engine is running.
Rthe transmission is in position Dor R.
Rthe seat belt has been fastened.
Ryou depress the accelerator pedal.
Parking191
Driving and parking
Z
Page 196 of 462
The percent value is the average value of the
three bars. The three bars and the mean value
begin at the value of 50%. A higher percent-
age indicates a more economical driving
style.
The ECO display does not indicate the actual
fuel consumption. A fixed percentage count
in the ECO display does not indicate a fixed
consumption.
Apart from driving style, consumption is
dependent on many factors such as, e.g.:
Rload
Rtire pressure
Rcold start
Rchoice of route
Relectrical consumers switched on
These factors are not included in the ECO dis-
play.
The evaluation of your driving style is carried
out using the following three categories:
RAccel.(evaluation of all acceleration pro-
cesses):
-The bar fills up: moderate acceleration,
especially at higher speeds
-The bar empties: sporty acceleration
RConstant(assessment of driving behavior
at all times):
-The bar fills up: constant speed and
avoidance of unnecessary acceleration
and deceleration
-The bar empties: fluctuations in speed
RCoasting(assessment of all deceleration
processes):
-The bar fills up: anticipatory driving,
keeping your distance and early release
of the accelerator. The vehicle can coast
without use of the brakes.
-The bar empties: frequent braking
iAn economical driving style specially
requires driving at moderate engine
speeds.
To achieve a higher value in the categories
Accel.
and Constant, observe the gear-
shift recommendations.
iOn long journeys at a constant speed, e.g.
on the highway, only the bar for Constant
will change.
iThe ECO display summarizes the driving
characteristics from the start of the journey
to its completion. For this reason, the bars change dynamically at the beginning of the
journey. On longer journeys, there are
fewer changes. For more dynamic changes,
carry out a manual reset.
For further information on the ECO display,
see (
Ypage 276).
Braking
Important safety notes
GWARNING
If you shift down on a slippery road surface in an attempt to increase the engine's braking
effect, the drive wheels could lose their grip.
There is an increased danger of skidding and
accidents.
Do not shift down for additional engine brak-
ing on a slippery road surface.
Downhill gradients
!On long and steep gradients, you must
reduce the load on the brakes by shifting
early to a lower gear. This allows you to take
advantage of the engine braking effect and
helps avoid overheating and excessive
wear of the brakes.
When you take advantage of the engine
braking effect, a drive wheel may not turn
for some time, e.g. on a slippery road sur-
face. This could cause damage to the drive
train. This type of damage is not covered by
the Mercedes-Benz warranty.
Do not depress the brake pedal continuously
while the vehicle is in motion, e.g. causing the
brakes to rub by constantly applying light
pressure to the pedal. This results in exces-
sive and premature wear to the brake pads.
194Driving tips
Driving and parking
Page 197 of 462
Heavy and light loads
GWARNING
If you rest your foot on the brake pedal while
driving, the braking system can overheat. This increases the stopping distance and can even
cause the braking system to fail. There is a
risk of an accident.
Never use the brake pedal as a footrest. Never
depress the brake pedal and the accelerator
pedal at the same time.
!Depressing the brake pedal constantly
results in excessive and premature wear to
the brake pads.
If the brakes have been subjected to a heavy
load, do not stop the vehicle immediately.
Drive on for a short while. This allows the air-
flow to cool the brakes more quickly.
Wet roads
If you have driven for a long time in heavy rain
without braking, there may be a delayed reac-
tion from the brakes when braking for the first
time. This may also occur after the vehicle has
been washed or driven through deep water.
You then have to depress the brake pedal
more firmly. Maintain a greater distance from
the vehicle in front.
After driving on a wet road or having the vehi-
cle washed, brake firmly while paying atten-
tion to the traffic conditions. This will warm up
the brake discs, thereby drying them more
quickly and protecting them against corro-
sion.
Limited braking performance on salt-
treated roads
If you drive on salted roads, a layer of salt
residue may form on the brake discs and
brake pads. This can result in a significantly
longer braking distance.
RBrake occasionally to remove any possible
salt residue. Make sure that you do not
endanger other road users when doing so.
RCarefully depress the brake pedal and the
beginning and end of a journey.
RMaintain a greater distance to the vehicle
ahead.
Servicing the brakes
!If the red brake warning lamp lights up in
the instrument cluster and you hear a warn-
ing tone while the engine is running, the
brake fluid level may be too low. Observe
additional warning messages in the multi-
function display.
The brake fluid level may be too low due to
brake pad wear or leaking brake lines.
Have the brake system checked immedi-
ately. This work should be carried out at a
qualified specialist workshop.
!A function or performance test should
only be carried out on a 2-axle dynamom-
eter. If you are planning to have the vehicle tested on such a dynamometer, contact an
authorized Mercedes-Benz Center to
obtain further information first. Otherwise,
you could damage the drive train or the
brake system.
!Because ESP®is an automatic system,
the engine and ignition must be switched
off (SmartKey in position 0or 1or Start/
Stop button in position 0or 1) when the
electric parking brake is being tested on a
brake dynamometer (maximum
10 seconds).
Braking triggered automatically by ESP
®
may seriously damage the brake system.
All checks and maintenance work on the
brake system must be carried out at a quali-
fied specialist workshop. Consult a qualified
specialist workshop to arrange this.
Have brake pads installed and brake fluid
replaced at a qualified specialist workshop.
Driving tips195
Driving and parking
Z
Page 201 of 462
specialist workshop as soon as possible.
Adapt your driving style to the different brak-
ing characteristics.
Driving off-road increases the likelihood of
damage to the vehicle, which, in turn, can lead
to failure of the mechanical assembly or sys-
tems. Adapt your driving style to suit the ter-
rain conditions. Drive carefully. Have damage
to the vehicle rectified immediately at a quali-
fied specialist workshop.
Do not switch to transmission positionN
when driving off-road. If you try to brake the
vehicle using the service brake, you could
lose control of the vehicle. If the gradient is
too steep for your vehicle, drive back down in
reverse gear.
General notes
Read this section carefully before driving your
vehicle off-road. Practice by driving over more
gentle off-road terrain first.
Familiarize yourself with the characteristics
of your vehicle and the gear shift operation
before driving through difficult terrain.
The following driving systems are specially
adapted to off-road driving:
ROff-road program 1 and 2 (vehicles with the
ON&OFFROAD package) (
Ypage 258)
RLOW RANGE off-road gear (vehicles with
the ON&OFFROAD package)
(
Ypage 259)
RDifferential lock (vehicles with the
ON&OFFROAD package) (
Ypage 259)
ROff-road ABS (Ypage 69)
ROff-road 4ETS (Ypage 73)
RAIRMATIC package (vehicle level)
(
Ypage 218)
RDSR (Downhill Speed Regulation)
(
Ypage 257)
Observe the following notes:
RStop the vehicle before starting to drive
along an off-road route.
RSelect a vehicle level that is suitable for the
terrain. To avoid damaging the vehicle, make sure there is always sufficient ground
clearance.
RCheck that items of luggage and loads are
stowed safely and are well secured
(
Ypage 345).
RAlways keep the engine running and in gear
when driving on a downhill gradient. Acti-
vate DSR (
Ypage 257).
RAlways keep the engine running and in gear
when driving on a slope.
RAdapt your speed to the terrain. The
rougher, steeper or more ruts on the ter-
rain, the slower your speed should be.
RDo not jump with the vehicle as this will
interrupt the vehicle's propulsion.
RDrive with extreme care on unfamiliar off-
road routes where visibility is poor. For
safety reasons, get out of the vehicle first
and survey the off-road route.
RLook out for obstacles, such as rocks,
holes, tree stumps and furrows.
RAlways keep the doors, the tailgate, the
side windows and the sliding sunroof
closed while the vehicle is in motion.
RDo not shift the automatic transmission to
transmission position N.
RObserve the notes on off-road fording
(
Ypage 197).
iDo not use the HOLD function when driv-
ing off-road, on steep uphill or downhill gra-
dients or on slippery or loose surfaces. The
HOLD function cannot hold the vehicle on
such surfaces.
Checklist before driving off-road
!If the engine oil warning lamp lights up
while the vehicle is in motion, stop the vehi- cle in a safe place as soon as possible.
Check the engine oil level. The engine oil
warning lamp warning must not be ignored.
Continuing the journey while the symbol is
displayed could lead to engine damage.
XEngine oil level: check the engine oil level
and add oil if necessary.
Driving tips199
Driving and parking
Z