key battery MERCEDES-BENZ GL-Class 2016 X166 User Guide
[x] Cancel search | Manufacturer: MERCEDES-BENZ, Model Year: 2016, Model line: GL-Class, Model: MERCEDES-BENZ GL-Class 2016 X166Pages: 462, PDF Size: 10.44 MB
Page 91 of 462
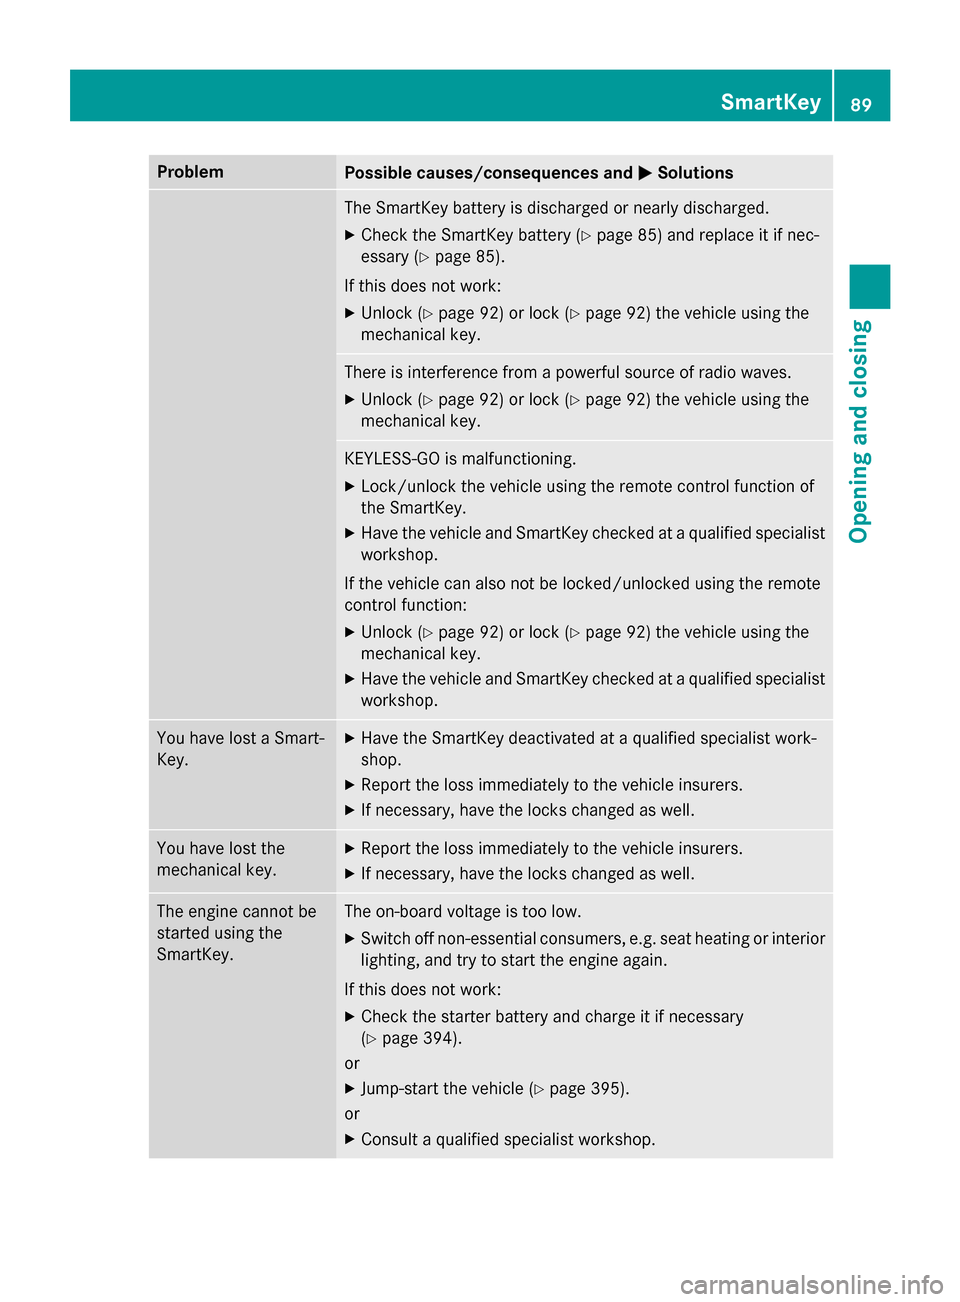
ProblemPossible causes/consequences andMSolutions
The SmartKey battery is discharged or nearly discharged.
XCheck the SmartKey battery (Ypage 85) and replace it if nec-
essary (
Ypage 85).
If this does not work:
XUnlock (Ypage 92) or lock (Ypage 92) the vehicle using the
mechanical key.
There is interference from a powerful source of radio waves.
XUnlock (Ypage 92) or lock (Ypage 92) the vehicle using the
mechanical key.
KEYLESS-GO is malfunctioning.
XLock/unlock the vehicle using the remote control function of
the SmartKey.
XHave the vehicle and SmartKey checked at a qualified specialist
workshop.
If the vehicle can also not be locked/unlocked using the remote
control function:
XUnlock (Ypage 92) or lock (Ypage 92) the vehicle using the
mechanical key.
XHave the vehicle and SmartKey checked at a qualified specialist
workshop.
You have lost a Smart-
Key.XHave the SmartKey deactivated at a qualified specialist work-
shop.
XReport the loss immediately to the vehicle insurers.
XIf necessary, have the locks changed as well.
You have lost the
mechanical key.XReport the loss immediately to the vehicle insurers.
XIf necessary, have the locks changed as well.
The engine cannot be
started using the
SmartKey.The on-board voltage is too low.
XSwitch off non-essential consumers, e.g. seat heating or interior
lighting, and try to start the engine again.
If this does not work:
XCheck the starter battery and charge it if necessary
(
Ypage 394).
or
XJump-start the vehicle (Ypage 395).
or
XConsult a qualified specialist workshop.
SmartKey89
Opening and closing
Z
Page 92 of 462
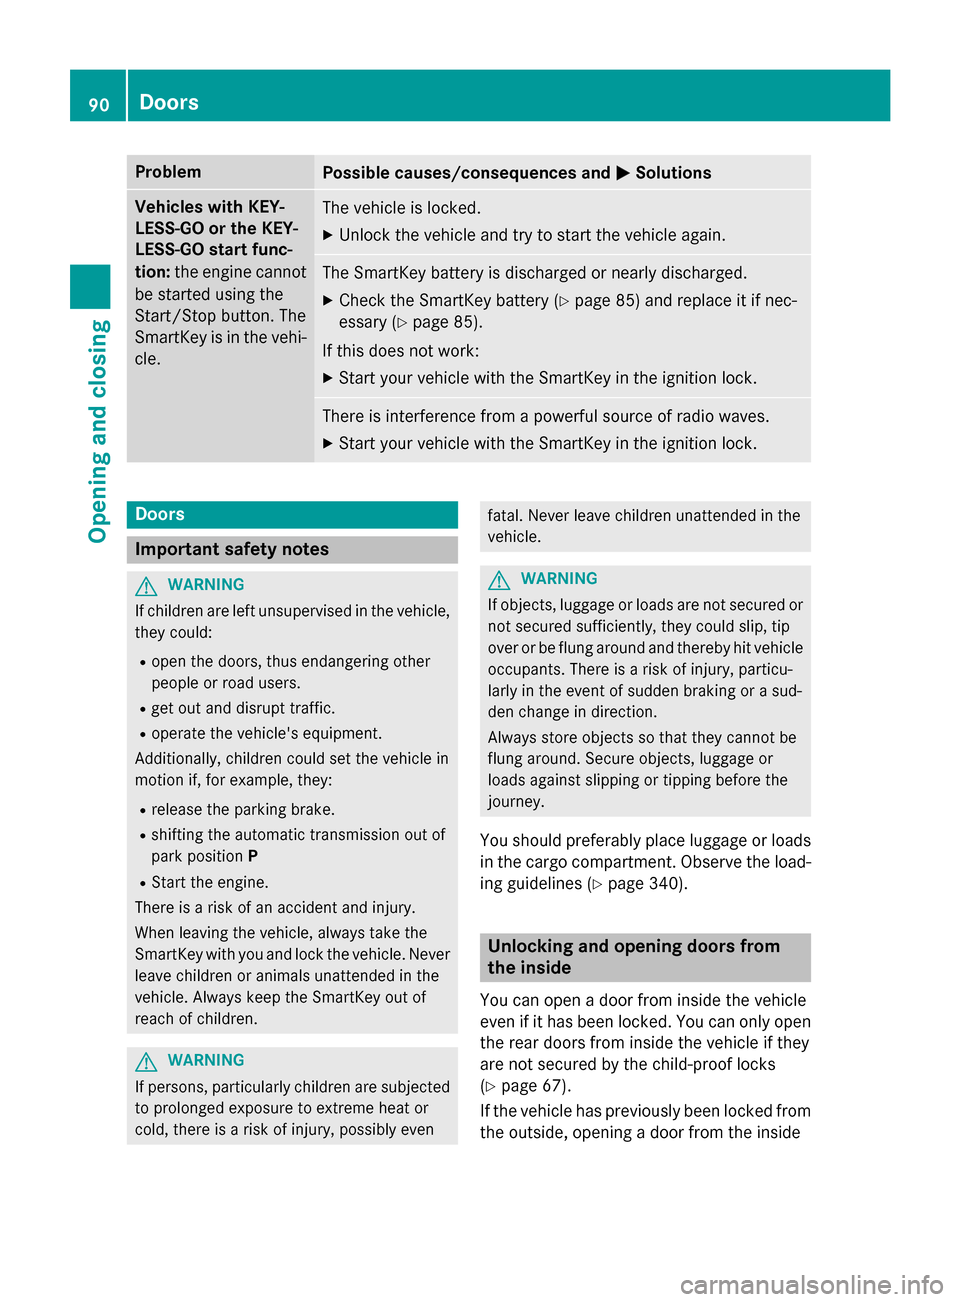
ProblemPossible causes/consequences andMSolutions
Vehicles with KEY-
LESS-GO or the KEY-
LESS-GO start func-
tion:the engine cannot
be started using the
Start/Stop button. The
SmartKey is in the vehi-
cle.The vehicle is locked.
XUnlock the vehicle and try to start the vehicle again.
The SmartKey battery is discharged or nearly discharged.
XCheck the SmartKey battery (Ypage 85) and replace it if nec-
essary (
Ypage 85).
If this does not work:
XStart your vehicle with the SmartKey in the ignition lock.
There is interference from a powerful source of radio waves.
XStart your vehicle with the SmartKey in the ignition lock.
Doors
Important safety notes
GWARNING
If children are left unsupervised in the vehicle,
they could:
Ropen the doors, thus endangering other
people or road users.
Rget out and disrupt traffic.
Roperate the vehicle's equipment.
Additionally, children could set the vehicle in
motion if, for example, they:
Rrelease the parking brake.
Rshifting the automatic transmission out of
park position P
RStart the engine.
There is a risk of an accident and injury.
When leaving the vehicle, always take the
SmartKey with you and lock the vehicle. Never
leave children or animals unattended in the
vehicle. Always keep the SmartKey out of
reach of children.
GWARNING
If persons, particularly children are subjected to prolonged exposure to extreme heat or
cold, there is a risk of injury, possibly even
fatal. Never leave children unattended in the
vehicle.
GWARNING
If objects, luggage or loads are not secured or
not secured sufficiently, they could slip, tip
over or be flung around and thereby hit vehicle
occupants. There is a risk of injury, particu-
larly in the event of sudden braking or a sud-
den change in direction.
Always store objects so that they cannot be
flung around. Secure objects, luggage or
loads against slipping or tipping before the
journey.
You should preferably place luggage or loads
in the cargo compartment. Observe the load- ing guidelines (
Ypage 340).
Unlocking and opening doors from
the inside
You can open a door from inside the vehicle
even if it has been locked. You can only open
the rear doors from inside the vehicle if they
are not secured by the child-proof locks
(
Ypage 67).
If the vehicle has previously been locked from
the outside, opening a door from the inside
90Doors
Opening and closing
Page 121 of 462

Therefore, do not switch the seat heating on
repeatedly.
Driver's and front-passenger seat
Rear seats
The three red indicator lamps in the button
indicate the heating level you have selected.
The system automatically switches down
from level3to level 2after approximately
eight minutes.
The system automatically switches down
from level 2to level 1after approximately ten
minutes.
The system automatically switches off
approximately 35 minutes after it is set to
level 1.
XTurn the SmartKey to position 1or 2in the
ignition lock (
Ypage 165).
XTo switch on: press button:repeatedly
until the desired heating level is set.
XTo switch off: press button:repeatedly
until all the indicator lamps go out.
iIf the battery voltage is too low, the seat
heating may switch off.
Seats119
Seats, steering wheel and mirrors
Z
Page 122 of 462

Problems with the seat heating
ProblemPossible causes/consequences andMSolutions
The seat heating has
switched off prema-
turely or cannot be
switched on.The on-board voltage is too low because too many electrical con-
sumers are switched on.
XSwitch off electrical consumers that you do not need, such as
the rear window defroster or interior lighting.
Once the battery is sufficiently charged, the seat heating will
switch back on automatically.
Switching the seat ventilation on/off
Switching on/off
The three blue indicator lamps in the buttons
indicate the ventilation level you have selec-
ted.
XTurn the SmartKey to position 2in the igni-
tion lock (
Ypage 165).
XTo switch on: press button:repeatedly
until the desired ventilation level is set.
XTo switch off: press button:repeatedly
until all the indicator lamps go out.
iIf the battery voltage is too low, the seat
ventilation may switch off.
iYou can open the side windows and the
sliding sunroof using the "Convenience
opening" feature (
Ypage 99). The seat ven-
tilation of the driver's seat automatically
switches to the highest level.
120Seats
Seats, steering wheel and mirrors
Page 123 of 462
Problems with the seat ventilation
ProblemPossible causes/consequences andMSolutions
The seat ventilation has
switched off prema-
turely or cannot be
switched on.The on-board voltage is too low because too many electrical con-
sumers are switched on.
XSwitch off electrical consumers that you do not need, such as
the rear window defroster or interior lighting.
Once the battery is sufficiently charged, the seat ventilation will
switch back on automatically.
Steering wheel
Important safety notes
GWARNING
You could lose control of your vehicle if you do the following while driving:
Radjust the driver's seat, head restraint,
steering wheel or mirrors
Rfasten the seat belt
There is a risk of an accident.
Adjust the driver's seat, head restraint, steer-
ing wheel and mirror and fasten your seat belt before starting the engine.
GWARNING
Children could injure themselves if they
adjust the steering wheel. There is a risk of
injury.
When leaving the vehicle, always take the
SmartKey with you and lock the vehicle. Never
leave children unsupervised in the vehicle.
The electrically adjustable steering wheel can
still be adjusted when there is no SmartKey in
the ignition lock.
Adjusting the steering wheel man-
ually
GWARNING
If the steering wheel is unlocked while the
vehicle is in motion, it could change position
unexpectedly. This could cause you to lose
control of the vehicle. There is a risk of an
accident.
Before starting off, make sure the steering
wheel is locked. Never unlock the steering
wheel while the vehicle is in motion.
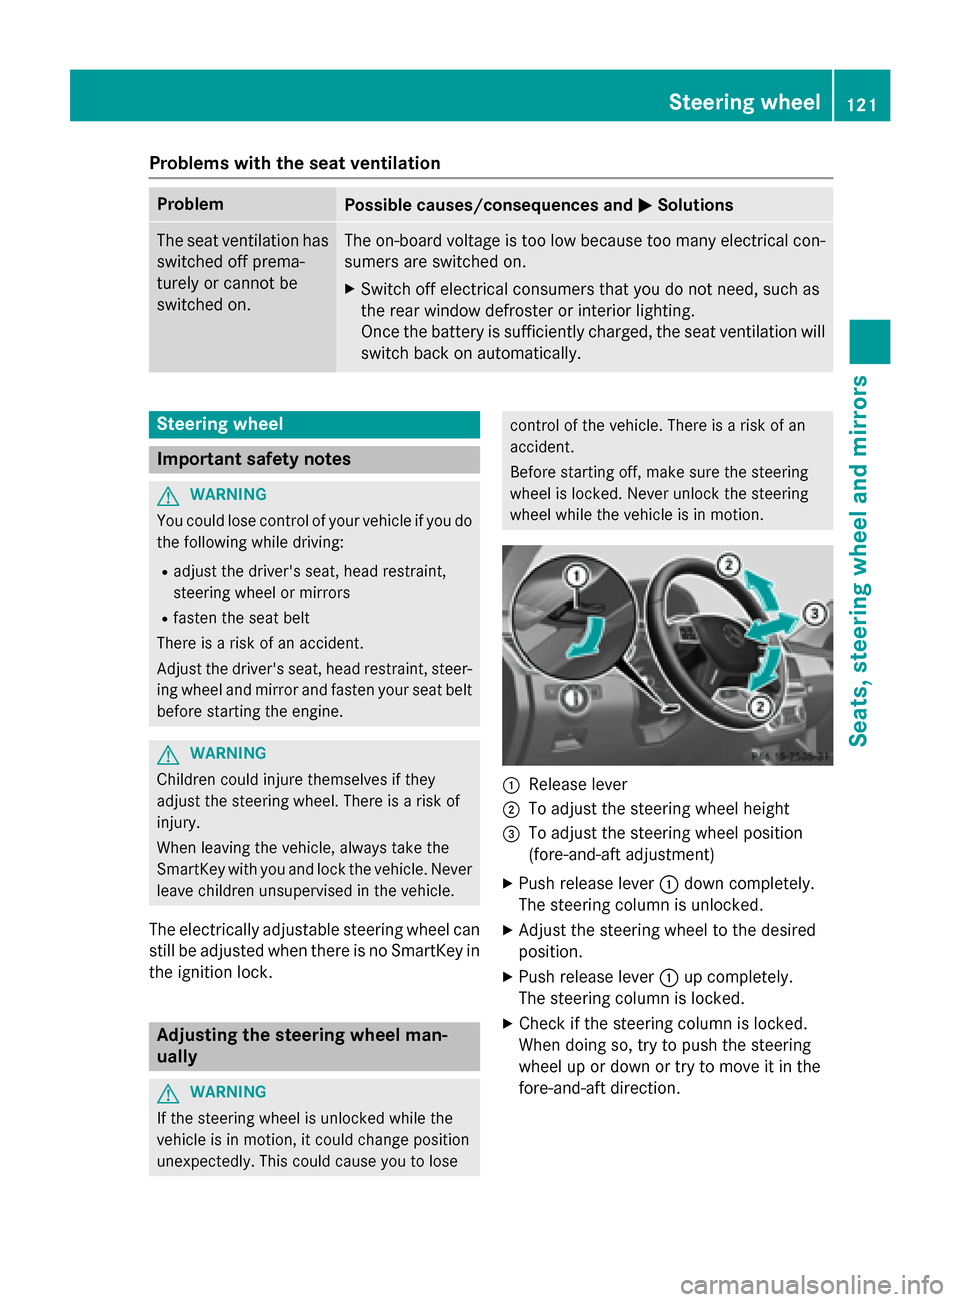
:Release lever
;To adjust the steering wheel height
=To adjust the steering wheel position
(fore-and-aft adjustment)
XPush release lever :down completely.
The steering column is unlocked.
XAdjust the steering wheel to the desired
position.
XPush release lever :up completely.
The steering column is locked.
XCheck if the steering column is locked.
When doing so, try to push the steering
wheel up or down or try to move it in the
fore-and-aft direction.
Steering wheel121
Seats, steering wheel and mirrors
Z
Page 127 of 462

The indicator lamp goes out again after
some time. You can adjust the selected
mirror using adjustment button=as long
as the indicator lamp is lit.
XPress adjustment button =up, down, or to
the left or right until you have adjusted the
exterior mirror to the correct position. You
should have a good overview of traffic con-
ditions.
The convex exterior mirrors provide a larger
field of vision.
The exterior mirrors are heated automatically
if the rear window defroster is switched on
and the outside temperature is low.
Folding the exterior mirrors in or out
electrically
XTurn the SmartKey to position 1or 2in the
ignition lock (
Ypage 165).
XBriefly press button :.
Both exterior mirrors fold in or out.
iMake sure that the exterior mirrors are
always folded out fully while driving. They
could otherwise vibrate.
iIf you are driving faster than 30 mph
(47 km/h) , you can no longer fold in the
exterior mirrors.
Setting the exterior mirrors
If the battery has been disconnected or com-
pletely discharged, the exterior mirrors must
be reset. The exterior mirrors will otherwise
not fold in when you select the "Fold in mir- rors when locking" function in the on-board
computer (
Ypage 286).
XTurn the SmartKey to position
1in the igni-
tion lock (
Ypage 165).
XBriefly press button :.
Folding the exterior mirrors in or out
automatically
If the "Fold in mirrors when locking" function
is activated in the on-board computer:
(
Ypage 286)
Rthe exterior mirrors fold in automatically as
soon as you lock the vehicle from the out-
side.
Rthe exterior mirrors fold out again automat-
ically as soon as you unlock the vehicle and
then open the driver's or front-passenger
door.
Exterior mirror pushed out of position
If an exterior mirror has been pushed out of
position, proceed as follows:
XVehicles without electrically folding
exterior mirrors:move the exterior mirror
into the correct position manually.
XVehicles with electrically folding exte-
rior mirrors: press and hold button for mir-
ror folding :until you hear a click and the
mirror engages audibly in position.
The mirror housing is engaged again and
you can adjust the exterior mirrors as usual
(
Ypage 124).
Automatic anti-glare mirrors
GWARNING
Electrolyte may escape if the glass in an auto-
matic anti-glare mirror breaks. The electrolyte
is harmful and causes irritation. It must not
come into contact with your skin, eyes, res-
piratory organs or clothing or be swallowed.
There is a risk of injury.
Mirrors125
Seats, steering wheel and mirrors
Z
Page 133 of 462
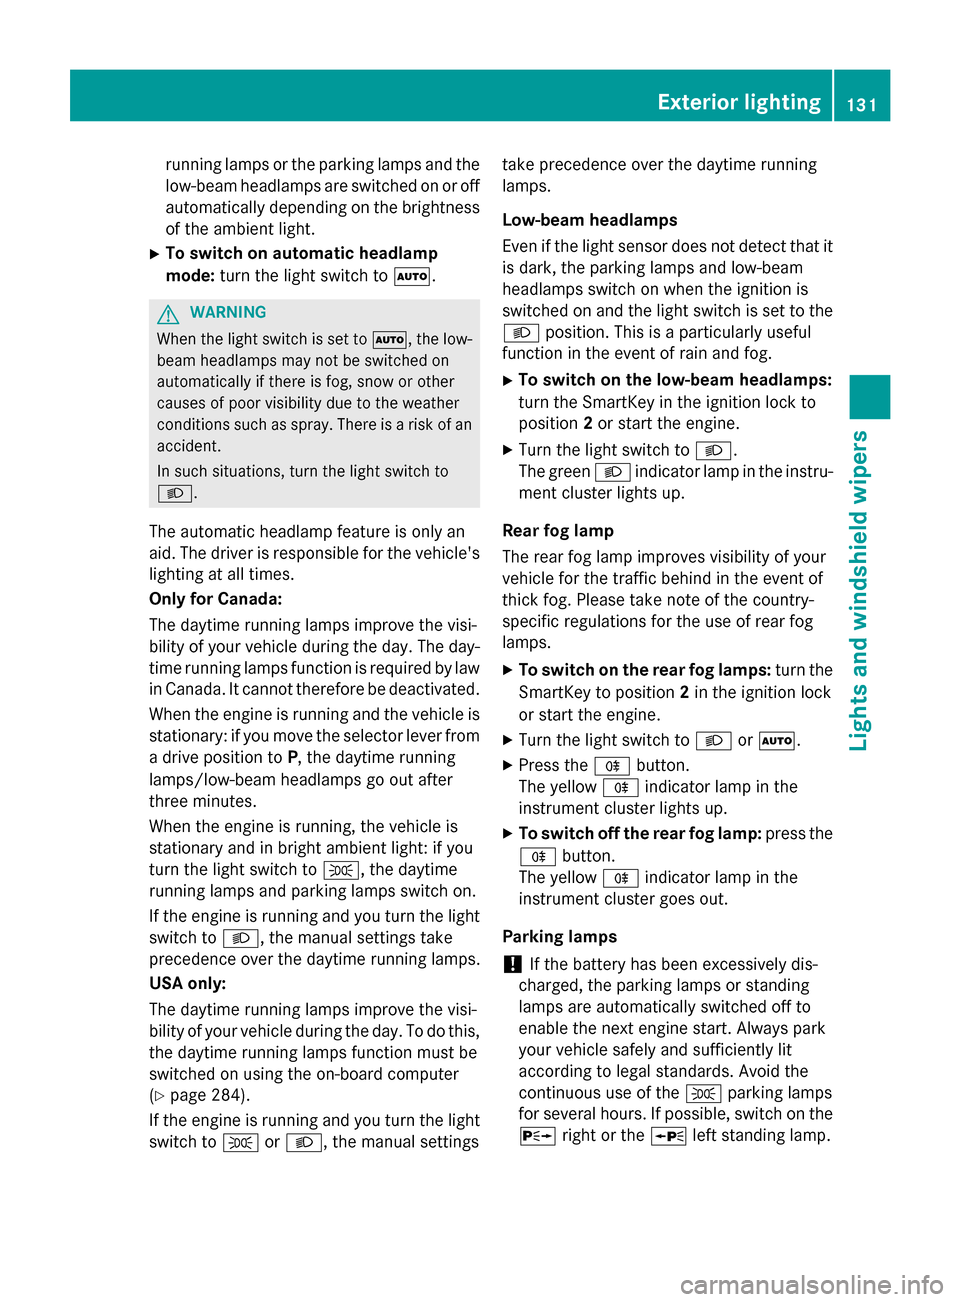
running lamps or the parking lamps and the
low-beam headlamps are switched on or off
automatically depending on the brightness
of the ambient light.
XTo switch on automatic headlamp
mode: turn the light switch to Ã.
GWARNING
When the light switch is set to Ã, the low-
beam headlamps may not be switched on
automatically if there is fog, snow or other
causes of poor visibility due to the weather
conditions such as spray. There is a risk of an
accident.
In such situations, turn the light switch to
L.
The automatic headlamp feature is only an
aid. The driver is responsible for the vehicle's
lighting at all times.
Only for Canada:
The daytime running lamps improve the visi-
bility of your vehicle during the day. The day-
time running lamps function is required by law
in Canada. It cannot therefore be deactivated.
When the engine is running and the vehicle is
stationary: if you move the selector lever from
a drive position to P, the daytime running
lamps/low-beam headlamps go out after
three minutes.
When the engine is running, the vehicle is
stationary and in bright ambient light: if you
turn the light switch to T, the daytime
running lamps and parking lamps switch on.
If the engine is running and you turn the light
switch to L, the manual settings take
precedence over the daytime running lamps.
USA only:
The daytime running lamps improve the visi-
bility of your vehicle during the day. To do this,
the daytime running lamps function must be
switched on using the on-board computer
(
Ypage 284).
If the engine is running and you turn the light
switch to TorL, the manual settings take precedence over the daytime running
lamps.
Low-beam headlamps
Even if the light sensor does not detect that it
is dark, the parking lamps and low-beam
headlamps switch on when the ignition is
switched on and the light switch is set to the
L
position. This is a particul
arly useful
function in the event of rain and fog.
XTo switch on the low-beam headlamps:
turn the SmartKey in the ignition lock to
position 2or start the engine.
XTurn the light switch to L.
The green Lindicator lamp in the instru-
ment cluster lights up.
Rear fog lamp
The rear fog lamp improves visibility of your
vehicle for the traffic behind in the event of
thick fog. Please take note of the country-
specific regulations for the use of rear fog
lamps.
XTo switch on the rear fog lamps: turn the
SmartKey to position 2in the ignition lock
or start the engine.
XTurn the light switch to LorÃ.
XPress the Rbutton.
The yellow Rindicator lamp in the
instrument cluster lights up.
XTo switch off the rear fog lamp: press the
R button.
The yellow Rindicator lamp in the
instrument cluster goes out.
Parking lamps
!If the battery has been excessively dis-
charged, the parking lamps or standing
lamps are automatically switched off to
enable the next engine start. Always park
your vehicle safely and sufficiently lit
according to legal standards. Avoid the
continuous use of the Tparking lamps
for several hours. If possible, switch on the
X right or the Wleft standing lamp.
Exterior lighting131
Lights and windshield wipers
Z
Page 137 of 462
users have been detected or the roads are
adequately lit:
The high-beam headlamps are switched off
automatically. TheKindicator lamp in
the instrument cluster goes out. The _
indicator lamp inthe multifunction display
remains lit.
XTo switch off: move the combination
swit ch back to its normal position or move
the light switch to another position.
The _ indicator lamp inthe multifunc-
tion display goes out.
Headlamps fogged up on the inside
Certain climatic and physical cond itions may
cause moisture to form inthe headlamp. This
moisture does not affect the functionalit y of
the headlamp.
Interior lighting
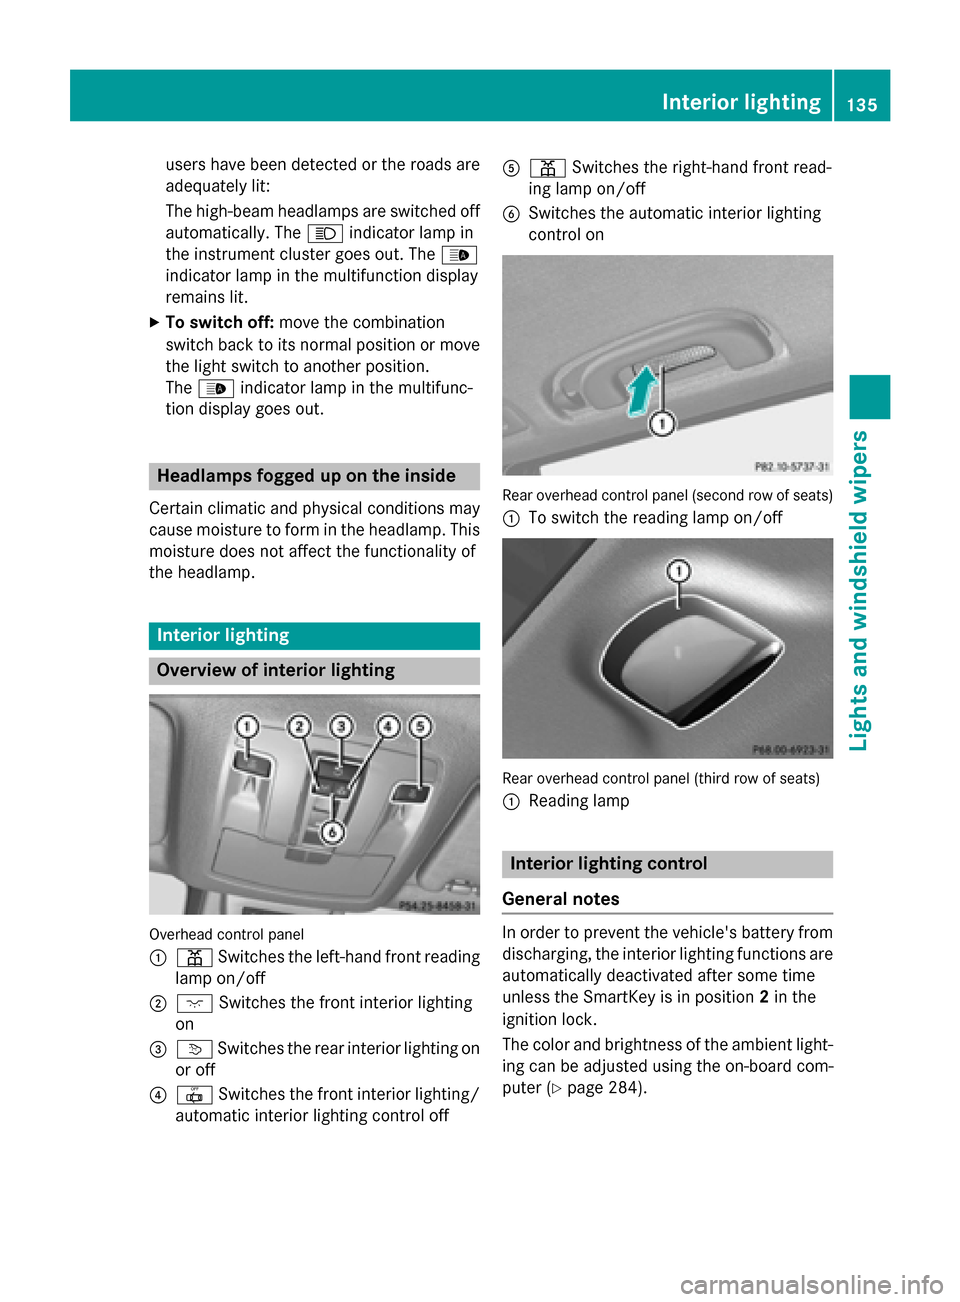
Overview of interior lighting
Overhead control panel
:
p Switches the left-hand front reading
lamp on/o ff
;cSwitches the front interior lighting
on
=v Switches the rear interior lighting on
or off
?| Switches the front interior lighting/
automat icinterior lighting control off
Ap Switches the right-hand front read-
ing lamp on/o ff
BSwitches the automat icinterior lighting
control on
Rear overhead control panel (secon drow of seats)
:
To switch the reading lamp on/o ff
Rear overhead control panel (thir drow of seats)
:
Readin g lamp
Interior lighting control
General notes
In order to prevent the vehicle's battery from
discharging, the interior lighting functions are
automatical lydeactivated after some time
unless the SmartKey is inposition 2in the
ignit ion lock.
The color and brightness of the ambient light-
ing can beadjusted using the on-board com-
puter (
Ypage 284).
Interior lighting135
Lights and windshield wipers
Z
Page 160 of 462
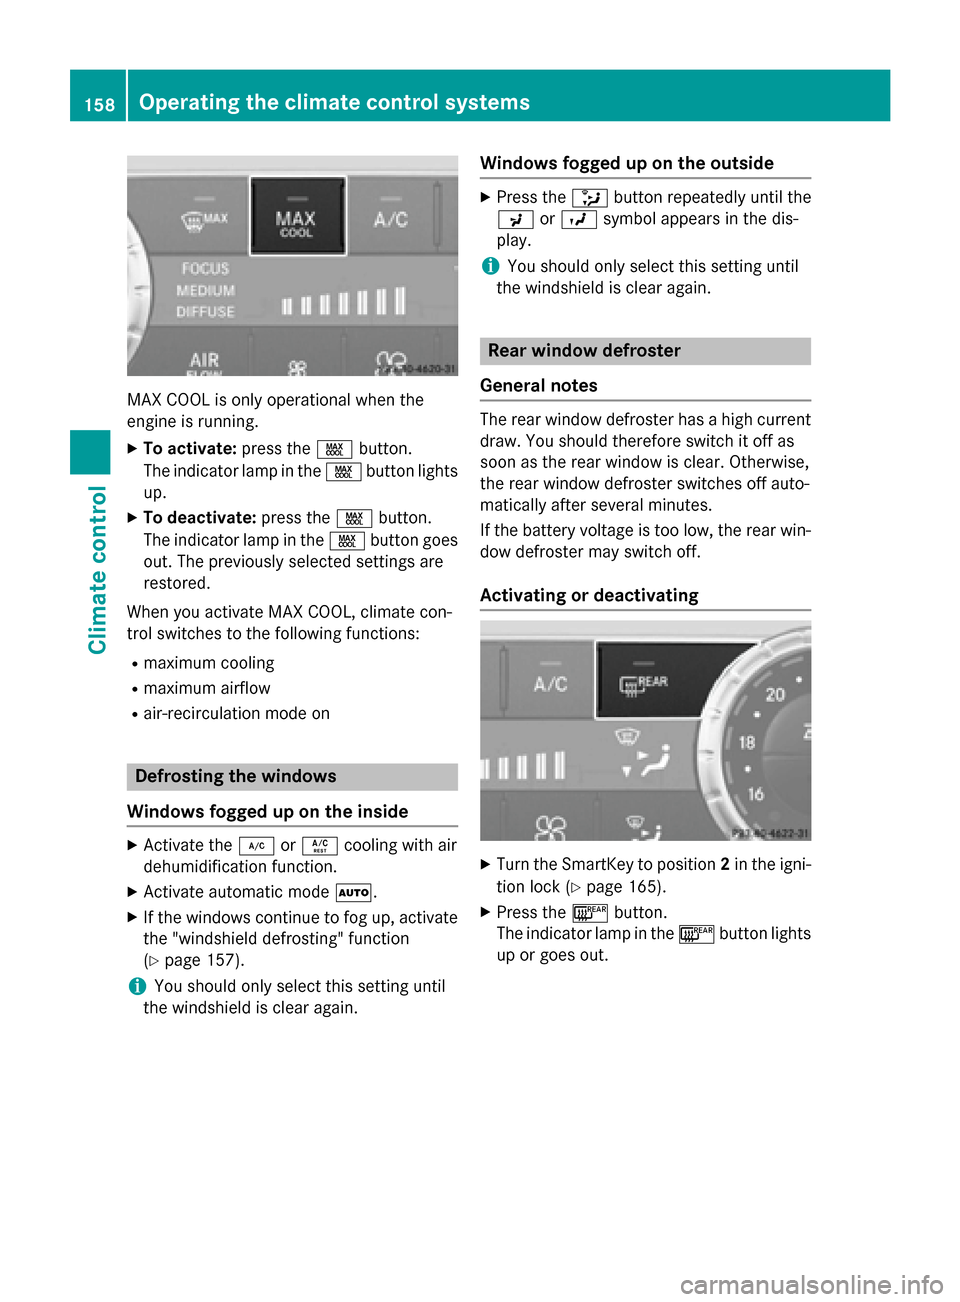
MAX COOL is only operational when the
engine is running.
XTo activate:press theÙbutton.
The indicator lamp in the Ùbutton lights
up.
XTo deactivate: press theÙbutton.
The indicator lamp in the Ùbutton goes
out. The previously selected settings are
restored.
When you activate MAX COOL, climate con-
trol switches to the following functions:
Rmaximum cooling
Rmaximum airflow
Rair-recirculation mode on
Defrosting the windows
Windows fogged up on the inside
XActivate the ¿orÁ cooling with air
dehumidification function.
XActivate automatic mode Ã.
XIf the windows continue to fog up, activate
the "windshield defrosting" function
(
Ypage 157).
iYou should only select this setting until
the windshield is clear again.
Windows fogged up on the outside
XPress the _button repeatedly until the
P orO symbol appears in the dis-
play.
iYou should only select this setting until
the windshield is clear again.
Rear window defroster
General notes
The rear window defroster has a high current
draw. You should therefore switch it off as
soon as the rear window is clear. Otherwise,
the rear window defroster switches off auto-
matically after several minutes.
If the battery voltage is too low, the rear win-
dow defroster may switch off.
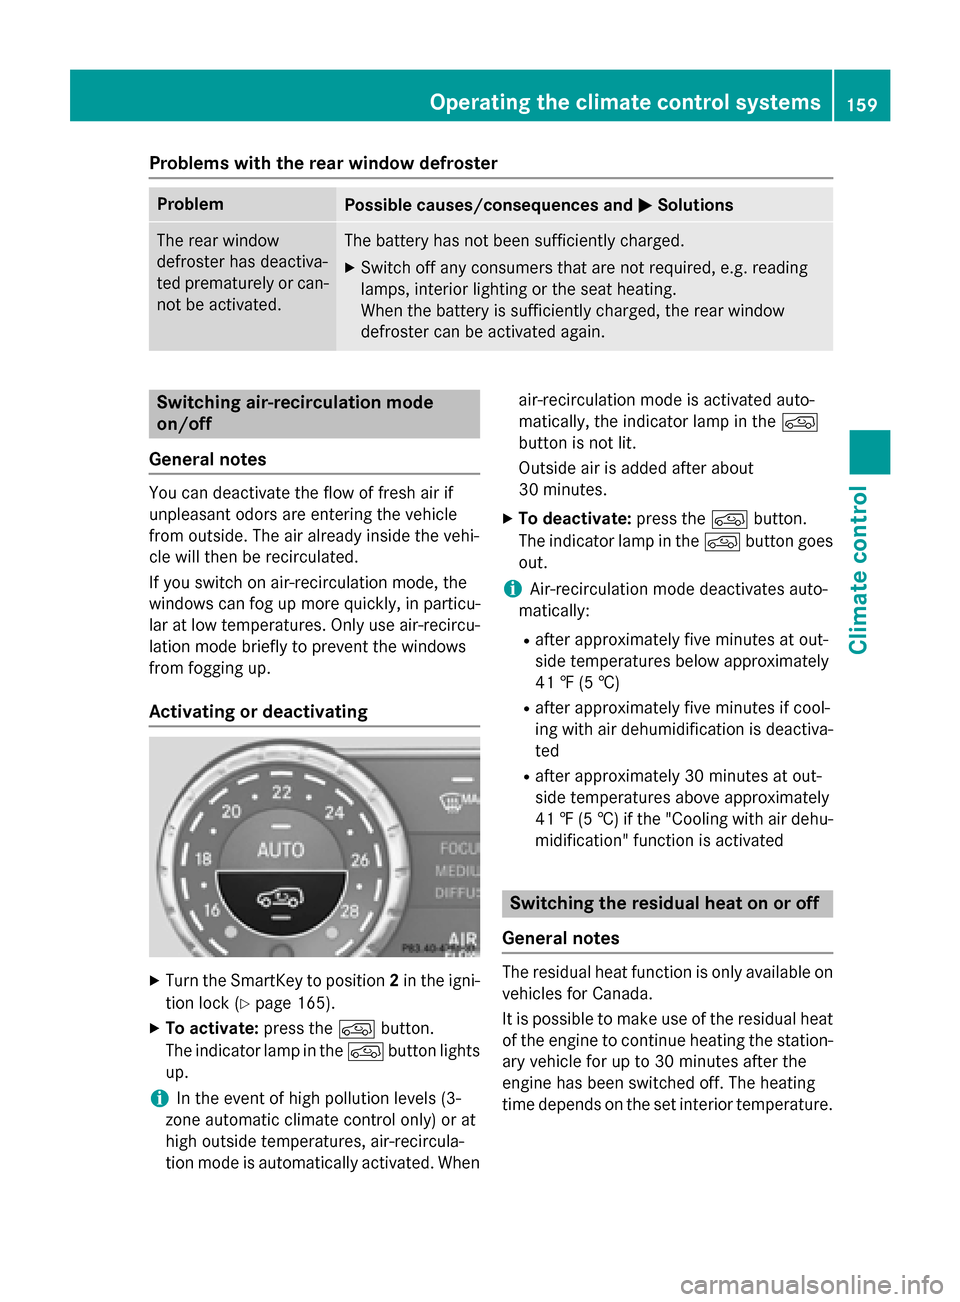
Activating or deactivating
XTurn the SmartKey to position 2in the igni-
tion lock (
Ypage 165).
XPress the ¤button.
The indicator lamp in the ¤button lights
up or goes out.
158Operating the climate control systems
Climate control
Page 161 of 462
Problems with the rear window defroster
ProblemPossible causes/consequences andMSolutions
The rear window
defroster has deactiva-
ted prematurely or can-
not be activated.The battery has not been sufficiently charged.
XSwitch off any consumers that are not required, e.g. reading
lamps, interior lighting or the seat heating.
When the battery is sufficiently charged, the rear window
defroster can be activated again.
Switching air-recirculation mode
on/off
General notes
You can deactivate the flow of fresh air if
unpleasant odors are entering the vehicle
from outside. The air already inside the vehi-
cle will then be recirculated.
If you switch on air-recirculation mode, the
windows can fog up more quickly, in particu-
lar at low temperatures. Only use air-recircu-
lation mode briefly to prevent the windows
from fogging up.
Activating or deactivating
XTurn the SmartKey to position 2in the igni-
tion lock (
Ypage 165).
XTo activate: press thedbutton.
The indicator lamp in the dbutton lights
up.
iIn the event of high pollution levels (3-
zone automatic climate control only) or at
high outside temperatures, air-recircula-
tion mode is automatically activated. When air-recirculation mode is activated auto-
matically, the indicator lamp in the
d
button is not lit.
Outside air is added after about
30 minutes.
XTo deactivate: press thedbutton.
The indicator lamp in the dbutton goes
out.
iAir-recirculation mode deactivates auto-
matically:
Rafter approximately five minutes at out-
side temperatures below approximately
41 ‡ (5 †)
Rafter approximately five minutes if cool-
ing with air dehumidification is deactiva-
ted
Rafter approximately 30 minutes at out-
side temperatures above approximately
41 ‡ (5 †) if the "Cooling with air dehu-
midification" function is activated
Switching the residual heat on or off
General notes
The residual heat function is only available on
vehicles for Canada.
It is possible to make use of the residual heat
of the engine to continue heating the station-
ary vehicle for up to 30 minutes after the
engine has been switched off. The heating
time depends on the set interior temperature.
Operating the climate control systems159
Climate control