key battery MERCEDES-BENZ GL-Class 2016 X166 Owner's Guide
[x] Cancel search | Manufacturer: MERCEDES-BENZ, Model Year: 2016, Model line: GL-Class, Model: MERCEDES-BENZ GL-Class 2016 X166Pages: 462, PDF Size: 10.44 MB
Page 171 of 462
have removed your foot from the brake pedal.
This gives you enough time to move your foot
from the brake pedal to the accelerator pedal
and to depress it before the vehicle begins to
roll.
GWARNING
After a short time, hill start assist will no lon-
ger brake your vehicle and it could roll away.
There is a risk of an accident and injury.
Therefore, quickly move your foot from the
brake pedal to the accelerator pedal. Never
leave the vehicle when it is held by hill start
assist.
Hill start assist is not active if:
Ryou are pulling away on a level road or on a downhill gradient.
Rthe transmission is in position N.
Rthe electric parking brake is applied.
RESP®is malfunctioning.
ECO start/stop function
Introduction
The ECO start/stop function switches the
engine off automatically if the vehicle is stop-
ped under certain conditions.
The engine starts automatically when the
driver wants to pull away again. The ECO
start/stop function thereby helps you to
reduce the fuel consumption and emissions
of your vehicle.
Important safety notes
GWARNING
If the engine is switched off automatically and
you exit the vehicle, the engine is restarted
automatically. The vehicle may begin moving.
There is a risk of accident and injury.
If you wish to exit the vehicle, always turn off
the ignition and secure the vehicle against
rolling away.
General notes
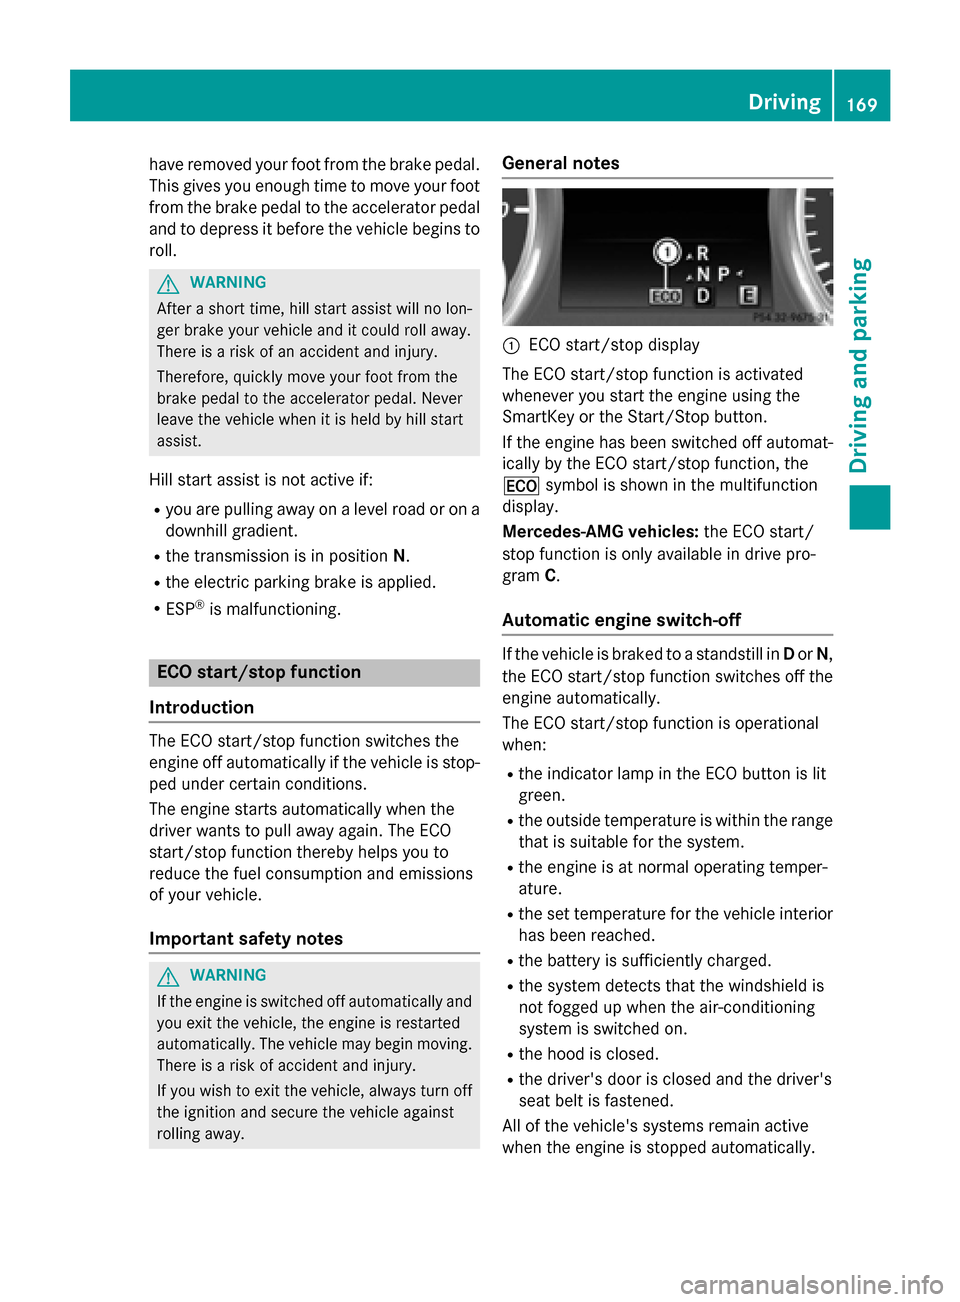
:ECO start/stop display
The ECO start/stop function is activated
whenever you start the engine using the
SmartKey or the Start/Stop button.
If the engine has been switched off automat-
ically by the ECO start/stop function, the
¤ symbol is shown in the multifunction
display.
Mercedes-AMG vehicles: the ECO start/
stop function is only available in drive pro-
gram C.
Automatic engine switch-off
If the vehicle is braked to a standstill in Dor N,
the ECO start/stop function switches off the
engine automatically.
The ECO start/stop function is operational
when:
Rthe indicator lamp in the ECO button is lit
green.
Rthe outside temperature is within the range that is suitable for the system.
Rthe engine is at normal operating temper-
ature.
Rthe set temperature for the vehicle interior
has been reached.
Rthe battery is sufficiently charged.
Rthe system detects that the windshield is
not fogged up when the air-conditioning
system is switched on.
Rthe hood is closed.
Rthe driver's door is closed and the driver's
seat belt is fastened.
All of the vehicle's systems remain active
when the engine is stopped automatically.
Driving169
Driving and parking
Z
Page 174 of 462
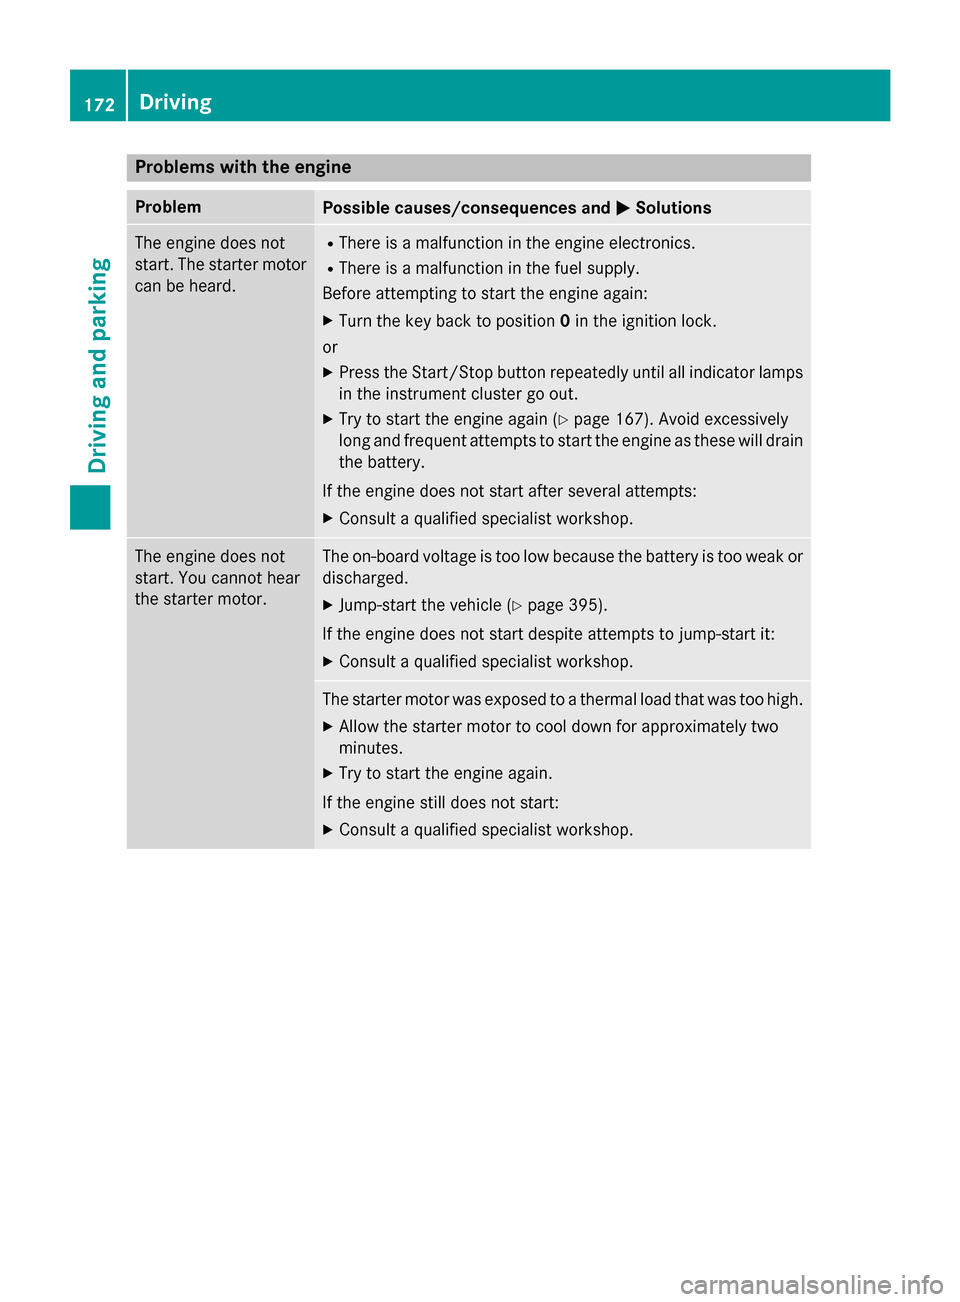
Problems with the engine
ProblemPossible causes/consequences andMSolutions
The engine does not
start. The starter motor
can be heard.RThere is a malfunction in the engine electronics.
RThere is a malfunction in the fuel supply.
Before attempting to start the engine again:
XTurn the key back to position 0in the ignition lock.
or
XPress the Start/Stop button repeatedly until all indicator lamps in the instrument cluster go out.
XTry to start the engine again (Ypage 167). Avoid excessively
long and frequent attempts to start the engine as these will drain
the battery.
If the engine does not start after several attempts:
XConsult a qualified specialist workshop.
The engine does not
start. You cannot hear
the starter motor.The on-board voltage is too low because the battery is too weak or
discharged.
XJump-start the vehicle (Ypage 395).
If the engine does not start despite attempts to jump-start it:
XConsult a qualified specialist workshop.
The starter motor was exposed to a thermal load that was too high.
XAllow the starter motor to cool down for approximately two
minutes.
XTry to start the engine again.
If the engine still does not start:
XConsult a qualified specialist workshop.
172Driving
Driving and parking
Page 187 of 462
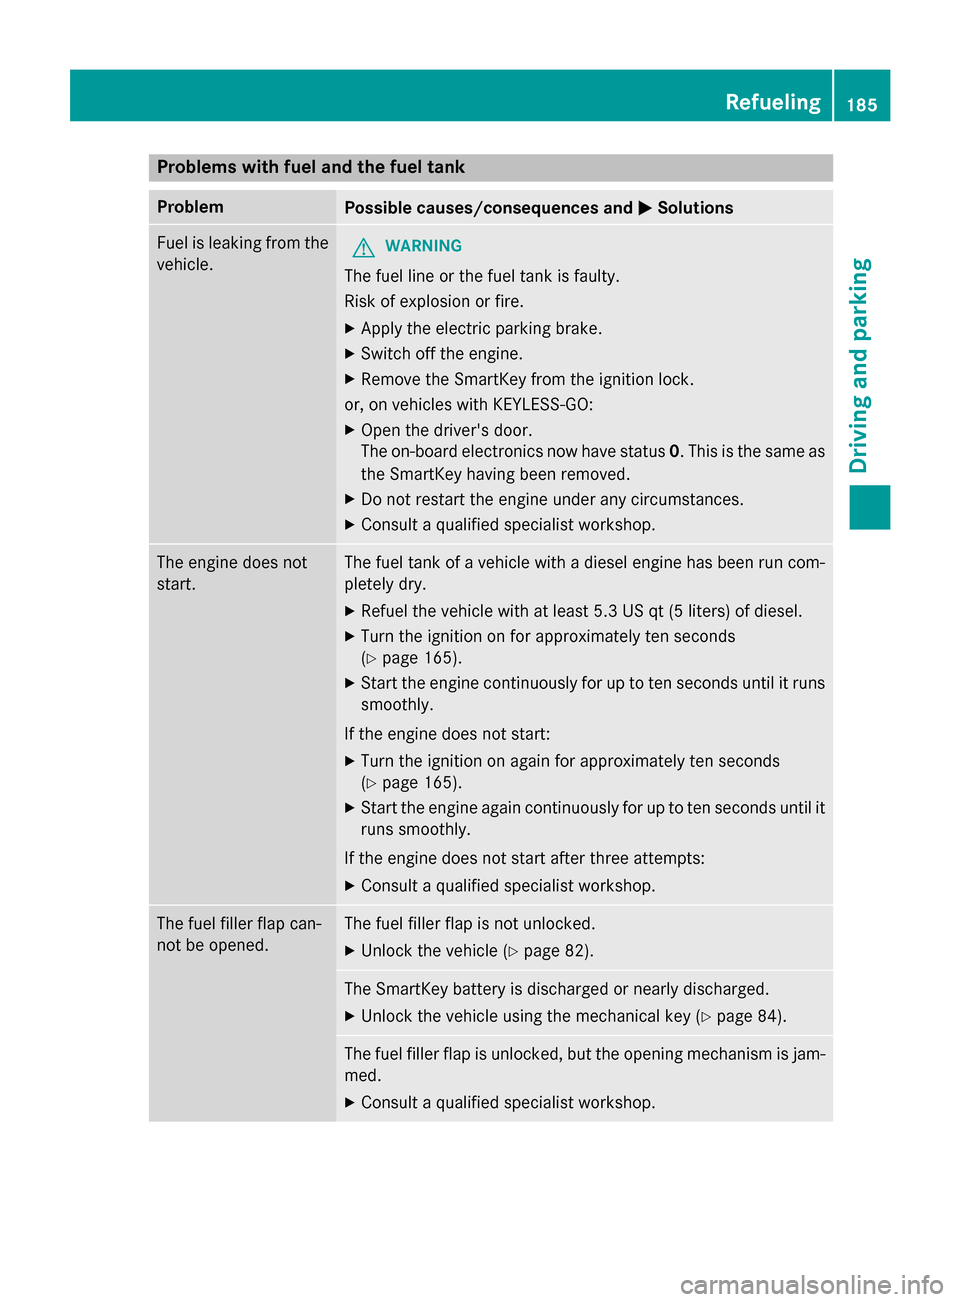
Problems with fuel and the fuel tank
ProblemPossible causes/consequences andMSolutions
Fuel is leaking from the
vehicle.GWARNING
The fuel line or the fuel tank is faulty.
Risk of explosion or fire.
XApply the electric parking brake.
XSwitch off the engine.
XRemove the SmartKey from the ignition lock.
or, on vehicles with KEYLESS‑GO:
XOpen the driver's door.
The on-board electronics now have status 0. This is the same as
the SmartKey having been removed.
XDo not restart the engine under any circumstances.
XConsult a qualified specialist workshop.
The engine does not
start.The fuel tank of a vehicle with a diesel engine has been run com-
pletely dry.
XRefuel the vehicle with at least 5.3 US qt (5 liters) of diesel.
XTurn the ignition on for approximately ten seconds
(
Ypage 165).
XStart the engine continuously for up to ten seconds until it runs
smoothly.
If the engine does not start:
XTurn the ignition on again for approximately ten seconds
(
Ypage 165).
XStart the engine again continuously for up to ten seconds until it
runs smoothly.
If the engine does not start after three attempts:
XConsult a qualified specialist workshop.
The fuel filler flap can-
not be opened.The fuel filler flap is not unlocked.
XUnlock the vehicle (Ypage 82).
The SmartKey battery is discharged or nearly discharged.
XUnlock the vehicle using the mechanical key (Ypage 84).
The fuel filler flap is unlocked, but the opening mechanism is jam-
med.
XConsult a qualified specialist workshop.
Refueling185
Driving and parking
Z
Page 325 of 462
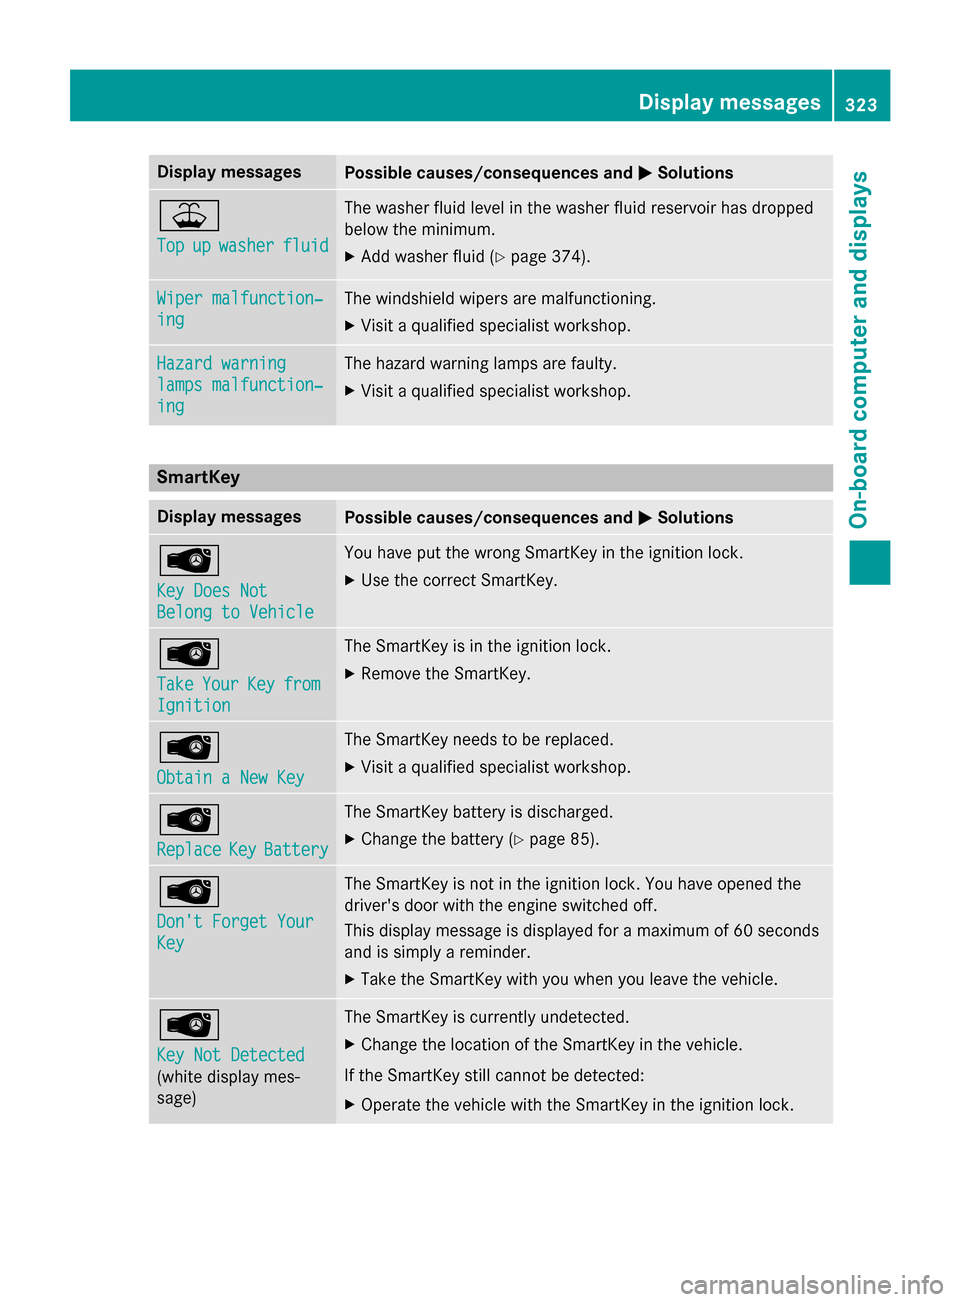
Display messagesPossible causes/consequences andMSolutions
¥
Topupwasherfluid
The washer fluidlevel in th ewasher flui dreservoir has dropped
belo wtheminimum .
XAddwasher flui d (Ypage 374).
Wiper malfunction‐
ing
The windshield wiper sare malfunctioning.
XVisit aqualified specialist workshop .
Hazard warning
lamps malfunction‐
ing
The hazard warnin glamp sare faulty.
XVisit aqualified specialist workshop .
SmartKey
Display messagesPossible causes/consequences and MSolutions
Â
Key DoesNot
Belong to Vehicl e
You haveput th ewrong SmartKey in th eignition lock.
XUse th ecorrec tSmartKey.
Â
Tak eYourKeyfrom
Ignition
The SmartKey is in th eignition lock.
XRemove th eSmartKey.
Â
Obtain aNew Key
The SmartKey needs to be replaced.
XVisit aqualified specialist workshop .
Â
ReplaceKeyBattery
The SmartKey battery is discharged.
XChange th ebattery (Ypage 85) .
Â
Don't Forget You r
Key
The SmartKey is notin th eignition lock. You hav eopened th e
driver's doo rwit hth eengin eswitched off.
This display message is displayed fo r amaximum of 60 seconds
and is simply areminder .
XTaketh eSmartKey wit hyou when you leav eth evehicle.
Â
Key Not Detected
(whit edisplay mes -
sage )
The SmartKey is currentl yundetected.
XChange th elocation of th eSmartKey in th evehicle.
If th eSmartKey still canno tbe detected:
XOperat eth evehicl ewit hth eSmartKey in th eignition lock.
Display messages32 3
On-board computer and displays
Z
Page 355 of 462
XTurn the SmartKey to position2in the igni-
tion lock (
Ypage 165).
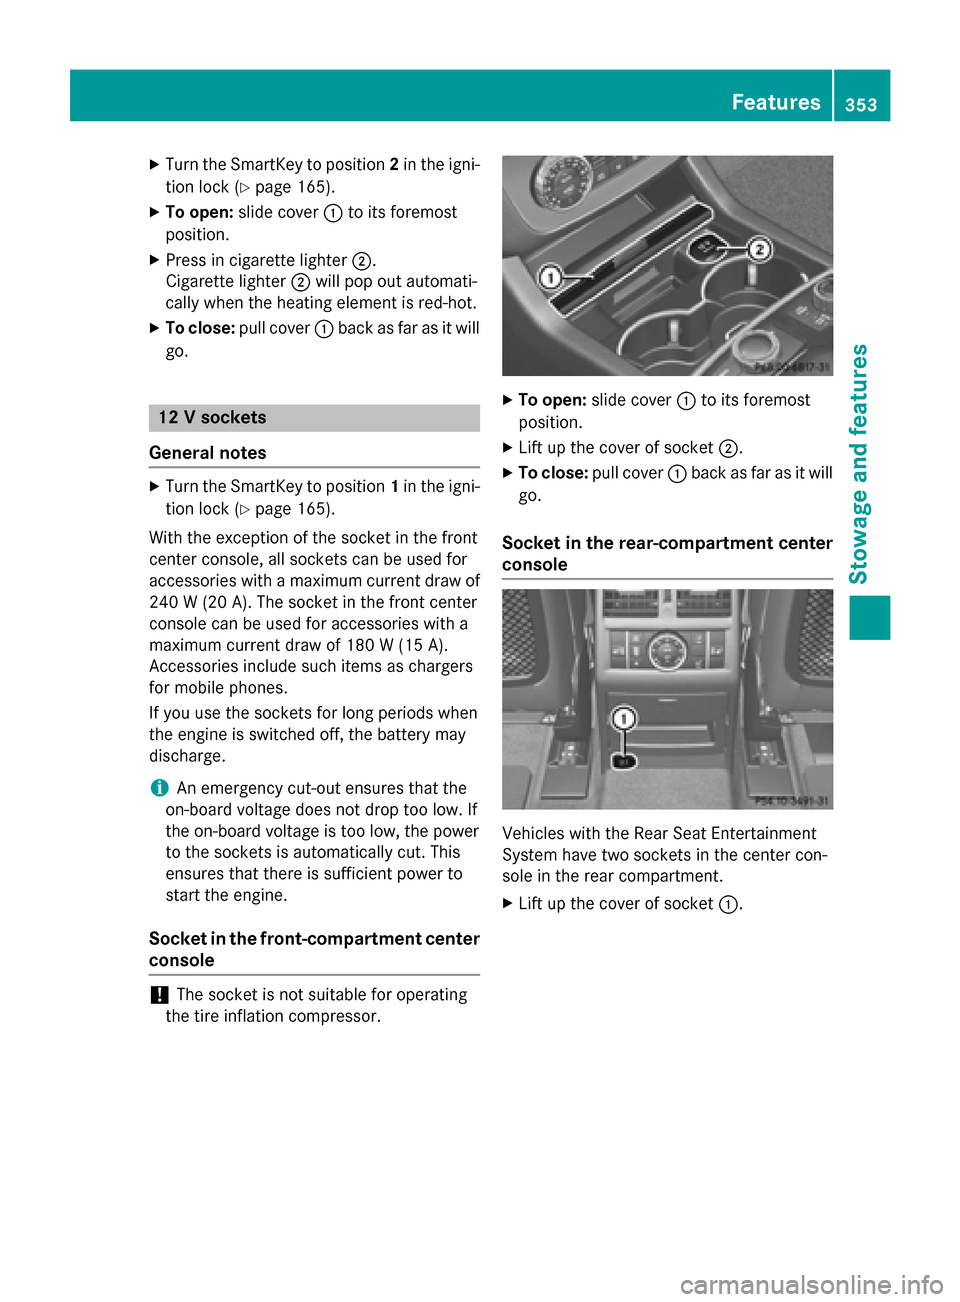
XTo open: slide cover :to its foremost
position.
XPress in cigarette lighter ;.
Cigarette lighter ;will pop out automati-
cally when the heating element is red-hot.
XTo close: pull cover :back as far as it will
go.
12 V sockets
General notes
XTurn the SmartKey to position 1in the igni-
tion lock (
Ypage 165).
With the exception of the socket in the front
center console, all sockets can be used for
accessories with a maximum current draw of
240 W (20 A). The socket in the front center
console can be used for accessories with a
maximum current draw of 180 W (15 A).
Accessories include such items as chargers
for mobile phones.
If you use the sockets for long periods when
the engine is switched off, the battery may
discharge.
iAn emergency cut-out ensures that the
on-board voltage does not drop too low. If
the on-board voltage is too low, the power
to the sockets is automatically cut. This
ensures that there is sufficient power to
start the engine.
Socket in the front-compartment center
console
!The socket is not suitable for operating
the tire inflation compressor.
XTo open: slide cover :to its foremost
position.
XLift up the cover of socket ;.
XTo close:pull cover :back as far as it will
go.
Socket in the rear-compartment center
console
Vehicles with the Rear Seat Entertainment
System have two sockets in the center con-
sole in the rear compartment.
XLift up the cover of socket :.
Features353
Stowage and features
Z
Page 395 of 462
HEnvironmental note
Batteries contain dangerous
substances. It is against the
law to dispose of them with
the household rubbish. They
must be collected separatelyand recycled to protect the
environment.
Dispose of batteries in an
environmentally friendly
manner. Take discharged
batteries to a qualified spe-
cialist workshop or a special
collection point for used bat-
teries.
!Have the battery checked regularly at a
qualified specialist workshop.
Observe the service intervals in the Main-
tenance Booklet or contact a qualified spe-
cialist workshop for more information.
!You should have all work involving the
battery carried out at a qualified specialist
workshop. In the exceptional case that it is
necessary for you to disconnect the battery
yourself, make sure that:
Ryou switch off the engine and remove the
SmartKey. On vehicles with KEYLESS-
GO, ensure that the ignition is switched
off. Check that all the indicator lamps in
the instrument cluster are off. Otherwise, electronic components, such as the
alternator, may be damaged.
Ryou first remove the negative terminal
clamp and then the positive terminal
clamp. Never swap the terminal clamps.
Otherwise, the vehicle's electronic sys-
tem may be damaged.
Rthe transmission is locked in position P
after disconnecting the battery. The vehi-
cle is secured against rolling away. You
can then no longer move the vehicle.
The battery and the cover of the positive
terminal clamp must be installed securely
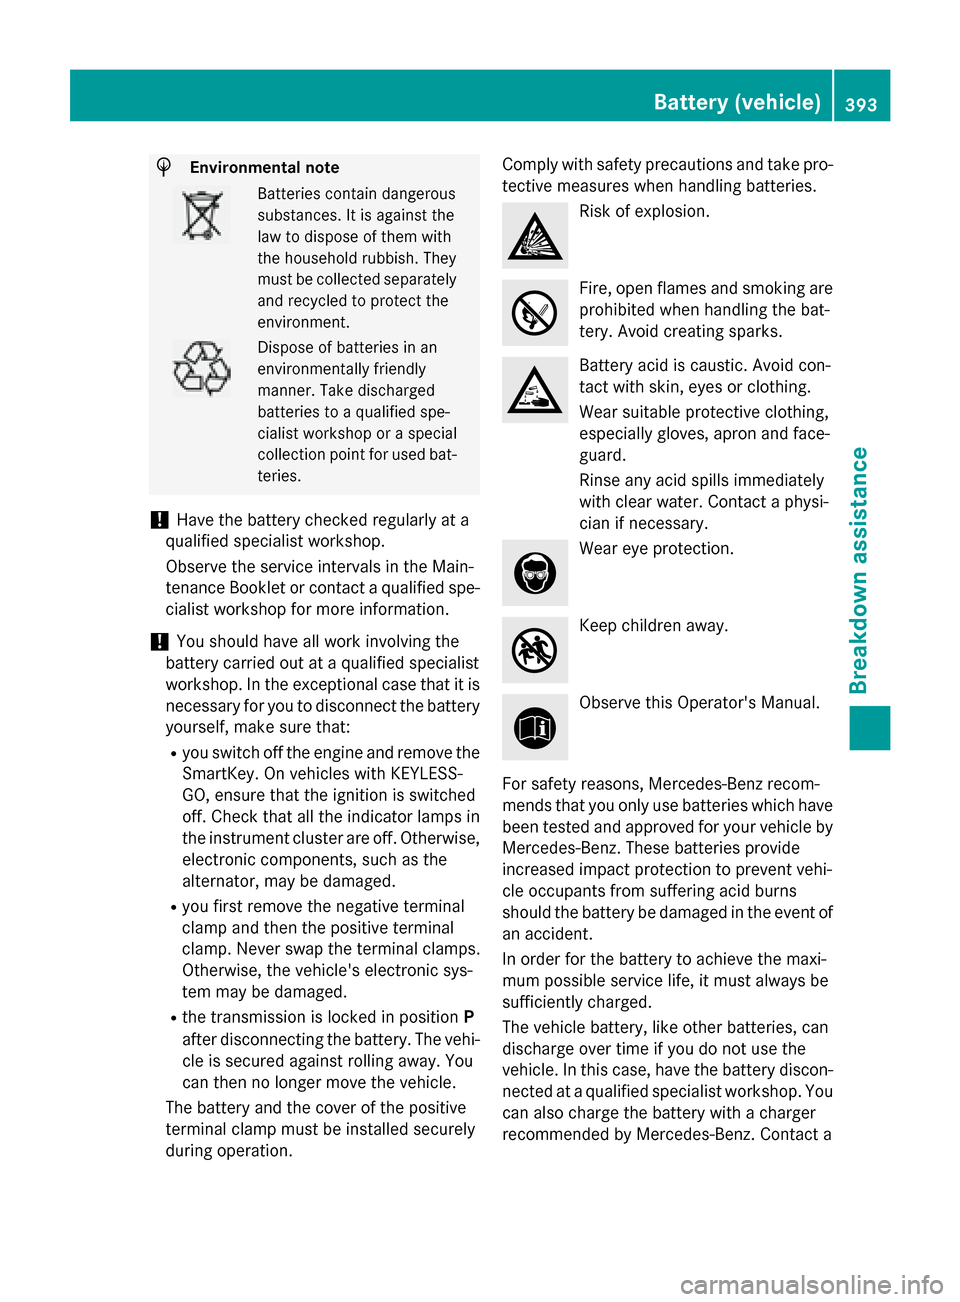
during operation. Comply with safety precautions and take pro-
tective measures when hand
ling bat
teries.
Risk of explosion.
Fire, open flames and smoking are
prohibited when handling the bat-
tery. Avoid creating sparks.
Battery acid is caustic. Avoid con-
tact with skin, eyes or clothing.
Wear suitable protective clothing,
especially gloves, apron and face-
guard.
Rinse any acid spills immediately
with clear water. Contact a physi-
cian if necessary.
Wear eye protection.
Keep children away.
Observe this Operator's Manual.
For safety reasons, Mercedes-Benz recom-
mends that you only use batteries which have
been tested and approved for your vehicle by
Mercedes-Benz. These batteries provide
increased impact protection to prevent vehi-
cle occupants from suffering acid burns
should the battery be damaged in the event of
an accident.
In order for the battery to achieve the maxi-
mum possible service life, it must always be
sufficiently charged.
The vehicle battery, like other batteries, can
discharge over time if you do not use the
vehicle. In this case, have the battery discon- nected at a qualified specialist workshop. You
can also charge the battery with a charger
recommended by Mercedes-Benz. Contact a
Battery (vehicle)393
Breakdown assistance
Z
Page 396 of 462
qualified specialist workshop for further infor-
mation.
Have the battery condition of charge checked
more frequently if you use the vehicle mainly
for short trips or if you leave it standing idle
for a lengthy period. Consult a qualified spe-
cialist workshop if you wish to leave your
vehicle parked for a long period of time.
Remove the SmartKey if you park the vehicle
and do not require any electrical consumers.
The vehicle will then use very little energy,
thus conserving battery power.
iIf the power supply has been interrupted,
e.g. if you reconnect the battery, you will
have to:
Rset the clock. Information on setting the
clock can be found in the Digital Opera-
tor's Manual.
On vehicles with COMAND and a naviga-
tion system, the clock is set automati-
cally.
Rreset the function for folding the exterior mirrors in/out automatically, by folding
the mirrors out once (
Ypage 125).
Charging the battery
GWARNING
During charging and jump-starting, explosive
gases can escape from the battery. There is a risk of an explosion.
Particularly avoid fire, open flames, creating
sparks and smoking. Ensure there is sufficient
ventilation while charging and jump-starting.
Do not lean over a battery.
GWARNING
Battery acid is caustic. There is a risk of injury.
Avoid contact with skin, eyes or clothing. Do
not inhale any battery gases. Do not lean over
the battery. Keep children away from batter-
ies. Wash away battery acid immediately with
plenty of clean water and seek medical atten-
tion.
GWARNING
A discharged battery can freeze at tempera-
tures below freezing point. When jump-start-
ing the vehicle or charging the battery, gases can escape from the battery. There is a risk of
an explosion.
Allow the frozen battery to thaw out before
charging it or jump-starting.
!Only use battery chargers with a maxi-
mum charging voltage of 14.8 V.
!Only charge the battery using the jump-
starting connection point.
If, at low temperatures, the indicator lamps/
warning lamps in the instrument cluster do
not light up, it is highly likely that the dis-
charged battery has frozen. In this case you
may neither jump-start the vehicle nor charge
the battery. The service life of a thawed-out
battery may be shorter. The starting charac-
teristics can be impaired, particularly at low
temperatures. Have the thawed-out battery
checked at a qualified specialist workshop.
Never charge the battery if it is still installed in
the vehicle, unless you use a battery charger
which has been tested and approved by
Mercedes-Benz. A battery charger unit spe-
cially adapted for Mercedes-Benz vehicles
and tested and approved by Mercedes-Benz
is available as an accessory. It permits the
charging of the battery in its installed posi-
tion. Contact an authorized Mercedes-Benz
Center for further information and availabil-
ity. Charge the battery in accordance with the
separate instructions for the battery charger.
The jump-starting connection point is in the
engine compartment (
Ypage 395).
Read the battery charger's operating instruc-
tions before charging the battery.
XOpen the hood.
XConnect the battery charger to the positive terminal and ground point in the same
order as when connecting the donor bat-
tery in the jump-starting procedure
(
Ypage 395).
394Battery (vehicle)
Breakdown assistance
Page 398 of 462
Do not start the vehicle using a rapid charging device. If your vehicle's battery is discharged,
the engine can be jump-started from another vehicle or from a second battery using jumper
cables. Observe the following points:
RThe battery is not accessible in all vehicles. If the other vehicle's battery is not accessible,
jump-start the vehicle using a second battery or a jump-starting device.
RVehicles with a gasoline engine:only jump-start the vehicle when the engine and exhaust
system are cold.
RDo not start the engine if the battery is frozen. Let the battery thaw first.
ROnly jump-start from batteries with a 12 V voltage rating.
ROnly use jumper cables which have a sufficient cross-section and insulated terminal clamps.
RIf the battery is fully discharged, leave the battery that is being used to jump-start connected
for a few minutes before attempting to start. This charges the battery slightly.
RMake sure that the two vehicles do not touch.
Make sure that:
RThe jumper cables are not damaged.
RBare parts of the terminal clamp do not come into contact with other metal parts while the
jumper cables are conne cted to th
e battery.
RThe jumper cables cannot come into contact with parts which can move when the engine is
running, such as the V-belt pulley or the fan.
XSecure the vehicle by applying the electric parking brake.
XShift the transmission to position P.
XTurn the SmartKey to position 0in the ignition lock and remove it (Ypage 165). On vehicles
with KEYLESS-GO, make sure the ignition is switched off (
Ypage 165). All indicator lamps
in the instrument cluster must be off.
XSwitch off all electrical consumers, e.g. rear window defroster, lighting, etc.
XOpen the hood.
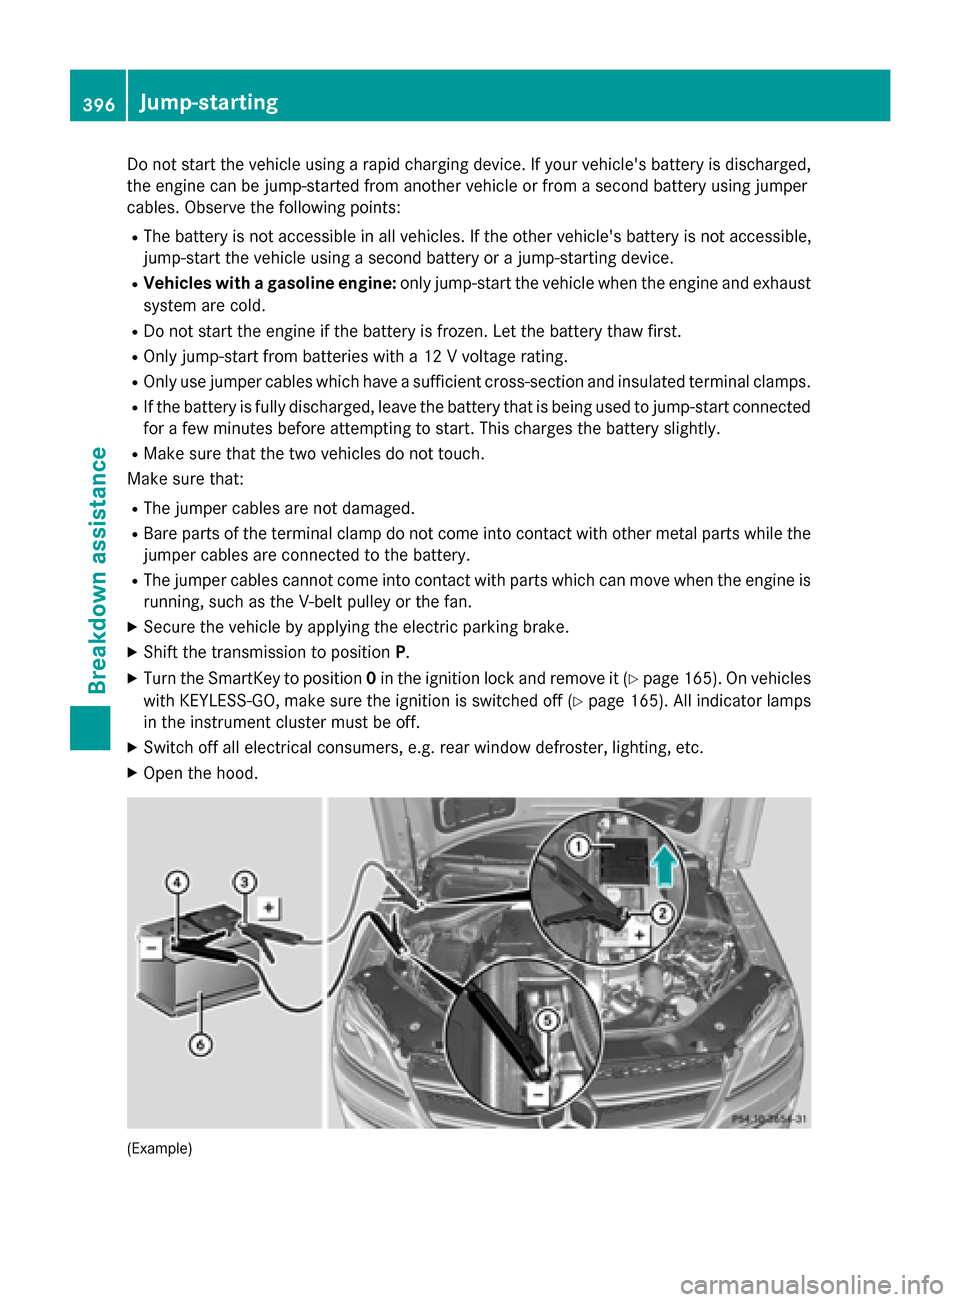
(Example)
396Jump-starting
Breakdown assistance
Page 400 of 462
To prevent damage to the vehicle, deacti-
vate DISTRONIC PLUS and the HOLD func-tion in the following or other similar situa-
tions:
Rwhen towing the vehicle
Rin the car wash
!Make sure that the electric parking brake
is released. If the electric parking brake is
faulty, visit a qualified specialist workshop.
!Only secure the tow rope or tow bar at the
towing eyes. Otherwise, the vehicle could
be damaged.
!Do not use the trailer tow hitch for recov-
ery or towing. Do not use the towing eye for recovery. this could damage the vehicle. If
in doubt, have the vehicle recovered using
a crane.
!When towing, pull away slowly and
smoothly. Pull the towed vehicle as straight
as possible and not at an acute angle.
Excessive tractive power could damage the
vehicles.
iWhen towing, it is preferable to use a rigid
towing bar as opposed to a tow rope. A rigid towing bar helps to keep the tractive power
low.
!When towing vehicles with KEYLESS-GO,
use the key instead of the Start/Stop but-
ton. Otherwise, the automatic transmission
may shift to position Pwhen the driver's or
front-passenger door are opened, which
could lead to damage to the transmission.
!Do not tow with sling-type equipment.
This could damage the vehicle.
!Vehicles with differential locks: make
sure the differential locks are in automatic
mode. When towing, the differential locks
must not be switched on. The transmission may otherwise be damaged.
!The vehicle can be towed a maximum of
30 miles (50km). The towing speed of
30 mph (50 km/h) must not be exceeded. If the vehicle has to be towed more than
30 miles (50km), the entire vehicle must be
raised and transported.
It is better to have the vehicle transported
than to have it towed away.
If the vehicle has suffered transmission dam-
age, have it transported on a transporter or
trailer.
The automatic transmission must be in posi-
tion Nwhen the vehicle is being towed.
The battery must be connected and charged.
Otherwise, you:
Rcannot turn the SmartKey to position 2in
the ignition lock
Rcannot release the electric parking brake
Rcannot shift the automatic transmission to position N
iDisarm the automatic locking feature
(
Ypage 285). You could otherwise be
locked out when pushing or towing the
vehicle.
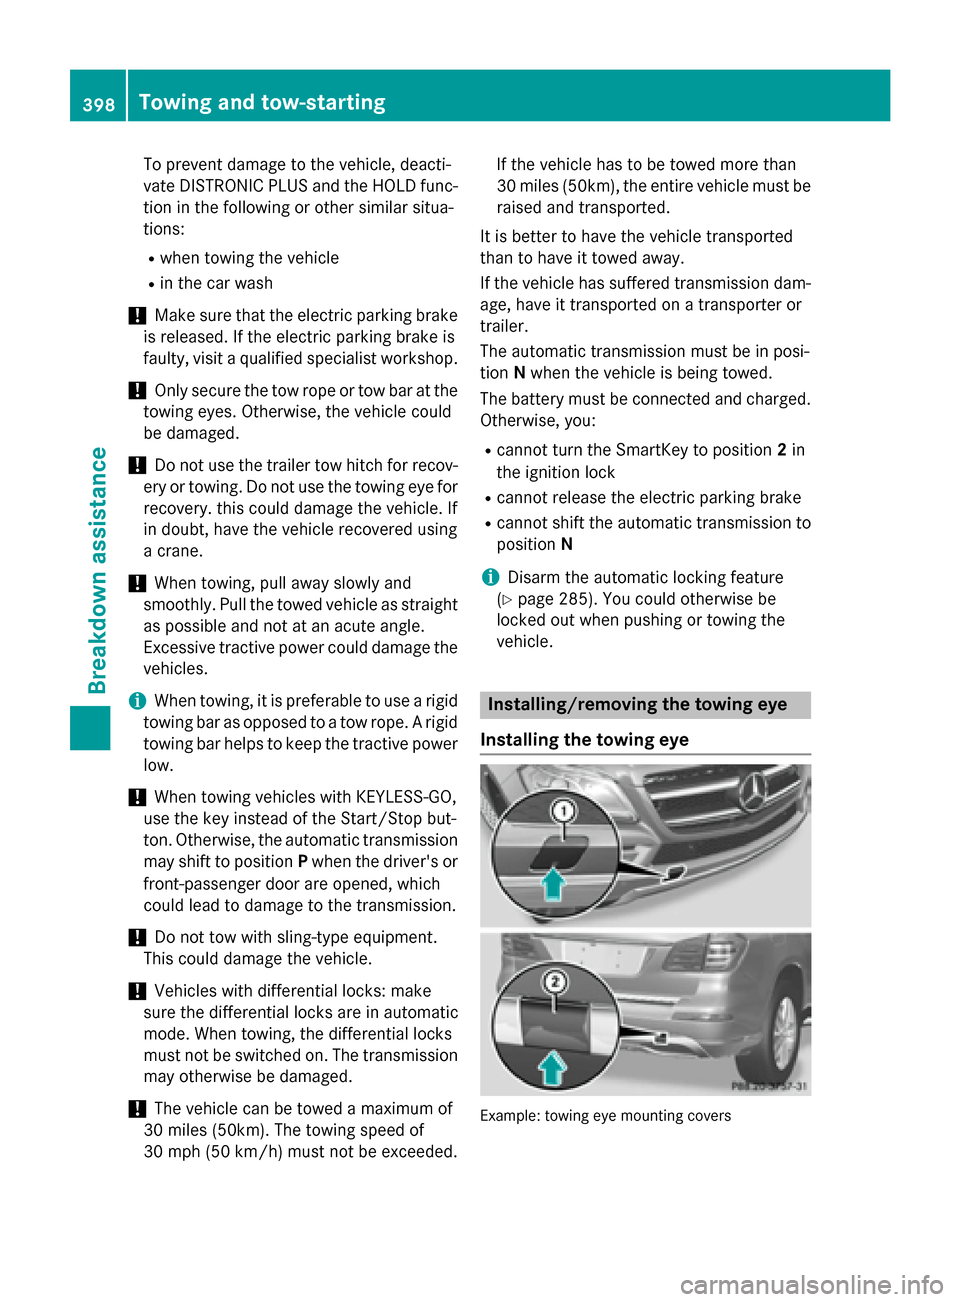
Installing/removing the towing eye
Installing the towing eye
Example: towing eye mounting covers
398Towing and tow-starting
Breakdown assistance
Page 402 of 462
Information on 4MATIC vehicles
!
Vehicles with 4MATIC must not be towed
wit h either the front or the rear axle raised,
as doin g so willdamage the transmission.
If the vehicle has transmission damage or
damage to the front or rear axle, have it trans- ported on a transporter or trailer.
In the event ofdamage tothe electri cal
system
If the battery isdefective, the automat ic
transmission will belocked in position P. To
shift the automat ictransmission to position
N , you must pro videpower to the vehicle's
electrical system in the same way as when
jum p-starting (
Ypage 395).
Have the vehicle transported on a transporter
or trailer.
Tow-starting (emergency engine
starting)
!
Vehicles with automat ictransmission
must not betow-starte d.You could other-
wise damage the automat ictransmission.
iYou can find information on "Jump-start-
ing" under (
Ypage 395).
Fuses
Important safety notes
GWARNIN G
If you manipulat eor bridge afault yfus eor if
you replace it wit h afusewit h a higher amper-
age, th eelectric cables could be overloaded.
This could result in afire. Ther eis aris kof an
acciden tand injury.
Always replace fault yfuses wit hth especifie d
ne wfuses having th ecorrec tamperage .
!For the fuse boxes inthe engine compart-
ment and under the rear bench seat, only
use fuses with the suffix "S".Otherwise,
components or systems could be dam-
aged. The fuses
inyour vehicle serve to close down
faulty circuits. Ifa fuse blows, all the compo-
nents on the circuit and their functions stop
operating.
Blo wn fuses must bereplaced with fuses of
the same rating, which you can recogniz eby
the color and value. The fuse ratings are listed
in the fuse allocation chart.
If a newly inserted fuse also blows, have the
cause traced and rectified at a qualified spe-
cialist workshop, e.g. an authorized
Mercedes-Benz Center.
Before changing a fuse
Observe the important safety notes
(
Ypage 400)
XSe cure the vehicle against rol ling away
(
Ypage 189).
XSwi tch off the engine.
XSwitch off all electrical consumers.
XRemo vethe SmartKey from the ignit ion
lock.
or, on vehicles with KEYLESS‑ GO:
XOpen the driver's door.
The on-board electronics now have status
0. Thisisthe same as the SmartKey having
been remove d.
All indicator lamps inthe instrument cluster
must beoff.
The fuses are located invarious fuse boxes:
RFuse box on the front-passenger side of the
dashboard
RFuse box inthe engine compartment on the
right-hand side of the vehicle, when viewed
in the direction of travel
RFuse box under the rear bench seat
The fuse allocation chart islocated inthe fuse
box under the rear bench seat (
Ypage 401).
Dashboard fuse box
Pay attention to the important safety notes
(
Ypage 400).
400Fuses
Breakdown assistance