check engine light MERCEDES-BENZ GL-Class 2016 X166 Owner's Manual
[x] Cancel search | Manufacturer: MERCEDES-BENZ, Model Year: 2016, Model line: GL-Class, Model: MERCEDES-BENZ GL-Class 2016 X166Pages: 462, PDF Size: 10.44 MB
Page 10 of 462
Consumption statistics (on-board
computer).......................................... 276
Convenience closing feature .............. 99
Convenience opening feature ............ 99
Coolant (engine)
Checking the level ........................ .373
Display message ............................ 306
Filling capacity ............................... 453
Important safety notes .................. 452
Temperature (on-board computer,
Mercedes-AMG vehicles) ...............2 87
Temperature gauge ........................ 273
Warning lamp ................................. 335
Cooling
see Climate control
Copyright ............................................. 31
Cornering light function
Display message ............................ 303
Function/notes .............................1 33
Crash-responsive emergency light-
ing ....................................................... 136
Crosswind Assist ................................. 75
Crosswind driving assistance ............ 75
Cruise control
Activating ....................................... 204
Activation conditions ..................... 203
Cruise control lever ....................... 203
Deactivating ................................... 205
Display message ............................ 317
Driving system ............................... 202
Function/notes .............................2 02
Important safety notes .................. 203
Storing and maintaining current
speed ............................................. 204
Cup holder
Center console .............................. 349
Important safety notes .................. 349
Rear compartment ......................... 350
Temperature controlled ................. 349
Third row of seats .......................... 350
Customer Assistance Center
(CAC) ..................................................... 29
Customer Relations Department ....... 29
D
Data
see Technical data Daytime running lamps
Display message ............................ 305
Function/notes .............................1 30
Switching on/off (on-board com-
puter) ............................................. 284
Declarations of conformity ................. 28
DEF
Adding ...........................................1 86
Display message ............................ 310
Filling capacity ............................... 450
Important safety notes .................. 450
Delayed switch-off
Exterior lighting (on-board com-
puter) ............................................. 284
Interior lighting .............................. 285
Diagnostics connection ......................28
Differential lock (display mes-
sage) .................................................. .312
Digital speedometer ......................... 277
DIRECT SELECT lever
Automatic transmission ................. 173
Display messages
ASSYST PLUS ................................ 374
Calling up (on-board computer) ..... 290
Driving systems .............................3 10
Engine ............................................ 306
General notes ................................ 290
Hiding (on-board computer) ........... 290
KEYLESS-GO .................................. 323
Lights ............................................. 303
Safety systems .............................. 291
SmartKey ....................................... 323
Tires ............................................... 318
Vehicle ...........................................3 20
Distance recorder .............................2 75
Distance warning (warning lamp) .... 337
Distance warning function
Activating/deactivating ................. 281
Function/notes ................................ 70
Warning lamp ................................. 337
DISTRONIC PLUS
Activating ....................................... 207
Activation conditions ..................... 207
Cruise control lever ....................... 207
Deactivating ................................... 210
Display message ............................ 316
8Index
Page 13 of 462
Temperature (on-board computer,
Mercedes-AMG vehicles) ............... 287
Viscosity ........................................451
ESP
®(Electronic Stability Pro-
gram)
AMG menu (on-board computer) ... 287
Characteristics ................................. 74
Deactivating/activating ................... 74
Display message ............................ 291
Function/notes ................................ 73
General notes .................................. 73
Important safety information ........... 73
Trailer stabilization ........................... 75
Warning lamp ................................. 330
ETS/4ETS (Electronic Traction Sys-
tem) ...................................................... 73
Exhaust check ................................... 193
Exhaust pipe (cleaning instruc-
tions) ..................................................3 81
Exterior lighting
see Lights
Exterior mirrors
Adjusting ....................................... 124
Dipping (automatic) ....................... 125
Folding in when locking (on-board
computer) ...................................... 286
Folding in/out (automatically) ....... 125
Folding in/out (electrically) ........... 125
Out of position (troubleshooting) ... 125
Setting ........................................... 125
Storing settings (memory func-
tion) ............................................... 127
Storing the parking position .......... 126
Eyeglasses compartment ................. 342
F
Filler cap
see Fuel filler flap
Flat tire
MOExtended tires .......................... 387
Preparing the vehicle ..................... 387
TIREFIT kit ...................................... 388
see Emergency spare wheel
Floormats ........................................... 368
Folding the rear bench seat for-
wards/back ....................................... 344 Fording
Off-road ......................................... 197
On flooded roads ........................... 196
Frequencies
Mobile phone ................................. 444
Two-way radio ................................ 444
Fuel
Additives ........................................ 449
Consumption statistics .................. 276
Displaying the current consump-
tion ................................................ 276
Displaying the range ...................... 276
Driving tips .................................... 193
Fuel gauge ....................................... 35
Grade (gasoline) ............................ 448
Important safety notes .................. 447
Low outside temperatures ............. 450
Problem (malfunction) ................... 185
Quality (diesel) ............................... 449
Refueling ........................................ 182
Tank content/reserve fuel ............. 448
Fuel filler flap
Opening ......................................... 184
Fuel filter (display message) ............ 309
Fuel level
Calling up the range (on-board
computer) ...................................... 276
Fuel tank
Capacity ........................................ 448
Problem (malfunction) ................... 185
Fuses
Allocation chart ............................. 400
Before changing ............................. 400
Dashboard fuse box ....................... 400
Fuse box in the engine compart-
ment .............................................. 401
Fuse box under rear bench seat .... 401
Important safety notes .................. 400
G
Garage door openerClearing the memory ..................... 367
General notes ................................ 364
Important safety notes .................. 365
Opening/closing the garage doo r..3 67
Programming (button in the rear-
view mirror) ................................... 365
Index11
Page 17 of 462
PASSENGER AIR BAG indicator
lamps ............................................... 45
Pets in the vehicle ........................... 67
PRE-SAFE
®(anticipatory occu-
pant protection) ...............................6 0
Restrain tsystem warnin glamp ........ 45
OCS
Condition s...................................... .53
Faults ............................................... 57
Operation ......................................... 54
System self-test ............................... 56
Odometer ........................................... 275
Off-road driving
Approach/departure angle ............ 456
Checklist after driving off-road ...... 200
Checklist before driving off-road .... 199
Fording depth ................................ 455
General information ....................... 199
Important safety notes .................. 198
Maximum gradient climbing abil-
ity .................................................. 456
Traveling uphill ............................... 201
Off-road programs (vehicles with
the ON&OFFROAD package)
Displays in the COMAND display ... 262
Function/notes ............................. 258
Off-road program 1 ........................ 258
Off-road program 2 ........................ 259
Off-road system
4MATIC .......................................... 256
DSR ............................................... 257
LOW RANGE off-road gear ............. 259
Off-road 4ETS .................................. 73
Off-road ABS .................................... 69
Off-road ESP
®.................................. 75
Off-road programs (vehicles with
the ON&OFFROAD package) .......... 258
Oil
see Engine oil
On and Offroad menu (on-board
computer) .......................................... 287
On-board computer
AMG menu ..................................... 287
Assistance menu ........................... 281
Audio menu ................................... 278
Convenience submenu .................. 285
Display messages .......................... 290 Displaying a service message ........ 375
DISTRONIC PLUS ........................... 211
Factory settings submenu ............. 286
Importa
nt sa
fety notes .................. 272
Instrument cluster submenu .......... 283
Lighting submenu .......................... 284
Menu overview .............................. 275
Message memory .......................... 290
Navigation menu ............................ 277
On and Offroad menu .................... 287
Operation ....................................... 273
RACETIMER ................................... 288
Service menu ................................. 283
Settings menu ............................... 283
Standard display ............................ 275
Telephone menu ............................ 279
Trip menu ...................................... 275
Vehicle submenu ........................... 285
Video DVD operation ..................... 279
On-road programs
AUTO program ............................... 254
Function/notes ............................. 254
Snow program ............................... 255
SPORT program ............................. 255
Trailer program .............................. 256
Opening and closing the side trim
panels ................................................. 138
Operating safety
Declaration of conformity ................ 28
Important safety notes .................... 27
Operating system
see On-board computer
Operator's Manual
Vehicle equipment ........................... 25
Outside temperature display ........... 273
Overhead control panel ...................... 41
Override feature
Rear side windows ........................... 67
P
Paint code number ............................ 446
Paintwork (cleaning instructions) ... 378
Panic alarm .......................................... 44
Panorama roof with power tilt/
sliding panel
Important safety notes .................. 102
Opening/closing ............................ 104
Index15
Page 47 of 462

For more information about children traveling
with you in the vehicle and on child restraint
systems, see "Children in the vehicle"
(
Ypage 61).
Important safety notes
GWARNING
Modifications to the restraint system may
cause it to no longer work as intended. The
restraint system may then not perform its
intended protective function and may fail in an
accident or trigger unexpectedly, for example.
This poses an increased risk of injury or even fatal injury.
Never modify parts of the restraint system.
Never tamper with the wiring, the electronic
components or their software.
If it is necessary to modify an air bag system to
accommodate a person with disabilities, con-
tact an authorized Mercedes-Benz Center for
details. USA only: for further information con-
tact our Customer Assistance Center at
1-800-FOR-MERCedes (1‑800‑367 ‑6372).
Restraint system warning lamp
The functions of the restraint system are
checked after the ignition is switched on and
at regular intervals while the engine is run-
ning. Therefore, malfunctions can be detec-
ted in good time.
The 6 restraint system warning lamp in
the instrument cluster lights up when the igni-
tion is switched on. It goes out no later than a
few seconds after the vehicle is started. The
components of the restraint system are in
operational readiness.
A malfunction has occurred if the 6
restraint system warning lamp:
Rdoes not light up after the ignition is
switched on
Rdoes not go out after a few seconds with
the engine running
Rlights up again while the engine is running
GWARNING
If restraint system is malfunctioning, restraint
system components may be triggered unin-
tentionally or might not be triggered at all in
the event of an accident with a high rate of
vehicle deceleration. This can affect the Emer- gency Tensioning Device or air bag, for exam-
ple. This poses an increased risk of injury or
even fatal injury.
Have the restraint system checked and
repaired in a qualified specialist workshop as
soon as possible.
PASSENGER AIR BAG OFF indicator
lamp
PASSENGER AIR BAG OFF indicator lamp :
is part of the Occupant Classification System
(OCS).
The PASSENGER AIR BAG OFF indicator lamp
informs you about the status of the front-
passenger front air bag.
If the PASSENGER AIR BAG OFF indicator
lamp:
Ris lit: the front-passenger front air bag is
deactivated. It will then not be deployed in
the event of an accident.
Rdoes not light up: the front-passenger
front air bag is enabled. If, in the event of an
accident, all deployment criteria are met,
the front-passenger front air bag is
deployed.
Occupant safety45
Safety
Z
Page 85 of 462
If you do not open the vehicle within
approximately 40 seconds of unlocking:
Rthe vehicle is locked again.
Rprotection against theft is reactivated.
XTo lock centrally:press button:.
The SmartKey centrally locks and unlocks the following components:
Rthe doors
Rthe tailgate
Rthe fuel filler flap
The turn signals flash once when unlocking
and three times when locking.
You can also set an audible signal to confirm
that the vehicle has been locked. The audible
signal can be activated and deactivated using
the on-board computer (
Ypage 285).
You will receive visual and acoustic locking
confirmation if all components were able to
be locked.
When it is dark, the surround lighting also
comes on if it is activated in the on-board
computer (
Ypage 284).
KEYLESS-GO
General notes
Bear in mind that the engine can be started by
any of the vehicle occupants if there is a KEY-
LESS-GO key in the vehicle.
Locking/unlocking centrally
You can start, lock or unlock the vehicle using
KEYLESS-GO. To do this, you only need carry
the SmartKey with you. You can combine the functions of KEYLESS-GO with those of a con-
ventional SmartKey. Unlock the vehicle by
using KEYLESS-GO, for instance, and lock it
using the &button on the SmartKey.
When locking or unlocking with KEYLESS-GO,
the distance between the SmartKey and the
corresponding door handle must not be
greater than 3 ft (1 m). KEYLESS-GO checks whether a valid Smart-
Key is in the vehicle by periodically establish-
ing a radio connection between the vehicle
and the SmartKey. This happens:
Rwhen the external door handles are
touched
Rwhen starting the engine
Rwhile the vehicle is in motion
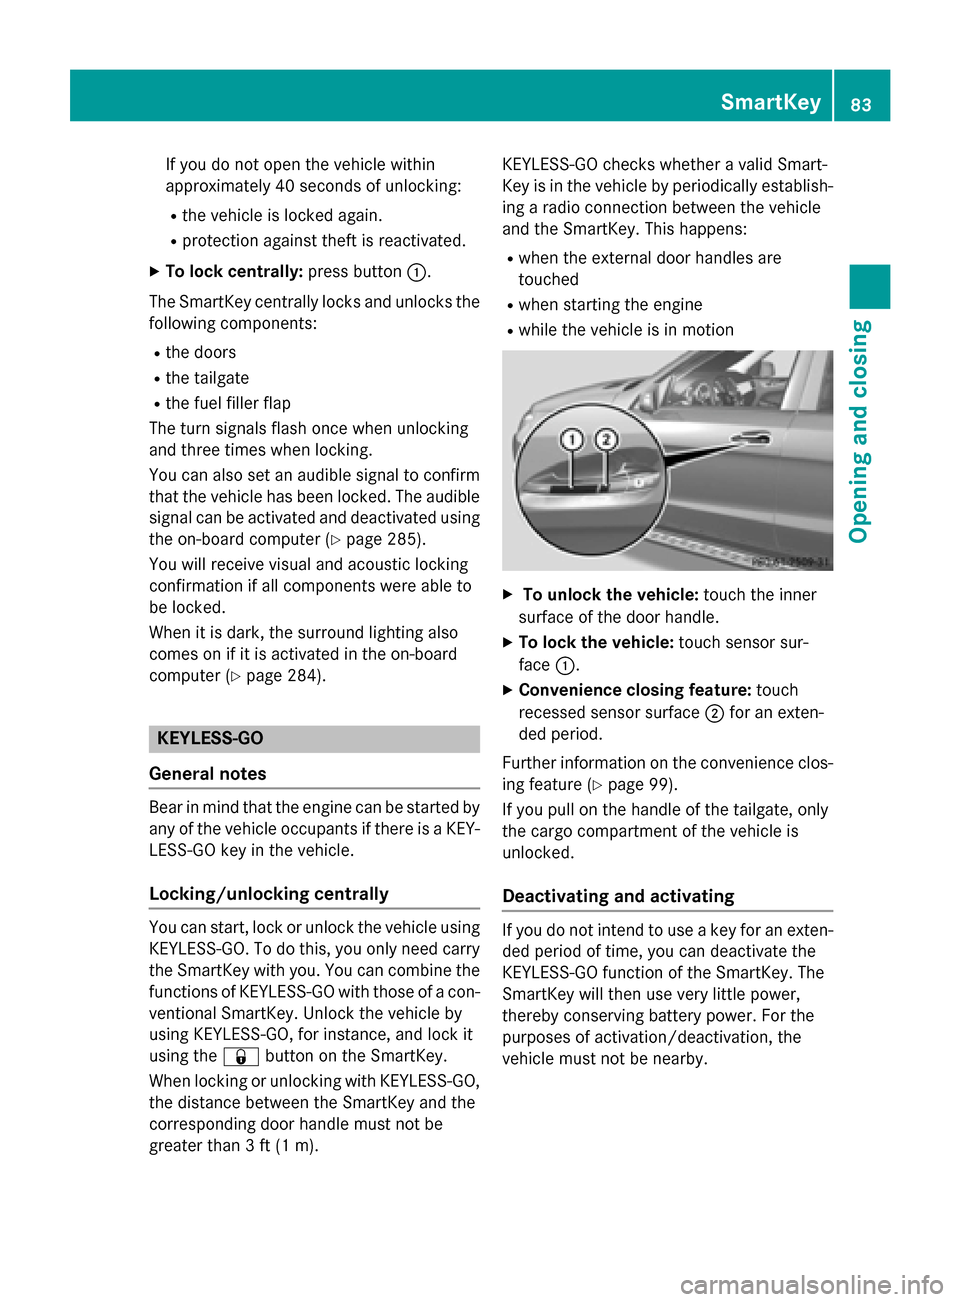
XTo unlock the vehicle:
touch the inner
surface of the door handle.
XTo lock the vehicle: touch sensor sur-
face :.
XConvenience closing feature: touch
recessed sensor surface ;for an exten-
ded period.
Further information on the convenience clos-
ing feature (
Ypage 99).
If you pull on the handle of the tailgate, only
the cargo compartment of the vehicle is
unlocked.
Deactivating and activating
If you do not intend to use a key for an exten-
ded period of time, you can deactivate the
KEYLESS-GO function of the SmartKey. The
SmartKey will then use very little power,
thereby conserving battery power. For the
purposes of activation/deactivation, the
vehicle must not be nearby.
SmartKey83
Opening and closing
Z
Page 86 of 462
XTo deactivate:press the&button on
the SmartKey twice in rapid succession.
The battery check lamp (
Ypage 85) of the
SmartKey flashes twice briefly and lights up
once, then KEYLESS-GO is deactivated.
XTo activate: press any button on the
SmartKey or insert the SmartKey into the
ignition lock.
KEYLESS-GO and all of its associated fea-
tures are available again.
KEYLESS-GO start function
Bear in mind that the engine can be started by
any of the vehicle occupants if there is a
SmartKey in the vehicle.
Changing the settings of the locking
system
You can change the settings of the locking
system. This means that only the driver's door
and the fuel filler flap are unlocked when the
vehicle is unlocked. This is useful if you fre-
quently travel on your own.
XTo change the setting: press and hold
down the %and& buttons simulta-
neously for approximately six seconds until
the battery check lamp flashes twice
(
Ypage 85).
iIf the setting of the locking system is
changed within the signal range of the vehi-
cle, pressing the &or% button:
Rlocks or
Runlocks the vehicle
The SmartKey now functions as follows:
XTo unlock the driver's door: press the
% button once.
XTo unlock centrally: press the%but-
ton twice.
XTo lock centrally: press the&button. The KEYLESS-GO function is changed as fol-
lows:
XTo unlock the driver's door:
touch the
inner surface of the door handle on the
driver's door.
XTo unlock centrally: touch the inner sur-
face of the door handle on the front-
passenger door or the rear door.
XTo lock centrally: touch the outer sensor
surface on one of the door handles
(
Ypage 83).
XTo restore the factory settings: press
and hold d
own the %and& buttons
simultaneously for approximately six sec-
onds until the battery check lamp flashes
twice (
Ypage 85).
Mechanical key
General notes
If the vehicle can no longer be locked or
unlocked with the SmartKey, use the
mechanical key.
If you use the mechanical key to unlock and
open the driver's door, the anti-theft alarm
system will be triggered (
Ypage 78).
There are several ways to turn off the alarm:
XTo turn the alarm off with the SmartKey:
press the %or& button on the
SmartKey.
or
XInsert the SmartKey into the ignition lock.
or
XTo deactivate the alarm with KEYLESS-
GO: press the Start/Stop button in the igni-
tion lock. The SmartKey must be in the
vehicle.
or
XLock or unlock the vehicle using KEYLESS-
GO. The SmartKey must be outside the
vehicle.
84SmartKey
Opening and closing
Page 90 of 462
ProblemPossible causes/consequences andMSolutions
The engine cannot be
started using the
SmartKey.The on-board voltage is too low.
XSwitch off non-essential consumers, e.g. seat heating or interior
lighting, and try to start the engine again.
If this does not work:
XCheck the starter battery and charge it if necessary
(
Ypage 394).
or
XJump-start the vehicle (Ypage 395).
or
XConsult a qualified specialist workshop.
The engine cannot be
started using KEYLESS-
GO. The SmartKey is in
the vehicle.A door is open. Therefore, the SmartKey cannot be detected as
easily.
XClose the door and try to start the vehicle again.
There is interference from a powerful source of radio waves.
XStart your vehicle with the SmartKey in the ignition lock.
ProblemPossible causes/consequences and MSolutions
You cannot lock or
unlock the vehicle
using the SmartKey.The SmartKey battery is discharged or nearly discharged.
XVehicles without KEYLESS-GO or KEYLESS-GO start func-
tion:try again to lock/unlock the vehicle using the remote con-
trol function of the SmartKey. Point the tip of the SmartKey at
the driver's door handle from close range and press the %or
& button.
If this does not work:
XCheck the SmartKey battery and replace it if necessary
(
Ypage 85).
XUnlock (Ypage 92) or lock (Ypage 92) the vehicle using the
mechanical key.
The SmartKey is faulty.
XUnlock (Ypage 92) or lock (Ypage 92) the vehicle using the
mechanical key.
XHave the SmartKey checked at a qualified specialist workshop.
You can no longer lock
or unlock the vehicle
using KEYLESS-GO.KEYLESS-GO was deactivated.
XReactivate KEYLESS-GO (Ypage 83).
88SmartKey
Opening and closing
Page 91 of 462
ProblemPossible causes/consequences andMSolutions
The SmartKey battery is discharged or nearly discharged.
XCheck the SmartKey battery (Ypage 85) and replace it if nec-
essary (
Ypage 85).
If this does not work:
XUnlock (Ypage 92) or lock (Ypage 92) the vehicle using the
mechanical key.
There is interference from a powerful source of radio waves.
XUnlock (Ypage 92) or lock (Ypage 92) the vehicle using the
mechanical key.
KEYLESS-GO is malfunctioning.
XLock/unlock the vehicle using the remote control function of
the SmartKey.
XHave the vehicle and SmartKey checked at a qualified specialist
workshop.
If the vehicle can also not be locked/unlocked using the remote
control function:
XUnlock (Ypage 92) or lock (Ypage 92) the vehicle using the
mechanical key.
XHave the vehicle and SmartKey checked at a qualified specialist
workshop.
You have lost a Smart-
Key.XHave the SmartKey deactivated at a qualified specialist work-
shop.
XReport the loss immediately to the vehicle insurers.
XIf necessary, have the locks changed as well.
You have lost the
mechanical key.XReport the loss immediately to the vehicle insurers.
XIf necessary, have the locks changed as well.
The engine cannot be
started using the
SmartKey.The on-board voltage is too low.
XSwitch off non-essential consumers, e.g. seat heating or interior
lighting, and try to start the engine again.
If this does not work:
XCheck the starter battery and charge it if necessary
(
Ypage 394).
or
XJump-start the vehicle (Ypage 395).
or
XConsult a qualified specialist workshop.
SmartKey89
Opening and closing
Z
Page 110 of 462
Useful information
i
This Operator's Manual describes all
models and all standard and optional equip-
ment of your vehicle available at the time of
publication of the Operator's Manual.
Country-specific differences are possible.
Please note that your vehicle may not be
equipped with all features described. This
also applies to safety-related systems and
functions.
iRead the information on qualified special-
ist workshops (
Ypage 29).
Correct driver's seat position
GWARNING
You could lose control of your vehicle if you do the following while driving:
Radjust the driver's seat, head restraint,
steering wheel or mirrors
Rfasten the seat belt
There is a risk of an accident.
Adjust the driver's seat, head restraint, steer-
ing wheel and mirror and fasten your seat belt before starting the engine.
XObserve the safety guidelines on seat
adjustment (
Ypage 109).
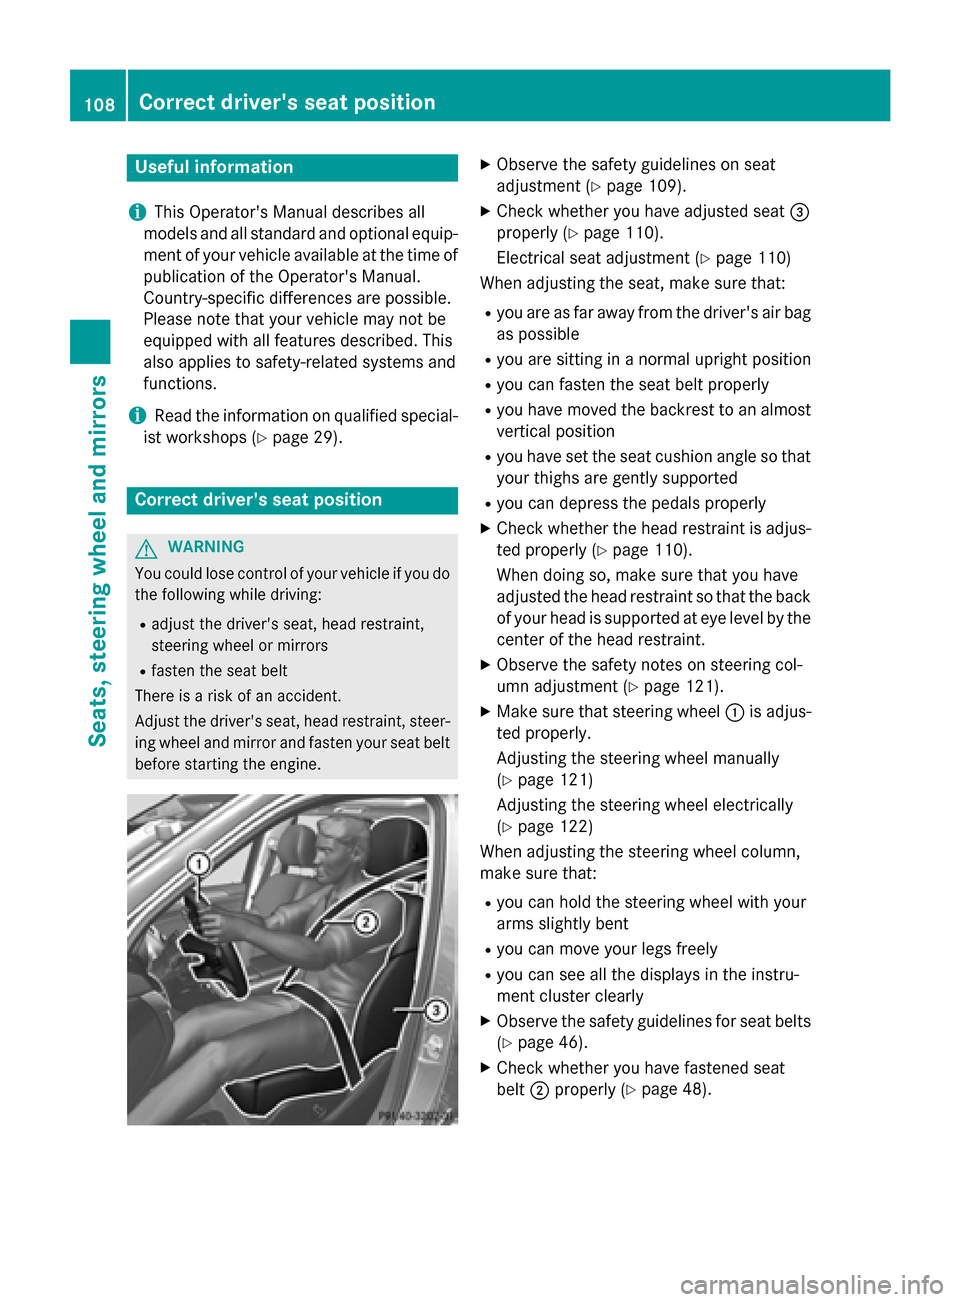
XCheck whether you have adjusted seat =
properly (
Ypage 110).
Electrical seat adjustment (
Ypage 110)
When adjusting the seat, make sure that:
Ryou are as far away from the driver's air bag
as possible
Ryou are sitting in a normal upright position
Ryou can fasten the seat belt properly
Ryou have moved the backrest to an almost
vertical position
Ryou have set the seat cushion angle so that
your thighs are gently supported
Ryou can depress the pedals properly
XCheck whether the head restraint is adjus-
ted properly (
Ypage 110).
When doing so, make sure that you have
adjusted the head restraint so that the back
of your head is supported at eye level by the
center of the head restraint.
XObserve the safety notes on steering col-
umn adjustment (
Ypage 121).
XMake sure that steering wheel :is adjus-
ted properly.
Adjusting the steering wheel manually
(
Ypage 121)
Adjusting the steering wheel electrically
(
Ypage 122)
When adjusting the steering wheel column,
make sure that:
Ryou can hold the steering wheel with your
arms slightly bent
Ryou can move your legs freely
Ryou can see all the displays in the instru-
ment cluster clearly
XObserve the safety guidelines for seat belts
(
Ypage 46).
XCheck whether you have fastened seat
belt ;properly (
Ypage 48).
108Correct driver's seat position
Seats, steering wheel and mirrors
Page 123 of 462
Problems with the seat ventilation
ProblemPossible causes/consequences andMSolutions
The seat ventilation has
switched off prema-
turely or cannot be
switched on.The on-board voltage is too low because too many electrical con-
sumers are switched on.
XSwitch off electrical consumers that you do not need, such as
the rear window defroster or interior lighting.
Once the battery is sufficiently charged, the seat ventilation will
switch back on automatically.
Steering wheel
Important safety notes
GWARNING
You could lose control of your vehicle if you do the following while driving:
Radjust the driver's seat, head restraint,
steering wheel or mirrors
Rfasten the seat belt
There is a risk of an accident.
Adjust the driver's seat, head restraint, steer-
ing wheel and mirror and fasten your seat belt before starting the engine.
GWARNING
Children could injure themselves if they
adjust the steering wheel. There is a risk of
injury.
When leaving the vehicle, always take the
SmartKey with you and lock the vehicle. Never
leave children unsupervised in the vehicle.
The electrically adjustable steering wheel can
still be adjusted when there is no SmartKey in
the ignition lock.
Adjusting the steering wheel man-
ually
GWARNING
If the steering wheel is unlocked while the
vehicle is in motion, it could change position
unexpectedly. This could cause you to lose
control of the vehicle. There is a risk of an
accident.
Before starting off, make sure the steering
wheel is locked. Never unlock the steering
wheel while the vehicle is in motion.
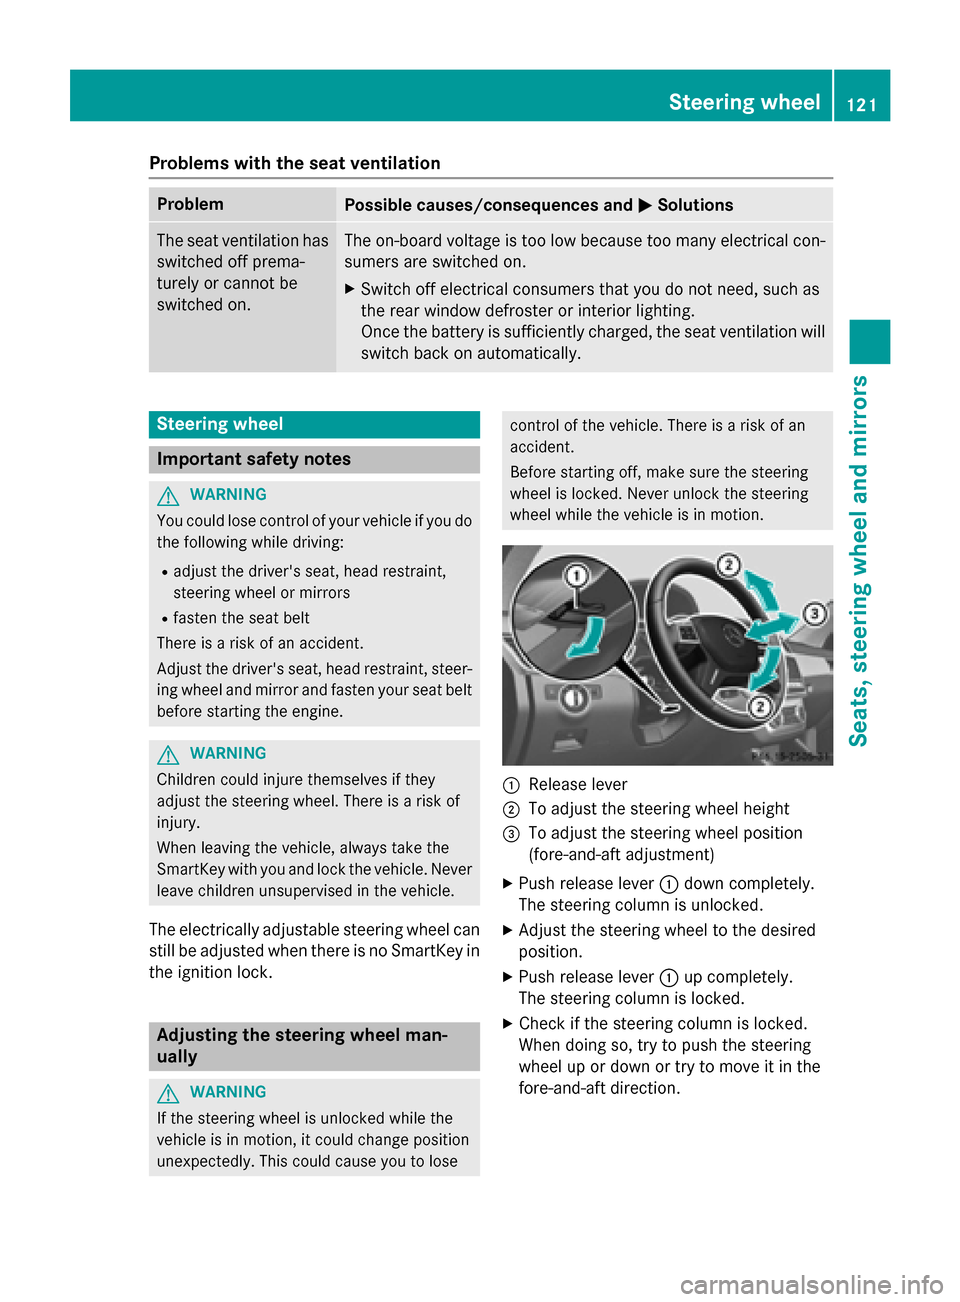
:Release lever
;To adjust the steering wheel height
=To adjust the steering wheel position
(fore-and-aft adjustment)
XPush release lever :down completely.
The steering column is unlocked.
XAdjust the steering wheel to the desired
position.
XPush release lever :up completely.
The steering column is locked.
XCheck if the steering column is locked.
When doing so, try to push the steering
wheel up or down or try to move it in the
fore-and-aft direction.
Steering wheel121
Seats, steering wheel and mirrors
Z