headlamp MERCEDES-BENZ GL SUV 2009 Owner's Manual
[x] Cancel search | Manufacturer: MERCEDES-BENZ, Model Year: 2009, Model line: GL SUV, Model: MERCEDES-BENZ GL SUV 2009Pages: 309, PDF Size: 10.27 MB
Page 228 of 309
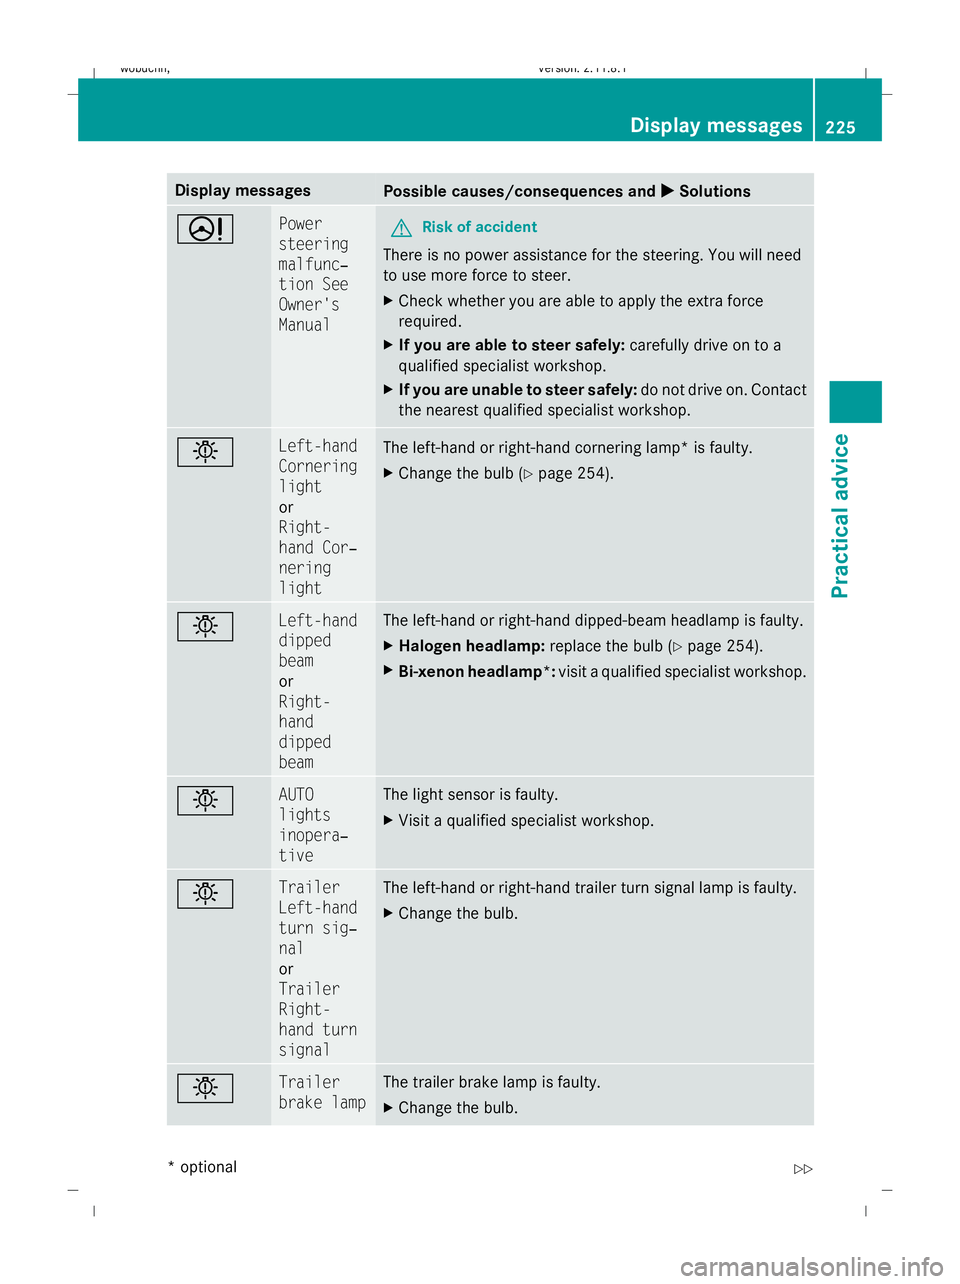
Display messages
Possible causes/consequences and
X
X Solutions D Power
steering
malfunc‐
tion See
Owner's
Manual
G
Risk of accident
There is no power assistance for the steering. You will need
to use more force to steer.
X Check whether you are able to apply the extra force
required.
X If you are able to steer safely: carefully drive on to a
qualified specialist workshop.
X If you are unable to steer safely: do not drive on. Contact
the nearest qualified specialist workshop. b Left-hand
Cornering
light
or
Right-
hand Cor‐
nering
light
The left-hand or right-hand cornering lamp* is faulty.
X
Change the bulb ( Ypage 254). b Left-hand
dipped
beam
or
Right-
hand
dipped
beam The left-hand or right-hand dipped-beam headlamp is faulty.
X
Halogen headlamp: replace the bulb (Ypage 254).
X Bi-xenon headlamp*: visit a qualified specialist workshop. b AUTO
lights
inopera‐
tive The light sensor is faulty.
X
Visit a qualified specialist workshop. b Trailer
Left-hand
turn sig‐
nal
or
Trailer
Right-
hand turn
signal The left-hand or right-hand trailer turn signal lamp is faulty.
X
Change the bulb. b Trailer
brake lamp The trailer brake lamp is faulty.
X
Change the bulb. Display
messages
225Practical advice
* optional
X164_AKB; 2; 3, en-GB
wobuchh
,V ersion: 2.11.8.1
2009-03-31T14:14:58+02:00 - Seite 225 Z
Dateiname: 6515431202_buchblock.pdf; erzeugt am 01. Apr 2009 00:18:00; WK
Page 230 of 309
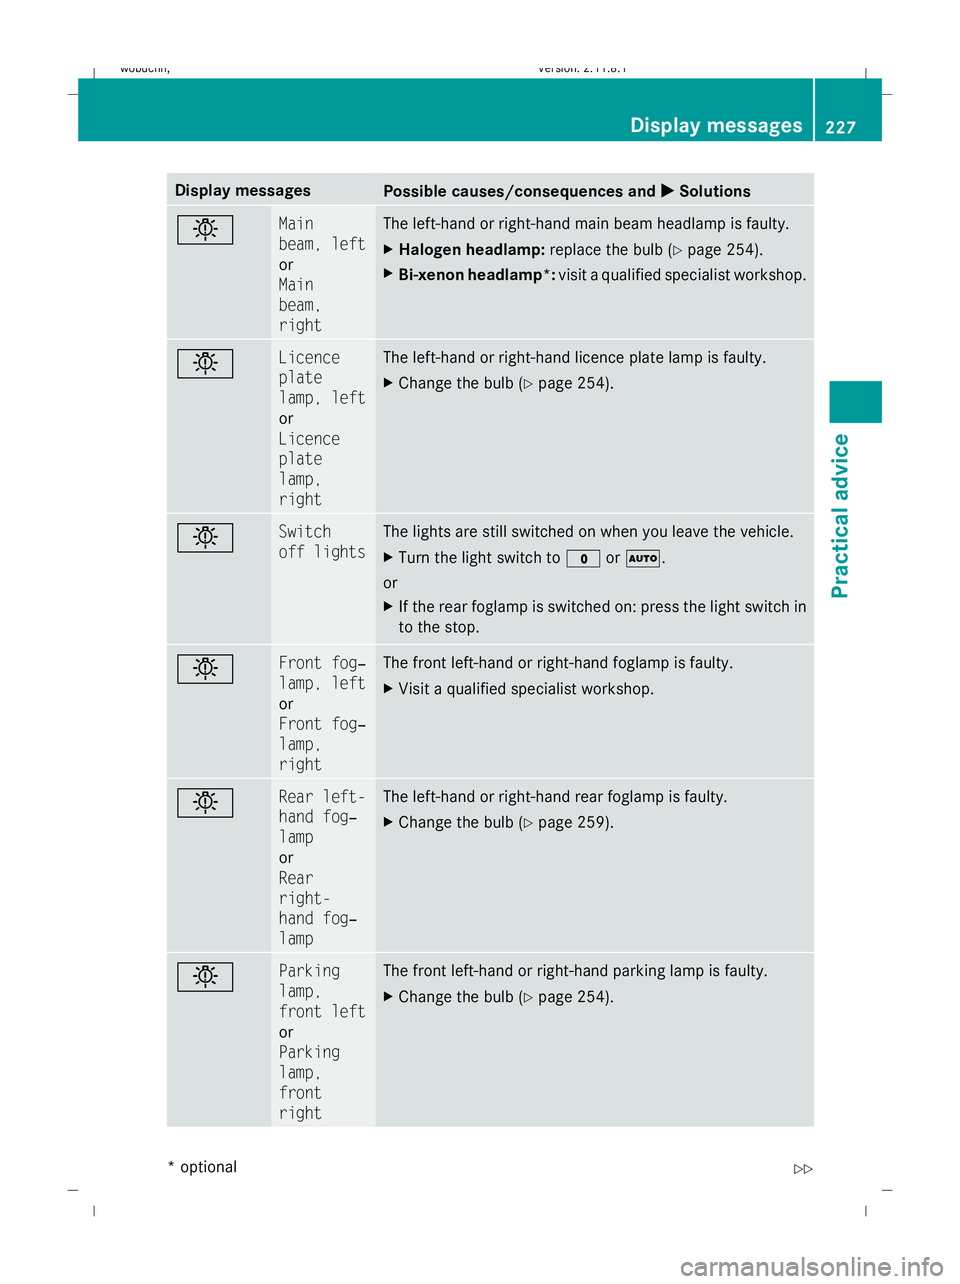
Display messages
Possible causes/consequences and
X
X Solutions b Main
beam, left
or
Main
beam,
right The left-hand or right-hand main beam headlamp is faulty.
X
Halogen headlamp: replace the bulb (Ypage 254).
X Bi-xenon headlamp*: visit a qualified specialist workshop. b Licence
plate
lamp, left
or
Licence
plate
lamp,
right The left-hand or right-hand licence plate lamp is faulty.
X
Change the bulb ( Ypage 254). b Switch
off lights The lights are still switched on when you leave the vehicle.
X
Turn the light switch to $orÃ.
or
X If the rear foglamp is switched on: press the light switch in
to the stop. b Front fog‐
lamp, left
or
Front fog‐
lamp,
right The front left-hand or right-hand foglamp is faulty.
X
Visit a qualified specialist workshop. b Rear left-
hand fog‐
lamp
or
Rear
right-
hand fog‐
lamp The left-hand or right-hand rear foglamp is faulty.
X
Change the bulb ( Ypage 259). b Parking
lamp,
front left
or
Parking
lamp,
front
right The front left-hand or right-hand parking lamp is faulty.
X
Change the bulb ( Ypage 254). Display
messages
227Practical advice
* optional
X164_AKB; 2; 3, en-GB
wobuchh
,V ersion: 2.11.8.1
2009-03-31T14:14:58+02:00 - Seite 227 Z
Dateiname: 6515431202_buchblock.pdf; erzeugt am 01. Apr 2009 00:18:00; WK
Page 248 of 309
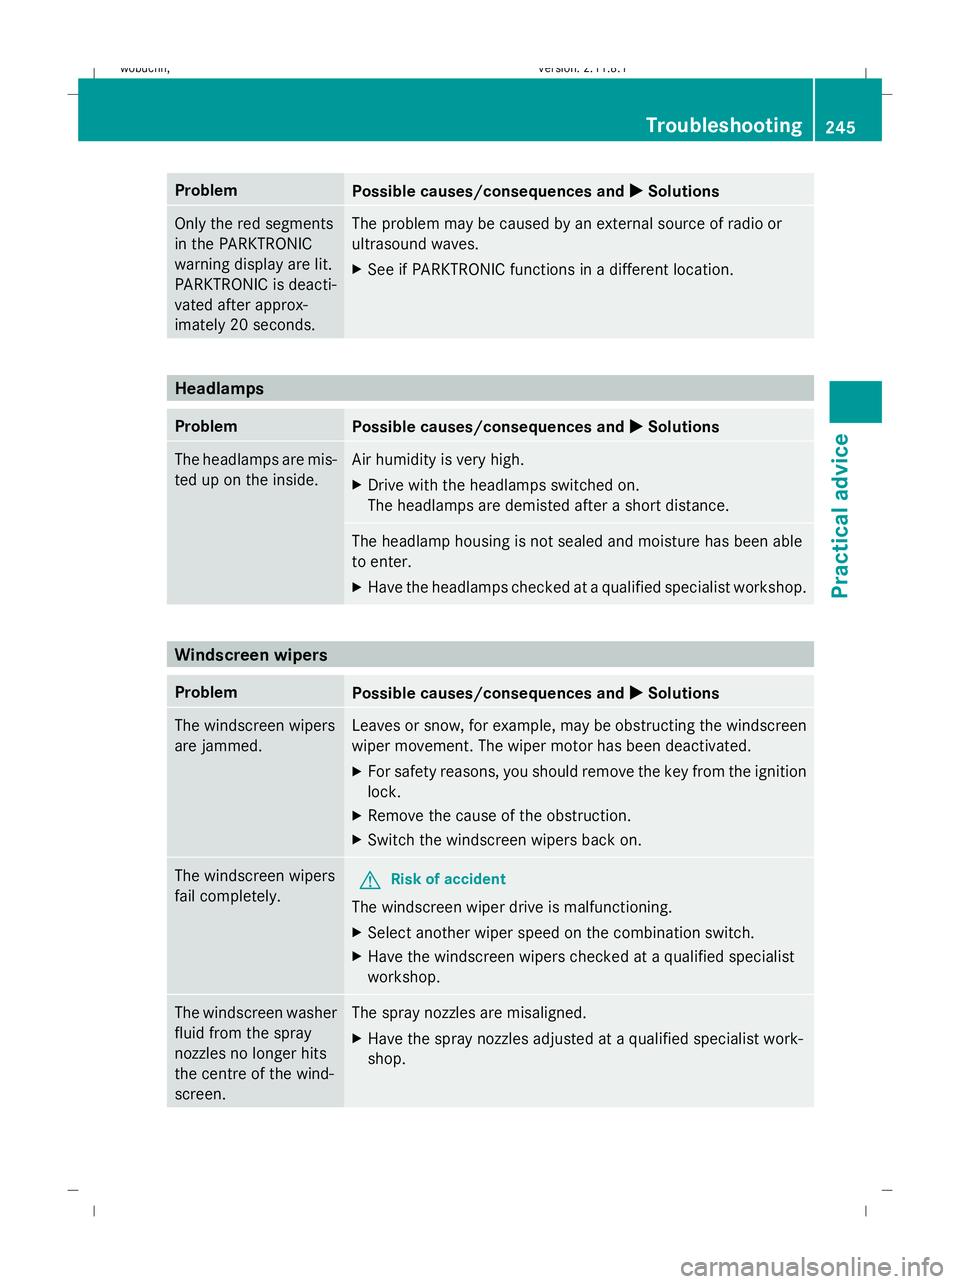
Problem
Possible causes/consequences and
X
X Solutions Only the red segments
in the PARKTRONIC
warning display are lit.
PARKTRONIC is deacti-
vated after approx-
imately 20 seconds. The problem may be caused by an external source of radio or
ultrasound waves.
X
See if PARKTRONIC functions in a different location. Headlamps
Problem
Possible causes/consequences and
X
X Solutions The headlamps are mis-
ted up on the inside. Air humidity is very high.
X Drive with the headlamps switched on.
The headlamps are demisted after a short distance. The headlamp housing is not sealed and moisture has been able
to enter.
X
Have the headlamps checked at a qualified specialist workshop. Windscreen wipers
Problem
Possible causes/consequences and
X
X Solutions The windscreen wipers
are jammed. Leaves or snow, for example, may be obstructing the windscreen
wiper movement. The wiper motor has been deactivated.
X
For safety reasons, you should remove the key from the ignition
lock.
X Remove the cause of the obstruction.
X Switch the windscreen wipers back on. The windscreen wipers
fail completely.
G
Risk of accident
The windscreen wiper drive is malfunctioning.
X Select another wiper speed on the combination switch.
X Have the windscreen wipers checked at a qualified specialist
workshop. The windscreen washer
fluid from the spray
nozzles no longer hits
the centre of the wind-
screen. The spray nozzles are misaligned.
X
Have the spray nozzles adjusted at a qualified specialist work-
shop. Troubleshooting
245Practical advice
X164_AKB; 2; 3, en-GB
wobuchh, Version: 2.11.8.1 2009-03-31T14:14:58+02:00 - Seite 245 Z
Dateiname: 6515431202_buchblock.pdf; erzeugt am 01. Apr 2009 00:18:02; WK
Page 257 of 309
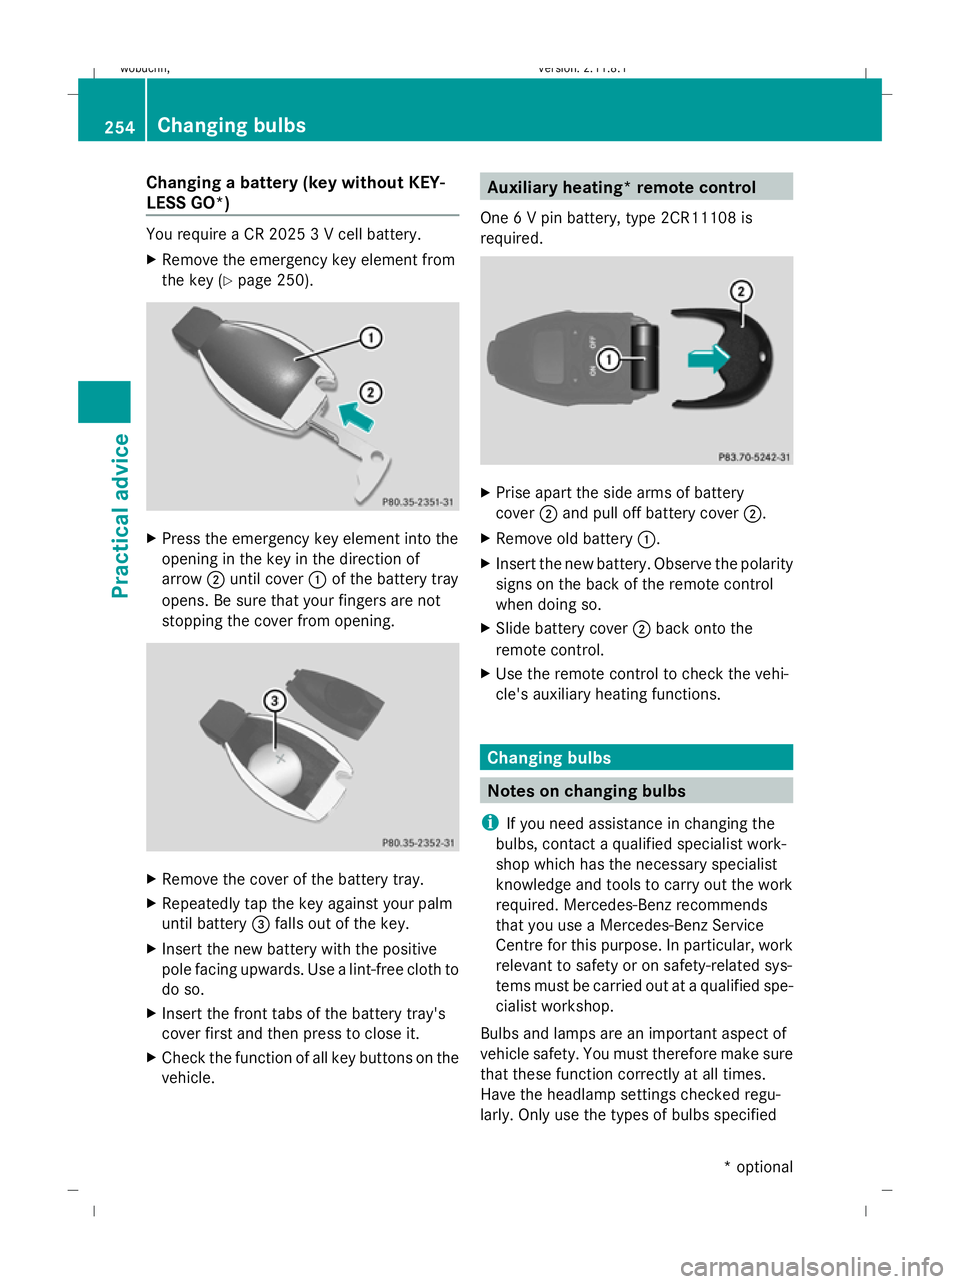
Changing a battery (key without KEY-
LESS GO*) You require a CR 2025 3 V cell battery.
X Remove the emergency key element from
the key (Y page 250). X
Press the emergency key element into the
opening in the key in the direction of
arrow ;until cover :of the battery tray
opens. Be sure that your fingers are not
stopping the cover from opening. X
Remove the cover of the battery tray.
X Repeatedly tap the key against your palm
until battery =falls out of the key.
X Insert the new battery with the positive
pole facing upwards. Use a lint-free cloth to
do so.
X Insert the front tabs of the battery tray's
cover first and then press to close it.
X Check the function of all key buttons on the
vehicle. Auxiliary heating* remote control
One 6 V pin battery, type 2CR11108 is
required. X
Prise apart the side arms of battery
cover ;and pull off battery cover ;.
X Remove old battery :.
X Insert the new battery. Observe the polarity
signs on the back of the remote control
when doing so.
X Slide battery cover ;back onto the
remote control.
X Use the remote control to check the vehi-
cle's auxiliary heating functions. Changing bulbs
Notes on changing bulbs
i If you need assistance in changing the
bulbs, contact a qualified specialist work-
shop which has the necessary specialist
knowledge and tools to carry out the work
required. Mercedes-Benz recommends
that you use a Mercedes-Benz Service
Centre for this purpose. In particular, work
relevant to safety or on safety-related sys-
tems must be carried out at a qualified spe-
cialist workshop.
Bulbs and lamps are an important aspect of
vehicle safety. You must therefore make sure
that these function correctly at all times.
Have the headlamp settings checked regu-
larly. Only use the types of bulbs specified 254
Changing bulbsPractical advice
* optional
X164_AKB; 2; 3, en-GB
wobuchh,
Version: 2.11.8.1 2009-03-31T14:14:58+02:00 - Seite 254
Dateiname: 6515431202_buchblock.pdf; erzeugt am 01. Apr 2009 00:18:05; WK
Page 259 of 309
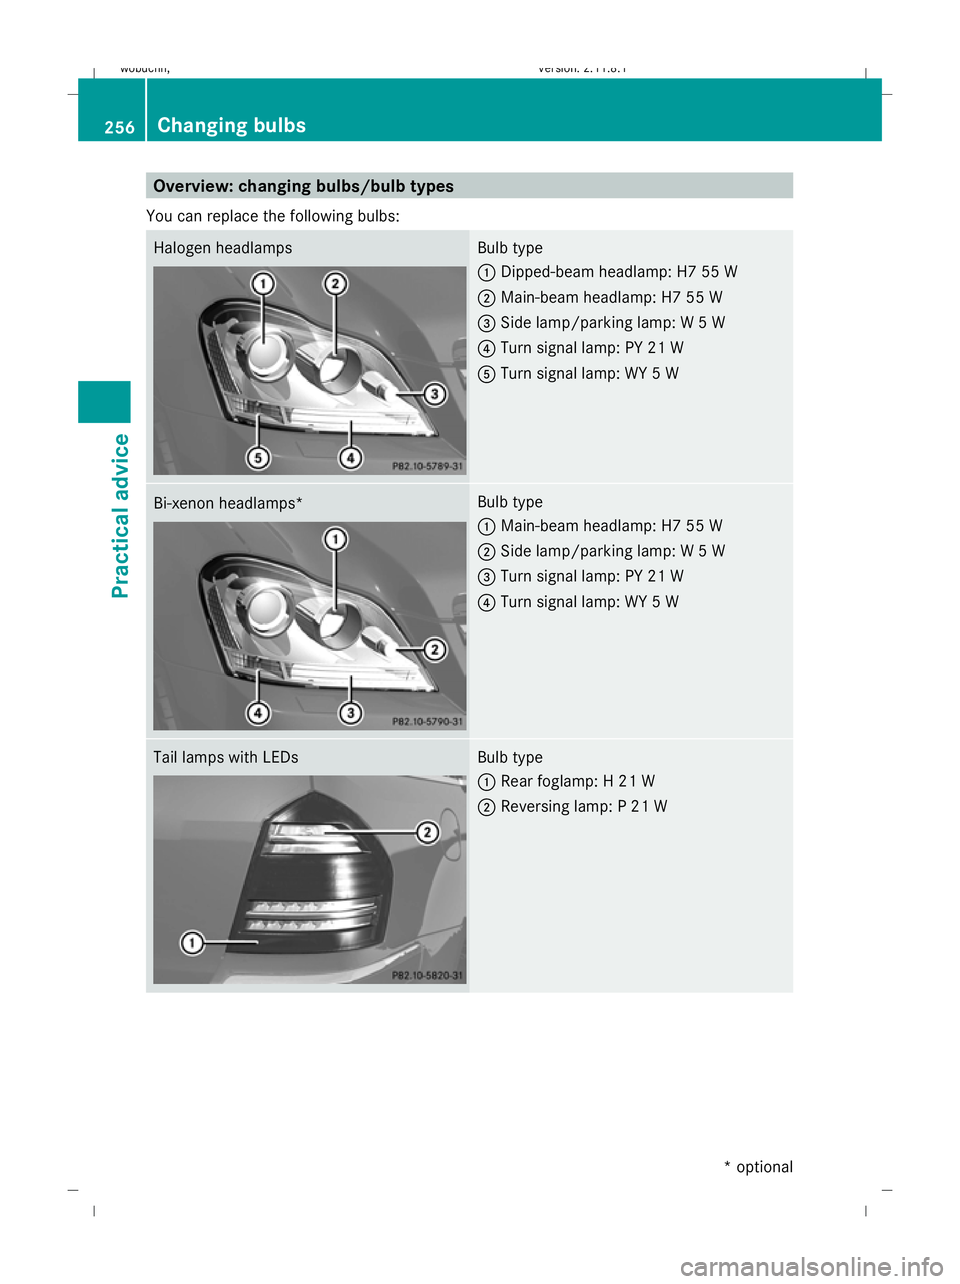
Overview: changing bulbs/bulb types
You can replace the following bulbs: Halogen headlamps Bulb type
:
Dipped-beam headlamp: H7 55 W
; Main-beam headlamp: H7 55 W
= Side lamp/parking lamp: W 5 W
? Turn signal lamp: PY 21 W
A Turn signal lamp: WY 5 W Bi-xenon headlamps* Bulb type
:
Main-beam headlamp: H7 55 W
; Side lamp/parking lamp: W 5 W
= Turn signal lamp: PY 21 W
? Turn signal lamp: WY 5 W Tail lamps with LEDs Bulb type
:
Rear foglamp: H 21 W
; Reversing lamp: P 21 W 256
Changing bulbsPractical advice
* optional
X164_AKB; 2; 3, en-GB
wobuchh,
Version: 2.11.8.1 2009-03-31T14:14:58+02:00 - Seite 256
Dateiname: 6515431202_buchblock.pdf; erzeugt am 01. Apr 2009 00:18:05; WK
Page 261 of 309
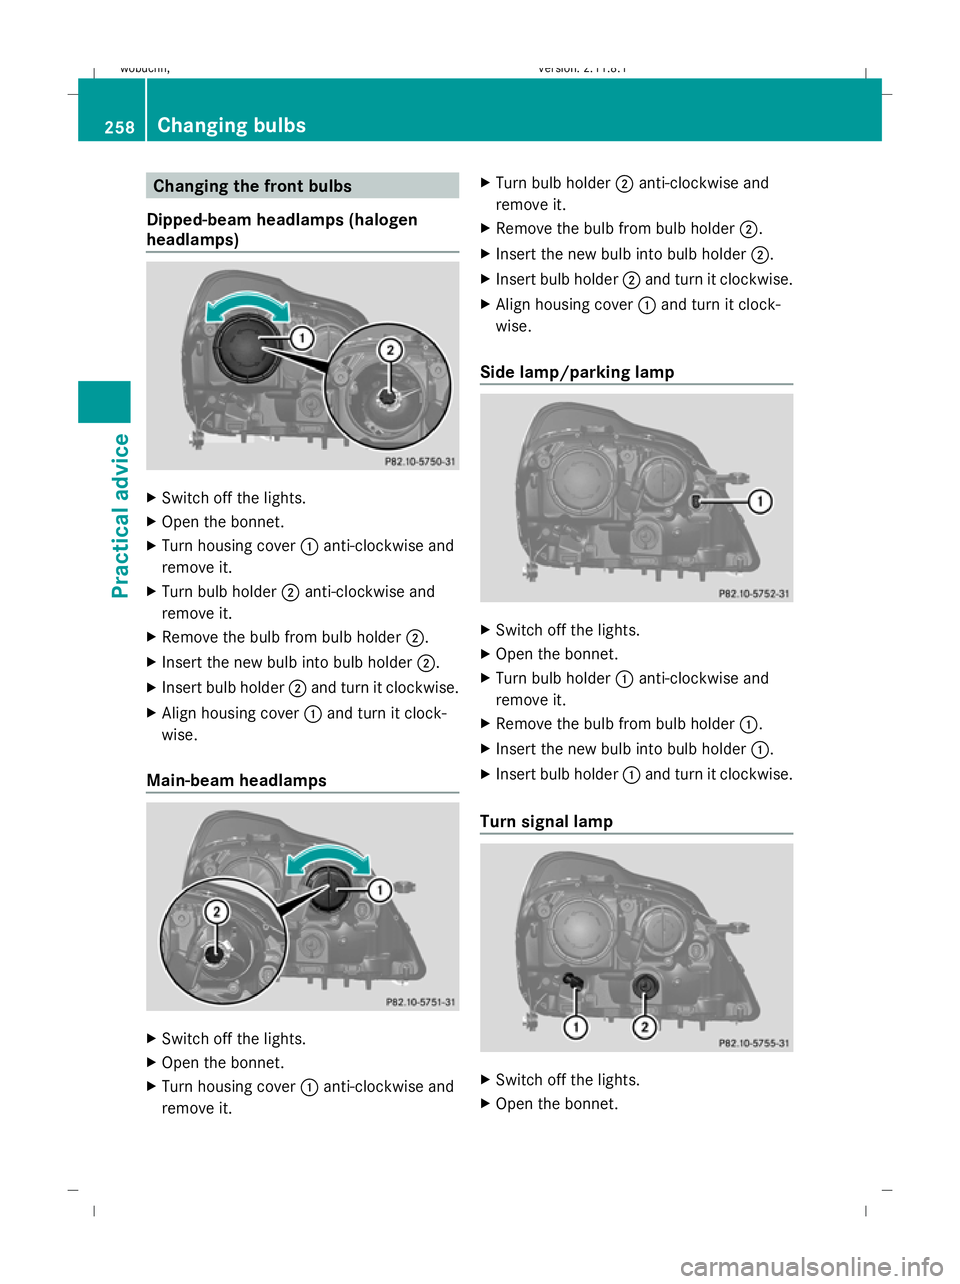
Changing the front bulbs
Dipped-beam headlamps (halogen
headlamps) X
Switch off the lights.
X Open the bonnet.
X Turn housing cover :anti-clockwise and
remove it.
X Turn bulb holder ;anti-clockwise and
remove it.
X Remove the bulb from bulb holder ;.
X Insert the new bulb into bulb holder ;.
X Insert bulb holder ;and turn it clockwise.
X Align housing cover :and turn it clock-
wise.
Main-beam headlamps X
Switch off the lights.
X Open the bonnet.
X Turn housing cover :anti-clockwise and
remove it. X
Turn bulb holder ;anti-clockwise and
remove it.
X Remove the bulb from bulb holder ;.
X Insert the new bulb into bulb holder ;.
X Insert bulb holder ;and turn it clockwise.
X Align housing cover :and turn it clock-
wise.
Side lamp/parking lamp X
Switch off the lights.
X Open the bonnet.
X Turn bulb holder :anti-clockwise and
remove it.
X Remove the bulb from bulb holder :.
X Insert the new bulb into bulb holder :.
X Insert bulb holder :and turn it clockwise.
Turn signal lamp X
Switch off the lights.
X Open the bonnet. 258
Changing bulbsPractical advice
X164_AKB; 2; 3, en-GB
wobuchh,
Version: 2.11.8.1 2009-03-31T14:14:58+02:00 - Seite 258
Dateiname: 6515431202_buchblock.pdf; erzeugt am 01. Apr 2009 00:18:06; WK
Page 294 of 309
Coolant
The coolant is a mixture of water and anti-
freeze/corrosion inhibitor. It performs the
following tasks:
R anti-corrosion protection
R antifreeze protection
R raising the boiling point
i When the vehicle is first delivered, it is
topped up with a coolant that will ensure
adequate antifreeze and corrosion protec-
tion.
! Only top up with coolant that has been
premixed with the desired antifreeze pro-
tection. You could otherwise damage the
engine.
Further information on coolants and on fill-
ing can be found in the Mercedes-Benz
Specifications for Service Products, Sheet
310.1, or at any Mercedes-Benz Service
Centre.
! Always use a suitable coolant mixture,
even in countries where high temperatures
prevail.
Otherwise, the cooling system will not be
sufficiently protected from corrosion, and
the boiling point will be too low.
If antifreeze/corrosion inhibitor is present in
the correct concentration, the boiling point of
the coolant will be around 130 †.
The antifreeze/corrosion inhibitor concentra-
tion in the cooling system should:
R be at least 50%. This will protect the cooling
system against freezing down to around
-37 †.
R not exceed 55% (antifreeze protection
down to -45 †); otherwise, heat will not be
effectively dissipated
If the vehicle has lost coolant, top it up with
equal amounts of water and antifreeze/cor-
rosion inhibitor. Mercedes-Benz recom-
mends an antifreeze/corrosion inhibitor
which has been approved for Mercedes-Benz. !
The cooling system contains a supply
which must be renewed after 15 years, or
after 250, 000 km at the latest.
The warranty is only valid if you top up with
an antifreeze/corrosion inhibitor which
has been approved by Mercedes-Benz and
if the recommended mixture ratio is
observed. Brake fluid
Over a period of time, the brake fluid absorbs
moisture from the air; this lowers its boiling
point. G
Risk of accident
If the boiling point of the brake fluid is too low,
vapour pockets may form in the brake system
when the brakes are applied hard (e.g. when
driving downhill). This would impair braking
efficiency.
Have the brake fluid renewed every two years
with a brake fluid that has been approved by
Mercedes-Benz and have this confirmed in
the Service Booklet.
i There is usually a notice in the engine
compartment to remind you when the next
brake fluid change is due. Windscreen washer system
The headlamp cleaning system* and wind-
screen washer system are both supplied from
the washer fluid reservoir.
Further information on windscreen washer
fluid and its mixing ratio ( Ypage 178). Service products and capacities
291Technical data
* optional
X164_AKB; 2; 3, en-GB
wobuchh,
Version: 2.11.8.1 2009-03-31T14:14:58+02:00 - Seite 291 Z
Dateiname: 6515431202_buchblock.pdf; erzeugt am 01. Apr 2009 00:18:25; WK