headlamp MERCEDES-BENZ GL SUV 2009 User Guide
[x] Cancel search | Manufacturer: MERCEDES-BENZ, Model Year: 2009, Model line: GL SUV, Model: MERCEDES-BENZ GL SUV 2009Pages: 309, PDF Size: 10.27 MB
Page 83 of 309
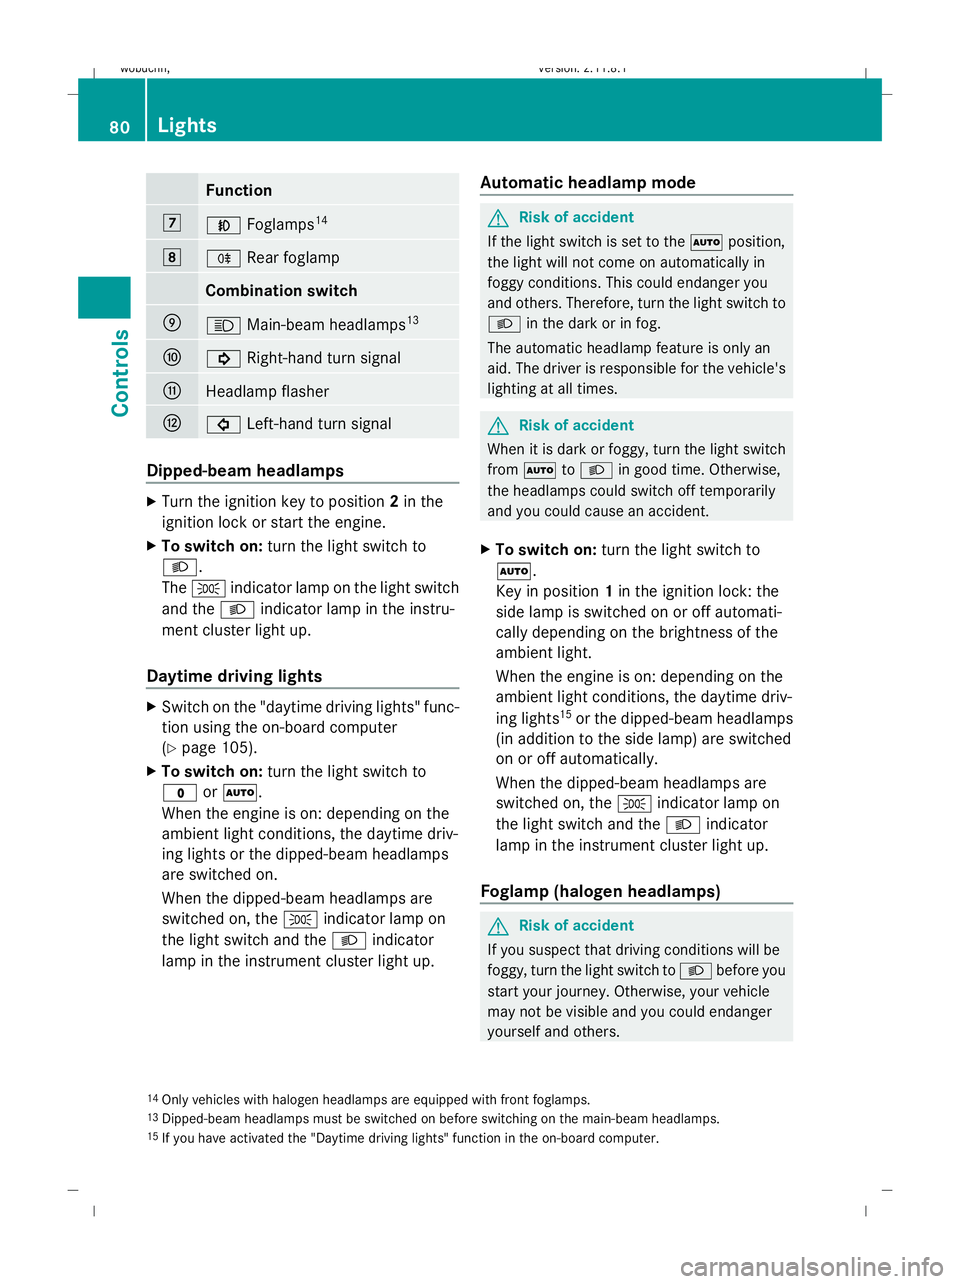
Function
7
N
Foglamps 14 8
R
Rear foglamp Combination switch
E
K
Main-beam headlamps 13 F
!
Right-hand turn signal G
Headlamp flasher
H
#
Left-hand turn signal Dipped-beam headlamps
X
Turn the ignition key to position 2in the
ignition lock or start the engine.
X To switch on: turn the light switch to
L.
The T indicator lamp on the light switch
and the Lindicator lamp in the instru-
ment cluster light up.
Daytime driving lights X
Switch on the "daytime driving lights" func-
tion using the on-board computer
(Y page 105).
X To switch on: turn the light switch to
$ orÃ.
When the engine is on: depending on the
ambient light conditions, the daytime driv-
ing lights or the dipped-beam headlamps
are switched on.
When the dipped-beam headlamps are
switched on, the Tindicator lamp on
the light switch and the Lindicator
lamp in the instrument cluster light up. Automatic headlamp mode G
Risk of accident
If the light switch is set to the Ãposition,
the light will not come on automatically in
foggy conditions. This could endanger you
and others. Therefore, turn the light switch to
L in the dark or in fog.
The automatic headlamp feature is only an
aid. The driver is responsible for the vehicle's
lighting at all times. G
Risk of accident
When it is dark or foggy, turn the light switch
from à toL in good time. Otherwise,
the headlamps could switch off temporarily
and you could cause an accident.
X To switch on: turn the light switch to
Ã.
Key in position 1in the ignition lock: the
side lamp is switched on or off automati-
cally depending on the brightness of the
ambient light.
When the engine is on: depending on the
ambient light conditions, the daytime driv-
ing lights 15
or the dipped-beam headlamps
(in addition to the side lamp) are switched
on or off automatically.
When the dipped-beam headlamps are
switched on, the Tindicator lamp on
the light switch and the Lindicator
lamp in the instrument cluster light up.
Foglamp (halogen headlamps) G
Risk of accident
If you suspect that driving conditions will be
foggy, turn the light switch to Lbefore you
start your journey. Otherwise, your vehicle
may not be visible and you could endanger
yourself and others.
14 Only vehicles with halogen headlamps are equipped with front foglamps.
13 Dipped-beam headlamps must be switched on before switching on the main-beam headlamps.
15 If you have activated the "Daytime driving lights" function in the on-board computer. 80
LightsControls
X164_AKB; 2; 3, en-GB
wobuchh,
Version: 2.11.8.1 2009-03-31T14:14:58+02:00 - Seite 80
Dateiname: 6515431202_buchblock.pdf; erzeugt am 01. Apr 2009 00:17:06; WK
Page 84 of 309
X
Turn the key to position 2in the ignition
lock.
X To switch on: turn the light switch to
L orT. If the light switch is set to
Ã, you cannot switch on the foglamp.
X Pull the light switch out to the first detent.
The green Nindicator lamp on the light
switch lights up.
X To switch off: press the light switch in as
far as it will go.
The green Nindicator lamp on the light
switch goes out.
Rear foglamp On vehicles with foglamps
X Turn the key to position 2in the ignition
lock.
X To switch on: turn the light switch to
L orT. When the light switch is set
to à you cannot switch on the rear fog-
lamp.
X Pull the light switch out to the second stop.
The R yellow indicator lamp on the light
switch lights up.
X To switch off: press the light switch in as
far as it will go.
The R yellow indicator lamp on the light
switch goes out.
On vehicles without foglamps
X Turn the key to position 2in the ignition
lock.
X To switch on: turn the light switch to
L. When the light switch is set to
à you cannot switch on the rear fog-
lamp.
X Pull the light switch out to the stop.
The R yellow indicator lamp on the light
switch lights up.
X To switch off: press the light switch in as
far as it will go.
The R yellow indicator lamp on the light
switch goes out. Main-beam headlamps X
Turn the ignition key to position 2in the
ignition lock or start the engine.
X Turn the light switch to Lorà 16
.
X To activate: press the combination switch
in the direction of arrow Epast the point
of resistance (Y page 80).
The K indicator lamp in the instrument
cluster lights up.
X To deactivate: move the combination
switch back to its normal position.
The K indicator lamp in the instrument
cluster goes out.
Turn signal lamp X
To indicate a minor change of direc-
tion: push the combination switch in the
direction of arrow ForH (Ypage 80).
The corresponding turn signal flashes three
times.
X To indicate: push the combination switch
in the direction of arrow ForH past the
point of resistance (Y page 80).
The corresponding turn signal indicator
lamp ! or# in the instrument clus-
ter flashes.
Hazard warning lamps 16
In the Ãposition, the main-beam headlamps are only switched on when it is dark. Lights
81Controls
X164_AKB; 2; 3, en-GB
wobuchh, Version: 2.11.8.1 2009-03-31T14:14:58+02:00 - Seite 81 Z
Dateiname: 6515431202_buchblock.pdf; erzeugt am 01. Apr 2009 00:17:07; WK
Page 85 of 309
The hazard warning lamp switches on auto-
matically if:
R an airbag is deployed.
R the vehicle is braked to a standstill from a
speed of over 70 km/h.
The hazard warning lamps still operate if the
ignition is switched off.
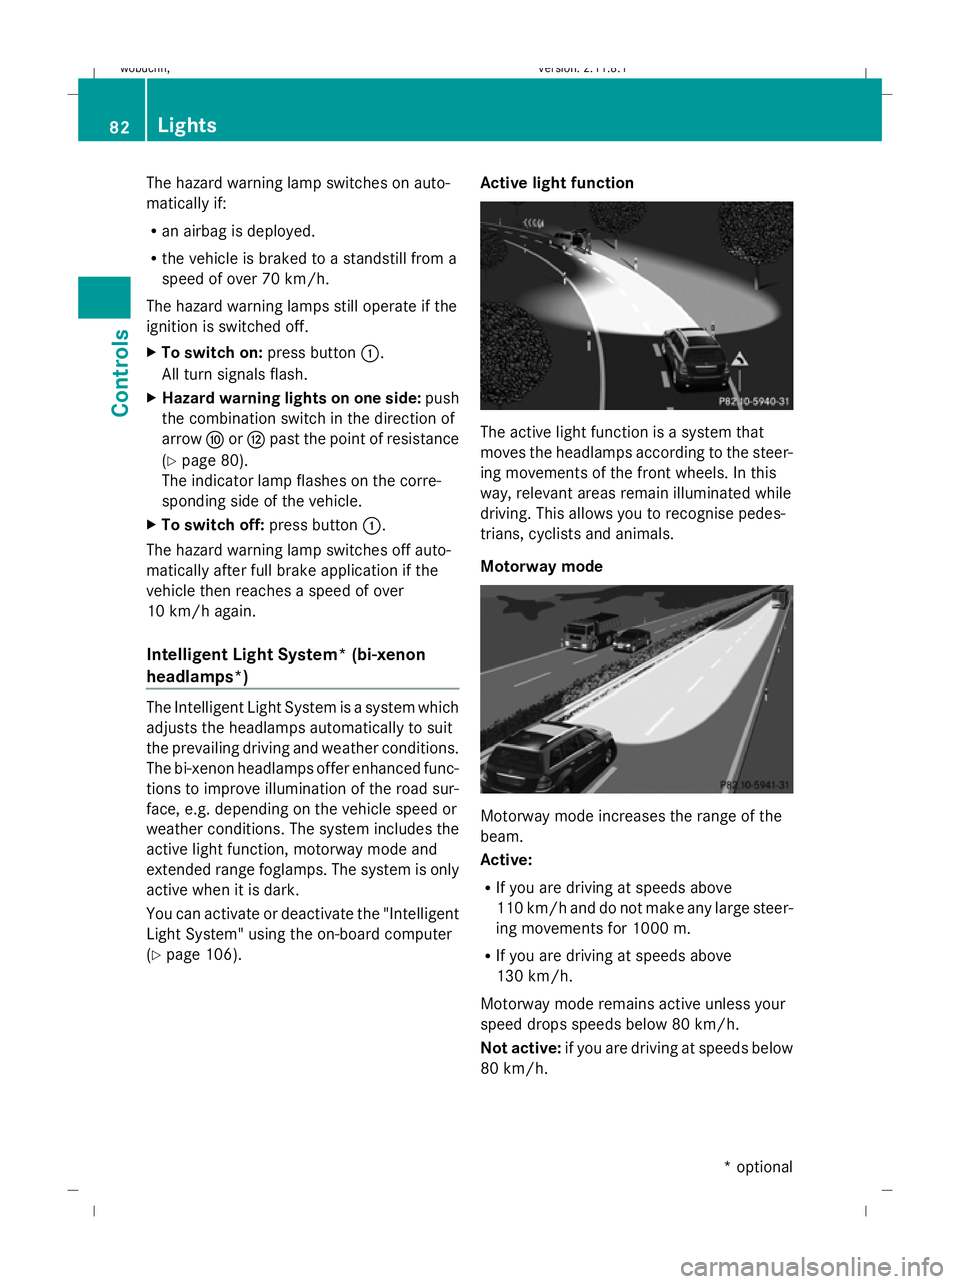
X To switch on: press button:.
All turn signals flash.
X Hazard warning lights on one side: push
the combination switch in the direction of
arrow ForH past the point of resistance
(Y page 80).
The indicator lamp flashes on the corre-
sponding side of the vehicle.
X To switch off: press button:.
The hazard warning lamp switches off auto-
matically after full brake application if the
vehicle then reaches a speed of over
10 km/h again.
Intelligent Light System* (bi-xenon
headlamps*) The Intelligent Light System is a system which
adjusts the headlamps automatically to suit
the prevailing driving and weather conditions.
The bi-xenon headlamps offer enhanced func-
tions to improve illumination of the road sur-
face, e.g. depending on the vehicle speed or
weather conditions. The system includes the
active light function, motorway mode and
extended range foglamps. The system is only
active when it is dark.
You can activate or deactivate the "Intelligent
Light System" using the on-board computer
(Y page 106). Active light function The active light function is a system that
moves the headlamps according to the steer-
ing movements of the front wheels. In this
way, relevant areas remain illuminated while
driving. This allows you to recognise pedes-
trians, cyclists and animals.
Motorway mode
Motorway mode increases the range of the
beam.
Active:
R
If you are driving at speeds above
110 km/ha nd do not make any large steer-
ing movements for 1000 m.
R If you are driving at speeds above
130 km/h.
Motorway mode remains active unless your
speed drops speeds below 80 km/h.
Not active: if you are driving at speeds below
80 km/h. 82
LightsControls
* optional
X164_AKB; 2; 3, en-GB
wobuchh
,V ersion: 2.11.8.1
2009-03-31T14:14:58+02:00 - Seite 82
Dateiname: 6515431202_buchblock.pdf; erzeugt am 01. Apr 2009 00:17:07; WK
Page 86 of 309
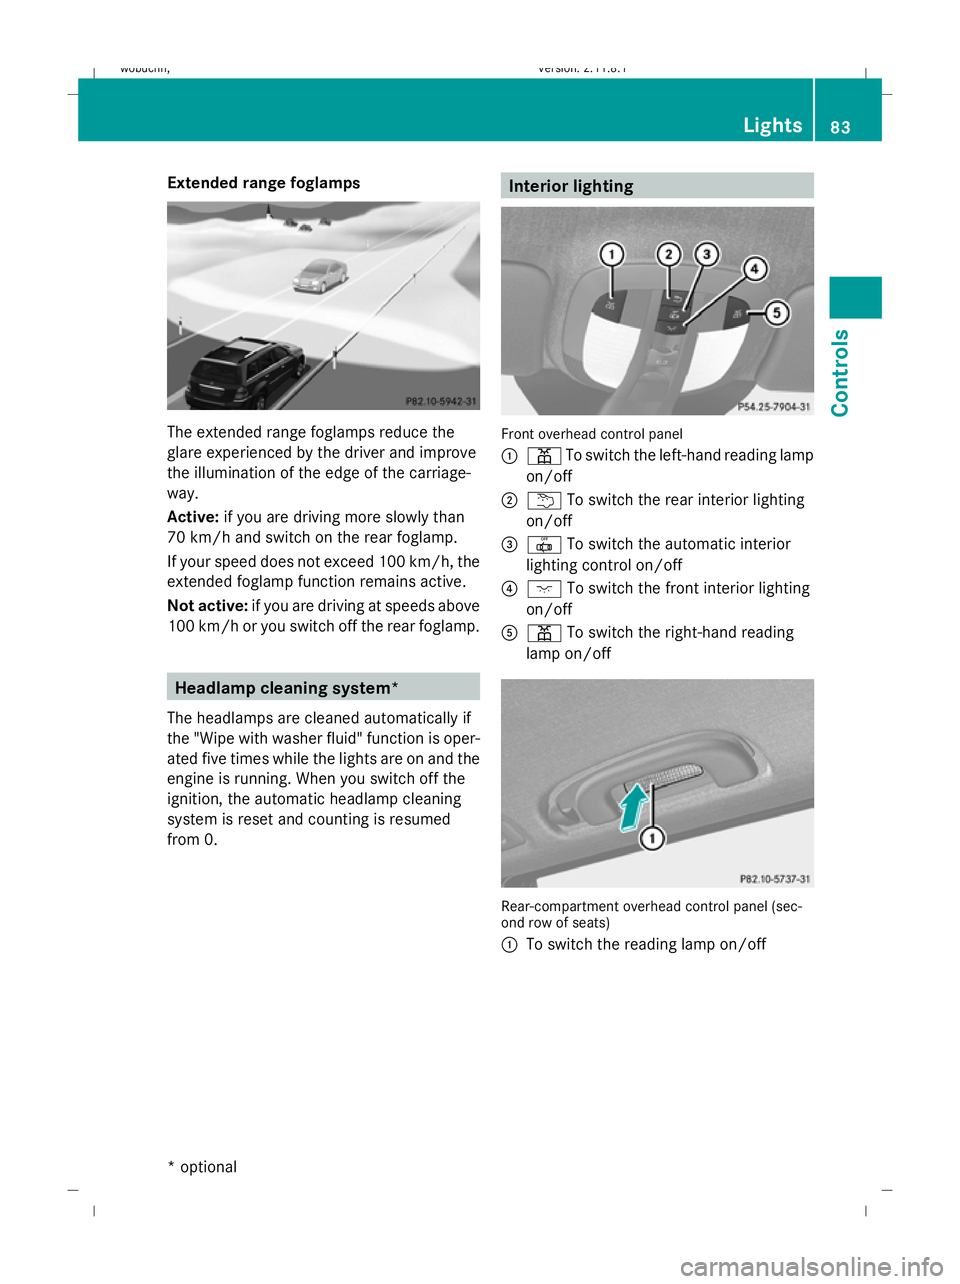
Extended range foglamps
The extended range foglamps reduce the
glare experienced by the driver and improve
the illumination of the edge of the carriage-
way.
Active:
if you are driving more slowly than
70 km/h and switch on the rear foglamp.
If your speed does not exceed 100 km/h, the
extended foglamp function remains active.
Not active: if you are driving at speeds above
100 km/h or you switch off the rear foglamp. Headlamp cleaning system*
The headlamps are cleaned automatically if
the "Wipe with washer fluid" function is oper-
ated five times while the lights are on and the
engine is running. When you switch off the
ignition, the automatic headlamp cleaning
system is reset and counting is resumed
from 0. Interior lighting
Front overhead control panel
:
p To switch the left-hand reading lamp
on/off
; u To switch the rear interior lighting
on/off
= | To switch the automatic interior
lighting control on/off
? c To switch the front interior lighting
on/off
A p To switch the right-hand reading
lamp on/off Rear-compartment overhead control panel (sec-
ond row of seats)
:
To switch the reading lamp on/off Lights
83Controls
* optional
X164_AKB; 2; 3, en-GB
wobuchh,
Version: 2.11.8.1 2009-03-31T14:14:58+02:00 - Seite 83 Z
Dateiname: 6515431202_buchblock.pdf; erzeugt am 01. Apr 2009 00:17:08; WK
Page 108 of 309
Setting the time
X
Press &to select Time set Hours (or
time set Minutes).
X Press the WorX button to set a
value.
Setting the date
X Press the &button to select Date Set
day (orDate Set month orDate set
year).
X Press the WorX button to set the
date.
X Press the &,VorU button to
select a different display.
Lighting submenu Setting the daytime driving lights
If you set the daytime driving lights and the
light switch is set to
$orÃ, the day-
time driving lights are switched on automati-
cally when the engine is running. When it is
dark, the side lamps and dipped-beam head-
lights are switched on automatically.
In countries in which daytime driving lights
are a legal requirement, Onis the factory set-
ting.
X Press VorU on the steering wheel
to select the Settings... menu.
X Press the &button to select submenus.
X Press the WorX button to select the
Lighting submenu.
X Press &to select Daytime driving
lamps.
X Press WorX to set daytime driving
lights to onoroff.
X Press the &,VorU button to
select a different display. Switching the surround lighting on/off
If the surround lighting is switched on, the
following lights will be switched on automat-
ically in the dark after you have unlocked the
vehicle using the key:
R
the side lamps
R the licence plate lighting
R the front foglamps
The surround lighting switches off automati-
cally after 40 seconds or when the driver's
door is opened.
X Press VorU on the steering wheel
to select the Settings... menu.
X Press the &button to select submenus.
X Press the WorX button to select the
Lighting submenu.
X Press the &button to select the Sur‐
round lighting function.
X Press the WorX button to switch
the Surround lighting function on or
off.
X Press the &,VorU button to
select a different display.
Activating or deactivating the exterior
lighting delayed switch-off
When you activate the Headlamp delayed
shut off function, the exterior lighting
remains on for another 15 seconds after clos-
ing the doors when it is dark. If the engine is
switched off and then none of the doors are
opened, or if an open door is not closed, the
exterior lighting goes out after 60 seconds.
If you have activated the delayed switch-off
function and switched off the engine, the fol-
lowing remain lit:
R the side lamps
R the licence plate lighting
R the front foglamps
X Press VorU on the steering wheel
to select the Settings... menu.
X Press the &button to select submenus. On-board computer
105Controls
X164_AKB; 2; 3, en-GB
wobuchh, Version: 2.11.8.1 2009-03-31T14:14:58+02:00 - Seite 105 Z
Dateiname: 6515431202_buchblock.pdf; erzeugt am 01. Apr 2009 00:17:17; WK
Page 109 of 309
X
Press the WorX button to select the
Lighting submenu.
X Press the &button to select Head‐
lamps delayed switch-off.
X Press the WorX button to activate
or deactivate the Headlamps delayed
switch-off function.
X Press the &,VorU button to
select a different display.
Deactivating the delayed switch-off tempora-
rily:
X Before leaving the vehicle, turn the key to
position 0in the ignition lock.
X Turn the key to position 2in the ignition
lock and back to position 0.
Delayed switch-off is deactivated.
Delayed switch-off is deactivated the next
time you start the engine.
Activating/deactivating the interior light-
ing delayed switch-off
If you remove the key from the ignition lock
while the Interior lighting delayed
switch off function is activated, the interior
lighting remains on for 10 seconds if it is dark.
X Press VorU on the steering wheel
to select the Settings... menu.
X Press the &button to select submenus.
X Press the WorX button to select the
Lighting submenu.
X Press the &button to select Interior
lighting delayed switch-off.
X Press the WorX button to activate
or deactivate Interior lighting
delayed switch-off.
X Press the &,VorU button to
select a different display.
Activating/deactivating the Intelligent
Light System*
When you activate the Intelligent Light
System you activate the following functions: R
motorway mode
R active light function
R extended range foglamps
X Press VorU on the steering wheel
to select the Settings... menu.
X Press the &button to select submenus.
X Press WorX to select the Light‐
ing submenu.
X Press &to select Intelligent Light
System.
X Press the WorX button to activate
or deactivate the Intelligent Light
System.
X Press the &,VorU button to
select a different display.
Setting the ambient lighting*
X Press VorU on the steering wheel
to select the Settings... menu.
X Press the &button to select submenus.
X Press the WorX button to select the
Lighting submenu.
X Press the &button to select Ambient
light.
X Press WorX to adjust the bright-
ness to any level from Level 0(off) to
Level 5 (bright).
X Press &, VorU to select a dif-
ferent display.
Vehicle submenu In the
Vehicle submenu, you can call up the
following functions:
R compass* (Y page 166)
R display when the ignition is switched off
(Y page 107)
R permanent Speedtronic (Y page 126)
R automatic locking feature (Y page 107)106
On-board computerControls
* optional
X164_AKB; 2; 3, en-GB
wobuchh,
Version: 2.11.8.1 2009-03-31T14:14:58+02:00 - Seite 106
Dateiname: 6515431202_buchblock.pdf; erzeugt am 01. Apr 2009 00:17:17; WK
Page 181 of 309
cooled down. The coolant temperature gauge
must display less than 70 †. Otherwise, you
could be scalded if hot coolant escapes.
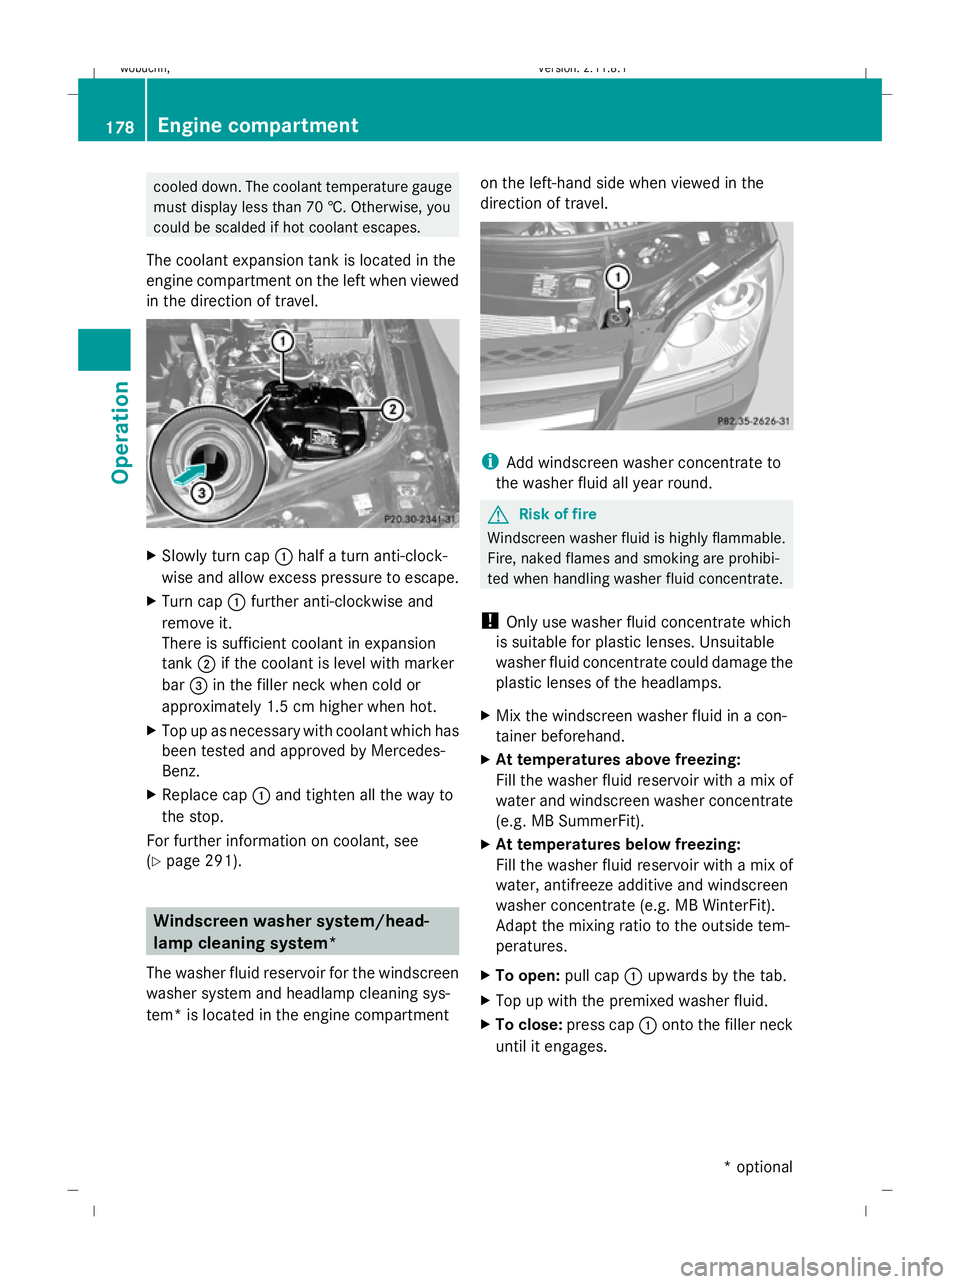
The coolant expansion tank is located in the
engine compartment on the left when viewed
in the direction of travel. X
Slowly turn cap :half a turn anti-clock-
wise and allow excess pressure to escape.
X Turn cap :further anti-clockwise and
remove it.
There is sufficient coolant in expansion
tank ;if the coolant is level with marker
bar =in the filler neck when cold or
approximately 1.5 cm higher when hot.
X Top up as necessary with coolant which has
been tested and approved by Mercedes-
Benz.
X Replace cap :and tighten all the way to
the stop.
For further information on coolant, see
(Y page 291). Windscreen washer system/head-
lamp cleaning system*
The washer fluid reservoir for the windscreen
washer system and headlamp cleaning sys-
tem* is located in the engine compartment on the left-hand side when viewed in the
direction of travel.
i
Add windscreen washer concentrate to
the washer fluid all year round. G
Risk of fire
Windscreen washer fluid is highly flammable.
Fire, naked flames and smoking are prohibi-
ted when handling washer fluid concentrate.
! Only use washer fluid concentrate which
is suitable for plastic lenses. Unsuitable
washer fluid concentrate could damage the
plastic lenses of the headlamps.
X Mix the windscreen washer fluid in a con-
tainer beforehand.
X At temperatures above freezing:
Fill the washer fluid reservoir with a mix of
water and windscreen washer concentrate
(e.g. MB SummerFit).
X At temperatures below freezing:
Fill the washer fluid reservoir with a mix of
water, antifreeze additive and windscreen
washer concentrate (e.g. MB WinterFit).
Adapt the mixing ratio to the outside tem-
peratures.
X To open: pull cap:upwards by the tab.
X Top up with the premixed washer fluid.
X To close: press cap :onto the filler neck
until it engages. 178
Engine compartmentOperation
* optional
X164_AKB; 2; 3, en-GB
wobuchh,
Version: 2.11.8.1 2009-03-31T14:14:58+02:00 - Seite 178
Dateiname: 6515431202_buchblock.pdf; erzeugt am 01. Apr 2009 00:17:47; WK
Page 193 of 309
X
Wheels and tyres: check the tyre tread
depth and tyre pressure.
X Check for damage and remove foreign
objects, e.g. small stones, from the
wheels/tyres.
X Replace any missing valve caps.
X Replace dented or damaged wheels.
Checklist after driving off-road Driving over rough terrain places greater
demands on your vehicle than driving on nor-
mal roads. After driving off-road, check the
vehicle. This allows you to detect damage
promptly and reduce the risk of an accident
to yourself and other road users.
X Deactivate the LOW RANGE off-road gear
(Y page 114).
X Deactivate DSR (Y page 113).
X Set the differential lock setting to AUTO on
the selector wheel (Y page 116).
X Lower the vehicle level again to a level suit-
able to the road conditions, e.g. to the high-
way/high-speed level.
X Clean the headlamps and rear lights and
check for damage.
X Clean the front and rear licence plates.
X Clean the wheels/tyres with a water jet and
remove any foreign objects.
X Clean the wheels, wheel arches and the
vehicle underside with a water jet; check
for foreign objects and damage.
X Check whether twigs or other parts of
plants have become trapped. These
increase the risk of fire and can damage
fuel pipes, brake hoses or the rubber bel-
lows of the axle joints and propeller shafts.
X After the trip, examine without fail the
entire undercarriage, wheels, tyres, brakes,
bodywork structure, steering, chassis and
exhaust system for damage.
X After driving for extended periods across
sand, mud, gravel, water or in similarly dirty
conditions, have the brake discs, wheels, brake pads/l
inings and axle joints checked
and cleaned.
X If you detect strong vibrations after off-road
travel, check for foreign objects in the
wheels and drive train and remove them if
necessary. Foreign objects can disturb the
balance and cause vibrations. Travelling uphill
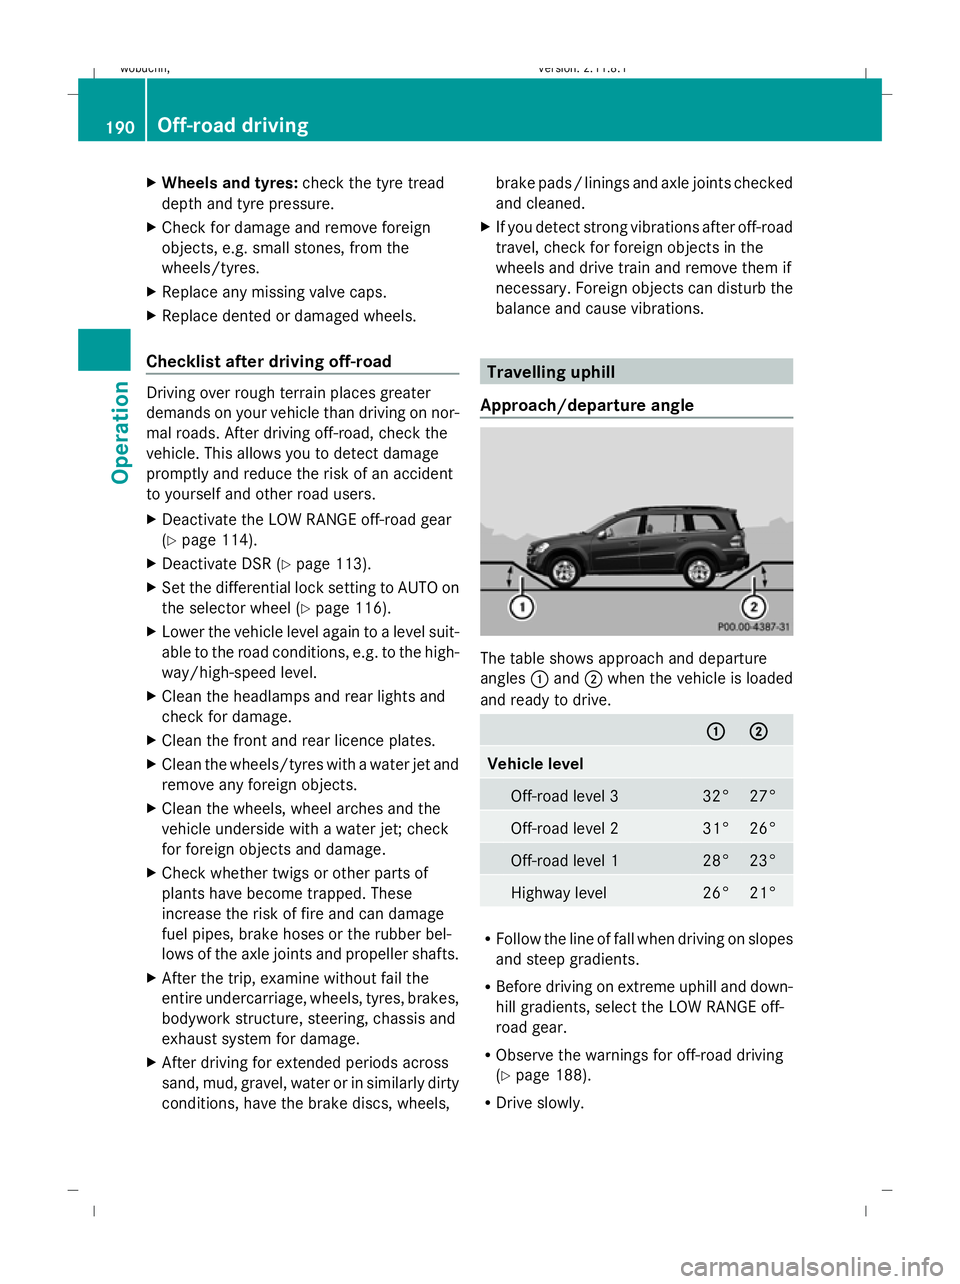
Approach/departure angle The table shows approach and departure
angles
:and ;when the vehicle is loaded
and ready to drive. :
: ;
; Vehicle level
Off-road level 3 32° 27°
Off-road level 2 31° 26°
Off-road level 1 28° 23°
Highway level 26° 21°
R
Follow the line of fall when driving on slopes
and steep gradients.
R Before driving on extreme uphill and down-
hill gradients, select the LOW RANGE off-
road gear.
R Observe the warnings for off-road driving
(Y page 188).
R Drive slowly. 190
Off-road drivingOperation
X164_AKB; 2; 3, en-GB
wobuchh,
Version: 2.11.8.1 2009-03-31T14:14:58+02:00 - Seite 190
Dateiname: 6515431202_buchblock.pdf; erzeugt am 01. Apr 2009 00:17:49; WK
Page 196 of 309
R
Drive quickly to overcome the rolling resist-
ance. The vehicle could otherwise dig itself
into the sand.
R Drive in the tracks of other vehicles, if pos-
sible. Make sure that the ruts are not too
deep, that the sand is firm enough and that
your vehicle has sufficient ground clear-
ance. Ruts
Observe the following rules when driving
along ruts in off-road terrain or on roads with
loose gravel:
! Check that the ruts are not too deep and
that your vehicle has sufficient clearance.
Otherwise, your vehicle could be damaged
or bottom out and get stuck.
R Select the LOW RANGE off-road gear
(Y page 114).
R Select a higher vehicle level.
R Avoid high engine speeds.
R Select shift range 1.
R Drive slowly.
R Where ruts are too deep, drive with the
wheels on one side on the middle section
of turf if possible. Driving abroad
Points to remember
An extensive Mercedes-Benz Service network
is also available in other countries. The
Service Hotline's current telephone numbers
for use when you are abroad are to be found
in the "Service24h" chapter of the Service
Booklet.
Only low-octane fuel is available in certain
countries.
You can find further information about fuel
grades on (Y page 172). Symmetrical dipped beam
If your journey takes you to countries where
vehicles are driven on sides of the road oppo-
site to the country in which the vehicle is reg-
istered, your headlamps must be switched to
symmetrical dipped beam. Oncoming traffic
will be dazzled less.
X Have the headlamps switched over at a
qualified specialist workshop, e. g. a
Mercedes-Benz Service Centre. G
Risk of accident
Remember to set the headlamps back to
asymmetrical dipped beam when you return
to driving on the same side of the road as that
of the country in which your vehicle was reg-
istered. You may otherwise dazzle the oncom-
ing traffic and could cause an accident. Trailer towing*
Folding out the ball coupling
Before you can tow a trailer with your vehicle,
you must fit the ball coupling.
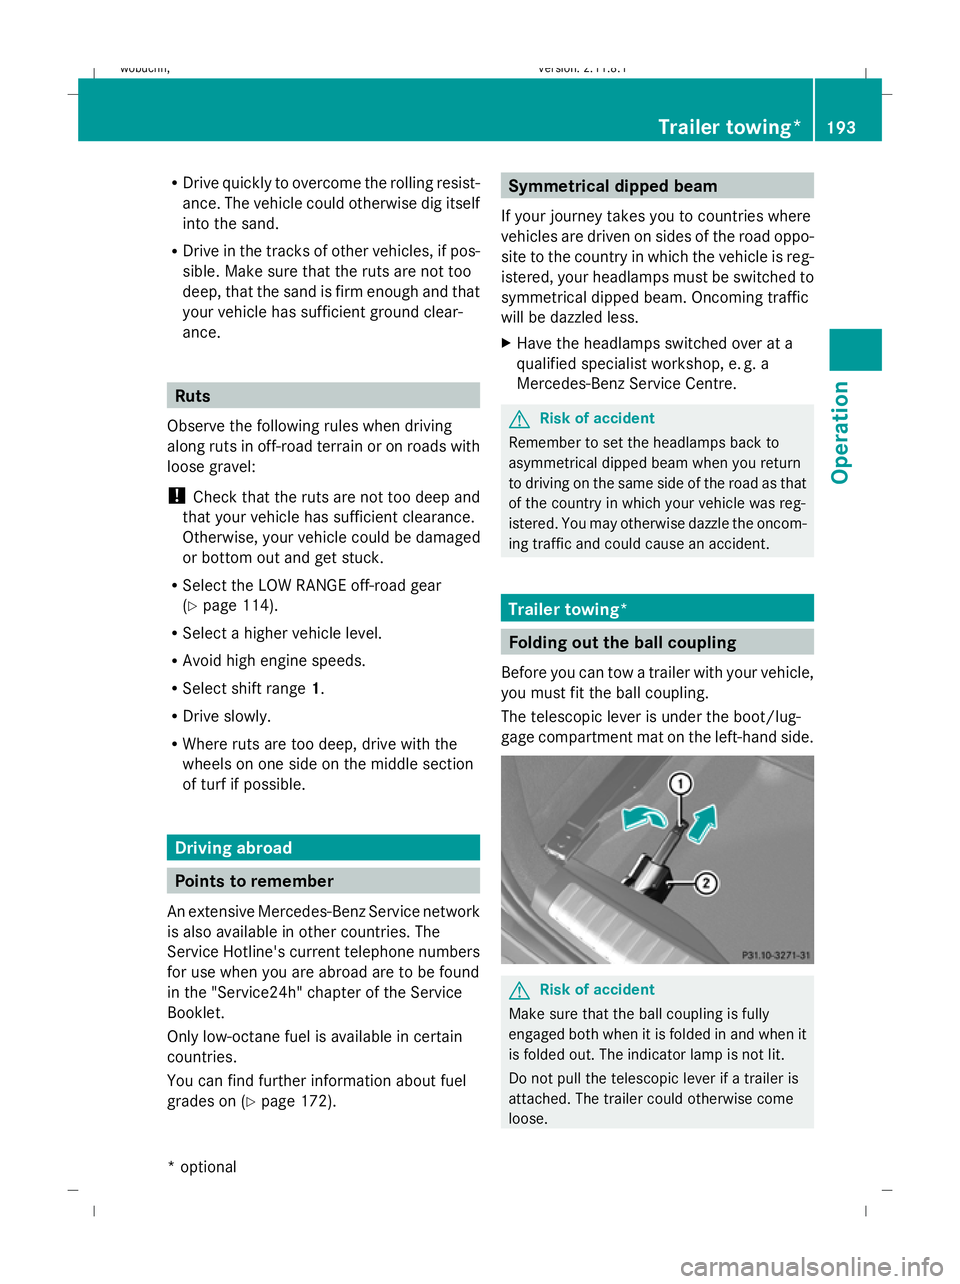
The telescopic lever is under the boot/lug-
gage compartment mat on the left-hand side. G
Risk of accident
Make sure that the ball coupling is fully
engaged both when it is folded in and when it
is folded out. The indicator lamp is not lit.
Do not pull the telescopic lever if a trailer is
attached. The trailer could otherwise come
loose. Trailer towing*
193Operation
* optional
X164_AKB; 2; 3, en-GB
wobuchh
,V ersion: 2.11.8.1
2009-03-31T14:14:58+02:00 - Seite 193 Z
Dateiname: 6515431202_buchblock.pdf; erzeugt am 01. Apr 2009 00:17:50; WK
Page 206 of 309
!
Do not clean the wiper blades too often,
and avoid rubbing too hard, as this could
result in damage to the graphite coating.
This could cause wiper noise.
X Fold the wiper arms away from the wind-
screen.
X Clean the wiper blades carefully with a
damp cloth.
X Fold the wiper arms back again before
switching on the ignition.
Cleaning the headlamps X
Clean the plastic lenses of the headlamps
with a wet sponge and windscreen washer
fluid or cleaning cloths.
! Only use washer fluid or cleaning cloths
suitable for plastic lenses. Unsuitable
washer fluid or cleaning cloths could
scratch or damage the plastic lenses of the
headlamps.
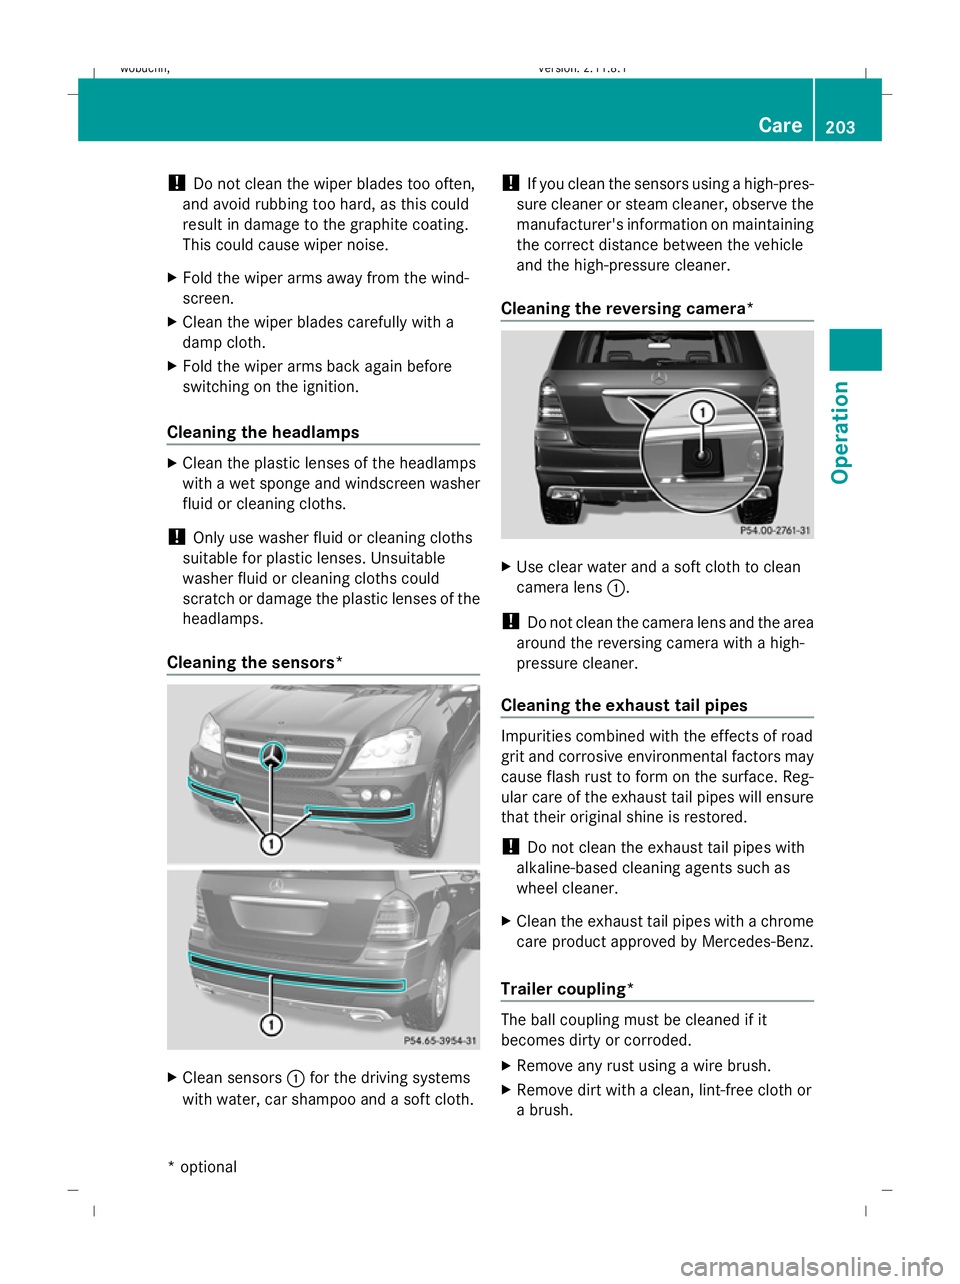
Cleaning the sensors* X
Clean sensors :for the driving systems
with water, car shampoo and a soft cloth. !
If you clean the sensors using a high-pres-
sure cleaner or steam cleaner, observe the
manufacturer's information on maintaining
the correct distance between the vehicle
and the high-pressure cleaner.
Cleaning the reversing camera* X
Use clear water and a soft cloth to clean
camera lens :.
! Do not clean the camera lens and the area
around the reversing camera with a high-
pressure cleaner.
Cleaning the exhaust tail pipes Impurities combined with the effects of road
grit and corrosive environmental factors may
cause flash rust to form on the surface. Reg-
ular care of the exhaust tail pipes will ensure
that their original shine is restored.
!
Do not clean the exhaust tail pipes with
alkaline-based cleaning agents such as
wheel cleaner.
X Clean the exhaust tail pipes with a chrome
care product approved by Mercedes-Benz.
Trailer coupling* The ball coupling must be cleaned if it
becomes dirty or corroded.
X
Remove any rust using a wire brush.
X Remove dirt with a clean, lint-free cloth or
a brush. Care
203Operation
* optional
X164_AKB; 2; 3, en-GB
wobuchh,
Version: 2.11.8.1 2009-03-31T14:14:58+02:00 - Seite 203 Z
Dateiname: 6515431202_buchblock.pdf; erzeugt am 01. Apr 2009 00:17:53; WK