buttons MERCEDES-BENZ GL SUV 2009 Owners Manual
[x] Cancel search | Manufacturer: MERCEDES-BENZ, Model Year: 2009, Model line: GL SUV, Model: MERCEDES-BENZ GL SUV 2009Pages: 309, PDF Size: 10.27 MB
Page 17 of 309
Socket
................................................ 163
Cockpit .......................................... 163
Luggage compartment ...................164
Rear compartment .........................163
Spare wheel
Fitting ............................................ 268
Storage location ............................ 209
Technical data ............................... 297
Spare wheel bracket ...........................60
Emergency release ........................251
Speed limiter
Speedtronic ................................... 126
Speedometer
Additional speedometer (on-
board computer) ............................ 100
Segments ......................................... 97
Setting the unit (on-board com-
puter) ............................................. 103
Speedtronic ....................................... 126
Display message ............................ 218
Permanent ..................................... 128
Variabl e......................................... 126
SRS (Supplemental Restraint Sys-
tem) ...................................................... 35
Display message ............................ 221
Warning lamp ........................... 35, 236
Standard display (on-board com-
puter) .................................................... 99
Station see Radio ....................................... 100
Status line (on-board computer) ........98
Selecting the display ..................... .104
Steering
Display message ............................ 225
Steering wheel
Adjusting ................................... 70, 71
Buttons (on-board computer) ...........97
Storing settings ............................... 74
Steering wheel boss
Cleaning ......................................... 204
Steering wheel heating .......................71
Malfunction indicator lamp ............233
Stowage compartments ...................152
Armrest (under) ............................. 153
Centre console .............................. 152
Centre console (rear) .....................153Cup holder
..................................... 153
Glove compartment .......................152
Submenu (on-board computer)
Convenience .................................. 108
Heating .......................................... 107
Instrument cluster .........................103
Lighting .......................................... 105
Time/Date ..................................... 104
Vehicle .......................................... .106
Summer opening
see Convenience opening
Sun visor ............................................ 161
Supplemental Restraint System See SRS ........................................... 35
Surround lighting
Switching on/off (on-board com-
puter) ............................................. 105
Switching off the alarm
ATA .................................................. 54 T
Tailgate Display message ............................ 219
Limiting the opening angle ...............63
Tail lamps
Display message ............................ 228
Tail pipes
Cleaning ......................................... 203
Tank
see Fuel tank
Tank capacity .................................... 287
Technical data GL 350 BlueTEC ............................. 293
GL 350 CDI 4MATIC BlueEFFI-
CIENCY .......................................... 293
GL 450 4MATIC ............................. 292
GL 450 CDI 4MATIC ......................294
GL 500 4MATIC ............................. 292
Trailer loads ................................... 298
Tyres ...................................... 296, 297
Wheels ................................... 296, 297
Telescopic lever ................................ 193
Telescopic rod (Easy-Pack fix kit) ....160
Temperature Outside temperature ........................ 97
Thermatic
Malfunction indicator lamp ............234 14
Index X164_AKB; 2; 3, en-GB
wobuchh,
Version: 2.11.8.1 2009-03-31T14:14:58+02:00 - Seite 14Dateiname: 6515431202_buchblock.pdf; erzeugt am 01. Apr 2009 00:16:30; WK
Page 33 of 309
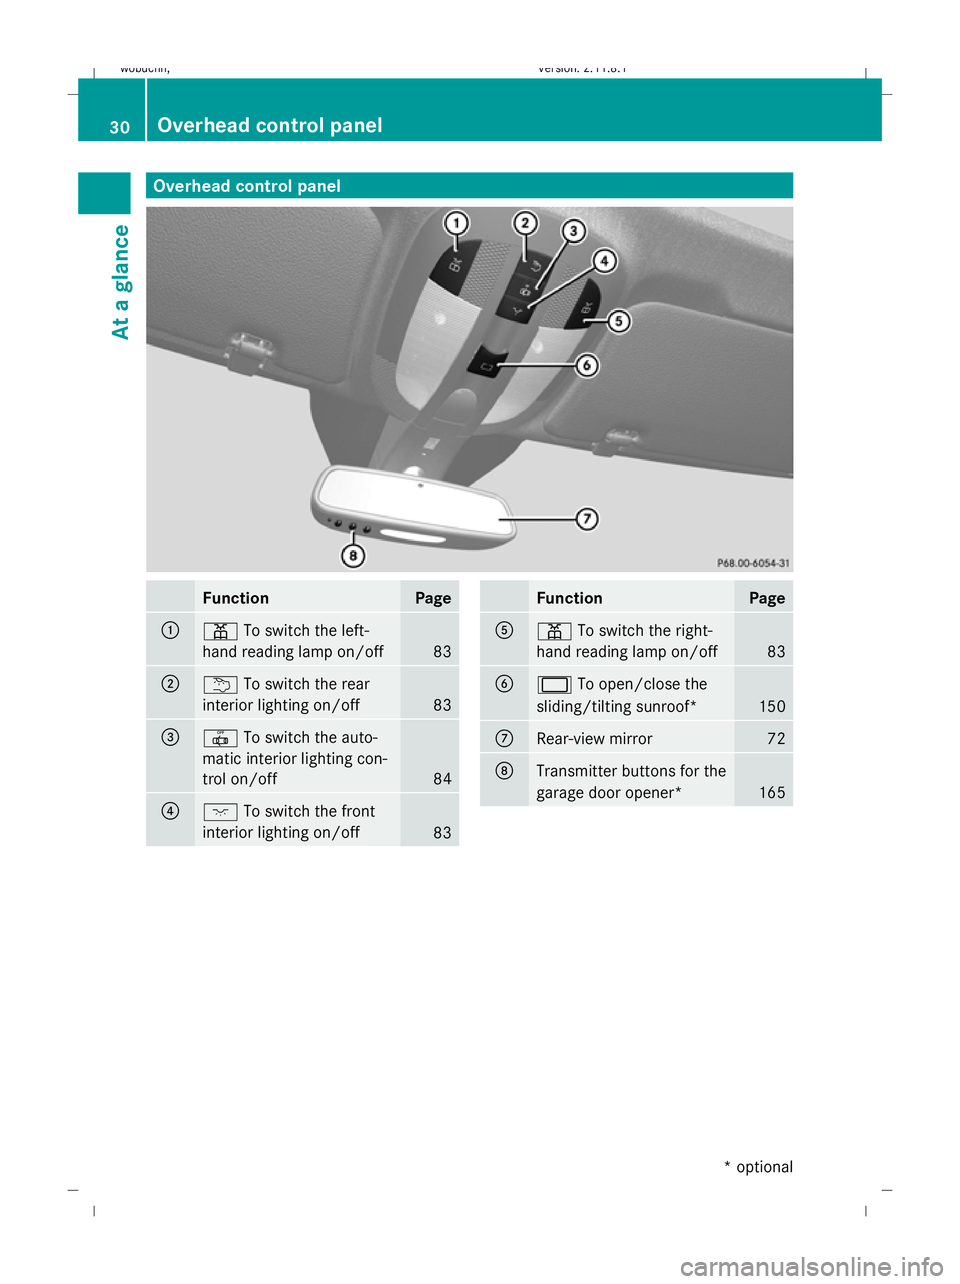
Overhead control panel
Function Page
:
p
To switch the left-
hand reading lamp on/off 83
;
u
To switch the rear
interior lighting on/off 83
=
|
To switch the auto-
matic interior lighting con-
trol on/off 84
?
c
To switch the front
interior lighting on/off 83 Function Page
A
p
To switch the right-
hand reading lamp on/off 83
B
2
To open/close the
sliding/tilting sunroof* 150
C
Rear-view mirror 72
D
Transmitter buttons for the
garage door opener*
16530
Overhead control panelAt a glance
* optional
X164_AKB; 2; 3, en-GB
wobuchh,
Version: 2.11.8.1 2009-03-31T14:14:58+02:00 - Seite 30
Dateiname: 6515431202_buchblock.pdf; erzeugt am 01. Apr 2009 00:16:41; WK
Page 52 of 309
X
Hook TopTether hook* Ainto TopTether
anchorage ?.
X Tighten TopTether belt* B. Comply with
the manufacturer's installation instruc-
tions.
X Move head restraint =back down again
slightly if necessary (Y page 68). Make
sure that you do not interfere with the cor-
rect routing of TopTether belt* B.
Child-proof locks If children are travelling in the vehicle, you can
activate the child-proof locks for the rear
doors.
Child-proof locks for the rear doors
The child-proof locks on the rear doors enable
you to secure each door individually. A locked
door cannot be opened from the inside. The
door can be opened from the outside if the
vehicle is unlocked.
G
Risk of accident and injury
Activate the child-proof locks for the rear
doors and the override switch for the rear
windows if children are travelling in the vehi-
cle. Otherwise, the children could open doors
or windows while the vehicle is in motion and
injure themselves or others. X
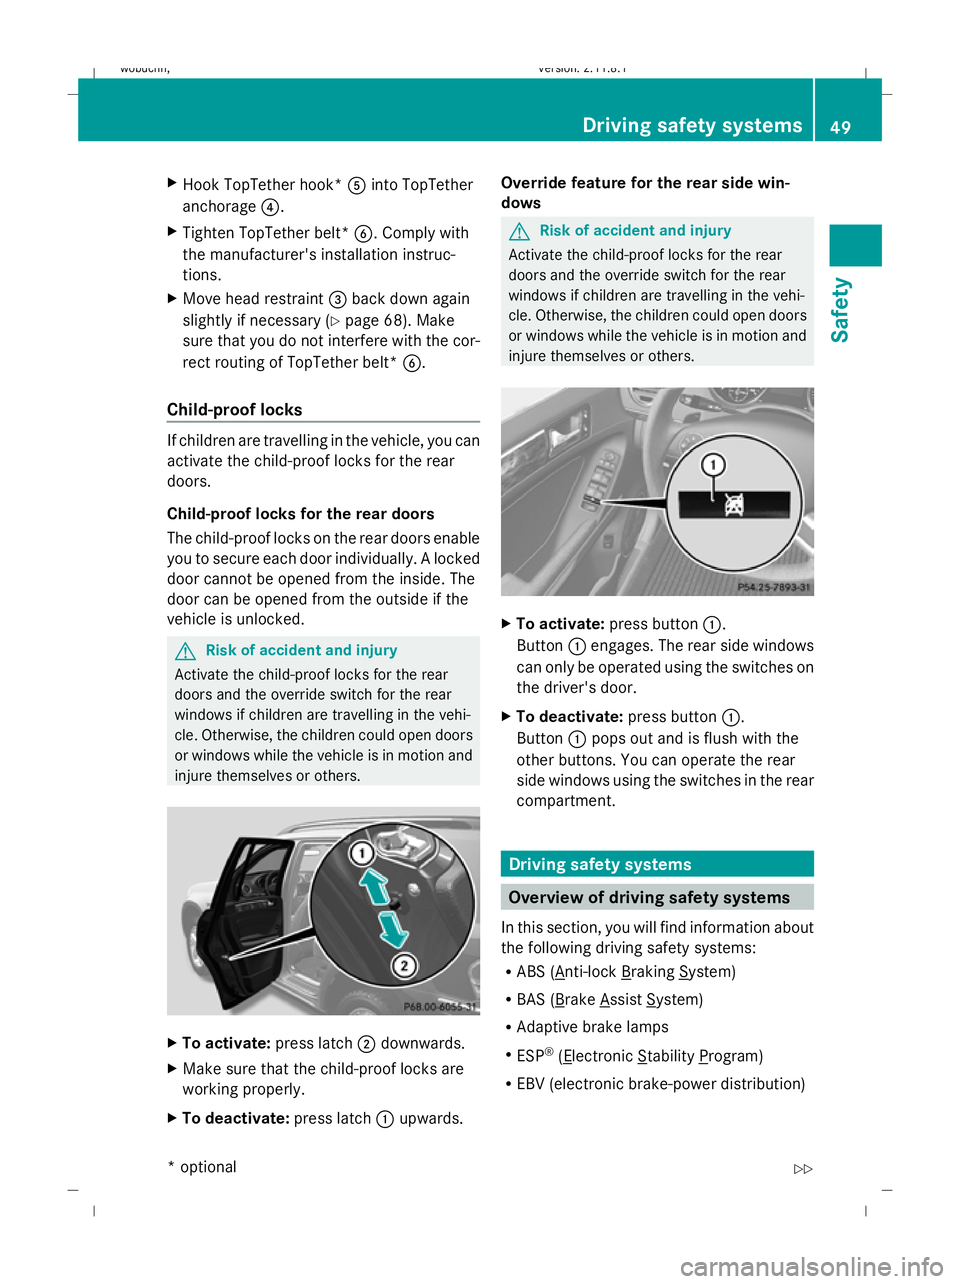
To activate: press latch;downwards.
X Make sure that the child-proof locks are
working properly.
X To deactivate: press latch:upwards. Override feature for the rear side win-
dows G
Risk of accident and injury
Activate the child-proof locks for the rear
doors and the override switch for the rear
windows if children are travelling in the vehi-
cle. Otherwise, the children could open doors
or windows while the vehicle is in motion and
injure themselves or others. X
To activate: press button :.
Button :engages. The rear side windows
can only be operated using the switches on
the driver's door.
X To deactivate: press button:.
Button :pops out and is flush with the
other buttons. You can operate the rear
side windows using the switches in the rear
compartment. Driving safety systems
Overview of driving safety systems
In this section, you will find information about
the following driving safety systems:
R ABS ( Anti-lock Braking System)
R BAS ( Brake Assist System)
R Adaptive brake lamps
R ESP ®
( Electronic Stability Program)
R EBV (electronic brake-power distribution) Driving safety systems
49Safety
* optional
X164_AKB; 2; 3, en-GB
wobuchh
,V ersion: 2.11.8.1
2009-03-31T14:14:58+02:00 - Seite 49 Z
Dateiname: 6515431202_buchblock.pdf; erzeugt am 01. Apr 2009 00:16:48; WK
Page 62 of 309
Individual settings
You can change the setting of the locking
system in such a way that only the driver's
door and the fuel filler flap are unlocked. This
could be useful if you frequently travel on your
own.
X To change the setting: press the%
and & buttons simultaneously for
approximately six seconds until the battery
check lamp flashes twice.
The key now functions as follows:
X To unlock the driver's door: press the
% button once.
X To unlock centrally: press the%but-
ton twice.
X To lock centrally: press the&button.
The KEYLESS GO* function is changed as fol-
lows:
X To unlock the driver's door: touch the
inner surface of the door handle on the
driver's door.
X To unlock centrally: touch the inner sur-
face of the door handle on the front-
passenger door or the rear door.
X To lock centrally: press locking but-
ton :on one of the door handles.
Restoring the factory settings X
Press the %and& buttons simulta-
neously for approximately six seconds until
the battery check lamp flashes twice.
Additional information R
Convenience opening (Y page 87)
R Convenience closing (Y page 87)
R Opening and closing in an emergency
(Y page 250) Opening the doors from the inside
You can open a door from the inside even if it
has been locked, unless the child-proof locks
have been activated ( Ypage 49). X
Pull door handle ;.
If the door is locked, locking knob :pops
up. The door is unlocked and can be
opened. Locking/unlocking the vehicle from
the inside
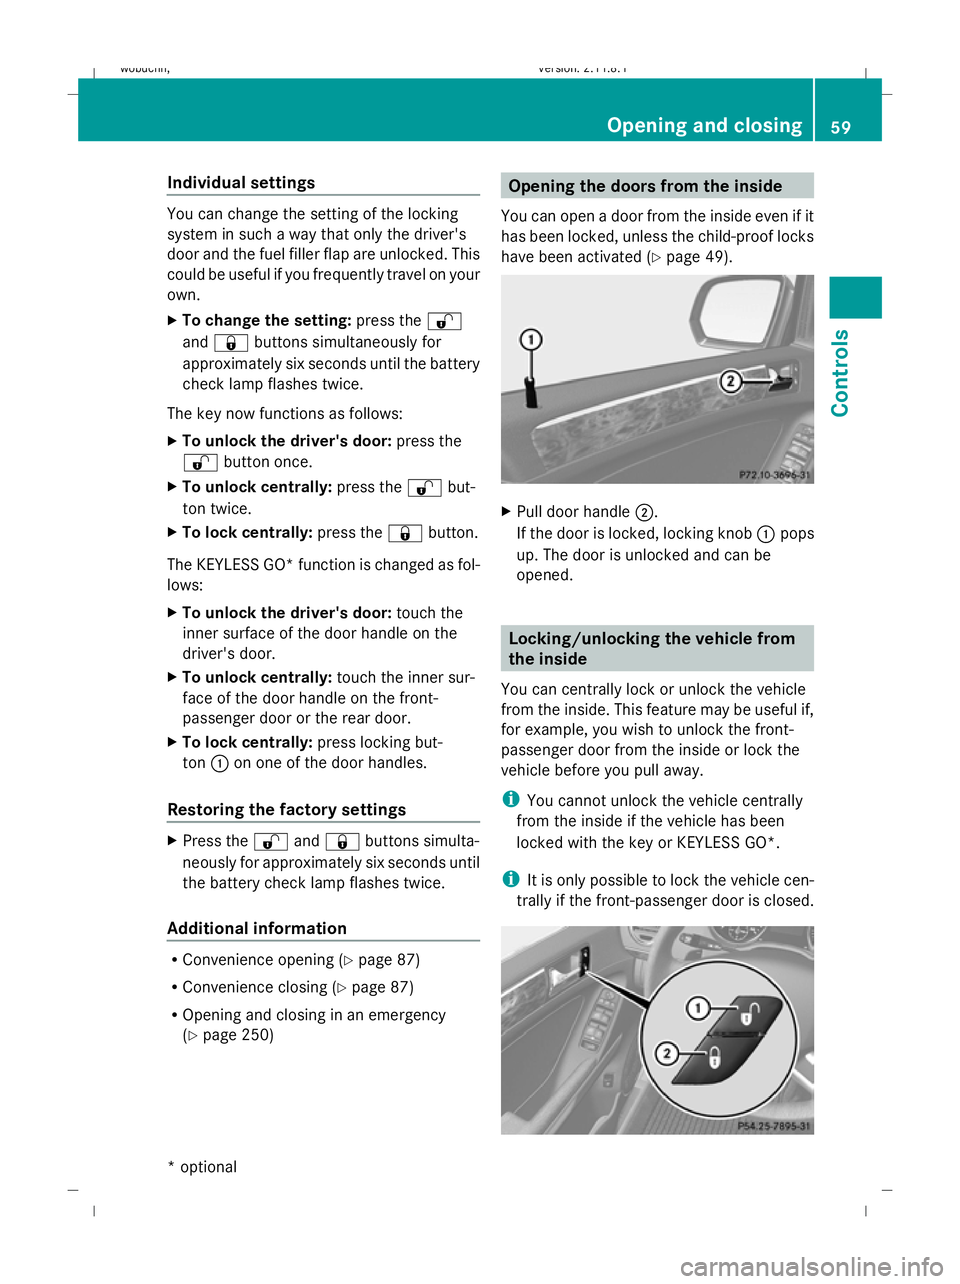
You can centrally lock or unlock the vehicle
from the inside. This feature may be useful if,
for example, you wish to unlock the front-
passenger door from the inside or lock the
vehicle before you pull away.
i You cannot unlock the vehicle centrally
from the inside if the vehicle has been
locked with the key or KEYLESS GO*.
i It is only possible to lock the vehicle cen-
trally if the front-passenger door is closed. Opening and closing
59Controls
* optional
X164_AKB; 2; 3, en-GB
wobuchh,
Version: 2.11.8.1 2009-03-31T14:14:58+02:00 - Seite 59 Z
Dateiname: 6515431202_buchblock.pdf; erzeugt am 01. Apr 2009 00:16:52; WK
Page 75 of 309
Easy-entry/exit feature*
The EASY-ENTRY/EXIT feature makes getting
in and out of your vehicle easier.
The steering wheel swings upwards when
you:
R remove the key from the ignition lock
R open the driver's door when the key is in
position 0or 1in the ignition lock
When the key is inserted into the ignition lock
with the driver's door closed, the steering
wheel is automatically moved to the previ-
ously set position. G
Risk of injury
Make sure that nobody can become trapped
when you activate the easy-entry/exit fea-
ture.
If there is a risk of becoming trapped, stop the
adjustment procedure. To halt the procedure:
R press the steering-column adjustment
switch
R press one of the memory function position
buttons
The steering column stops moving immedi-
ately.
Never leave children unsupervised in the vehi-
cle. They could open the driver's door and
thereby unintentionally activate the easy-
entry feature and become trapped.
The most recent position of the steering
wheel is stored when you switch off the igni-
tion or when you store a memory position
(Y page 74).
You can activate and deactivate the EASY-
ENTRY/EXIT feature via the on-board com-
puter (Y page 108).
i The crash-responsive EASY-EXIT fea-
ture* can only be activated after an acci-
dent if the EASY-ENTRY/EXIT feature is
activated in the on-board computer.
When the crash-responsive EASY-EXIT fea-
ture is triggered in an accident, the steering
wheel column will move upwards irrespec- tive of the position of the key in the ignition
lock. This makes it easier to exit the vehicle
or rescue the occupants. Mirrors
Rear-view mirror
X Adjust the rear-view mirror by hand so you
have a good overview of the traffic condi-
tions.
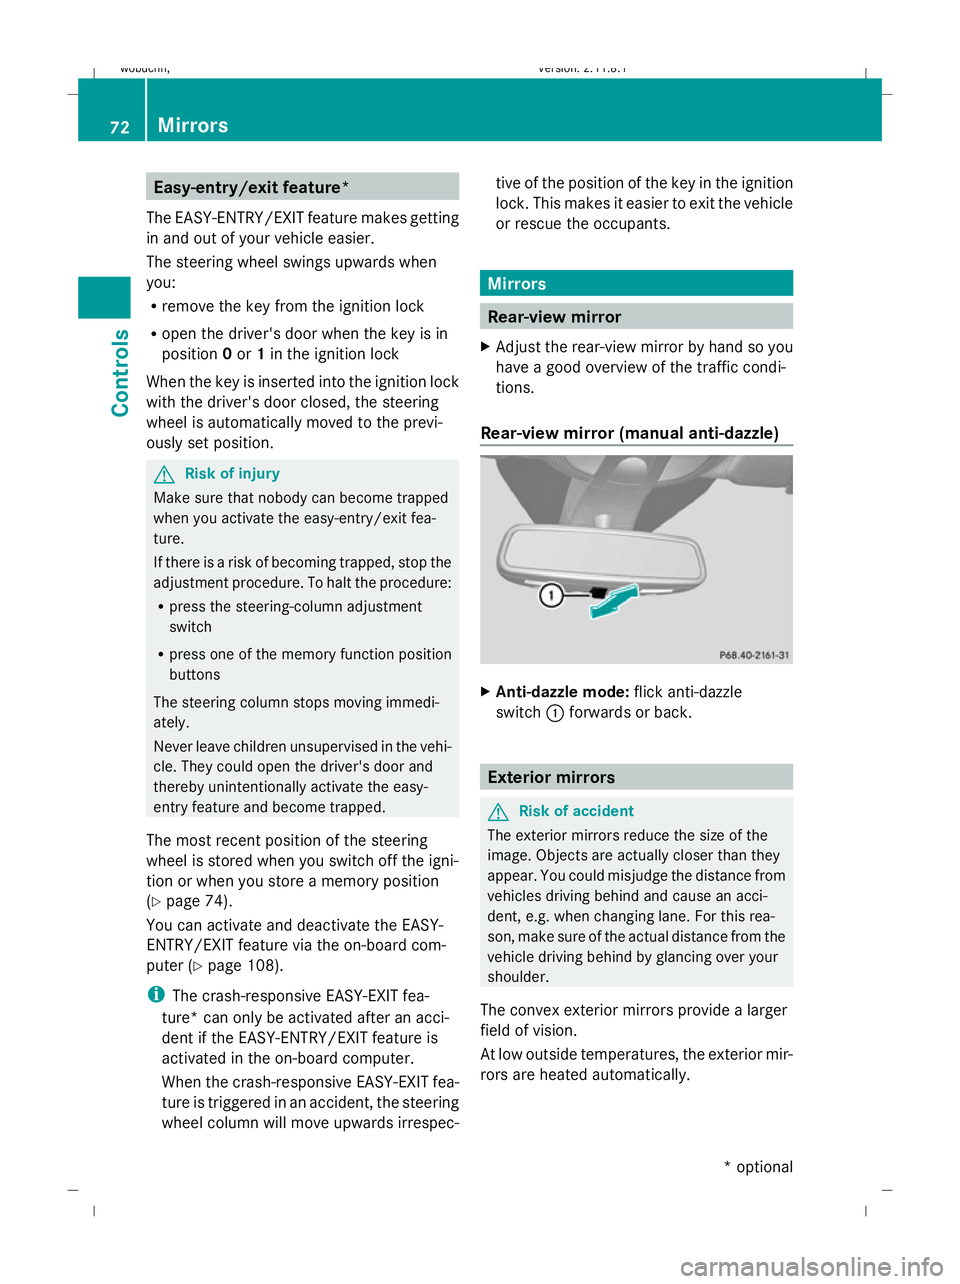
Rear-view mirror (manual anti-dazzle) X
Anti-dazzle mode: flick anti-dazzle
switch :forwards or back. Exterior mirrors
G
Risk of accident
The exterior mirrors reduce the size of the
image. Objects are actually closer than they
appear. You could misjudge the distance from
vehicles driving behind and cause an acci-
dent, e.g. when changing lane. For this rea-
son, make sure of the actual distance from the
vehicle driving behind by glancing over your
shoulder.
The convex exterior mirrors provide a larger
field of vision.
At low outside temperatures, the exterior mir-
rors are heated automatically. 72
MirrorsControls
* optional
X164_AKB; 2; 3, en-GB
wobuchh,
Version: 2.11.8.1 2009-03-31T14:14:58+02:00 - Seite 72
Dateiname: 6515431202_buchblock.pdf; erzeugt am 01. Apr 2009 00:17:03; WK
Page 100 of 309
Speedometer with segments
The segments in the speedometer indicate
which speed range is available.
Distronic* mode:
One or two segments around the stored
speed light up. Rev counter
The red band in the rev counter indicates the
engine's overrevving range. The fuel supply is
interrupted to protect the engine when the
red band is reached.
! Do not drive in the overrevving range.
Doing so will damage the engine. Outside temperature display
G
Risk of accident
At temperatures just above freezing point, the
road could be icy, particularly in wooded areas
or on bridges. The vehicle could start skidding
if you fail to adapt your driving style. You
should therefore always adapt your driving
style and speed to suit the weather condi-
tions.
Changes in the outside temperature are dis-
played after a short delay. On-board computer
Points to remember
The on-board computer is activated as soon
as you turn the key to position 1in the ignition
lock. G
Risk of accident
Only use the on-board computer when road
and traffic conditions permit. You would oth-
erwise be distracted and unable to concen-
trate properly on driving, and could cause an
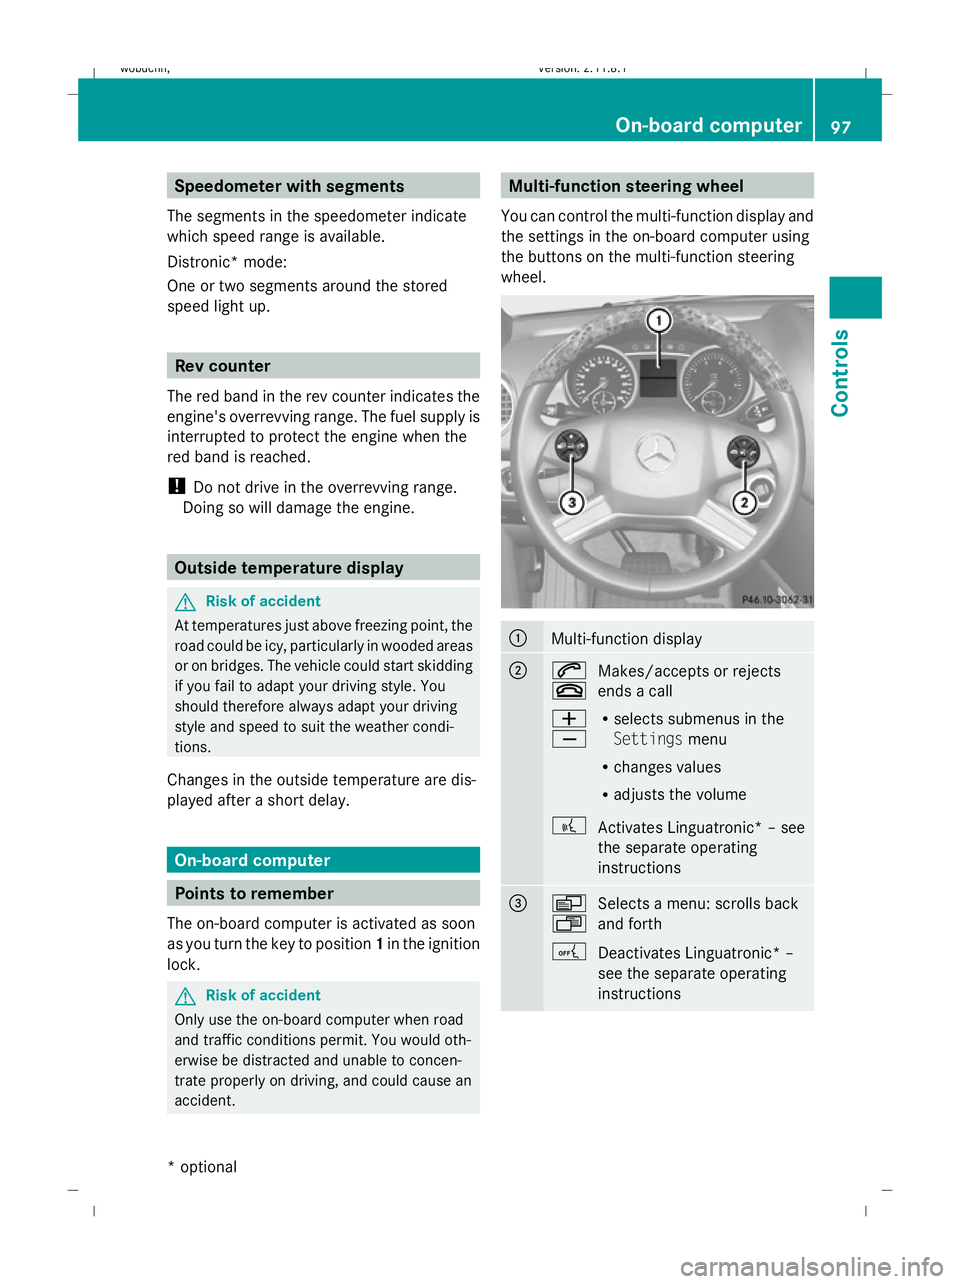
accident. Multi-function steering wheel
You can control the multi-function display and
the settings in the on-board computer using
the buttons on the multi-function steering
wheel. :
Multi-function display
;
6
~
Makes/accepts or rejects
ends a call
W
X R
selects submenus in the
Settings menu
R changes values
R adjusts the volume
? Activates Linguatronic* – see
the separate operating
instructions =
V
U
Selects a menu: scrolls back
and forth
A Deactivates Linguatronic* –
see the separate operating
instructions On-board computer
97Controls
* optional
X164_AKB; 2; 3, en-GB
wobuchh,
Version: 2.11.8.1 2009-03-31T14:14:58+02:00 - Seite 97 Z
Dateiname: 6515431202_buchblock.pdf; erzeugt am 01. Apr 2009 00:17:14; WK
Page 102 of 309
Menus and submenus
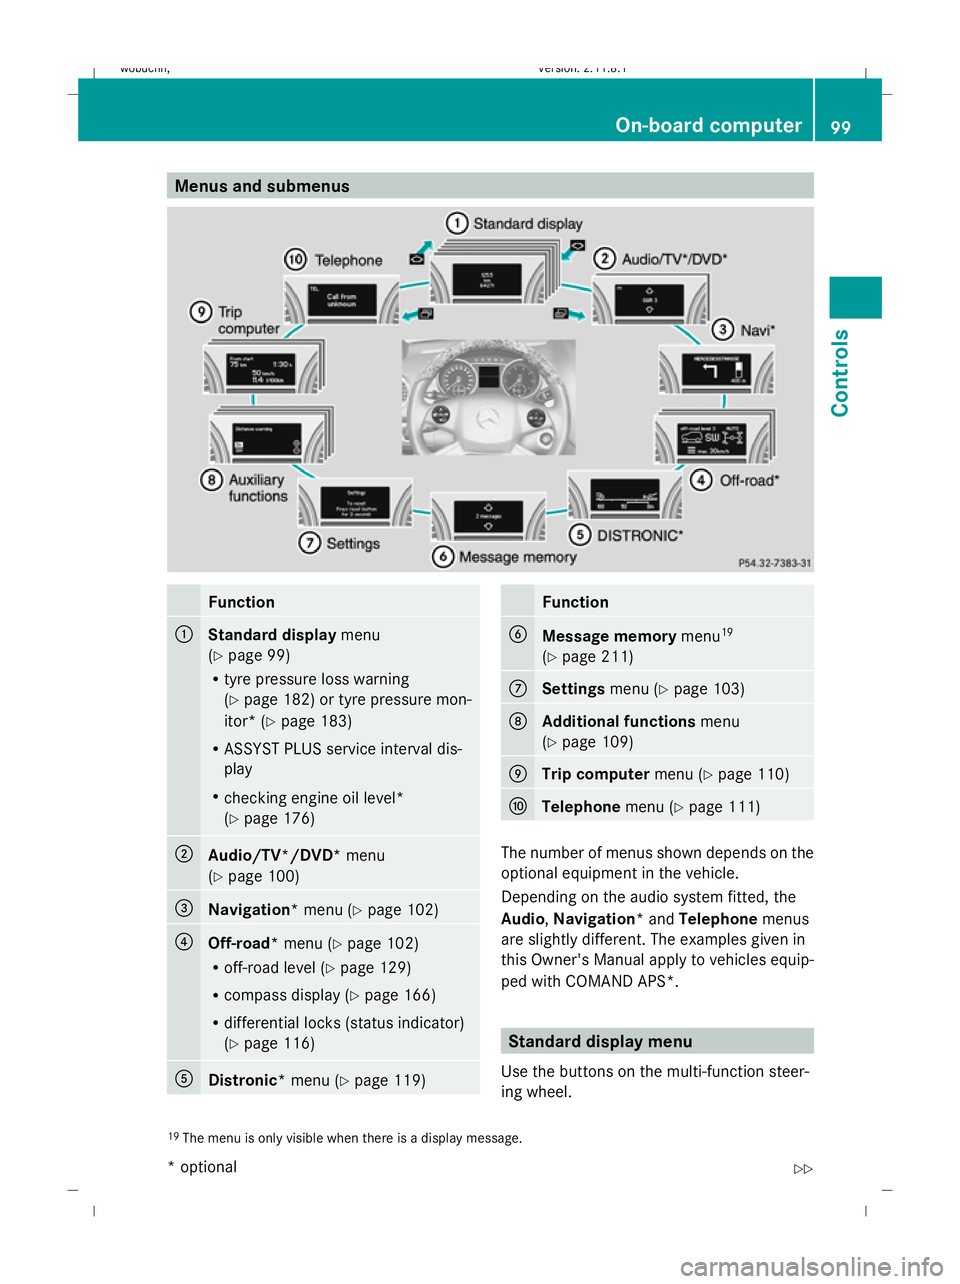
Function
:
Standard display
menu
(Y page 99)
R tyre pressure loss warning
(Y page 182) or tyre pressure mon-
itor* (Y page 183)
R ASSYST PLUS service interval dis-
play
R checking engine oil level*
(Y page 176) ;
Audio/TV*/DVD*
menu
(Y page 100) =
Navigation*
menu (Ypage 102) ?
Off-road*
menu (Ypage 102)
R off-road level (Y page 129)
R compass display (Y page 166)
R differential locks (status indicator)
(Y page 116) A
Distronic*
menu (Ypage 119) Function
B
Message memory
menu19
(Y page 211) C
Settings
menu (Ypage 103) D
Additional functions
menu
(Y page 109) E
Trip computer
menu (Ypage 110) F
Telephone
menu (Ypage 111) The number of menus shown depends on the
optional equipment in the vehicle.
Depending on the audio system fitted, the
Audio, Navigation* and Telephonemenus
are slightly different. The examples given in
this Owner's Manual apply to vehicles equip-
ped with COMAND APS*. Standard display menu
Use the buttons on the multi-function steer-
ing wheel.
19 The menu is only visible when there is a display message. On-board computer
99Controls
* optional
X164_AKB; 2; 3, en-GB
wobuchh,
Version: 2.11.8.1 2009-03-31T14:14:58+02:00 - Seite 99 Z
Dateiname: 6515431202_buchblock.pdf; erzeugt am 01. Apr 2009 00:17:15; WK
Page 105 of 309
not receive channel lists): press and briefly
hold the &or* button.
Operating the DVD video* X
Switch on COMAND and select video DVD
(see the separate operating instructions).
X Press VorU on the steering wheel
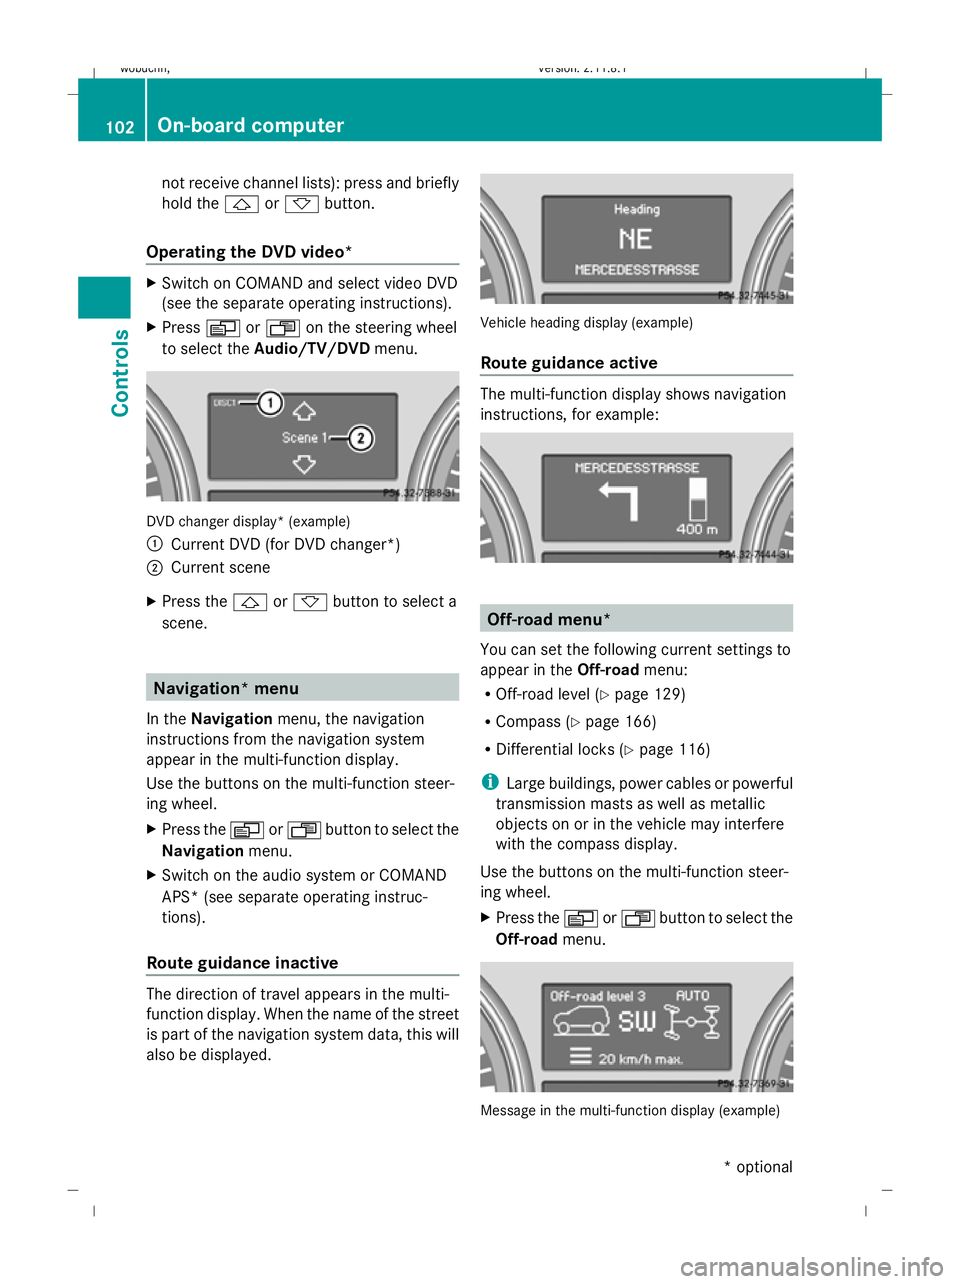
to select the Audio/TV/DVD menu. DVD changer display* (example)
:
Current DVD (for DVD changer*)
; Current scene
X Press the &or* button to select a
scene. Navigation* menu
In the Navigation menu, the navigation
instructions from the navigation system
appear in the multi-function display.
Use the buttons on the multi-function steer-
ing wheel.
X Press the VorU button to select the
Navigation menu.
X Switch on the audio system or COMAND
APS* (see separate operating instruc-
tions).
Route guidance inactive The direction of travel appears in the multi-
function display. When the name of the street
is part of the navigation system data, this will
also be displayed. Vehicle heading display (example)
Route guidance active
The multi-function display shows navigation
instructions, for example:
Off-road menu*
You can set the following current settings to
appear in the Off-roadmenu:
R Off-road level (Y page 129)
R Compass (Y page 166)
R Differential locks (Y page 116)
i Large buildings, power cables or powerful
transmission masts as well as metallic
objects on or in the vehicle may interfere
with the compass display.
Use the buttons on the multi-function steer-
ing wheel.
X Press the VorU button to select the
Off-road menu. Message in the multi-function display (example)102
On-board computerControls
* optional
X164_AKB; 2; 3, en-GB
wobuchh
,V ersion: 2.11.8.1
2009-03-31T14:14:58+02:00 - Seite 102
Dateiname: 6515431202_buchblock.pdf; erzeugt am 01. Apr 2009 00:17:16; WK
Page 114 of 309
Calling up the range
X
Press VorU on the steering wheel
to select the trip computer menu.
X Press &or* to select Range:
The multi-function display shows the esti-
mated range of the vehicle, based on the
current driving style and the fuel level. If
there is only a small amount of fuel remain-
ing in the fuel tank, a vehicle refuelling
C appears instead of the range.
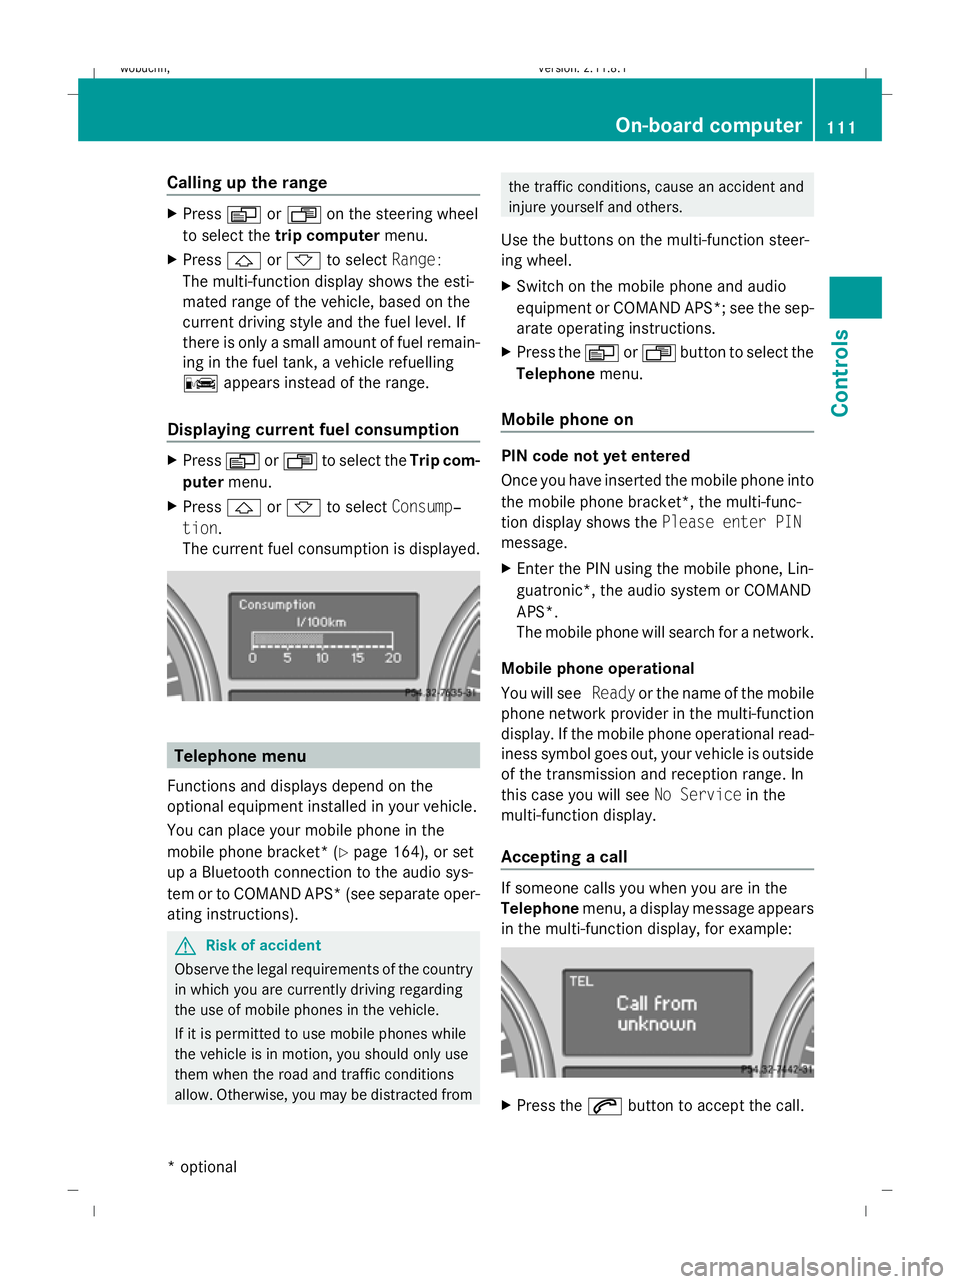
Displaying current fuel consumption X
Press VorU to select the Trip com-
puter menu.
X Press &or* to select Consump‐
tion.
The current fuel consumption is displayed. Telephone menu
Functions and displays depend on the
optional equipment installed in your vehicle.
You can place your mobile phone in the
mobile phone bracket* (Y page 164), or set
up a Bluetooth connection to the audio sys-
tem or to COMAND APS* (see separate oper-
ating instructions). G
Risk of accident
Observe the legal requirements of the country
in which you are currently driving regarding
the use of mobile phones in the vehicle.
If it is permitted to use mobile phones while
the vehicle is in motion, you should only use
them when the road and traffic conditions
allow. Otherwise, you may be distracted from the traffic conditions, cause an accident and
injure yourself and others.
Use the buttons on the multi-function steer-
ing wheel.
X Switch on the mobile phone and audio
equipment or COMAND APS*; see the sep-
arate operating instructions.
X Press the VorU button to select the
Telephone menu.
Mobile phone on PIN code not yet entered
Once you have inserted the mobile phone into
the mobile phone bracket*, the multi-func-
tion display shows the Please enter PIN
message.
X Enter the PIN using the mobile phone, Lin-
guatronic*, the audio system or COMAND
APS*.
The mobile phone will search for a network.
Mobile phone operational
You will see Readyor the name of the mobile
phone network provider in the multi-function
display. If the mobile phone operational read-
iness symbol goes out, your vehicle is outside
of the transmission and reception range. In
this case you will see No Servicein the
multi-function display.
Accepting a call If someone calls you when you are in the
Telephone
menu, a display message appears
in the multi-function display, for example: X
Press the 6button to accept the call. On-board computer
111Controls
* optional
X164_AKB; 2; 3, en-GB
wobuchh,
Version: 2.11.8.1 2009-03-31T14:14:58+02:00 - Seite 111 Z
Dateiname: 6515431202_buchblock.pdf; erzeugt am 01. Apr 2009 00:17:18; WK
Page 141 of 309
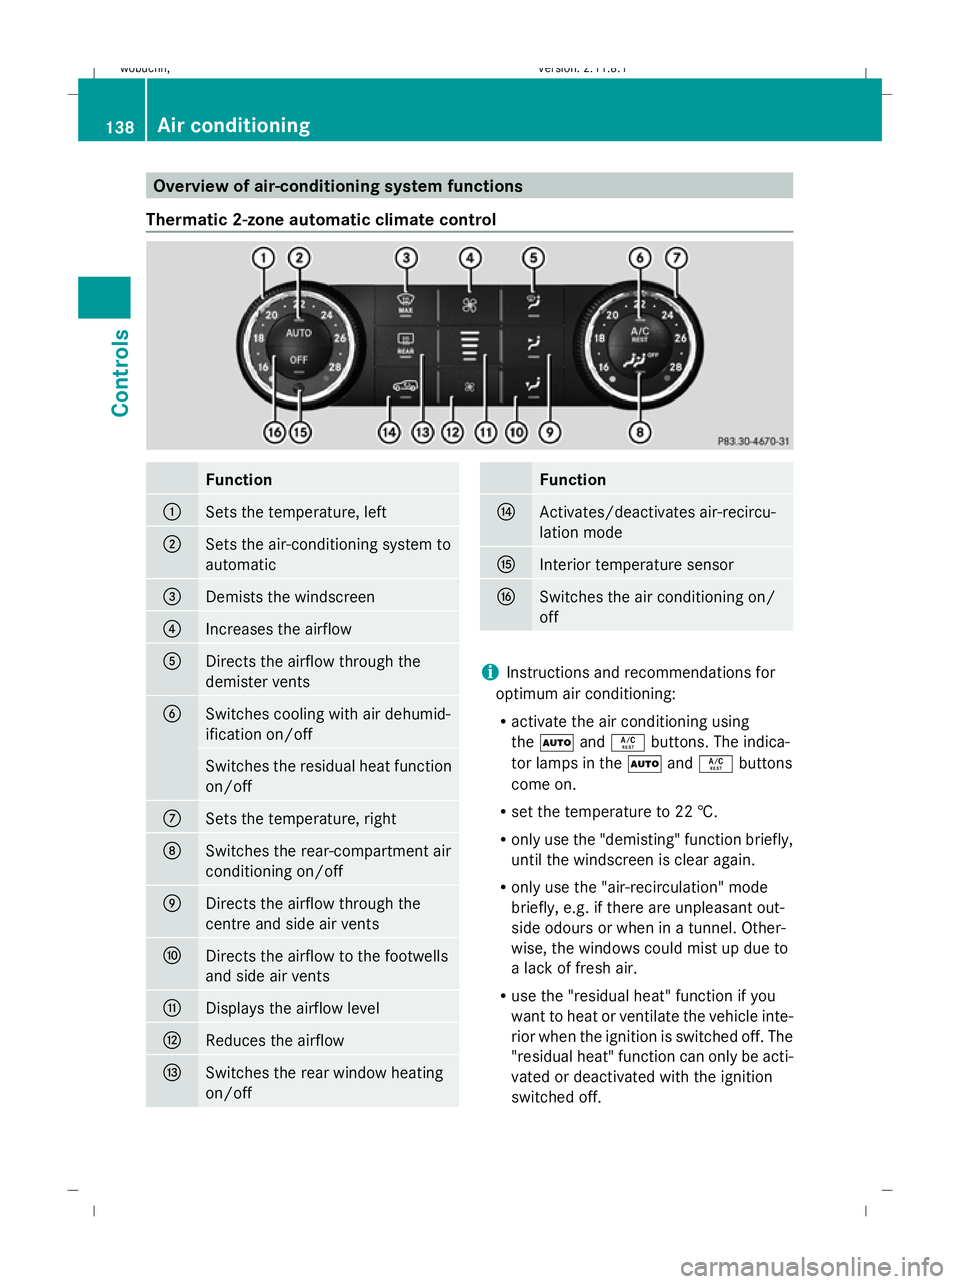
Overview of air-conditioning system functions
Thermatic 2-zone automatic climate control Function
:
Sets the temperature, left
;
Sets the air-conditioning system to
automatic
=
Demists the windscreen
?
Increases the airflow
A
Directs the airflow through the
demister vents
B
Switches cooling with air dehumid-
ification on/off
Switches the residual heat function
on/off
C
Sets the temperature, right
D
Switches the rear-compartment air
conditioning on/off
E
Directs the airflow through the
centre and side air vents
F
Directs the airflow to the footwells
and side air vents
G
Displays the airflow level
H
Reduces the airflow
I
Switches the rear window heating
on/off Function
J
Activates/deactivates air-recircu-
lation mode
K
Interior temperature sensor
L
Switches the air conditioning on/
off
i
Instructions and recommendations for
optimum air conditioning:
R activate the air conditioning using
the à andÁ buttons. The indica-
tor lamps in the ÃandÁ buttons
come on.
R set the temperature to 22 †.
R only use the "demisting" function briefly,
until the windscreen is clear again.
R only use the "air-recirculation" mode
briefly, e.g. if there are unpleasant out-
side odours or when in a tunnel. Other-
wise, the windows could mist up due to
a lack of fresh air.
R use the "residual heat" function if you
want to heat or ventilate the vehicle inte-
rior when the ignition is switched off. The
"residual heat" function can only be acti-
vated or deactivated with the ignition
switched off. 138
Air conditioningControls
X164_AKB; 2; 3, en-GB
wobuchh,
Version: 2.11.8.1 2009-03-31T14:14:58+02:00 - Seite 138
Dateiname: 6515431202_buchblock.pdf; erzeugt am 01. Apr 2009 00:17:28; WK