power steering MERCEDES-BENZ GL SUV 2009 Owners Manual
[x] Cancel search | Manufacturer: MERCEDES-BENZ, Model Year: 2009, Model line: GL SUV, Model: MERCEDES-BENZ GL SUV 2009Pages: 309, PDF Size: 10.27 MB
Page 94 of 309
Parking brake
X
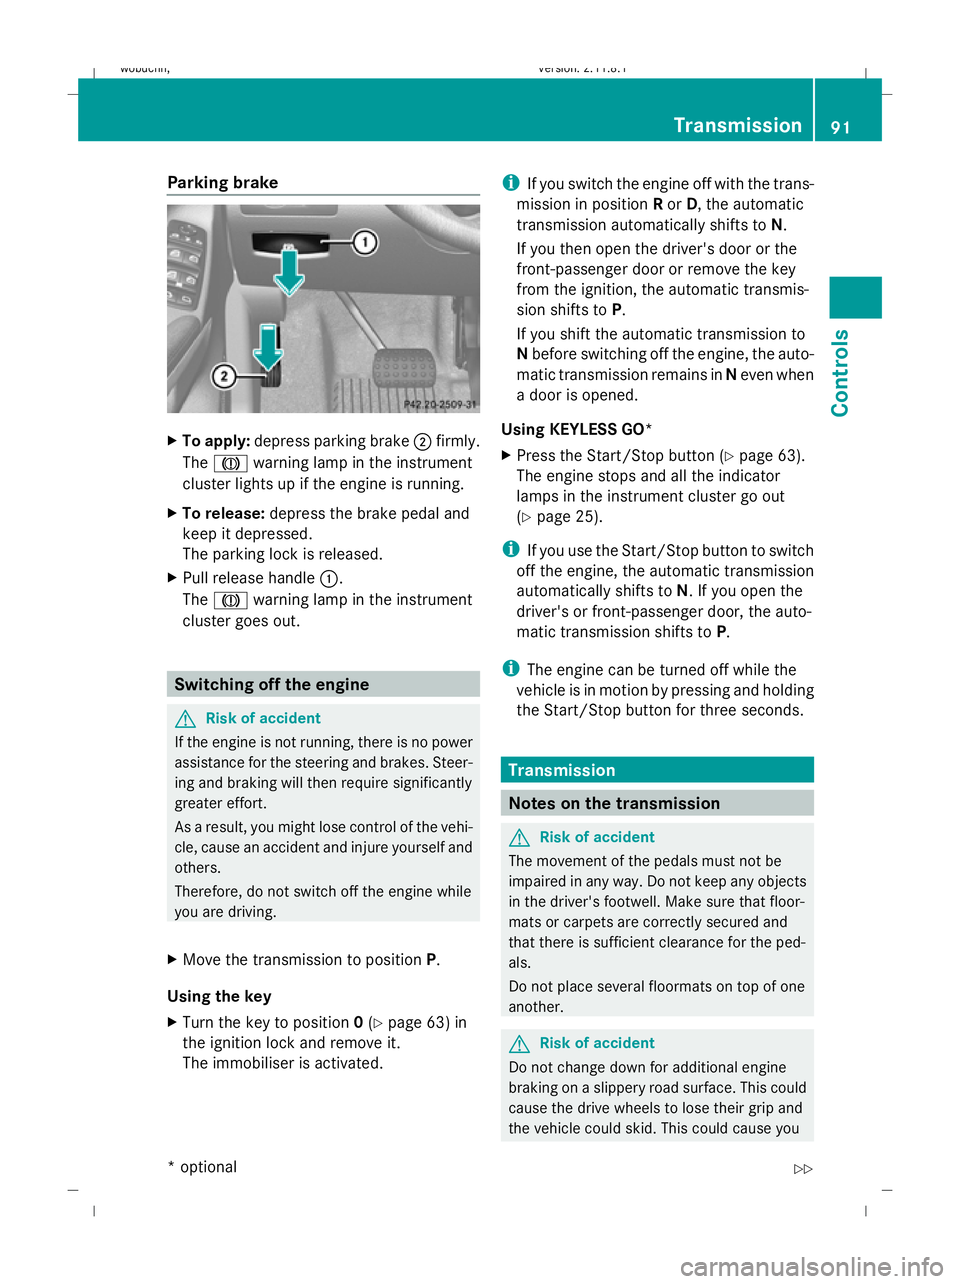
To apply: depress parking brake ;firmly.
The J warning lamp in the instrument
cluster lights up if the engine is running.
X To release: depress the brake pedal and
keep it depressed.
The parking lock is released.
X Pull release handle :.
The J warning lamp in the instrument
cluster goes out. Switching off the engine
G
Risk of accident
If the engine is not running, there is no power
assistance for the steering and brakes. Steer-
ing and braking will then require significantly
greater effort.
As a result, you might lose control of the vehi-
cle, cause an accident and injure yourself and
others.
Therefore, do not switch off the engine while
you are driving.
X Move the transmission to position P.
Using the key
X Turn the key to position 0(Y page 63) in
the ignition lock and remove it.
The immobiliser is activated. i
If you switch the engine off with the trans-
mission in position Ror D, the automatic
transmission automatically shifts to N.
If you then open the driver's door or the
front-passenger door or remove the key
from the ignition, the automatic transmis-
sion shifts to P.
If you shift the automatic transmission to
N before switching off the engine, the auto-
matic transmission remains in Neven when
a door is opened.
Using KEYLESS GO*
X Press the Start/Stop button (Y page 63).
The engine stops and all the indicator
lamps in the instrument cluster go out
(Y page 25).
i If you use the Start/Stop button to switch
off the engine, the automatic transmission
automatically shifts to N. If you open the
driver's or front-passenger door, the auto-
matic transmission shifts to P.
i The engine can be turned off while the
vehicle is in motion by pressing and holding
the Start/Stop button for three seconds. Transmission
Notes on the transmission
G
Risk of accident
The movement of the pedals must not be
impaired in any way. Do not keep any objects
in the driver's footwell. Make sure that floor-
mats or carpets are correctly secured and
that there is sufficient clearance for the ped-
als.
Do not place several floormats on top of one
another. G
Risk of accident
Do not change down for additional engine
braking on a slippery road surface. This could
cause the drive wheels to lose their grip and
the vehicle could skid. This could cause you Transmission
91Controls
* optional
X164_AKB; 2; 3, en-GB
wobuchh,
Version: 2.11.8.1 2009-03-31T14:14:58+02:00 - Seite 91 Z
Dateiname: 6515431202_buchblock.pdf; erzeugt am 01. Apr 2009 00:17:11; WK
Page 105 of 309
not receive channel lists): press and briefly
hold the &or* button.
Operating the DVD video* X
Switch on COMAND and select video DVD
(see the separate operating instructions).
X Press VorU on the steering wheel
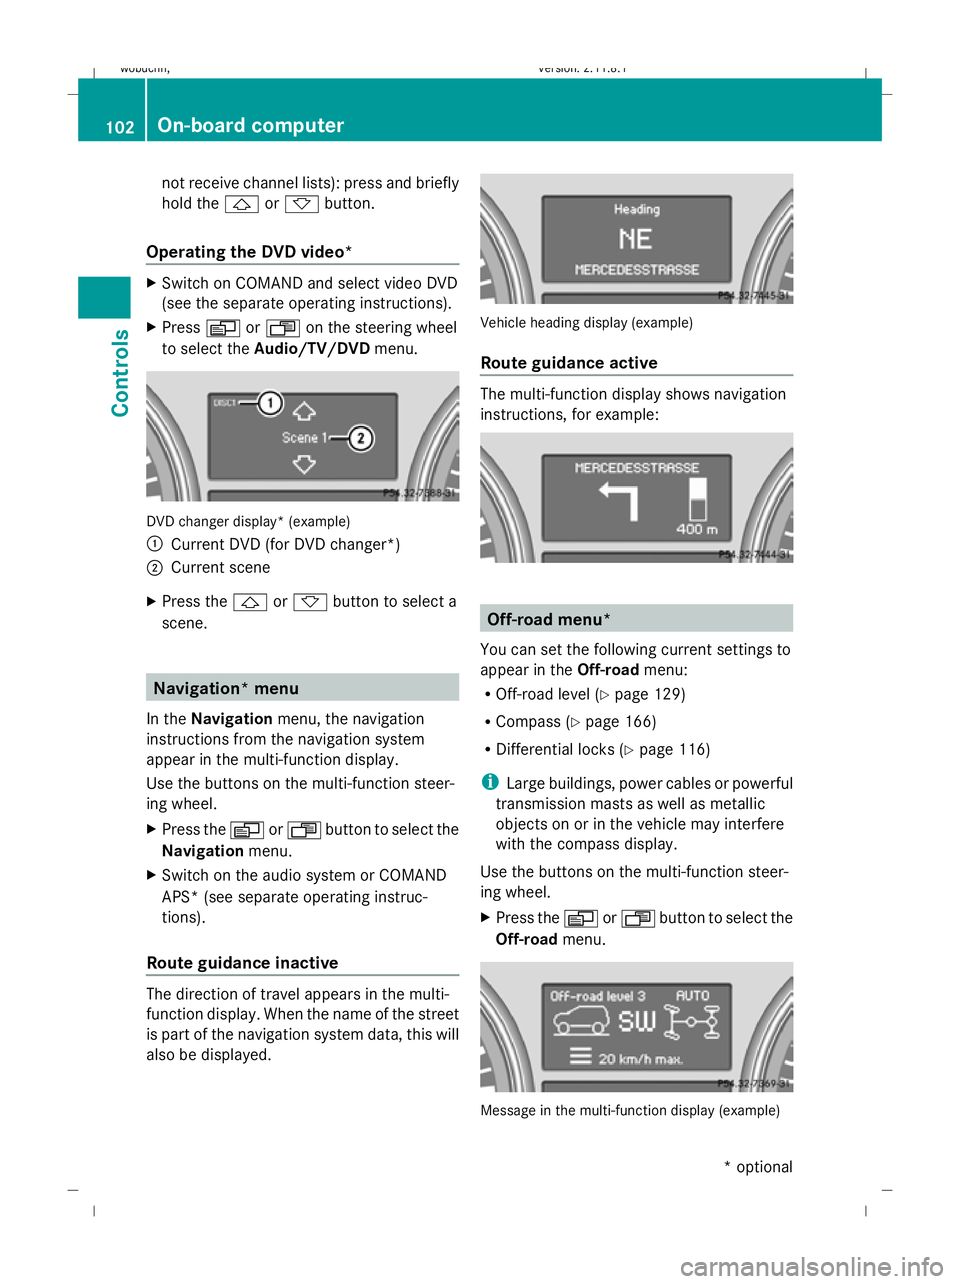
to select the Audio/TV/DVD menu. DVD changer display* (example)
:
Current DVD (for DVD changer*)
; Current scene
X Press the &or* button to select a
scene. Navigation* menu
In the Navigation menu, the navigation
instructions from the navigation system
appear in the multi-function display.
Use the buttons on the multi-function steer-
ing wheel.
X Press the VorU button to select the
Navigation menu.
X Switch on the audio system or COMAND
APS* (see separate operating instruc-
tions).
Route guidance inactive The direction of travel appears in the multi-
function display. When the name of the street
is part of the navigation system data, this will
also be displayed. Vehicle heading display (example)
Route guidance active
The multi-function display shows navigation
instructions, for example:
Off-road menu*
You can set the following current settings to
appear in the Off-roadmenu:
R Off-road level (Y page 129)
R Compass (Y page 166)
R Differential locks (Y page 116)
i Large buildings, power cables or powerful
transmission masts as well as metallic
objects on or in the vehicle may interfere
with the compass display.
Use the buttons on the multi-function steer-
ing wheel.
X Press the VorU button to select the
Off-road menu. Message in the multi-function display (example)102
On-board computerControls
* optional
X164_AKB; 2; 3, en-GB
wobuchh
,V ersion: 2.11.8.1
2009-03-31T14:14:58+02:00 - Seite 102
Dateiname: 6515431202_buchblock.pdf; erzeugt am 01. Apr 2009 00:17:16; WK
Page 170 of 309
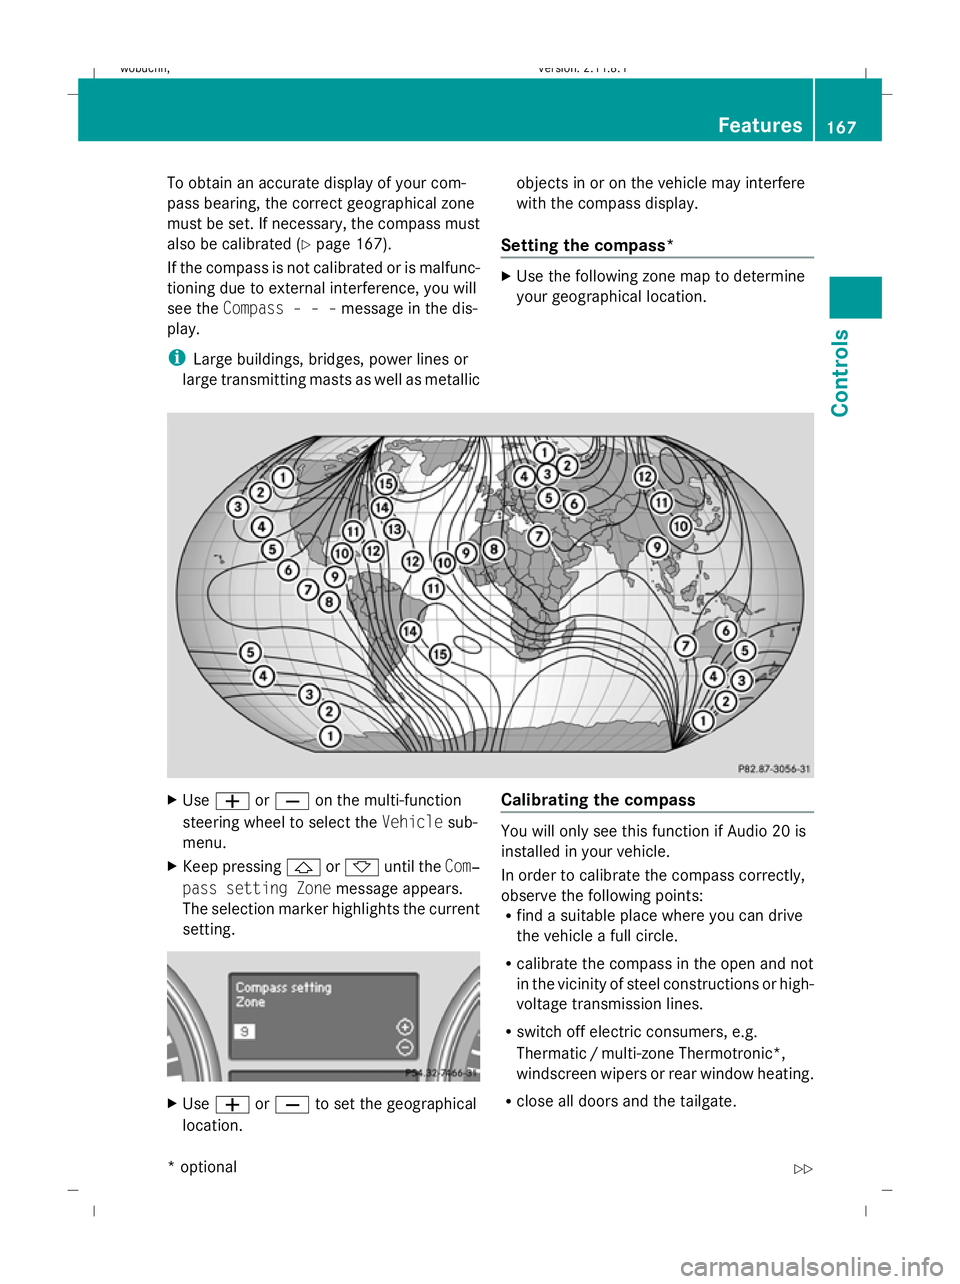
To obtain an accurate display of your com-
pass bearing, the correct geographical zone
must be set. If necessary, the compass must
also be calibrated (Y page 167).
If the compass is not calibrated or is malfunc-
tioning due to external interference, you will
see the Compass – – – message in the dis-
play.
i Large buildings, bridges, power lines or
large transmitting masts as well as metallic objects in or on the vehicle may interfere
with the compass display.
Setting the compass* X
Use the following zone map to determine
your geographical location. X
Use W orX on the multi-function
steering wheel to select the Vehiclesub-
menu.
X Keep pressing &or* until the Com‐
pass setting Zone message appears.
The selection marker highlights the current
setting. X
Use W orX to set the geographical
location. Calibrating the compass You will only see this function if Audio 20 is
installed in your vehicle.
In order to calibrate the compass correctly,
observe the following points:
R
find a suitable place where you can drive
the vehicle a full circle.
R calibrate the compass in the open and not
in the vicinity of steel constructions or high-
voltage transmission lines.
R switch off electric consumers, e.g.
Thermatic /multi-zone Thermotronic*,
windscreen wipers or rear window heating.
R close all doors and the tailgate. Features
167Controls
* optional
X164_AKB; 2; 3, en-GB
wobuchh,
Version: 2.11.8.1 2009-03-31T14:14:58+02:00 - Seite 167 Z
Dateiname: 6515431202_buchblock.pdf; erzeugt am 01. Apr 2009 00:17:43; WK
Page 189 of 309
mum permissible speed for the winter tyres
(Y page 128).
Once you have fitted the winter tyres:
X Check the tyre pressures (Y page 180).
X Restart the tyre pressure moni-
tor* (Y page 183). G
Risk of accident
If you fit the spare wheel* when driving with
winter tyres, bear in mind that driving stability
will be impaired owing to unstable cornering
characteristics caused by the different tyres.
You should therefore adapt your driving style
and drive carefully.
Have the spare wheel* replaced at the near-
est qualified specialist workshop which has
the necessary specialist knowledge and tools
to carry out the work required. Mercedes-
Benz recommends that you use a Mercedes-
Benz Service Centre for this purpose. In par-
ticular, work relevant to safety or on safety-
related systems must be carried out at a quali-
fied specialist workshop. Snow chains
For safety reasons, Mercedes-Benz recom-
mends that you only use snow chains which
have been specially approved for your vehicle
by Mercedes-Benz, or are of a corresponding
standard of quality.
! Do not drive in ADS SPORTmode when
driving with snow chains fitted.
If you intend to fit snow chains, please bear
the following points in mind:
R you may not attach snow chains to all
wheel-tyre combinations; see the "Tyres and wheels" section in the "Technical data"
chapter.
R snow chains must not be fitted to emer-
gency spare wheels, e.g. a "Minispare"
emergency spare wheel.
R Fit snow chains only in pairs and only to the
rear wheels. Comply with the manufactur-
er's installation instructions.
Do not exceed the maximum permissible
speed of 50 km/h.
i You may wish to deactivate ESP ®
when
pulling away with snow chains fitted
(Y page 51). This way, you can allow the
wheels to spin in a controlled manner, ach-
ieving an increased driving force (cutting
action). Winter driving
G
Risk of accident
Do not shift down for additional engine brak-
ing on a slippery road surface. This could
cause the drive wheels to lose their grip and
the vehicle could skid.
You should drive particularly carefully on slip-
pery road surfaces. Avoid sudden accelera-
tion, steering and braking manoeuvres.
If the vehicle threatens to skid or cannot be
stopped when moving at low speed:
X Shift the selector lever to N.
X Try to bring the vehicle under control by
using corrective steering. Driving tips
Rolling with the engine switched off
G
Risk of accident
Never switch the engine off while the vehicle
is in motion.
There is no power assistance for the steering
and the service brake when the engine is not
running. 186
Driving tipsOperation
* optional
X164_AKB; 2; 3, en-GB
wobuchh,
Version: 2.11.8.1 2009-03-31T14:14:58+02:00 - Seite 186
Dateiname: 6515431202_buchblock.pdf; erzeugt am 01. Apr 2009 00:17:48; WK
Page 200 of 309
You will find the values approved by the man-
ufacturer on the vehicle identification plates
and those for the towing vehicle in the "Tech-
nical data" section.
You will find installation dimensions and loads
in the "Technical data" section
(Y page 297).
The maximum drawbar load of the trailer
drawbar on the ball coupling is 140 kg. How-
ever, the actual noseweight must not exceed
the value given on the trailer coupling or
trailer identification plates. The lowest weight
applies.
! Use a noseweight as close as possible to
the maximum permissible noseweight. Do
not use a noseweight of less than 50 kg,
otherwise the trailer may come loose.
Bear in mind that the payload and the rear
axle load are reduced by the actual nose-
weight.
When towing a trailer, where possible set the
tyre pressures for the permissible gross
weight which you find in the table on the
inside of your vehicle's fuel filler flap (higher
values).
Driving tips i
Observe the notes on ESP ®
trailer stabi-
lisation (Y page 51).
In Germany, the maximum permissible speed
for vehicle/trailer combinations depends on
the type of trailer and is either 80 km/h or
100 km/h. Before beginning the journey,
check the trailer's documents to see what the
maximum permitted speed is. G
Risk of accident
Always observe the maximum speed permit-
ted in Germany for vehicle/trailer combina-
tions, even in countries where higher speeds
are permitted. This lowers the risk of an acci-
dent. When towing a trailer, your vehicle's handling
characteristics will be different in comparison
to when driving without a trailer.
The vehicle/trailer combination:
R is heavier
R is restricted in its acceleration and gradi-
ent-climbing capability
R has an increased braking distance
R is affected more by strong crosswinds
R demands more sensitive steering
R consumes more fuel
On long and steep downhill gradients, you
must select shift range 1,2or 3in good time.
i This also applies if you have activated
cruise control, Distronic* or Speedtronic.
This will use the braking effect of the engine,
so less braking will be required to maintain
the speed. This relieves the load on the brake
system and prevents the brakes from over-
heating and wearing too quickly. If you need
additional braking, depress the brake pedal
repeatedly rather than continuously. G
Risk of accident
Never depress the brake pedal continuously
while the vehicle is in motion, e.g. never cause
the brakes to rub by applying constant slight
pedal pressure. This causes the brake system
to overheat, increases the braking distance
and can lead to the brakes failing completely.
Driving tips
R Maintain a greater distance from the vehi-
cle in front than when driving without a
trailer.
R Avoid braking abruptly. If possible, brake
gently at first to allow the trailer to run on.
Then, increase the braking force rapidly.
R The values given for gradient-climbing
capabilities from a standstill refer to sea
level. When driving in mountainous areas,
note that the power output of the engine,
and consequently the vehicle's gradient- Trailer towing*
197Operation
* optional
X164_AKB; 2; 3, en-GB
wobuchh
,V ersion: 2.11.8.1
2009-03-31T14:14:58+02:00 - Seite 197 Z
Dateiname: 6515431202_buchblock.pdf; erzeugt am 01. Apr 2009 00:17:52; WK
Page 228 of 309
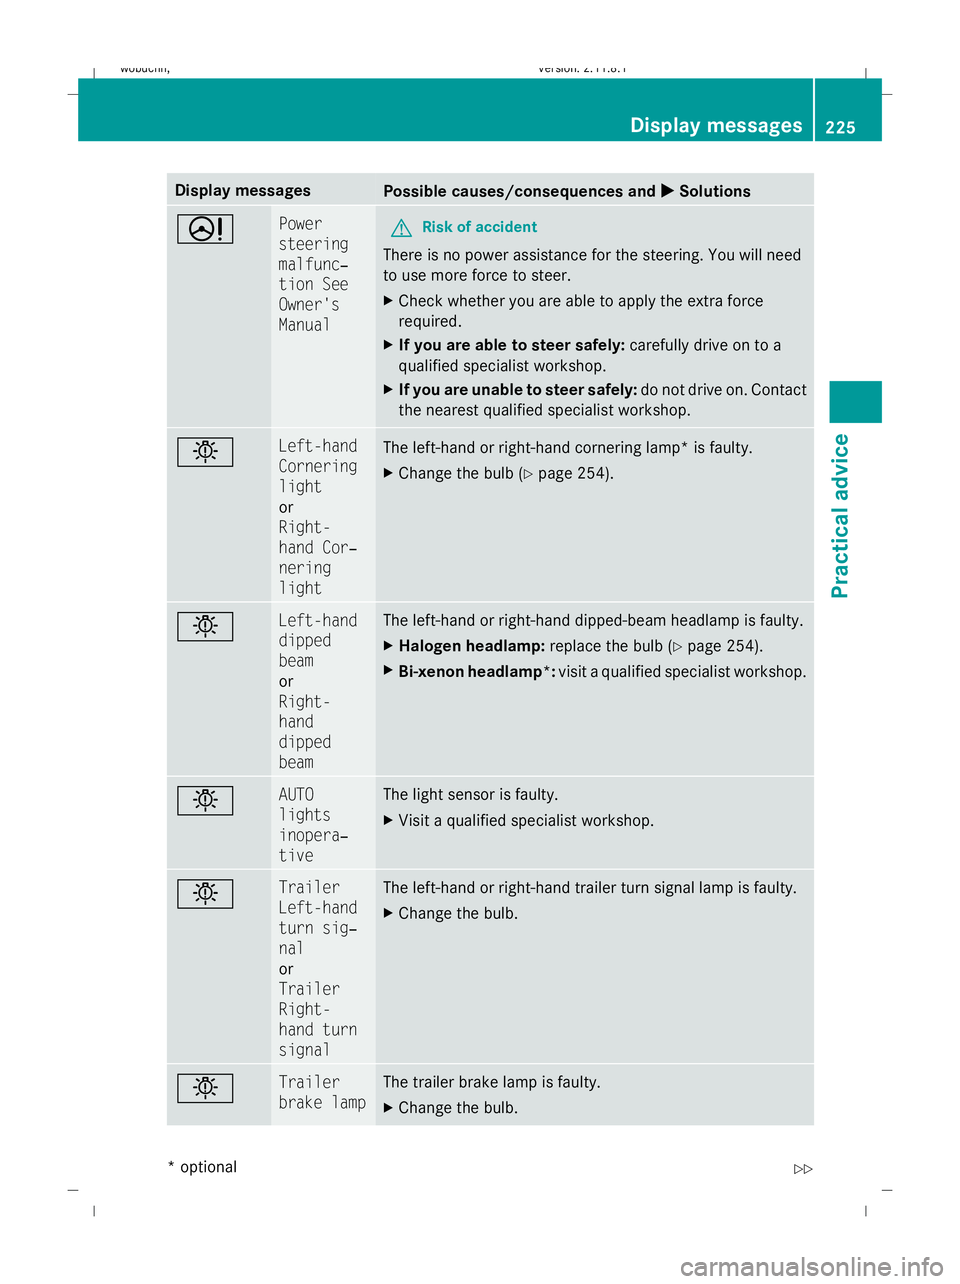
Display messages
Possible causes/consequences and
X
X Solutions D Power
steering
malfunc‐
tion See
Owner's
Manual
G
Risk of accident
There is no power assistance for the steering. You will need
to use more force to steer.
X Check whether you are able to apply the extra force
required.
X If you are able to steer safely: carefully drive on to a
qualified specialist workshop.
X If you are unable to steer safely: do not drive on. Contact
the nearest qualified specialist workshop. b Left-hand
Cornering
light
or
Right-
hand Cor‐
nering
light
The left-hand or right-hand cornering lamp* is faulty.
X
Change the bulb ( Ypage 254). b Left-hand
dipped
beam
or
Right-
hand
dipped
beam The left-hand or right-hand dipped-beam headlamp is faulty.
X
Halogen headlamp: replace the bulb (Ypage 254).
X Bi-xenon headlamp*: visit a qualified specialist workshop. b AUTO
lights
inopera‐
tive The light sensor is faulty.
X
Visit a qualified specialist workshop. b Trailer
Left-hand
turn sig‐
nal
or
Trailer
Right-
hand turn
signal The left-hand or right-hand trailer turn signal lamp is faulty.
X
Change the bulb. b Trailer
brake lamp The trailer brake lamp is faulty.
X
Change the bulb. Display
messages
225Practical advice
* optional
X164_AKB; 2; 3, en-GB
wobuchh
,V ersion: 2.11.8.1
2009-03-31T14:14:58+02:00 - Seite 225 Z
Dateiname: 6515431202_buchblock.pdf; erzeugt am 01. Apr 2009 00:18:00; WK
Page 280 of 309
X
Shift the transmission to position P.
X Switch off all electrical consumers (e.g.
radio, blower, etc.).
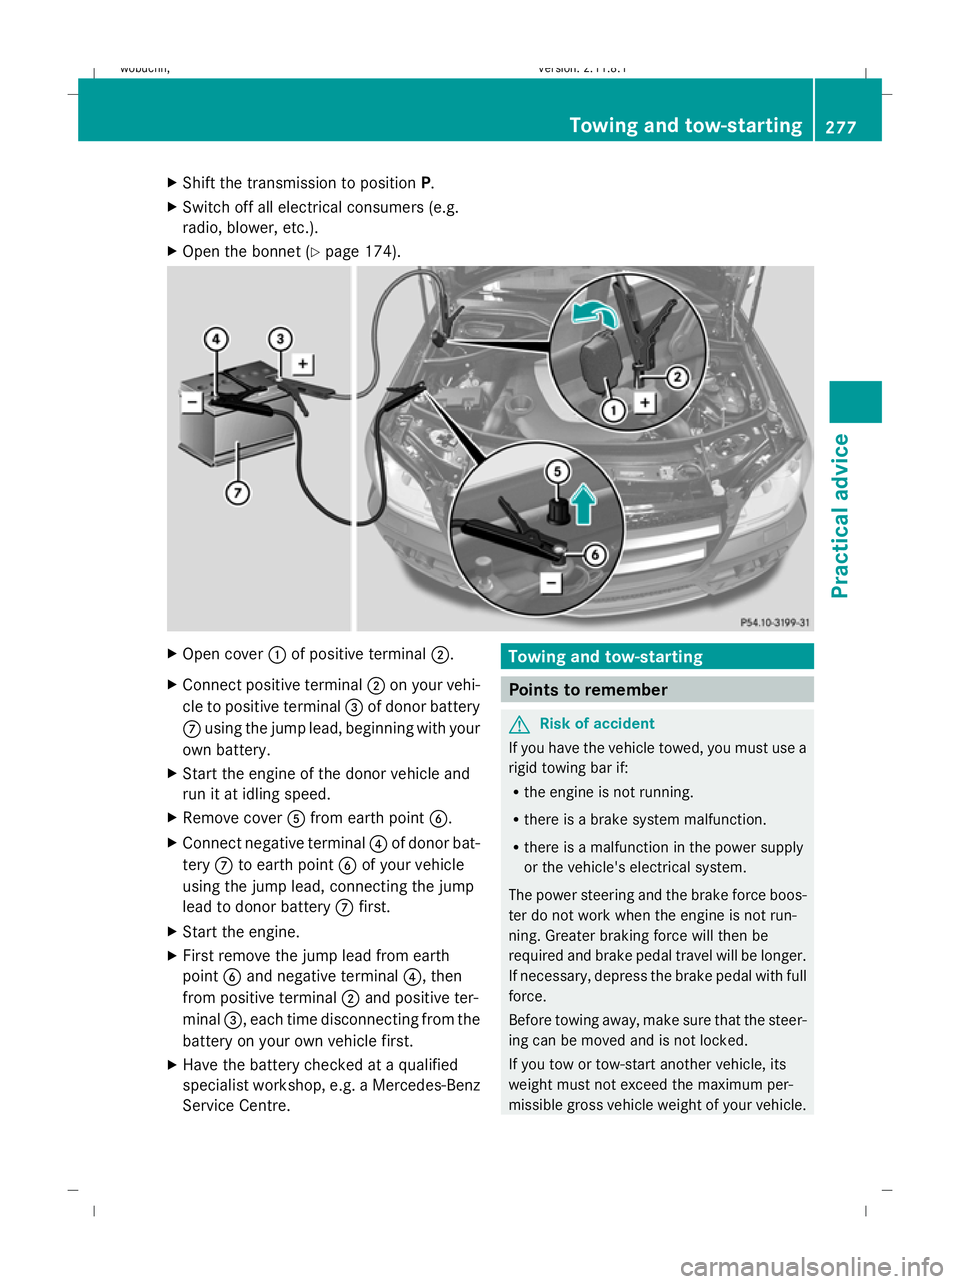
X Open the bonnet (Y page 174). X
Open cover :of positive terminal ;.
X Connect positive terminal ;on your vehi-
cle to positive terminal =of donor battery
C using the jump lead, beginning with your
own battery.
X Start the engine of the donor vehicle and
run it at idling speed.
X Remove cover Afrom earth point B.
X Connect negative terminal ?of donor bat-
tery Cto earth point Bof your vehicle
using the jump lead, connecting the jump
lead to donor battery Cfirst.
X Start the engine.
X First remove the jump lead from earth
point Band negative terminal ?, then
from positive terminal ;and positive ter-
minal =, each time disconnecting from the
battery on your own vehicle first.
X Have the battery checked at a qualified
specialist workshop, e.g. a Mercedes-Benz
Service Centre. Towing and tow-starting
Points to remember
G
Risk of accident
If you have the vehicle towed, you must use a
rigid towing bar if:
R the engine is not running.
R there is a brake system malfunction.
R there is a malfunction in the power supply
or the vehicle's electrical system.
The power steering and the brake force boos-
ter do not work when the engine is not run-
ning. Greater braking force will then be
required and brake pedal travel will be longer.
If necessary, depress the brake pedal with full
force.
Before towing away, make sure that the steer-
ing can be moved and is not locked.
If you tow or tow-start another vehicle, its
weight must not exceed the maximum per-
missible gross vehicle weight of your vehicle. Towing and tow-starting
277Practical advice
X164_AKB; 2; 3, en-GB
wobuchh, Version: 2.11.8.1 2009-03-31T14:14:58+02:00 - Seite 277 Z
Dateiname: 6515431202_buchblock.pdf; erzeugt am 01. Apr 2009 00:18:19; WK