AUX MERCEDES-BENZ GL SUV 2012 User Guide
[x] Cancel search | Manufacturer: MERCEDES-BENZ, Model Year: 2012, Model line: GL SUV, Model: MERCEDES-BENZ GL SUV 2012Pages: 441, PDF Size: 10.66 MB
Page 156 of 441
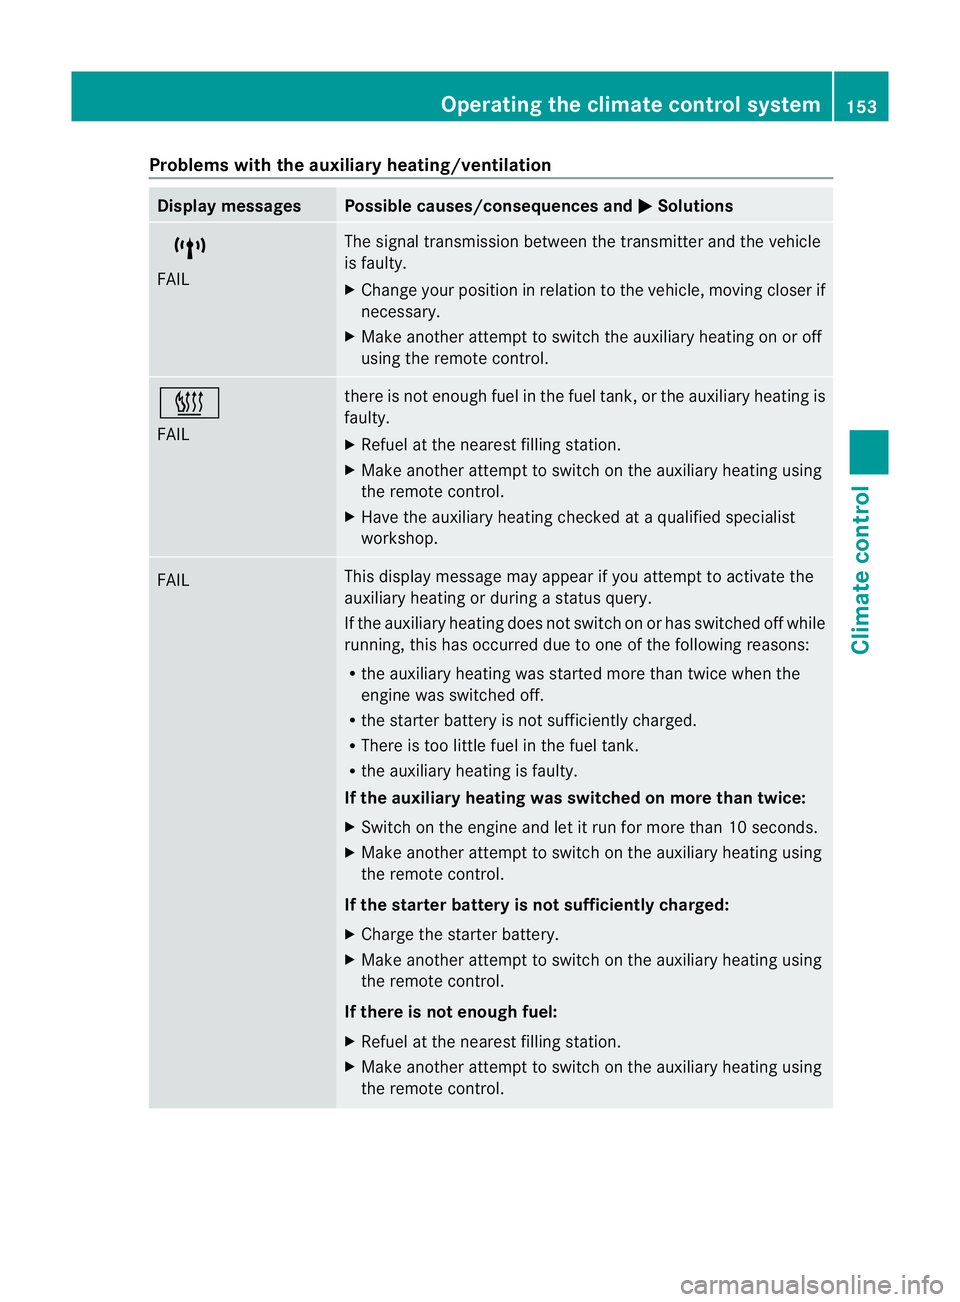
Problems wit
hthe auxiliary heating/ventilation Display messages Possible causes/consequences and
M Solutions
$
FAIL Th
es ignal transmission between the transmitter and the vehicle
is faulty.
X Change your position in relation to the vehicle, movin gcloser if
necessary.
X Make another attempt to switch the auxiliary heating on or off
using the remote control. ©
FAIL there is not enough fuel in the fuel tank
,orthe auxiliary heating is
faulty.
X Refuel at the nearest filling station.
X Make another attemp ttos witch on the auxiliary heating using
the remote control.
X Have the auxiliary heating checked at aqualified specialist
workshop. FAIL This display messag
emay appear if you attempt to activate the
auxiliary heating or during astatus query.
If the auxiliary heating doe snot switc honorh as switched off while
running, this has occurred due to one of the following reasons:
R the auxiliary heating was started more than twice when the
engine was switched off.
R the starter battery is not sufficiently charged.
R There is too little fuel in the fuel tank.
R the auxiliary heating is faulty.
If the auxiliary heating was switched on more than twice:
X Switch on the engine and let it run for more than 10 seconds.
X Make another attempt to switch on the auxiliary heating using
the remote control.
If the starter battery is not sufficiently charged:
X Charge the starter battery.
X Make another attempt to switch on the auxiliary heating using
the remote control.
If there is not enough fuel:
X Refuel at the nearest filling station.
X Make another attempt to switch on the auxiliary heating using
the remote control. Operating the climate control system
153Climate control Z
Page 157 of 441
Displa
ymessages Possible causes/consequences and
M Solutions
If th
eauxiliar yheating is faulty:
X Hav ethe auxil iaryh eatin gchecked at aqualified specialist
workshop. Adjusting th
eair vents Important safet
ynotes G
WARNING
Ver yhot or ver ycold ai rcan flo wfromt he air
vents. This coul dcause burns or frostbite to
bare skin in the immediate vicinity of the
vents. Keep bare skin away from these air
outlets. If necessary, direct the airflow away
to ad ifferent area of the vehicle interior.
In order to ensure the direct flow of fresh air
through the air vent sinto the vehicl einterior,
please observe the following notes:
R keep the air inlet grill eonthe bonnet and
in the engin ecompartmen tonthe front-
passenger side free of blockages, such as
ice, snow or leaves.
R never cover the ven tsor ven tilation grilles
in the vehicle interior.
i For virtually draught-free ventilation,
adjust the sliders of the air vent stothe
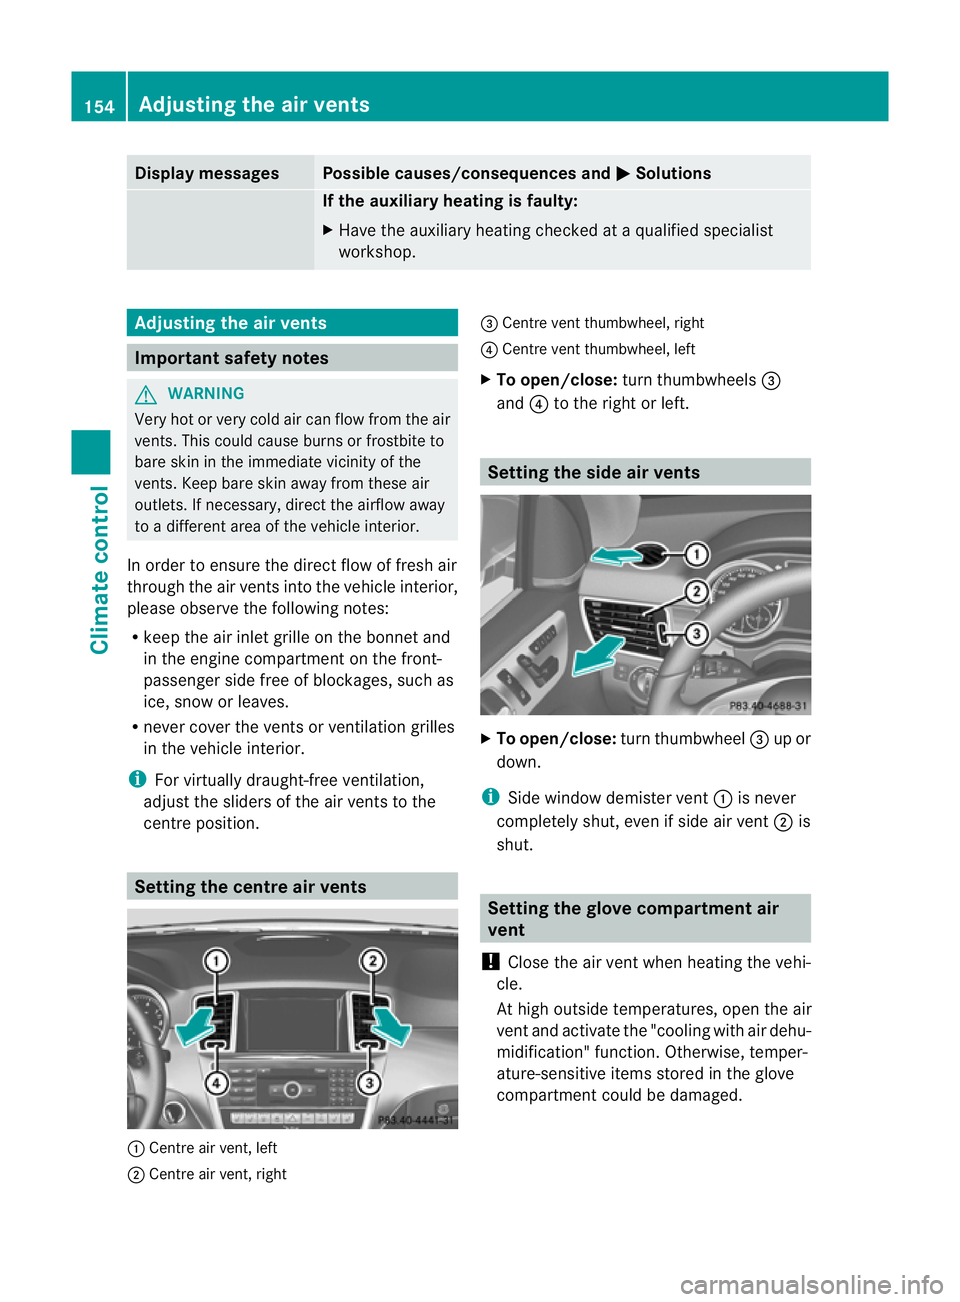
cen treposition. Setting the centre air vents
:
Centre air vent, left
; Centre air vent, right =
Centre ven tthumbwheel, right
? Centre ven tthumbwheel, left
X To open/close: turnthumbwheels =
and ?to the right or left. Setting th
eside air vents X
To open/close: turnthumbwheel =up or
down.
i Side window demister vent :is never
completely shut, even if side air vent ;is
shut. Setting th
eglove compartment air
vent
! Close the air vent when heating the vehi-
cle.
At high outside temperatures, open the air
vent and activate the "cooling with air dehu-
midification" function. Otherwise, temper-
ature-sensitiv eitems stored in the glove
compartmen tcould be damaged. 154
Adjusting th
eair ventsClimat econtrol
Page 177 of 441
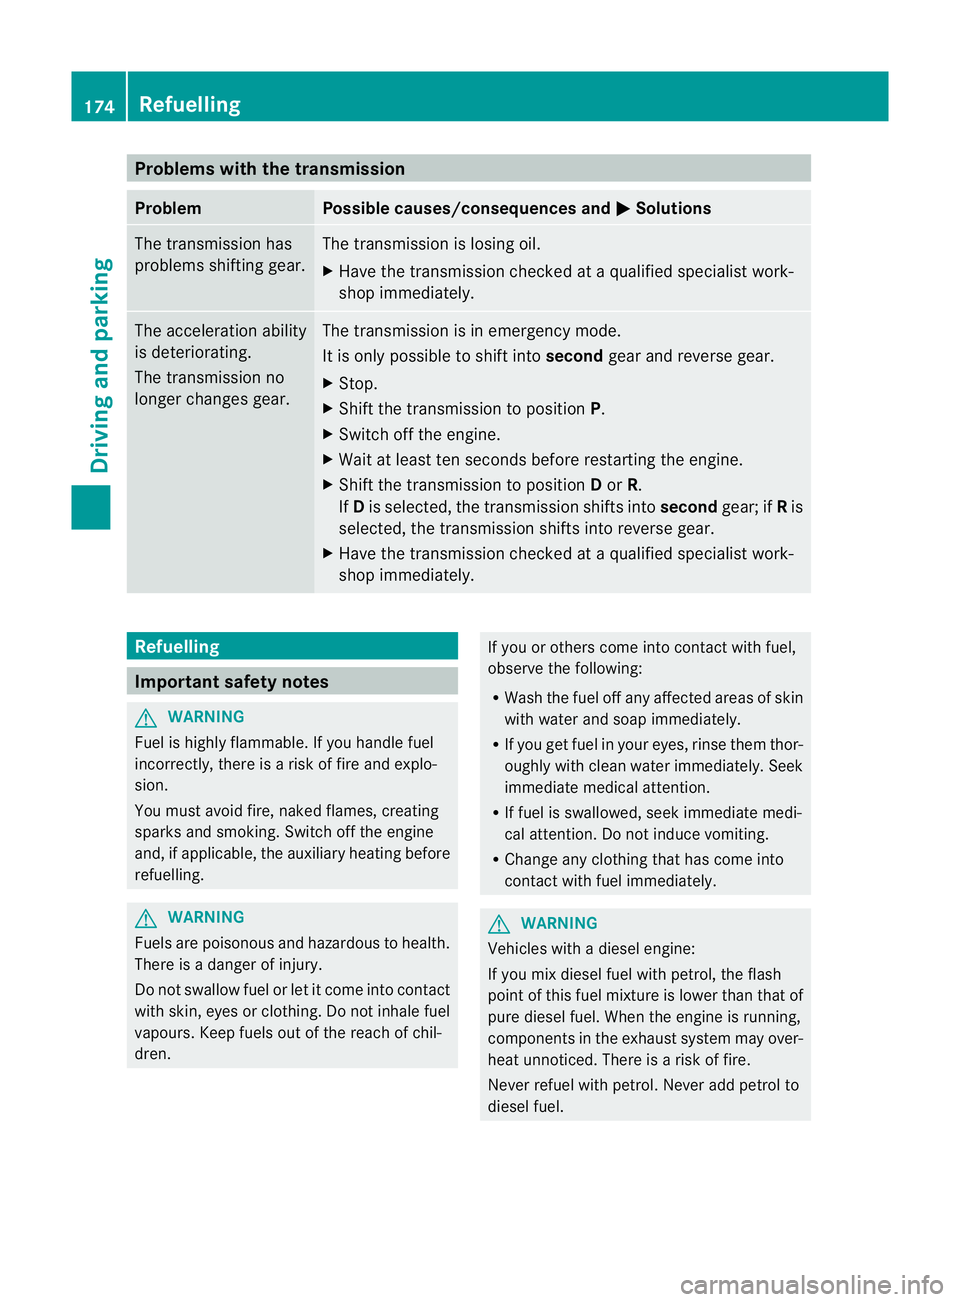
Problems wit
hthe transmission Problem Possible causes/consequences and
M Solutions
Th
et rans mission has
problem sshifting gear. The transmission is losing oil.
X
Hav ethe transmission chec kedataq ualified specialist work-
sho pimmediately. Th
ea cceleratio nability
is deteriorating.
The transmission no
longer changes gear. The transmission is in emergency mode.
It is only possible to shift into
secondgear and reverse gear.
X Stop.
X Shift the transmission to position P.
X Switch off the engine.
X Wait at least ten seconds befor erestar tingthe engine.
X Shift the transmission to position Dor R.
If D is selected, the transmission shifts into secondgear; ifRis
selected, the transmission shifts into reverse gear.
X Have the transmission checked at aqualified specialist work-
sho pimmediately. Refuelling
Important safety notes
G
WARNING
Fue lish ighly flammable. If you handle fuel
incorrectly, there is arisk of fire and explo-
sion.
You must avoid fire, naked flames, creating
sparks and smoking. Switch off the engine
and, if applicable, the auxiliary heating before
refuelling. G
WARNING
Fuels are poisonous and hazardous to health.
There is adanger of injury.
Do not swallow fuel or let it come into contact
with skin, eyes or clothing. Do not inhale fuel
vapours. Keep fuels out of the reach of chil-
dren. If you or others come into contact with fuel,
observe the following:
R Wash the fuel off any affected areas of skin
with water and soap immediately.
R If you get fuel in your eyes, rinse them thor-
oughly with clean water immediately. Seek
immediate medical attention.
R If fuel is swallowed, seek immediate medi-
cal attention. Do not induce vomiting.
R Change any clothing that has come into
contact with fuel immediately. G
WARNING
Vehicles with adiesel engine:
If you mix diesel fuel with petrol, the flash
point of this fuel mixture is lower than that of
pure diesel fuel. When the engine is running,
components in the exhaust system may over-
heat unnoticed. There is arisk of fire.
Never refuel with petrol. Never add petrol to
diesel fuel. 174
RefuellingDriving and parking
Page 190 of 441
vehicle's el
ectronics and interior equip-
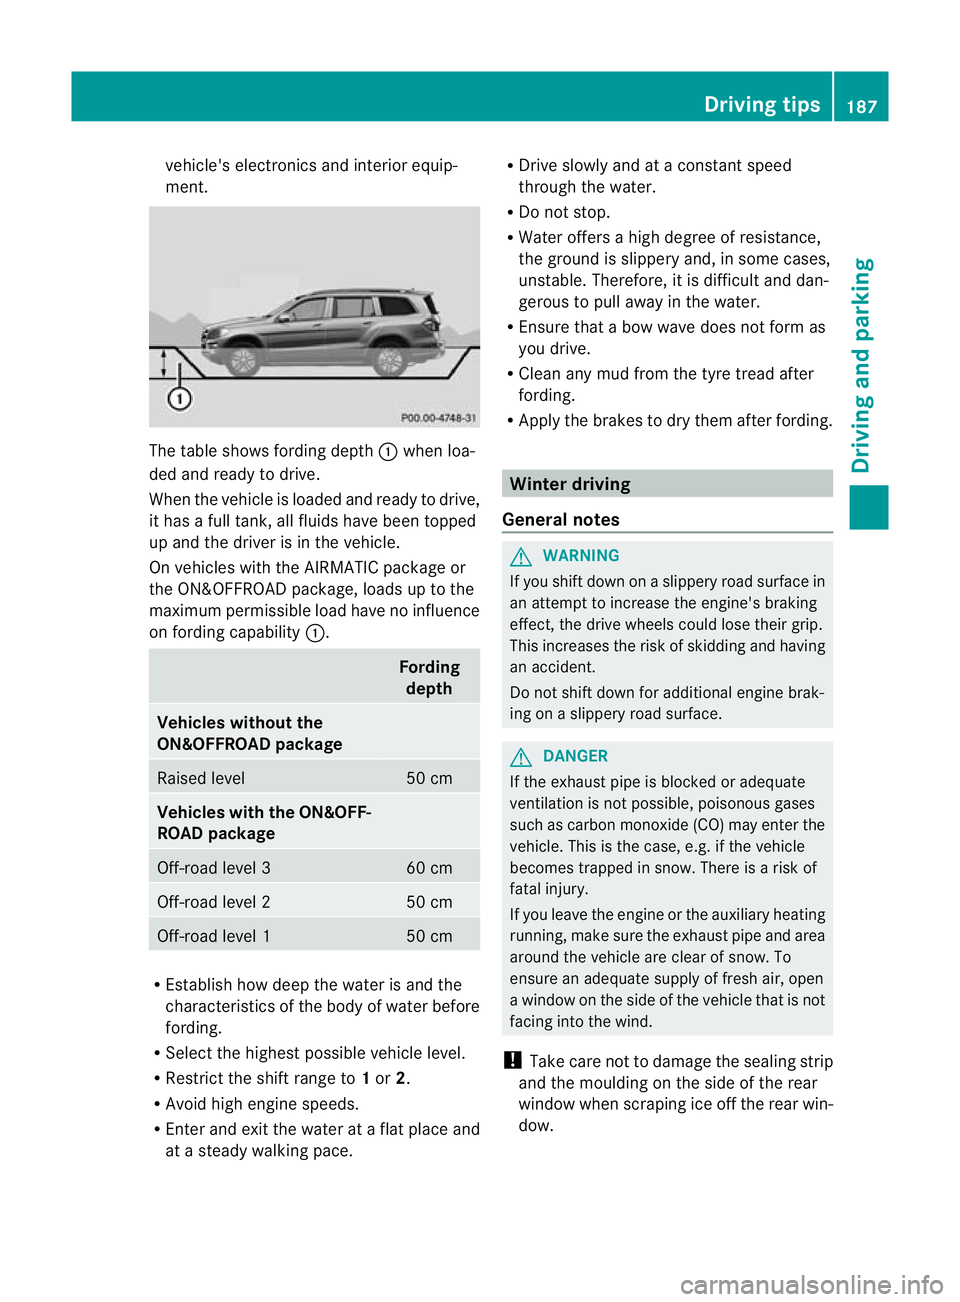
ment. The table sho
wsfording depth :when lo a-
de da nd read ytodrive.
When th evehicle is loaded and ready to driv e,
it has afull tank, all fluids have been topped
up and the driver is in the vehicle.
On vehicles with the AIRMATIC packag eor
the ON&OFFROAD package ,loads up to the
maximum permissible load have no influence
on fording capability :. Fording
depth Vehicles without the
ON&OFFROAD package
Raised level 50 cm
Vehicles with th
eON&OFF-
ROAD package Off-road level 3 60 cm
Off-road level 2 50 cm
Off-road level 1 50 cm
R
Establish how dee pthe water is and the
characteristic softhe body of water before
fording.
R Select the highest possible vehicle level.
R Restrict the shift range to 1or 2.
R Avoid high engin espeeds.
R Enter and exit the water at aflat place and
at as teady walking pace. R
Drive slowly and at aconstant speed
through the water.
R Do not stop.
R Water offers ahigh degree of resistance,
the ground is slippery and, in some cases,
unstable. Therefore, it is difficult and dan-
gerous to pull away in the water.
R Ensure that abow wav edoes not for mas
you drive.
R Clea nany mud from the tyre tread after
fording.
R Appl ythe brakes to dry them after fording. Winter driving
Genera lnotes G
WARNING
If you shift down on aslippery road surfac ein
an attempt to increase the engine's braking
effect, the drive wheels could lose their grip.
This increases the risk of skidding and having
an accident.
Do not shift down for additional engine brak-
ing on aslippery road surface. G
DANGER
If the exhaust pipe is blocked or adequate
ventilation is not possible ,poisonous gases
such as carbon monoxide (CO) may enter the
vehicle. This is the case, e.g. if the vehicle
becomes trapped in snow. There is arisk of
fatal injury.
If you leave the engine or the auxiliary heating
running, make sure the exhaust pipe and area
around the vehicle are clear of snow. To
ensure an adequate supply of fresh air, open
aw indow on the side of the vehicle that is not
facin ginto the wind.
! Take care not to damage the sealing strip
and the mould ingont he side of the rear
window when scrapin gice off the rear win-
dow. Driving tips
187Driving and parking Z
Page 277 of 441
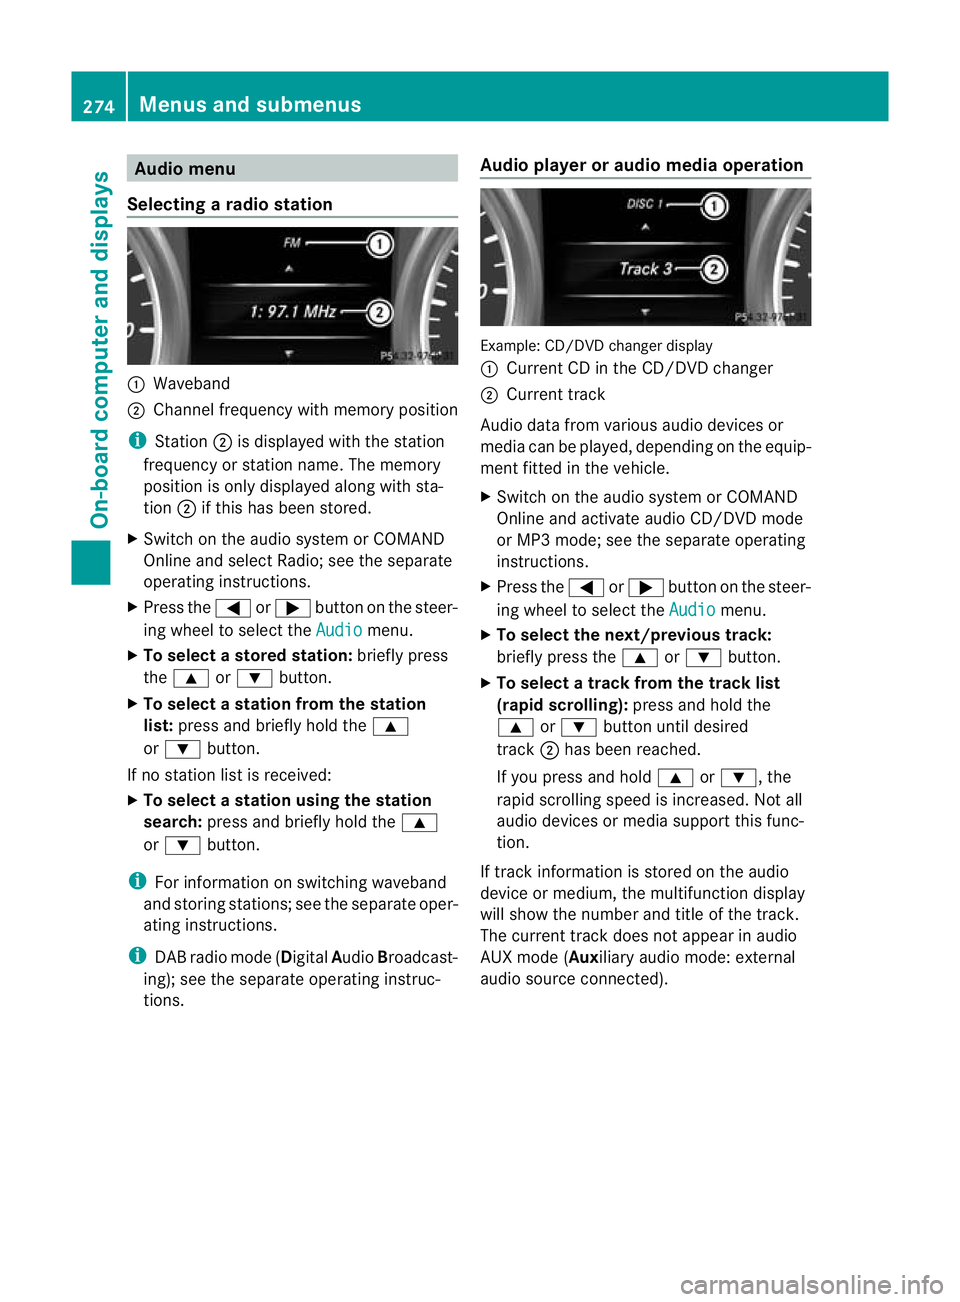
Audio menu
Selecting aradio station :
Waveb and
; Channel frequency with memory position
i Station ;is displaye dwitht he station
frequency or station name. The memory
position is only displayed along with sta-
tion ;if this has been stor ed.
X Switch on the audi osystem or COM AND
Online and select Radio; see the separate
operating instructions.
X Pres sthe = or; button on the steer-
ing wheel to selec tthe Audio menu.
X To select astore dstation: brieflypress
the 9 or: button.
X To select astation from the station
list: press and briefl yholdt he 9
or : button.
If no station lis tisr eceived:
X To select astatio nusing th estation
search: press and briefl yholdt he 9
or : button.
i For inf ormatio nons witching waveband
and storin gstations ;see th eseparate oper-
atin ginstructions.
i DABradio mode ( DigitalAudioBroadcast-
ing); see the separat eoperatin ginstruc-
tions. Audio player or audio media operation Example: CD/DV
Dchange rdisplay
: Curren tCDint he CD/DV Dchanger
; Curren ttrack
Audi odata from various audio devices or
media can be played, depending on the equip-
men tfitted in the vehicle.
X Switch on the audio system or COMAND
Onlin eand activate audi oCD/DVD mode
or MP3 mode; see the separate operating
instructions.
X Press the =or; button on the steer-
ing whee ltos elect the Audio menu.
X To select th enext/previous track:
briefly press the 9or: button.
X To select atrack from the track list
(rapid scroll ing): press and hold the
9 or: button until desired
track ;has been reached.
If you press and hold 9or:,t he
rapid scrollin gspeed is increased. Not all
audio devices or media support this func-
tion.
If track information is stored on the audio
devic eorm edium,the multifunction display
will show the number and title of the track.
The curren ttrack does not appe ar inaudio
AU Xm ode( Aux iliary audio mode: exter nal
audio source con nected). 274
Menu
sand submenusOn-boar dcomputer and displays
Page 282 of 441
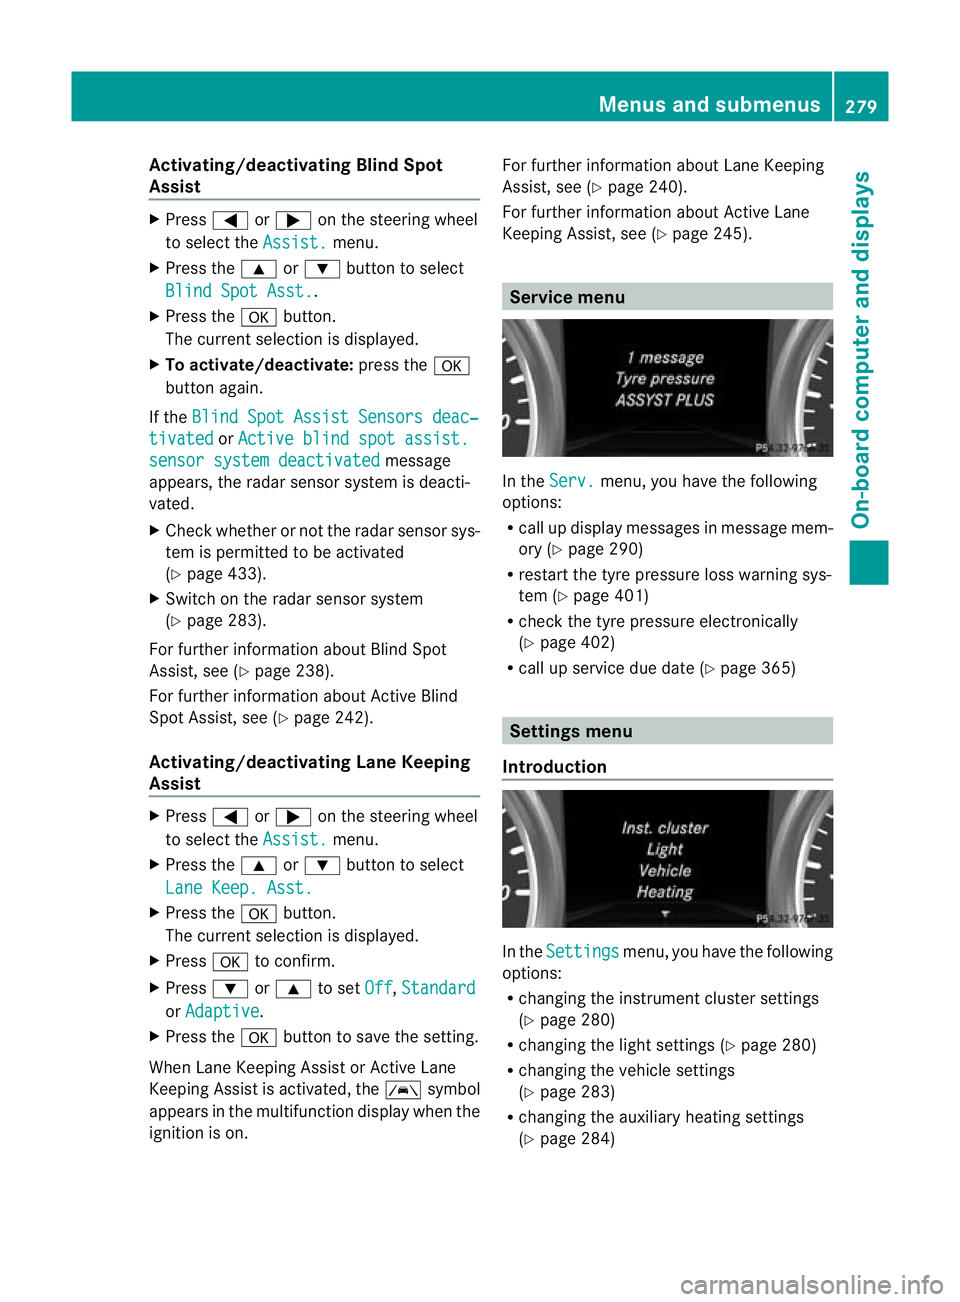
Activating/deactivating Blind Spot
Assist X
Press =or; on thesteering wheel
to select the Assist. menu.
X Pres sthe 9 or: buttontos elect
Blin dSpot Asst. .
X Press the abutton.
Th ec urrent selection is displayed.
X To activate/deactivate: press thea
button again.
If the BlindSpot Assist Sensors deac‐ tivated or
Active blind spot assist. sensor system deactivated message
appears ,the radar sensor system is deacti-
vated.
X Chec kwhether or not the radar sensor sys-
tem is permitted to be activated
(Y page 433).
X Switc hont he radar sensor system
(Y page 283).
For further information about Blind Spot
Assist ,see (Y page 238).
For further information about Active Blind
Spot Assist ,see (Y page 242).
Activating/deactivating Lane Keeping
Assist X
Press =or; on the steerin gwheel
to selec tthe Assist. menu.
X Press the 9or: button to select
Lane Keep .Asst. X
Press the abutton.
Th ec urrent selection is displayed.
X Press ato confirm.
X Press :or9 to set Off ,
Standard or
Adaptive .
X Press the abutton to save the setting.
When Lane Keeping Assis torActive Lane
Keeping Assist is activated, the Ãsymbol
appears in the multifunction displa ywhen the
ignition is on. For further information about Lane Keeping
Assist
,see (Y page 240).
For further information about Active Lane
Keepin gAssist ,see (Y page 245). Service menu
In the
Serv. menu, you have the following
options:
R call up display messages in message mem-
ory (Y page 290)
R restart the tyr epressure loss warning sys-
tem (Y page 401)
R check th etyre pressure electronically
(Y page 402)
R call up service due date (Y page 365) Settings menu
Introduction In the
Settings menu, you have the following
options:
R changing the instrument cluster settings
(Y page 280)
R changing the ligh tsettings (Y page 280)
R changing the vehicle settings
(Y page 283)
R changing the auxiliary heatin gsettings
(Y page 284) Menu
sand submenus
279On-board computer and displays Z
Page 287 of 441
When you are close to radi
otelescope facili-
ties, the rada rsensor system will be deacti-
vated automatically.
The following system sare switche doff when
th er adar senso rsystem is deactivated:
R DISTRONIC PLUS (Y page 198)
R BAS PLUS (Y page 62)
R PRE-SAFE ®
Brak e(Ypage 68)
R Blin dSpot Assist (Y page 238)
R Active Blin dSpot Assist (Y page 242)
Heating submenu Auxiliary heating dep
arture time G
WARNING
Exhaus tfumes are produced when the auxili-
ary heating is in operation. Inhaling the se
exhaus tfumes can be poisonous. You should
therefor eswitch off th eauxiliar yheating in
confine dspaces without an extraction sys-
tem, e.g .agarage. G
WARNING
When operating the auxiliary heating parts of
the vehicle can get very hot. Make sure that
the exhaust system does not under any cir-
cumstances come into contact with easily
ignitable material such as dry grass or fuels.
The material could otherwise ignite and set
the vehicle alight. Choos eyour parkin gspot
accordingly.
Operating the auxiliary heating is thus pro-
hibited at fillin gstations or when your vehicle
is being refuelled .You must therefor eswitch
off the auxiliary heating at filling stations.
! Operating the auxiliary heating/ventila-
tion draws on the vehicle battery. After you
have heated or ventilated the vehicle a
maximum of two times, drive for alonger
distance.
This func tion is only available on vehicles with
auxiliary heatin g(Ypage 148). In the
Heating submenu, you can select a
stored departure tim eorchange adeparture
time.
The auxiliary heatin gtimer func tion calcu-
lates the switch-on tim eaccording to the out-
sid etemperatur esothat the vehicle is pre-
heate dbyt he departur etime. When the
departur etime is reached, the auxiliary heat-
ing continues to heat for afurther five
minutes and then switches off. The auxiliary
heating adopts the THERMATI Cor
THERMOTRONI Ctemperature setting.
You can switc hoff th eauxiliary heating by
using the remot econtrol or the auxiliar yheat-
ing button on the centre console.
i Swit chthe auxiliary heating on regularly
once amonthfor about ten minutes.
Selecting th edepartur etime or deactivat-
ing aselected depa rtur et ime
X Press the =or; button on the steer-
ing wheel to select the Settings menu.
X Press the :or9 button to select the
Heating submenu.
X Press ato confirm.
You will see the selected setting.
X Press ato confirm.
X Press the :or9 button to select
one of the three departur etimes or Timer off (no timer active).
X Press ato confirm.
If ad eparture tim eisselected, the yellow
indicator lam plights up on the auxiliary
heating button.
Changing the depa rtur et ime
X Press the =or; button on the steer-
ing wheel to select the Settings menu.
X Press the :or9 button to select the
Heating submenu.
X Press ato confirm.
You will see the selected setting.
X Press ato confirm. 284
Menus and submenusOn-board computer and displays
Page 288 of 441
X
Press the :or9 button to select A ,
B or
Change C .
X Press ato confirm.
You can now change the departur etime.
X Press the =or; button to select the
display to be changed: hours, minutes.
X Press the :or9 button to set the
selected display.
X Press the abutton to store the entry.
The yellow indicator lamp on the auxiliary
heating button lights up.
Convenience submenu Activating/deactivating the EASY-
ENTRY/EXIT feature
G
WARNING
The steerin gwheel moves when the EASY-
ENTRY/ EXIT feature is active. There is arisk
of occupant sbecoming trapped. Before acti-
vating the EASY-ENTRY/EXI Tfeature, make
sure that nobody can becom etrapped.
Do not leave children unsupervised in the
vehicle, eve nifthey ar esecured in achild
rest raint system. The children could open the
driver's door and thereby unintentionally acti-
vate the EASY-ENTRY/EXIT featur eand
become trapped.
X Pres sthe = or; button on the steer-
ing wheel to selec tthe Settings menu.
X Press the :or9 button to selec tthe
Convenie nce submenu.
X Press ato con firm.
X Press :or9 to select the Easy Entry/Ex
it function.
If the Easy Entry/Exit function is activa-
ted ,the vehicle steerin gwheel is displayed
in red in the multifunction display.
X Press the abutton to sav ethe setting.
Further information on the EASY- ENTRY/EXIT
feature (Y page 111). Switching the belt adjustment on/off
X
Press the =or; button on the steer-
ing whee ltoselect the Settings menu.
X Press the :or9 button to select the
Convenie nce submenu.
X Press ato con firm.
X Press the :or9 buttontos elect the
Belt adjustme nt function.
When the Belt adjustment function is
activated, th evehicle seat belt is displayed
in red in the multifunction display.
X Press the abutton to save the setting.
For further information on belt adjustment,
see (Y page 48).
Switching th eFold in mirrors when lock-
ing function on/off
This func tion is only available on vehicles with
Memor yFunction (Y page 115).
When you activat ethe Auto. fold-in mir‐
rors func
tion, the exterior mirror sare folded
in when th evehicle is locked. When you
unloc kthe vehicle and then open adoor, the
exterior mirror sfold out again.
X Press the =or; button on the steer-
ing wheel to select the Settings menu.
X Press the :or9 button to select the
Convenie nce submenu.
X Press ato con firm.
X Press :or9 to select the Auto. fold-in mirrors function.
If the Auto. fold-in mirrors function is
activated, th evehicle' sexterior mirror is
displaye dinred in the multifunction dis-
play.
X Press the abutton to save the setting. Menus and submenus
285On-board computera nd displays Z
Page 308 of 441
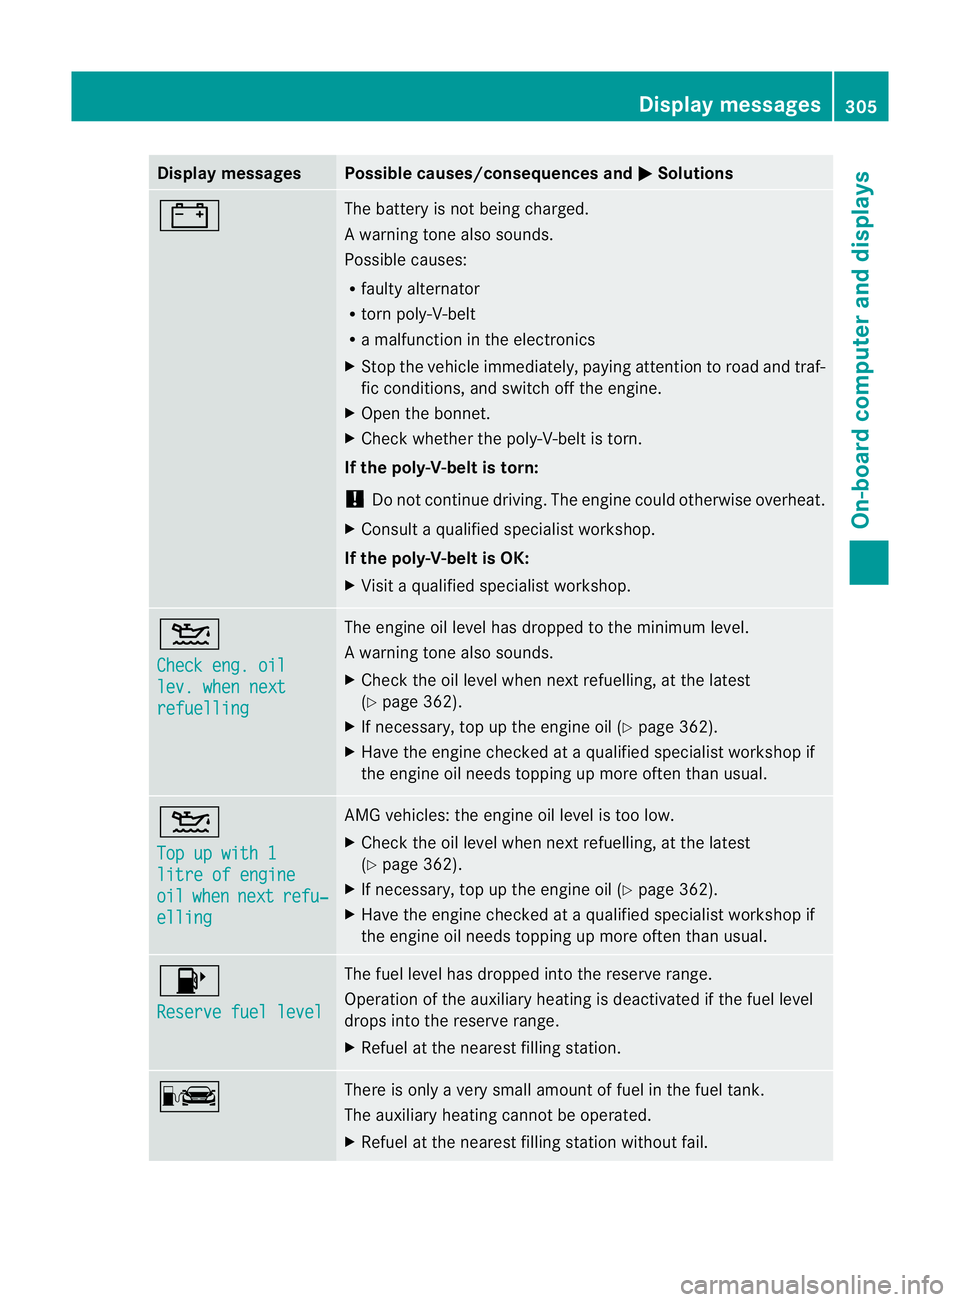
Displa
ymessages Possible causes/consequences and
M Solutions
# The battery is no
tbeing charged.
Aw arning ton ealso sounds.
Possible causes:
R fault yalternator
R torn poly-V-belt
R am alfunction in the elect ronics
X Stop the vehicle immediately, paying attention to road and traf-
fic conditions, and switch off the engine.
X Open the bonnet.
X Check whether the poly-V-belt is torn.
If the poly-V-belt is torn:
! Do not continue driving. The engine could otherwise overheat.
X Consult aqualified specialist workshop.
If the poly-V-belt is OK:
X Visit aqualified specialist workshop. 4
Chec
keng. oil lev. when next
refuelling Th
ee ngine oil level has dropped to the minimum level.
Aw arning ton ealso sounds.
X Chec kthe oil level when nex trefuelling, at the latest
(Y page 362).
X If necessary, top up the engine oil (Y page 362).
X Hav ethe engin echecked at aqualified specialist worksho pif
the engine oil needs topping up more often than usual. 4
Top up wit
h1 litre of engine
oil when next refu‐
elling AM
Gvehicles: the engine oil level is too low.
X Check the oil level when next refuelling, at the latest
(Y page 362).
X If necessary, top up the engine oil (Y page 362).
X Hav ethe engin echecked at aqualified specialist worksho pif
the engine oil needs topping up more often than usual. 8
Reserv
efuel level Th
ef uel level has dropped into the reserve range.
Operation of the auxiliary heating is deactivated if the fuel level
drops into the reserve range.
X Refuel at the nearest filling station. C There is only
avery small amount of fuel in the fuel tank.
The auxiliary heatin gcannot be operated.
X Refuel at the nearest filling station without fail. Display messages
305On-board computer and displays Z
Page 322 of 441
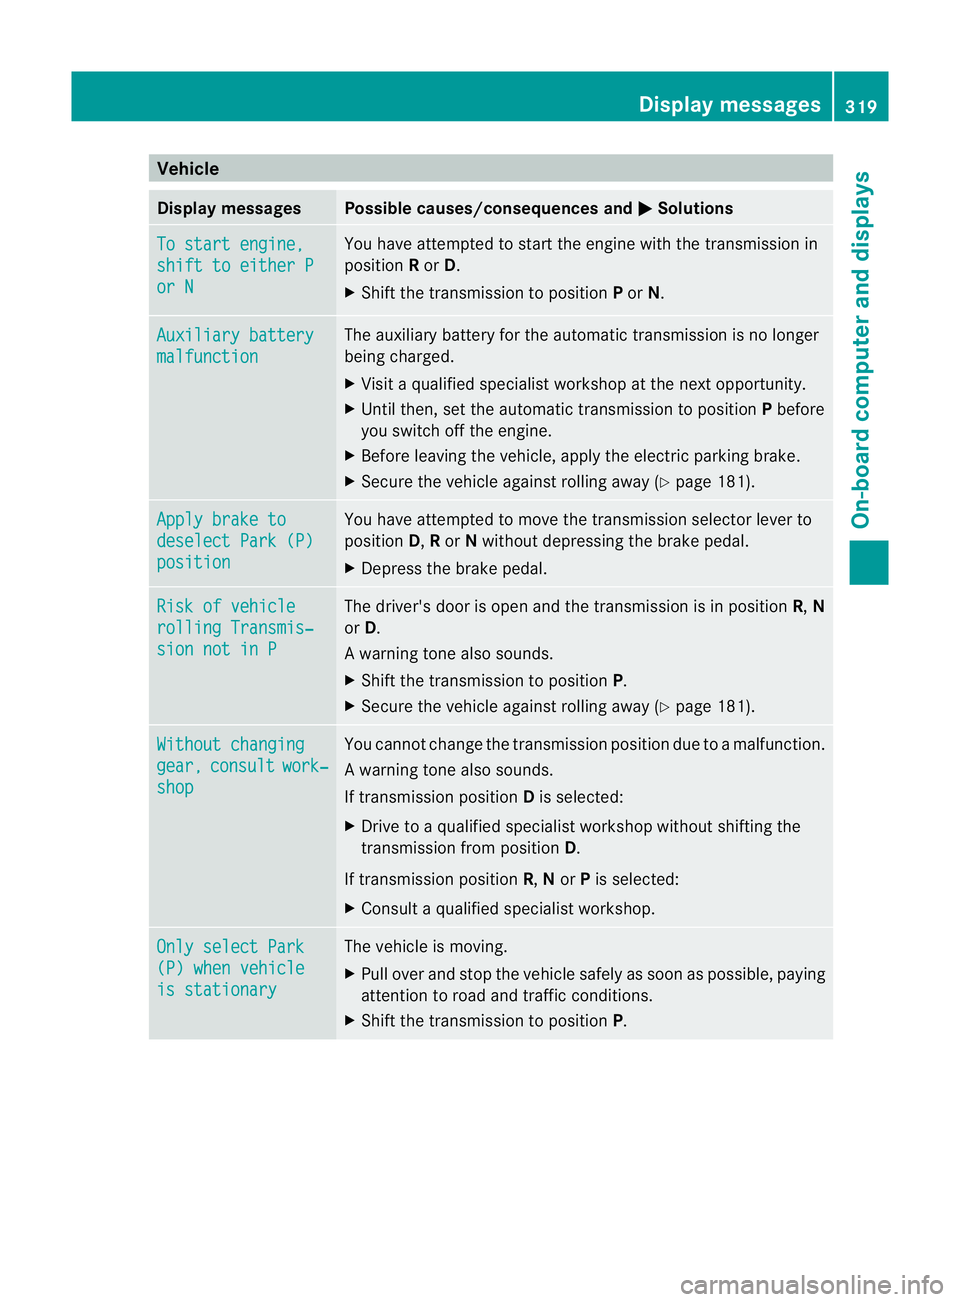
Vehicle
Display messages Possible caus
es/consequences and M Solutions
To start engine,
shift to either P
or N Yo
uh avea ttempte dtostart the engine with the transmission in
position Ror D.
X Shift the transmission to position Por N. Auxiliary battery
malfunction The auxiliary battery for the automatic transmission is no longer
being charged.
X Visit aqualified spec ialist worksho patthe nex toppor tunity.
X Until then, set the automatic transmission to position Pbefore
yo us witch off the engine.
X Before leaving the vehicle, appl ythe electr ic parking bra ke.
X Secure the vehicle agai nstrolling away ( Ypage 181). Ap
plyb rake to deselect Par
k(P) position Yo
uh ave attempted to mov ethe transmission selector lever to
position D,Ror Nwithout depressing the brake pedal.
X Depress the brake pedal. Risk of vehicle
rollin
gTransmis‐ sion not in P Th
ed river's door is open and th etransmission is in position R,N
or D.
Aw arning ton ealso sounds.
X Shift th etransmissio ntoposition P.
X Secur ethe vehicl eagainst rolling away ( Ypage 181). Wi
thoutc hanging gear, consult work‐
shop Yo
uc annot change the transmission position due to amalfunction.
Aw arning ton ealso sounds.
If transmission position Dis selected:
X Drive to aqualified specialist workshop without shiftin gthe
transmissio nfromp osition D.
If transmission position R,Nor Pis selected:
X Consult aqualified specialist workshop. On
ly select Park (P) whe
nvehicle is stationary Th
ev ehicle is moving.
X Pull ove rand sto pthe vehicle safel yassoonasp ossible, paying
attention to roa dand traffic conditions.
X Shift the transmissio ntoposition P. Display messages
319On-board computer and displays Z