child restraint MERCEDES-BENZ GL SUV 2012 User Guide
[x] Cancel search | Manufacturer: MERCEDES-BENZ, Model Year: 2012, Model line: GL SUV, Model: MERCEDES-BENZ GL SUV 2012Pages: 441, PDF Size: 10.66 MB
Page 58 of 441
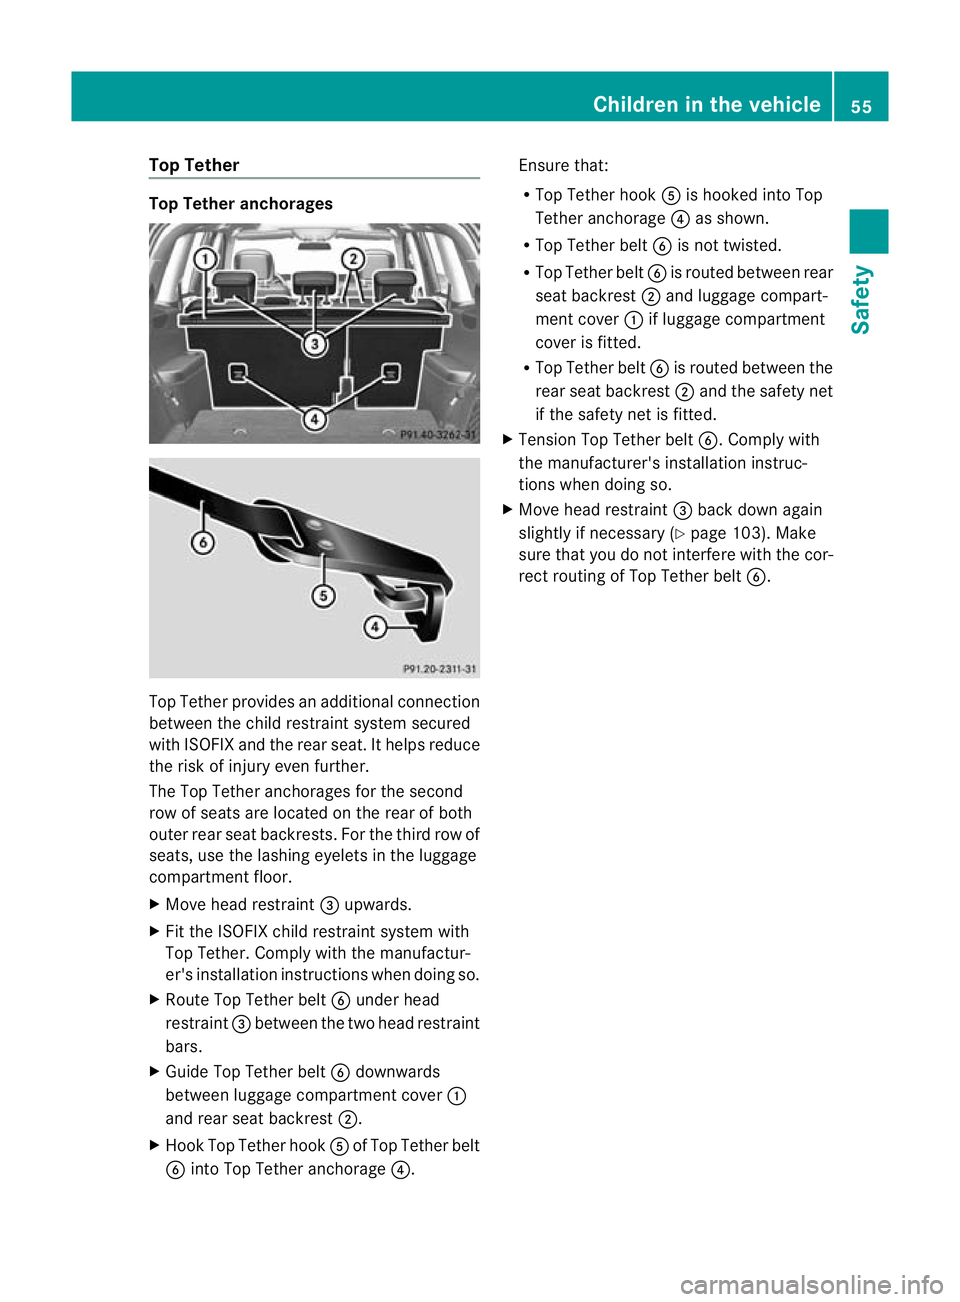
Top Tether
Top Tethe
ranchorages To
pT ethe rprovides an additional connecti on
between the child restraint system secured
with ISOFIX and the rear seat. It help sreduce
the risk of injury even further.
The Top Tether anchorages for the second
row of seats are located on the rear of both
outer rear seat back rests. For the thir drow of
seats, use the lashin geyelets in the luggage
compartment floor.
X Move head restraint =upwards.
X Fit the ISOFIX child restraint syste mwith
Top Tether .Compl ywith the manufactur-
er' sinstallatio ninstructions whe ndoing so.
X Rout eTop Tether belt Bunder head
rest raint = between the two head restraint
bars.
X Guide Top Tether belt Bdownwards
between luggage compar tment cover:
and rear seat backrest ;.
X Hook Top Tethe rhook Aof Top Tether belt
B intoT op Tether anchorage ?.Ensure that:
R
Top Tether hook Ais hooked int oTop
Tether anchorage ?as shown.
R Top Tether belt Bis not twisted.
R Top Tether belt Bis routed between rear
seat backrest ;and luggage compart-
men tcover :if luggage compartment
cover is fit ted.
R Top Tether belt Bis routed between the
rear seat backrest ;and the safety net
if the safety net is fit ted.
X Tension Top Tether belt B.Complywith
the manufacturer's installation instruc-
tions when doing so.
X Move head restraint =back down again
slightly if necessary (Y page 103). Make
sure that you do not interfere with the cor-
rect routing of Top Tether belt B. Children in the vehicle
55Safety Z
Page 59 of 441
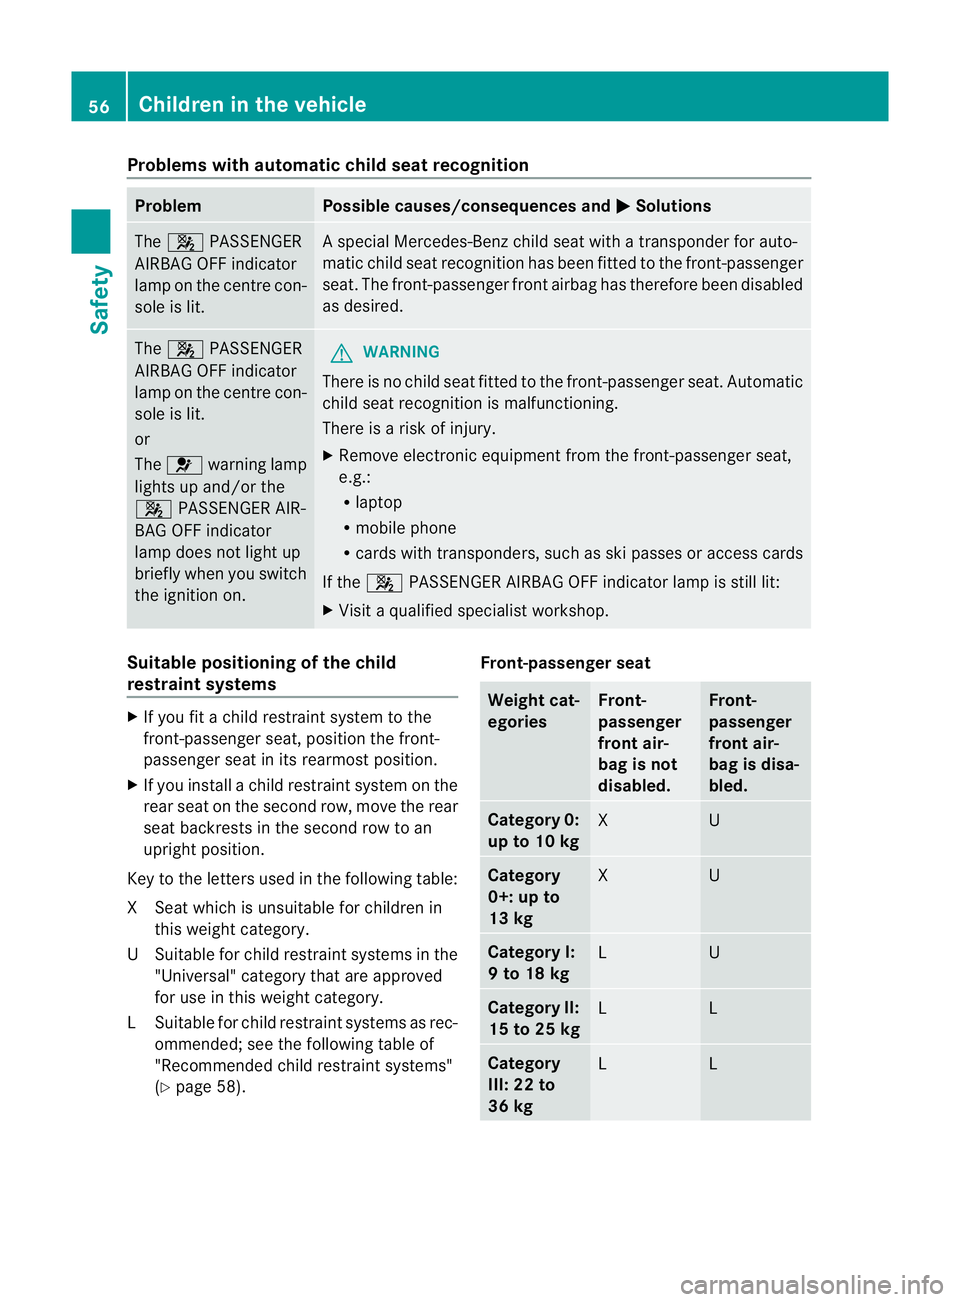
Problems wit
hautomatic chil dseat recognition Problem Possible causes/consequences and
M Solutions
The
4 PASSENGER
AIRB AGOFF indicator
lam ponthe cen trecon-
sole is lit. As
pecial Mercedes-Benz child seat with atransponde rfor auto-
matic child seat recognition has been fit tedtot he front-passenger
seat. The front-passenger fron tairbag has therefore been disabled
as desired. The
4 PASSENGER
AIRBA GOFF indi cator
lamp on the centr econ-
sole is lit.
or
The 6 warnin glamp
lights up and/or the
4 PASSENGER AIR-
BA GO FF indi cator
lamp doe snot light up
briefly when you switch
the ignition on. G
WARNING
There is no child seat fitted to the fr ont-passengerseat .Automatic
child seat recognition is malfunctioning.
There is arisk of injur y.
X Remove electronic equipment from the front-passenger seat,
e.g.:
R
laptop
R mobil ephone
R card switht ransponders, such as sk ipasses or accessc ards
If the 4 PASSENGER AIRBAG OFF indicator lamp is still lit:
X Vis itaq uali fieds pecialist workshop. Suitable positioning of the child
restraint syste
ms X
Ifyou fit achild restraint system to the
front-passenger seat, position the front-
passenger seat in its rearmos tposition.
X If you install achild rest raint system on the
rear seat on the second row, move the rear
seat backrest sinthe secon drow to an
upright position.
Key to the letters used in the following table:
XS eat which is unsuitable for children in
this weight category.
US uitable for child rest raint systems in the
"Universal" categor ythat ar eapproved
for use in this weigh tcategory.
LS uitable for child rest raint systems as rec-
ommended; see th efollowin gtable of
"Recommended child restraint systems"
(Y page 58). Front-passenger seat Weight cat-
egories Front-
passenger
front air-
bag is not
disabled. Front-
passenger
front air-
bag is disa-
bled.
Categor
y0:
up to 10 kg X U
Cate
gory
0+: up to
13 kg X U
Category I:
9to18kg
L U
Category II:
15 to 25 kg
L L
Category
III: 22 to
36 kg
L L56
Children in the vehicleSafety
Page 60 of 441
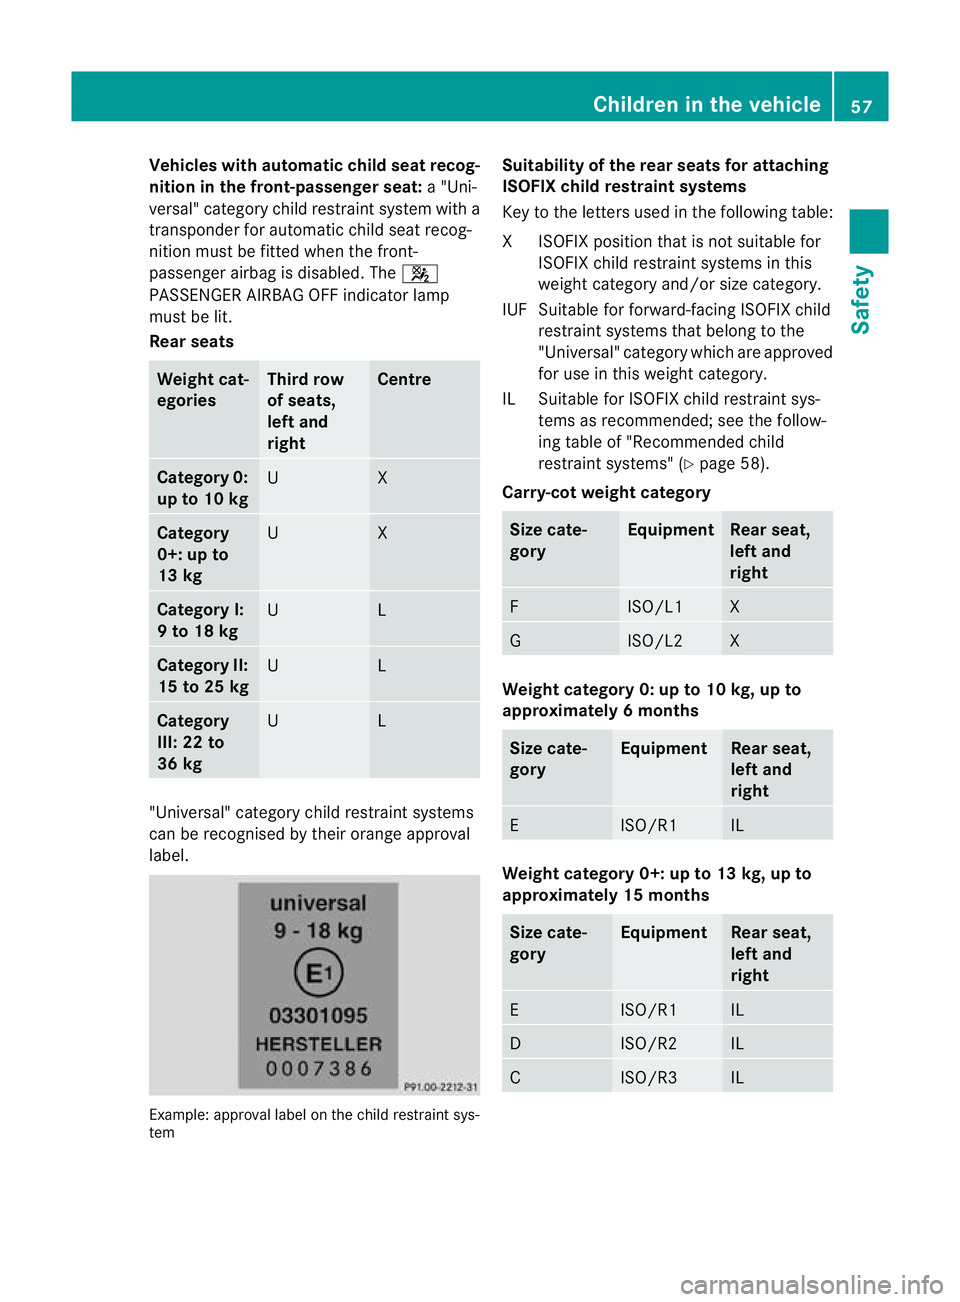
Vehicles with automati
cchild seat recog-
nitio nint he front-pas senger seat:a"Uni-
versal" category child res train tsystem with a
transponder for automatic child seat recog-
nition must be fitted when the front-
passenger airbag is disabled. The 4
PAS SENG ER AIRBA GOFFindicator lamp
must be lit.
Rea rseats Weight cat-
egories Thir
drow
of seats,
left and
right Centre
Categor
y0:
up to 10 kg U X
Cate
gory
0+: up to
13 kg U X
Category I:
9to18kg
U L
Category II:
15 to 25 kg
U L
Category
III: 22 to
36 kg
U L
"Univ
ersal" categor ychild restra ints ystems
can be recognised by their orange approval
label. Example
:approval label on the child restrain tsys-
tem Suitability of the rear seats for attaching
ISOFIX child restraint systems
Key to the letters used in the following table:
XI
SOFIX position tha tisnot suitable for
ISOFI Xchild restraint system sinthis
weight category and/or size category.
IU FS uitable for forward-facing ISOFIX child
restraint systems that belong to the
"Universal" category which are approved
for use in this weigh tcategory.
IL Suitable for ISOFI Xchild restraint sys-
tem sasr ecommended; see the follow-
ing table of "Recommended child
restraint systems" (Y page 58).
Carry -cot weight category Size cate-
gory Equipment Rear seat,
left and
right
F ISO/L1 X
G ISO/L2 X
Weight category 0: up to 10 kg, up to
approximately
6months Size cate-
gory Equipment Rear seat,
left and
right
E ISO/R1 IL
Weight category 0+: up to 13 kg, up to
approximately 15 months
Size cate-
gory Equipment Rear seat,
left and
right
E ISO/R1 IL
D ISO/R2 IL
C ISO/R3 ILChildren in the vehicle
57Safety Z
Page 61 of 441
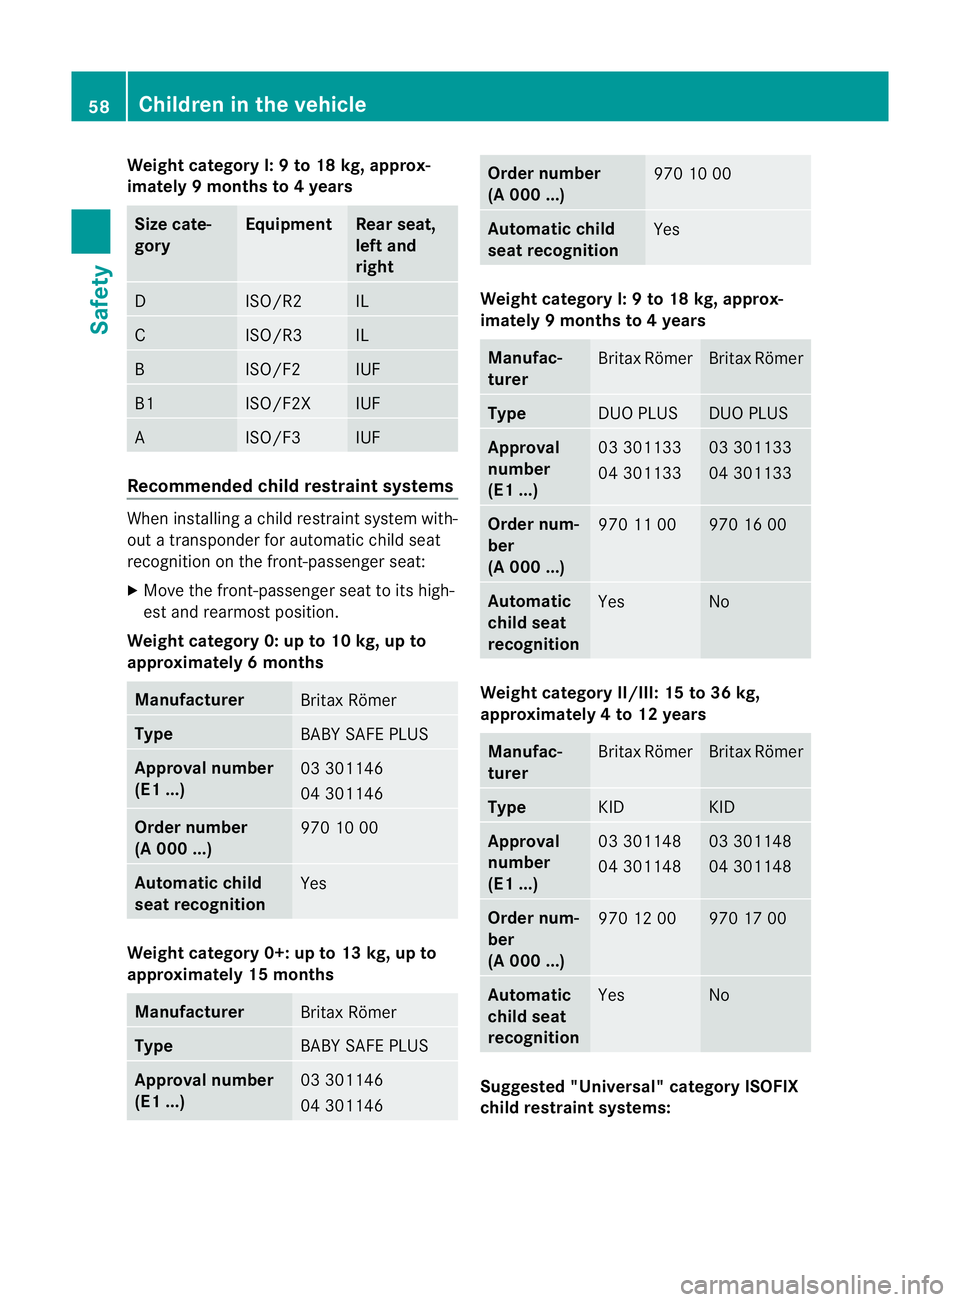
Wei
ghtc ategory I: 9to18kg, approx-
imately 9months to 4years Size cate-
gory Equipment Rear seat,
left and
right
D ISO/R2 IL
C ISO/R3 IL
B ISO/F2 IUF
B1 ISO/F2X IUF
A ISO/F3 IUF
Recommended chil
drestraint systems When installing
achild restraint system with-
out atransponde rfor automatic child seat
recognition on the front-passenger seat:
X Move the front-passenger seat to its high-
est and rearmost position.
Weight categor y0:upto10kg, up to
approximately 6months Manufacturer
Britax Römer
Type
BAB
YSAFEP LUS Approval number
(E
1. ..) 03 301146
04 301146
Orde
rnumber
(A 00 0...) 97
01000 Automatic child
seat recognition
Yes
Weight category 0+: up to 13 kg, up to
approximately 15 months
Manuf
acturer Britax Römer
Type
BAB
YSAFEP LUS Approval number
(E
1. ..) 03 301146
04 301146 Orde
rnumber
(A 00 0...) 97
01000 Automatic child
seat recognition
Yes
Weight category I:
9to18kg, approx-
imately 9months to 4years Manufac-
turer
Britax Römer Britax Römer
Type
DUO PLUS DUO PLUS
Approval
number
(E1 ...)
03 301
133
04 301133 03 301133
04 301133
Orde
rnum-
ber
(A 00 0...) 97
01100 970 16 00
Automatic
chil
dseat
recognition Yes No
Weight category II/III: 15 to 36 kg,
approximately
4to12years Manufac-
turer
Britax Römer Britax Römer
Type
KID KID
Approval
number
(E1 ...)
03 301
148
04 301148 03 301148
04 301148
Orde
rnum-
ber
(A 00 0...) 97
01200 970 17 00
Automatic
chil
dseat
recognition Yes No
Suggested "Universal" category ISOFIX
child restraint systems:58
Children in the vehicleSafety
Page 62 of 441
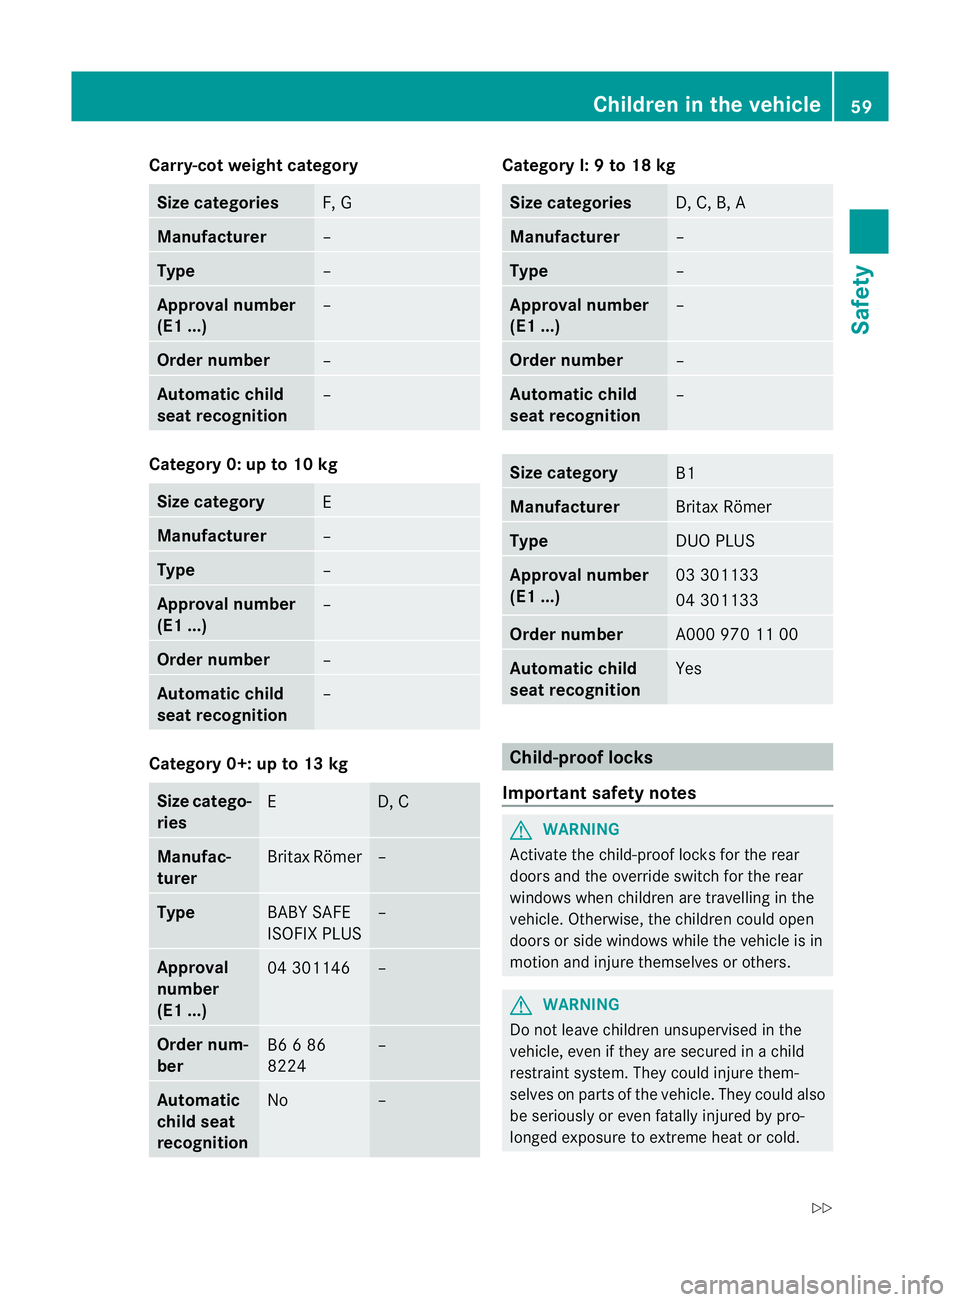
Carry-cot weight category
Size categories
F, G
Manufacturer
–
Type
–
Approva
lnumber
(E1 ...) –
Order number
–
Automatic child
seat recognition
–
Category 0: up to 10 kg
Size category
E
Manufacturer
–
Type
–
Approval number
(E1 ...)
–
Order number
–
Automatic child
seat recognition
–
Category 0+
:upto13kg Siz
ecatego-
ries E D, C
Manufac-
turer
Brita
xRömer –
Type
BABY SAFE
ISOFIX PLUS –
Approval
number
(E1 ...)
04 301146 –
Order num-
ber
B6
686
8224 –
Automatic
chil
dseat
recognition No – Categor
yI:9to18kg Siz
ec ategories D, C, B, A
Manufacturer
–
Type
–
Approval number
(E1 ...)
–
Order number
–
Automatic child
seat recognition
–
Si
ze category B1
Manufacturer
Britax Römer
Type
DU
OP LUS Approval number
(E
1. ..) 03 301133
04 301133
Order number
A000 97
01100 Automatic child
seat recognition
Yes
Child-proof locks
Important safety notes G
WARNING
Activate the child-proof lock sfor th erear
door sand the override switch for the rear
windows whe nchildr en are travel ling in the
vehicle. Otherwise, the children could open
doors or sid ewindows while the vehicle is in
motion and injur ethemselves or others. G
WARNING
Do not leave children unsu pervis edin the
vehicle, even if they are secured in achild
restraint system .They coul dinjure them-
selve sonp arts of the vehicle. They could also
be seriousl yoreven fata llyi njured by pro-
longed exposure to extreme hea torcold. Children in the vehicle
59Safety
Z
Page 63 of 441
Do not expose the child restraint system to
direct sunlight. Parts of the child restraint sys-
tem could heat up and the child could burn
herself/h imselfonthem.
If ac hild opens adoor, th echild or other per-
sons coul dbeinjured as aresult. They could
get out and injure themselves or be injured by
ap assing vehicle.
Also observe the notes on HOLD .Relevant
information can be foun dinthe index.
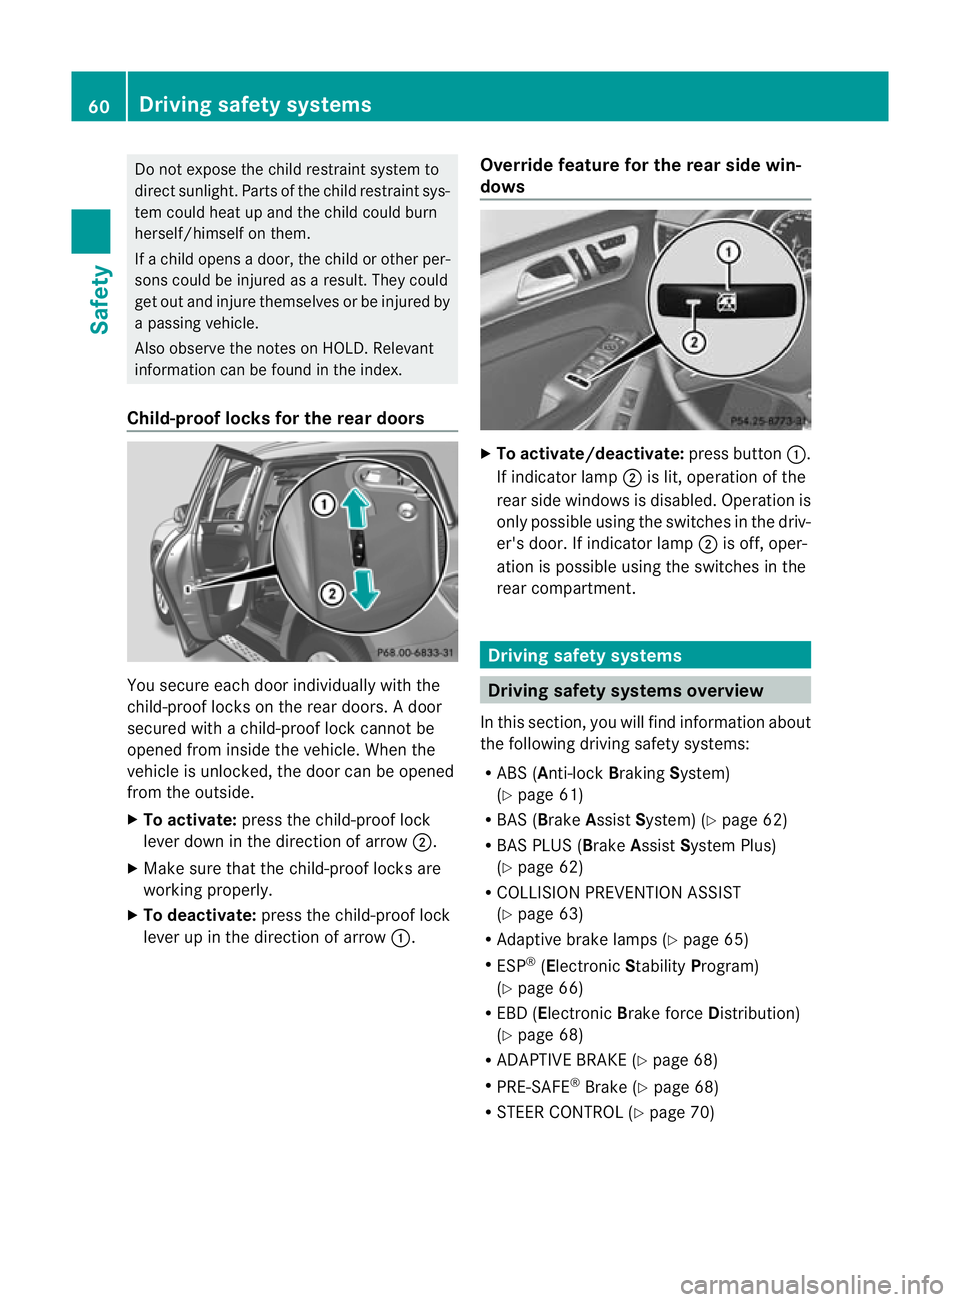
Child- proof locks for the rear doors You secure each door individually with the
child-proof locks on the rear doors.
Adoor
secured with achild-proof lock can notbe
opened from inside the vehicle. When the
vehicle is unlocked, the door can be opened
from the outside.
X To activate: press the child-proof lock
leve rdown in the direction of arrow ;.
X Make sure that the child-proof lock sare
workin gproperly.
X To deactivate: press thechild-proof lock
lever up in the direction of arrow :.Overrid
efeature for the rear side win-
dows X
To activate/deactivate: press button:.
If indicator lamp ;is lit, operation of the
rear side windows is disabled. Operation is
only possible using the switches in the driv-
er' sd oor. If indicator lamp ;is off ,oper-
ation is possible using the switches in the
rear compart ment. Driving safety systems
Driving safety systems overview
In this section, you will find information about
the following driving safety systems:
R ABS (Anti-lock BrakingSystem)
(Y pag e61)
R BAS (Brake AssistSystem) (Y page62)
R BAS PLUS ( BrakeAssist System Plus)
(Y pag e62)
R COLLISION PREVENTION ASSIST
(Y pag e63)
R Adaptive brak elamps (Y page 65)
R ESP ®
(Electronic StabilityProgram)
(Y page 66)
R EBD ( Electronic Brake force Distribution)
(Y page 68)
R ADAPTIVE BRAKE (Y page 68)
R PRE-SAFE ®
Brake (Y page 68)
R STEE RCONTROL (Y page 70)60
Driving safety systemsSafety
Page 92 of 441
Side windows
Important safety notes
G
WARNING
Mak esure that nobody can become trapped
between the side window and the door frame
when aside window is opened. Do not touch
or lean against the side window during the
opening procedure. You could become trap-
ped between the side window and the door
frame as the side window moves down. If
there is arisk of becoming trapped, release
the switch or pull the switch upwards to close
the side window again. G
WARNING
Make sure that nobody can become trapped
as you close aside window. If there is arisk
of becoming trapped, release the switch or
press it again to open the side window again. G
WARNING
Children may injur ethemselves if they open
or close the side windows.
Never leav echildren unsupervised in the vehi-
cle. Always tak ethe key with you when leaving
the vehicle, even if you ar eonly leaving it for
as hort time. G
WARNING
Do not leav echildren unsupervised in the
vehicle, even if they ar esecured in achild
restraint system .The children could:
R be seriously or even fatall yinjured on parts
of the vehicle
R be seriously or even fatally injured by pro-
longed exposure to extremely hig hor
extremely low temperatures
If children open adoor, they could:
R seriously or even fatally injure other people
R get out of the vehicle and injure them-
selves, or be seriously or even fatally
injure dbya passing vehicle
Activat ethe child-proof locks/override fea-
tur eifc hildren ar etravelling in th evehicle. They could otherwise open doors or side win-
dows while the vehicle is in motion and
thereby injure themselves or others.
Opening and closin
gthe side win-
dows
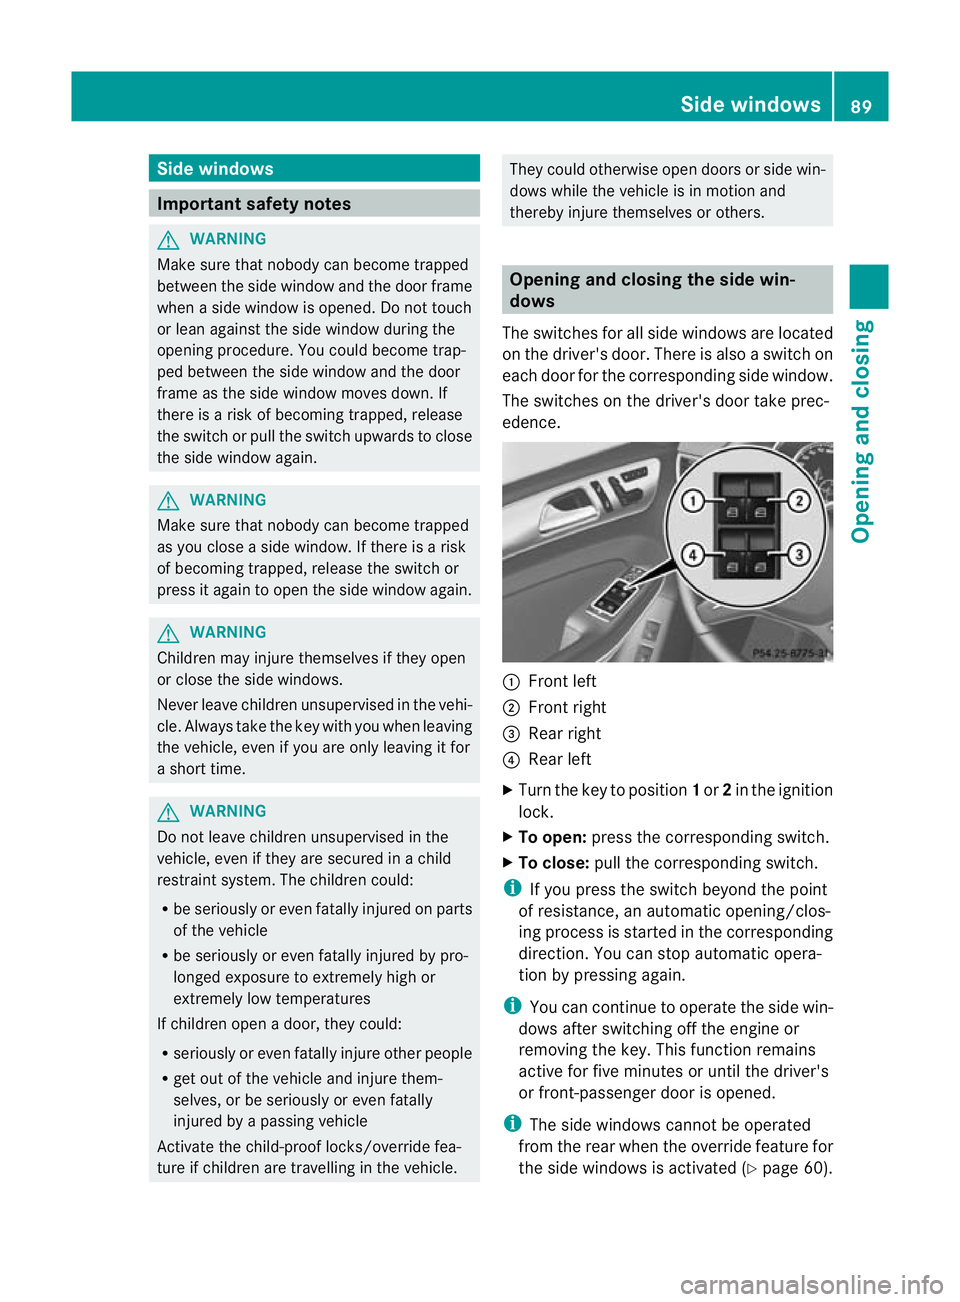
Th es witches for all side windows are located
on the driver's door. There is also aswitch on
each door for the correspondin gside window.
The switches on the driver's door take prec-
edence. :
Front left
; Front right
= Rear right
? Rear left
X Turn the key to position 1or 2in the ignition
lock.
X To open: press the corresponding switch.
X To close: pull the corresponding switch.
i If you press the switch beyond the point
of resistance, an automatic opening/clos-
ing process is started in the corresponding
direction. You can stop automatic opera-
tion by pressing again.
i You can continue to operate the side win-
dows after switching off the engine or
removing the key. This func tion remains
active for fiv eminutes or until the driver's
or front-passenger door is opened.
i The side windows cannot be operated
from the rear when the override featur efor
the side window sisactivate d(Ypage 60). Side windows
89Opening and closing Z
Page 104 of 441

Seats
Important safety notes
G
WARNING
The seat scan still be adjusted when there is
no key in the ignition lock. For this reason,
children shoul dnever be left unsupervised in
the vehicle. They could adjust the seats and
becom etrapped. G
WARNING
Only adjus tthe driver's seat when the vehicle
is stationary .You will otherwise be distracted
from the road and traffic condition sand you
could los econtrol of the vehicle as aresult of
the seat moving. This could cause an acci-
dent. G
WARNING
If you adjust the seat height carelessly, you or
others could be trapped and thereby injured.
Children in particula rcould unintentionally
press the buttons to electrically adjust the
seats and becom etrapped.
Take care that:
R while moving th eseats, your hands do not
get under the lever assembly of the seat
adjustmen tsystem.
R children in the vehicle do not slid etheir
hands unde rthe levers. G
WARNING
Make sur ethat nobody can becom etrapped
when adjustin gthe seats.
Observ ethe note sonairbags.
Secur echildren as recommended; see the
"Childre ninthe vehicle" section. G
WARNING
Make sur ethat the bac kofyour head is sup-
ported at eye level by the cen tralarea of the
head restraint. If your head is not supported
correctly by th ehead restraint ,you coul dsuf-
fer asever eneck injury in the event of an accident
.Never driv eifthe head rest raints are
not engaged and set correctly. G
WARNING
As eat belt can only offer its intended degree
of protection when the back rest is almost ver-
tical and the occupan tiss itting upright. Avoid
seat positions that do not allow the seat belt
to be routed correctly. Adjust the backrest so
that it is as upright as possible .Never travel
with the back rest reclined too fa rbackwards.
You could otherwise be seriousl yoreven
fatally injured in th eevent of an accident or
sudden braking.
! To avoid damag etothe seats and the seat
heating, observe the followin ginformation:
R do not spill any liquids on the seats. If
liquid is spilled on the seats, dry them as
soon as possible.
R if the sea tcover sare damp or wet, do not
switc hont he seat heating. The seat
heating should also not be used to dry
the seats.
R clea nthe seat cover sasrecommended;
see "In terior care".
R do not transport heav yloads on the
seats. Do not plac eshar pobjects on the
seat cushions ,e.g. knives, nails or tools.
Th es eats should only be occupied by
passengers, if possible.
R when the seat heatin gisinoperation ,do
not cover the seats with insulating mate-
rials, e.g. blanke ts,c oats, bags, seat cov-
ers, child seats or booster seats.
! Make sure that ther eare no objects in the
footwell or behind th eseats when moving
the seat back .There is arisk that the seats
and/or the objects could be damaged.
i The head restraint scannot be removed
from the fron tseats. The rear-compart-
men thead restraints, however ,can be
removed (Y page 104).
For more information ,contac taqualified
specialist workshop. Seats
101Seats, steering wheel and mirrors Z
Page 118 of 441
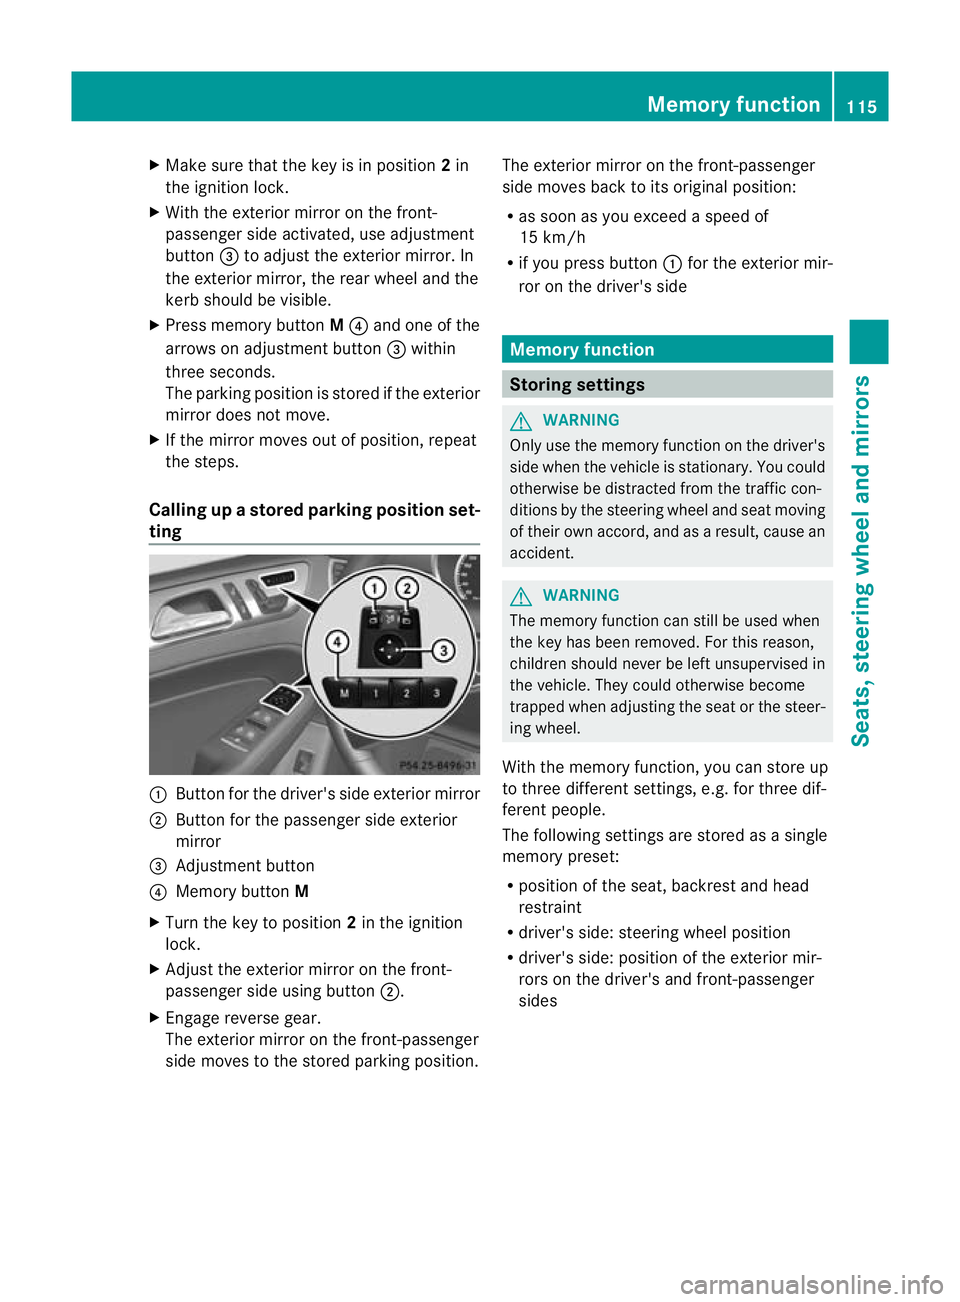
X
Make sur ethat the key is in position 2in
the ignition lock.
X With the exterior mirror on the front-
passenger side activated, use adjustment
button =to adjust the exterior mirror. In
the exterior mirror, the rea rwheel and the
ker bshould be visible.
X Press memory button M? and one of the
arrow sona djustment button =within
three seconds.
The parking position is stored if the exterior
mirror does not move.
X If the mirror moves out of position, repeat
the steps.
Calling up astore dparkin gposition set-
ting :
Button for the driver's sid eexterio rmirror
; Button for the passenger side exterior
mirror
= Adjustment button
? Memo rybutton M
X Turn the key to position 2in the ignition
lock.
X Adjust the exterior mir roront he front-
pa ssenger side usin gbutton ;.
X Engage reverse gear.
The exterior mirror on the front-passenger
side moves to the stored parking posi tion. The exterior mir
roront he front-passenger
side moves bac ktoits original position:
R as soo nasyou exceed aspeed of
15 km/h
R if you press button :for the exterior mir-
ror on the driv er'sside Me
mo ry function Storing settings
G
WARNING
Only use the memory function on the driver's
side when the vehicle is stationary. You could
otherwise be distracted fro mthe traffic con-
diti ons by th esteerin gwheel and seat moving
of their own accord, and as aresult ,cause an
accident. G
WARNING
The memory function can still be used when
the key has been removed. For this reason,
children shoul dnever be left unsupervised in
the vehicle. They could otherwise become
trapped when adjusting the seat or the steer-
ing wheel.
With the mem ory function,you can store up
to three differen tsettings, e.g. for three dif-
ferent people.
The followi ngsettings ar estore dasa single
mem orypreset:
R position of the seat ,backrest and head
restraint
R driver's side: steerin gwheel position
R driver' sside: position of the exterior mir-
ror so nthe driver' sand front-passenger
sides Memory function
115Seats, steering wheel and mirrors Z