display MERCEDES-BENZ GL SUV 2012 Owner's Manual
[x] Cancel search | Manufacturer: MERCEDES-BENZ, Model Year: 2012, Model line: GL SUV, Model: MERCEDES-BENZ GL SUV 2012Pages: 441, PDF Size: 10.66 MB
Page 36 of 441

Multifunctio
nsteering wheel Function Page
:
Multifunction dis
play 270
;
Audio/COMAND display;
see the separate operating
instructions
=
?
Switches on LINGUA-
TRONIC; see the separate
operating instructions
?
~
Rejects or ends
acall 275
Exits telephone book/
redial memory
6
Makes or accepts
acall Switches to the redial mem-
ory
WX
Adjusts the volume
8
Mute Function Page
A
=;
Selects
amenu 269
9:
Selects
asubmenu or
scroll sthrough lists 269
a
Confirms your selection 269
Hides display messages 290
B
%
Back 269
Switches off LINGU
A-
TRONIC ;see the separate
operatin ginstructions Multifunction steering wheel
33Atag lance
Page 52 of 441
tinuousl
yorflash. In addition, th erem ay be a
warning tone.
The 7 seat belt warning lamp goes ou tand
the warning tone ceases when the driver and
the front pass enger hav efastened their seat
belt.
For certain coun tries only: regardless of
whether th edriver and the front passenger
have fastened their seat belts, the 7seat
bel tw arning lamp lights up for six seconds
after the engin eisstarted. It then goes out if
th ed river and the front passenger have fas-
tened thei rseat belts.
i For mor einformation on the 7seat
bel twarning lamp, see "Indicator and warn-
in gl am ps in the instrument cluster ,seat
belt" (Y page 325).
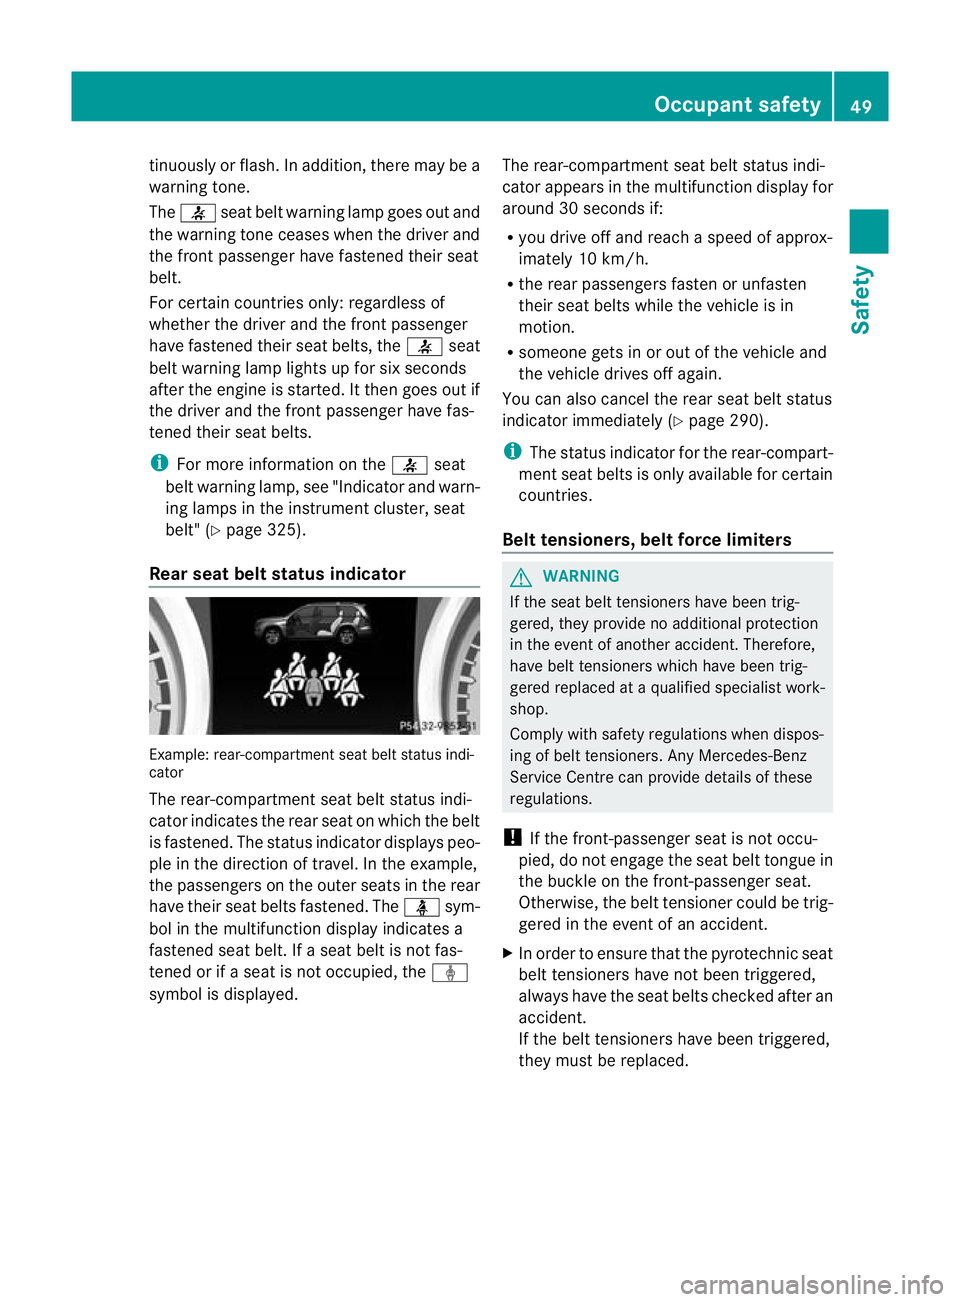
Rear seat belt status indicator Example: rear-compartment sea
tbelts tatus indi-
cator
The rear-comp artment sea tbelt status indi-
cator indicates the rear seat on which the belt
is fastened. The status indicator displays peo-
ple in the direc tion of travel. In the example,
the passenger sonthe outer seats in the rear
hav etheir seat belts fastened. The üsym-
bol in the multifunction displa yindicates a
fastened sea tbelt. If aseat belt is not fas-
tened or if aseat is not occupied, the ý
symbol is displayed. The rear-compartment seat belt status indi-
cator appear
sint he multifunction displa yfor
around 30 seconds if:
R you drive off and reach aspeed of approx-
imately 10 km/h.
R the rear passengers fasten or unfasten
their seat belts while the vehicle is in
motion.
R someon egets in or out of the vehicle and
the vehicle drives off again.
You can also can celthe rea rseat belt status
indicator immediately (Y page 290).
i The status indicator for the rear- compart-
ment seat belts is only available for certain
countries.
Bel ttensioners, belt force limiters G
WARNING
If the seat belt tensioners have been trig-
gered, they provide no additional protection
in the event of another accident. Therefore,
have belt tensioners which have been trig-
gered replaced at aqualified specialist work-
shop.
Comply with safety regulations when dispos-
ing of belt tensioners. An yMercedes-Benz
Ser vice Centre can provid edetails of these
regulations.
! If the front-passenger seat is not occu-
pied, do not engage the seat belt tongue in
the buckl eonthe front-passenger seat.
Otherwise, the belt tensioner could be trig-
gere dint he even tofanaccide nt.
X In order to ensur ethat the pyrotechnic seat
belt tensioner shave not been triggered,
alway shave the seat belts checked after an
accident.
If the belt tensioners have been triggered,
they must be replaced. Occupant safety
49Safety Z
Page 64 of 441
Important safety notes
If you fail to adapt your driving style or
become distracted, th edriving sa fetysys-
tems ca nneith er reduce th erisk of accident
no ro verri dethe law sofphysics. Driving
safety system sare mere ly aids desig nedto
assis tdrivi ng.You ar eresponsible for the dis-
tance to the vehicle in fr ont, forvehicle speed
and for braking in good time. Alway sadapt
your drivin gstyle to suit the prevailing road
and weather condition sand maintain asafe
distance from the vehicle in front .Drive care-
fully.
i Thed riving safet ysystems described only
work as effectively as possibl ewhen there
is adequate con tact betwee nthe tyres and
the roa dsurface. Pleas epay special atten-
tion to the notes on tyres, recommended
minimum tyre tread depths ,etc.
(Y page 396).
In wintry driving conditions, always use
winter tyres (M+S tyres) and if necessary,
snow chains .Only in this way will the driv-
ing safety systems described in this section
work as effectively as possible. ABS (Anti-lock Braking System)
Important safety notes i
Observe the "Important safety notes" sec-
tion (Y page61). G
WARNING
If ABS is faulty, the wheels could lock when
braking .The steerability and brakin gcharac-
teristics ma ybeseverely impaired. Addition-
ally, further driving safet ysystems are deac-
tivated. There is an increased danger of skid-
ding and accidents.
Drive on carefully. Have ABS checked imme-
diatel yata qualified specialist workshop.
When ABS is malfunctioning, other systems,
including driving safety systems, will also
become inoperative. Observe the infor mation on the ABS warning lamp (Y
page 326) and
display messages which may be shown in the
instrument cluster (Y page 291).
ABS regulate sbrake pressure in such away
that the wheels do not lock when you brake.
This allows you to continue steering the vehi-
cle when braking.
ABS works from aspeed of about 8km/h
upwards, regardless of road-surfac econdi-
tions. AB Sworksons lippery surfaces, even
when you only brake gently.
The yellow !ABS warnin glamp in the
instrument cluster lights up when the ignition
is switched on. It goes out when the engine is
running.
Brakes X
If ABS intervenes: continue to depress the
brake pedal with force until the braking sit-
uation is over.
X To mak eafull brake application:
depress th ebrake peda lwith full force.
If ABS intervenes when braking, you will feel
ap ulsing in the brake pedal.
The pulsating brake pedal can be an indica-
tion of hazardous road conditions, and func-
tions as areminder to take extr acare while
driving.
Off-road ABS An ABS system specifically suited to off-road
terrain is activated automatically once the off-
road program is activated on:
R
Vehicles without the ON&OFFROAD pack-
age (Y page 252)
R Vehicles with the ON&OFFROAD package
(Y page 253)
At speeds below 30 km/h, the front wheels
lock cyclically during braking. The digging-in
effect achieved in the process reduces the
stopping distance when driving off-road. This
limits steering capability. Driving safety systems
61Safety Z
Page 67 of 441
When the distan
cewarning function is acti-
vated, the multifunction display shows the
Ä symbol as long as the HOLD function is
not activated (Y page 211). On vehicles with
Active Parking Assist, the Äsymbol is dis-
played when position Pis engaged or you are
driving faster than 35 km/h.
The distanc ewarning function can help you
to minimise the risk of acollision with the
vehicle in fron torreduce the effects of such
ac ollision .Ifthe distanc ewarning function
detect sthat ther eisar isk of acollision ,you
will be warned visually and acoustically .The
distanc ewarning function cannot preven ta
collision without your inte rvention.
The distan cewarning function will issue a
warning at speed sofaround 30 km/h or
more if:
R thed istanc etothe vehicle in fron tist oo
short for the speed you ar edriving at for
severa lseconds. The ·distan cewarn-
ing lamp then lights up in the instrument
cluster.
R you are rapidly approaching the vehicle in
front. An intermittent warning ton ewill
then sound and the ·distanc ewarning
lamp will light up in the instrument cluster.
X Brak eimmediatel yinordertoi ncreas ethe
distanc efrom th evehicle in front.
or
X Take evasiv eactio nprovide ditiss afe to do
so.
For the distanc ewarning function to assist
you when driving, the function must be acti-
vated in the on-board computer and be opera-
tional (Y page 278).
Due to the nature of the system, particularly
complicated driving conditions may cause the
system to display an unnecessary warning.
With the help of the radar senso rsystem, the
distanc ewarning function can detect obsta-
cles that are in the path of your vehicle for an
extended period of time.
At speeds up to approximately 70 km/h, the
distance warning fun ction may also detect stationary obstacles, for example, stopped or
parked vehicles.
If you approach an obstacle and the distance
warnin gfunction detects arisk of acollision,
the system will initially aler tyou both visually
and acoustically.
In particular ,the detection of obstacles can
be impaired if ther eis:
R dir tont he sensors or anythin gelse cover-
ing the sensors
R snow or heavy rain
R interferenc ebyother radar sources
R the possibility of strong radar reflections,
for example, in multi-storey car parks
R an arro wvehicle travelling in front, e.g. a
motorcycle
R av ehicle travelling in fron tonadifferent
line
Following damage to the fron tend of the vehi-
cle ,havet he configuration and operation of
the radar sensor checked at aqualified spe-
cialist workshop. This also applie stoc olli-
sions at slow speeds where ther eisnovisible
damage to the fron tofthe vehicle.
Adaptive Brake Assist i
Observ ethe "Importan tsafety notes" sec-
tion (Y page 61). G
WARNING
Adaptive Brake Assist cannot always clearly
identify objects and complex traffic situa-
tions. In these cases, Adaptive Brake Assist
may not intervene. There is arisk of an acci-
dent.
Always pay careful attention to the traffic sit-
uation and be ready to brake. G
WARNING
Adaptive Brak eAssist does not react:
R to people or animals
R to oncomi ng vehicles
R to crossing traffic 64
Driving safety systemsSafety
Page 69 of 441
ESP
®
(Electronic Stability Program)
Important safety notes i
Observ ethe "Important safety notes "sec-
tio n(Ypage 61). G
WARNING
If ESP ®
is mal functioning, ESP ®
is unable to
stabilis ethe vehicle. In addition, othe rdriving
safety systems are switche doff. This increa-
se st he risk of skiddi ngand an accident.
Driv eonc arefully. Have ESP ®
checked at a
qualified specialis tworkshop.
! Only operat ethe vehicle for amaximum
of ten seconds on abrake dynamometer.
Switch off th eignition.
Application of the brakes by ESP ®
ma yoth-
erwise destroy the brake system.
! Afunction or performanc etest should
only be carried out on atwin-axle dyna-
mometer .Before you operate th evehicle
on such adynamometer, pleas econsult a
qualified workshop. You coul dotherwise
damage the drive train or the brake system.
ESP ®
is deactivated if the åwarning lamp
in the instrument cluster lights up continu-
ousl ywhen the engin eisrunning.
If the ÷ warning lamp and the åwarn-
ing lamp are lit continuously, ESP ®
is not
available due to amalfunction.
Observe the information on warning lamps
(Y page 329 )and display message swhich
ma ybes hown in the inst rument cluster
(Y page 291).
If ESP ®
detects that th evehicle is deviating
from the direction desired by the driver, one
or mor ewheels ar ebrake dtos tabilise the
vehicle .The engin eoutput is also modified to
keep the vehicle on the desired course within
physical limits. ESP ®
assists the driver when
pulling away on wet or slippery roads. ESP ®
can also stabilise the vehicle during braking.
If ESP ®
intervenes, the ÷ESP®
warning
lamp flashes in the instrument cluster. If ESP
®
intervenes:
X Do not deactivate ESP ®
under any circum-
stances.
X When pulling away ,only depress the accel-
erator pedal as far as is necessary.
X Adapt your driving style to suit the prevail-
ing road and weather condi tions.
i Only use wheels with the recommended
tyr es izes. Only then will ESP ®
func tion
properly.
4ETS (Electronic Traction System) Traction con
trol is par tofESP®
.
Tractio ncontrol brakes the drive wheels indi-
vidually if they spin. This enables you to pull
away and accelerate on slipper ysurfaces, for
example if the road surface is slippery on one
side .Ina ddition, mor edrive torqu eistrans-
ferre dtot he wheel or wheels with traction.
Traction con trol remains active if you deacti-
vate ESP ®
.
In appropriate drivin gsituations, activate the
off-road program:
X Vehicles without the ON&OFFROAD pack-
age (Y page 252)
X Vehicles with the ON&OFFROAD package
(Y page 253)
Off- road 4ETS (Electronic Traction Sys-
tem) A4
ETS syste mspecifically suited to off -road
ter rain is activated automatically onc ethe off-
roa dprogram is acti vated on:
R Vehicle swithout the ON&OFFROA Dpack-
age (Y page 252)
R Vehicles with the ON&OFFROAD package
(Y page 253) 66
Driving safety systemsSafety
Page 73 of 441
G
WARNING
PRE-SAFE ®
Brake does not react:
R to people or animals
R to oncoming vehicles
R to crossing traffic
R when cornering
As aresult, PRE-SAFE ®
Brake may neither
give warnings nor intervene in all critical sit-
uations. There is arisk of an accident.
Always pay caref ulattention to the traffic sit-
uation and be read ytobrake.
In order to maintai nthe appropriate distance
to the vehicle in front and thus preven tacol-
lision, you must apply the brake syourself.
X To activate/deactiva te:activate or deac-
tivate PRE-SAFE ®
Brake in the on-board
computer (Y page 278).
When PRE-SAFE ®
Brake is activated, the
Ä symbol appears in multifunction dis-
play ,asl ong as the HOL Dfunction is deac-
tivated (Y page 211). On vehicles with the
Active Parking Assis tdriving system, the
Ä symbo lisdisplayed when position P
is engaged or you are drivin gfaster than
35 km/h.
For PRE-SAFE ®
Brake to assis tyou when driv-
ing, the radar sensor system must be
switched on (Y page 283) and be opera-
tional.
The radar sensor system is switched off auto-
matically in the vicinit yofradio telescope
facilities in the following vehicles:
R vehicles with COMAND Online and naviga-
tion
R vehicles with Audio 20 and Becker ®
MAP
PILOT
Becker ®
MAP PILOT must be connected;
see the separate operating instructions. The radar senso
rsystem must be switched off
using the on-board computer in the vicinity of
radio telescope facilities in the following vehi-
cles:
R vehicles without COMAND Online and nav-
igation
R vehicles without Audio 20 and Becker ®
MAP PILOT
R vehicles for Australia
For information on switching off the radar
sensor syste musing the on-boar dcomputer,
see (Y page 283).
Following damage to the front end of the vehi-
cle, have the configuration and operation of
the radar sensor schecked at aqualified spe-
cialist workshop. This also applies to colli-
sions at slow speeds where there is no visible
damage to the front of the vehicle. STEER CONTROL
i Observe the "Important safety notes" sec-
tion (Y page 61).
STEE RCONTROL helps you by transmittin ga
noticeable steering force to the steering
wheel in the direction require dfor vehicle
stabilisation.
This steering suppor tisprovide dinparticular
if:
R both right wheel sorboth left wheels ar eon
aw et or slippery road surface when you
brake.
R the vehicle starts to skid.
If there is an ESP ®
malfunction ,you will not
receive any steering suppor tfrom STEER
CONTROL. Powe rsteering will ,however, con-
tinue to func tion. 70
Driving safety systemsSafety
Page 108 of 441
Folding th
eseat sup/down (3rd row of
seats) Genera
lnotes
! Mak esure that there is nothing on the
folded-down seats in the luggag ecompar t-
ment. Th eluggag ecompar tmentm ust be
empt yfor th ethird ro wofseatstobef olded
up. The seat sorthe objects in th eluggage
compartment could, otherwise, be dam-
aged.
Make sure that the seats in the thir drow
ar ee mpty and not blocked before folding
them down.
Th et hir dr ow of seats consist softwo electri-
cally foldable individual seats, which can be
lowered into the luggage compartment.
If the seat is not correctly locked in position,
the display message: 3rds eat row, right Not locked appears in th
emultifunc-
tion display.
The switches for folding the left or right-hand
seats up and down are marked: Lfor the left-
hand seat when viewed in the direction of
travel, Rfor the right-hand seat when viewed
in the direction of travel.
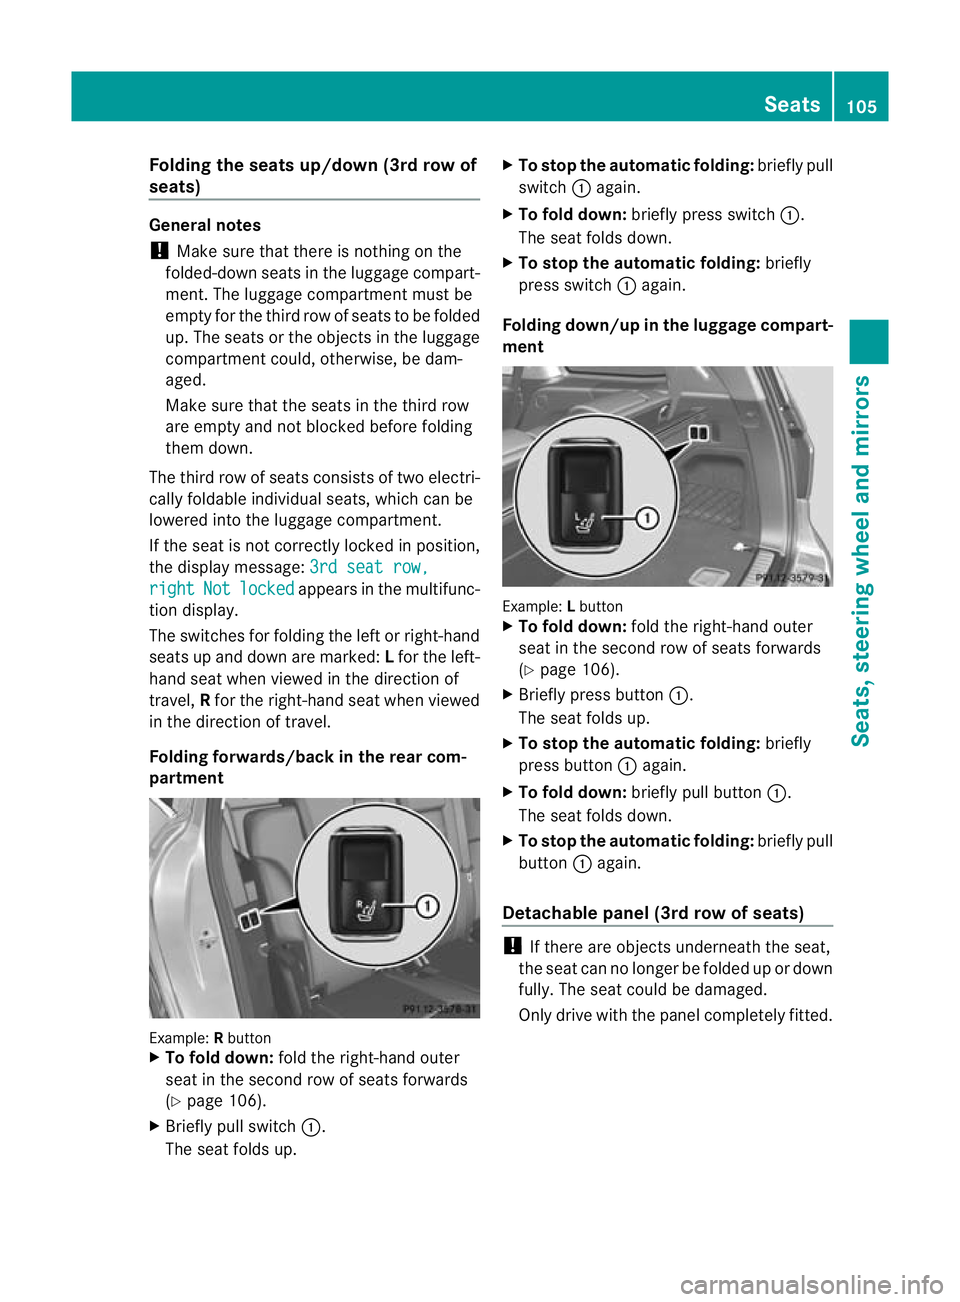
Folding forwards/back in the rear com-
partment Example:
Rbutton
X To fold down: fold the right-hand outer
seat in the second row of seats forwards
(Y page 106).
X Briefly pull switch :.
The seat folds up. X
To stop the automatic folding: briefly pull
switch :again.
X To fold down: briefly press switch :.
The seat folds down.
X To stop the automatic folding: briefly
press switch :again.
Folding down/up in the luggage compart-
ment Example:
Lbutton
X To fold down: fold the right-hand outer
seat in the second row of seats forwards
(Y page 106).
X Briefly press button :.
The seat folds up.
X To stop the automatic folding: briefly
press button :again.
X To fold down: briefly pull button :.
The seat folds down.
X To stop the automatic folding: briefly pull
button :again.
Detachable panel (3rd row of seats) !
If there are objects underneath the seat,
the seat can no longer be folded up or down
fully. The seat could be damaged.
Only drive with the panel completely fitted. Seats
105Seats, steerin gwhee land mirrors Z
Page 110 of 441
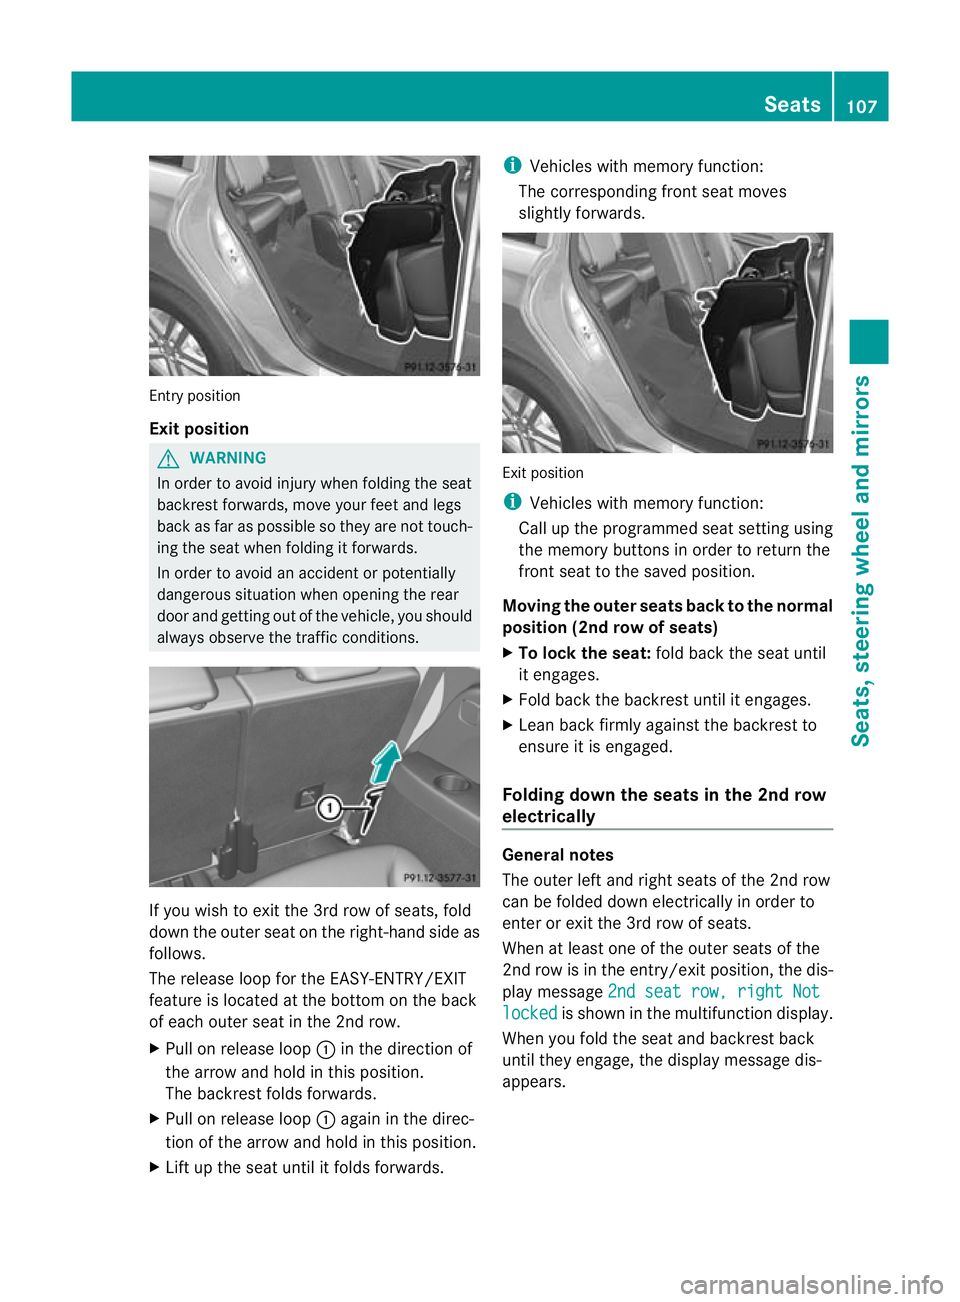
Entry position
Exit position
G
WARNING
In order to avo idinjury when folding the seat
backres tforwards, mov eyour feet and legs
back as far as possible so they are not touch-
ing the seat when folding it forwards.
In order to avoi danaccident or potentially
dangerou ssituation when opening the rear
door and gettin gout of the vehicle, you should
alway sobserv ethe traffic conditions. If you wish to exit the 3r
drow of seats, fold
down the outer seat on the right -hand side as
follows.
The release loop for the EASY-ENTRY/EXIT
feature is located at the bottom on the back
of each outer seat in the 2nd row.
X Pull on release loop :in the direction of
the arrow and hold in this position.
The backrest folds forwards.
X Pull on release loop :again in the direc-
tion of the arrow and hold in this position.
X Lift up the seat until it folds forwards. i
Vehicles with memory function:
The corresponding front seat moves
slightly forwards. Exit position
i
Vehicles with memory function:
Call up the programmed seat setting using
the memory buttons in order to return the
front seat to the saved position.
Moving the outer seats back to the normal
position (2nd row of seats)
X To lock the seat: fold back the seat until
it engages.
X Fold back the backrest until it engages.
X Lean back firmly against the backrest to
ensure it is engaged.
Folding down the seats in the 2nd row
electrically General notes
The outer left and right seats of the 2nd row
can be folded down electrically in order to
enter or exit the 3rd row of seats.
When at least one of the outer seats of the
2nd row is in the entry/exit position, the dis-
play message
2nds eat row, right Not locked is show
ninthe multifunc tion display.
When you fold the seat and backrest back
until they engage, the display message dis-
appears. Seats
107Seats, steering wheel and mirrors Z
Page 128 of 441
The system may not recognise the following
road users:
R road users that have no lighting, e.g. pedes-
trians
R road users that have poor lighting, e.g.
cyclists
R road users whose lightin gisnot clearly visi-
ble, e.g. road users behind acras hb arrier
R on rare occasions: road users that have
lights that may be recognised too late or not
at all
The automatic main-beam headlamps will not
be deactivated, or they may be activated
despite road users travelling in front of or
approaching the vehicle.
Thus, you could cause an accident and injure
yourself and others. Always observe traffic
conditions and, if necessary, dip the lights
manually. You can use this function to set the head-
lamps to change between dippe dbeam and
mai nbeam automatically. The system recog-
nises vehicles with their lights on, either
approaching from the opposite direction or
travelling in front of your vehicle, and conse-
quently switches the headlamps from main
beam to dipped beam.
The system automatically adapts the dipped-
beam headlam prange depending on the dis- tanc
etot he other vehicle. Onc ethe system
no longer detec tsany other vehicles, it reac-
tivates the main-beam headlamps.
The system's optical senso risl ocated behind
the windscreen near the overhead con trol
panel.
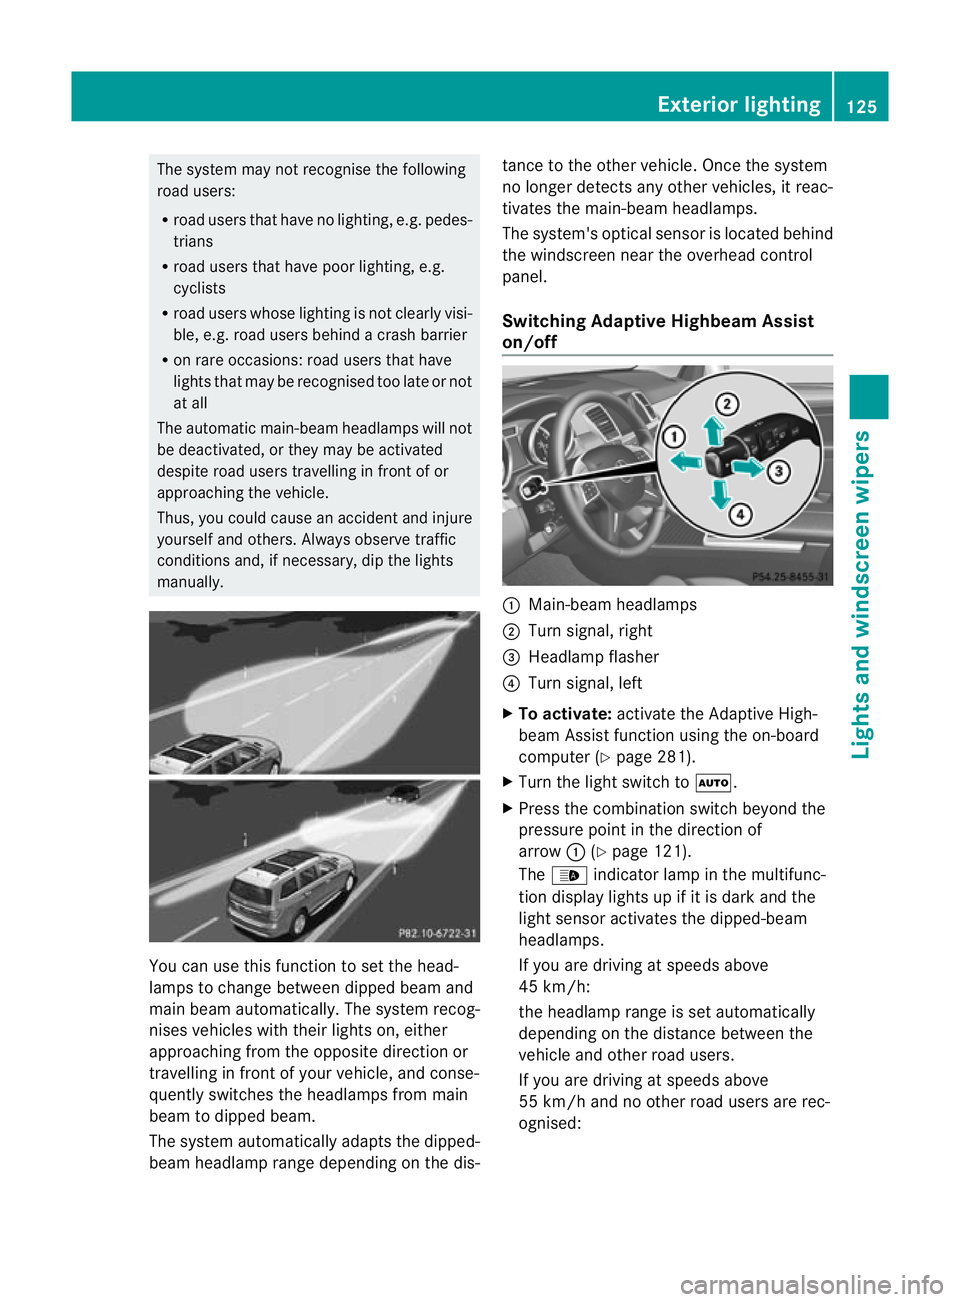
Switching Adaptive Highbeam Assist
on/off :
Main-beam headlamps
; Turnsignal, right
= Headlamp flasher
? Turn signal, left
X To activa te:activate the Adaptive High-
beam Assis tfunction using the on-board
computer (Y page 281).
X Turn the light switch to Ã.
X Press the combination switch beyond the
pressure point in the direction of
arrow :(Ypage 121).
The _ indicator lamp in the multifunc-
tion display lights up if it is dark and the
light senso ractivate sthe dipped-beam
headlamps.
If you ar edriving at speeds above
45 km/h:
th eh eadlam prange is set automatically
depending on the distance between the
vehicle and other road users.
If you are driving at speeds above
55 km/ hand no other road users are rec-
ognised: Exterior lighting
125Lights and windscree nwipers Z
Page 129 of 441
the main-bea
mheadlamps are switched on
automatically. The Kindicator lam pin
the instrument cluster also lights up.
If you are driving at speeds below
45 km/ horother road users are recog-
nised or the roads are adequately lit:
the main-beam headlamps are switched off
automatically. The Kindicator lamp in
the instrument cluster goe sout. The _
indicator lamp in the multifunction display
remains lit.
X To deactivate: move the combination
switch back to its normal position.
The _ indicator lamp in the instrument
cluster goes out. Headlamp
smisted up on the inside
The headlamps may mist up on the inside if
ther eish igh atmospheric humidity.
X Switc honthe lights and drive off.
The level of moistur ediminishes, depend-
ing on the lengt hofthe jour neya nd the
weather conditions (humidity and temper-
ature).
If the level of moisture doe snot diminish:
X Hav ethe headlamps checked at aqualified
specialist workshop. Interior lighting
Overview of interior lighting
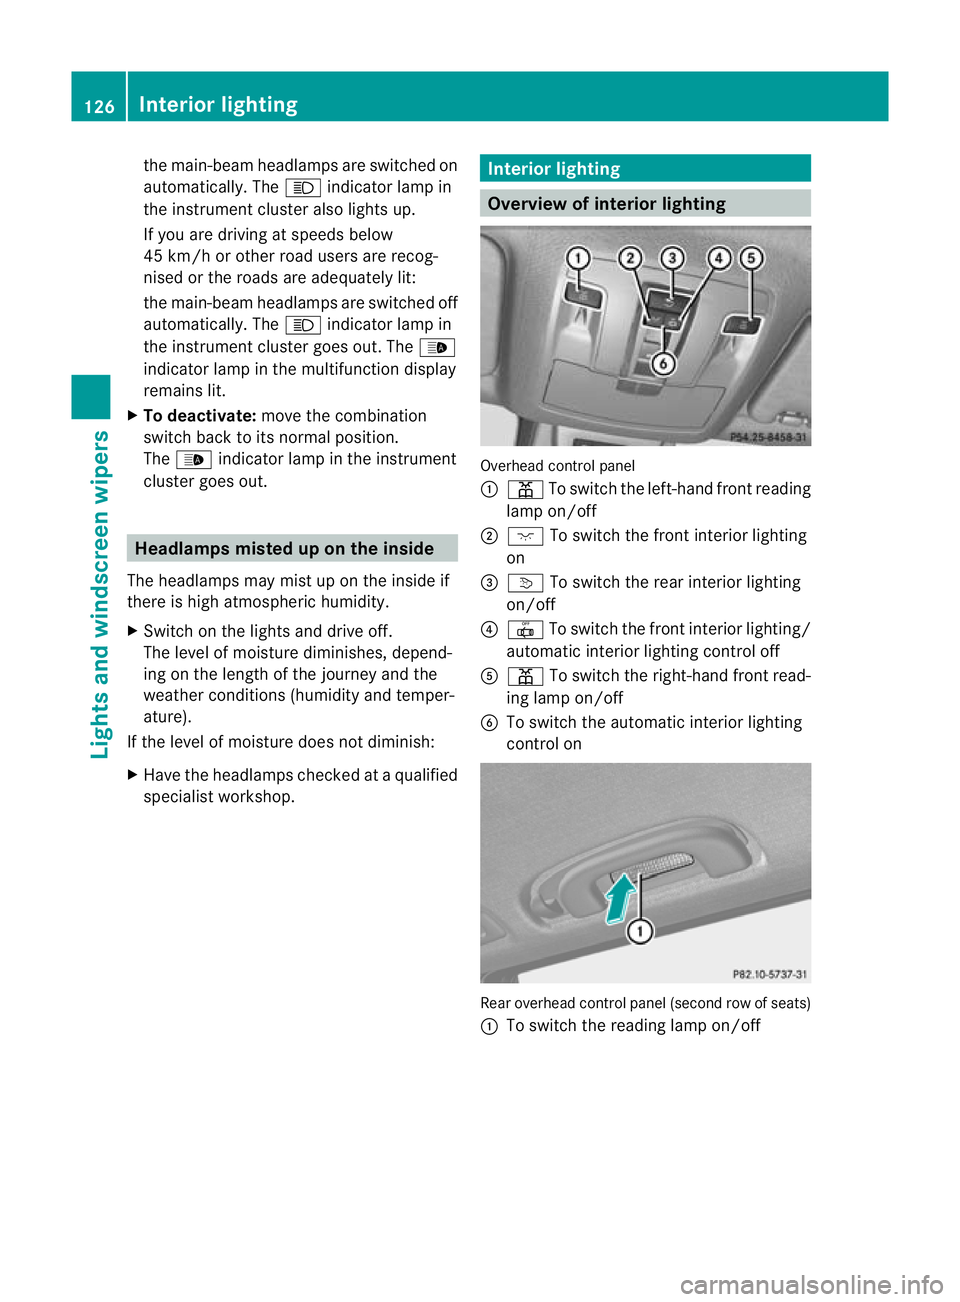
Overhead control panel
:
p To switch the left-hand fron treading
lam pon/off
; c To switch the fron tinterior lighting
on
= v To switch the rear interior lighting
on/off
? | To switch the fron tinterior light ing/
automatic int eriorl ightin gcontrol off
A p To switc hthe right-han dfront read-
ing lamp on/off
B To switch th eautomatic interior lighting
control on Rear overhead control panel (second row of seats)
: To switc hthe readin glamp on/off 126
Interior lightingLight
sand windscreen wipers