display MERCEDES-BENZ GL SUV 2012 Repair Manual
[x] Cancel search | Manufacturer: MERCEDES-BENZ, Model Year: 2012, Model line: GL SUV, Model: MERCEDES-BENZ GL SUV 2012Pages: 441, PDF Size: 10.66 MB
Page 212 of 441
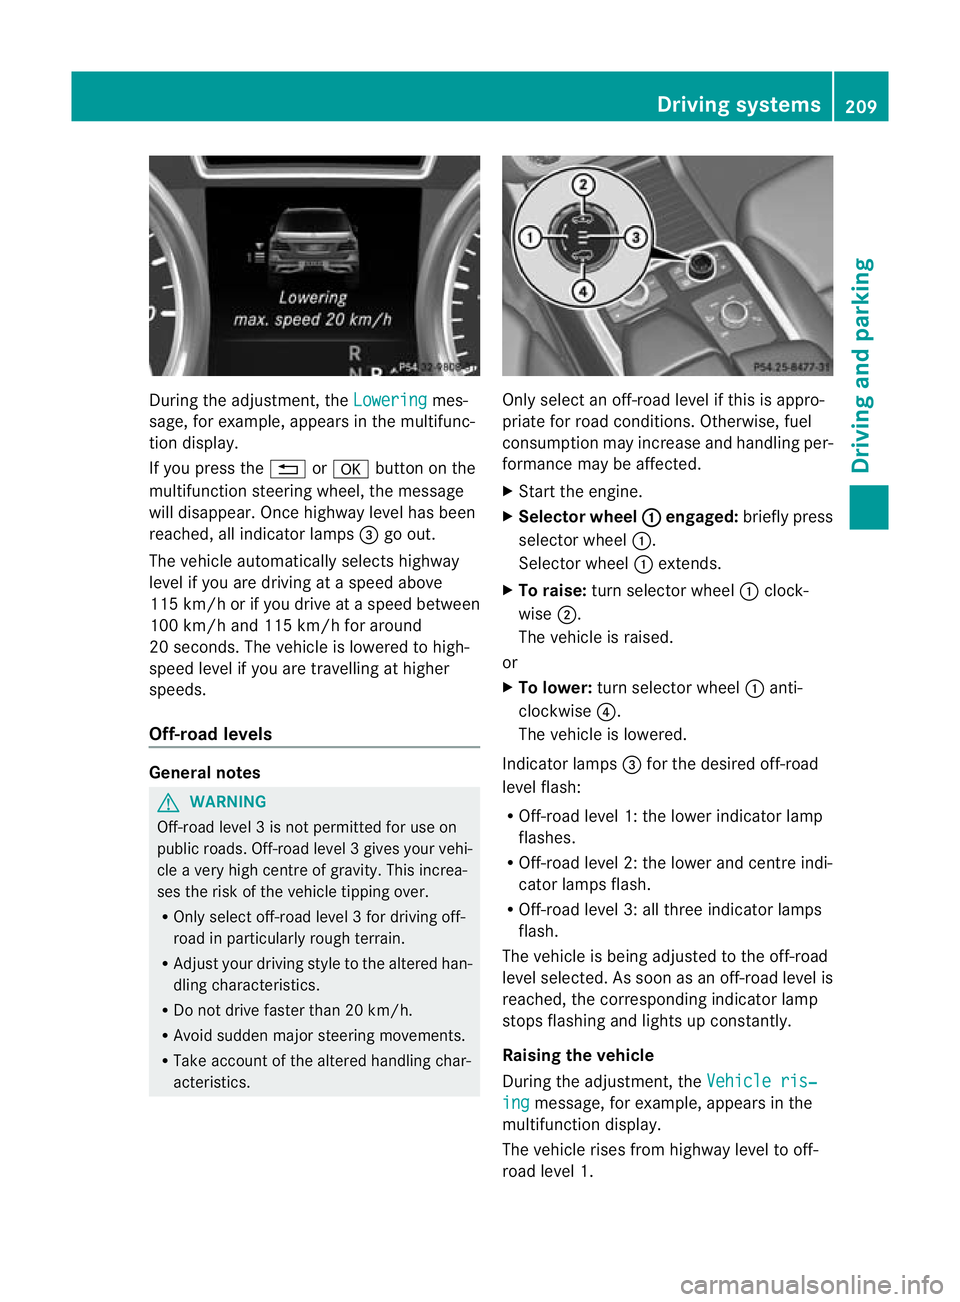
During the adjustment, the
Lowering mes-
sage ,for example, appears in the multifunc-
tion display.
If yo upressthe % ora button on the
multifunction steeri ngwheel, the message
will disappear. Onc ehighway level has been
reached, all indicator lamps =go out.
The vehicle automatically select shighway
level if you are drivin gataspeed above
11 5k m/ horify ou drive at aspeed between
10 0k m/ hand 115 km/h for around
20 seconds. The vehicle is lowered to high-
speed level if you are travelling at higher
speeds.
Off- road levels General notes
G
WARNING
Off-road level 3isn ot permitte dfor use on
public roads. Off -road level 3gives your vehi-
cle avery high centr eofgravity. This increa-
se st he risk of the vehi clet ippin gover.
R Onl yselec toff-road level 3for drivin goff-
road in particularl yrough terrain.
R Adjust your drivin gstyle to the altered han-
dling charac teristics.
R Do not drive faster than 20 km/h.
R Avoid sudden majo rsteering movements.
R Take account of th ealtered handling char-
acteristics. Only select an off-road level if this is appro-
priate for road conditions. Otherwise, fuel
consumption may increase and handling per-
formanc
emay be affected.
X Start the engine.
X Selector wheel : engaged:
briefly press
selector wheel :.
Selector wheel :extends.
X To raise: turn selector wheel :clock-
wise ;.
The vehicle is raised.
or
X To lower: turn selector wheel :anti-
clockwise ?.
The vehicle is lowered.
Indicator lamps =for the desired off-road
level flash:
R Off-road level 1: the lower indicator lamp
flashes.
R Off-road level 2: the lower and centre indi-
cator lamps flash.
R Off-road level 3: all three indicator lamps
flash.
The vehicle is being adjusted to the off-road
level selected .Assoon as an off-road leve lis
reached, th ecorresponding indicator lamp
stops flashing and lights up constantly.
Raising th evehicle
During the adjustment, the Vehicleris‐ ing message
,for example, appear sint he
multifunc tion display.
The vehicle rises from highway leve ltooff-
roa dlevel 1. Driving systems
209Driving and parking Z
Page 213 of 441
If yo
upressthe % ora button on the
multifunction steering wheel, the messa ge
wil ldisappear.
i Up to off-road level 2, you can hide the
messages using the %ora button
on the multif unctio nsteering wheel.
Once off-road level 2has been reached, the
lower and centr eindicator lamps of the selec-
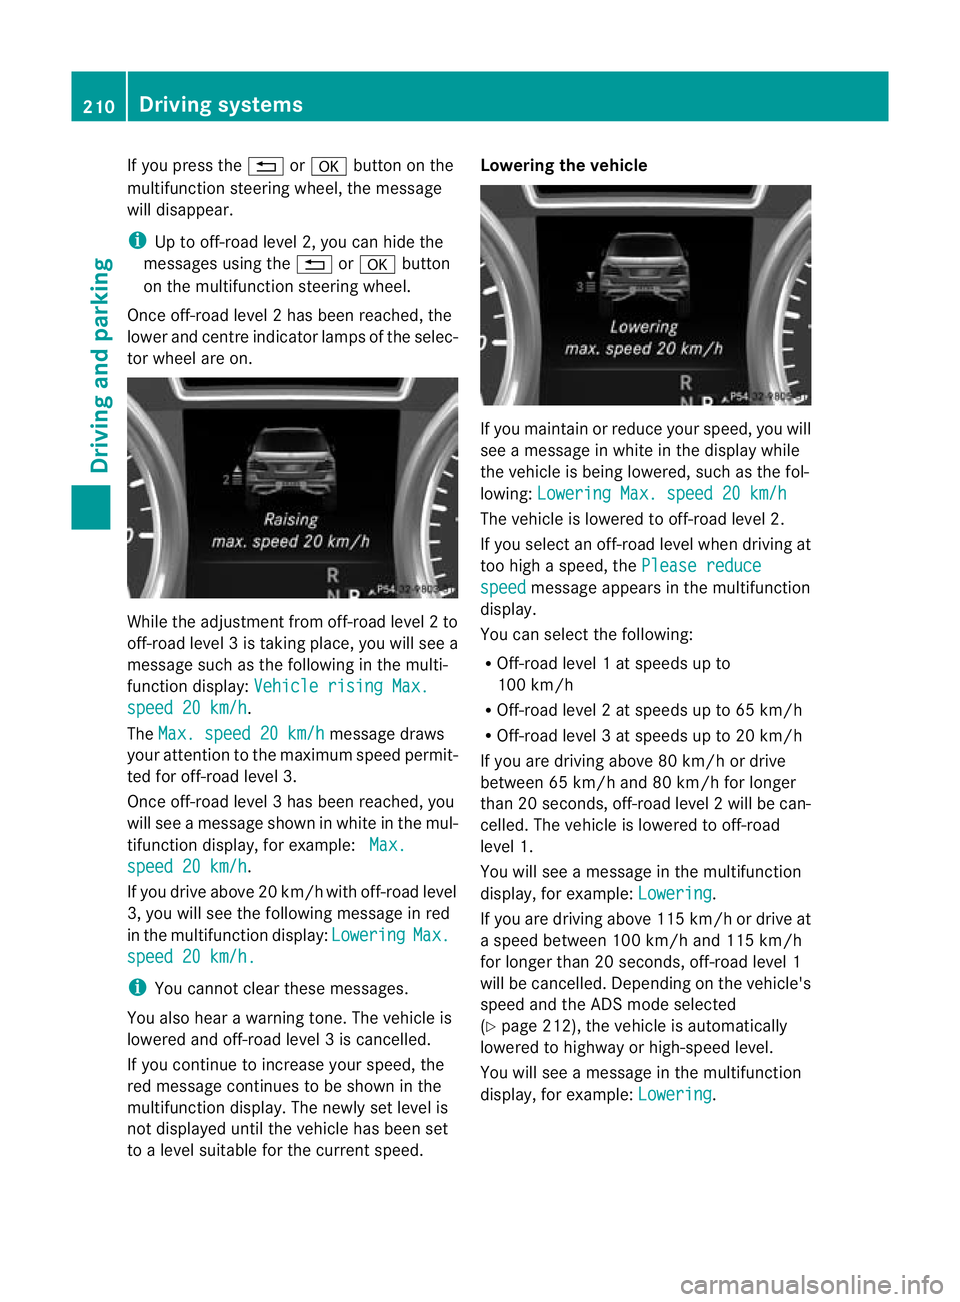
tor wheel are on. While the adjustment from off-road level
2to
off -ro ad level 3istaking place, you will see a
message such as the following in the multi-
function displ ay:Vehicle rising Max. speed 20 km/h .
The Max. speed 20 km/h message draws
your attentio ntothe maximum speed permit-
ted for off-road level 3.
Onc eoff-roa dlevel 3has been reached, you
will see amessage shown in whit eint he mul-
ti fu nction display, for example: Max.spee
d20k m/h .
If yo udrive above 20 km/h wit hoff-road level
3, you wil lsee the followi ngmessage in red
in th emultifunction display: Lowering Max.
spee
d20k m/h. i
Youc annot clear these messages.
You also hear awarnin gtone. The vehicle is
lowered and off-road leve l3iscancelled.
If you continue to increase your speed, the
red message continues to be shown in the
multifunction displ ay.T he newl yset level is
not displayed until the vehicle has been set
to alevel suitable for the curren tspeed. Lowering the vehicle
If you maintain or reduc
eyour speed, you will
see amessage in white in the display while
the vehicle is being lowered, such as the fol-
lowing: Lowering Max. spee d20km/h Th
ev ehicle is lowered to off-road level 2.
If you select an off-road level when driving at
too high aspeed, the Please reduce speed message appears in the multifunction
display.
You can select the following:
R Off-road level 1atspeeds up to
10 0k m/h
R Off-road level 2atspeeds up to 65 km/h
R Off -road leve l3atspeeds up to 20 km/h
If you are drivin gabove 80 km/ hordrive
between 65 km/h and 80 km/h for longer
than 20 seconds ,off-roa dlevel 2will be can-
celled. The vehicle is lowered to off-road
level 1.
You will see amessage in the mul tifunction
display, for example: Lowering .
If you are drivin gabove 11 5km/ hordrive at
as peed between 10 0km/ hand 115 km/h
for longer than 20 seconds ,off-road level 1
wil lbec ancelled. Dependin gonthe vehicle's
speed and the ADS mode selected
(Y page 212), the vehicle is automatically
lowered to highway or high-spee dlevel.
You will see amessage in the multifunction
display, for example: Lowering .210
Driving systemsDriving and parking
Page 215 of 441
R
you depress the brak epedal again wit ha
certain amount of pressure until ëdis-
appears from themultifun ctiondisplay.
R you secur ethe vehi cleu sing the elec tric
parking brake.
R you activat eDISTRONIC PLU S.
i After atime, the electric parking brake
secures the vehicle and relieves the service
brake.
The electric parking brak esecures the vehicle
automatically if the HOL Dfunction is activa-
ted and:
R the driver' sdoor is open and the driver's
seat belt is unfastened.
R the engin eisswitched off, unless it is auto-
matically switched off by the ECO start/
stop function.
R as ystem fault occurs.
R the powe rsupply is not sufficient.
On steep uphill or downhill inclines or if there
is am alfunction, the transmissio nmay also
be automatically shifted int oposition P. AIRMATIC package
Genera lnotes AIRMATI
Cenable sasuspension tuning set-
ting to be selected and regulates the damping
behaviour and level of your vehicle. The sys-
tem comprises aminimum of two compo-
nents. These are AD S(Adaptive Damp ingS ys-
tem) (Y page 212) and level control
(Y page 213) .Your vehicle ma yalso be equip-
ped with the Active Curv eSystem
(Y page 213).
Observe the notes on driving with atrailer
(Y page 257).
ADS (Adaptive Damping System) General notes
ADS adapts th
edamping characteristic sto
the curren toperatin gand driving situation. Thi
sd epends on:
R your drivin gstyle
R the road surface conditions
R the AD Ssetting
R the vehicle level setting
Your selection remains stored even if you
remov ethe key from the igni tion lock.
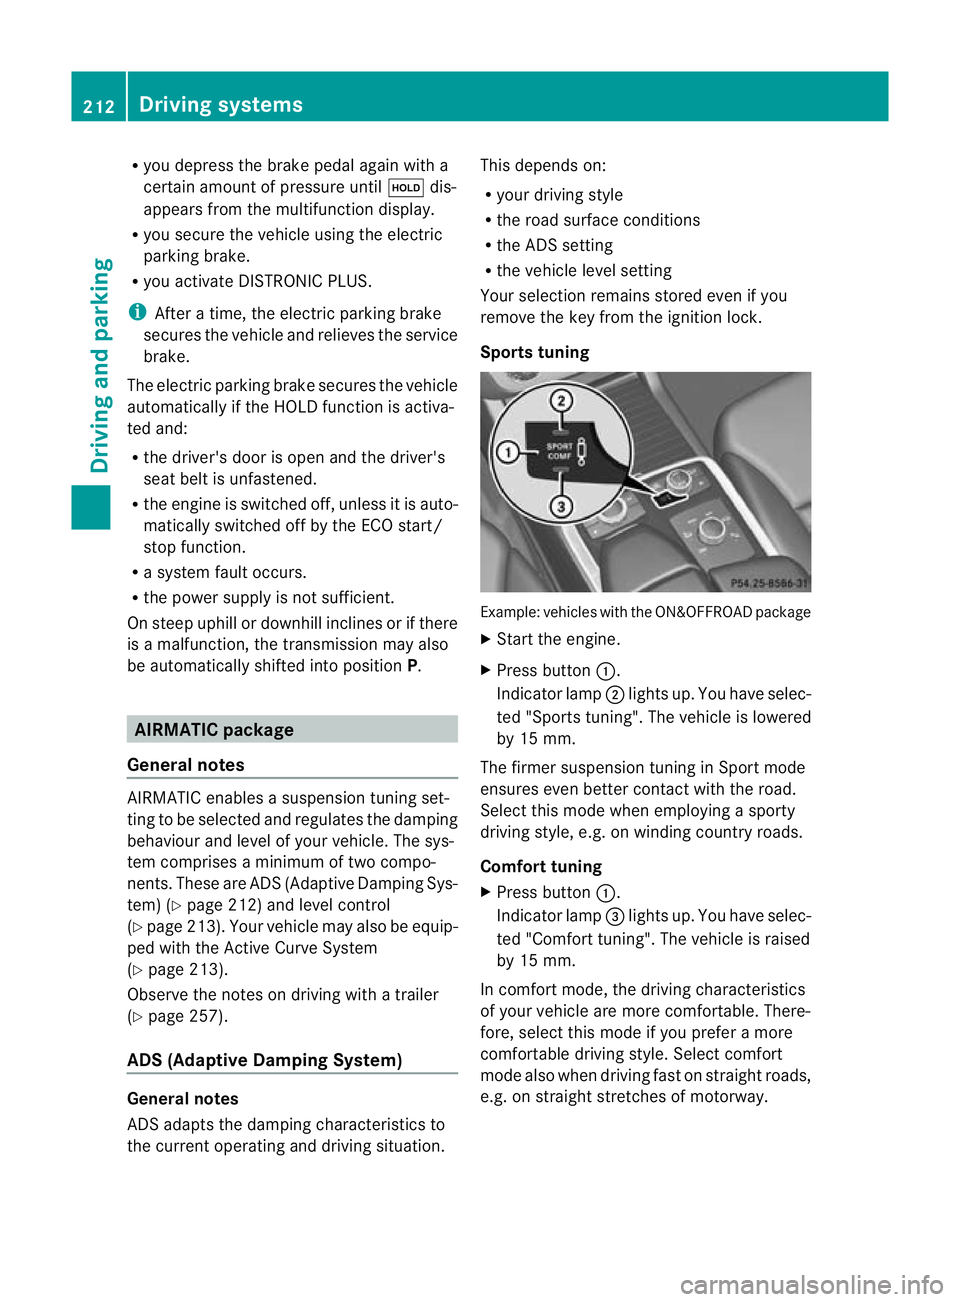
Sports tuning Example: vehicles wit
hthe ON&OFFROA Dpackage
X Start the engine.
X Press button :.
Indicator lamp ;ligh tsup. You have sele c-
ted "Sport stuning". The vehicle is lowered
by 15 mm.
The firmer suspension tuning in Spor tmode
ensures even bette rcontac twith th eroad.
Select this mode when empl oyingasporty
driving style, e.g .onwindingcountr yroads.
Comfor ttun ing
X Press button :.
Indicator lamp =light sup. You have selec-
ted "Comfor ttuning". The vehicle is raised
by 15 mm.
In com fort mode, the dri ving characteristics
of your vehicl eare more comfortable. There-
fore, select this mode if you prefer amore
comfortable drivin gstyle. Select comfort
mode also when driving fast on straigh troads,
e.g. on straight stretches of motorway. 212
Driving systemsDriving and pa
rking
Page 217 of 441
Raised level
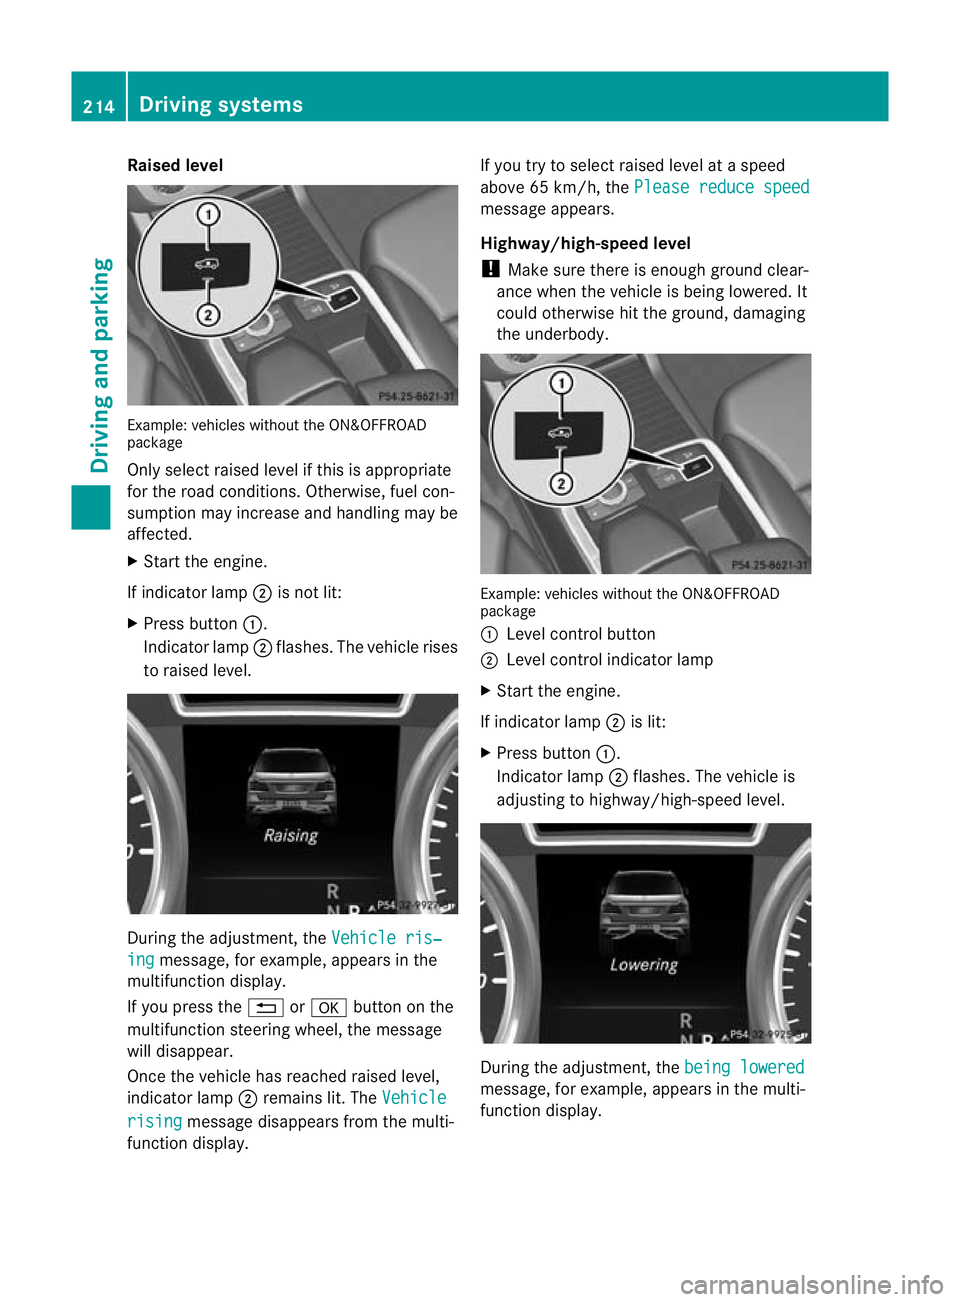
Example
:vehicles without the ON&OFFROAD
package
Only select raised level if this is appropriate
for the road conditions. Otherwise, fuel con-
sumption may increase and handling may be
affected.
X Start the engine.
If indicator lamp ;is not lit:
X Press button :.
Indicator lamp ;flashes. The vehicle rises
to raised level. During the adjustment, the
Vehicleris‐ ing message
,for example, appear sint he
multifunction display.
If you press the %ora button on the
multifunction steerin gwheel, the message
will disappear.
Onc ethe vehicle has reached raised level,
indicat or lamp ;remains lit.T he Vehicle rising message disappear
sfrom th emulti-
function display. If you try to select raised level at
aspeed
above 65 km/h, the Please reduce speed message appears.
Highway/high-speed level
!
Make sure there is enough groun dclear-
ance when the vehicle is being lowered. It
could otherwise hit the ground, damaging
the underbody. Example: vehicles without the ON&OF
FROAD
package
: Level control button
; Level control indicator lamp
X Start the engine.
If indicator lamp ;is lit:
X Press button :.
Indicator lamp ;flashes. The vehicle is
adjusting to highway/high-speed level. During the adjustment
,the bein glowered message
,for example, appears in the multi-
func tion display. 214
Driving systemsDriving and pa
rking
Page 218 of 441
If yo
upressthe % ora button on the
multifunction steering wheel, the messa ge
wil ldisappear.
Once highway level has been reached, indi-
cator lamp ;goes out. The beinglow‐ ered messa
gedisappears from the multi-
function display.
The vehicle autom atically adjusts to highway
level when you:
R drive faster than 80 km/ hor
R driv eatas peed between 65 km/ hand
80 km/h for approximatel y20seconds.
Dependin gonthe ADS setting selected
(Y page 212), the vehicle is lowered to high-
speed level at high speeds. AM
GR IDE CONTROL sports suspen-
sion
Vehicl elevel The vehicle automatically sets the vehicle
level at the rear axle. Rea raxle level control
ensures the best poss iblesuspension and
that the ground clearanc eremains const ant
even when the vehicle is loaded .This
improves drivin gsafety and fuel consump-
tion.
Suspensio ntuning General notes
Th
ee lectronically controlled damping system
works continuously. This improves driving
safety and ride comfort.
The damping is tuned individually to each
wheel and depends on:
R your drivin gstyle, e.g. sporty
R the road surface conditio n,e.g .bum ps
R your individual selection of Sport, Sport +
or Comfort
If you select Sport or Sport +mode and
restar tthe engine, the suspension setting
revert stoComfort mode. Spor
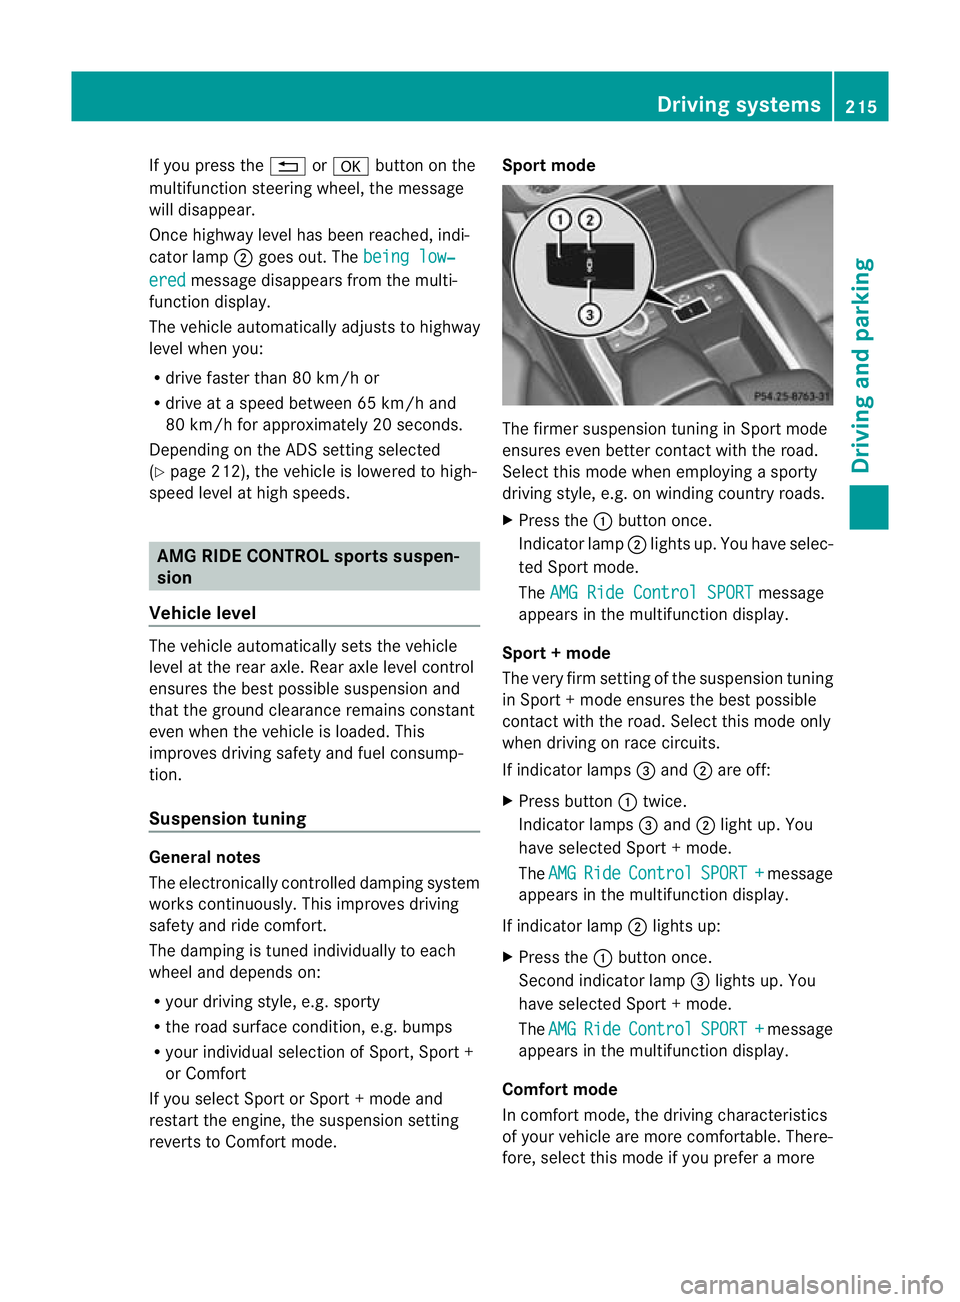
tmode The firmer suspension tuning in Sport mode
ensures even better contact with the road.
Select this mode when employing
asporty
driving style, e.g. on windin gcountry roads.
X Press the :button once.
Indica torlamp ;lights up. You have selec-
ted Sport mode.
The AMGR ide Control SPORT message
appears in th emultifunction display.
Sport +mode
The very firm settin gofthe suspension tuning
in Spor t+mode ensures the best possible
con tact with the road .Select this mode only
when driving on rac ecircuits.
If indicator lamps =and ;are off:
X Press button :twice.
Indicator lamps =and ;light up. You
have selected Sport +mode.
The AMG Ride Control SPORT + message
appear sint he multifunc tion display.
If indicator lamp ;lights up:
X Press the :button once.
Secon dindicato rlamp =lights up. You
have selected Sport +mode.
The AMG Ride Control SPORT + message
appear sint he multifunc tion display.
Comfort mode
In comfor tmode, the drivin gcharacteristics
of your vehicle ar emore comfortable .There-
fore, selec tthis mode if you prefer amore Driving systems
215Driving and parking Z
Page 219 of 441
comfortable driving style. Select comfort
mod
ealsow hend riving fas tonstraightroads,
e.g. on straight str etche sofm otorway.
X Press button :repeatedly unt ilindicator
lamps =and ;go out.
Yo uh aves elec ted Comfort mode.
The AMG Ride Control COMFORT mes-
sage appears in the multifunctio ndisplay. PARKTRONIC
Important safety notes G
WAR
NING
PARKTRONI Cisonly an aid and may not
detect all obs tacles .Itisnotas ubstitut efor
attentive driving.
You are alway sresponsible for safet yand
must continue to pay attention to your imme-
diate surroundings whe nparking and
manoeuvring. You could otherwise endanger
yourself and others. G
WARNING
Make sure that no persons or animals are in
the manoeuvrin grange. Otherwise, they
could be injured.
PARKTRONI Cisanelectronic parking aid with
ultrasonic sensors. It indicates visuallyand
audibl ythe distanc ebetween your vehicle
and an object.
PARKTRONIC is activated automaticall yif
you:
R switch on the ignition
R shift the transmission to position D,Ror N
R release the electri cparking brake
PARKTRONIC is deactivated at speeds above
18 km/h. It is reactivated at lower speeds.
PARKTRONIC monitor sthe ar ea arou ndyour
vehicle using six sensor sint he front bumper
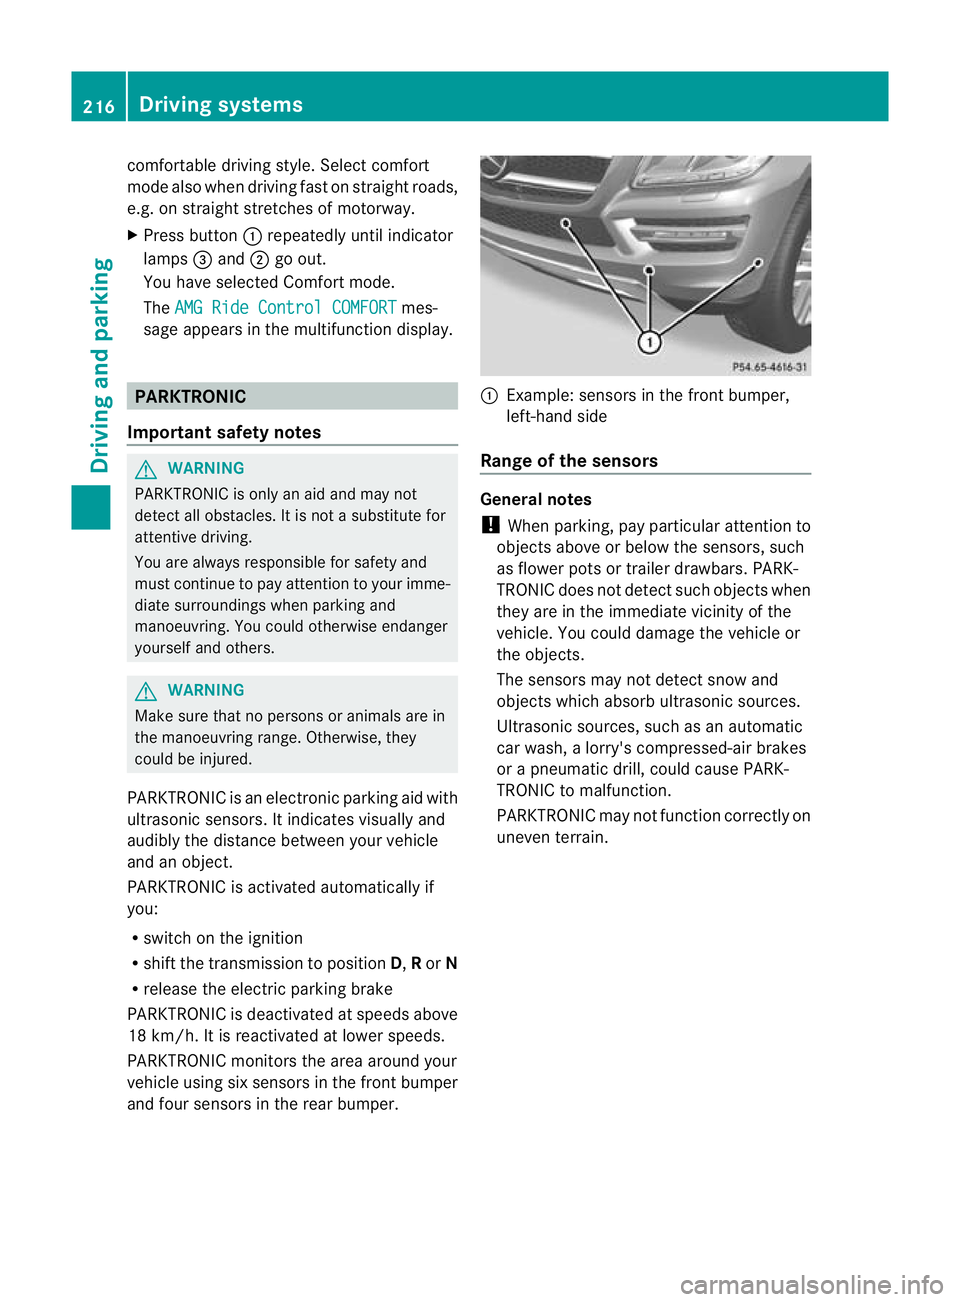
an df our sensor sint he rear bumper. :
Example :sensor sint he front bumper,
left-hand side
Range of th esensors General notes
! When parking ,pay particular attention to
object sabov eorbelow th esensors, such
as flower pot sortrailer drawbars. PARK-
TRONIC does no tdetec tsuch objects when
they are in the immediate vicinity of the
vehicle. You could damage the vehicle or
the objec ts.
The sensors ma ynot detect sno wand
object swhich absor bultrasonic sources.
Ultrasonic sources, such as an automatic
car wash, alorry' scompressed-ai rbrakes
or ap neumatic drill, could cause PARK-
TRONI Ctom alfunction.
PARKTRONI Cmay not function correctly on
uneven terrain. 216
Driving systemsDriving and parking
Page 220 of 441
Sid
eview Top view
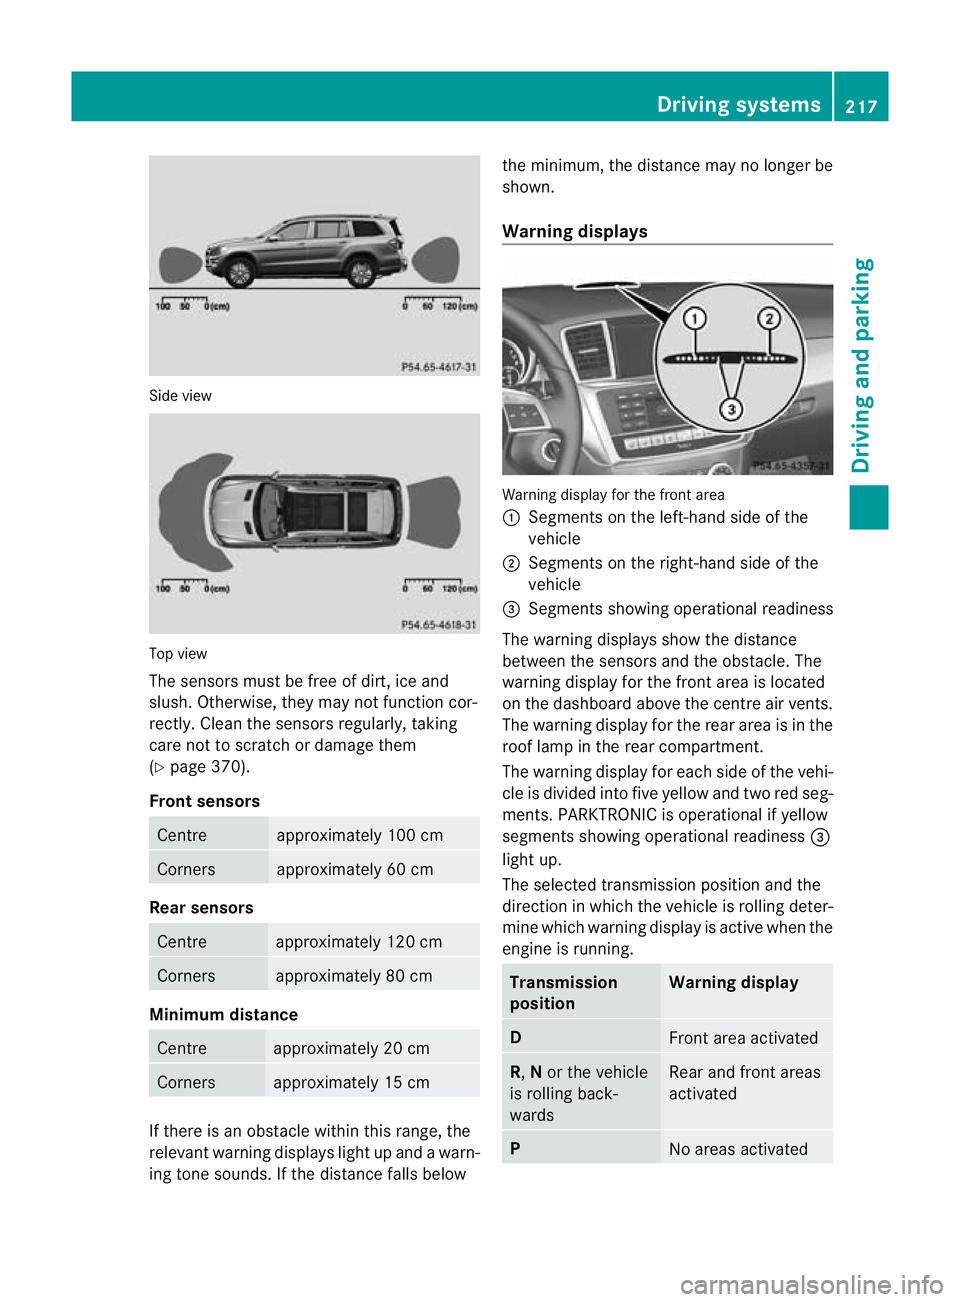
The sensors mus
tbefree of dirt, ice and
slush. Othe rwise, they may not function cor-
rectly. Clean the sensor sregularly, taki ng
care not to scratch or damag ethem
(Y page 37 0).
Front sensors Centre approximately 100 cm
Corners approximately 60 cm
Rear sensors
Centre approximately 120 cm
Corners approximately 80 cm
Minimu
mdistance Centre approximately 20 cm
Corners approximately 15 cm
If ther
eisano bstacle within this range, the
relevant warning displays light up and awarn-
ing ton esounds. If the distan cefall sbelow the minimum, the distanc
emay no longer be
shown.
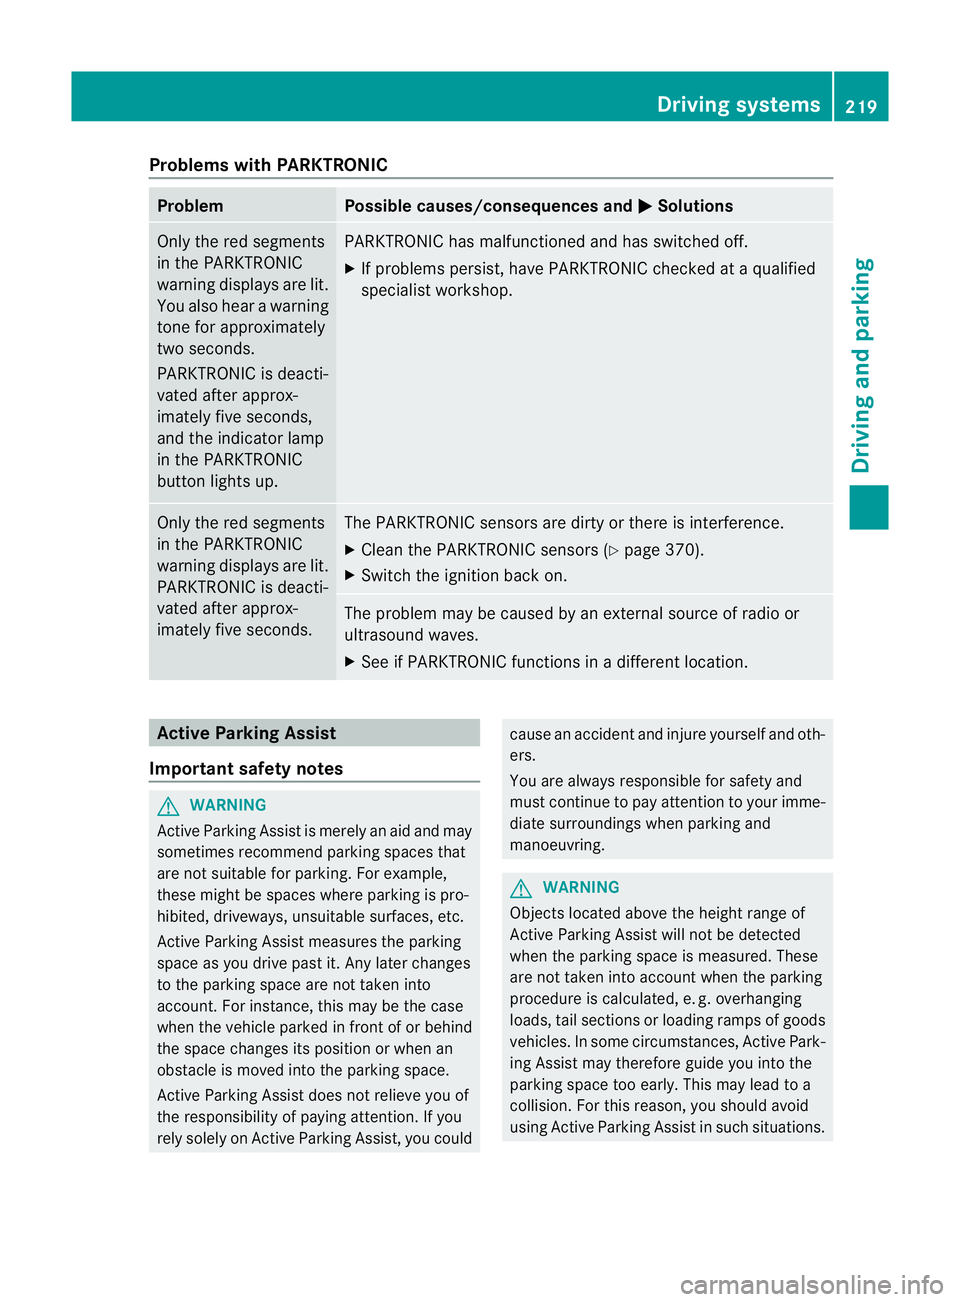
Warning displays Warning display for th
efront area
: Segment sonthe left-hand side of the
vehicle
; Segment sonthe right-hand side of the
vehicle
= Segment sshowing operational readiness
The warning display sshow the distance
betwe enthe sensor sand the obstacle. The
warning displa yfor the front area is located
on the dashboar dabove the centre air vents.
The warning display for the rear area is in the
roof lamp in the rear compartment.
The warning display for each side of the vehi-
cle is divided into fiv eyellow and two red seg-
men ts.P ARKTRONIC is operational if yellow
segments showing operational readiness =
ligh tup.
The selected transmission position and the
direction in which the vehicle is rollin gdeter-
min ewhich warnin gdispla yisa ctive whe nthe
engin eisrunning. Transmission
position Warning display
D
Front area activated
R,
Nor the vehicle
is rolling back-
wards Rear and front areas
activated
P
No areas activatedDriving systems
217Drivingand pa rking Z
Page 222 of 441
Problems wit
hPARKTRONIC Problem Possible causes/consequences and
M Solutions
Only the red segments
in the PARKTRONIC
warning display
sare lit.
Yo ua lso hear awarning
tone for approximately
two seconds.
PARKTRONIC is deacti-
vated after approx-
imately five seconds,
and the indicator lamp
in the PARKTRONIC
button lights up. PARKTRONIC has malfunctioned and has switched off.
X
If problems persist, have PARKTRONIC checked at aqualified
specialist workshop. Only the red segments
in the PARKTRONIC
warning display
sare lit.
PARKTRONIC is deacti-
vate dafter approx-
imatel yfive seconds. The PARKTRONIC sensors are dirty or there is interference.
X
Clean the PARKTRONIC sensors (Y page 370).
X Switc hthe ignition bac kon. The problem may be cause
dbyanexternal source of radio or
ultrasound waves.
X See if PARKTRONIC functions in adifferent location. Active Parking Assist
Important safet ynotes G
WARNING
Active Parkin gAssist is merely an aid and may
sometimes recommen dparking spaces that
are not suitable for parking. For example,
these might be spaces where parking is pro-
hibited ,driveways, unsuitabl esurfaces, etc.
Active Parking Assis tmeasures the parking
space as you driv epast it. Any later changes
to the parking space are not taken into
account. For instance, this may be the case
when the vehicle parked in front of or behind
the space changes its positio norwhen an
obstacle is moved int othe parkin gspace.
Active Parking Assist does not reliev eyou of
the responsibilit yofpaying attention. If you
rely solel yonA ctive Parkin gAssist, you could cause an acciden
tand injure yourself and oth-
ers.
You are always responsible for safety and
must continue to pay attention to your imme-
diate surroundings whe nparking and
manoeuvring. G
WARNING
Objects located above the heigh trange of
Active Parking Assis twill not be detected
when the parking space is measured. These
are not taken into account when the parking
procedure is calculated, e. g. overhanging
loads, tail sections or loading ramps of goods
vehicles. In some circumstances, Active Park-
ing Assist may therefor eguide you into the
parking space too early. This may lead to a
collision. For this reason, you should avoid
using Active Parking Assis tinsuch situations. Driving systems
219Drivingand pa rking Z
Page 224 of 441
Active Parking Ass
isti ss witched on automat-
icall ywhend riving forwards .The system is
operational at speeds of up to approximately
35 km/h. While in operation, the system inde-
pendently locates and measures parking
spaces on both sides of the vehicle. When
drivin gatspeeds below 30 km/ h,you will see
the parking symbol as astatus indicato rinthe
instrumen tcluster .Active Parking Ass ist only
display sparking spaces on the front-
pass enger sid easstandard .Parking spaces
on the driver' sside are displayed as soon as
th et urns ignal on the driver' sside is activa-
ted. To park on the driver' sside, you must
leave the driver' sside tur nsignal switched
on. This must remain switched on until you
acknowledge the use of Activ eParking Assist
by pressing the abutton on the multi-
function steerin gwheel.
When aparking space has been detected, an
arrow towards the right or the left also
appears.
Activ eParking Assist will only detect parking
spaces:
R that are parallel to the direction of travel
R that are at least 1. 5mwide
R that are at least 1. 3mlonger than your
vehicle
Ap arking space is displayed while you are
driving past it, and until you are approx-
imately 15 maway from it.
Parking G
WARNING
PARKTRONI Cand Activ eParking Assist are
merely parking aids and may not detec tall
obstacles. They do not reliev eyou of the
responsibili tyof payin gattention.
You are always responsible for safety and
must continue to pay attention to your imme-
diate surroundings when parking and
manoeuvring. You could, otherwise, endanger
yoursel fand others. G
WARNING
Whe nparking, you need to make sure that no
obstacles are located in the vicinity of the
vehicle durin gthe entire opera tion. Active
Parking Assist does not reliev eyou of the
responsibili tyof payin gattention. It merely
aids you by intervenin gactively in the steer-
ing.
To stop the vehi cleo ravoi dana ccident you
need to apply the brakes yourself.
X Stop the vehi clew hen the par king space
symbo lshows the desired par king space in
the instrumen tcluster.
X Shif tthe transmission to position R.
The Star tPark Assist? Yes: OK No: %
message appe arsint he multifunction
display.
X To cancel th eprocedure: press the
% button on the multifunction steering
whee lorp ull away.
or
X To par kusing Active Parking Assist:
press the abutton on the multifunction
steeri ngwheel.
The Park Assist active Accelerate and brake Observe surroundings mes-
sage appears in the multifunction display.
X Release the multifunction steerin gwheel.
X Reverse the vehicle, being ready to brake
at all times. When reversi ng,d rive at a
spee dbelow 10 km /h.O therwise, Active
Parking Assist will be cancelled.
i In tigh tparking spaces, you will achieve
the best parking results by backin gupas
far as possible .When doing so, also
observe the PARKTRONIC messages.
X Stop as soon as PARKTRONIC sound sthe
continuous warnin gtone, if not before.
Manoeuvrin gmay be required in tight park-
ing spaces.
The Park Assist active Select D Observe surroundings message appears in
the multifunction display. Driving systems
221Driving and parking Z
Page 225 of 441
X
Shift the transmissio ntoposition Dwhile
the vehicle is stationary.
Active Parkin gAssist immediately steer sin
the othe rdirection.
The Park Assist active Accelerate and brake Observe surroundings mes-
sage appears in the multifunction display.
i You will achieve the best results by wait-
ing for the steerin gprocedure to complete
before pulling awa y.
X Drive forwards and be ready to brake at all
times.
X Stop as soo nasPARKTRONIC sounds the
continuous warning tone, if not before.
The ParkAssist active Select R Observe surroundings message appears in
th em ultifunction display.
Further transmissio nshift sm ay be neces-
sary.
As soon as the parking procedure is com-
plete, the Park Assist switched off mes-
sage appears in the multifunc tion display.
PARKTRONIC is still available.
X Manoeuvr eifnecessary.
X Alway sobserv ethe warnin gmessages dis-
played by PARKTRONI C(Ypage 217).
Parking tips:
R on narrow roads, driv easclosely as possi-
ble past the parkin gspace.
R parking spaces that are littered, overgrown
or partially occupied by trailer drawbars
might be identified incor rectly or not at all.
R snowfall or heavy rain may lea dtoap arking
space being measured inaccurately.
R the way your vehicle is positioned in the
parking space after parking is dependent
on various factors. Thes einclude the posi-
tion and shape of the vehicles parked in
front and behind it and the condi tions of the
location .Insome cases, Active Parking
Assist ma yguide you too far into aparking
space, or not far enough into it. In some
cases, it may also lead you across or onto
the kerb. If necessary, you should cancel the parking procedure with Active Parking
Assis
t.
R you can also engag eforward gear prema-
turely. The vehicle redirects and does not
drive as far int othe parkin gspace. Should
ag ear be changed too early, the parking
procedure will be cancelled. Asensible
parkin gposition can no longer be achieved
from this position.
Exiting aparkin gspace G
WARNING
Active Parking Assist doe snot monitor street
traffic .Insome cases, the vehicle will also
tak eyou onto section softhe oncoming lane
when exitin gaparking space.
You are responsible for safety at all times and
must pay attention to any road users
approaching or passing. Stop the vehicle if
necessary or cancel Active Parking Assis t.
Activ eParking Assis tcan only assis tyou with
exitin gaparking space if you have parked the
vehicle using Active Parking Assis t.
X Start the engine.
X Switch on the turn signal on the side facing
the street.
X Shift the transmission to position Dor R.
The Star tPark Assist? Yes: OK No: %
message appears in th emultifunction
display.
X To cancel the procedure: press the
% button on the multifunction steering
wheel or pull away.
or
X To exit aparkin gspace usin gActive
Parking Assist: press theabutton on
the multifunction steering wheel.
The Park Assis tactive Accelerate and brake Observe surroundings mes-
sage appear sinthe multifuncti on display.
X Releas ethe multifunction steeri ngwheel.
X Revers ethe vehi cleo rdrive forwards, being
ready to brake at all times .Donot exceed
am aximum spee dofapproximately 222
Driving systemsDriving and parking