roof MERCEDES-BENZ GL SUV 2012 Owner's Guide
[x] Cancel search | Manufacturer: MERCEDES-BENZ, Model Year: 2012, Model line: GL SUV, Model: MERCEDES-BENZ GL SUV 2012Pages: 441, PDF Size: 10.66 MB
Page 220 of 441
Sid
eview Top view
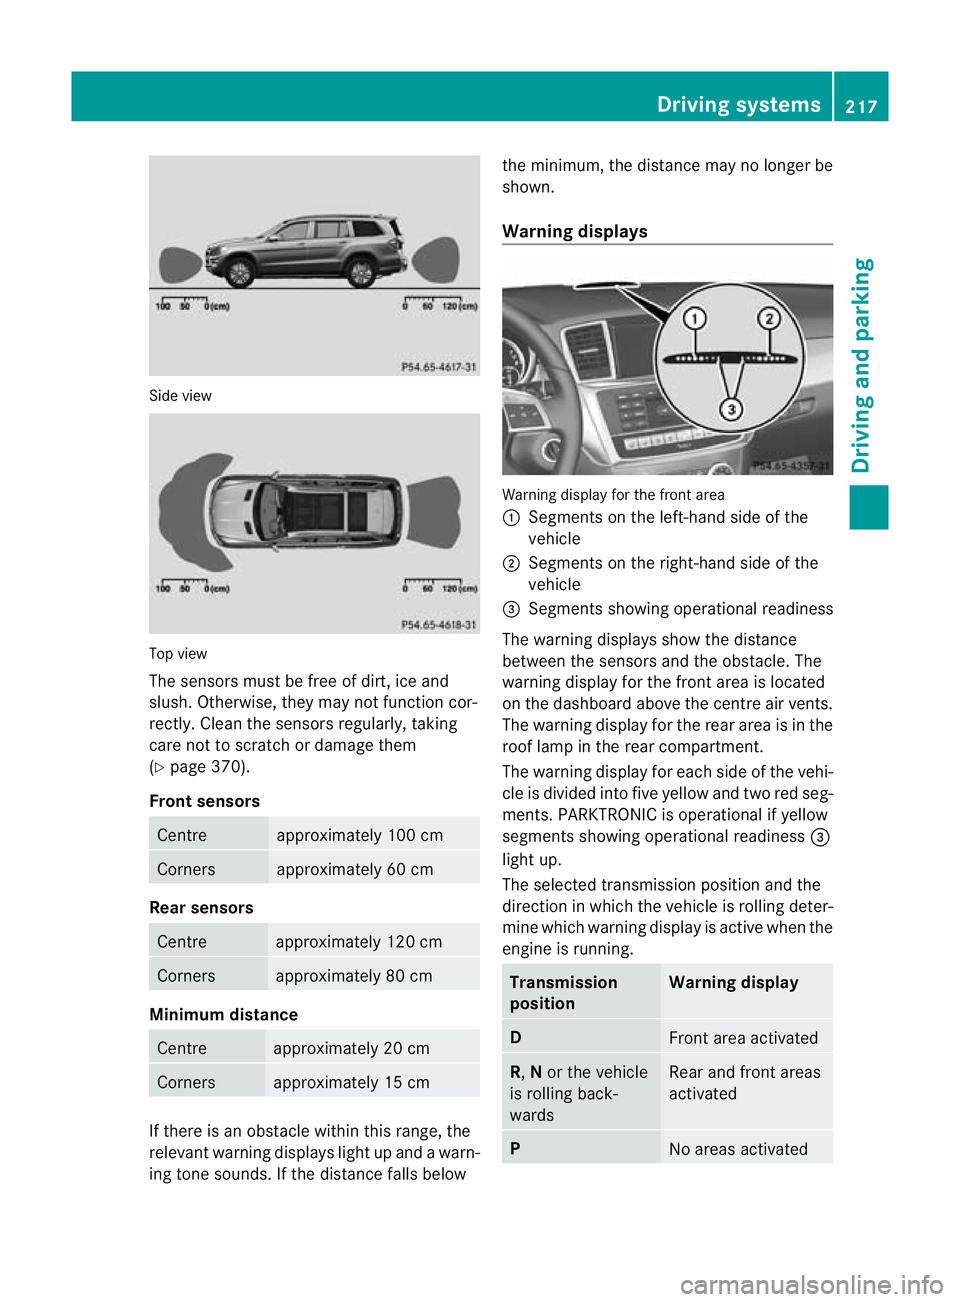
The sensors mus
tbefree of dirt, ice and
slush. Othe rwise, they may not function cor-
rectly. Clean the sensor sregularly, taki ng
care not to scratch or damag ethem
(Y page 37 0).
Front sensors Centre approximately 100 cm
Corners approximately 60 cm
Rear sensors
Centre approximately 120 cm
Corners approximately 80 cm
Minimu
mdistance Centre approximately 20 cm
Corners approximately 15 cm
If ther
eisano bstacle within this range, the
relevant warning displays light up and awarn-
ing ton esounds. If the distan cefall sbelow the minimum, the distanc
emay no longer be
shown.
Warning displays Warning display for th
efront area
: Segment sonthe left-hand side of the
vehicle
; Segment sonthe right-hand side of the
vehicle
= Segment sshowing operational readiness
The warning display sshow the distance
betwe enthe sensor sand the obstacle. The
warning displa yfor the front area is located
on the dashboar dabove the centre air vents.
The warning display for the rear area is in the
roof lamp in the rear compartment.
The warning display for each side of the vehi-
cle is divided into fiv eyellow and two red seg-
men ts.P ARKTRONIC is operational if yellow
segments showing operational readiness =
ligh tup.
The selected transmission position and the
direction in which the vehicle is rollin gdeter-
min ewhich warnin gdispla yisa ctive whe nthe
engin eisrunning. Transmission
position Warning display
D
Front area activated
R,
Nor the vehicle
is rolling back-
wards Rear and front areas
activated
P
No areas activatedDriving systems
217Drivingand pa rking Z
Page 348 of 441
The TIREFI
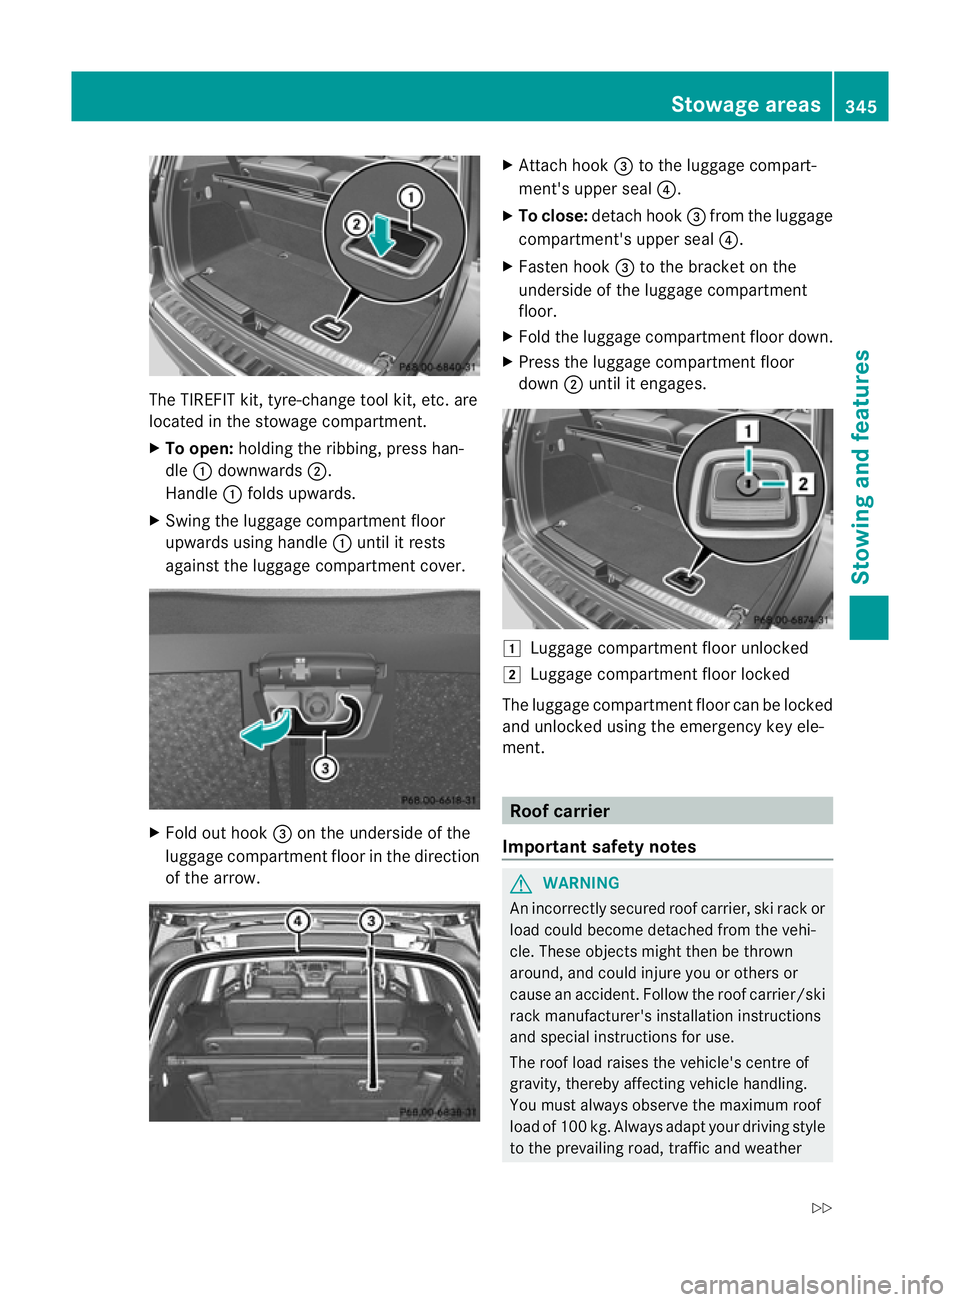
Tkit, tyre- change tool kit, etc. are
located in the stowage compartment.
X To open: holding the ribbing, press han-
dle :downwards ;.
Handle :folds upwards.
X Swing the luggag ecompartmen tfloor
upwards using handle :until it rests
against the luggage compar tment cover. X
Fold out hook =on the underside of the
luggage compartment floor in the direction
of the arrow. X
Attach hook =to the luggage compart-
ment's uppe rseal ?.
X To close: detachhook =from the luggage
compar tment's uppe rseal ?.
X Fasten hook =to the bracket on the
underside of the luggage compartment
floor.
X Fold the luggage compartmen tfloor down.
X Press the luggage compar tment floor
down ;until it engages. 1
Luggag ecompartmen tfloor unlocked
2 Luggage compar tment floor locked
The luggage compartment floor can be locked
and unlocke dusing the emergenc ykey ele-
men t. Roof carrier
Important safety notes G
WARNING
An incorrectly secured roof carrier, ski rack or
load could become detached from the vehi-
cle. These object smight then be thrown
around, and could injur eyou or other sor
caus eana ccident .Follow the roof carrier/ski
rac km anufacturer' sinstallation instructions
and special instructions for use.
The roof load raise sthe vehicle' scentre of
gravity, thereby affecting vehicle handling.
You must always observ ethe maximum roof
load of 10 0kg. Always adapt your driving style
to the prevailin groad, traffic and weather Stowage areas
345Stowing and features
Z
Page 349 of 441
cond
itions and drive with partic ularcareift he
roof is laden.
! Mercedes-Benz recommends that you
only us eroof carrier sthat hav ebeen tested
and approved for Mercedes-Ben zvehicles.
This helps to prevent damage to the vehi-
cle.
Position the load on the roof carrier in such
aw ay that the vehicle will not sustain dam-
age even when it is in motion.
Depending on the vehicle equipment,
ensure that when the roof carrier is fitted
you can:
R raise the sliding sunroof fully
R open the panorama sliding sunroof fully
R open the tailgate fully
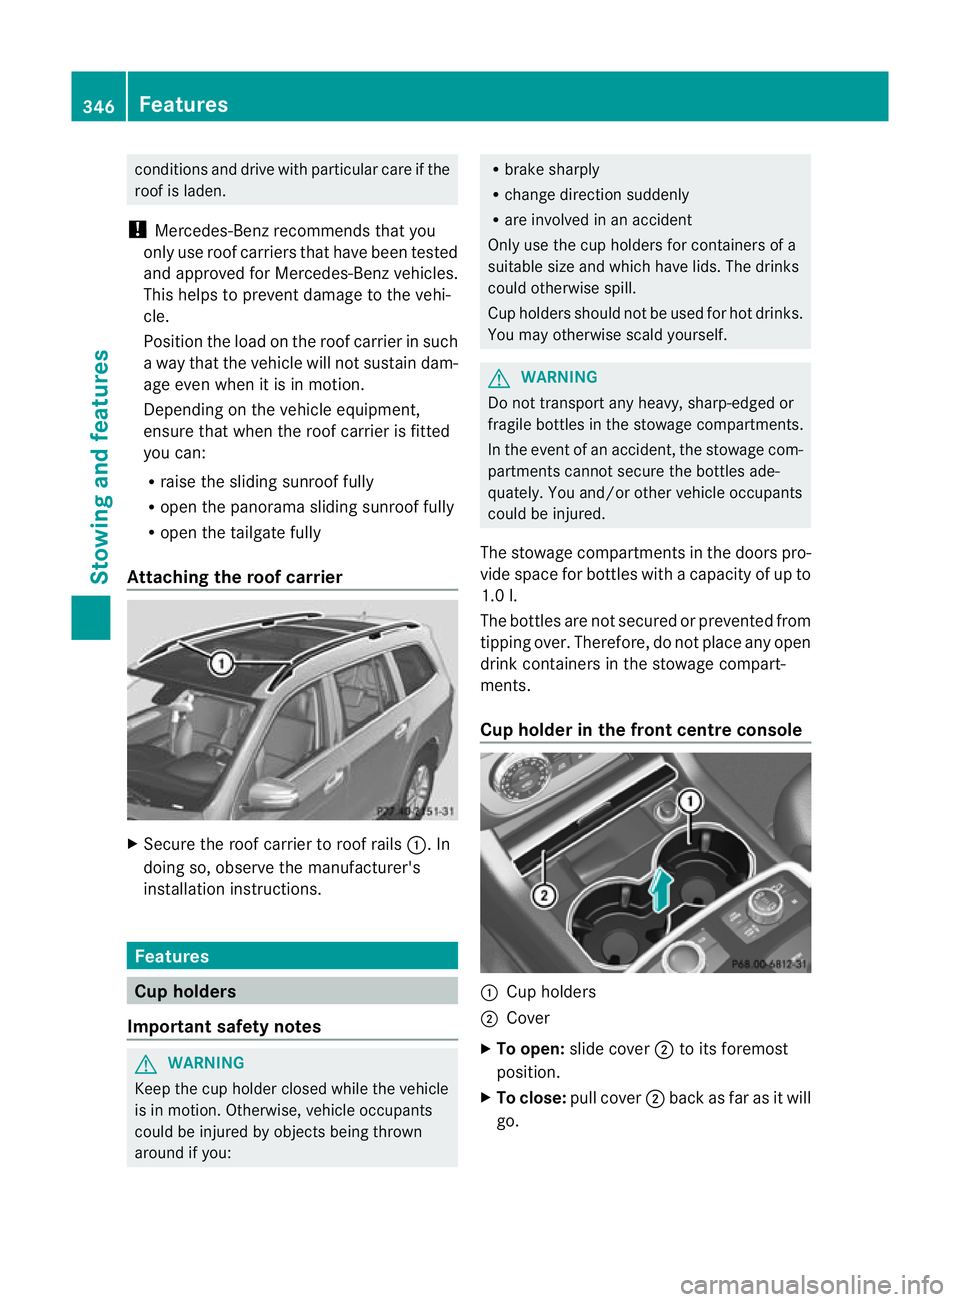
Attaching the roof carrier X
Secure the roof carrier to roof rails :.In
doing so, observe the manufacturer's
installation instructions. Features
Cup holders
Important safety notes G
WARNING
Keep the cup holder closed while the vehicle
is in motion. Otherwise, vehicle occupants
could be injured by object sbeing thrown
around if you: R
brak esharply
R change direction suddenly
R arei nvolved in an accident
Only use the cup holders for containers of a
suitable size and which have lids .The drinks
coul dotherwis espill.
Cup holders should not be used for hot drinks.
You may otherwise scald yourself. G
WARNING
Do not transport any heavy, sharp-edged or
fragile bottles in the stowage compartments.
In the event of an accident, the stowage com-
partment scannot secure the bottles ade-
quately .You and/or other vehicle occupan ts
co uld be injured.
The stowag ecompart ments in the doors pro-
vide space for bottles with acapacity of up to
1.0 l.
The bottles are not secured or prevented from
tipping over. Therefore, do not place any open
drink containers in the stowage compart-
ments.
Cup holder in the front centre console :
Cup holders
; Cover
X To open: slide cover ;to its foremost
position.
X To close: pull cover ;back as far as it will
go. 346
FeaturesStowing and features
Page 370 of 441
G
WARNING
Th ev ehicle is braked when the HOL Dfunction
or DISTRONIC PLUS is activated. Therefore,
deactivate the HOLD function and DISTRONIC
PLUS before the vehicl eiswashed in an auto-
matic car wash.
! Make sure that:
R the side windows and sliding sunroof are
closed completely.
R the blower for the ventilation/heating is
switched off (OFF button is depressed).
R the windscreen wiper switch is at posi-
tion 0.
The vehicl ecould otherwise be dam aged.
! In car washes with atowing mechanism,
make sure that the automatic transmission
is in transmission position N,otherwise the
vehicl ecould be dam aged.
R Vehicles with akey:
do not remove the key from the igniti on
lock. Do not open the driver's door or
front-passenge rdoor when the engin eis
switched off .Otherwise, the automatic
transmission selects park position P
automatically and locks the wheels. You
can prevent this by shiftin gthe auto-
matic transmission to Nbeforehand.
R Vehicles with KEYL ESS-GO:
do not ope nthe driver's door or front-
passenger door when the engin eis
switched off .Otherwise, the automatic
transmission selects park position P
automatically and locks the wheels.
Observe the following to make sure that the
automatic transmission stays in position N:
X Make sure the vehicle is statio naryand the
ignition is switched off.
X Turn the key to position 2(Y page 159 )in
the ignitio nlock.
Use the key instead of the Start/S topb ut-
ton on vehicles with KEYLESS-GO.
X Depress and hold the brake pedal. X
Shift the automatic transmissio ntoposi-
tion N.
X Release the brake pedal.
X Release the electric parkin gbrake.
X Switch off th eignition and leav ethe key in
the ignition lock.
You can wash the vehicle in an automatic car
wash from the ver ystart.
Wash off excess dirt before cleaning the vehi-
cle in an automatic car wash.
After using an automatic car wash ,wipe off
wax from the windscreen and the wiper
blades. This will prevent smears and reduce
wiping noises caused by residue on the wind-
screen.
Washing by hand In some countries, washing by hand is only
allowe
datspecially equipped washing bays.
Observe the legal requirement sfor each indi-
vidual coun try.
X Do not use hot water and do not wash the
vehicle in direct sunlight.
X Use asoft sponge to clean.
X Use amild cleaning agent, such as acar
shampoo approved by Mercedes-Benz.
X Thoroughly hos edown the vehicle with a
gentl ejet of water.
X Do not point the water jet directly towards
the air inlets.
X Use plenty of water and rinse out the
sponge frequently.
X Rinse the vehicle with clean water and dry
thoroughly with achamois.
X Do not let the cleanin gagent dry on the
paintwork.
When using the vehicle in winter, remove all
traces of roa dsalt deposits carefully and as
soon as possible. Care
367Maintenance and care Z
Page 371 of 441
High-pressure cl
eaning equipment G
WARNING
Do not use high-pressure cleaner swith circu-
lar-jet nozzles (dirt grinders) to clean your
vehicle ,inparticular the tyres. You could oth-
erwise damage the tyres and cause an acci-
dent.
! Always maintain adistance of at least
30 cm between the vehicle and the high-
pressure cleaner nozzle. Information about
the correc tdistanc eisavailable from the
equipment manufacturer.
Move the high-pressure cleane rnozzle
around when cleanin gyour vehicle.
Do not aim directly at any of the following:
R tyres
R door gaps, roof gaps, join tsetc.
R electrical components
R battery
R connectors
R lights
R seals
R trim elements
R ven tilation slots
Damaged seals or electrical components
can lead to leaks or failures.
Cleanin gthe paintwork !
Do not affix:
R stickers
R films
R magnetic plate sorsimilar items
to painted surfaces. You could otherwise
damage the paintwork.
Scratches, corrosive deposits, areas affected
by corrosion and damage caused by inade-
quate care cannot always be completely
repaired. In such cases, visit aqualified spe-
cialist workshop. X
Remove impurities immediately, where
possible, whils tavoiding rubbing to ohard.
X Soak insect remains with insect remover
and rinse off the treated areas afterwards.
X Soak bird droppings with water and rinse
off the treated areas afterwards.
X Remove coolant, brake fluid, tree resin,
oils, fuels and greases by rubbing gently
with acloth soaked in petroleum ether or
lighter fluid.
X Use tar remover to remov etar stains.
X Use silicone remover to remove wax.
Care and treatment of mat tpaintwork !
Never polis hthe vehicle or the light alloy
wheels. Polishin gmakes the paintwork
shiny.
! The following may cause the paint to
become shiny and thus reduce the matt
effect:
R Vigorous rubbing with unsuitable mate-
rials.
R Frequent use of car washes.
R Washing the vehicle in direct sunlight.
! Never use paint cleaner, buffing or pol-
ishing products, or glos spreserver, e.g.
wax .These product sare onl ysuitable for
high-glos ssurfaces. Thei ruse on vehicles
wit hm att finish leads to considerable sur-
face damage (shiny, spotted areas).
Always have paintwork repairs performed
at aq ualified specialist workshop, e.g. a
Mercedes-Ben zService Centre.
! Do not use wash programs with ahot wax
treatmen tunder any circumstances.
Observe thes enotes if your vehicle has a
clea rmatt finish. This will help you to avoid
damage to the paintwork due to incorrect
treatment.
Thes enotes also apply to light-alloy wheels
with aclear matt finish. 368
CareMaintenance and care
Page 376 of 441
Mercedes-Benz. You can obtai
nthese
from aqualified specialist workshop.
R clean artificial leather covers with acloth
moistened with asolution con taining
1%d etergen t(e.g. washing-up liquid).
R clean clot hcover switham icrofibre cloth
moistened with asolution containing
1%d etergen t(e.g. washing-up liquid).
Rub carefully, and always wipe entire
seat sections to avoid leaving visible
lines. Leav ethe seat to dry afterwards.
Cleanin gresults depend on the type of
dirt and how long it has been there.
R clean DI NAMIC Acover swithadamp
cloth. Make sure that you wipe entire
seat sections to avoid leaving visible
lines.
! Do not use microfibre cloths to clean gen-
uine leather, artificial leather or DINAMICA
covers. If used often ,these can damage the
cover.
i Notethat regular car eisessential to
make sur ethat the appearanc eand com-
fort of the covers are retained over time.
Cleaning the seat belts !
Do not clean the sea tbelts using chemical
cleanin gagents .Don ot dry the seatbelts
at tempera turesabove 80 †orbye xposing
them to direc tsunlight.
X Use clean ,lukewarm water and soap solu-
tion.
Cleanin gthe roo flining and carpets X
Roof lining: if it is verydirty, use asoft
brush or dry shampoo.
X Carpets: use the carpe tand textile clean-
ing agents recommend edand approved by
Mercedes-Benz. Care
373Maintenance and care Z
Page 401 of 441
Observe the notes on the emergenc
yspare
wheel (Y page 414). MOExtended tyres (tyres with run-flat
characteristics)
With MOExtended tyres (tyres with run-flat
characteristics), you can continue to drive
your vehicle even if there is atotal loss of
pressure in one or mor etyres.
MOExtended tyres may only be used in con-
junction with an active tyre pressure loss
warning syste morwith an activ etyre pres-
sure monitor and on wheels specificall ytes-
ted by Mercedes-Ben z.
No tes on driving with MOExtended tyres with
af lat tyre (Y page 378).
i Vehicles with MOExtended tyres are not
equipped with aTIREFIT kit at th efactory.
It is therefore recommended that you addi-
tionally equi pyour vehicle with aTIREFIT kit
if yo ufit tyres that do not featur erun-flat
characteristics, e.g. winter tyres. ATIREFIT
kit can be obtaine dfrom aqualified spe-
cialist workshop. Winter operation
General notes
Have your vehicle winterproofed at aqualified
specialist worksho patthe onset of winter.
Observ ethe notes in the "Changin gawheel"
section (Y page 404). Driving wit
hsummer tyres
At temperatures belo w+7† ,summer tyres
lose elasticity and therefore traction and
braking power. Change the tyres on your vehi-
cle to M+S tyres .Using summer tyres at very
cold temperatures could cause tears to form,
thereby damaging the tyres permanently.
Mercedes-Benz cannot accept responsibility
for this typ eofdamage. M+S tyres
G
WARNING
M+S tyres with atyre tread depth of less than
4mma re not su itable for use in winter as they
do not provid esufficient traction. There is a
risk of accident.
M+S tyres with atrea ddepth of less than
4mmm ust be replaced.
At temperatures below +7 †, use winter tyres
or all-seas ontyres.B oth types of tyr eare
identified by th eM+S marking.
Onl ywinter tyres bearing the isnowflake
symbol in addition to the M+S marking pro-
vide the best possible grip in wintr yroad con-
ditions.
Only these tyres will allow drivin gsafety sys-
tems such as ABS and ESP ®
to function opti-
mally in winter. Thes etyres have been devel-
ope dspecifically for driving in snow.
Use M+S tyres of the same mak eand tread
on all wheels to maintain safe handling char-
acteris tics.
Alway sobserv ethe maximum permissible
speed specifie dfor the M+S tyres you have
fit ted.
If you fit M+S tyres that have alower maxi-
mu mp ermissible speed than that of the vehi-
cle, affix acorresponding warnin glabel in the
driver' sfield of vision. This can be obtained
at aq ualified specialist workshop.
Under these circumstances, you should also
restrict the maximum spee dofthe vehicle
usin gpermanen tSPEEDTRONIC so that it
does not exceed the maximu mpermissible
speed for the M+S tyres(Y page 198).
When you have fit tedt he M+S tyres:
X Chec kthe tyr epressures (Y page 399).
X Restart th etyre pressure monitor
(Y page 403).
X Restart the tyre pressure los swarning sys-
tem (Y page 401).
For more information on driving with the
emergenc yspare wheel, see (Y page 414).398
Winter opera
tionWheels and tyres
Page 404 of 441
i
The tyr epressure values given for low
load sare minimum values which offe ryou
good rid ecomfor tcharacteristics.
However ,you can also use the values given
for higher loads. These ar epermissible and
will not adversely affect the running of the
vehicle. Ty
re pr essur eloss warning system
Important safety notes While the vehicle is in motion, the tyre pres-
sure loss warnin gsystem monitors the set
tyre pressure using the rotational speed of
the wheels. This enable sthe system to detect
significant pressur eloss in atyre. If the speed
of rotation of awheel changes as aresult of
al oss of pressure, acorrespondin gwarning
message will appea rinthe multifunction dis-
play.
The tyr epressure warning system does not
warn yo uofani ncorrectly set tyre pressure.
Observe the notes on the recommended tyre
pressure (Y page399).
Th et yre pressure los swarning system does
not replace the need to regularly check your
vehicle's tyre pressures, since an even loss of
pressure on several tyres at the same time
cannot be detected by the tyre pressure loss
warning system.
The tyre pressure monitor is not able to warn
you of asudden loss of pressure, e.g. if the
tyre is penetrated by aforeign objec t. Inthe
event of asudden loss of pressure, bring the
vehicle to ahalt by braking carefully. Avoid
abrupt steering manoeuvres.
The function of the tyre pressure loss warning
system is limited or delayed if:
R snow chains are fitted to your vehicle's
tyres.
R road conditions are wintry.
R you are driving on sand or gravel.
R you adopt avery sporty driving style (cor-
nering at high speeds or driving with high
rates of acceleration). R
you are towing avery heavy or large trailer.
R you are driving with aheavy load (in the
vehicle or on the roof).
Resta rting the ty re pressur eloss warn-
ing system Restart the tyre pressure loss warnin
gsystem
if you have:
R changed the tyre pressure
R changed the wheels or tyres
R fitted new wheels or tyres
X Before restarting, make sure that the tyre
pressures are set properly on all four tyres
for the respective operating conditio ns.
The recommended tyr epressures can be
found in th etable on the fuel filler flap.
The tyre pressure loss warning system can
only give reliabl ewarnings if you have set
the correct tyre pressure. If an incorrect
tyre pressure is set, these incorrec tvalues
will be monitored.
X Also observ ethe notes in the sectionon
tyre pressures (Y page 399).
X Make sure tha tthe key is in posi-
tion 2(Ypage 159) in the ignition lock.
X Press the =or; button on the steer-
ing wheel to selec tthe Serv. menu.
X Press the 9or: button to select
Tyre pressure .
X Press the abutton.
The RunF lat Indicator active Restart with OK message appe
arsint he
multifunction display.
If yo uwish to confirm the resta rt:
X Press the abutton.
The Tyre press. no wOK? message
appe arsint he multifunction display.
X Press the 9or: button to select
Yes .
X Press the abutton.
The RunF lat Indicator restarted message appe
arsint he multifunction dis-
play. Ty
re pressure
401Wheelsand ty res Z
Page 424 of 441
This is the case:
R
if they cause achange of the vehicle type
from that for whic hthe vehicle' sgeneral
operating permit was gran ted
R if other road users could be endangered
R if the emission or noise levels are adversely
affected.
Always specify the vehicle identification num-
ber (VIN) (Y page 422)and the engine num-
ber (Y page423) when ordering genuine
Mercedes-Benz parts. Vehicle electronics
Tamperin
gwith the engine electron-
ics G
WARNING
Alway shave work on the engine electronics
and related components carried out at aquali-
fied specialist workshop .Otherwise, the vehi-
cle's operating safety could be affected.
! Only have work carried out on the engine
electro nics and its associated parts ,such
as control units, sensors and connector
leads ,ataq ualified specialist workshop.
Vehicle component smay otherwise wear
more quickly and the vehicle's operating
permit may be invalidated. Retrofitting two-way radios and
mobile phones (RF transmitters)
G
WARNING
Incorrect retrofittin gofRFtransmitters can
caus ethe vehicle electronics to malfunc tion.
The vehicle' soperating safety and thus your
own safety are impaired.
Hav eaftermarket radi ofrequency transmit-
tin ge quipmen tinstalled at aqualified spe-
cialist workshop. G
WARNING
Incorrect retrofittin gofRFtransmitters can
lead to increased electromagnetic radiation in
th ev ehicle interior. Usin ganexterior aerial
takes into account curren tscientific discus-
sions relating to the possible health hazards
that may result from electromagnetic fields.
Have aftermarket radio frequency transmit-
ting equipment installed at aqualified spe-
cialist workshop.
! The operating permit may be invalidated
if the instructions for installation and use of
RF transmitters are not observed.
In particular, the following conditions must
be complied with:
R only approved wavebands may be used.
R the maximum permissible output in
thes ewavebands must be complied with.
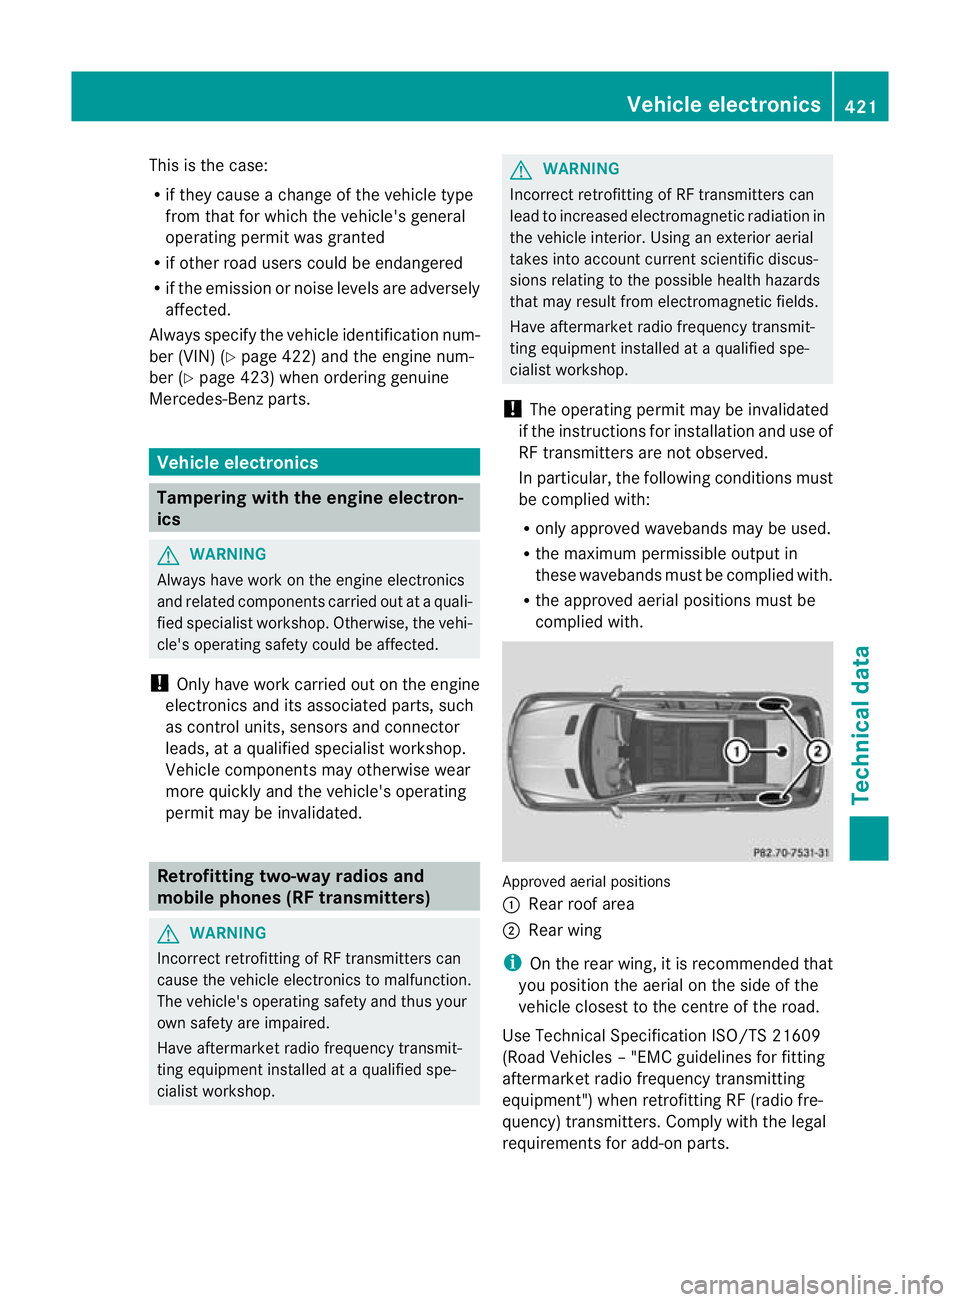
R the approved aerial positions must be
complied with. Approved aerial positions
:
Rear roof area
; Rear wing
i On the rear wing, it is recommended that
you position the aerial on the side of the
vehicle closes ttothe cen treoft he road.
Use Technical Specifi cation ISO/TS 21609
(Road Vehicle s–"EMC guideline sfor fitting
aftermarket radi ofrequenc ytransmitting
equipment") when retrofitting RF (radi ofre-
quenc y)transmitters .Compl ywith the legal
requirements for add-on parts. Vehicle electronics
421Technical data Z
Page 435 of 441
All models (except AMG
vehicles)
Unladen weight
Maximum roof load
10
0kg GL 63 AMG
Vehi
clel ength 514
6mm Vehicle width including
exterio rmirrors 2141 mm
Vehicle width excluding
exterior mirrors
1982 mm
Maximum vehicle height
1903 mm
Minimum vehicle height
1850 mm
Wheelbase
3075 mm
Maximum ground clear-
ance
24
9mm Min
imum ground clear-
ance 198 mm
Un
laden weight 2580 kg
Maximum roof load
100 kg
Traile
rtow hitch Mounting dimensions
! If you have atrailer to whitch retrofitted,
changes to the cooling system and drive
train may be necessary, depending on the
vehicle type.
If you have atrailer to whitch retrofitted,
observ ethe anchorage point sonthe chas-
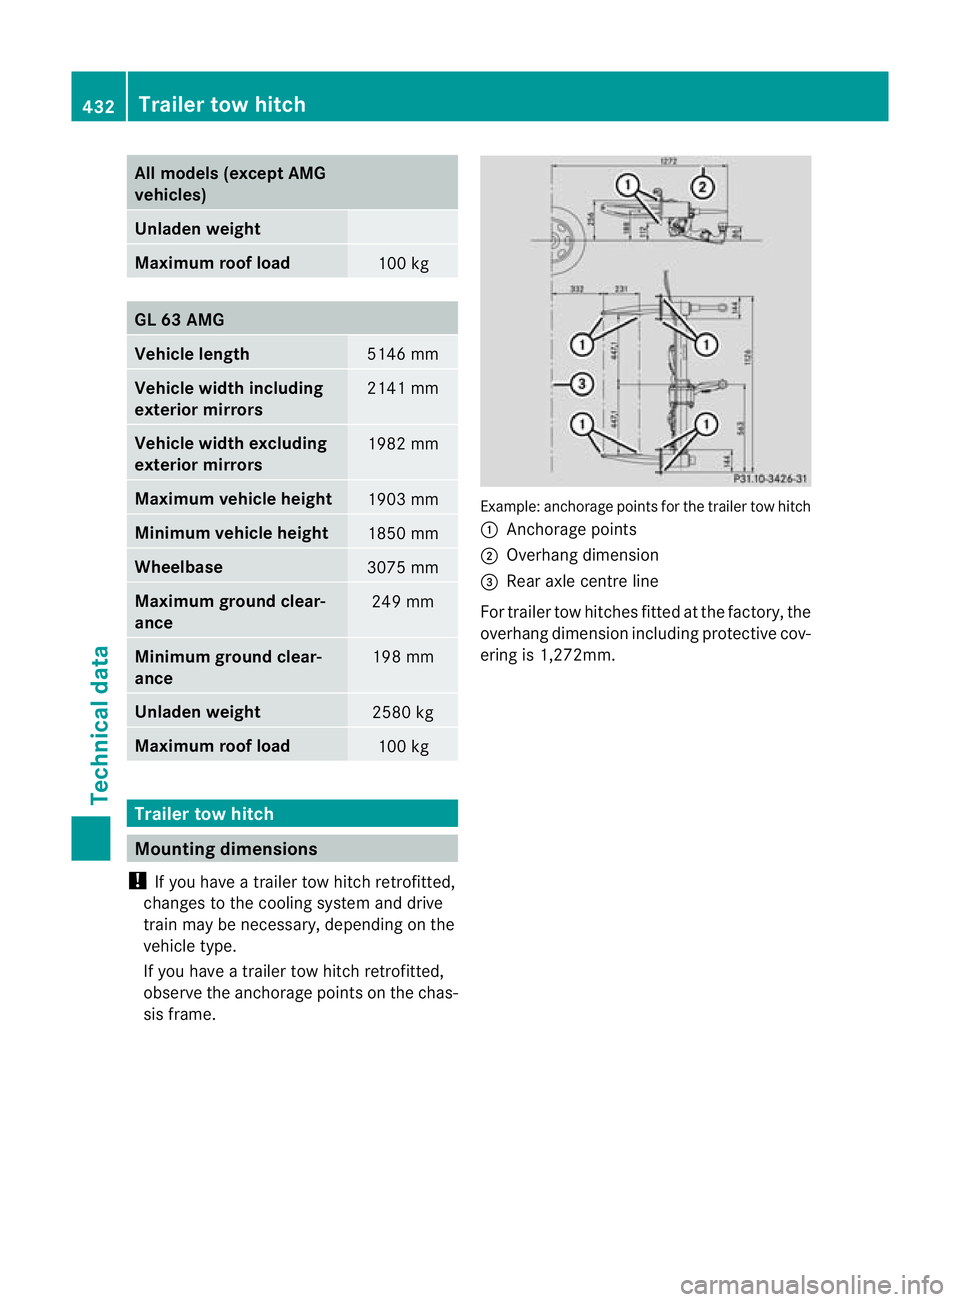
sis frame. Example: anchorage point
sfor the trailer tow hitch
: Anchorage points
; Overhang dimension
= Rear axle centre line
For traile rtow hitches fit tedatt he factory, the
overhang dimension includin gprotective cov-
ering is 1,272mm. 432
Trailer tow hitchTechnical data