ad blue MERCEDES-BENZ GL SUV 2012 Owners Manual
[x] Cancel search | Manufacturer: MERCEDES-BENZ, Model Year: 2012, Model line: GL SUV, Model: MERCEDES-BENZ GL SUV 2012Pages: 441, PDF Size: 10.66 MB
Page 7 of 441
1, 2,
3...
12 Vsocket
see Socket
360°camera
Function/ notes............................. 228
36 0° ca mera
Cleaning ......................................... 370
4ETS (Electronic Traction System) ....66
4MATIC (permanent four-wheel
drive) .................................................. 250A
ABS (Anti-lock Brakin gSystem)
Disp laym essage ............................ 291
Function/notes ................................ 61
Important safety notes ....................61
Warn ingl am p................................. 327
Activating/deactivating air-recir-
culation mode .................................... 146
Activating/d eactivating cooling
with air dehumidification .................141
Activ eBlindS pot Assist
Activating/deactivating (on-
board computer) ............................ 279
Display message ............................ 311
Function/notes ............................. 242
To wing atrailer .............................. 245
Activ eCurv eSyst em
Disp laym essage ............................ 308
Function/notes ............................. 213
Activ eDriving Assistanc epackage .242
Activ eLane Keepi ngAssist
Activating/deactivating (on-
board computer) ............................ 279
Display message ............................ 311
Function/notes ............................. 246
To wing atrailer .............................. 248
Activ elight function ......................... 123
Activ ePark Assist
Display message ............................ 312
Activ eParkin gAssist
Important safety notes ..................219
To wing atrailer .............................. 223
Activ eService System
see ASSYST PLUS
ADAPTIVE BRAKE ................................ .68Adaptive Brak
eAssist
Display message ............................ 297
Function/notes ................................ 64
Adaptive brake lamps .........................65
Adaptive Dampi ng System
see ADS (Adaptive Damping System)
Adaptive High beam Assist
Display message ............................ 303
Function/notes ............................. 124
Adaptive Main-beam Assist
Switch ingo n/off (on-board com-
puter) ............................................. 281
AdBlue ®
Display message ............................ 306
Fil ling capacity ............................... 428
Important safety notes ..................427
Service ind icator ............................ 366
topping up ..................................... 178
AdBlue ®
service indicator ................366
Additive s(engine oil)........................ 429
AD S(Ad aptiv eDampin gSystem)
Function/note s............................. 212
Airbags
Front airba g(driver, front
passenger) ....................................... 43
Important safety gu idelines ............. 42
Kneeba g.......................................... .44
Sidebag ............................................ 44
Trigg ering ........................................ .41
Windowbag ...................................... 45
Air-co nditionin gsyst em
se eC limate control
Ai rf ilter (whit edisplay message) ....306
AI RF LOW ........................................... 143
AIRMATIC package ADS (Ad aptive Damping System) ...212
Function/notes ............................. 212
Leve lcontrol .................................. 213
Ai rp ressure
see Tyr epres sure
Ai rv ents
Glove compartmen t....................... 154
Important safety notes ..................154
Rea r............................................... 155
Setting ........................................... 154
Setting the centre ai rvents ........... 154
Setting the si deairv ents ............... 154 4
Index
Page 9 of 441
Auxiliar
yventila tion
Activating/deac tivating ................. 148
Activating/deactivating (o nthe
centr econsole) .............................. 149
Pro blem (display message) ............153
Remote control .............................. 149
Ax leload, permissible (traile rtow-
ing) ...................................................... 433 B
Ba gh ook ............................................ 343
Ball coupli ng
Folding in ....................................... 261
Fol ding out ..................................... 259
BAS (Brake Assist System) .................62
BAS PL US(Brak eAssist System
PLUS) .................................................... 62
Battery (key) Checking ...... .................................... 79
Important safety note s.................... 79
Replacing ......................................... 79
Battery (v ehicle)
Charging ........................................ 384
Display message ............................ 305
Important safety notes ..................382
Jump starting ................................. 386
Overview ........................................ 382
Belt
seeS eat belt
Belt force limiters (activation) ...........41
Bel ttensioner
Activatio n......................................... 41
Functio n.......................................... .49
Blind Spo tAssist
Activating/deactiva ting ................. 279
Display message ............................ 311
Notes/function .............................. 238
Traile rtowing ................................. 240
se eA ctive Blind Spo tAssist
BlueTEC
Topping up AdBlue ®
...... ................. 178
BlueTE C(AdBlue ®
) ............................. 427
Bon net
Active bonne t(pedestrian protec-
tion) ............................................... 360
Closing ........................................... 361 Display message
............................ 320
Opening ......................................... 360
Boot
seeT ailgate
Brak eAssist System
see BAS (Brake Assist System)
Brake fluid
Display message ............................ 296
Note s............................................. 429
Brake lamps
Ada ptive .......................................... .65
Changin gbulbs .............................. 131
Display message ............................ 301
Brakes
ABS .................................................. 61
Ada ptive Brake Assist ......................64
BAS .................................................. 62
BAS PLUS ........................................ 62
Brake fluid (notes )......................... 429
Display message ............................ 291
Driving tip s.................................... 184
High-performance brake sy stem .... 186
Important safety notes ..................184
Parking brake ................................ 182
Warn ingl am p................................. 326
Breakdown
seeF lat tyre
see Towing away
Bulbs
see Changing bulbs C
Callin gupaf ault
se eD isplay messages
Car
see Vehicle
Care
360 °camera ................................. 370
Automatic car wash .......................366
Carpets .......................................... 373
Display ........................................... 371
Exhaust pi pe.................................. 371
Exterio rlighting ............................. 369
Gea rors electo rlever .................... 372
High-pressure cle aner ...... .............. 368
Interior ........................................... 371
Matt paintwork .............................. 3686
Index
Page 112 of 441
Driver's and front-p
assenger seat Rear seats
Th
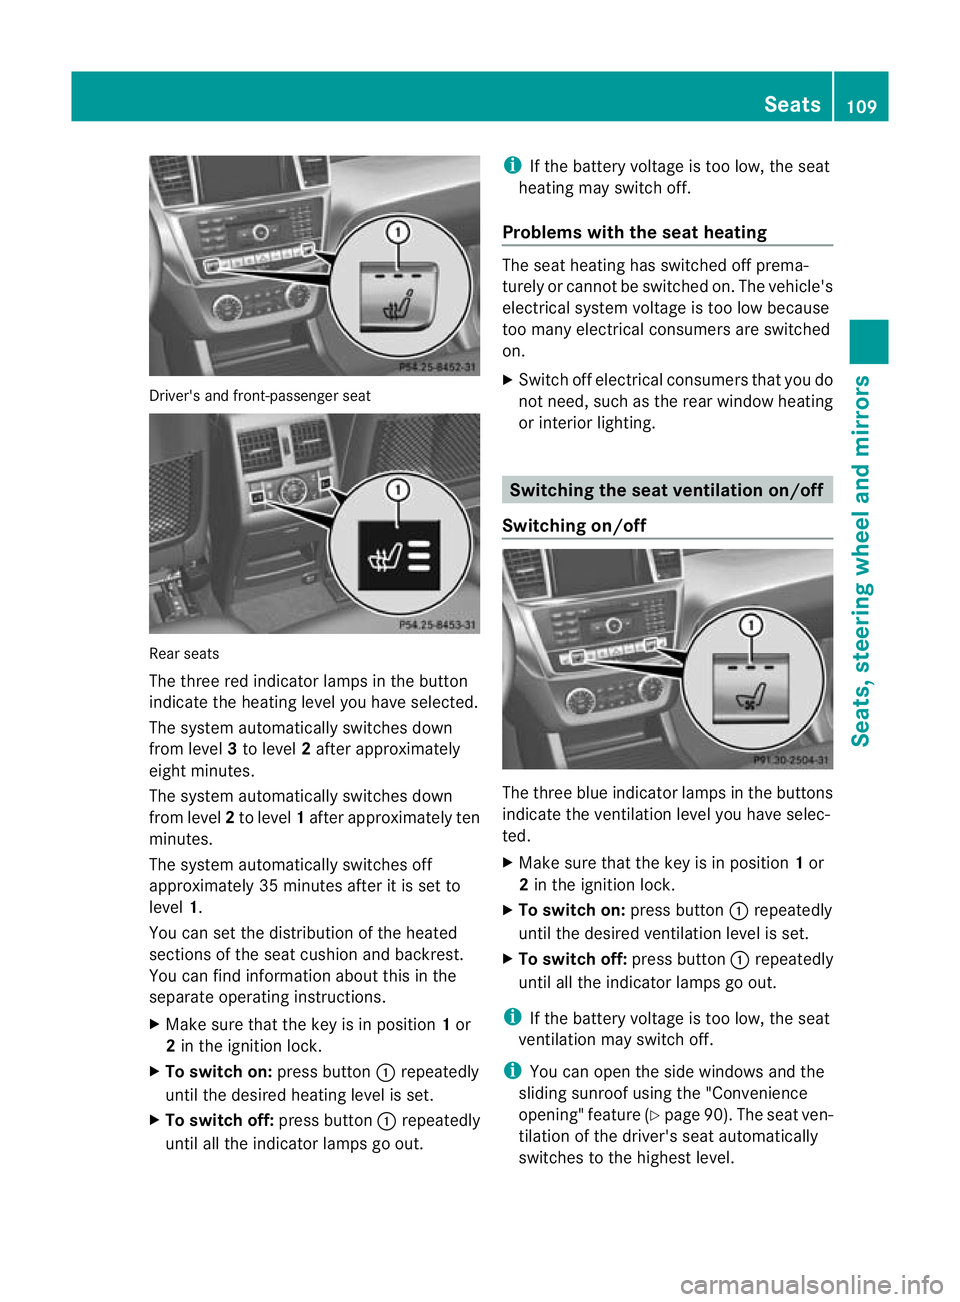
et hree red indicat or lampsinthebutton
indicat ethe heating lev el youhave selected.
The system automatically switches down
from level 3to level 2after approximately
eight minutes.
The system automatically switches down
from level 2to level 1after approxima tely ten
minutes.
The system automatically switches off
approximately 35 minutes after it is set to
level 1.
You can set the distribution of the heated
sections of the seat cushion and backrest.
You can find information about this in the
separate operatin ginstructions.
X Make sure that the key is in position 1or
2 in the ignition lock.
X To switch on: pressbutton :repeatedly
until the desired heating level is set.
X To switch off: press button:repeatedly
until all the indicator lamps go out. i
If the batter yvoltage is too low, the seat
heatin gmay switch off.
Problems with the seat heating The seat heating has switched off prema-
turely or cannot be switched on. The vehicle's
electrical system voltage is too low because
too many electrical consumers are switched
on.
X
Switc hoff elect rical consumers that you do
not need, such as the rear window heating
or interior lighting. Switchin
gthe seat ventilation on/off
Switchin gon/off The three blue indicator lamps in the buttons
indicat
ethe ven tilation level you have selec-
ted.
X Make sure that the key is in position 1or
2 in the ignition lock.
X To switch on: press button:repeatedly
until the desired ventilation level is set.
X To switch off: press button:repeatedly
until all the indicator lamps go out.
i If the batter yvoltage is too low, the seat
ven tilation may switch off.
i You can open the side windows and the
sliding sunroof using the "Convenience
opening" featur e(Ypage 90). The seat ven-
tilation of the driver' sseat automatically
switches to the highest level. Seats
109Seats, steering wheel and mirrors Z
Page 125 of 441
Main-beam headlamps
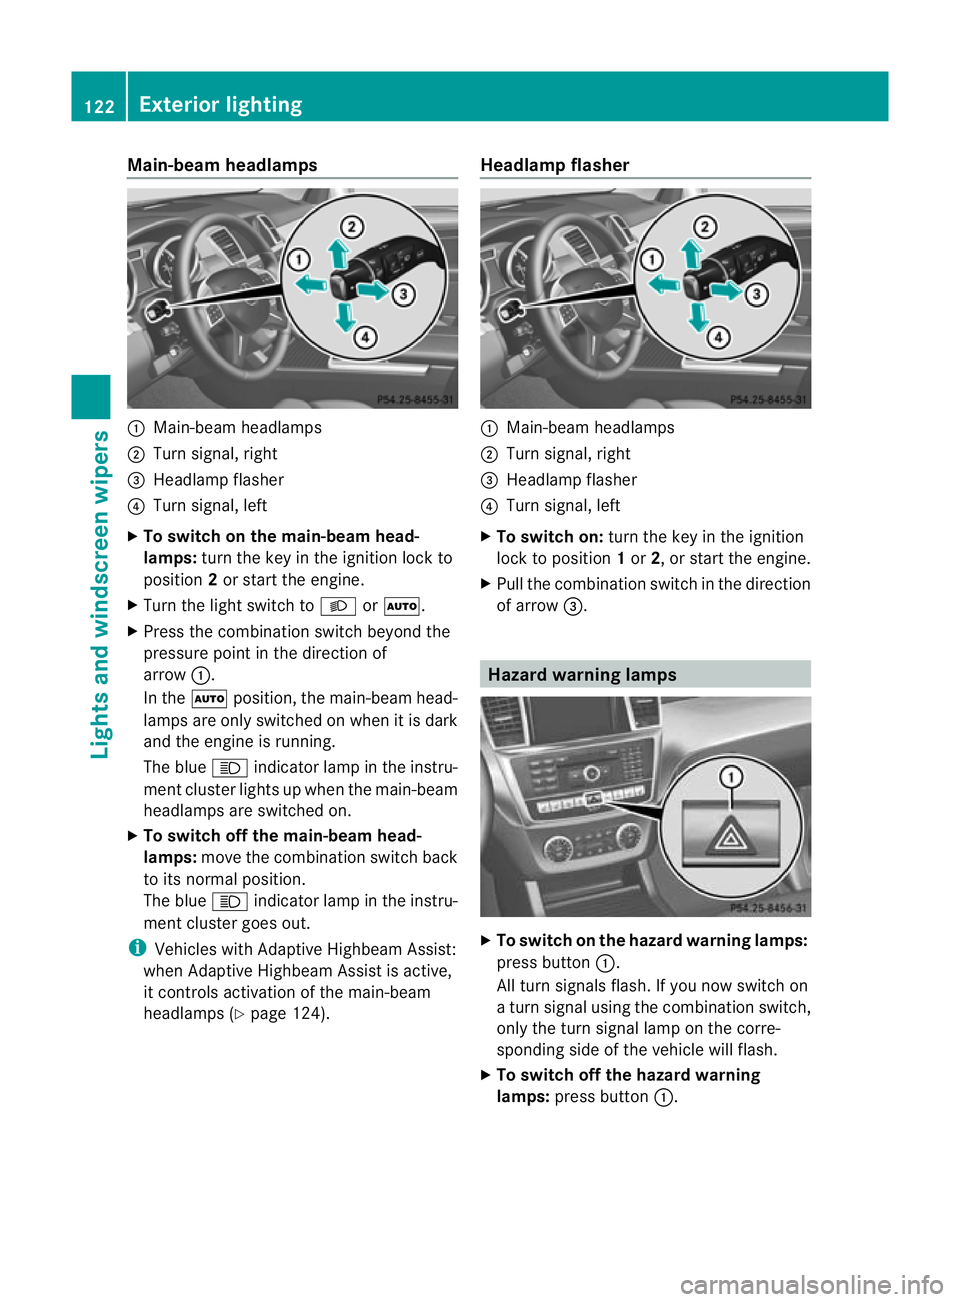
:
Main-beam headlamps
; Turn signal, right
= Headlam pflasher
? Turn signal, left
X To switch on the main-beam head-
lamps: turn the key in the ignitio nlock to
position 2or star tthe engine.
X Tur nthe light switch to LorÃ.
X Press the combination switch beyond the
pressure point in the direction of
arrow :.
In the Ãposition, the main-beam head-
lamps ar eonly switched on whe nitisdark
and the engine is running.
The blue Kindicator lamp in the instru-
ment cluster lights up when the main-beam
headlamps are switched on.
X To switch off the main-beam head-
lamps: move the combinatio nswitch back
to its normal position.
The blue Kindicator lamp in the instru-
ment cluster goes out.
i Vehicles with Adaptive Highbeam Assist:
when Adaptive Highbeam Assist is active,
it controls activation of the main-beam
headlamps (Y page124). Headlamp flasher :
Main-beam headlamps
; Turn signal, right
= Headlam pflasher
? Turn signal, left
X To switch on: turn the key in the ignition
lock to position 1or 2,ors tart the engine.
X Pul lthe combination switch in the direction
of arrow =. Hazard warning lamps
X
To switch on th ehazard warnin glamps:
press button :.
All turn signals flash .Ifyou now switch on
at urn signa lusing the combination switch,
only the tur nsigna llam pont he corre-
sponding side of the vehicle will flash.
X To switch of fthe hazard warn ing
lamps: press button :.122
Exterior lightingLights and windscreen wipers
Page 152 of 441
manu
al.O ptimum comfor tcan be attained
when the system is set to automatic mode.
Set the temperature to 22 †.
The auxiliary heating/ventilatio ncan be acti-
vated or deactivated using the remote con trol
or th ebutton on the centr econsole.
Th eo n-bo ard computer can be used to spec-
ify up to three departur etimes, one of which
may be preselec ted( Ypage 28 4).
Switching th eauxiliary heating/ven ti-
lation on/off usin gthe centr econsole
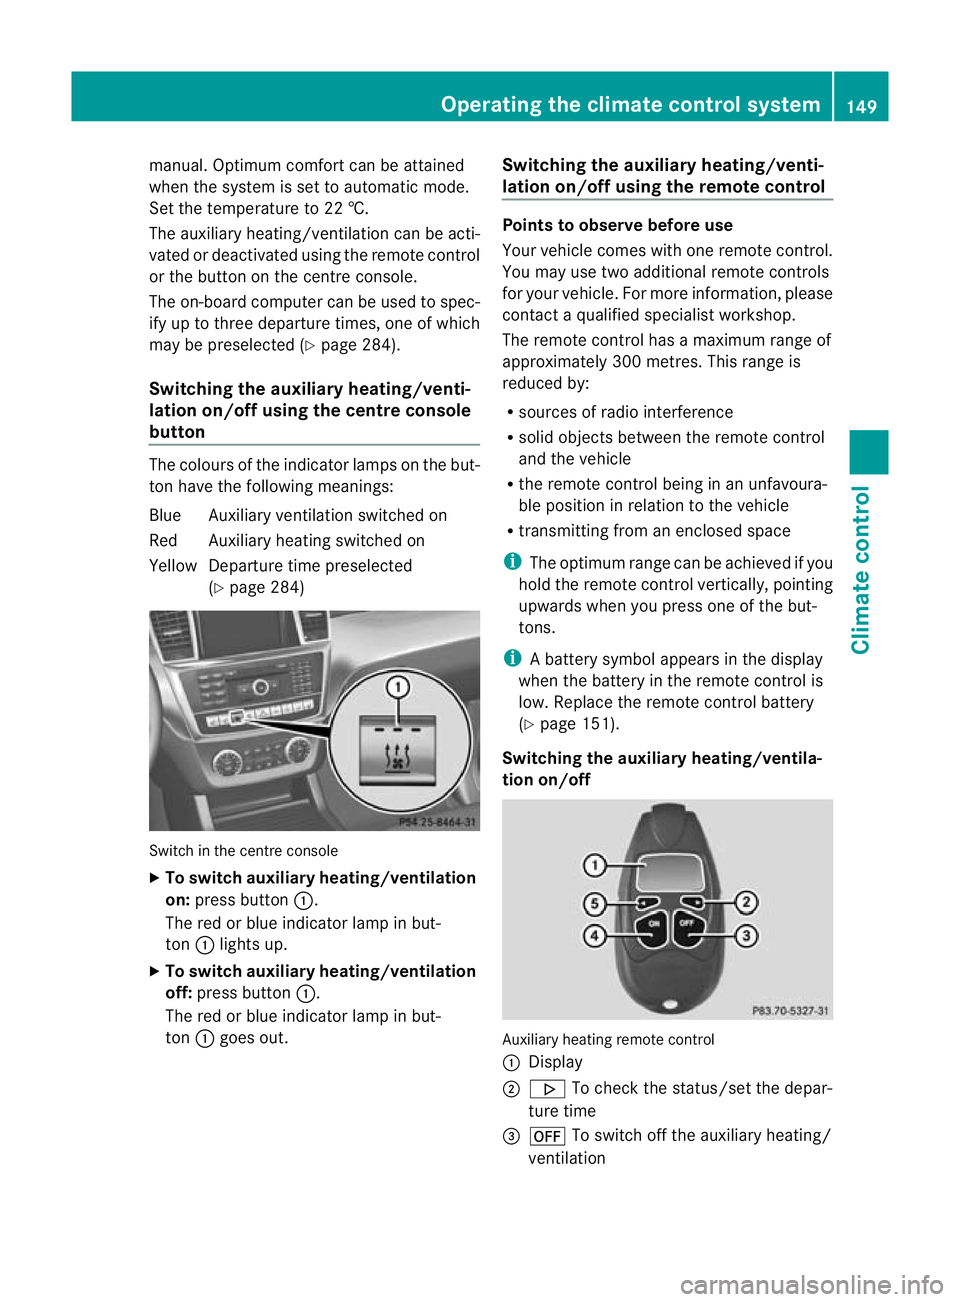
button The colours of th
eindicator lamps on the but-
ton have the following meanings:
Blue Auxiliary ventilation switched on
Red Auxiliary hea ting swi tche don
Yellow Departure tim epreselected
(Y page 284) Swi
tchint he centr econsole
X To switch auxiliary heating/ventilation
on: pres sbutton :.
The red or blue indicator lamp in but-
ton :lights up.
X To switch auxiliary heating/ventilation
off: press button :.
The red or blue indicator lamp in but-
ton :goes out. Switching th
eauxiliary heating/venti-
lation on/off using th eremote control Point
stoo bserve befo reuse
Your vehicle comes wit hone remote control.
You may use two addi tional remot econtrols
for your vehicle. For mor einformation, please
contac taqualifieds pecialist workshop.
The remot econtr olhas amaximum range of
approximately 300 metres. This range is
reduced by:
R sources of radio interference
R solid objects between the remot econtr ol
an dt he vehicle
R the remot econtr ol bein ginanu nfavoura-
ble positio ninrelation to the vehicle
R transmit ting from an enclosed space
i The optimum range can be achieved if you
hol dthe remot econtr ol vertically, pointing
upward swhen you press one of the but-
tons.
i Abattery symbol appears in the display
when the batter yinthe remote control is
low. Re placethe remote control battery
(Y page 151).
Switching th eauxiliary heating/ventila-
tion on/off Auxiliar
yheating remot econtrol
: Display
; . To check th estatus/set the depa r-
tur etime
= ^ To switch off th eauxiliar yheating/
ventilation Operatin
gthe clima tecontrol system
149Climatecontrol Z
Page 181 of 441
AdBlue
®
(BlueTEC vehicles only)
Important notes on use To function properly, BlueTE
Cexhaust gas
aftertreatmen tmust be operate dwitht he
reduc inga gen tAdBlue ®
.
When the supply of AdBlue ®
is almost used
up, the Refill AdBlue See Owner's Man‐
ual message is shown in the multifunction
display.
When the AdBlue ®
supply drops to amini-
mum ,the Refill AdBlue No star tinXXXX km message is show
ninthe multifunc-
tion display.
If the Refill AdBlue No star tinXXXX km message is show
ninthe multifunction dis-
play ,you can still drive the vehicle over the
distance shown. If AdBlue ®
is not topped up,
you will subsequen tlybe unable to start the
engine.R efill the AdBlue ®
tank or have the
AdBlue ®
tank refilled at aqualified specialist
workshop. If the Refill AdBlue Eng. star
tnot possible message appears in
th em ultifunction display and the engine does
not start ,you must top up with at least 3. 8l
of AdBlue ®
(approximately 2AdBlue ®
refill
bottles).
i If you driv ethe vehicle faster than
15 km /h,the Refill AdBlue Se eOwn‐ er's Manual message goes ou
tafter
approximately one minute.
If th eoutside temperature is lower than
Ò11 †, it may be difficult to top up. If
AdBlue ®
is frozen and there is an activ ewarn-
ing indicator, topping up may not be possible.
Park the vehicle in awarm place, e.g. in a
garage, until AdBlue ®
has become liquid
again. Topping up is then possible again.
Alternatively, have the AdBlue ®
tank refilled
at aq ualified specialist workshop.
Further information about BlueTEC exhaust
gas aftertreatment and about AdBlue ®
can
be obtained from any Mercedes-Benz Service
Centre. Importan
tsafety notes on the refilling
procedure AdBlue
®
is aw ater-solubl efluid for the
exhaust gas aftertreatment of diesel engines.
It is:
R not poisonous
R colourless and odourless
R not flammable
When you open the AdBlue ®
container ,small
amounts of ammonia vapou rmay be
released.
Ammonia vapours have apungent odour and
are particularly irritating to the skin, to
mucous membranes and to the eyes. You may
experienc eaburnin gsensation in your eyes,
nose and throat. Coughing and waterin gof
the eyes are possible.
Do not inhale any ammonia vapours that may
be released. Fill the AdBlue ®
tank only in well-
ventilated areas.
AdBlue ®
must not come into contact with
your skin, eyes or clothing and must not be
swallowed .Keep AdBlue ®
away from chil-
dren.
If you or other person scome int ocontact with
AdBlue ®
,o bserv ethe following:
R Rinse AdBlue ®
from your skin immediately
with soap and water.
R If AdBlue ®
comes int ocontact with your
eyes, immediately rinse them thoroughly
with clea nwater. Seek medical attention
immediately.
R If AdBlue ®
has been swallowed, rinse your
mouth out immediately. Drin kplent yof
water .Seek medical attention immedi-
ately.
R Change out of clothing contaminated with
AdBlue ®
immediately.
! Only use AdBlue ®
in accordanc ewith
ISO 22241. Do not mix any additives with
AdBlue ®
,a nd do not dilute AdBlue ®
with
water. Thi smay destroy the BlueTEC
exhaust gas aftertreatmen tsystem. 178
RefuellingDriving and parking
Page 182 of 441
!
In order to fil lthe AdBlue ®
tank, the vehi-
cle must be parked on alevel surface. The
AdBlue ®
tank can only be filled as intended
with the vehicle parked on alevel surface.
Fluctuations in capacity will thus be avoi-
ded. Filling avehicle standing on an uneven
surface is not permitted. There is adanger
of overfilling, which can cause damage to
BlueTEC exhaust gas aftertreatmen tcom-
ponen ts.
! Surfaces which have come into contact
with AdBlue ®
while refilling shoul dbe
rinsed immediately wit hwater, or remove
AdBlue ®
with amoist clot hand cold water.
If AdBlue ®
has alread ycrystallised, us ea
sponge and cold water to clean the area.
AdBlue ®
residue crystallises after acertain
amount of tim eand soils the affected sur-
faces.
! AdBlue ®
is not afuel additive and must
not be added to the fuel tank .IfAdBlue ®
is
added to the fuel tank ,this can lead to
engin edamage.
Have the AdBlue ®
tank refilled at aqualified
specialist workshop. However ,you can also
top up the AdBlue ®
tan k:
R at afilling station with an AdBlue ®
filling
pump
R with AdBlue ®
refill bottles
R with an AdBlue ®
refill canister
When the pump nozzle switches off automat-
ically during filling at afilling pump, the
AdBlue ®
tank has been completely filled. Do
not fill the AdBlue ®
tank any fur ther.
AdBlue ®
may leak out.
For fur ther information on AdBlue ®
,s ee
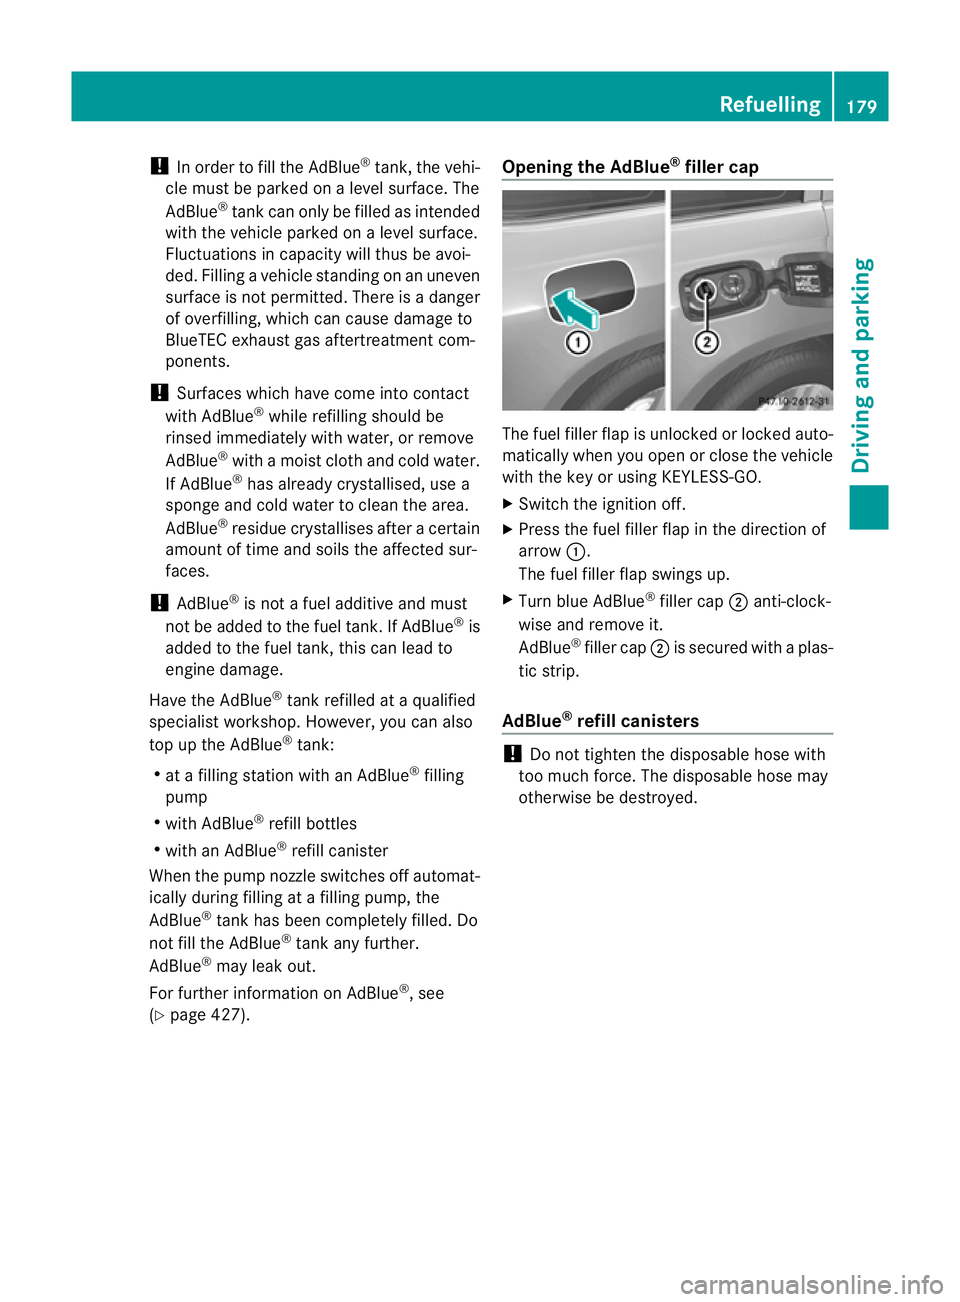
(Y page 42 7). Opening th
eAdBlue ®
fille rcap Th
ef uel filler flap is unlocked or locked auto-
matically when you open or close the vehicle
with the key or using KEYLESS-GO.
X Switc hthe igni tion off.
X Press the fuel filler fla pinthe direction of
arrow :.
The fuel filler fla pswings up.
X Turn blue AdBlue ®
filler cap ;anti-clock-
wise and remov eit.
AdBlue ®
filler cap ;is secured with aplas-
tic strip.
AdBlue ®
refill canisters !
Do not tighten the disposable hose with
too muc hforce. The disposable hose may
otherwise be destroyed. Ref
uelling
179Driving and parking Z
Page 183 of 441
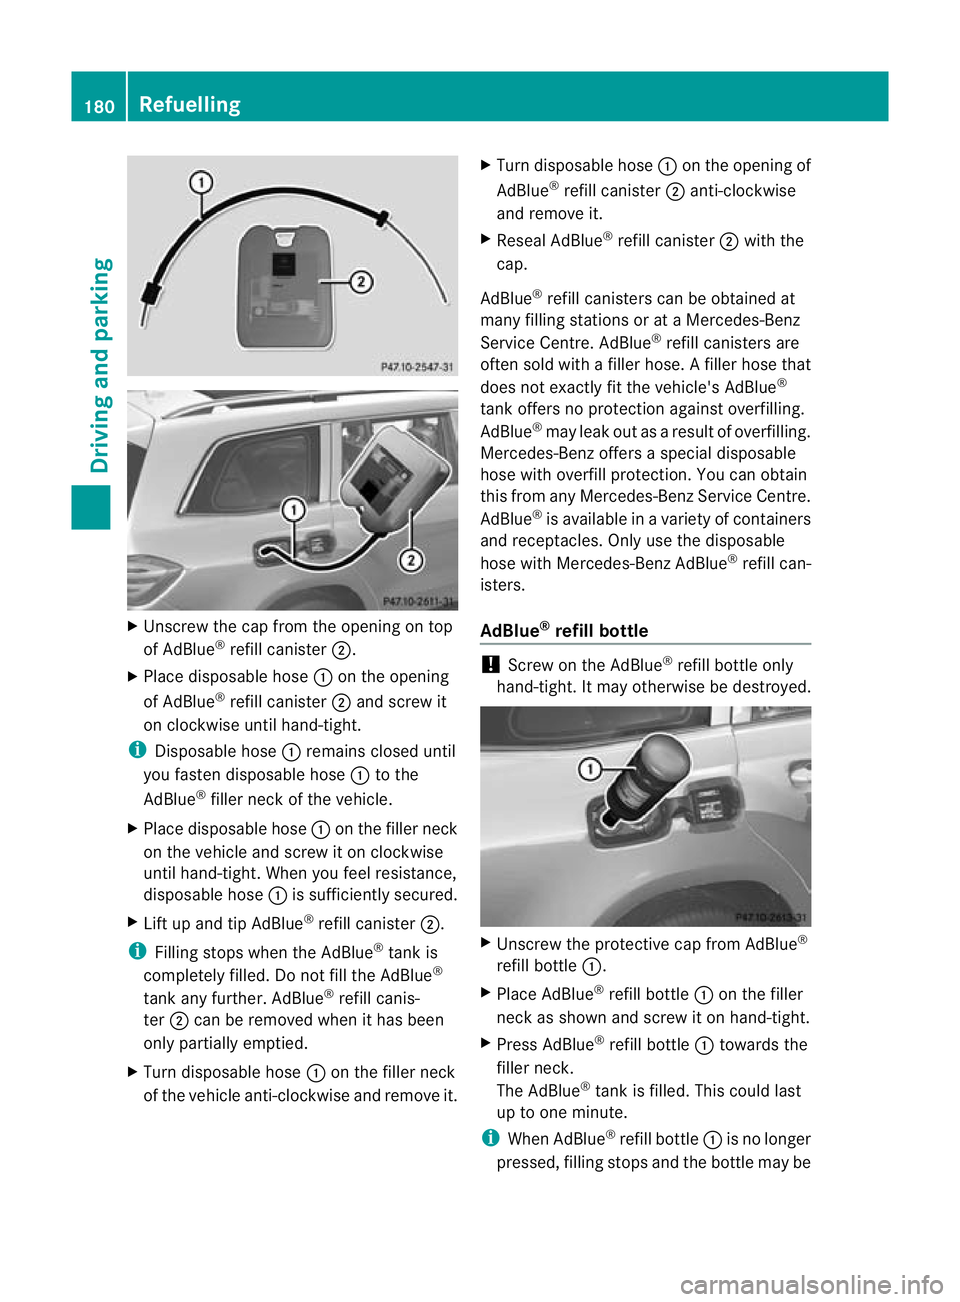
X
Unscre wthe cap from the opening on top
of AdBlue ®
refill canister ;.
X Plac edisposable hose :on the opening
of AdBlue ®
refill canister ;and screw it
on clockwise until hand-tight.
i Disposable hose :remains closed until
you fasten disposable hose :to the
AdBlue ®
filler neck of the vehicle.
X Place disposable hose :on the filler neck
on the vehicle and screw it on clockwise
until hand-tight. When you feel resistance,
disposable hose :is sufficiently secured.
X Lif tu pa nd tip AdBlue ®
refill canister ;.
i Filling stops whe nthe AdBlue ®
tan kis
completely fille d.Do no tfill the AdBlue ®
tank any further. AdBlue ®
refill canis-
ter ;can be removed when it has been
only partially emptied.
X Turn disposable hose :on the filler neck
of the vehicle anti-clockwise and remov eit. X
Turn disposable hose :on the opening of
AdBlue ®
refill canister ;anti-clockwise
and remove it.
X Reseal AdBlue ®
refill canister ;with the
cap.
AdBlue ®
refill canisters can be obtained at
many filling statio nsor at aMercedes-Benz
Servic eCentre. AdBlue ®
refill canisters are
often sold with afiller hose. Afiller hose that
does not exactly fit the vehicle's AdBlue ®
tan koffers no pro tection agains toverfilling.
AdBlue ®
may leak ou tasar esult of overfilling.
Mercedes-Ben zoffers aspecial disposable
hose with overfill protection. You can obtain
this from any Mercedes-Benz Servic eCentre.
AdBlue ®
is available in avariety of containers
and receptacles. Only use the disposable
hos ewith Mercedes-Benz AdBlue ®
refill can-
isters.
AdBlue ®
refill bottle !
Screw on the AdBlue ®
refill bottle only
hand-tight. It may otherwis ebedestroyed. X
Unscrew the protectiv ecap from AdBlue ®
refill bottle :.
X Place AdBlue ®
refill bottle :on the filler
neck as sho wn andscre witonh and-tight.
X Press AdBlue ®
refill bottle :towards the
fille rneck.
The AdBlue ®
tank is filled. Thi scould last
up to one min ute.
i Whe nAdBlue ®
refill bottle :is no longer
pressed, filling stops and the bottle may be 180
RefuellingDriving and parking
Page 184 of 441
take
noff ag aina fter be ingo nly partially
emptied.
X Releas eAdBlue ®
refil lbottle :.
X Tur nAdBlue ®
refil lbottle :anti-clockwise
and remove it.
X Screw the protective cap onto AdBlue ®
refill bottle :again.
AdBlue ®
refill bottles can be obtained at many
fil ling stations or at aMercedes-Benz Ser vice
Centre. Refil lbottles withou tathreaded seal
offer no protection agains toverfilling.
AdBlue ®
may leak ou tasaresult of overfilling.
Mercedes Ben zoffers special refi llbottles
with athrea deds eal. Thes eare avail able at
any Mercedes-Benz Service Centre.
Closin gthe AdBlue ®
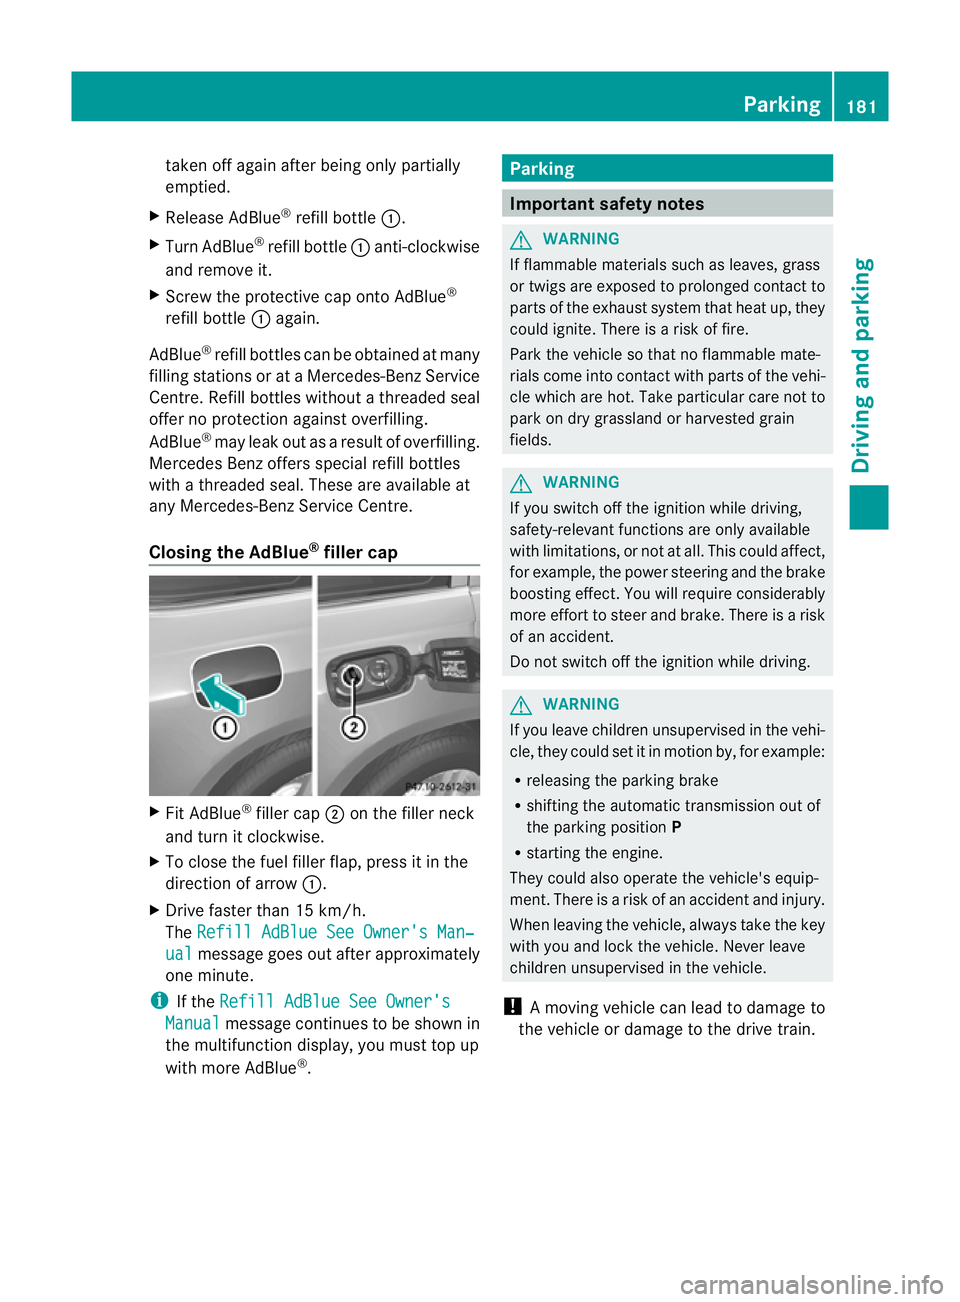
fil lerc ap X
Fit AdBl ue®
filler cap ;on th efiller neck
and turn it clockwise.
X To close the fuel filler flap, press it in the
direction of arrow :.
X Driv efaster than 15 km/h.
The Refill AdBlue Se eOwner' sMan‐ ual message goes ou
tafter approximately
one minute.
i If the Refill AdBlue See Owner's Manual message continues to be show
nin
the multifunctio ndisplay, you must top up
with mor eAdBlue ®
. Parking
Important safety notes
G
WAR
NING
If flammable materials such as leaves ,grass
or twigs are exposed to prolo nged contac tto
part soft he exhaust system that heat up, they
coul dignite. There is arisk of fire.
Park the vehicle so that no flammable mate-
rials come int ocontac twith parts of the vehi-
cle which are hot. Take particular care not to
park on dry grassland or harvested grain
fields. G
WARNING
If you switch off the ignition while driving,
safety-relevan tfunctions are only available
with lim itations, or not at all .This coul daffect,
for example, the powe rsteering and the brake
boosting effect .You will require considerably
mor eeffort to steer and brake. There is arisk
of an accident.
Do not switch off the ignition while driving. G
WARNING
If you leave children unsupervised in the vehi-
cle, they could set it in motion by, for example:
R releasing the parking brake
R shifting the automatic transmission out of
the parking position P
R starting the engine.
They could also operate the vehicle's equip-
ment .There is arisk of an accident and injury.
When leaving the vehicle, always take the key
with you and lock the vehicle. Never leave
children unsupervised in the vehicle.
! Am ovin gvehicle can lead to damage to
the vehicle or damage to the driv etrain. Parking
181Driving and parking Z
Page 192 of 441
Read this section before drivin
gyour vehicle
off-road. Pra ctisebyt ravelling over more gen-
tle off-road terrain first.
The following driving systems are specially
adapted to off-road driving:
R Off-road program (vehicles without the
ON&OFFROAD package) (Y page 252)
R Off-road program 1and 2(vehicles wit hthe
ON&OFFROAD package) (Y page 253)
R LOW RANGE off-road gear (vehicles with
the ON&OFFROAD package)
(Y page 254)
R Differential lock (vehicles with the
ON&OFFROAD package) (Y page 254)
R Off-road AB S(Ypage 61)
R Off-road 4ETS (Y page 66)
R Off-road ESP ®
(Y page 67)
R AIRMATI Cpackag e(veh icle level)
(Y pag e212)
R DSR (Downh illS peed Regulation)
(Y page 251)
Observe the following notes:
R Stop your vehicle and, if necessary, select
the off-road program (Y page 252)orthe
LOW RANGE off -road gear (Y page 254)
befor edriving off-road.
R Select avehicle level suitable for the off-
road ter rain. To avoid damaging the vehicle,
make sure ther eisalways sufficien tground
cle arance.
R Check that items of luggage and loads are
stowed safel yand are wel lsecur ed
( Y page 343).
R Always keep the engine running and in gear
when driv ingonad ownhill gradient. Acti-
vate DSR (Y page 251).
R Drive slowly and evenly, if necessary at
walking pace.
R Ensure that the wheels ar einc ontact with
the ground at all times.
R Drive with extreme car eonu nknown off-
road routes where visibility is poor. For
safety reasons, get out of the vehicl efirst
and survey the off-road route. R
Check the depth of water before fording
rivers and streams.
R Look out for obstacles such as rocks, holes,
tree stumps and furrows.
R Take care when turning on an uphill or
downhill slop eorwhen driving across a
slope. The vehicle could otherwise tip over.
R Always keep the side windows and the pan-
orama sliding sunroof closed dur ingt he
journey.
R Do not stray from marked routes or paths.
i Information about retrofitting special all-
terrain tyres is available from any qualified
specialist workshop.
i Do not use the HOL Dfunction when driv-
ing off-road, on steep uphill or downhill gra-
dients or on slippery or loos esurfaces. The
HOLD function cannot hold the vehicl eon
suc hsurfaces.
Checklis tbefor edriving off-road X
Engine oil level: check theengine oil and
top it up if necessary.
Whe ndriving on stee pgradients, the
engin eoil level must be sufficiently high to
ensure acorrec toil supply in the vehicle.
X AdBlue ®
tank (BlueTEC vehicles): check
the fluid level and, if necessary, refill to the
maximum (13 l) (Y page 178).
X Tyre-ch ange tool kit: checkthat the jack
is wor king and mak esure you have the
wheelbrace, arobust tow cabl eand afold-
ing spade in the vehicle.
X Wheels and ty res: chec kthe tyr etread
depth and tyre pressure.
X Check for damage and remove any foreign
objects, e.g. small stones, fro mthe
wheels/tyres.
X Replace any missing valv ecaps.
X Replace dented or damaged wheels.
X Wheels: dented or bent wheel scan lead to
al oss of tyr epressure and damag etot he
tyr eb ead. Before driving off-road, check
the wheels and replace them if necessary. Driving tips
189Driving and parking Z