key battery MERCEDES-BENZ GL SUV 2012 Owners Manual
[x] Cancel search | Manufacturer: MERCEDES-BENZ, Model Year: 2012, Model line: GL SUV, Model: MERCEDES-BENZ GL SUV 2012Pages: 441, PDF Size: 10.66 MB
Page 9 of 441
Auxiliar
yventila tion
Activating/deac tivating ................. 148
Activating/deactivating (o nthe
centr econsole) .............................. 149
Pro blem (display message) ............153
Remote control .............................. 149
Ax leload, permissible (traile rtow-
ing) ...................................................... 433 B
Ba gh ook ............................................ 343
Ball coupli ng
Folding in ....................................... 261
Fol ding out ..................................... 259
BAS (Brake Assist System) .................62
BAS PL US(Brak eAssist System
PLUS) .................................................... 62
Battery (key) Checking ...... .................................... 79
Important safety note s.................... 79
Replacing ......................................... 79
Battery (v ehicle)
Charging ........................................ 384
Display message ............................ 305
Important safety notes ..................382
Jump starting ................................. 386
Overview ........................................ 382
Belt
seeS eat belt
Belt force limiters (activation) ...........41
Bel ttensioner
Activatio n......................................... 41
Functio n.......................................... .49
Blind Spo tAssist
Activating/deactiva ting ................. 279
Display message ............................ 311
Notes/function .............................. 238
Traile rtowing ................................. 240
se eA ctive Blind Spo tAssist
BlueTEC
Topping up AdBlue ®
...... ................. 178
BlueTE C(AdBlue ®
) ............................. 427
Bon net
Active bonne t(pedestrian protec-
tion) ............................................... 360
Closing ........................................... 361 Display message
............................ 320
Opening ......................................... 360
Boot
seeT ailgate
Brak eAssist System
see BAS (Brake Assist System)
Brake fluid
Display message ............................ 296
Note s............................................. 429
Brake lamps
Ada ptive .......................................... .65
Changin gbulbs .............................. 131
Display message ............................ 301
Brakes
ABS .................................................. 61
Ada ptive Brake Assist ......................64
BAS .................................................. 62
BAS PLUS ........................................ 62
Brake fluid (notes )......................... 429
Display message ............................ 291
Driving tip s.................................... 184
High-performance brake sy stem .... 186
Important safety notes ..................184
Parking brake ................................ 182
Warn ingl am p................................. 326
Breakdown
seeF lat tyre
see Towing away
Bulbs
see Changing bulbs C
Callin gupaf ault
se eD isplay messages
Car
see Vehicle
Care
360 °camera ................................. 370
Automatic car wash .......................366
Carpets .......................................... 373
Display ........................................... 371
Exhaust pi pe.................................. 371
Exterio rlighting ............................. 369
Gea rors electo rlever .................... 372
High-pressure cle aner ...... .............. 368
Interior ........................................... 371
Matt paintwork .............................. 3686
Index
Page 16 of 441
Instr
ument cluster
Overview .................................. 30 ,267
Warning and indicator
lamp s....................................... 32, 324
Instrument cluster lighting ..............268
Int elligen tLight System
Activating/deactivatin g................. 281
Display message ............................ 303
Overview ........................................ 123
Setting the di pped-beam head-
lamps for driving on the right/left .281
Int erior lighting ................................. 126
Automatic control sy stem .............. 127
Del ayed swit ch-off (on-bo ard
computer) ...................................... 282
Emergency lighting ........................128
Manual control ............................... 127
Overview ........................................ 126
Reading lamp ................................. 126
Setting the ambient lighting
bri ghtness (on-bo ardc omputer ).... 281
Setting the ambient lighting col-
ou r(on-board computer) ...... .......... 282
Interior motio nsensor ........................ 72
IS OFIX child seat securing system ....53 J
Jack Storage locatio n............................ 377
Using ............................................. 406
Jump star t(engine)
se eJ um pstarting (engine)
Jump starting (engine) ......................386 K
Key Changing the battery ....................... 79
Ch ecking the battery ....................... 79
Convenience closing feat ure. ........... 91
Convenience op ening feature ..........90
Display message ............................ 322
Doo rcentral locking/unlocking .......77
Emergency key el ement ...... ............. 78
Important safety note s.................... 76
Los s................................................. 81
Modifying the programming .............78Overview
.......................................... 76
Positions (i gnition lock) ................. 159
Pro blem (malfunction) ..................... 81
Starting the engine ........................161
KEYLES S-GO
Convenience closing ........................91
Display message ............................ 322
Locking ............................................ 77
Start/Sto pbutton ...... .................... 159
Starting the engine ........................161
Unlockin g......................................... 77
Ke yp ositions
Key ................................................ 159
KEYLESS GO .................................. 159
Kickdown
Driving tip s.................................... 170
Manual drive program ....................173
Kneebag ............................................... 44 L
Lamps seeW arning and indicator lamps
Lane Keepin gAssist
Activating/ deactivating ................. 279
Display message ............................ 311
Function/informatio n.................... 240
se eA ctive Lane Keeping Assist
Lap time (RACETIMER) ......................287
Lashing eyelets ................................. 343
Leve lcont rol (display message) ......307
Leve lcont rol (vehicles with the
ON&OFFROA Dpackage)
Bas ic se ttings ................................ 208
Function/notes ............................. 207
Important safety notes ..................207
Leve lcont rol (vehicle with AIR-
MATIC package) Basi csettings ................................ 213
Function/notes ............................. 213
Important safety notes ..................213
Licen ceplate lamp (display mes-
sage) ................................................... 302
Lighting seeL ights
Lights
Activating/deactivating the Intel-
ligent Light System ........................281 Index
13
Page 81 of 441
Changing th
esettings of th elocking
system
You can chang ethe settings of th elocking
system. This mea nsthat only the driver' sdoor
and th efuel filler flap are unlocked when the
vehicle is unlocked. This is useful if you fre-
quently travel on your own.
X To change th esetting: press and hold
down the %and& buttons simulta-
neously for approximately six seconds until
the battery chec klamp flashes twice
(Y page 79).
i If the settin gofthe locki ngsystem is
changed within th esignal range of th evehi-
cle ,pressi ngthe & or% button:
R locks or
R unlock sthe vehicle
The ke ynow functions as follows:
X To unloc kthe drive r'sdoor: press the
% button once.
X To unlock cen trally:pressthe % but-
to nt wice.
X To lock centrally: pressthe & button.
The KEYLESS-GO function is changed as fol-
lows:
X To unlock th edriver's doo r:touch the
inner surface of the doo rhandle on the
driver' sdoor.
X To unlock centrally: touch theinner sur-
fac eo fthe door handle on th efront-
passenger door or th erear door.
X To lock centrally: touch theouter sensor
surface on one of the door handles
(Y page 77).
X To restor ethe facto rysettings: press
and hold down the %and& buttons
simulta neousl yfor appr oximate ly six sec-
onds until th ebatter ychec klamp flashes
twic e(Ypage 79). Emergency key element
General notes If th
evehicle can no longer be locke dor
unloc kedw itht he key ,use th eemergency
key element.
If yo uuse th eemergenc ykey elemen tto
unlock and open the driver' sdoor, the anti-
thef talarm system will be triggered
(Y page 71).
There are several ways to tur noff th ealarm:
X To turn the alarm off with the key: press
the % or& buttonont he key.
or
X Insert the key int othe ignition lock.
or
X To deactivat ethe alarm with KEYLESS-
GO: press th eStart/Stop button in the igni-
tion lock. The key must be in the vehicle.
or
X Lock or unlock the vehicle using KEYLESS-
GO. The key must be outside the vehicle.
If you unlock the vehicle using the emergency
key element, the fuel filler fla pwilln ot be
unlocked automatically.
X To unlock th efuel fil lerf lap: insert the
key into the ignition lock.
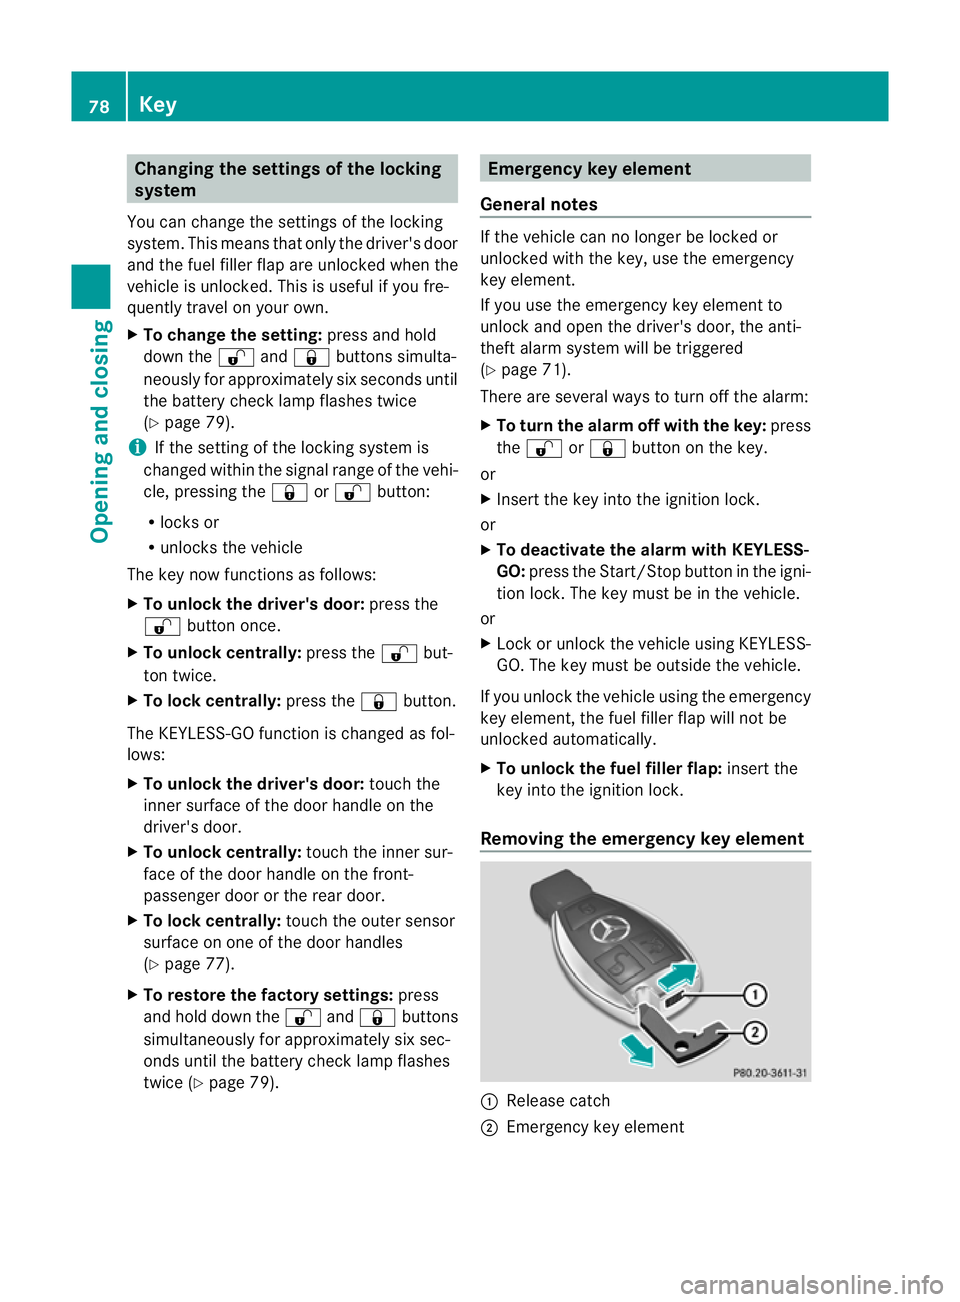
Removing the emergency key element :
Releas ecatch
; Emergency key element 78
KeyOpening and closing
Page 82 of 441
X
Push release cat ch: in the direction of
the arrow and at the same time, remove
emergenc ykey element ;from the key. Ba
ttery of the key
Important safety notes G
WARNING
Batteries are toxic and contain caustic sub-
stances. For this reason, keep batteries out of
the reach of children.
If ab attery has been swallowed, visit adoctor
immediately. H
Environment
alnote Bat
teri es contain pollutants.
It is illegal to dispose of them
with the household rubbish.
They must be collec teds ep-
arately and disposed of in an
environmen tally responsible
recycling system. Dispose of batteries in an
environmentally responsible
manner
.Take discharged
batteries to aqualified spe-
cialist workshop or to acol-
lection point for used batter-
ies.
Mercedes-Benz recommends that you have
the batteries replaced at aqualified specialist
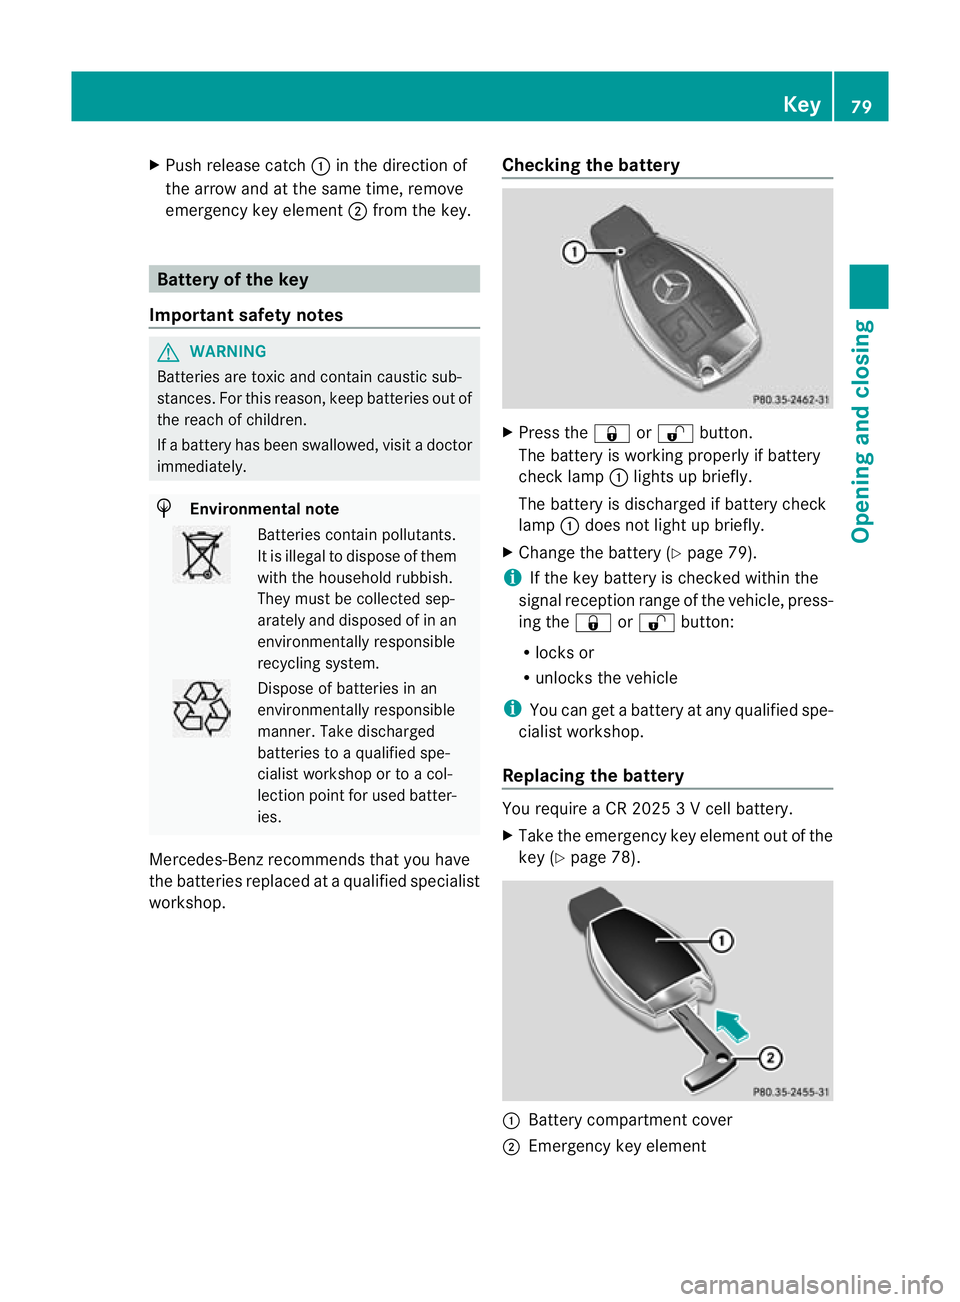
workshop. Checking the battery X
Press the &or% button.
The battery is working properly if battery
check lamp :lights up briefly.
The battery is discharge difbattery check
lamp :does not light up briefly.
X Change the battery (Y page 79).
i If the key battery is checked within the
signal reception range of the vehicle, press-
ing the &or% button:
R locks or
R unlocks the vehicle
i You can get abattery at any qualified spe-
cialist workshop.
Replacing the battery You require
aCR20253Vc ell battery.
X Take the emergenc ykey elemen tout of the
key (Y page 78). :
Battery compartment cover
; Emergency key element Key
79Openin gand closing Z
Page 83 of 441
X
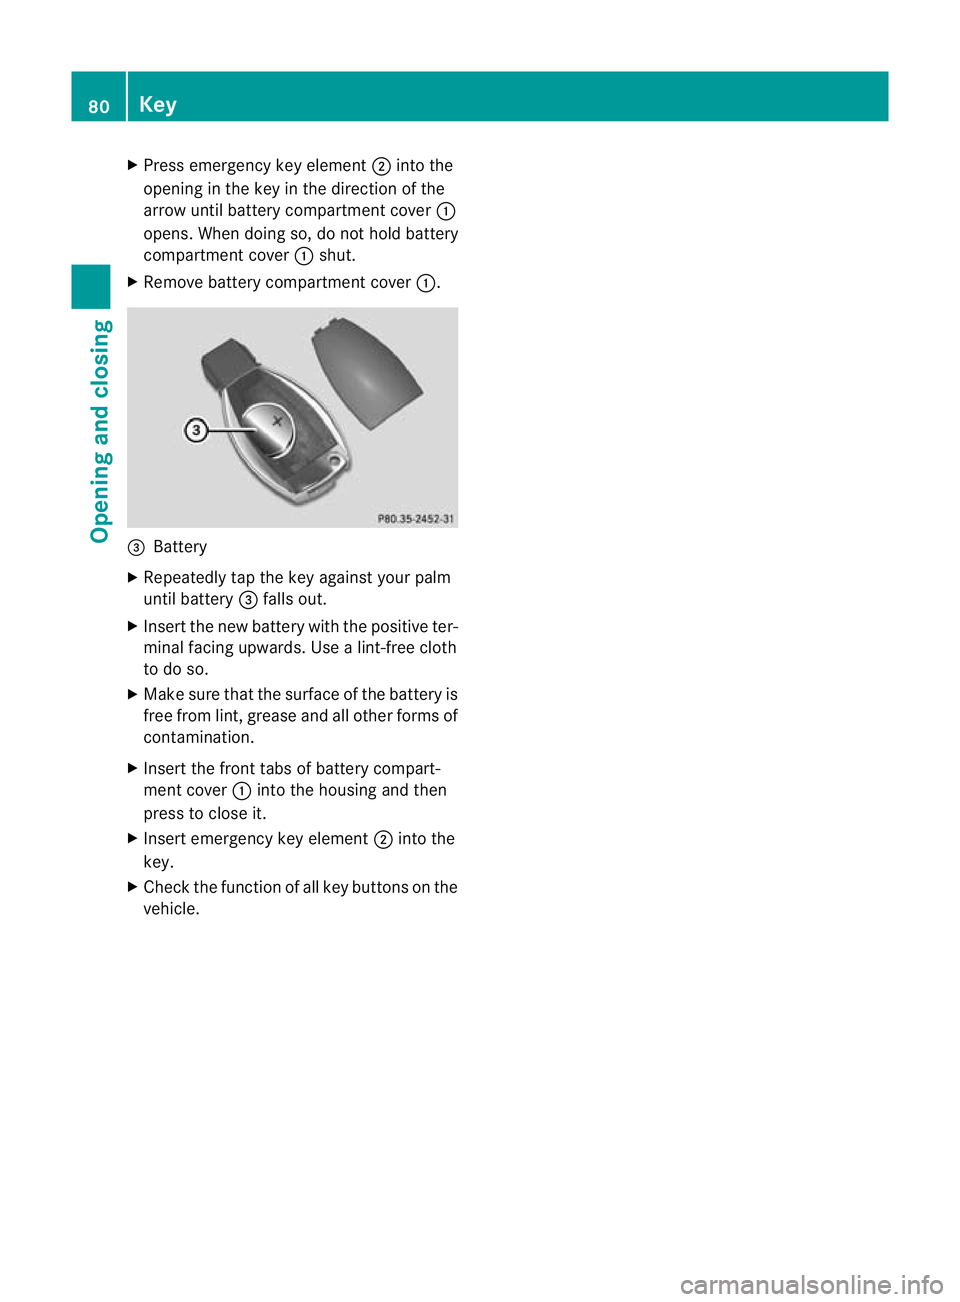
Press emergenc ykey element ;into the
opening in the key in the direction of the
arrow until batter ycompartmen tcover :
opens. When doing so, do not hold battery
compar tment cover :shut.
X Remove batte rycompartment cover :.=
Battery
X Repeatedly tap the key agains tyour palm
until battery =falls out.
X Inser tthe new battery with the positive ter-
minal facin gupwards. Use alint-free cloth
to do so.
X Make sure that the surface of the battery is
free from lint, grease and all other form sof
contamination.
X Insert the front tabs of battery compart-
ment cover :into the housing and then
pres stoc lose it.
X Insert emergenc ykey element ;into the
key.
X Check the function of all key button sonthe
vehicle. 80
KeyOpening and closing
Page 84 of 441
Problems wit
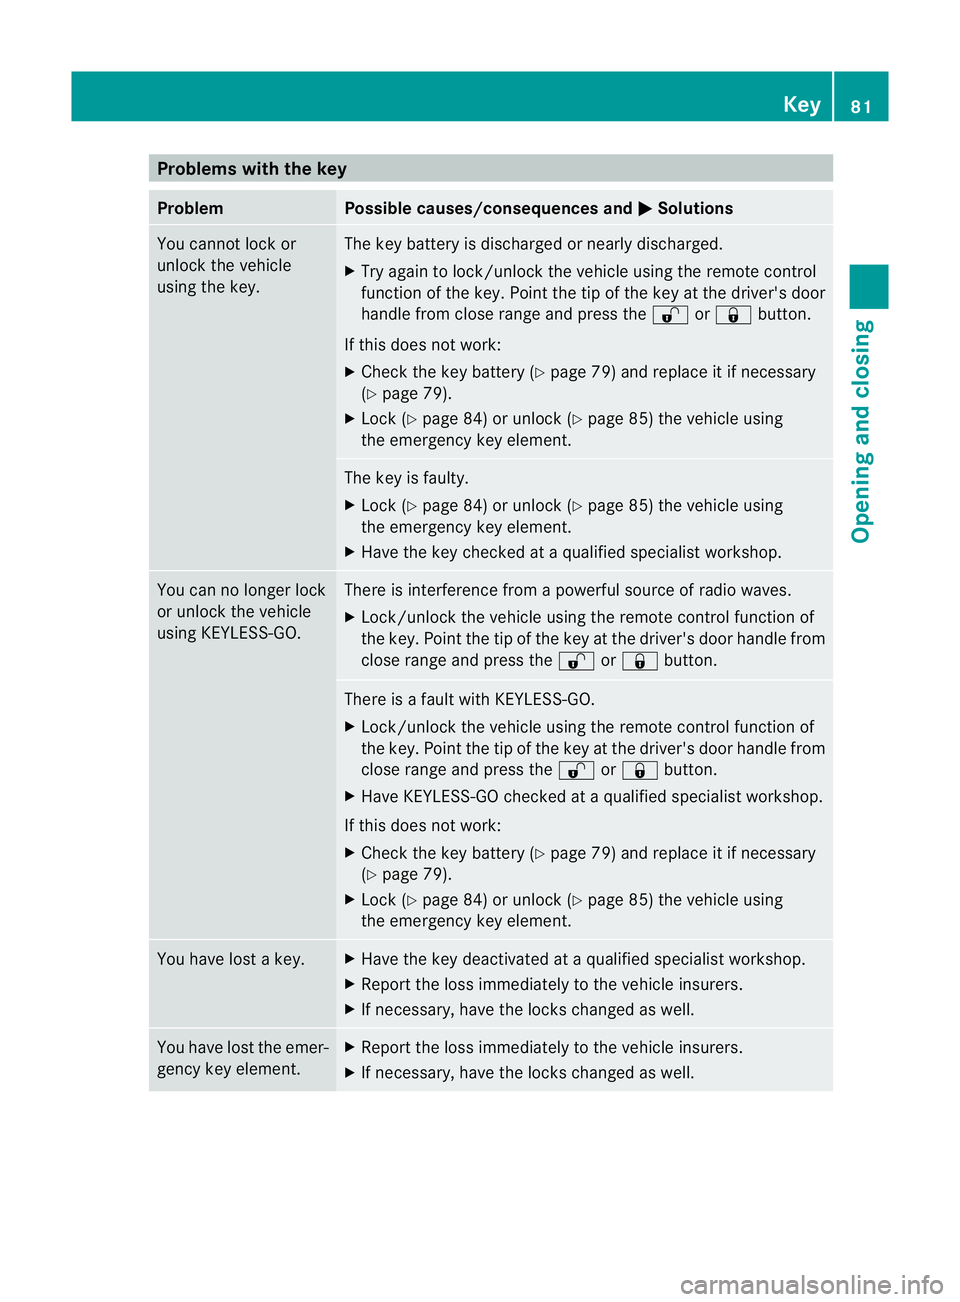
hthe key Problem Possible causes/consequences and
M Solutions
Yo
uc annot lock or
unlock the vehicle
using the key. The key battery is discharged or nearly discharged.
X
Try again to lock/unlock the vehicle using the remote control
function of the key. Point the tip of the key at the driver' sdoor
handl efrom close rang eand pres sthe % or& button.
If this does not work:
X Chec kthe key battery (Y page 79)and replace it if necessary
(Y pag e79).
X Lock (Y page84) or unlock (Y page85) the vehicl eusing
the emergenc ykey element. The key is faulty.
X
Loc k(Ypage 84 )orunlock (Y page85) the vehicl eusing
the emergenc ykey element.
X Hav ethe key chec kedataq ualified specialist workshop. You can no longer lock
or unlock the vehicle
using KEYLESS-GO. There is interference from
apowerfu lsource of radio waves.
X Lock/unloc kthe vehicle usin gthe remote con trol func tion of
the key. Point the tip of the key at the driver' sdoor handl efrom
close rang eand pres sthe % or& button. There is
afault with KEYLESS-GO.
X Lock/unlock the vehicle using the remote control function of
the key. Point the tip of the key at the driver' sdoor handl efrom
close rang eand pres sthe % or& button.
X Hav eKEYLESS-GO checked at aqualified specialist workshop.
If this does not work:
X Check the key battery (Y page 79) and replace it if necessary
(Y page 79).
X Lock (Y page 84) or unlock (Y page 85) the vehicle using
the emergency key element. You have lost
akey. X
Hav ethe key deactivated at aqualified specialist workshop.
X Report the loss immediately to the vehicle insurers.
X If necessary, have the locks changed as well. You have lost the emer-
gency key element. X
Report the loss immediately to the vehicle insurers.
X If necessary, have the locks changed as well. Key
81Openin gand closing Z
Page 85 of 441
Problem Possible causes/consequences and
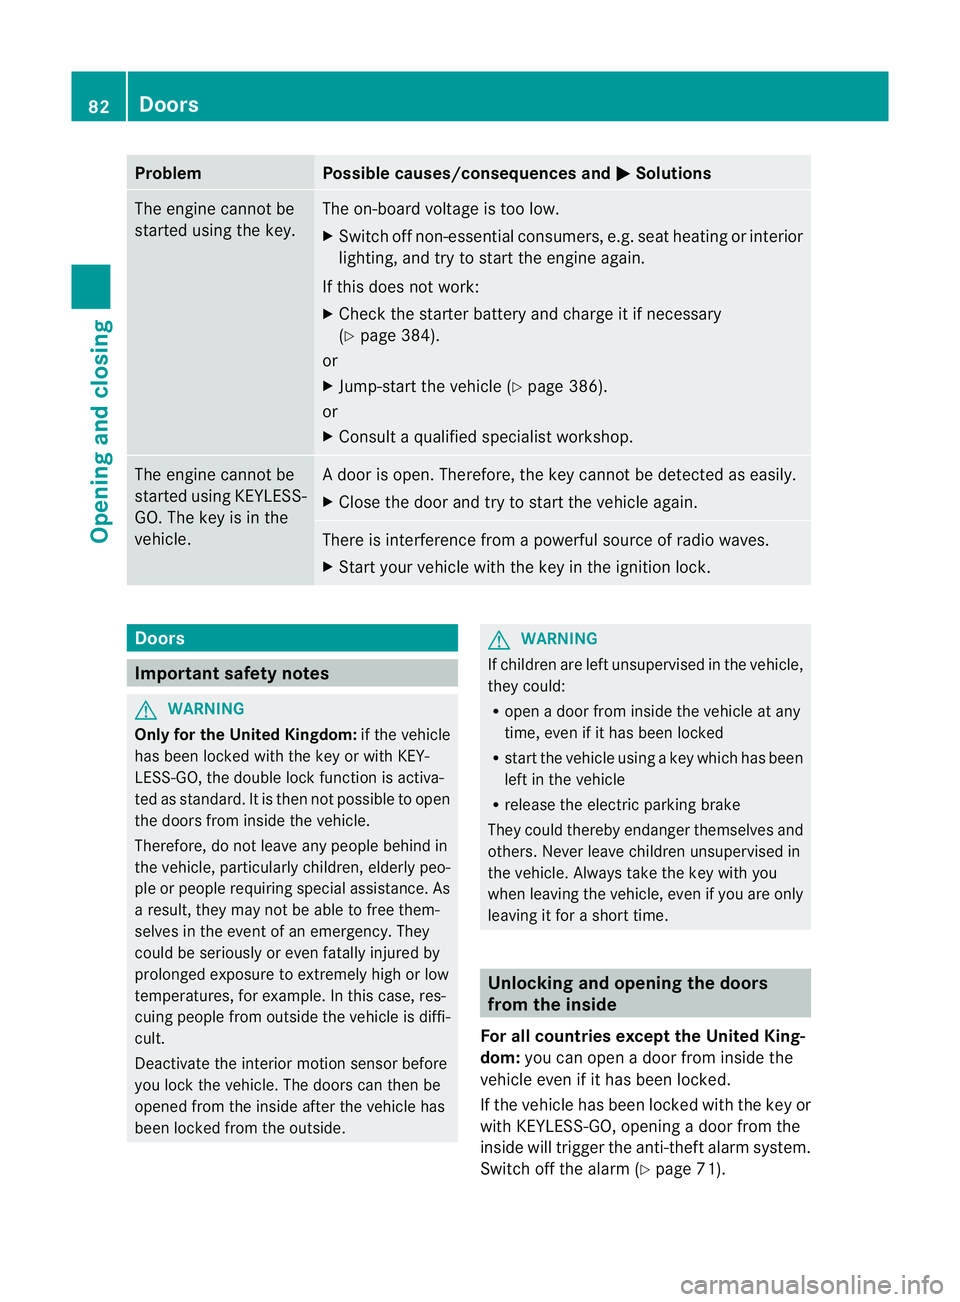
M Solutions
The engin
ecannot be
started using the key. The on-board voltage is too low.
X
Switch off non-essential consumers, e.g. seat heating or interior
lighting ,and try to start the engine again.
If this doe snot work:
X Check the starter battery and charge it if necessary
(Y page 384).
or
X Jump-start the vehicle (Y page 386).
or
X Consult aqualified specialist workshop. The engine cannot be
started using KEYLESS-
GO. The key is in the
vehicle. Ad
oor is open. Therefore, the key can notb ed etected as easily.
X Close the door and tr ytostart the vehicle again. There is interferenc
efrom apowerfu lsource of radio waves.
X Start your vehicle with the key in the ignition lock. Doors
Important safety notes
G
WARNING
Only fo rthe Unite dKingdom: if the vehicle
has been locked with the key or with KEY-
LESS-GO, the double lock func tion is activa-
ted as standard. It is then not possible to open
the doors from inside the vehicle.
Therefore, do not leav eany people behind in
the vehicle, particularly children, elderly peo-
ple or people requiring special assistance .As
ar esult, they may not be able to free them-
selves in the event of an emergency. They
could be seriously or even fatally injured by
prolonged exposur etoextremely hig horlow
tempera tures, for example. In this case ,res-
cuin gpeople from outside the vehicle is diffi-
cult.
Deac tivate the interior motion sensor before
you lock the vehicle .The doors can then be
opened from the insid eafter the vehicl ehas
been locked from the outside. G
WARNING
If children are left unsupervised in the vehicle,
they could:
R open adoor from inside the vehicle at any
time, even if it has been locked
R star tthe vehicle usin gakey which has been
left in the vehicle
R release the electric parking brake
They could thereby endanger themselves and
others. Never leave children unsupervised in
the vehicle. Alway stake the key with you
when leaving the vehicle, even if you are only
leaving it for ashort time. Unlocking and opening th
edoors
from the inside
For all countries except the United King-
dom: you can open adoor from inside the
vehicle even if it has been locked.
If the vehicle has been locked with the key or
with KEYLESS -GO, opening adoor from the
inside will trigger the anti-thef talarm system.
Switch off the alarm (Y page 71).82
DoorsOpening and closing
Page 116 of 441
X
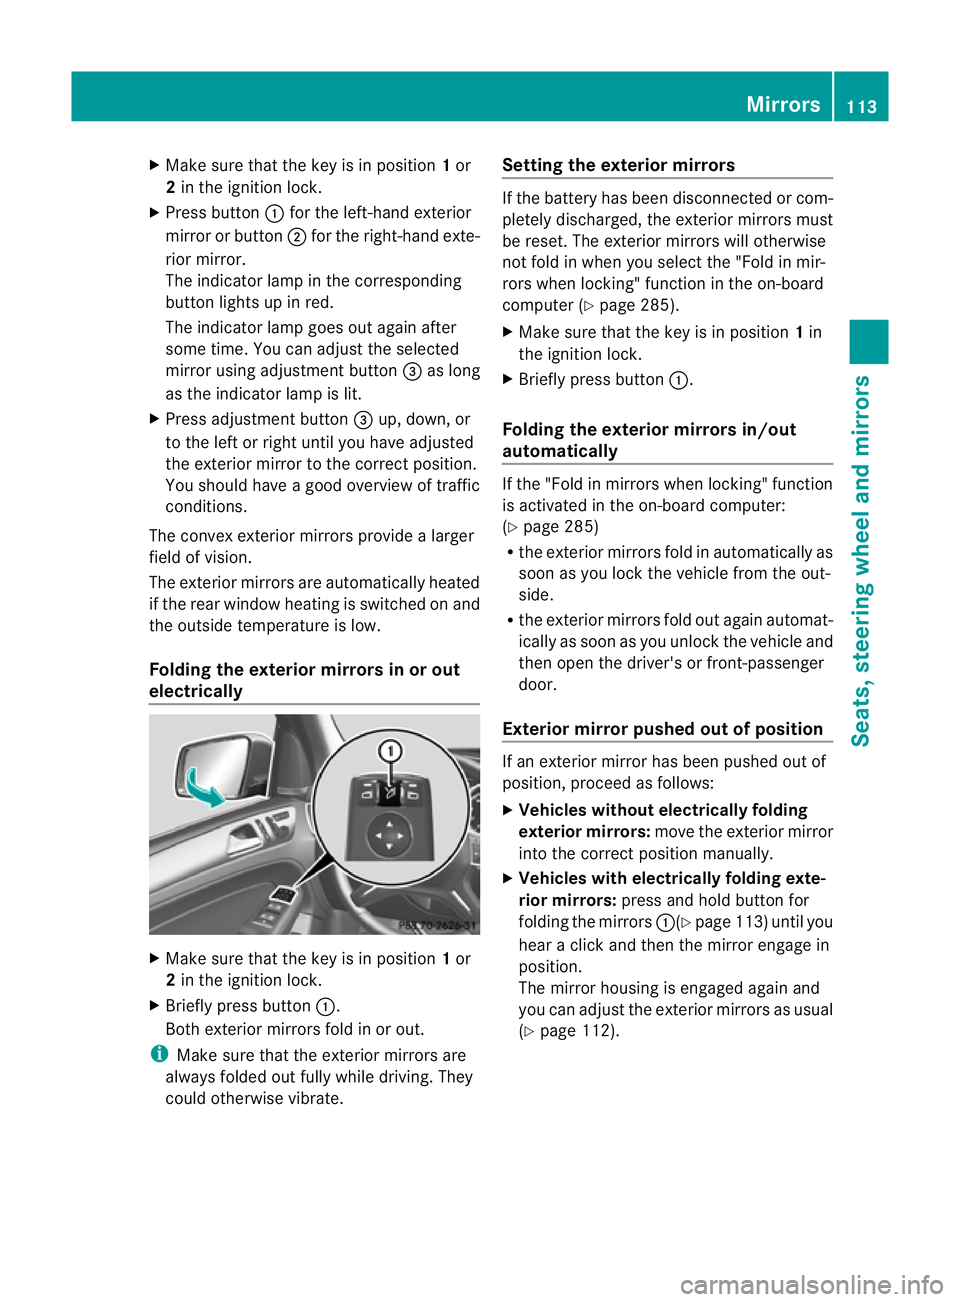
Make sur ethat the key is in position 1or
2 in the ignition lock.
X Press button :for the left-hand exterior
mirror or button ;for the right-hand exte-
rior mirror.
The indicator lam pint he corresponding
button lights up in red.
The indicator lam pgoes out again after
some time. You can adjust the selected
mirror using adjustment button =as long
as the indicator lam pislit.
X Press adjustment button =up, down, or
to the left or right until you have adjusted
the exterior mirror to the correct position.
You should have agood overview of traffic
conditions.
The convex exterior mirror sprovide alarger
field of vision.
The exterior mirrors are automatically heated
if the rear window heating is switched on and
the outside temperature is low.
Folding the exterior mirrors in or out
electrically X
Make sure that the key is in position 1or
2 in the ignition lock.
X Briefly press button :.
Both exterior mirrors fold in or out.
i Make sure that the exterior mirrors are
always folded out fully while driving. They
could otherwise vibrate. Setting the exterior mirrors If the battery has been disconnected or com-
pletely discharged
,the exterior mirrors must
be reset .The exterior mirrors will otherwise
not fol dinwhen you selec tthe "Fold in mir-
ror sw hen locking" func tion in the on-board
computer (Y page 285).
X Make sure that the key is in position 1in
the ignition lock.
X Briefl ypres sbutton :.
Folding the exterior mirrors in/out
automatically If the "Fold in mirrors when locking" function
is activated in the on-board computer:
(Y
page 285)
R the exterior mirrors fold in automatically as
soo nasyou lock the vehicle from the out-
side.
R the exterior mirror sfold out again automat-
ically as soon as you unloc kthe vehicle and
then open the driver's or front-passenger
door.
Exterior mir rorp ushe dout of position If an exterior mirro
rhas been pushe dout of
position, proceed as follows:
X Vehicles without electrically folding
exterior mirrors: move the exterior mirror
into the correct position manually.
X Vehicles with electrically folding exte-
rior mirrors: press and hold button for
folding the mirrors :(Ypage 113 )until you
hea rac lick and then the mirror engage in
position.
The mirror housing is engaged again and
you can adjust the exterior mirrors as usual
(Y page 112). Mirrors
113Seats, steerin gwhee land mirrors Z
Page 130 of 441
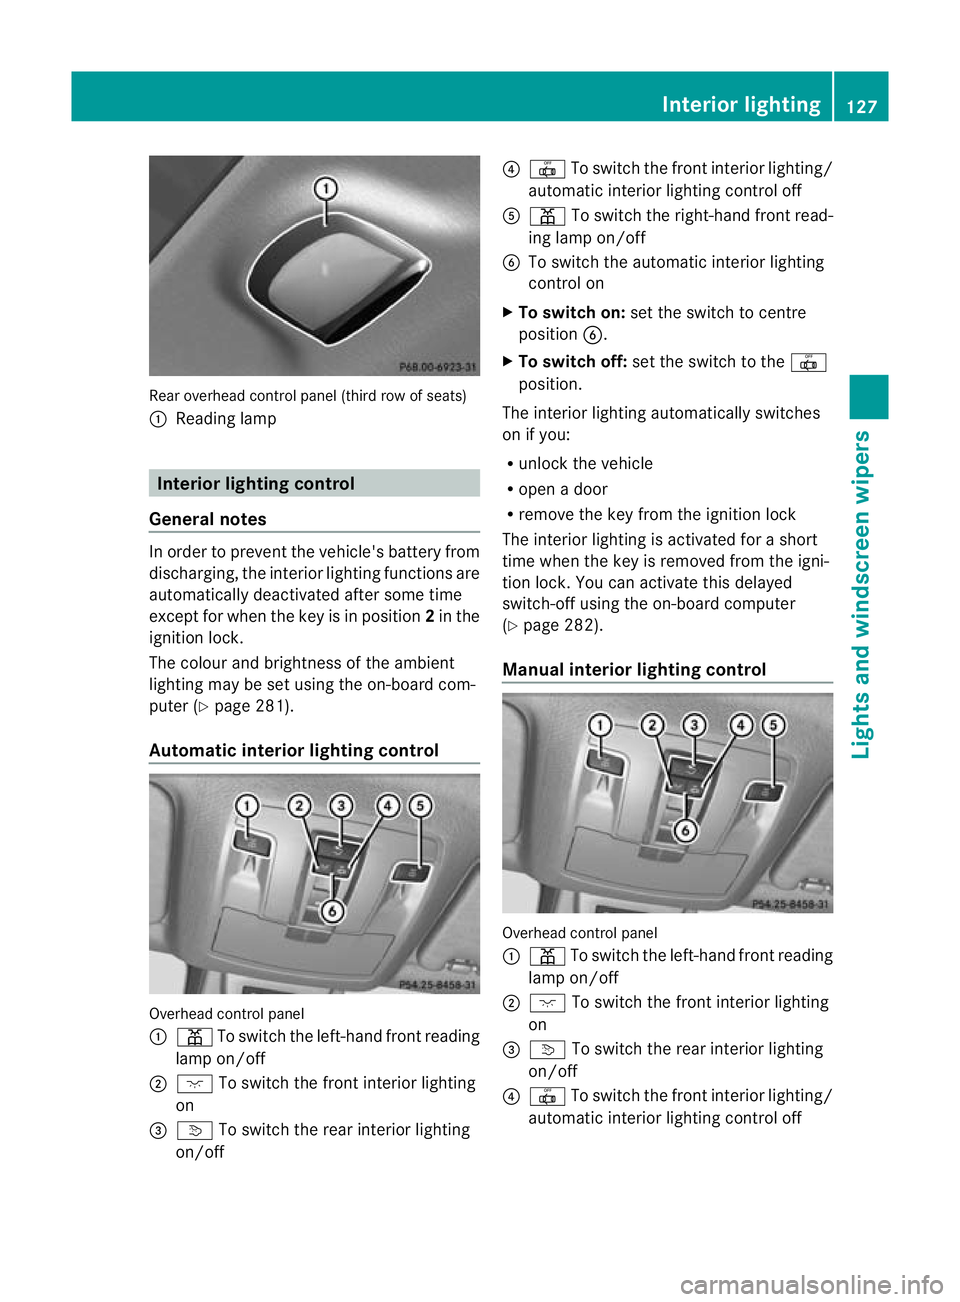
Rear overhead control panel (thir
drow of seats)
: Readin glamp Interior lightin
gcontrol
General notes In order to preven
tthe vehicle' sbattery from
discharging, the interior lighting functions are
automatically deactivated after some time
except for when the key is in position 2in the
ignition lock.
The colour and brightness of the ambient
lighting may be set using the on-board com-
puter (Y page 281).
Automatic interior lighting control Overhead control panel
:
p To switch the left-hand front reading
lamp on/off
; c To switch the front interior lighting
on
= v To switch the rear interior lighting
on/off ?
| To switch the front interior lighting/
automatic interior lighting control off
A p To switch the right-hand front read-
ing lamp on/off
B To switch the automatic interior lighting
control on
X To switch on: set the switch to centre
position B.
X To switch off: set the switch to the |
position.
The interior lighting automatically switches
on if you:
R unlock the vehicle
R open adoor
R remove the key from the ignition lock
The interior lightin gisactivate dfor as hort
tim ew hen the key is removed from the igni-
tion lock .You can activate this delayed
switch-of fusing the on-boar dcomputer
(Y page 282).
Manua linterior lighting control Overhead con
trolpanel
: p To switch the left-hand front reading
lamp on/off
; c To switch the front interior lighting
on
= v To switch the rear interior lighting
on/off
? | To switch the front interior lighting/
automatic interior lighting control off Interior lighting
127Lights and windscreen wipers Z
Page 149 of 441
Windows misted up on the outside
X
Press the _button repeatedly unti lthe
P orO symbolappears in the dis-
play.
i You should only select this setting until
the windscreen is clear again. Rear window heating
Switching on/off G
WARNING
Clear all windows of ice or snow before setting
off. Otherwise ,impaire dvisibility could
endanger you and others. The rear window heating has
ahigh cur rent
draw. You should therefore switc hitoff as
soon as th ewindow is clear .Itotherwi se
switches off automaticall yafterseveral
minutes.
If the batter yvoltage is too low, the rear win-
do wh eatin gmay switc hoff.
X Turn th ekey to position 2in the ignition
lock.
X Press the ¤button.
The indicator lam pinthe¤ button lights
up or goes out.
Problems wit hthe rea rwindow hea ting The rea
rwindow heatin ghas switched off
prematurely or cannot be activated. X
Switch off any consumers that are not
required, e.g. readin glamps or interior
lighting.
When the battery is sufficiently charged,
the rear window heatin gisactivated again
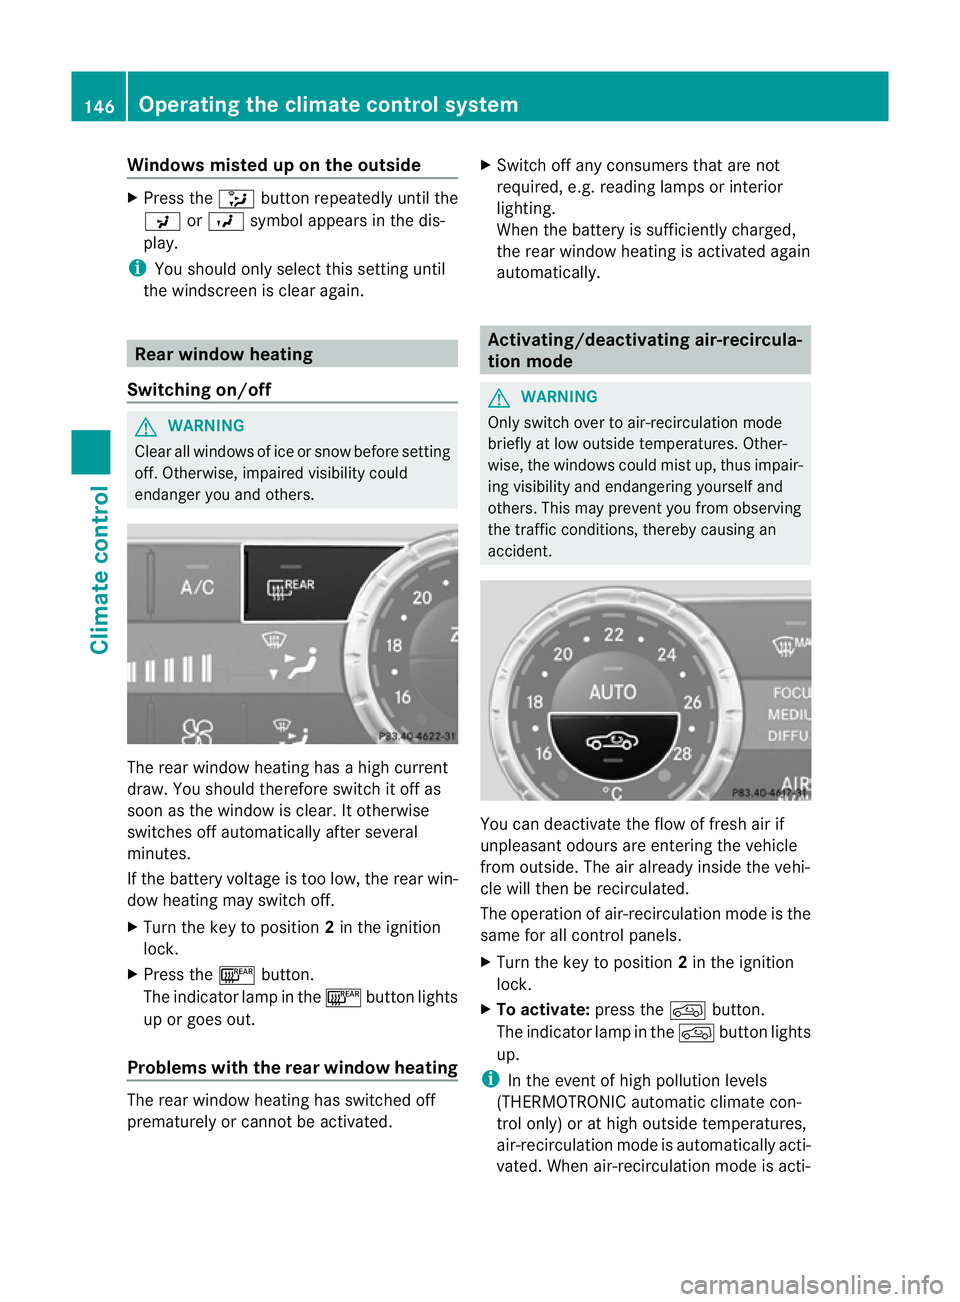
automatically. Activating/deactivating air-recircula-
tion mode
G
WARNING
Only switc hover to air- recirculation mode
briefly at low outsid etemperatures. Other-
wise, the windows could mist up, thus impair-
ing visibility and endangerin gyoursel fand
others. Thi smay prevent you from observing
the traffic conditions, thereby causing an
accident. You can deactivate the flow of fresh air if
unpleasant odours are entering the vehicle
from outside. The air already inside the vehi-
cle will then be recirculated.
The operation of air-recirculation mode is the
same for all control panels.
X
Turn the key to position 2in the ignition
lock.
X To activate: press thedbutton.
The indicator lamp in the dbutton lights
up.
i In the event of high pollutio nlevels
(THERMOTRONI Cautomatic climate con-
trol only) or at high outsid etemperatures,
air-recir culation mode is automatically acti-
vated. When air-recirculation mode is acti- 146
Operating the climate control systemClimate control