washer fluid MERCEDES-BENZ GL SUV 2012 Owners Manual
[x] Cancel search | Manufacturer: MERCEDES-BENZ, Model Year: 2012, Model line: GL SUV, Model: MERCEDES-BENZ GL SUV 2012Pages: 441, PDF Size: 10.66 MB
Page 25 of 441
LIM (cruis
econtrol) ........................ 193
LI M( DISTRONIC PLUS) ..................200
LIM (variabl eSPEEDTRONI C)......... 196
Overview .................................. 32, 324
PASSENGER AIRBAG OFF ................52
Reserve fuel ................................... 333
Sea tbelt. ....................................... 325
SRS ................................................ 332
Tyr ep ressure monito r................... 336
Warning triangle ................................ 376
Washer fluid Display message ............................ 322
Whee lboltt ightening torque ...........409
Whee lchock ...................................... 405
Wheels Changing/replacing ....................... 404
Ch anging awheel .......................... 404
Ch ecking ........................................ 397
Cleaning ......................................... 369
Cleaning (warning) .........................405
Emergency sp arew heel ................. 414
Fitting anew wheel ........................ 408
Fitting awheel ............................... 405
Important safety notes ..................396
Overview ........................................ 396
Removing awheel .......................... 407
Storin g........................................... 405
Ti gh tening torqu e........................... 409
Whee lsize/tyre size ...................... 409
Windowbag
Display message ............................ 300
Operatio n......................................... 45
Windows
Cleaning ......................................... 369
seeS ide windows
Windscreen
Demisting ...................................... 145
Infrared refl ective .......................... 358
Windscree nwashe rfluid
see Windscreen washer system
Windscreen washer system
Notes ............................................ .430
Topping up ..................................... 364
Windscree nwipers
Problem (malfunction) ...................133
Rea rwindow wiper ........................ 132
Replacing the wipe rblades ............ 132
Switch ingo n/off ........................... 131Winte
rdriving
Genera lnotes ................................ 398
Winte roperation
Overview ........................................ 398
Radi ator cover ............................... 362
Sli pp ery road surf aces ................... 188
Sno wchains .................................. 399
Sno wdrive program ....................... 249
Winte rtyres
Limiting th espee d(on-board com-
puter) ............................................ .283
M+S tyre s...................................... 398
Wipe rblades
Cleaning ...... ................................... 369
Important safety note s.................. 132
Replacing ....................................... 132
Replacing (o nthe rea rwindo w)..... 133
Replacing (windscreen) ..................132
Wooden trim (cleanin ginstruc-
tions) .................................................. 372
Workshop seeQ ualified specialist workshop 22
Index
Page 134 of 441
You must open the service flap in the luggage
compartmen
tbefor eyou can replac ethe
bulbs in the bra kelamp.
X To open: release service flap :at the top,
e.g. with ascrewdriver, and swing it down-
ward in the dire ction of the arrow.
X Right side: remove the first -aid kit before-
hand and pull the luggage net down.
X To close: reinsert service flap :.
Brake lamp X
Switch off the lights.
X Open the luggage compartment.
X Open the service flap (Y page 130).
X Turn bulb holder :anti-clockwise and
remove it.
X Take bulb out of bulb holder :.
X Insert the new bulb int obulb holder :.
X Insert bulb holder :intothe lamp and turn
it clockwise.
X Close th eservic eflap (Y page 130). Windscree
nwipers Switchin
gthe windscreen wiper son/
off G
WA
RNING
The windscree nwill not longer be wiped prop-
erly if the wiper blades are worn .This could
prevent you from observing the traffic condi-
tions, thereby causing an accident .Replace the wiper blades twic
eayear, ideally in spring
and autumn.
! Do not operate the windscreen wipers
when the windscreen is dry, as this could
damage the wiper blades. Moreover ,dust
that has collected on the windscreen can
scratc hthe glass if wipin gtakes place when
the windscreen is dry.
If it is necessary to switch on the wind-
screen wipers in dry weather conditions,
always operate them using washe rfluid.
! If the windscreen wipers leave smears on
the windscreen after the vehicle has been
washed in an automatic car wash, this may
be due to wax or other residue. Clean the
windscreen with washer fluid after an auto-
matic car wash.
! Intermit tentwiping with rain sensor: due
to optical influences and the windscreen
becoming dirty in dry weather conditions,
the windscreen wipers may be activated
inadvertently. This could damage the wind-
screen wiper blades or scratc hthe wind-
screen.
For this reason, you should always switch
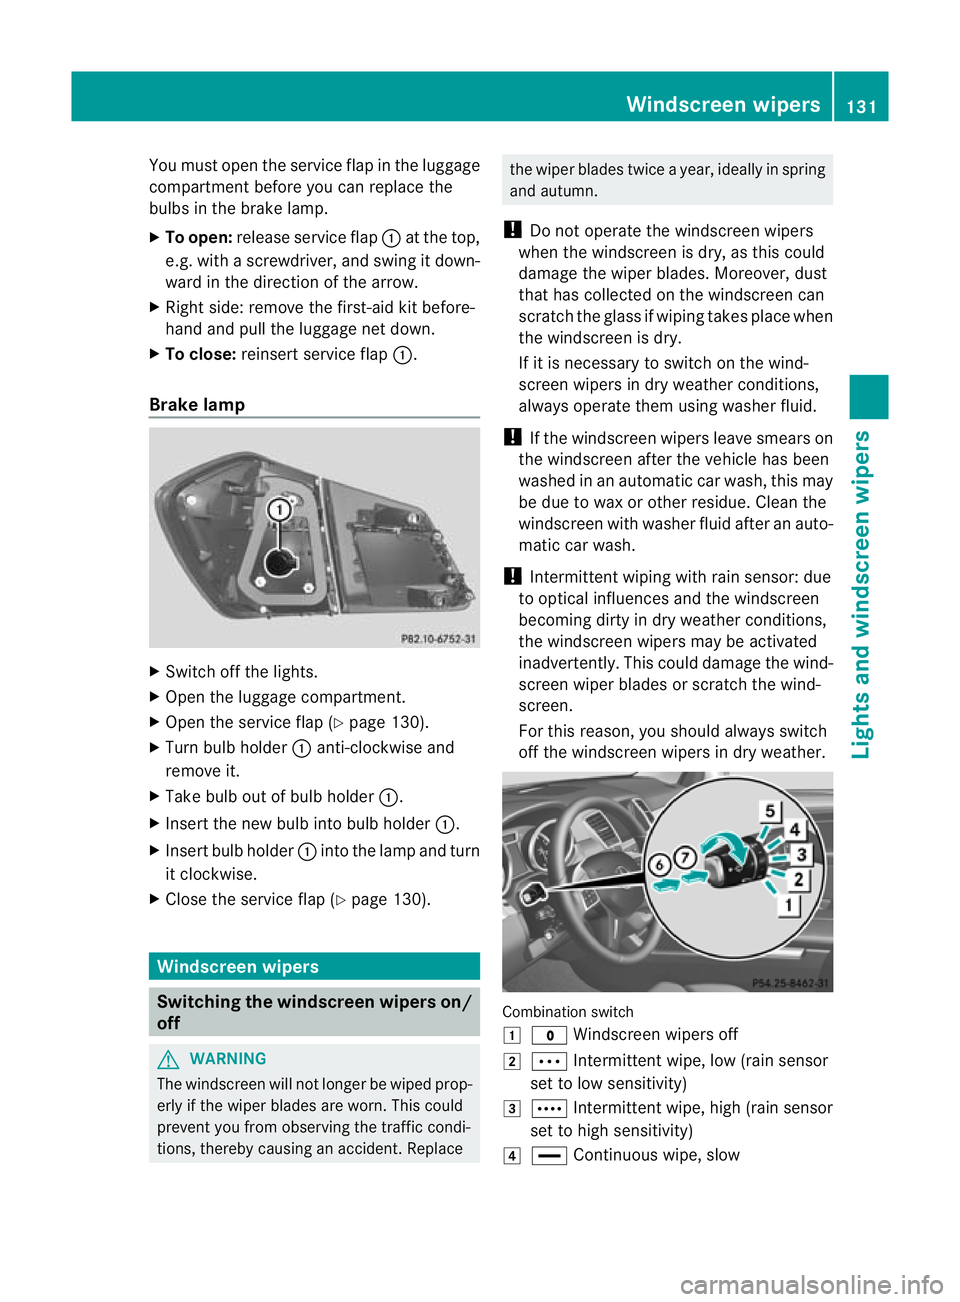
off the windscreen wiper sind ry weather. Combinatio
nswitch
1 $ Windscreen wipers off
2 Ä Intermittent wipe, low (rain sensor
set to low sensitivity)
3 Å Intermittent wipe, high (rain sensor
set to high sensitivity)
4 ° Continuous wipe, slow Windscreen wipers
131Lights and windscreen wipers Z
Page 135 of 441
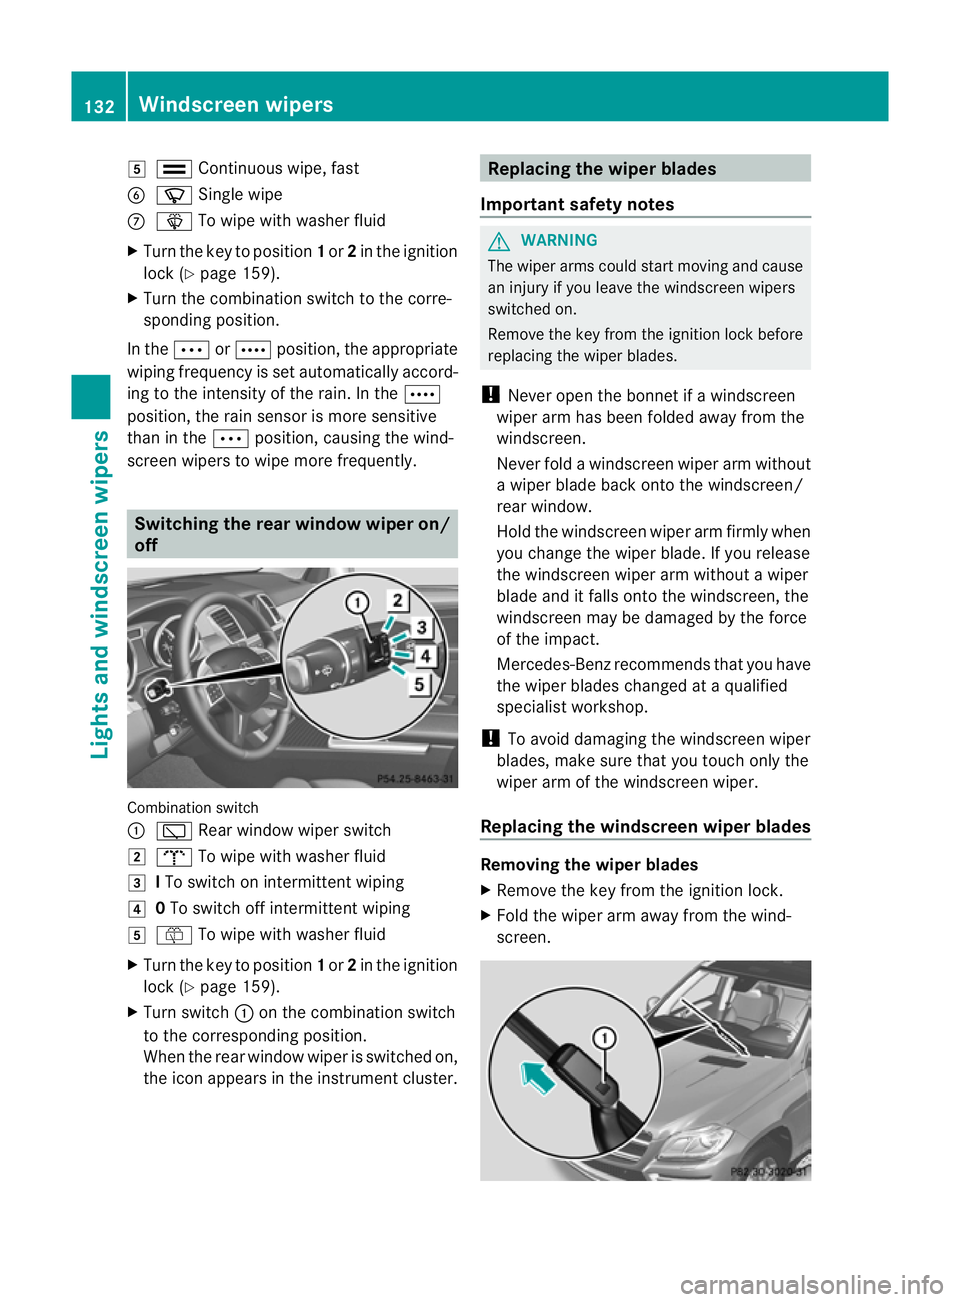
5
¯ Continuous wipe, fast
B í Single wipe
C î To wipe with washer fluid
X Turn the key to position 1or 2in the ignition
lock (Y page 159).
X Turn the combination switc htothe corre-
sponding position.
In the ÄorÅ position, the appropriate
wipin gfrequency is se tautomatically accord-
ing to the intensity of the rain. In the Å
posi tion, the rain sensor is mor esensitive
than in the Äposition, causin gthe wind-
screen wiper stowipe mor efrequently. Switc
hing th erearw indow wiper on/
off Combi
nation switch
: è Rear windo wwiper switch
2 b To wipe with washer fluid
3 ITo switc honintermitten twiping
4 0To switc hoff intermittent wiping
5 ô To wip ewith washer fluid
X Turn the key to position 1or 2in the ignition
lock (Y page 159).
X Turn switch :on the combination switch
to the correspondin gposition.
When the rea rwindow wiper is switched on,
the icon appears in the instrumen tcluster. Replacing th
ewiper blades
Important safety notes G
WAR
NING
The wipe rarms could start moving and cause
an injury if you leave the windscreen wipers
switche don.
Remove the key from the ignition lock before
replacing the wipe rblades.
! Never open the bonnet if awindscreen
wiper arm has been folded away from the
windscreen.
Never fold awindscreen wiper arm without
aw iper blade back ont othe windscreen/
rea rwindow.
Hold the windscreen wiper arm firmly when
you change the wiper blade. If you release
the windscreen wiper arm without awiper
blade and it falls ont othe windscreen, the
windscreen ma ybedamaged by the force
of the impact.
Mercedes-Benz recommends that you have
the wiper blades changed at aqualified
specialist workshop.
! To avoid damaging the windscreen wiper
blades, mak esure that you touc honly the
wipe rarm of th ewindsc reen wiper.
Replacing th ewindscreen wiper blades Removing th
ewiper blades
X Remov ethe key fr om theignition lock.
X Fold the wiper ar maway fro mthe wind-
screen. 132
Windscreen wipersLights and windscreen wipers
Page 325 of 441
Displa
ymessages Possible causes/consequences and
M Solutions
&
in
operative See Owner'
sMan. Th
ea uxiliar yheatin ghasatemporary ma lfunction or is faulty.
X When the vehicl eisonalevel surface and the engin ehas cooled
down, make up to four attempts to switch on the auxiliary heat-
ing, waiting several minutes between each attempt
(Y page 148).
X If the auxiliary heating does not switch on, consult aqualified
specialist workshop. Teleph
oneNo service Your vehicl
eisoutside the network provider's transmitter/
receiver range.
X Wait until the mobile phone operational readiness symbol
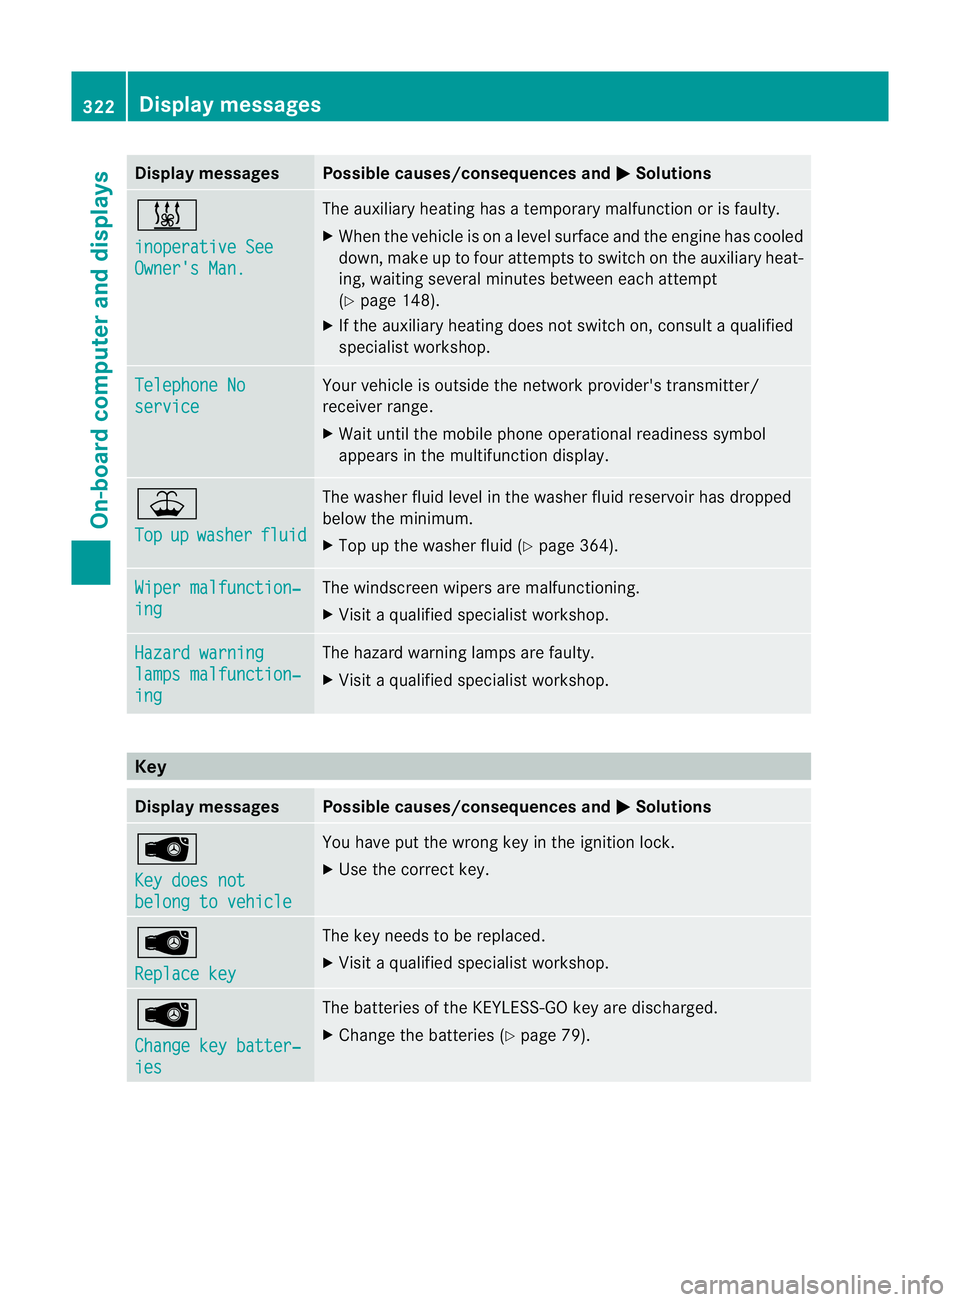
appears in the multifunction display. ¥
Top
up washer fluid The washe
rfluid level in the washer fluid reservoir has dropped
below the minimum.
X Top up the washer fluid (Y page 364).Wipe
rmalfunction‐ ing Th
ew indscreen wipers are malfunctioning.
X Visit aqualified specialist workshop. Hazard warning
lamp
smalfunction‐ ing Th
eh azard warning lamps are faulty.
X Visit aqualified specialist workshop. Key
Display messages Possible causes/consequences and
M Solutions
Â
Ke
yd oes not belong to vehicle Yo
uh ave put the wrong key in the ignition lock.
X Use the correct key. Â
Replac
ekey Th
ek ey needs to be replaced.
X Visit aqualified specialist workshop. Â
Change ke
ybatter‐ ies Th
eb atteries of the KEYLESS-GO key are discharged.
X Change the batteries (Y page 79).322
Display messagesOn-board computer and displ
ays
Page 367 of 441
X
Slowl yturn cap :half aturn anti-clock-
wise to allo wexces spress uretoe scape.
X Turn cap :further anti-clockwise and
rem ovei t.
If the coolant is at the level of marker bar
= in the fille rneck when cold, ther eis
enough coolan tincoolant expansion
tank ;.
If the coolant leve lisapproximately
1.5 cm above marker bar =in the filler
nec kwhen warm, ther eisenoughcoolant
in coolant expansion tank ;.
X If necessary ,top up with coolant that has
been tested and approved by Mercedes-
Ben z.
X Replace cap :and turn it clockwise as far
as it will go.
For further information on coolant, see
(Y page 429).
Topping up the windscreen washer sys-
tem/headlam pcleaning system G
WAR
NING
Windscreen washer fluid/antifreeze is highly
flammable .Avoid spilling windscreen washer
fluid/antifreez eonh ot engin ecomponent sas
it can ignit eand burn. Severe burns could be
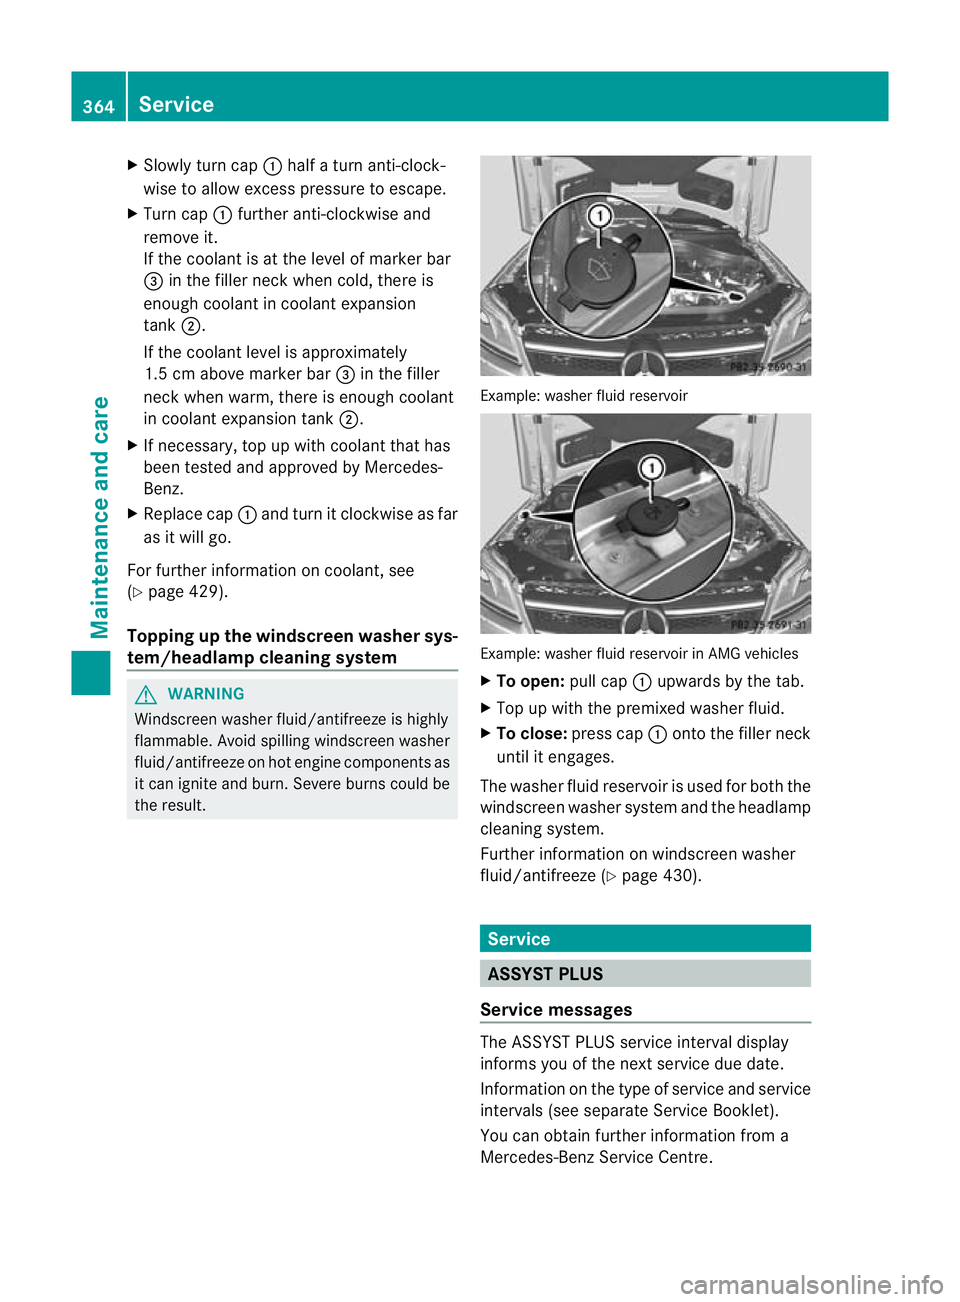
the resul t. Example: washer fluid reservoir
Example: washer fluid reservoir in AMG vehicles
X
To open: pull cap:upward sbythe tab.
X Top up with the premi xedw asher fluid.
X To close: press cap :ontothe filler neck
until it engages.
The washer fluid reservoi risu sed for both the
windscree nwasher system and th eheadlamp
cleaning system.
Further inf ormatio nonw indscreen washer
fluid/antifr eeze (Ypage 43 0). Service
ASSYST PLUS
Service messages The ASSYS
TPLUS service interva ldisplay
inform syou of the nex tservice due date.
In fo rmation on th etype of service and service
intervals (se eseparate Ser vice Boo klet).
You can obtain further information from a
Mercedes-Ben zService Cent re.364
ServiceMaintenance and care
Page 426 of 441
data applicable to your vehicle on the vehi-
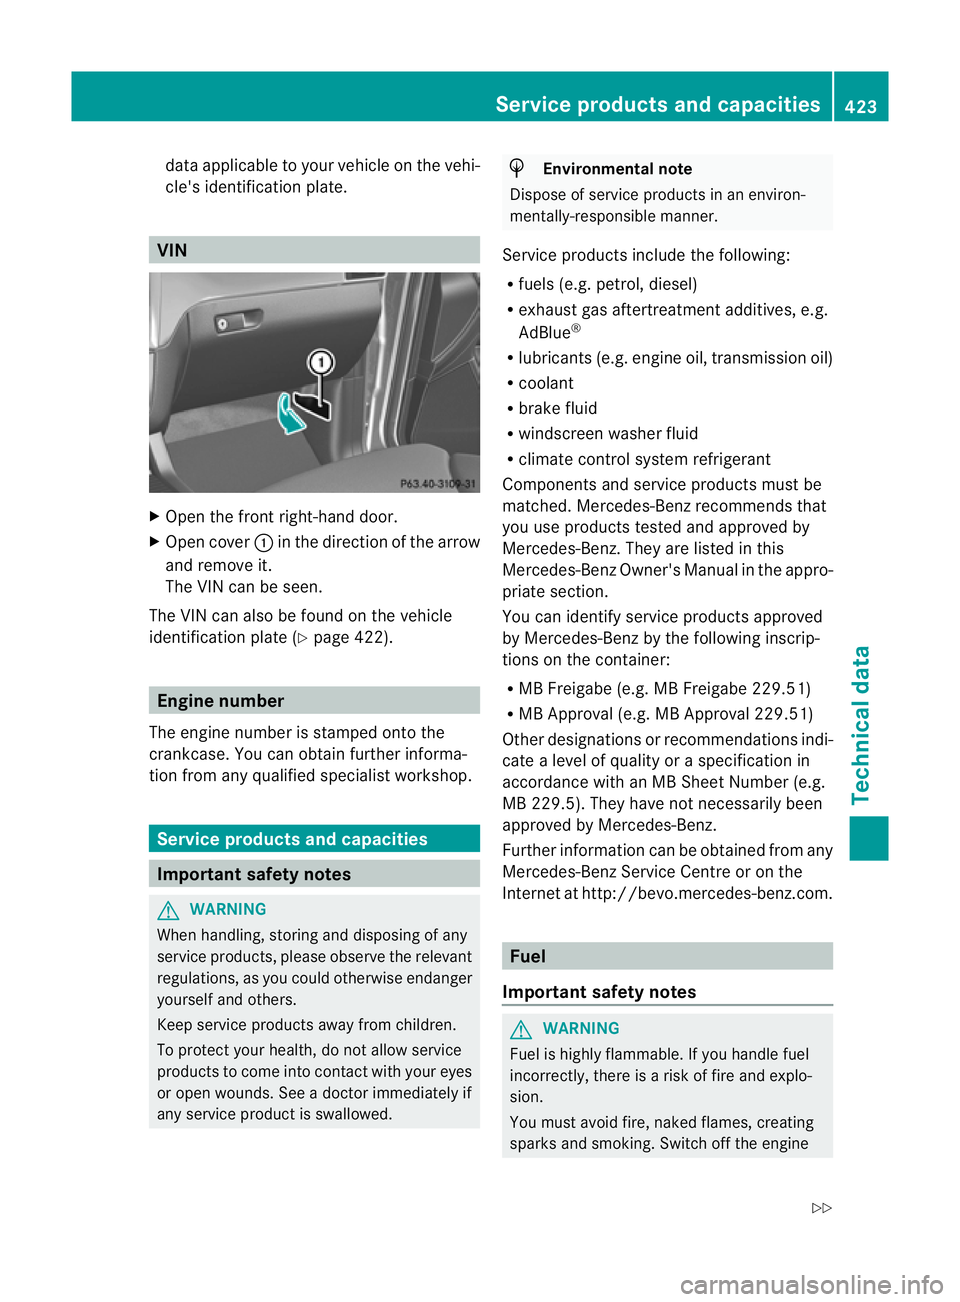
cle' sidentification plate. VIN
X
Open the fron tright-han ddoor.
X Open cover :in the dire ction of the arrow
and remove it.
The VI Ncan be seen.
The VIN can also be foun donthe vehi cle
identification plate (Y page 422).Engine number
The engin enumber is stamped ont othe
crankcase .You can obtain further informa-
tion fr om any qualified specialist workshop. Service products and capacities
Important safety notes
G
WARNING
Whe nhandling ,storing and disposing of any
servic eproducts, please observe the relevant
regulations, as you could othe rwise endanger
yourself and others.
Keep servic eproducts awa yfromc hildren.
To protec tyour health, do no tallow service
products to com eintoc ontac twith your eyes
or open wounds. See adoctor immediately if
any servic eproduct is swallowed. H
Environmental note
Dispose of service products in an environ-
mentally-responsible manner.
Service products includ ethe following:
R fuels (e.g. petrol, diesel)
R exhaust gas after treatmen tadditives, e.g.
AdBlue ®
R lubrican ts(e.g. engin eoil, transmission oil)
R coolant
R brake fluid
R windscreen washer fluid
R clima te control systemrefrigerant
Components and servic eproducts mus tbe
matched. Mercedes-Benz reco mmends that
you use produc tstested and approved by
Mercedes-Benz. They are listed in this
Mercedes-Benz Owne r'sM anual in the appro-
priat esection.
You can identif yservice product sapproved
by Mercedes-Ben zbythe fol lowinginscrip-
tion sonthe container:
R MB Freigab e(e.g. MB Freigab e229.51)
R MB Approva l(e.g. MB Approval 229.51)
Other designation sorrecommendation sind i-
cat eal evel of qualit yora specification in
ac cord ance wit hanMBS heet Nu mber (e.g.
MB 229.5). They hav enot necessarily been
approved by Mercedes-Benz.
Further informatio ncan be obtained from any
Mercedes -Ben zS ervice Cent reor on the
In te rnet at ht tp://bevo.mercedes -benz.co m. Fuel
Important safety notes G
WARNING
Fuel is highly flammable. If you handle fuel
incorrectly, there is arisk of fir eand explo-
sio n.
You must avoi dfire, naked flames, creating
sparks and smoking. Switc hoff the engine Servic
eproducts and capacities
423Technical data
Z
Page 433 of 441
!
Alway suseasuitabl ecoolant mixture,
even in countries where high temperatures
prevail.
Otherwise, the engin ecooling system is not
sufficiently protected from corrosion and
overheating.
! The engin ecooling system is filled with
coolant, which must be renewed after
15 years or after 250,000 kilometres at the
latest.
The coolant is amixtur eofw ater and anti-
freeze/corrosio ninhibitor. It performs the
following tasks:
R anti-corrosio nprotection
R antifreeze protection
R raising th eboiling point
If antifreeze/ corrosion inhibitor is presen tin
the correct concentration, the boil ingp oint of
the coolant during operation will be approx-
imately 13 0†.
The antifreeze/ corrosion inhibitor concentra-
tion in the engin ecooling system should:
R be at least 50%. This will protect the engine
coolin gsystem against freezing down to
approximatel y-37 †.
R not exceed 55% (antifreeze protection
down to -45 †). Hea twill otherwise not be
dissipated as effectively.
If the vehicle has lost coolant, top it up with
equa lamounts of water and antifreeze/cor-
rosio ninhibitor. Mercedes-Benz recom-
mends an antifreeze/corrosion inhibito rcon-
cen trate in accordance with MB Specifica-
tions for Service Products 310.1.
The coolant is checked at every maintenance
interval at aqualified special istworkshop.
i When the vehicle is first delivered ,itisfil-
led with acoolant mixtur ethat ensures
adequate antifreeze and corrosion protec-
tion. Windscreen washe
rsystem an dhead-
lamp cleaning system
Important safety notes G
WARNING
Windscreen washer concentrat eishighly
flammable. If it comes into contact with hot
engine component sorthe exhaust system it
coul dignite. There is arisk of fire and injury.
Make sure that no windscreen washer con-
centrate is spille dnext to the filler neck.
! Only use washer fluid that is suitable for
plastic lamp lenses, e.g. MB SummerFit or
MB WinterFit. Unsuitable washer fluid
could damage the plastic lenses of the
headlamps.
! Do not use distilled or de-ionised water in
the washer fluid reservoir. Otherwise, the
level sensor may be damaged.
! Only the washer fluids SummerFit and
WinterFit can be mixed. Otherwise, the
spraying nozzles could become blocked.
At temperatures above freezing:
X Fill the washer fluid reservoir with amixture
of water and washer fluid, e.g. MB Sum-
merFit.
Mix 1part MB SummerFit to 100 parts water.
At temperatures below freezing:
X Fill the washe rfluid reservoir with amixture
of water and washer fluid, e.g. MB Winter-
Fit.
Adapt the mixin gratio to the outside temper-
ature.
R Down to Ò10 †: mix 1part MB WinterFit to
2p arts water.
R Down to Ò20 †: mix 1part MB WinterFit to
1p art water.
R Down to Ò29 †: mix 2parts MB WinterFit
to 1p art water.
i Add washe rfluid concentrate, e.g. MB
SummerFit or MB WinterFit, to the washer
fluid all year round. 430
Service products and capacitiesTechnical data