towing MERCEDES-BENZ GL450 2010 X164 Owner's Guide
[x] Cancel search | Manufacturer: MERCEDES-BENZ, Model Year: 2010, Model line: GL450, Model: MERCEDES-BENZ GL450 2010 X164Pages: 380, PDF Size: 9.81 MB
Page 285 of 380
Vehicle equipment ............................284
Where will I find ...? ..........................284
Vehicle status messages in the
multifunction display .......................287
What to do if … ..................................314
Unlocking/locking manually ...........323
Resetting activated NECK-PRO
active front head restraints .............325
Replacing SmartKey batteries .........326
Replacing bulbs .................................328
Replacing wiper blades ....................334
Flat tire ..............................................336
Bleeding the fuel system (diesel
engine only) .......................................345
AdBlue® (diesel engine only) ...........346
Battery ...............................................348
Jump starting ....................................350
Towing the vehicle ............................352
Fuses ..................................................355
283Practical hintsX164_AKB; 5; 31, en-USd2ureepe,Version: 2.11.8.12009-09-11T12:30:16+02:00 - Seite 283
Page 286 of 380
Vehicle equipment
iThis Operator’s Manual describes all
features, standard or optional, potentially
available for your vehicle at the time of
purchase. Please be aware that your
vehicle might not be equipped with all
features described in this manual.
Where will I find ...?
First aid kit
iCheck expiration dates and contents for
completeness at least once a year and
replace missing/expired items.
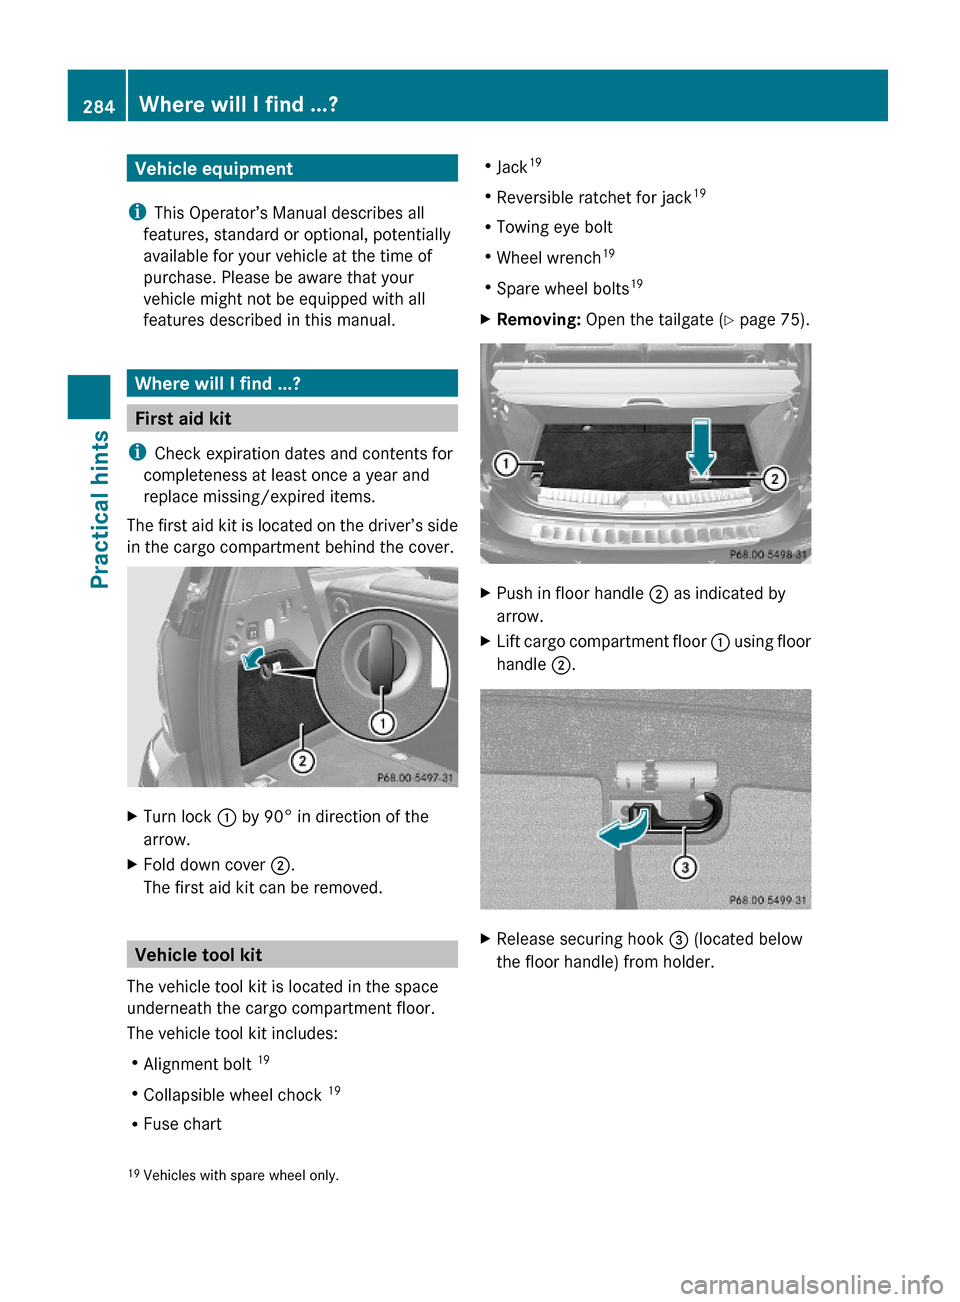
The first aid kit is located on the driver’s side
in the cargo compartment behind the cover.
XTurn lock : by 90° in direction of the
arrow.
XFold down cover ;.
The first aid kit can be removed.
Vehicle tool kit
The vehicle tool kit is located in the space
underneath the cargo compartment floor.
The vehicle tool kit includes:
RAlignment bolt 19
RCollapsible wheel chock 19
RFuse chart
RJack19
RReversible ratchet for jack19
RTowing eye bolt
RWheel wrench19
RSpare wheel bolts19
XRemoving: Open the tailgate (Y page 75).XPush in floor handle ; as indicated by
arrow.
XLift cargo compartment floor : using floor
handle ;.
XRelease securing hook = (located below
the floor handle) from holder.19Vehicles with spare wheel only.284Where will I find ...?Practical hints
X164_AKB; 5; 31, en-USd2ureepe,Version: 2.11.8.12009-09-11T12:30:16+02:00 - Seite 284
Page 287 of 380
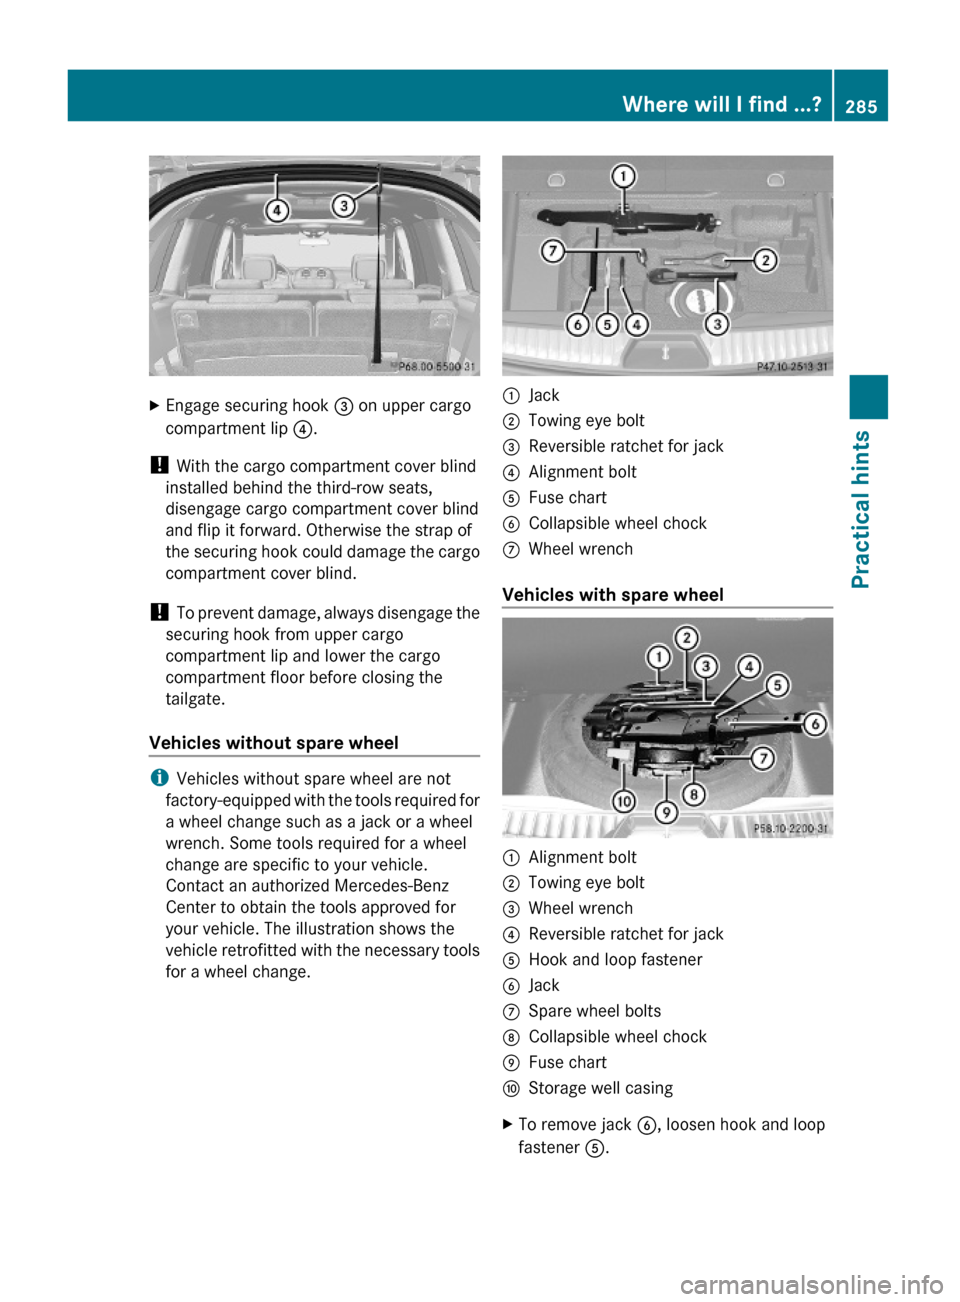
XEngage securing hook = on upper cargo
compartment lip ?.
! With the cargo compartment cover blind
installed behind the third-row seats,
disengage cargo compartment cover blind
and flip it forward. Otherwise the strap of
the securing hook could damage the cargo
compartment cover blind.
! To prevent damage, always disengage the
securing hook from upper cargo
compartment lip and lower the cargo
compartment floor before closing the
tailgate.
Vehicles without spare wheel
iVehicles without spare wheel are not
factory-equipped with the tools required for
a wheel change such as a jack or a wheel
wrench. Some tools required for a wheel
change are specific to your vehicle.
Contact an authorized Mercedes-Benz
Center to obtain the tools approved for
your vehicle. The illustration shows the
vehicle retrofitted with the necessary tools
for a wheel change.
:Jack;Towing eye bolt=Reversible ratchet for jack?Alignment boltAFuse chartBCollapsible wheel chockCWheel wrench
Vehicles with spare wheel
:Alignment bolt;Towing eye bolt=Wheel wrench?Reversible ratchet for jackAHook and loop fastenerBJackCSpare wheel boltsDCollapsible wheel chockEFuse chartFStorage well casingXTo remove jack B, loosen hook and loop
fastener A.
Where will I find ...?285Practical hintsX164_AKB; 5; 31, en-USd2ureepe,Version: 2.11.8.12009-09-11T12:30:16+02:00 - Seite 285Z
Page 303 of 380

Safety systemsDisplay messagesPossible causes/consequences and M SolutionsGTele Aid
Inoperativ
eOne or more main functions of the Tele Aid system are
malfunctioning.XHave the Tele Aid system checked at an authorized
Mercedes-Benz Center.+Restraint
Sys.
Malfunctio
n
Service
RequiredThe system is malfunctioning.XDrive with added caution to the nearest authorized
Mercedes-Benz Center and have the system checked
immediately.GWarning!
In the event a malfunction of the SRS is
indicated as outlined above, the SRS may not
be operational.
For your safety, we strongly recommend that
you contact an authorized Mercedes-Benz
Center immediately to have the system
checked. Otherwise the SRS may not be
activated when needed in an accident, which
could result in serious or fatal injury, or it
might deploy unexpectedly and unnecessarily
which could also result in injury.
Driving systems
Display messagesPossible causes/consequences and M SolutionsÁLevel
Selection
Not
PermittedThe selected vehicle level cannot be adjusted, because
R you are driving too fast for the desired vehicle level
R you are towing a trailer
R you are using accessories that are connected to the trailer
power socket, e.g. a bicycle rackXReduce vehicle speed and set the desired vehicle level
again ( Y page 159).XObserve the notes on trailer towing ( Y page 269).ÁMalfunctio
nThe air suspension is malfunctioning.XDo not drive faster than 50 mph (80 km/h).XHave the system checked at an authorized Mercedes-Benz
Center.Vehicle status messages in the multifunction display301Practical hintsX164_AKB; 5; 31, en-USd2ureepe,Version: 2.11.8.12009-09-11T12:30:16+02:00 - Seite 301Z
Page 354 of 380
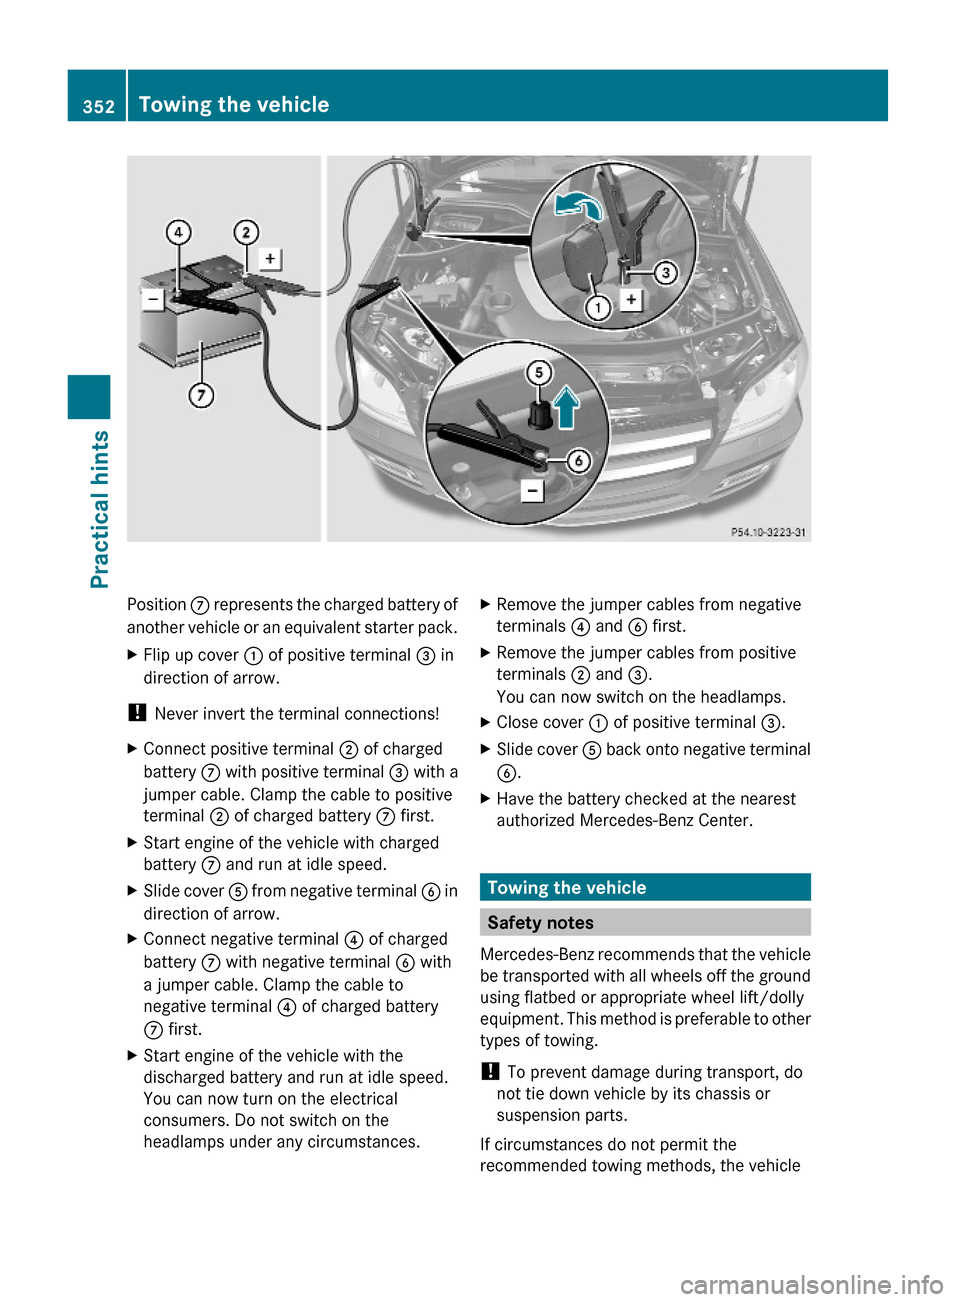
Position C represents the charged battery of
another vehicle or an equivalent starter pack.
XFlip up cover : of positive terminal = in
direction of arrow.
! Never invert the terminal connections!
XConnect positive terminal ; of charged
battery C with positive terminal = with a
jumper cable. Clamp the cable to positive
terminal ; of charged battery C first.
XStart engine of the vehicle with charged
battery C and run at idle speed.
XSlide cover A from negative terminal B in
direction of arrow.
XConnect negative terminal ? of charged
battery C with negative terminal B with
a jumper cable. Clamp the cable to
negative terminal ? of charged battery
C first.
XStart engine of the vehicle with the
discharged battery and run at idle speed.
You can now turn on the electrical
consumers. Do not switch on the
headlamps under any circumstances.
XRemove the jumper cables from negative
terminals ? and B first.
XRemove the jumper cables from positive
terminals ; and =.
You can now switch on the headlamps.
XClose cover : of positive terminal =.XSlide cover A back onto negative terminal
B.
XHave the battery checked at the nearest
authorized Mercedes-Benz Center.
Towing the vehicle
Safety notes
Mercedes-Benz recommends that the vehicle
be transported with all wheels off the ground
using flatbed or appropriate wheel lift/dolly
equipment. This method is preferable to other
types of towing.
! To prevent damage during transport, do
not tie down vehicle by its chassis or
suspension parts.
If circumstances do not permit the
recommended towing methods, the vehicle
352Towing the vehiclePractical hints
X164_AKB; 5; 31, en-USd2ureepe,Version: 2.11.8.12009-09-11T12:30:16+02:00 - Seite 352
Page 355 of 380

may be towed with all wheels on the ground
only so far as necessary to have the vehicle
moved to a safe location where the
recommended towing methods can be
employed.
! Before towing the vehicle observe the
following instructions:
RDo not tow-start the vehicle. You could
otherwise seriously damage the
automatic transmission which is not
covered by the Mercedes-Benz Limited
Warranty.
RDo not tow with sling-type equipment.
Towing with sling-type equipment over
bumpy roads will damage radiator and
supports.
RTowing of the vehicle should only be
done using the properly installed towing
eye bolt. Never attach a tow cable, tow
rope or tow rod to the vehicle chassis,
frame or suspension parts.
! Do not tow with one axle raised. Doing so
could damage the transfer case, which is
not covered by the Mercedes-Benz Limited
Warranty. All wheels must be on or off the
ground. Observe instructions for towing the
vehicle with all wheels on the ground.
GWarning!
With the engine not running, there is no power
assistance for the brake and steering
systems. In this case, it is important to keep
in mind that a considerably higher degree of
effort is necessary to brake and steer the
vehicle. Adapt your driving accordingly.
! Avoid pulling the vehicle abruptly or
diagonally, since it could result in damage
to the chassis alignment.
! Do not use the towing eye bolt for
recovery, as this could damage the vehicle.
If in doubt, recover the vehicle with a crane.
iIf the battery is disconnected or
discharged
Rthe SmartKey will not turn in the starter
switch
Rthe automatic transmission will remain in
park position P
For more information see “Battery”
(Y page 348) or “Jump starting”
(Y page 350).
Installing towing eye bolt
Depending on whether you are towing a
vehicle or you are being towed, the towing eye
bolt can be screwed into threaded holes
which are located behind covers on each
bumper.
The towing eye bolt is supplied with the
vehicle tool kit, located in the cargo
compartment underneath the cargo
compartment floor (Y page 284).
XTake the towing eye bolt out of the space
underneath the cargo compartment floor.
Removing cover in front bumper
XPress mark on cover : as indicated by the
arrow.
XLift cover : off to reveal the threaded hole
for the towing eye bolt.
Towing the vehicle353Practical hintsX164_AKB; 5; 31, en-USd2ureepe,Version: 2.11.8.12009-09-11T12:30:16+02:00 - Seite 353Z
Page 356 of 380
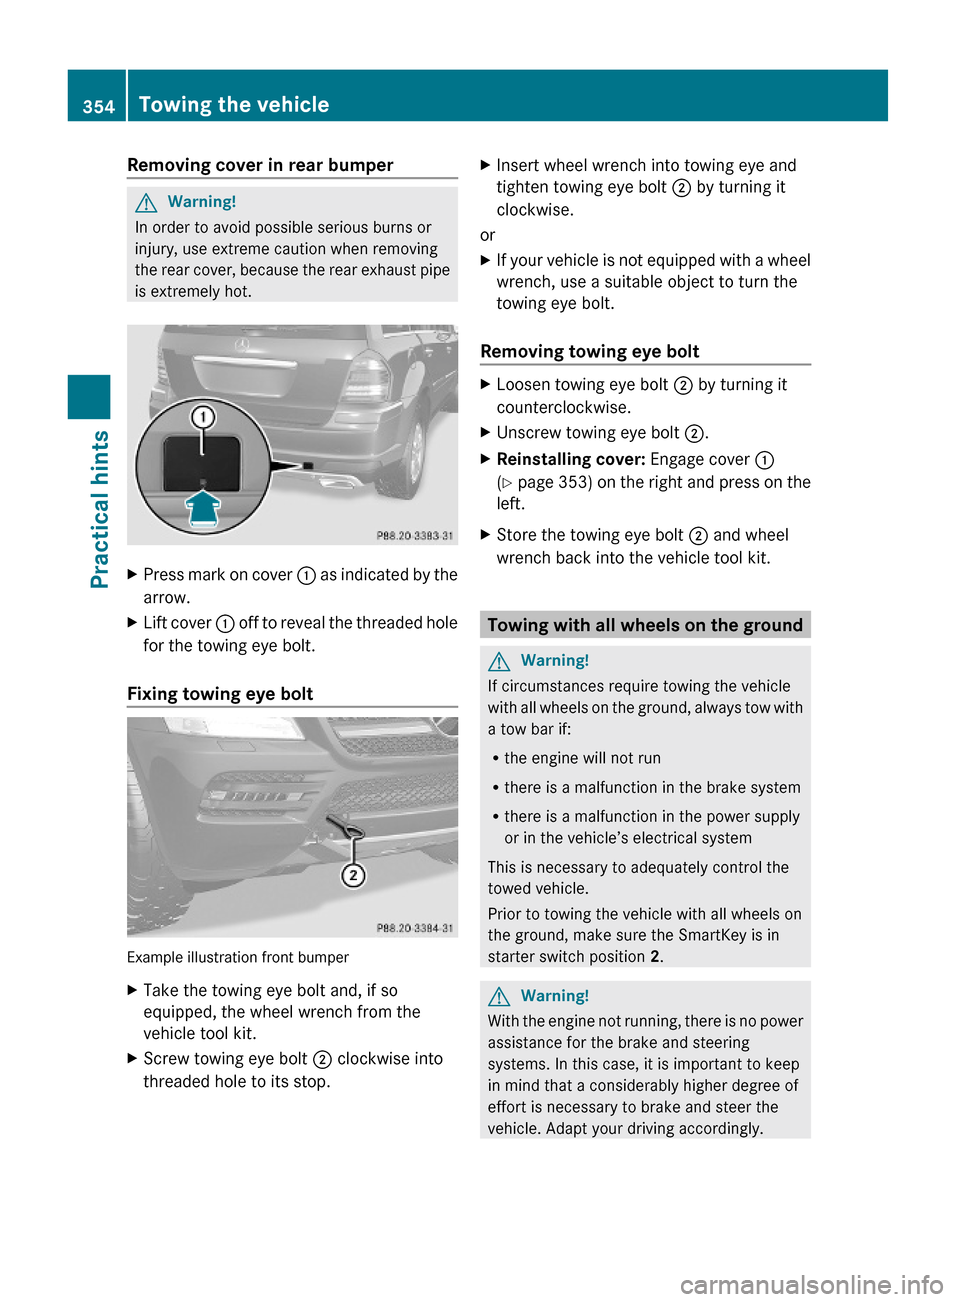
Removing cover in rear bumperGWarning!
In order to avoid possible serious burns or
injury, use extreme caution when removing
the rear cover, because the rear exhaust pipe
is extremely hot.
XPress mark on cover : as indicated by the
arrow.
XLift cover : off to reveal the threaded hole
for the towing eye bolt.
Fixing towing eye bolt
Example illustration front bumper
XTake the towing eye bolt and, if so
equipped, the wheel wrench from the
vehicle tool kit.
XScrew towing eye bolt ; clockwise into
threaded hole to its stop.
XInsert wheel wrench into towing eye and
tighten towing eye bolt ; by turning it
clockwise.
or
XIf your vehicle is not equipped with a wheel
wrench, use a suitable object to turn the
towing eye bolt.
Removing towing eye bolt
XLoosen towing eye bolt ; by turning it
counterclockwise.
XUnscrew towing eye bolt ;.XReinstalling cover: Engage cover :
(Y page 353) on the right and press on the
left.
XStore the towing eye bolt ; and wheel
wrench back into the vehicle tool kit.
Towing with all wheels on the ground
GWarning!
If circumstances require towing the vehicle
with all wheels on the ground, always tow with
a tow bar if:
Rthe engine will not run
Rthere is a malfunction in the brake system
Rthere is a malfunction in the power supply
or in the vehicle’s electrical system
This is necessary to adequately control the
towed vehicle.
Prior to towing the vehicle with all wheels on
the ground, make sure the SmartKey is in
starter switch position 2.
GWarning!
With the engine not running, there is no power
assistance for the brake and steering
systems. In this case, it is important to keep
in mind that a considerably higher degree of
effort is necessary to brake and steer the
vehicle. Adapt your driving accordingly.
354Towing the vehiclePractical hints
X164_AKB; 5; 31, en-USd2ureepe,Version: 2.11.8.12009-09-11T12:30:16+02:00 - Seite 354