MERCEDES-BENZ GL550 2010 X164 Owner's Manual
Manufacturer: MERCEDES-BENZ, Model Year: 2010, Model line: GL550, Model: MERCEDES-BENZ GL550 2010 X164Pages: 380, PDF Size: 9.81 MB
Page 201 of 380
XAttach cover caps (Y page 198) and lock
them.
XStore key and hex key back into the storage
well (Y page 284).
Adjusting the clamping widths of the
crossbars
GWarning!
Only install the crossbars at the exact
locations designated on the roof rails. The
designated locations for the front crossbars
are between the markings engraved on the
inside of the roof rails. The designated
locations for the rear crossbars are between
the gaps on the roof rails.
Otherwise, the crossbars, mounted
accessories and the objects attached to them
could come loose from the vehicle causing an
accident, thereby injuring you and other
persons and/or causing damage to property,
including damage to your vehicle.
The clamping widths of the crossbars are
factory set for your vehicle. These clamping
widths are solely intended for the designated
positions.
Only install the crossbars at the designated
locations and pay attention to the stickers
= FRONT and REAR (Y page 198).
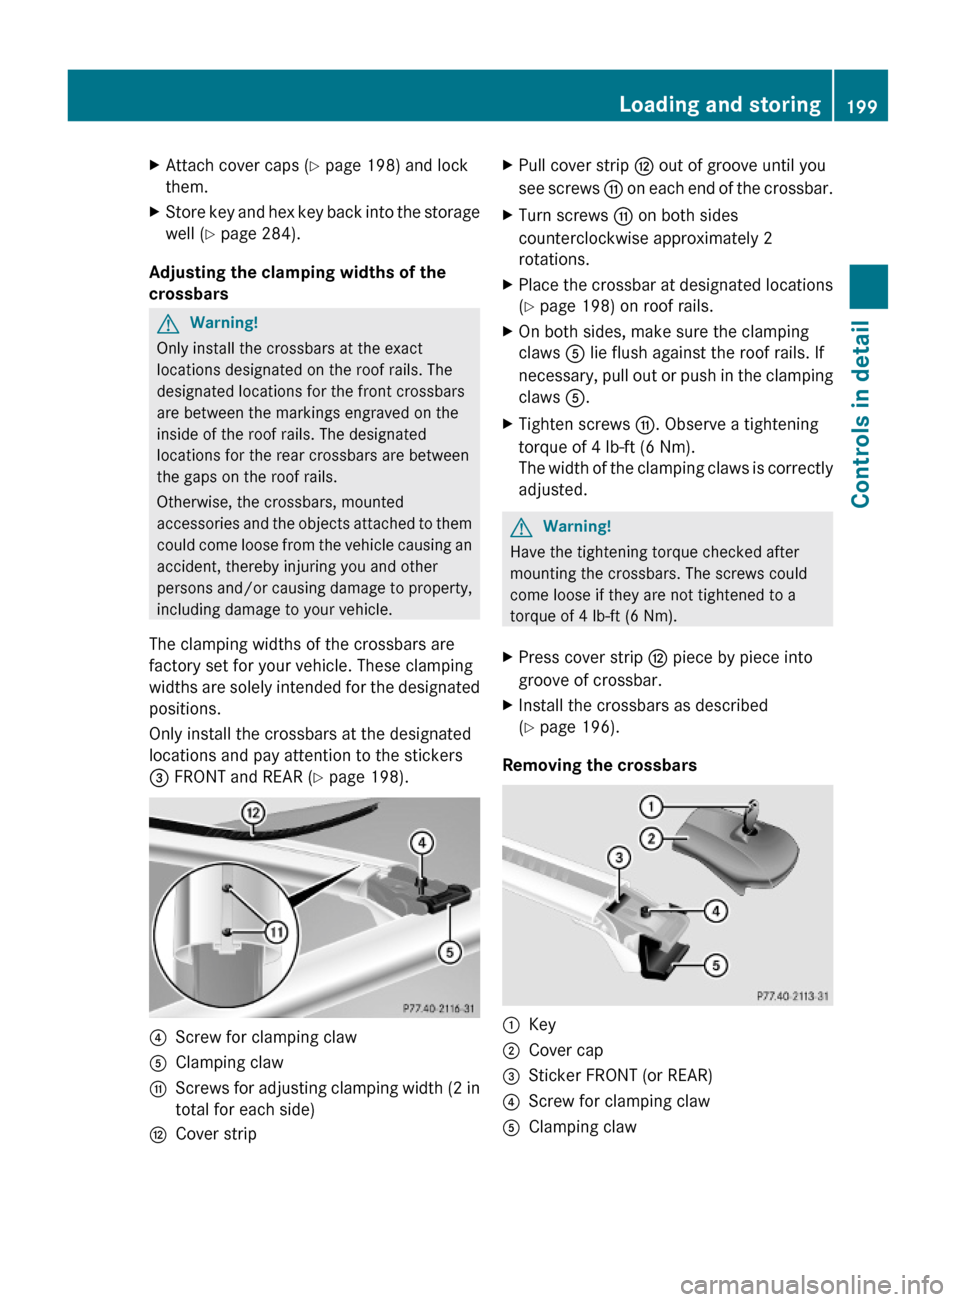
?Screw for clamping clawAClamping clawGScrews for adjusting clamping width (2 in
total for each side)
HCover stripXPull cover strip H out of groove until you
see screws G on each end of the crossbar.
XTurn screws G on both sides
counterclockwise approximately 2
rotations.
XPlace the crossbar at designated locations
(Y page 198) on roof rails.
XOn both sides, make sure the clamping
claws A lie flush against the roof rails. If
necessary, pull out or push in the clamping
claws A.
XTighten screws G. Observe a tightening
torque of 4 lb-ft (6 Nm).
The width of the clamping claws is correctly
adjusted.
GWarning!
Have the tightening torque checked after
mounting the crossbars. The screws could
come loose if they are not tightened to a
torque of 4 lb-ft (6 Nm).
XPress cover strip H piece by piece into
groove of crossbar.
XInstall the crossbars as described
(Y page 196).
Removing the crossbars
:Key;Cover cap=Sticker FRONT (or REAR)?Screw for clamping clawAClamping clawLoading and storing199Controls in detailX164_AKB; 5; 31, en-USd2ureepe,Version: 2.11.8.12009-09-11T12:30:16+02:00 - Seite 199Z
Page 202 of 380
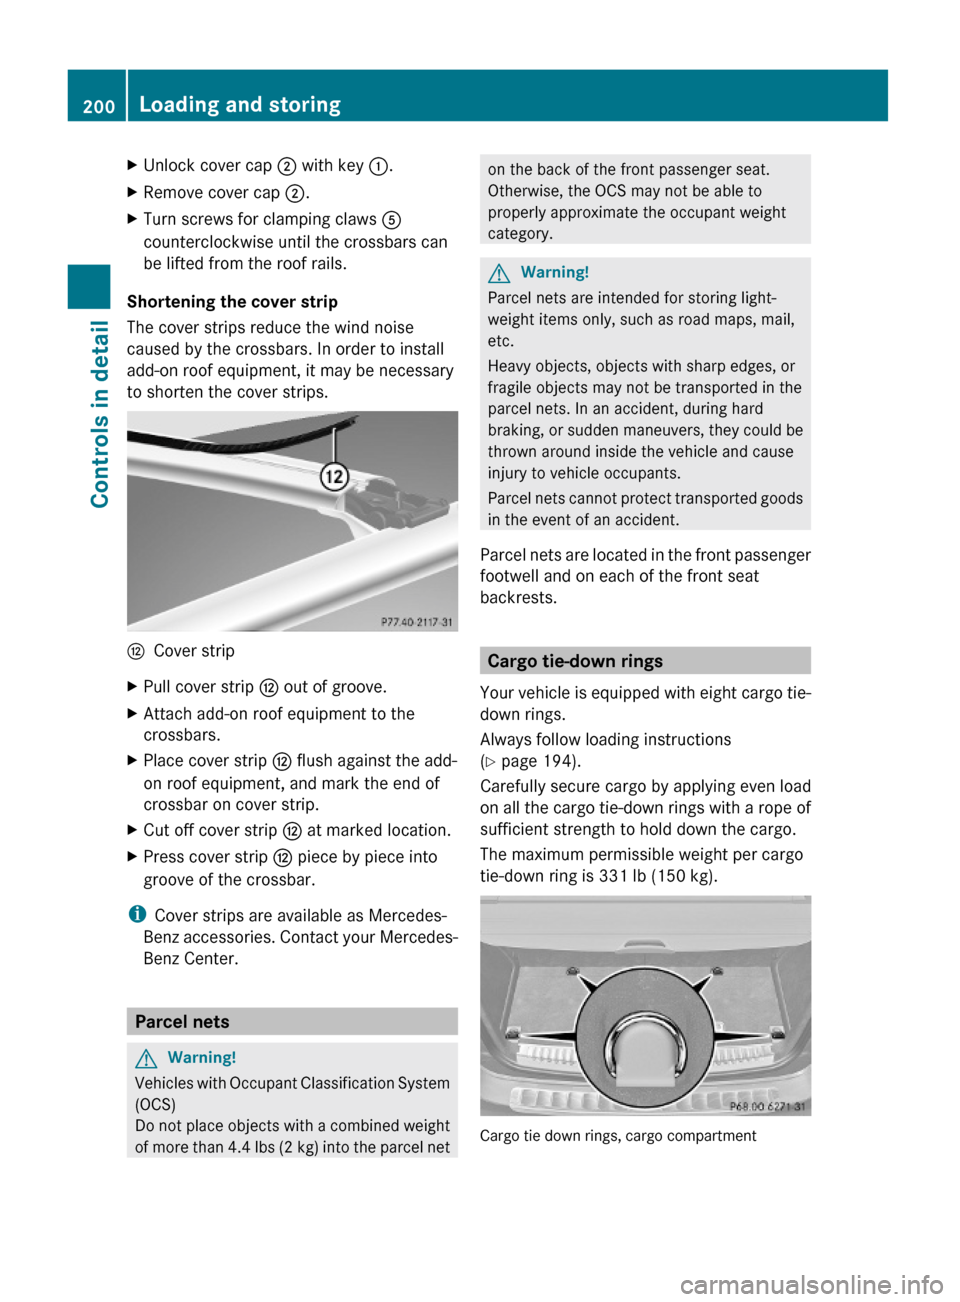
XUnlock cover cap ; with key :.XRemove cover cap ;.XTurn screws for clamping claws A
counterclockwise until the crossbars can
be lifted from the roof rails.
Shortening the cover strip
The cover strips reduce the wind noise
caused by the crossbars. In order to install
add-on roof equipment, it may be necessary
to shorten the cover strips.
HCover stripXPull cover strip H out of groove.XAttach add-on roof equipment to the
crossbars.
XPlace cover strip H flush against the add-
on roof equipment, and mark the end of
crossbar on cover strip.
XCut off cover strip H at marked location.XPress cover strip H piece by piece into
groove of the crossbar.
iCover strips are available as Mercedes-
Benz accessories. Contact your Mercedes-
Benz Center.
Parcel nets
GWarning!
Vehicles with Occupant Classification System
(OCS)
Do not place objects with a combined weight
of more than 4.4 lbs (2 kg) into the parcel net
on the back of the front passenger seat.
Otherwise, the OCS may not be able to
properly approximate the occupant weight
category.
GWarning!
Parcel nets are intended for storing light-
weight items only, such as road maps, mail,
etc.
Heavy objects, objects with sharp edges, or
fragile objects may not be transported in the
parcel nets. In an accident, during hard
braking, or sudden maneuvers, they could be
thrown around inside the vehicle and cause
injury to vehicle occupants.
Parcel nets cannot protect transported goods
in the event of an accident.
Parcel nets are located in the front passenger
footwell and on each of the front seat
backrests.
Cargo tie-down rings
Your vehicle is equipped with eight cargo tie-
down rings.
Always follow loading instructions
(Y page 194).
Carefully secure cargo by applying even load
on all the cargo tie-down rings with a rope of
sufficient strength to hold down the cargo.
The maximum permissible weight per cargo
tie-down ring is 331 lb (150 kg).
Cargo tie down rings, cargo compartment
200Loading and storingControls in detail
X164_AKB; 5; 31, en-USd2ureepe,Version: 2.11.8.12009-09-11T12:30:16+02:00 - Seite 200
Page 203 of 380
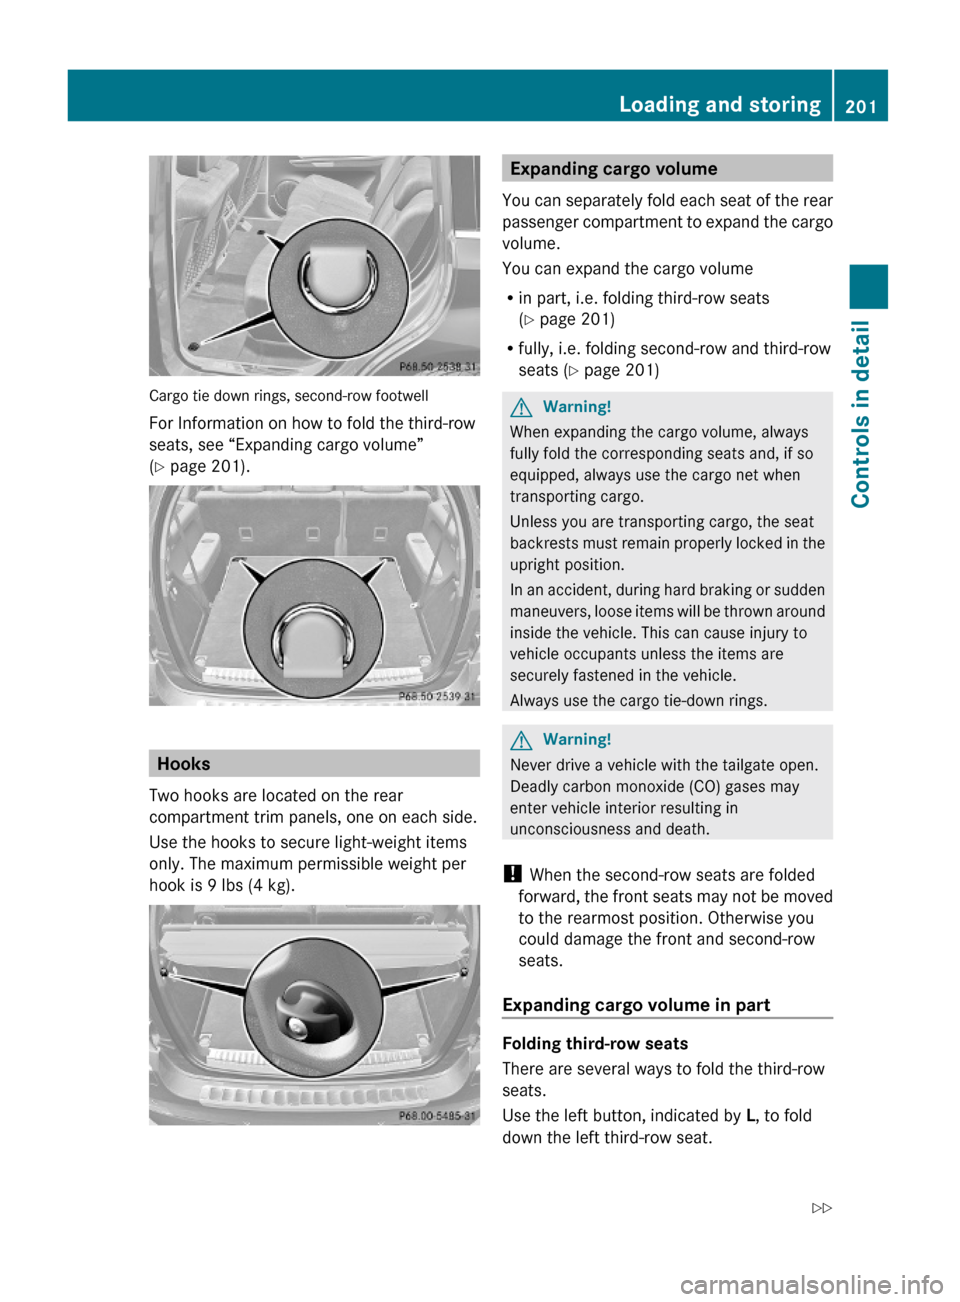
Cargo tie down rings, second-row footwell
For Information on how to fold the third-row
seats, see “Expanding cargo volume”
(Y page 201).
Hooks
Two hooks are located on the rear
compartment trim panels, one on each side.
Use the hooks to secure light-weight items
only. The maximum permissible weight per
hook is 9 lbs (4 kg).
Expanding cargo volume
You can separately fold each seat of the rear
passenger compartment to expand the cargo
volume.
You can expand the cargo volume
Rin part, i.e. folding third-row seats
(Y page 201)
Rfully, i.e. folding second-row and third-row
seats (Y page 201)
GWarning!
When expanding the cargo volume, always
fully fold the corresponding seats and, if so
equipped, always use the cargo net when
transporting cargo.
Unless you are transporting cargo, the seat
backrests must remain properly locked in the
upright position.
In an accident, during hard braking or sudden
maneuvers, loose items will be thrown around
inside the vehicle. This can cause injury to
vehicle occupants unless the items are
securely fastened in the vehicle.
Always use the cargo tie-down rings.
GWarning!
Never drive a vehicle with the tailgate open.
Deadly carbon monoxide (CO) gases may
enter vehicle interior resulting in
unconsciousness and death.
! When the second-row seats are folded
forward, the front seats may not be moved
to the rearmost position. Otherwise you
could damage the front and second-row
seats.
Expanding cargo volume in part
Folding third-row seats
There are several ways to fold the third-row
seats.
Use the left button, indicated by L, to fold
down the left third-row seat.
Loading and storing201Controls in detailX164_AKB; 5; 31, en-USd2ureepe,Version: 2.11.8.12009-09-11T12:30:16+02:00 - Seite 201Z
Page 204 of 380
Use the right button, indicated by R, to fold
down the right third-row seat.
Two buttons are located on the right side trim
of the third-row seats.
iIt is only possible to fold the third-row
seats down when the rear right door is
open.
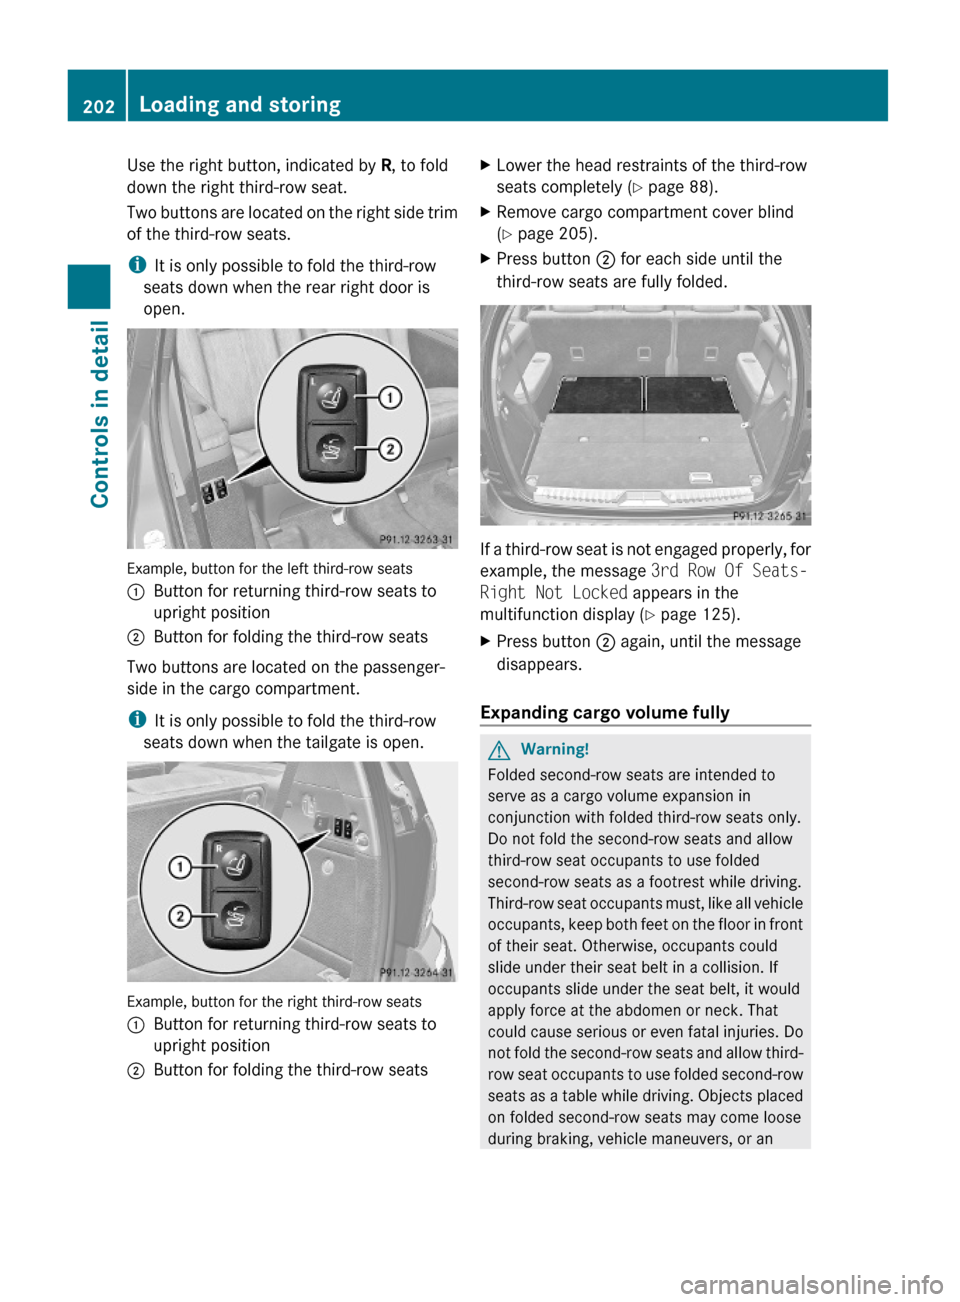
Example, button for the left third-row seats
:Button for returning third-row seats to
upright position
;Button for folding the third-row seats
Two buttons are located on the passenger-
side in the cargo compartment.
iIt is only possible to fold the third-row
seats down when the tailgate is open.
Example, button for the right third-row seats
:Button for returning third-row seats to
upright position
;Button for folding the third-row seatsXLower the head restraints of the third-row
seats completely (Y page 88).
XRemove cargo compartment cover blind
(Y page 205).
XPress button ; for each side until the
third-row seats are fully folded.
If a third-row seat is not engaged properly, for
example, the message 3rd Row Of Seats-
Right Not Locked appears in the
multifunction display (Y page 125).
XPress button ; again, until the message
disappears.
Expanding cargo volume fully
GWarning!
Folded second-row seats are intended to
serve as a cargo volume expansion in
conjunction with folded third-row seats only.
Do not fold the second-row seats and allow
third-row seat occupants to use folded
second-row seats as a footrest while driving.
Third-row seat occupants must, like all vehicle
occupants, keep both feet on the floor in front
of their seat. Otherwise, occupants could
slide under their seat belt in a collision. If
occupants slide under the seat belt, it would
apply force at the abdomen or neck. That
could cause serious or even fatal injuries. Do
not fold the second-row seats and allow third-
row seat occupants to use folded second-row
seats as a table while driving. Objects placed
on folded second-row seats may come loose
during braking, vehicle maneuvers, or an
202Loading and storingControls in detail
X164_AKB; 5; 31, en-USd2ureepe,Version: 2.11.8.12009-09-11T12:30:16+02:00 - Seite 202
Page 205 of 380
accident and be thrown around the vehicle
interior. Objects thrown around the vehicle
interior may cause an accident and/or
serious personal injury.
Folding second-row seats
! When the second-row seats are folded
forward, the front seats may not be moved
to the rearmost position. Otherwise you
could damage the front and second-row
seats.
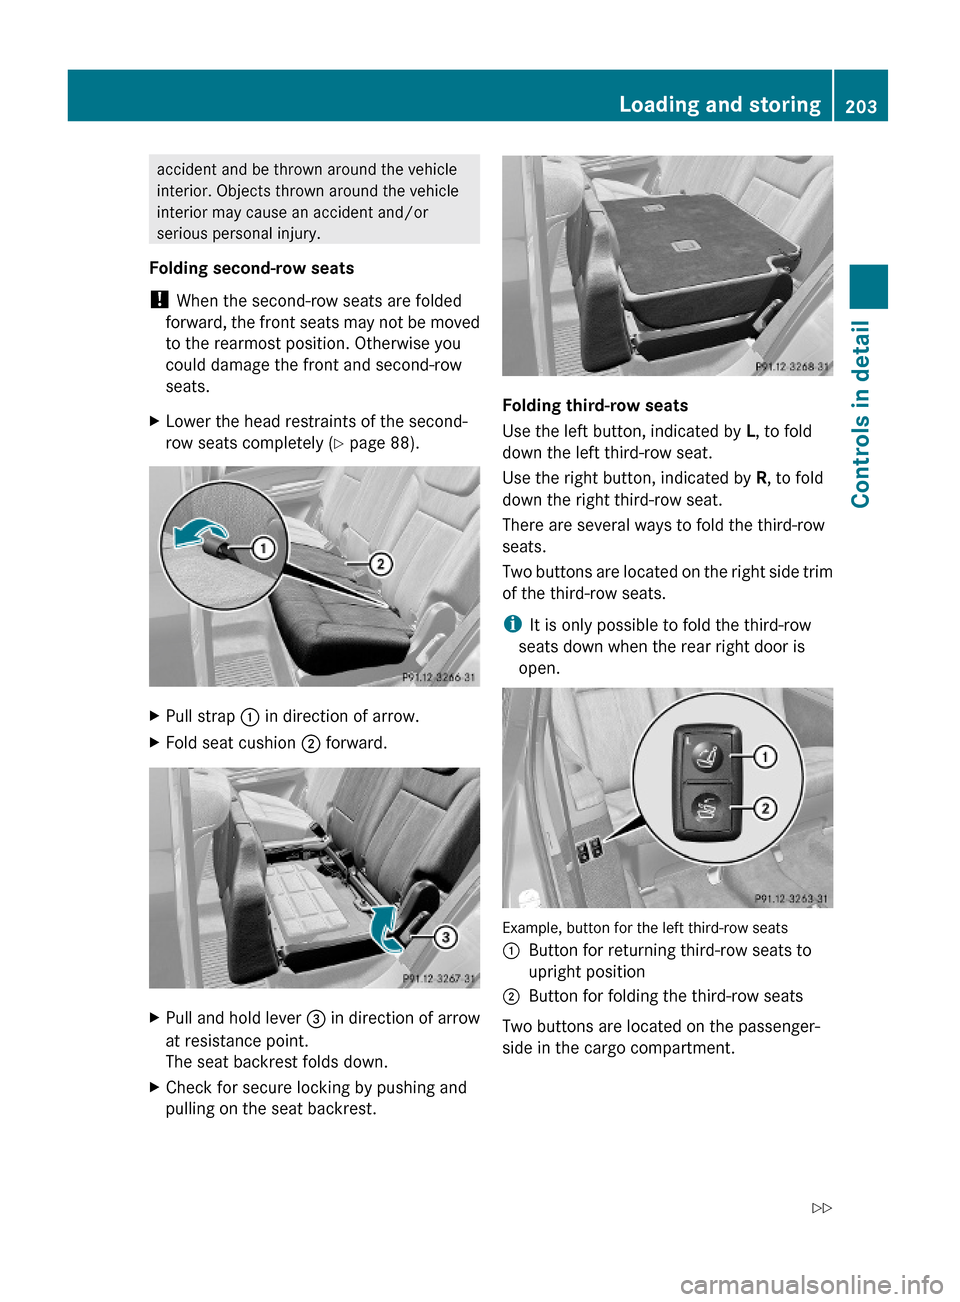
XLower the head restraints of the second-
row seats completely (Y page 88).
XPull strap : in direction of arrow.XFold seat cushion ; forward.XPull and hold lever = in direction of arrow
at resistance point.
The seat backrest folds down.
XCheck for secure locking by pushing and
pulling on the seat backrest.
Folding third-row seats
Use the left button, indicated by L, to fold
down the left third-row seat.
Use the right button, indicated by R, to fold
down the right third-row seat.
There are several ways to fold the third-row
seats.
Two buttons are located on the right side trim
of the third-row seats.
iIt is only possible to fold the third-row
seats down when the rear right door is
open.
Example, button for the left third-row seats
:Button for returning third-row seats to
upright position
;Button for folding the third-row seats
Two buttons are located on the passenger-
side in the cargo compartment.
Loading and storing203Controls in detailX164_AKB; 5; 31, en-USd2ureepe,Version: 2.11.8.12009-09-11T12:30:16+02:00 - Seite 203Z
Page 206 of 380
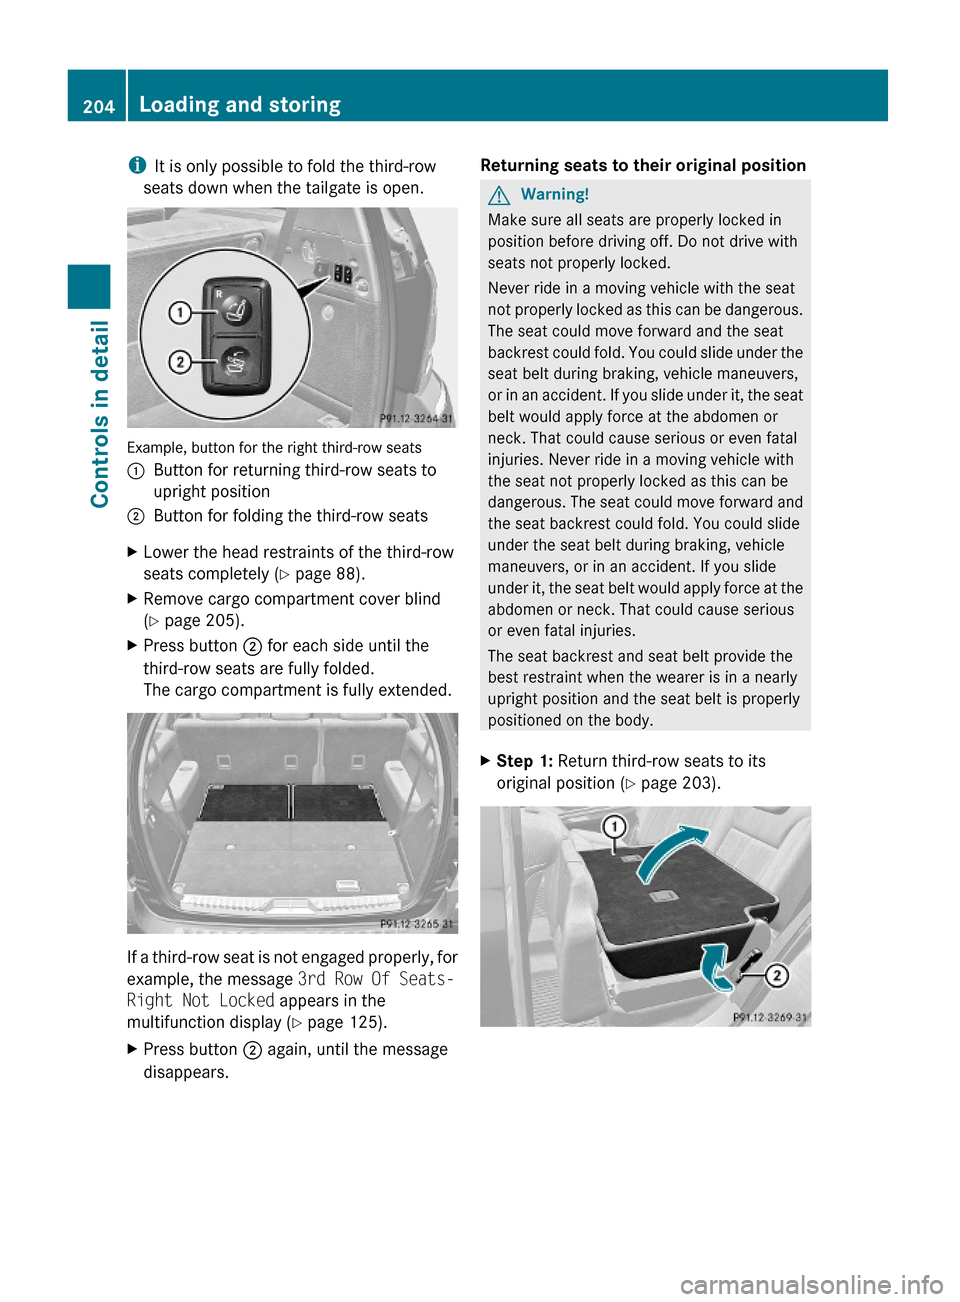
iIt is only possible to fold the third-row
seats down when the tailgate is open.
Example, button for the right third-row seats
:Button for returning third-row seats to
upright position
;Button for folding the third-row seatsXLower the head restraints of the third-row
seats completely (Y page 88).
XRemove cargo compartment cover blind
(Y page 205).
XPress button ; for each side until the
third-row seats are fully folded.
The cargo compartment is fully extended.
If a third-row seat is not engaged properly, for
example, the message 3rd Row Of Seats-
Right Not Locked appears in the
multifunction display (Y page 125).
XPress button ; again, until the message
disappears.
Returning seats to their original positionGWarning!
Make sure all seats are properly locked in
position before driving off. Do not drive with
seats not properly locked.
Never ride in a moving vehicle with the seat
not properly locked as this can be dangerous.
The seat could move forward and the seat
backrest could fold. You could slide under the
seat belt during braking, vehicle maneuvers,
or in an accident. If you slide under it, the seat
belt would apply force at the abdomen or
neck. That could cause serious or even fatal
injuries. Never ride in a moving vehicle with
the seat not properly locked as this can be
dangerous. The seat could move forward and
the seat backrest could fold. You could slide
under the seat belt during braking, vehicle
maneuvers, or in an accident. If you slide
under it, the seat belt would apply force at the
abdomen or neck. That could cause serious
or even fatal injuries.
The seat backrest and seat belt provide the
best restraint when the wearer is in a nearly
upright position and the seat belt is properly
positioned on the body.
XStep 1: Return third-row seats to its
original position (Y page 203).
204Loading and storingControls in detail
X164_AKB; 5; 31, en-USd2ureepe,Version: 2.11.8.12009-09-11T12:30:16+02:00 - Seite 204
Page 207 of 380
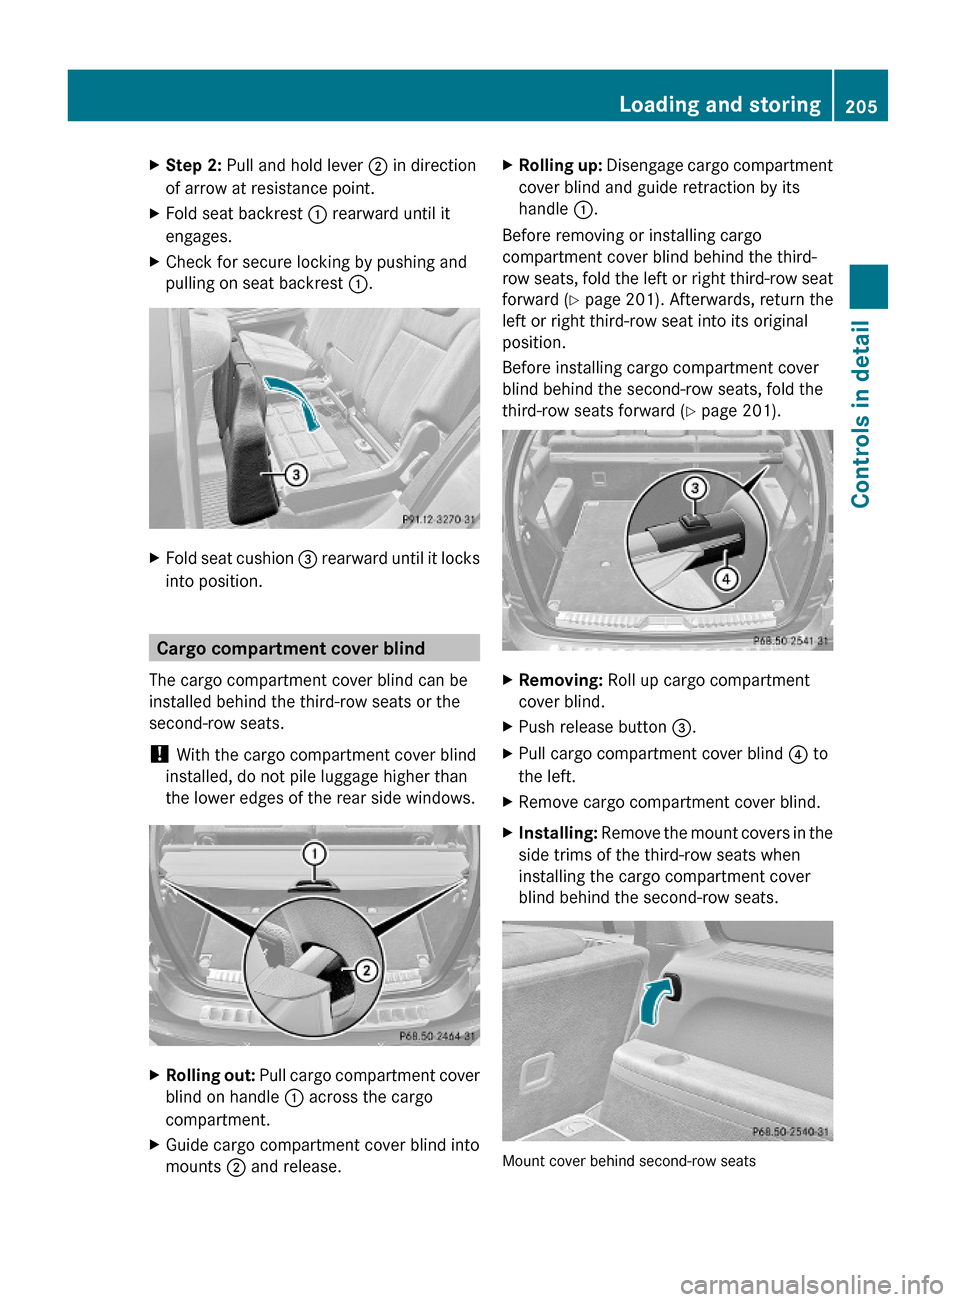
XStep 2: Pull and hold lever ; in direction
of arrow at resistance point.
XFold seat backrest : rearward until it
engages.
XCheck for secure locking by pushing and
pulling on seat backrest :.
XFold seat cushion = rearward until it locks
into position.
Cargo compartment cover blind
The cargo compartment cover blind can be
installed behind the third-row seats or the
second-row seats.
! With the cargo compartment cover blind
installed, do not pile luggage higher than
the lower edges of the rear side windows.
XRolling out: Pull cargo compartment cover
blind on handle : across the cargo
compartment.
XGuide cargo compartment cover blind into
mounts ; and release.
XRolling up: Disengage cargo compartment
cover blind and guide retraction by its
handle :.
Before removing or installing cargo
compartment cover blind behind the third-
row seats, fold the left or right third-row seat
forward (Y page 201). Afterwards, return the
left or right third-row seat into its original
position.
Before installing cargo compartment cover
blind behind the second-row seats, fold the
third-row seats forward (Y page 201).
XRemoving: Roll up cargo compartment
cover blind.
XPush release button =.XPull cargo compartment cover blind ? to
the left.
XRemove cargo compartment cover blind.XInstalling: Remove the mount covers in the
side trims of the third-row seats when
installing the cargo compartment cover
blind behind the second-row seats.
Mount cover behind second-row seats
Loading and storing205Controls in detailX164_AKB; 5; 31, en-USd2ureepe,Version: 2.11.8.12009-09-11T12:30:16+02:00 - Seite 205Z
Page 208 of 380
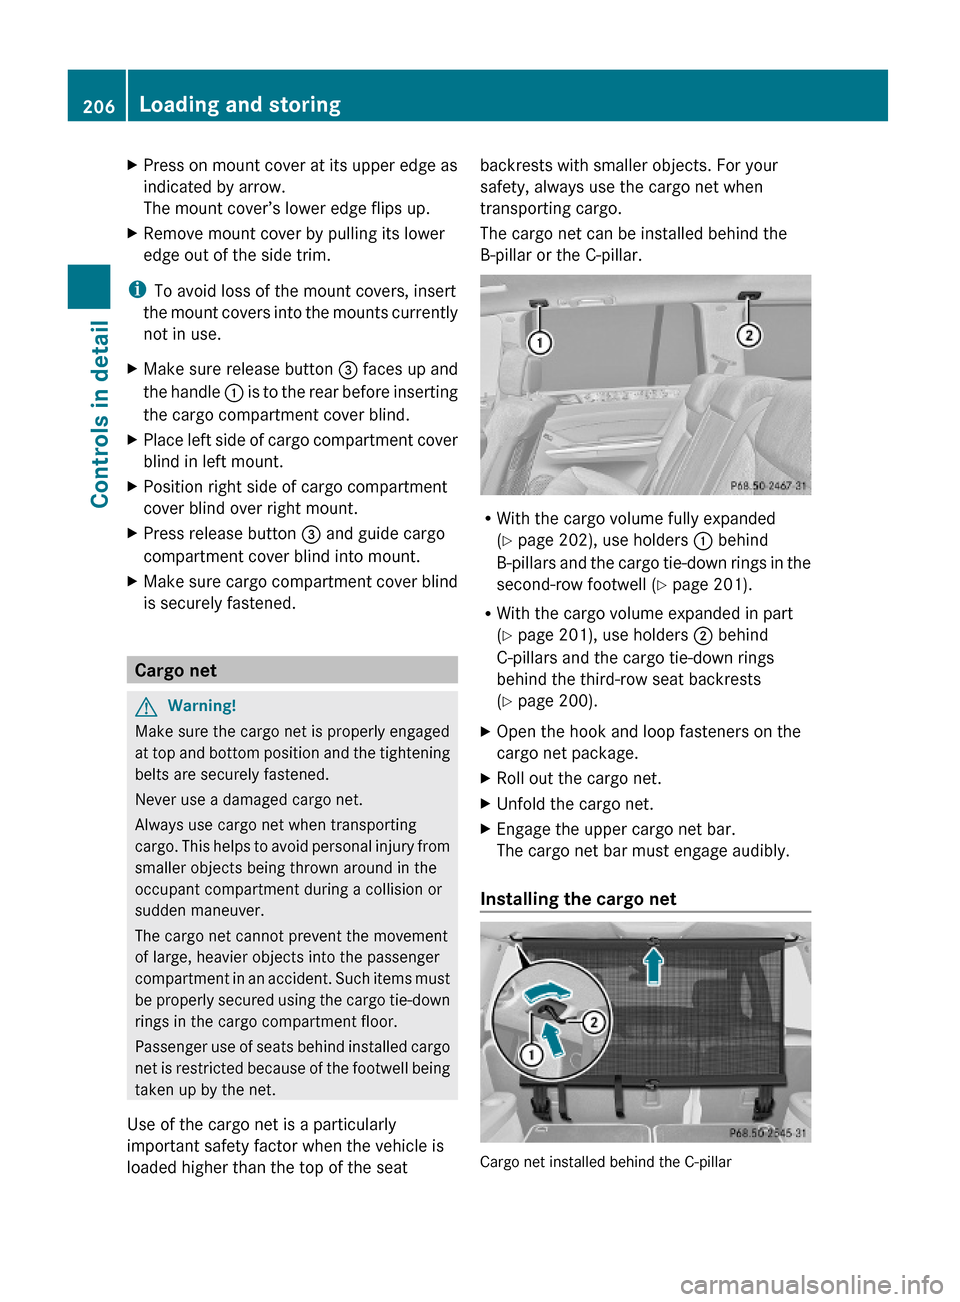
XPress on mount cover at its upper edge as
indicated by arrow.
The mount cover’s lower edge flips up.
XRemove mount cover by pulling its lower
edge out of the side trim.
iTo avoid loss of the mount covers, insert
the mount covers into the mounts currently
not in use.
XMake sure release button = faces up and
the handle : is to the rear before inserting
the cargo compartment cover blind.
XPlace left side of cargo compartment cover
blind in left mount.
XPosition right side of cargo compartment
cover blind over right mount.
XPress release button = and guide cargo
compartment cover blind into mount.
XMake sure cargo compartment cover blind
is securely fastened.
Cargo net
GWarning!
Make sure the cargo net is properly engaged
at top and bottom position and the tightening
belts are securely fastened.
Never use a damaged cargo net.
Always use cargo net when transporting
cargo. This helps to avoid personal injury from
smaller objects being thrown around in the
occupant compartment during a collision or
sudden maneuver.
The cargo net cannot prevent the movement
of large, heavier objects into the passenger
compartment in an accident. Such items must
be properly secured using the cargo tie-down
rings in the cargo compartment floor.
Passenger use of seats behind installed cargo
net is restricted because of the footwell being
taken up by the net.
Use of the cargo net is a particularly
important safety factor when the vehicle is
loaded higher than the top of the seat
backrests with smaller objects. For your
safety, always use the cargo net when
transporting cargo.
The cargo net can be installed behind the
B-pillar or the C-pillar.
RWith the cargo volume fully expanded
(Y page 202), use holders : behind
B-pillars and the cargo tie-down rings in the
second-row footwell (Y page 201).
RWith the cargo volume expanded in part
(Y page 201), use holders ; behind
C-pillars and the cargo tie-down rings
behind the third-row seat backrests
(Y page 200).
XOpen the hook and loop fasteners on the
cargo net package.
XRoll out the cargo net.XUnfold the cargo net.XEngage the upper cargo net bar.
The cargo net bar must engage audibly.
Installing the cargo net
Cargo net installed behind the C-pillar
206Loading and storingControls in detail
X164_AKB; 5; 31, en-USd2ureepe,Version: 2.11.8.12009-09-11T12:30:16+02:00 - Seite 206
Page 209 of 380
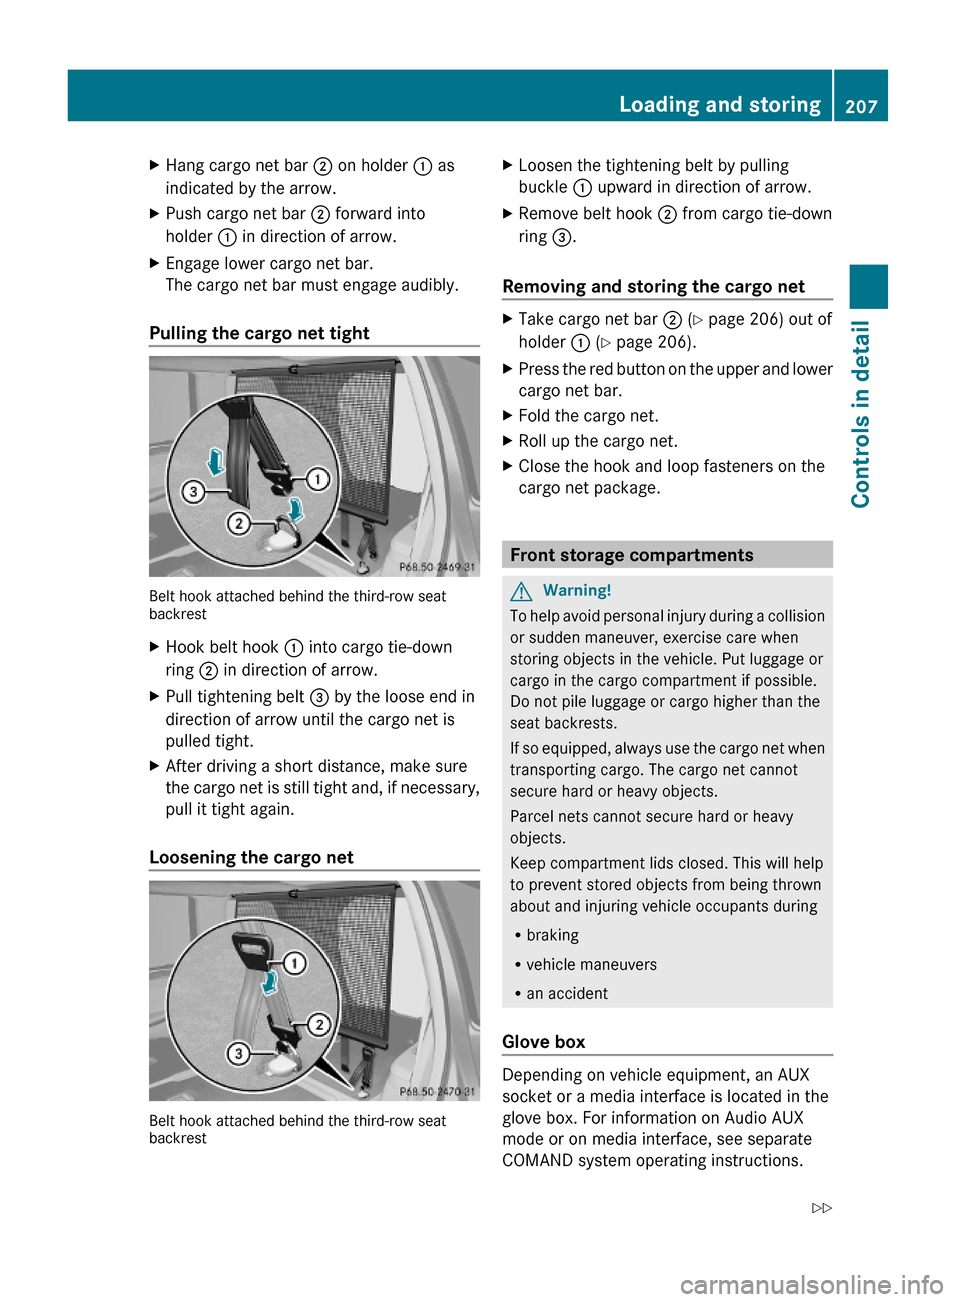
XHang cargo net bar ; on holder : as
indicated by the arrow.
XPush cargo net bar ; forward into
holder : in direction of arrow.
XEngage lower cargo net bar.
The cargo net bar must engage audibly.
Pulling the cargo net tight
Belt hook attached behind the third-row seatbackrest
XHook belt hook : into cargo tie-down
ring ; in direction of arrow.
XPull tightening belt = by the loose end in
direction of arrow until the cargo net is
pulled tight.
XAfter driving a short distance, make sure
the cargo net is still tight and, if necessary,
pull it tight again.
Loosening the cargo net
Belt hook attached behind the third-row seatbackrest
XLoosen the tightening belt by pulling
buckle : upward in direction of arrow.
XRemove belt hook ; from cargo tie-down
ring =.
Removing and storing the cargo net
XTake cargo net bar ; (Y page 206) out of
holder : (Y page 206).
XPress the red button on the upper and lower
cargo net bar.
XFold the cargo net.XRoll up the cargo net.XClose the hook and loop fasteners on the
cargo net package.
Front storage compartments
GWarning!
To help avoid personal injury during a collision
or sudden maneuver, exercise care when
storing objects in the vehicle. Put luggage or
cargo in the cargo compartment if possible.
Do not pile luggage or cargo higher than the
seat backrests.
If so equipped, always use the cargo net when
transporting cargo. The cargo net cannot
secure hard or heavy objects.
Parcel nets cannot secure hard or heavy
objects.
Keep compartment lids closed. This will help
to prevent stored objects from being thrown
about and injuring vehicle occupants during
Rbraking
Rvehicle maneuvers
Ran accident
Glove box
Depending on vehicle equipment, an AUX
socket or a media interface is located in the
glove box. For information on Audio AUX
mode or on media interface, see separate
COMAND system operating instructions.
Loading and storing207Controls in detailX164_AKB; 5; 31, en-USd2ureepe,Version: 2.11.8.12009-09-11T12:30:16+02:00 - Seite 207Z
Page 210 of 380
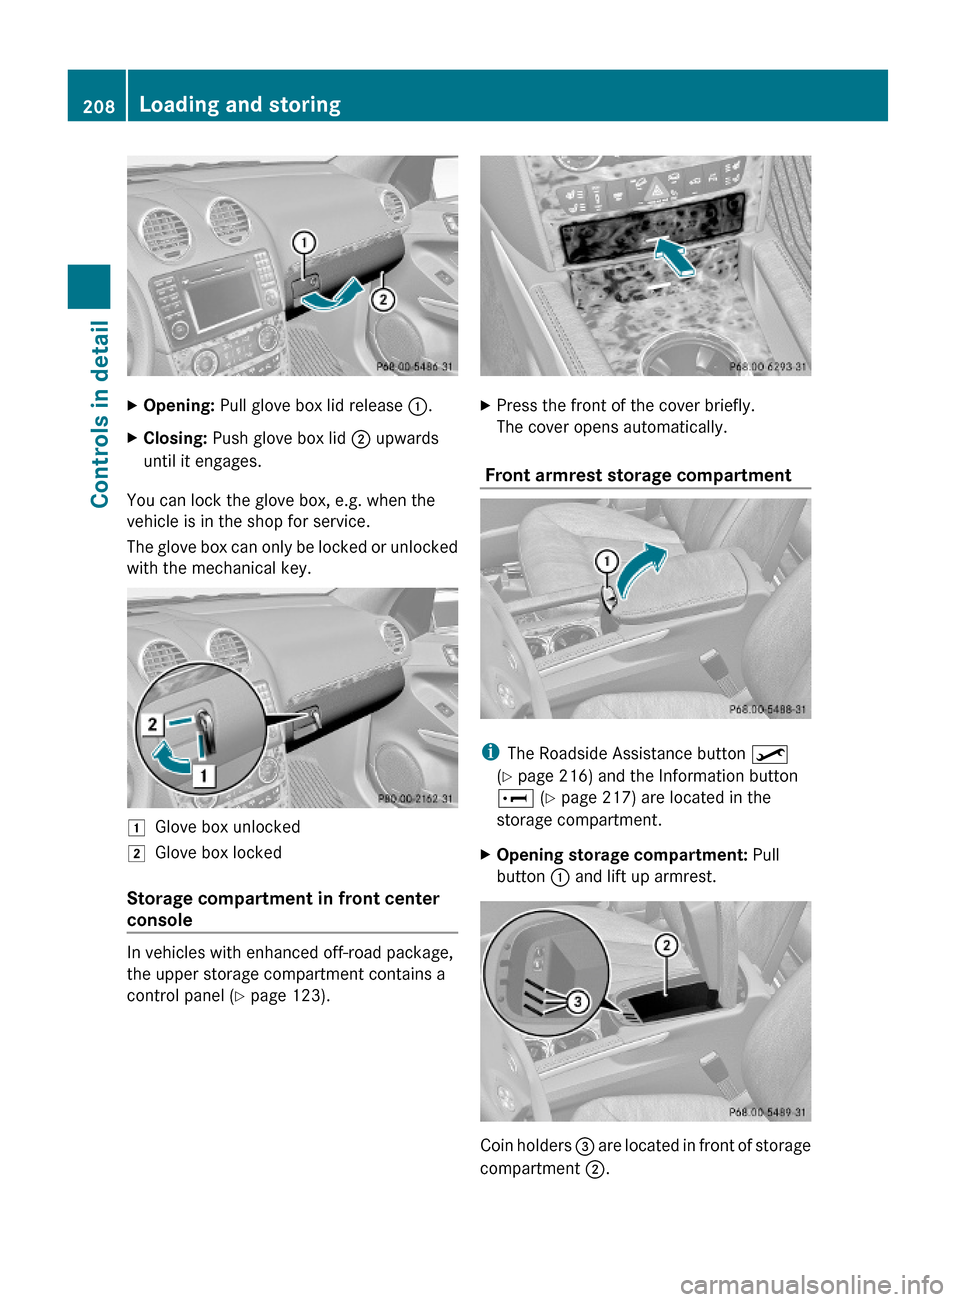
XOpening: Pull glove box lid release :.XClosing: Push glove box lid ; upwards
until it engages.
You can lock the glove box, e.g. when the
vehicle is in the shop for service.
The glove box can only be locked or unlocked
with the mechanical key.
1Glove box unlocked2Glove box locked
Storage compartment in front center
console
In vehicles with enhanced off-road package,
the upper storage compartment contains a
control panel (Y page 123).
XPress the front of the cover briefly.
The cover opens automatically.
Front armrest storage compartment
iThe Roadside Assistance button º
(Y page 216) and the Information button
E (Y page 217) are located in the
storage compartment.
XOpening storage compartment: Pull
button : and lift up armrest.
Coin holders = are located in front of storage
compartment ;.
208Loading and storingControls in detail
X164_AKB; 5; 31, en-USd2ureepe,Version: 2.11.8.12009-09-11T12:30:16+02:00 - Seite 208