fuel type MERCEDES-BENZ GLA 2019 Owners Manual
[x] Cancel search | Manufacturer: MERCEDES-BENZ, Model Year: 2019, Model line: GLA, Model: MERCEDES-BENZ GLA 2019Pages: 346, PDF Size: 16.66 MB
Page 19 of 346
Remote control
Garage door opener ....................... 268
Programming (garage door
opener) .......................................... 268
Replacing bulbs
Brake lamp .................................... 108
High-beam headlamps................... 107
Important safety notes .................. 106
Installing/removing the cover
(front wheel arch) .......................... 107
Low-beam headlamps.................... 107
Overview of bulb types .................. 106
Rear fog lamp ................................ 108
Turn signals (front) ......................... 108
Turn signals (rear) .......................... 108
Rescue card......................................... 28
Reserve (fuel tank)
see Fuel
Reserve fuel
Display message ............................ 218
Warning lamp ................................. 238
see Fuel
Residual heat (climate control)........ 122
Restraint system
Display message ............................ 211
Introduction ..................................... 39
Warning lamp ................................. 237
Warning lamp (function) ................... 40
Reverse gear (selector lever)........... 136
Reversing feature
Roller sunblind ................................. 89
Side windows ................................... 83
Tailgate ............................................ 78
Roadside Assistance (breakdown).... 26
Roller sunblind
Panorama roof with power tilt/
sliding panel ..................................... 89
Roof carrier........................................ 256
Roof lining and carpets (cleaning
guidelines)......................................... 285
Roof load (maximum)........................ 339
Route guidance
see also Digital Operator's Man-
ual .................................................. 242
S
Safety
Children in the vehicle ..................... 53
see Occupant safety
Safety system
see Driving safety systems
SD card
Inserting ........................................ 249
Inserting/removing ........................ 248
Removing ....................................... 249
SD memory card
see also Digital Operator's Man-
ual .................................................. 242
Search & Send
see also Digital Operator's Man-
ual .................................................. 242
Seat
Correct driver's seat position ........... 92
Seat belts
Adjusting the height ......................... 43
Cleaning ......................................... 285
Correct usage .................................. 42
Fastening ......................................... 43
Important safety guidelines ............. 41
Introduction ..................................... 41
Releasing ......................................... 43
Warning lamp ................................. 230
Warning lamp (function) ................... 44
Seats
Adjusting (electrically) ..................... 94
Adjusting (manually) ........................ 94
Adjusting (Performance Seat) .......... 96
Adjusting the 4-way lumbar sup-
port .................................................. 96
Adjusting the head restraint ............ 95
Cleaning the cover ......................... 284
Folding the backrest (rear com-
partment) forwards/back .............. 254
Important safety notes .................... 92
Seat heating problem ...................... 97
Storing settings (memory func-
tion) ............................................... 101
Switching seat heating on/off......... 96
Section
Cargo compartment ......................... 77
Securing a load
see Securing cargo
Index17
Page 24 of 346
Type identification plate
see Vehicle identification plate
U
Unlocking
Emergency unlocking ....................... 76
From inside the vehicle (central
unlocking button) ............................. 75
Upshift indicator (on-board com-
puter, Mercedes-AMG vehicles)....... 200
USB devices
Connecting to the Media Inter-
face ...............................................249
V
Vanity mirror (in the sun visor)........259
Vehicle
Correct use ...................................... 27
Data acquisition ............................... 28
Display message ............................ 225
Equipment ....................................... 26
Individual settings .......................... 198
Limited Warranty .............................28
Loading .......................................... 316
Locking (in an emergency) ............... 77
Locking (SmartKey) .......................... 69
Lowering ........................................ 329
Maintenance .................................... 26
Parking for a long period ................ 148
Pulling away................................... 128
Raising ........................................... 327
REACH Regulation ........................... 28
Reporting problems ......................... 28
Securing from rolling away ............ 326
Transporting .................................. 300
Unlocking (in an emergency) ........... 76
Unlocking (SmartKey)...................... 69
Vehicle data ................................... 339
Vehicle battery
see Battery (vehicle)
Vehicle data
Roof load (maximum) ..................... 339
Vehicle data (off-road driving)
Approach/departure angle ............ 340
Maximum gradient climbing abil-
ity .................................................. 340
Vehicle dimensions........................... 339
Vehicle emergency locking................ 77
Vehicle identification number
see VIN
Vehicle identification plate.............. 333
Vehicle tool kit.................................. 287
Ventilation
Setting the vents ........................... 123
Video
Operating the DVD ......................... 195
see also Digital Operator's Man-
ual .................................................. 242
VIN
Seat ............................................... 334
Type plate ...................................... 333
W
Warning and indicator lamps
ABS ................................................ 233
Active Brake Assist ........................ 240
Brakes ........................................... 232
Check Engine ................................. 238
Coolant .......................................... 238
Distance warning ........................... 240
ESP®.............................................. 235
ESP®OFF ....................................... 236
Fuel tank ........................................ 238
Overview .......................................... 32
Reserve fuel................................... 238
Restraint system ............................ 237
Seat belt ........................................ 230
SPORT handling mode................... 236
Tire pressure monitor .................... 241
Washer fluid
Display message ............................ 228
Weather display (COMAND)
see also Digital Operator's Man-
ual.................................................. 242
Wheel and tire combinations
Tires ............................................... 329
Wheel bolt tightening torque........... 329
Wheel chock...................................... 326
Wheels
Changing a wheel.......................... 325
Checking ........................................ 304
Cleaning ......................................... 281
Emergency spare wheel ................. 330
22Index
Page 55 of 346
The rate of vehicle deceleration or accelera-tion and the direction of the force are essen-tially determined by:
Rthe distribution of forces during the collision
Rthe collision angle
Rthe deformation characteristics of the vehi-cle
Rthe characteristics of the object with whichthe vehicle has collided
Factors which can only be seen and measuredafter a collision has occurred do not play adecisive role in the deployment of an air bag.Nor do they provide an indication of air bagdeployment.
The vehicle can be deformed considerably,without an air bag being deployed. This is thecase if only parts which are relatively easilydeformed are affected and the rate of deceler-ation is not high. Conversely, air bags may bedeployed even though the vehicle suffers onlyminor deformation. This is the case if, forexample, very rigid vehicle parts such as longi-tudinal body members are hit, and sufficientdeceleration occurs as a result.
If the restraint system control unit detects aside impact or if the vehicle rolls over, theapplicable components of the restraint systemare deployed independently of each otherdepending on the apparent type of accident.
RSide impact air bags on the side where theimpact takes place, independently of theEmergency Tensioning Device and the useof the seat belt on the driver's seat andouter seats in the second row
The side impact air bag on the frontpassenger side deploys under the followingconditions:
-the OCS system detects that the frontpassenger seat is occupied or
-the seat belt buckle tongue is engaged inthe belt buckle of the front passengerseat
RWindow curtain air bag on the side ofimpact, independently of the use of the seatbelt and independently of whether the front-passenger seat is occupied
REmergency Tensioning Devices, if the sys-tem determines that deployment can offeradditional protection in this situation
RWindow curtain air bags on the driver's andfront-passenger side in certain situationswhen the vehicle rolls over, if the system
determines that deployment can offer addi-tional protection to that provided by theseat belt
iNot all air bags are deployed in an acci-dent. The different air bag systems workindependently of each other.
How the air bag system works is determinedby the severity of the accident detected,especially the vehicle deceleration or accel-eration and the apparent type of accident:
RHead-on collision
RSide impact
RRollover
Automatic measures after an acci-
dent
Immediately after an accident, the followingmeasures are implemented, depending on thetype and severity of the impact:
Rthe hazard warning lamps are switched on
Rthe emergency lighting is activated
Rthe vehicle doors are unlocked
Rthe front side windows are lowered
Rthe engine is switched off and the fuel sup-ply is cut off
Rvehicles with Mercedes me connect: auto-matic emergency call
Children in the vehicle
Important safety notes
Accident statistics show that children securedin the rear seats are safer than childrensecured in the front-passenger seat. For thisreason, Mercedes-Benz strongly advises thatyou install a child restraint system on a rearseat. Children are generally better protectedthere.
If a child younger than twelve years old andunder 5 ft (1.50 m) in height is traveling in thevehicle:
Ralways secure the child in a child restraintsystem suitable for Mercedes-Benz vehicles.The child restraint system must be appropri-ate to the age, weight and size of the child.
Rbe sure to observe the instructions andsafety notes in this section in addition to the
Children in the vehicle53
Safety
Z
Page 282 of 346
the vehicle and the nozzle of the powerwasher.
Information about the correct distance isavailable from the equipment manufacturer.
Move the power washer nozzle around whencleaning your vehicle.
The water temperature of the power washermust not exceed 140 ‡ (60 †).
!Always maintain a distance of at least12 in (30 cm) between the vehicle and thepower washer nozzle. Information about thecorrect distance is available from the equip-ment manufacturer.
Move the power washer nozzle around whencleaning your vehicle.
Do not aim directly at any of the following:
RTires
RDoor gaps, roof gaps, joints, etc.
RElectrical components
RBattery
RPlug-type couplings
RLight bulbs
RSeals
RTrim elements
RVentilation slots
Damaged seals or electrical componentscan lead to leaks or failures.
Cleaning the paintwork
!Do not affix:
Rstickers
Rfilms
Rmagnetic plates or similar items
to painted surfaces. You could otherwisedamage the paintwork.
Scratches, corrosive deposits, areas affectedby corrosion and damage caused by inade-quate care cannot always be completelyrepaired. In such cases, visit a qualified spe-cialist workshop.
XRemove dirt immediately, where possible,while avoiding rubbing too hard.
XSoak insect remains with insect removerand rinse off the treated areas afterwards.
XSoak bird droppings with water and rinse offthe treated areas afterwards.
XRemove tree resin, oils, fuels and greases byrubbing gently with a cloth soaked in petro-leum ether or lighter fluid
XRemove coolant and brake fluid with a moistcloth and clear water.
XUse tar remover to remove tar stains.
XUse silicone remover to remove wax.
If water no longer forms "beads" on the paintsurface, use the paint care products recom-mended and approved by Mercedes-Benz. Thisis the case approximately every three to fivemonths, depending on the climate conditionsand the care product used.
If dirt has penetrated the paint surface or ifthe paint has become dull, the paint cleanerrecommended and approved by Mercedes-Benz should be used.
Do not use these care products in the sun oron the hood while the hood is hot.
XUse a suitable touch-up stick, e.g. MBTouch-Up Stick, to repair slight damage tothe paintwork quickly and provisionally.
Matte finish care
!Never polish the vehicle or the light alloywheels. Polishing causes the finish to shine.
!The following can give the paint a glossyappearance and thus reduce the matteffect:
RRubbing hard with unsuitable agents
RWashing the vehicle in direct sunlight
!Never use paint cleaner, buffing or polish-ing products, or gloss preserver, e.g. wax,for the purpose of paintwork care. Theseproducts are only suitable for high-gloss sur-faces. Their use on vehicles with mattepaintwork leads to considerable surfacedamage or, more specifically, to shiny, spot-ted areas.
Always have paintwork repairs carried out ata qualified specialist workshop.
!Only use automatic car washes which cor-respond to the latest technological stand-ards. Never use wash programs which finishby treating the vehicle with hot wax.
Observe these notes if your vehicle has a clearmatte finish. This will help you to avoid dam-age to the paintwork due to incorrect treat-ment.
280Care
Maintenance and care
Page 318 of 346
CountryRadio type approval number
IC: 2546A-MC34MA4
Loading the vehicle
Instruction labels for tires and loads
GWARNING
Overloaded tires can overheat, causing a
blowout. Overloaded tires can also impair
the steering and driving characteristics and
lead to brake failure. There is a risk of acci-
dent.
Observe the load rating of the tires. The load
rating must be at least half of the GAWR of
your vehicle. Never overload the tires by
exceeding the maximum load.
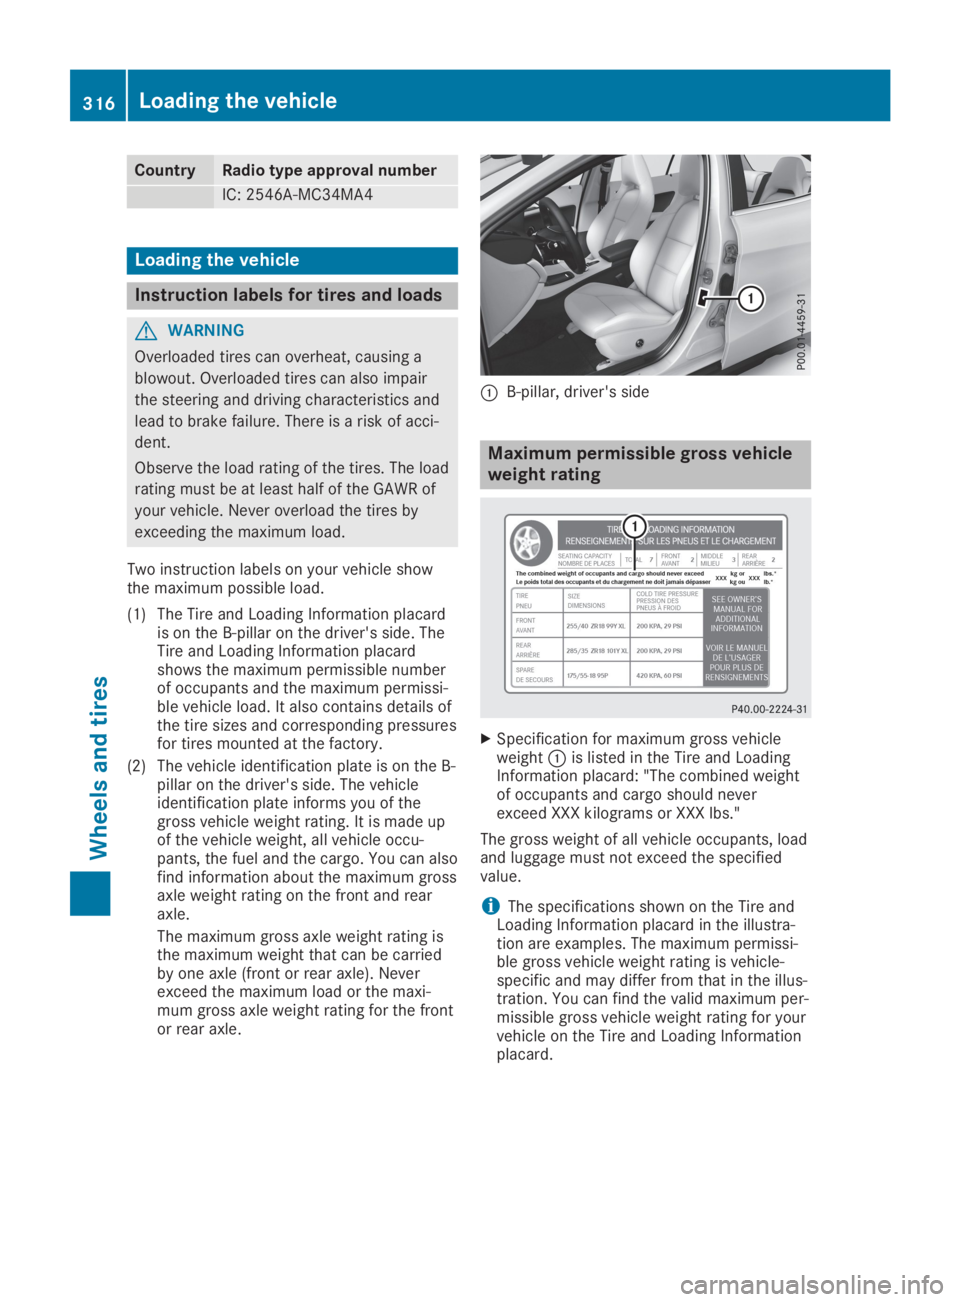
Two instruction labels on your vehicle showthe maximum possible load.
(1) The Tire and Loading Information placardis on the B-pillar on the driver's side. TheTire and Loading Information placardshows the maximum permissible numberof occupants and the maximum permissi-ble vehicle load. It also contains details ofthe tire sizes and corresponding pressuresfor tires mounted at the factory.
(2) The vehicle identification plate is on the B-pillar on the driver's side. The vehicleidentification plate informs you of thegross vehicle weight rating. It is made upof the vehicle weight, all vehicle occu-pants, the fuel and the cargo. You can alsofind information about the maximum grossaxle weight rating on the front and rearaxle.
The maximum gross axle weight rating isthe maximum weight that can be carriedby one axle (front or rear axle). Neverexceed the maximum load or the maxi-mum gross axle weight rating for the frontor rear axle.
�CB-pillar, driver's side
Maximum permissible gross vehicle
weight rating
XSpecification for maximum gross vehicleweight�Cis listed in the Tire and LoadingInformation placard: "The combined weightof occupants and cargo should neverexceed XXX kilograms or XXX lbs."
The gross weight of all vehicle occupants, loadand luggage must not exceed the specifiedvalue.
iThe specifications shown on the Tire andLoading Information placard in the illustra-tion are examples. The maximum permissi-ble gross vehicle weight rating is vehicle-specific and may differ from that in the illus-tration. You can find the valid maximum per-missible gross vehicle weight rating for yourvehicle on the Tire and Loading Informationplacard.
316Loading the vehicle
Wheels and tires
Page 332 of 346
which have been approved by Mercedes-Benz specifically for your vehicle.
These tires have been specially adapted foruse with the control systems, such as ABS
or ESP®, and are marked as follows:
RMO = Mercedes-Benz Original
RMOE = Mercedes-Benz Original Extended(tires featuring run-flat characteristics)
RMO1 = Mercedes-Benz Original (only cer-tain AMG tires)
Mercedes-Benz Original Extended tires mayonly be used on wheels that have been spe-cifically approved by Mercedes-Benz.
Only use tires, wheels or accessories testedand approved by Mercedes-Benz. Certaincharacteristics, e.g. handling, vehicle noiseemissions or fuel consumption, may other-wise be adversely affected. In addition,when driving with a load, tire dimension var-iations could cause the tires to come intocontact with the bodywork and axle compo-nents. This could result in damage to thetires or the vehicle.
Mercedes-Benz accepts no liability for dam-age resulting from the use of tires, wheelsor accessories other than those tested andapproved.
Information on tires, wheels and approvedcombinations can be obtained from anyqualified specialist workshop.
!Retreaded tires are neither tested nor rec-ommended by Mercedes-Benz, since previ-ous damage cannot always be detected onretreaded tires. As a result, Mercedes-Benzcannot guarantee vehicle safety if retreadedtires are mounted. Do not mount used tiresif you have no information about their previ-ous usage.
The recommended pressures for various oper-ating conditions can be found:
Ron the Tire and Loading Information placardon the B-pillar on the driver's side
Rin the tire pressure table in the fuel filler flap
Observe the notes on recommended tire pres-sures under various operating conditions(Ypage 307).
Check tire pressures regularly, and only whenthe tires are cold. Comply with the mainte-nance recommendations of the tire manufac-turer in the vehicle document wallet.
Notes on the vehicle equipment – alwaysequip the vehicle:
Rwith tires of the same size on a given axle(left and right)
Rwith the same type of tire (summer tires,MOExtended tires, winter tires)
Exception: it is permissible to install a differ-ent type or make in the event of a flat tire.Observe the "MOExtended tires (tires withrun-flat characteristics" section(Ypage 288).
Vehicles equipped with MOExtended tires arenot equipped with a TIREFIT kit at the factory.It is therefore recommended that you addition-ally equip your vehicle with a TIREFIT kit if youmount tires that do not feature run-flat proper-ties, e.g. winter tires. A TIREFIT kit may beobtained from a qualified specialist workshop.
Emergency spare wheel
Important safety notes
GWARNING
The wheel or tire size as well as the tire type
of the spare wheel or emergency spare
wheel and the wheel to be replaced may dif-
fer. Mounting an emergency spare wheel
may severely impair the driving characteris-
tics. There is a risk of an accident.
To avoid hazardous situations:
Radapt your driving style accordingly and
drive carefully.
Rnever mount more than one spare wheel
or emergency spare wheel that differs in
size.
Ronly use a spare wheel or emergency
spare wheel of a different size briefly.
Rdo not switch ESP®off.
Rhave a spare wheel or emergency spare
wheel of a different size replaced at the
nearest qualified specialist workshop.
Observe that the wheel and tire dimen-
sions as well as the tire type must be cor-
rect.
When using an emergency spare wheel orspare wheel of a different size, you must not
330Emergency spare wheel
Wheels and tires