transmission MERCEDES-BENZ GLA-Class 2016 X156 Repair Manual
[x] Cancel search | Manufacturer: MERCEDES-BENZ, Model Year: 2016, Model line: GLA-Class, Model: MERCEDES-BENZ GLA-Class 2016 X156Pages: 390, PDF Size: 8.37 MB
Page 234 of 390

ing temperature. Avoid driving at full engine
output during this time.
SETUP
:DriveComfort/Sport/Sport +
;Chassis Comfort/Sport/Sport +
=Transmission D/M
?ESP®On/Offor SPORT handling mode
Sport
SE TUP displays the following information and
functions:
Rthe digit al speedometer
Rthe gear indicator
Rthedrive system setting
Rthe suspension mode
Rthe transmission position
Rthe ESP®(Electronic Stability Program) sta-
tus
XPress =or; on the steering wheel
to select the AMG
menu.
XPress9repeatedly until SE TUP
appears.
RACETIMER
Displaying and starting RACETIMER
:Lap
;RACE TIMER The
RACE TIMER isonly intended for use on a
closed race circuit. Do not use the function on
public roads.
You can start the RACETIMER when the
engine isrunning or ifthe SmartKey is inposi-
tion 2in the ignit ion lock.
XPress=or; on the steering wheel
to select the AMG
menu.
XPress the9button repeatedly unt ilthe
RACE TIMER appears.
XTo star t:press the abutton to start the
RACETIMER.
Displaying the intermedia tetime
XPress the =or; button to select
Interm. Time
.
XPress ato confirm.
The intermediate time appears for five sec- onds.
Starting a new lap
:RACE TIMER
;Fastest lap time (best lap)
=Lap
XPress ato confirm New Lap.
iIt ispossible to store a maximum of six-
teen laps. The 16th lap can only be com-
pleted with Finish Lap
.
232Menus and submenus
On-board computer and displays
Page 263 of 390

Vehicle
Display messagesPossible causes/consequences andMSolutions
Depress Brake to
Start Engine
You have attempted to start the engine with the transmission in
positionNwithout depressing the brake pedal.
XDepress the brake pedal.
To Deselect P or
N, Depress Brake
and Start Engine
You have attempted to shift the transmission to position Ror D
without starting the engine.
XStart the engine.
XDepress the brake pedal.
iIt is only possible to shift the transmission from position Pto
the desired position if you depress the brake pedal. Only then
can the parking lock be deactivated. If you do not depress the
brake pedal, the DIRECT SELECT lever can still be moved but the parking lock remains engaged.
iAt transmission fluid temperatures below Ò4‡( Ò20 †) you can
only shift out of position Pinto another transmission position
when the engine is running.
Apply Brake to
Shift from 'P'
You have attempted to shift the transmission to position R,Nor D
without depressing the brake pedal.
XDepress the brake pedal.
Transmission Not
in P Risk of Vehi‐
cle Rolling Away
The driver's door is open or not fully closed and the transmission
is in position R,Nor D.
A warning tone also sounds.
GWARNING
The vehicle may roll away.
There is a risk of an accident.
XShift the transmission to position P.
XSecure the vehicle against rolling away (Ypage 171).
XClose the driver's door completely.
Display messages261
On-board computer and displays
Z
Page 264 of 390

Display messagesPossible causes/consequences andMSolutions
ServiceRequired
DoNotShiftGears
Visit Dealer
You canno tchang eth etransmissio nposition due to amalfunction .
A warnin gtone also sounds.
If transmissio nposition Dis selected:
XDrive to aqualified specialist workshop without shiftin gth e
transmissio nfrom position D.
If transmissio nposition R,N or Pis selected:
XSecur eth evehicl eagainst rollin gaway (Ypage 171).
XNotify aqualified specialist workshop or breakdown service.
Onl yShift to 'P'
whe nVehicl eis
Stationar y
The vehicleis moving.
XPull ove rand stop th evehicl esafely as soo nas possible, payin g
attention to roa dand traffic conditions.
XShift th etransmissio nto position P.
Reversing Not Pos ‐
sible Service
Required
The automatictransmissio nis malfunctioning. You canno tbac k
up.
XVisit aqualified specialist workshop .
Transmission Mal‐
function
The automatictransmissio nis malfunctioning.
XVisit aqualified specialist workshop .
Transmission Mal‐
function Stop
The automatictransmissio nis malfunctioning.
XPull ove rand stop th evehicl esafely as soo nas possible, payin g
attention to roa dand traffic conditions.
XSecur eth evehicl eagainst rollin gaway (Ypage 171).
XConsult aqualified specialist workshop .
StopVehicl eShift
to 'P' Leave
Engine Runnin g
The automatictransmissio nhas overheated.
XDrive on carefully.
The automati ctransmissio nis available again when th edisplay
message goe sout .
If th emultifunction display still shows th edisplay message :
XPull overand stop th evehicl esafely as soo nas possible, payin g
attention to roa dand traffic conditions.
XSecur eth evehicl eagainst rollin gaway (Ypage 171).
XWait until th eautomati ctransmissio nhas cooled down and th e
display message has disappeared.
262Display messages
On-board computer and displays
Page 304 of 390
Synchronizing the rolling code
Pay attention to the "Important safety notes"
(
Ypage 301).
If the garage door system uses a rolling code,
you will also have to synchronize the garage
door system with the integrated garage door
opener in the rear-view mirror. To do this you
will need to use the programing button on the
control panel of the door drive. The program-
ing button may be positioned in different pla-
ces depending on the manufacturer. It is usu-
ally located on the door drive unit on the
garage ceiling.
Familiarize yourself with the garage door
drive operating instructions, e.g. under "Pro-
graming of additional remote controls",
before carrying out the following steps.
Your vehicle must be within reach of the
garage door or gate opener drive. Make sure
that neither your vehicle nor any persons/
objects are present within the sweep of the
door or gate.
XTurn the SmartKey to position 2in the igni-
tion lock (
Ypage 149).
XGet out of the vehicle.
XPress the programing button on the door
drive unit.
Usually, you now have 30 seconds to ini-
tiate the next step.
XGet into the vehicle.
XPress previously programed button ;,=
or ? on the integrated garage door opener
repeatedly until the door closes.
The rolling code synchronization is then
complete.
Notes on programing the remote control
Canadian radio frequency laws require a
"break" (or interruption) of the transmission
signals after broadcasting for a few seconds.
Therefore, these signals may not last long
enough for the integrated garage door
opener. The signal is not recognized during
programing. Comparable with Canadian law,
some U.S. garage door openers also feature a
"break". Proceed as follows:
Rif you live in Canada
Rif you have difficulties programing the
garage door opener (regardless of where
you live) when using the programing steps.
XPress and hold one of buttons
;to? on
the integrated garage door opener.
After a short time, indicator lamp :lights
up yellow.
XRelease the button.
Indicator lamp :flashes yellow.
XPress button Bof garage door remote
control Afor two seconds, then release it
for two seconds.
XPress button Bagain for two seconds.
XRepeat this sequence on butt onB of
remote control Auntil indicator lamp :
lights up green.
When indicator lamp :lights up green:
programing is finished.
When indicator lamp :flashes green: pro-
graming was successful. The next step is to
synchronize the rolling code.
XRelease button Bof remote control Aof
the garage door drive.
If indicator lamp :lights up red: repeat the
programing process for the corresponding
button on the rear-view mirror. When doing so, vary the distance between remote con-
trol Aand the rear-view mirror.
The required distance between remote
control Aand the integrated garage door
opener depends on the garage door drive
system. Several attempts might be neces-
sary. You should test every position for at
least 25 seconds before trying another
position.
Problems when programing
If you experience problems programing the
integrated garage door opener on the rear-
view mirror, take note of the following instruc-
tions:
RCheck the transmitter frequency used by
garage door drive remote control Aand
302Features
Stowage and features
Page 305 of 390
whether it is supported. The transmitter
frequency can usually be found on the back
of the garage door drive remote control.
The integrated garage door opener is com-
patible with devices that have units which
operate in the frequency range of 280 to
433 MHz.
RReplace the batteries in garage door
remote controlA. This increases the like-
lihood that garage door remote control A
will transmit a strong and precise signal to the integrated garage door opener.
RWhen programing, hold remote control A
at varying distances and angles from the
button which you are programing. Try vari-
ous angles at a distance between 2and
12 inches (5to 30 cm )or at the same angle
but at varying distances.
RIf another remote control is available for the
same garage door drive, repeat the same
programing steps with this remote control. Before performing these steps, make sure
that new batteries have been installed in
garage door drive remote control A.
RNote that some remote controls only trans-
mit for a limited amount of time (the indi-
cator lamp on the remote control goes out).
Press buttonBon remote control Aagain
before transmission ends.
RAlign the antenna cable of the garage door
opener unit. This can improve signal recep-
tion/transmission.
Opening/closing the garage door
After it has been programmed, the integrated
garage door opener assumes the function of
the garage door system's remote control.
Please also read the operating instructions
for the garage door system.
XTurn the SmartKey to position 2in the igni-
tion lock (
Ypage 149).
XPress button ;,=or? that has been
programmed to operate the garage door.
Garage door system with a fixed code: indi-
cator lamp :lights up green. Garage door system with a rolling code:
indicator lamp
:flashes green.
The transmitter will transmit a signal as
long as the button is pressed. The trans-
mission is halted after a maximum of ten
seconds and indicator lamp :lights up
yellow.
XPress button ;,=or? again if neces-
sary.
Clearing the memory
Make sure that you clear the memory of the
integrated garage door opener before selling
the vehicle.
XTurn the SmartKey to position 2in the igni-
tion lock (
Ypage 149).
XPress and hold buttons ;and ?.
The indicator lamp initially lights up yellow
and then green.
XRelease buttons ;and ?.
The memory of the integrated garage door
opener in the rear-view mirror is cleared.
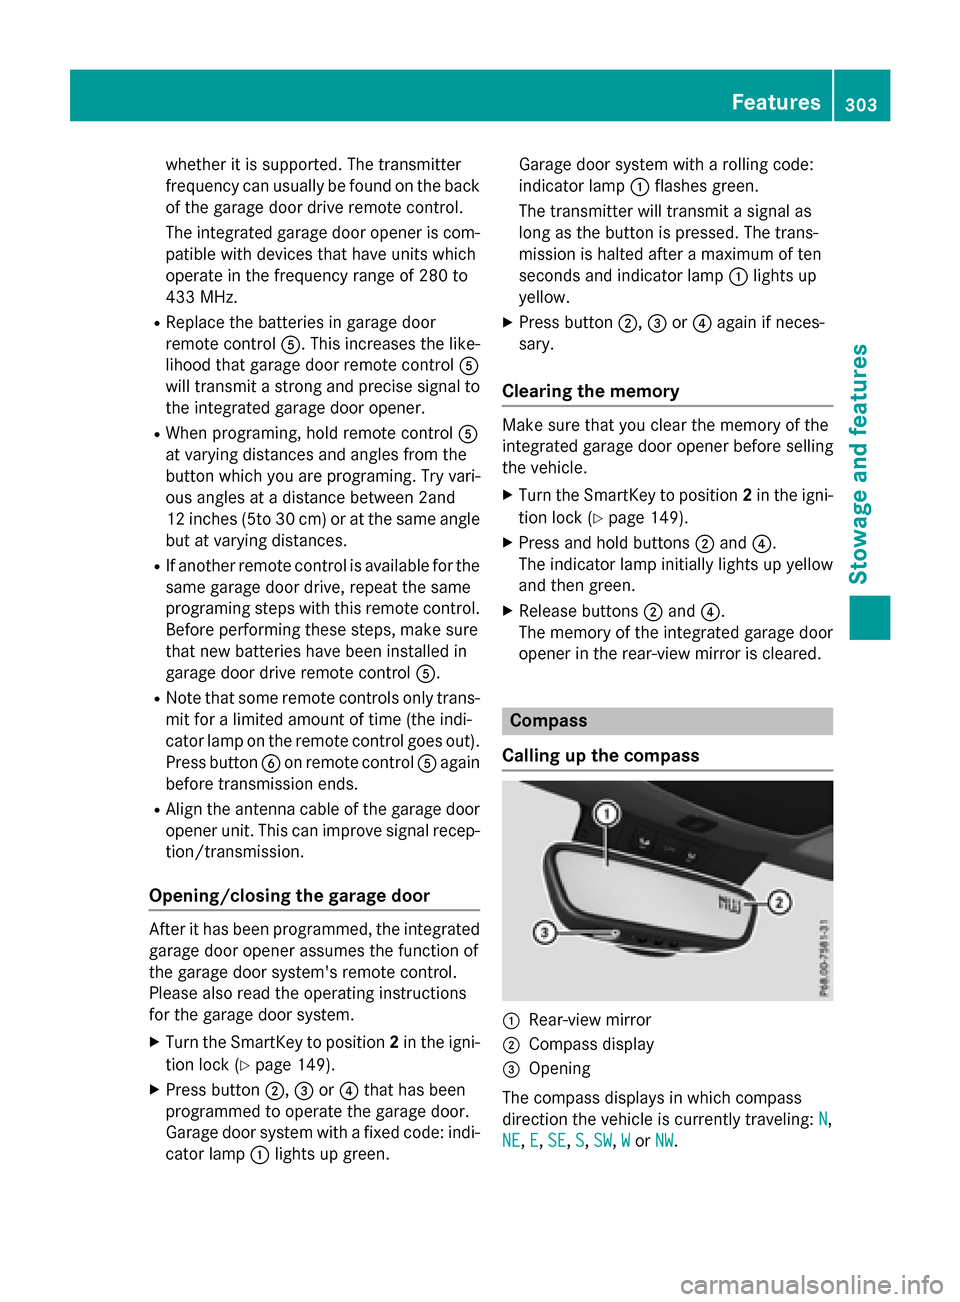
Compass
Calling up the compass
:Rear-view mirror
;Compass display
=Opening
The compass displays in which compass
direction the vehicle is currently traveling: N
,
NE
, E, SE,S, SW,Wor NW.
Features303
Stowage and features
Z
Page 306 of 390
To receive a correct compass display reading,
the magnetic field zone must be set and the
compass calibrated.
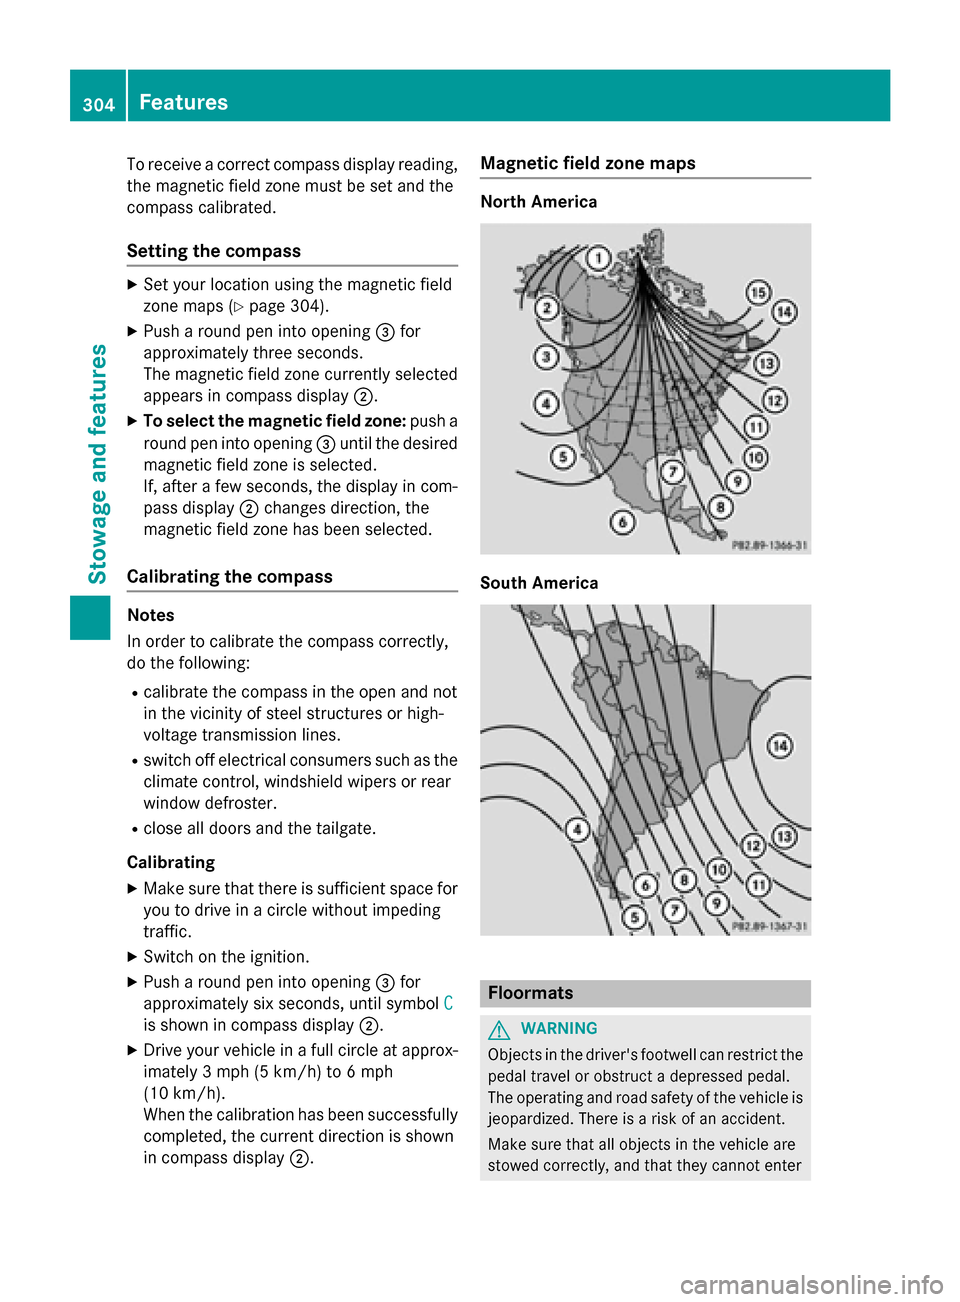
Setting the compass
XSet your location using the magnetic field
zone maps (
Ypage 304).
XPush a round pen into opening=for
approximately three seconds.
The magnetic field zone currently selected
appears in compass display ;.
XTo select the magnetic field zone: push a
round pen into opening =until the desired
magnetic field zone is selected.
If, after a few seconds, the display in com-
pass display ;changes direction, the
magnetic field zone has been selected.
Calibrating the compass
Notes
In order to calibrate the compass correctly,
do the following:
Rcalibrate the compass in the open and not
in the vicinity of steel structures or high-
voltage transmission lines.
Rswitch off electrical consumers such as the
climate control, windshield wipers or rear
window defroster.
Rclose all doors and the tailgate.
Calibrating
XMake sure that there is sufficient space for
you to drive in a circle without impeding
traffic.
XSwitch on the ignition.
XPush a round pen into opening =for
approximately six seconds, until symbol C
is shown in compass display;.
XDrive your vehicle in a full circle at approx-
imately 3 mph (5 km/h) to 6 mph
(10 km/h).
When the calibration has been successfully
completed, the current direction is shown
in compass display;.
Magnetic field zone maps
North America
South America
Floormats
GWARNING
Objects in the driver's footwell can restrict the pedal travel or obstruct a depressed pedal.
The operating and road safety of the vehicle is
jeopardized. There is a risk of an accident.
Make sure that all objects in the vehicle are
stowed correctly, and that they cannot enter
304Features
Stowage and features
Page 316 of 390

should drive for a few minutes after clean-
ing. Braking heats the brake discs and the
brake pads/linings, thus drying them. The
vehicle can then be parked.
Regular care of your vehicle is a condition for
retaining the quality in the long term.
Use care products and cleaning agents rec-
ommended and approved by Mercedes-Benz.
Washing the vehicle and cleaning the
paintwork
Automatic car wash
GWARNING
Braking efficiency is reduced after washing
the vehicle. There is a risk of an accident.
After the vehicle has been washed, brake
carefully while paying attention to the traffic
conditions until full braking power is restored.
!If DISTRONIC PLUS or the HOLD function
is activated, the vehicle brakes automati-
cally in certain situations.
To prevent damage to the vehicle, deacti-
vate DISTRONIC PLUS and the HOLD func-
tion in the following or other similar situa-
tions:
Rwhen towing the vehicle
Rin the car wash
!Never clean your vehicle in a Touchless
Automatic Car Wash as these use special
cleaning agents. These cleaning agents can
damage the paintwork or plastic parts.
!Make sure that the automatic transmis-
sion is in position Nwhen washing your
vehicle in a tow-through car wash. The vehi-
cle could be damaged if the transmission is
in another position.
!Make sure that:
Rthe side windows and the sliding sunroof are fully closed.
Rthe ventilation/heating is switched off
(the OFF button has been pressed/the
airflow control is set to position 0).
Rthe windshield wiper switch is in position
0.
Otherwise, the vehicle might be damaged.
You can wash the vehicle in an automatic car wash from the very start.
If the vehicle is very dirty, pre-wash it before
cleaning it in an automatic car wash.
After using an automatic car wash, wipe off
wax from the windshield and the wiper
blades. This will prevent smears and reduce
wiping noises caused by residue on the wind-
shield.
Washing by hand
In some countries, washing by hand is only
allowed at specially equipped washing bays.
Observe the legal requirements in each coun-
try.
XDo not use hot water and do not wash the
vehicle in direct sunlight.
XUse a soft sponge to clean.
XUse a mild cleaning agent, such as a car
shampoo approved by Mercedes-Benz.
XThoroughly hose down the vehicle with a
gentle jet of water.
XDo not point the water jet directly towardsthe air inlet.
XUse plenty of water and rinse out the
sponge frequently.
XRinse the vehicle with clean water and dry
thoroughly with a chamois.
XDo not let the cleaning agent dry on the
paintwork.
Carefully remove all deposits of road salt as
soon as possible when driving in winter.
314Care
Maintenance and care
Page 330 of 390

Always make sure that neither you nor the
battery is electrostatically charged. A build-
up of electrostatic charge can be caused, for
example:
Rby wearing clothing made from synthetic
fibers
Rdue to friction between clothing and seats
Rif you push or pull the battery across the
carpet or other synthetic materials
Rif you wipe the battery with a cloth
GWARNING
During the charging process, a battery produ-
ces hydrogen gas. If a short circuit occurs or
sparks are created, the hydrogen gas can
ignite. There is a risk of an explosion.
RMake sure that the positive terminal of a
connected battery does not come into con- tact with vehicle parts.
RNever place metal objects or tools on a bat-
tery.
RIt is important that you observe the descri-
bed order of the battery terminals when
connecting and disconnecting a battery.
RWhen jump-starting, make sure that the
battery poles with identical polarity are
connected.
RIt is particularly important to observe the
described order when connecting and dis-
connecting the jumper cables.
RNever connect or disconnect the battery
terminals while the engine is running.
GWARNING
Battery acid is caustic. There is a risk of injury.
Avoid contact with skin, eyes or clothing. Do
not inhale any battery gases. Do not lean over
the battery. Keep children away from batter-
ies. Wash away battery acid immediately with
plenty of clean water and seek medical atten-
tion.
HEnvironmental note
Batteries contain dangerous
substances. It is against the
law to dispose of them with
the household rubbish. They
must be collected separately and recycled to protect the
environment.
Dispose of batteries in an
environmentally friendly
manner. Take discharged
batteries to a qualified spe-
cialist workshop or a special
collection point for used bat-
teries.
!Have the battery checked regularly at a
qualified specialist workshop.
Observe the service intervals in the Main-
tenance Booklet or contact a qualified spe-
cialist workshop for more information.
!You should have all work involving the
battery carried out at a qualified specialist
workshop. In the exceptional case that it is
necessary for you to disconnect the battery
yourself, make sure that:
Ryou switch off the engine and remove the
key. On vehicles with KEYLESS-GO,
ensure that the ignition is switched off.
Check that all the indicator lamps in the
instrument cluster are off. Otherwise,
electronic components, such as the
alternator, may be damaged.
Ryou first remove the negative terminal
clamp and then the positive terminal
clamp. Never swap the terminal clamps.
Otherwise, the vehicle's electronic sys-
tem may be damaged.
Rin vehicles with automatic transmission,
the transmission is locked in position P
after disconnecting the battery. The vehi-
cle is secured against rolling away. Yo u
ca
n then no longer move the vehicle.
The battery and the cover of the positive
terminal clamp must be installed securely
during operation.
328Battery (vehicle)
Breakdo wn assis tance
Page 334 of 390

Do not start the vehicle using a rapid charging device. If your vehicle's battery is discharged,
the engine can be jump-started from another vehicle or from a second battery using jumper
cables. Observe the following points:
RThe battery is not accessible in all vehicles. If the other vehicle's battery is not accessible,
jump-start the vehicle using a second battery or a jump-starting device.
RYou may only jump-start the vehicle when the engine and exhaust system are cold.
RDo not start the engine if the battery is frozen. Let the battery thaw first.
ROnly jump-start from batteries with a 12 V voltage rating.
ROnly use jumper cables that are not damaged and have a sufficient cross-section and insu-
lated terminal clamps.
RMake sure that the two vehicles do not touch.
Make sure that:
Rthe jumper cables are not damaged.
Rnon-insulated parts of the terminal clamps do not come into contact with other metal parts
while the jumper cables are connected to the battery.
RThe jumper cables cannot come into contact with parts which can move when the engine is
running, such as the V-belt pulley or the fan.
XSecure the vehicle by applying the electric parking brake.
XShift the transmission to position P.
XTurn the SmartKey to position 0in the ignition lock and remove it.
XSwitch off all electrical consumers, e.g. rear window defroster, lighting, etc.
XOpen the hood.
Position number Bidentifies the charged battery of the other vehicle or an equivalent jump-
starting device.
XPress together cover :of positive clamp ;and slide it back.
XConnect positive terminal ;on your vehicle to positive terminal =of donor battery B
using the jumper cable, beginning with your own battery.
332Jump-starting
Breakdown assistance
Page 336 of 390
!Make sure that the electric parking brake
is released. If the electric parking brake is
faulty, visit a qualified specialist workshop.
!Only secure the tow rope or tow bar at the
towing eyes. Otherwise, the vehicle could
be damaged.
!Do not use the towing eyes for recovery
purposes as this could damage the vehicle. If in doubt, recover the vehicle with a crane.
!When towing, pull away slowly and
smoothly. If the tractive power is too high,
the vehicles could be damaged.
!The vehicle can be towed a maximum of
30 miles (50km). The towing speed of
30 mph (50km/h) must not be exceeded.
If the vehicle has to be towed more than
30 miles (50km), the front axle must be
raised or the entire vehicle raised and
transported.
!Do not tow with sling-type equipment.
This could damage the vehicle.
!When towing vehicles with KEYLESS-GO,
use the key instead of the Start/Stop but-
ton. Otherwise, the automatic transmission
may shift to position Pwhen the driver's or
front-passenger door are opened, which
could lead to damage to the transmission.
!Vehicles with automatic transmission
must not be started by tow-starting. This
could otherwise damage the transmission.
It is better to have the vehicle transported
than to have it towed away.
If the vehicle can no longer be driven because of an accident or breakdown, you have the
following options:
RTransporting the vehicle
As a rule, you should have the vehicle trans-
ported.
RTowing the vehicle with a tow rope or tow
bar
Only tow the vehicle in exceptional cases. The battery must be connected and charged.
Otherwise, you:
Rcannot turn the SmartKey to position 2in
the ignition lock
Rcannot release the electric parking brake
Rcannot shift the transmission to position N
The function of the electric parking brake and the parking lock is dependent on the on-board
voltage.
If the on-board voltage is low or there is a
system malfunction, it is possible that:
Rthe electric parking brake may not be
applied in certain circumstances, or
Rthe transmission may not be shifted to P
Switch off non-essential consumers, e.g. the
radio.
Disarm the automatic locking feature before
the vehicle is towed (
Ypage 230). You could
otherwise be locked out when pushing or
towing the vehicle.
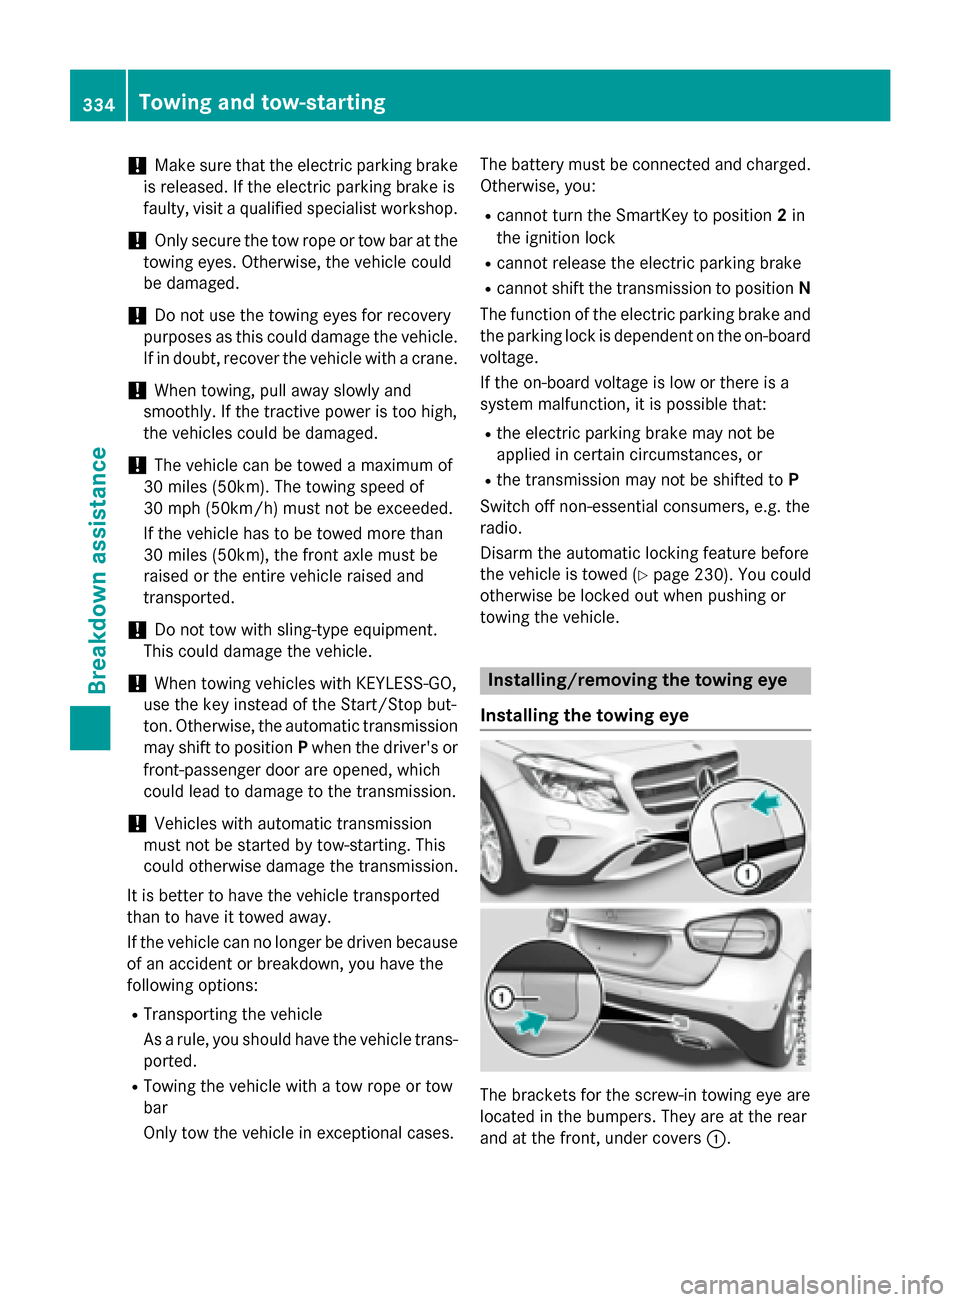
Installing/removing the towing eye
Installing the towing eye
The brackets for the screw-in towing eye are
located in the bumpers. They are at the rear
and at the front, under covers :.
334Towing and tow-starting
Breakdown assistance