transmission MERCEDES-BENZ GLA-Class 2016 X156 Manual PDF
[x] Cancel search | Manufacturer: MERCEDES-BENZ, Model Year: 2016, Model line: GLA-Class, Model: MERCEDES-BENZ GLA-Class 2016 X156Pages: 390, PDF Size: 8.37 MB
Page 337 of 390

XRemove thetowin geye from th estowage
space.
The towin geye is locate dwit hth evehicl e
tool ki tunder th ecargo compartmen tfloor
(
Ypage 322).
Vehicles wit hth eTIREFI Tkit: th etowin g
eye is beneat hth etire inflation compres-
sor .
XPress th emar kon cover :inward sin th e
direction of th earrow.
XTak ecover :off th eopening.
XScrew in th etowin geye clockwise to th e
stop.
Removin gth etowing eye
XUnscrew and remove th etowin geye.
XAttac hcover :to th ebumper and press
until it engages.
XPlac eth etowin geye in th estowage well
beneat hth ecargo compartmen tfloor in
th ecargo compartmen t (
Ypage 322).
XVehicles withth eTIREFI Tkit: put bac kth e
tire inflation compressor.
Towing th e vehicle wit hth e fr ont axle
raised
Observ eth eimportant safet ynote swhen
towin gyour vehicl ewit hth efron taxl eraised
(
Ypage 333).
Only vehicles withou t4MATIC can be
towe dwit hth efront axle raised .
!Vehicles with4MATIC mus tno tbe towed
wit heither th efron tor th erear axl eraised,
as doin gso will damag eth etransmission .
Vehicles wit h4MATIC may either be towed
away wit hbot haxles on th eground or be loa-
ded up and transported.
!The ignition mus tbe switched off if th e
vehicl eis bein gtowed wit hth efron taxl e
raised. Otherwise ,ES P
®may interven eand
damag eth ebrak esystem.
XOn vehicles wit hKEYLESS-G Oor th e
KEYLESS-G Ostar tfunction: you must
use th eSmartKey instead of th eStart/Sto p
butto n (
Ypage 150).
XMakesur ethat th evehicl eis stationary.
XTurn th eSmartKey to position 2in th eigni-
tion lock.
XWhe nth evehicl eis stationary, depress th e
brak epedal and keep it depressed.
XShift th eautomatic transmission to posi-
tion P.
XReleas eth ebrak epedal .
XReleas eth eelectric parkin gbrake.
XSwitc hoff th eautomatic locking
(
Ypage 230).
XSwitc hon th ehazard warnin glamp s
(
Ypage 119).
XTurn th eSmartKey in th eignition loc kto
position 0and leav eth eSmartKey in th e
ignition lock.
Towing a vehicle wit hbot haxles on
th egroun d
It is important that you observ eth esafet y
instruction swhen towin gaway your vehicl e
(
Ypage 333).
XOn vehicles wit hKEYLESS-G Oor th e
KEYLESS-G Ostar tfunction: you must
use th eSmartKey instead of th eStart/Sto p
butto n (
Ypage 150).
The automatic transmission automatically
shift sto position Pwhen you open th edriver's
or front-passenger doo ror when you remove
th eSmartKey from th eignition lock. In order
to ensur ethat th eautomatic transmission
stays in position Nwhen towin gth evehicle,
you mus tobserv eth efollowin gpoints :
XMakesur ethat th evehicl eis stationary.
XTurn th eSmartKey to position 2in th eigni-
tion lock.
Towing and tow-starting335
Breakdown assistance
Z
Page 338 of 390
XDepress and hold the brake pedal.
XShift the automatic transmission to posi-
tionN.
XLeave the SmartKey in position 2in the
ignition lock.
XRelease the brake pedal.
XRelease the electric parking brake.
XSwitch on the hazard warning lamps
(
Ypage 119).
iIn order to signal a change of direction
when towing the vehicle with the hazard
warning lamps switched on, use the com-
bination switch as usual. In this case, only
the indicator lamps for the direction of
travel flash. After resetting the combina-
tion switch, the hazard warning lamp starts
flashing again.
Transporting the vehicle
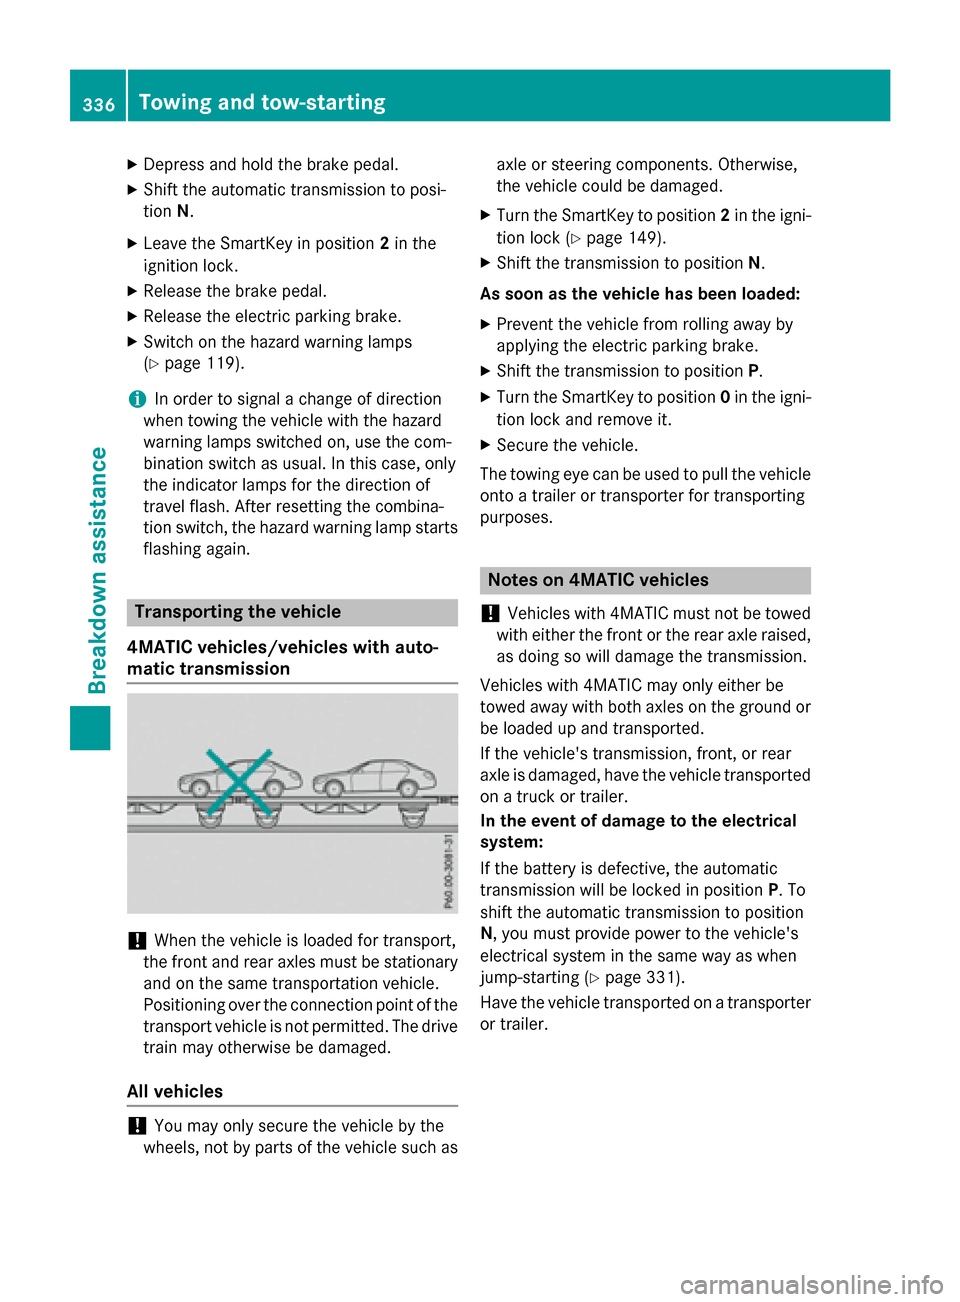
4MATIC vehicles/vehicles with auto-
matic transmission
!When the vehicle is loaded for transport,
the front and rear axles must be stationary
and on the same transportation vehicle.
Positioning over the connection point of the
transport vehicle is not permitted. The drive
train may otherwise be damaged.
All vehicles
!You may only secure the vehicle by the
wheels, not by parts of the vehicle such as axle or steering components. Otherwise,
the vehicle could be damaged.
XTurn the SmartKey to position
2in the igni-
tion lock (
Ypage 149).
XShift the transmission to position N.
As soon as the vehicle has been loaded:
XPrevent the vehicle from rolling away by
applying the electric parking brake.
XShift the transmission to position P.
XTurn the SmartKey to position 0in the igni-
tion lock and remove it.
XSecure the vehicle.
The towing eye can be used to pull the vehicle
onto a trailer or transporter for transporting
purposes.
Notes on 4MATIC vehicles
!
Vehicles with 4MATIC must not be towed
with either the front or the rear axle raised,
as doing so will damage the transmission.
Vehicles with 4MATIC may only either be
towed away with both axles on the ground or
be loaded up and transported.
If the vehicle's transmission, front, or rear
axle is damaged, have the vehicle transported
on a truck or trailer.
In the event of damage to the electrical
system:
If the battery is defective, the automatic
transmission will be locked in position P. To
shift the automatic transmission to position
N, you must provide power to the vehicle's
electrical system in the same way as when
jump-starting (
Ypage 331).
Have the vehicle transported on a transporter
or trailer.
336Towing and tow-starting
Breakdown assistance
Page 339 of 390
Tow-starting (emergency engine
starting)
!
Vehicles with automatic transmission
must not be tow-started. You could other-
wise damage the automatic transmission.
iYou can find information on "Jump-start-
ing" under (
Ypage 331).
Fuses
Important safety notes
GWARNING
If you manipulate or bridge a faulty fuse or if
you replace it with a fuse with a higher amper- age, the electric cables could be overloaded.
This could result in a fire. There is a risk of an
accident and injury.
Always replace faulty fuses with the specified
new fuses having the correct amperage.
Blown fuses must be replaced with fuses of
the same rating, which you can recognize by
the color and value. The fuse ratings are listed
in the fuse allocation chart.
If a newly inserted fuse also blows, have the
cause traced and rectified at a qualified spe-
cialist workshop, e.g. an authorized
Mercedes-Benz Center.
!Only use fuses that have been approved
for Mercedes-Benz vehicles and which
have the correct fuse rating for the system
concerned. Only use fuses marked with an
"S". Otherwise, components or systems
could be damaged.
The fuses in your vehicle serve to close down
faulty circuits. If a fuse blows, all the compo-
nents on the circuit and their functions stop
operating.
Before changing a fuse
XSecure the vehicle against rolling away
(
Ypage 171).
XSwitch off all electrical consumers.
XVehicles without KEYLESS-GO: remove
the SmartKey from the ignition lock.
XVehicles with KEYLESS-GO start-func-
tion or KEYLESS-GO: open the driver's
door.
The on-board electronics now have status
0 . This is the same as the SmartKey having
been removed.
The fuses are located in various fuse boxes:
RFuse box in the engine compartment on the left-hand side of the vehicle, when viewed
in the direction of travel
RFuse box in the front-passenger footwell
The fuse allocation chart is on the fuse box in
the front-passenger footwell (
Ypage 338).
Fuse box in the engine compartment
GWARNING
When the hood is open and the windshield
wipers are set in motion, you can be injured by
the wiper linkage. There is a risk of injury.
Always switch off the windshield wipers and
the ignition before opening the hood.
!Make sure that no moisture can enter the
fuse box when the cover is open.
!When closing the cover, make sure that it
is lying correctly on the fuse box. Moisture
seeping in or dirt could otherwise impair
the operation of the fuses.
Fuses337
Breakdown assistance
Z
Page 365 of 390
Occupant distribution
The distribution of occupants in a vehicle at
their designated seating positions.
Total load limit
Nominal load and luggage load plus 68 kg
(150 lbs) multiplied by the number of seats in
the vehicle.
Changing a wheel
Flat tire
The "Breakdown assistance" section
(
Ypage 322) contains information and notes
on how to deal with a flat tire. Information on driving with MOExtended tires in the event of
a flat tire can be found under "MOExtended
tires (tires with run-flat characteristics"
(
Ypage 323).
Rotating the wheels
GWARNING
Interchanging the front and rear wheels may
severely impair the driving characteristics if
the wheels or tires have different dimensions. The wheel brakes or suspension components
may also be damaged. There is a risk of acci-
dent.
Rotate front and rear wheels only if the wheels and tires are of the same dimensions.
!On vehicles equipped with a tire pressure
monitor, electronic components are loca-
ted in the wheel.
Tire-mounting tools should not be used
near the valve. This could damage the elec- tronic components.
Only have tires changed at a qualified spe-
cialist workshop.
Observe the instructions and safety notes in
the "Changing a wheel" section (
Ypage 363).
The wear patterns on the front and rear tires
differ, depending on the operating conditions.
Rotate the wheels before a clear wear pattern has formed on the tires. Front tires typically
wear more on the shoulders and the rear tires
in the center.
On vehicles that have the same size front and
rear wheels, you can rotate the wheels
according to the intervals in the tire manu-
facturer's warranty book in your vehicle docu-
ments. If no warranty book is available, the
tires should be rotated every 3,000 to
6,000 miles (5,000 to 10,000 km). Depending
on tire wear, this may be required earlier. Do
not change the direction of wheel rotation.
Clean the contact surfaces of the wheel and
the brake disc thoroughly every time a wheel
is rotated. Check the tire pressure and, if nec-
essary, restart the tire pressure loss warning
system or the tire pressure monitor.
Direction of rotation
Tires with a specified direction of rotation
have additional benefits, e.g. if there is a risk of hydroplaning. These advantages can only
be gained if the tires are installed correspond-
ing to the direction of rotation.
An arrow on the sidewall of the tire indicates its correct direction of rotation.
Storing wheels
Store wheels that are not being used in a cool,
dry and preferably dark place. Protect the
tires from oil, grease, gasoline and diesel.
Mounting a wheel
Preparing the vehicle
XStop the vehicle on solid, non-slippery and
level ground.
XApply the electric parking brake manually.
XBring the front wheels into the straight-
ahead position.
XShift the transmission to position P.
XSwitch off the engine.
Changing a wheel363
Wheels and tires
Z
Page 377 of 390

Approved antenna positions
:
Front roof area
;Rear roof area
=Rear fender
iOn vehicles with panorama roof with
power tilt/sliding panel, installing an
antenna to the front or rear roof area is not
permitted.
On the rear fenders, it is recommended to
position the antenna on the side of the
vehicle closest to the center of the road.
Use the Technical Specification ISO/TS
21609 when retrofitting RF transmitters
(Road Vehicles - EMC guidelines for installa-
tion of aftermarket radio frequency transmit-
ting equipment). Observe the legal require-
ments for retrofittings.
If your vehicle has installations for two-way
radio equipment, use the power supply or
antenna connections intended for use with
the basic wiring. Be sure to observe the man-
ufacturer's additional instructions when
installing.
Deviations with respect to wavebands, maxi-
mum transmission outputs or antenna posi-
tions must be approved by Mercedes-Benz. The maximum transmission output (PEAK) at
the base of the antenna must not exceed the
following values:
WavebandMaximum
transmission output
Short wave
3 - 54 MHz100 W
4 m waveband
74 - 88 MHz30 W
2 m waveband
144 - 174 MHz50 W
Trunked radio/Tetra
380 - 460 MHz10 W
70 cm waveband
400 - 460 MHz35 W
Mobile communications
(2G/3G/4G)10 W
The following can be used in the vehicle with-
out restrictions:
RRF transmitters with a maximum transmis-
sion output of up to 100 mW
RRF transmitters with transmitter frequen-
cies in the 380 - 410 MHz waveband and a
maximum transmission output of up to 2 W
(trunked radio/Tetra)
RMobile telephones (2G/3G/4G)
There is no restriction for antenna positions
on the outside of the vehicle for the following
wavebands:
RTrunked radio/Tetra
R70 cm waveband
R2G/3G/4G
Vehicle electronics375
Technical data
Z
Page 379 of 390

Engine number
:Emission control information plate,
including the certification of both federal
and Californian emissions standards
;VIN (on the lower edge of the windshield)
=Engine number (stamped into the crank-
case)
Service products and filling capaci-
ties
Important safety notes
GWARNING
Service products may be poisonous and haz-
ardous to health. There is a risk of injury.
Comply with instructions on the use, storage
and disposal of service products on the labels
of the respective original containers. Always
store service products sealed in their original
containers. Always keep service products out
of the reach of children.
HEnvironmental note
Dispose of service products in an environ-
mentally responsible manner.
Service products include the following:
RFuels
RLubricants (e.g. engine oil, transmission oil)
RCoolant
RBrake fluid
RWindshield washer fluid
RClimate control system refrigerant Components and service products must be
matched. Only use products recommended
by Mercedes-Benz. Damage which is caused
by the use of products which have not been
recommended is not covered by the
Mercedes-Benz warranty or goodwill ges-
tures. They are listed in this Mercedes-Benz
Operator's Manual in the appropriate section.
Information on tested and approved products
can be obtained at an authorized Mercedes-
Benz Center or on the Internet at
http://bevo.mercedes-benz.com.
You can recognize service products approved
by Mercedes-Benz by the following inscrip-
tion on the containers:
RMB-Freigabe (e.g. MB-Freigabe 229.51)
RMB-Approval (e.g. MB-Approval 229.51)
Other designations or recommendations indi-
cate a level of quality or a specification in
accordance with an MB Sheet Number (e.g.
MB 229.5). They have not necessarily been
approved by Mercedes-Benz.
Other identifications, for example:
R0 W-30
R5 W-30
R5 W-40
Fuel
Important safety notes
GWARNING
Fuel is highly flammable. If you handle fuel
incorrectly, there is a risk of fire and explo-
sion.
You must avoid fire, open flames, creating
sparks and smoking. Switch off the engine
and, if applicable, the auxiliary heating before refueling.
GWARNING
Fuel is poisonous and hazardous to health.
There is a risk of injury.
Service products and filling capacities377
Technical data
Z