Time MERCEDES-BENZ GLA-Class 2017 X156 Owner's Manual
[x] Cancel search | Manufacturer: MERCEDES-BENZ, Model Year: 2017, Model line: GLA-Class, Model: MERCEDES-BENZ GLA-Class 2017 X156Pages: 390, PDF Size: 8.37 MB
Page 311 of 390
!Make sure that the windshield wipers are
not folded away from the windshield. You
could otherwise damage the windshield
wipers or the hood.
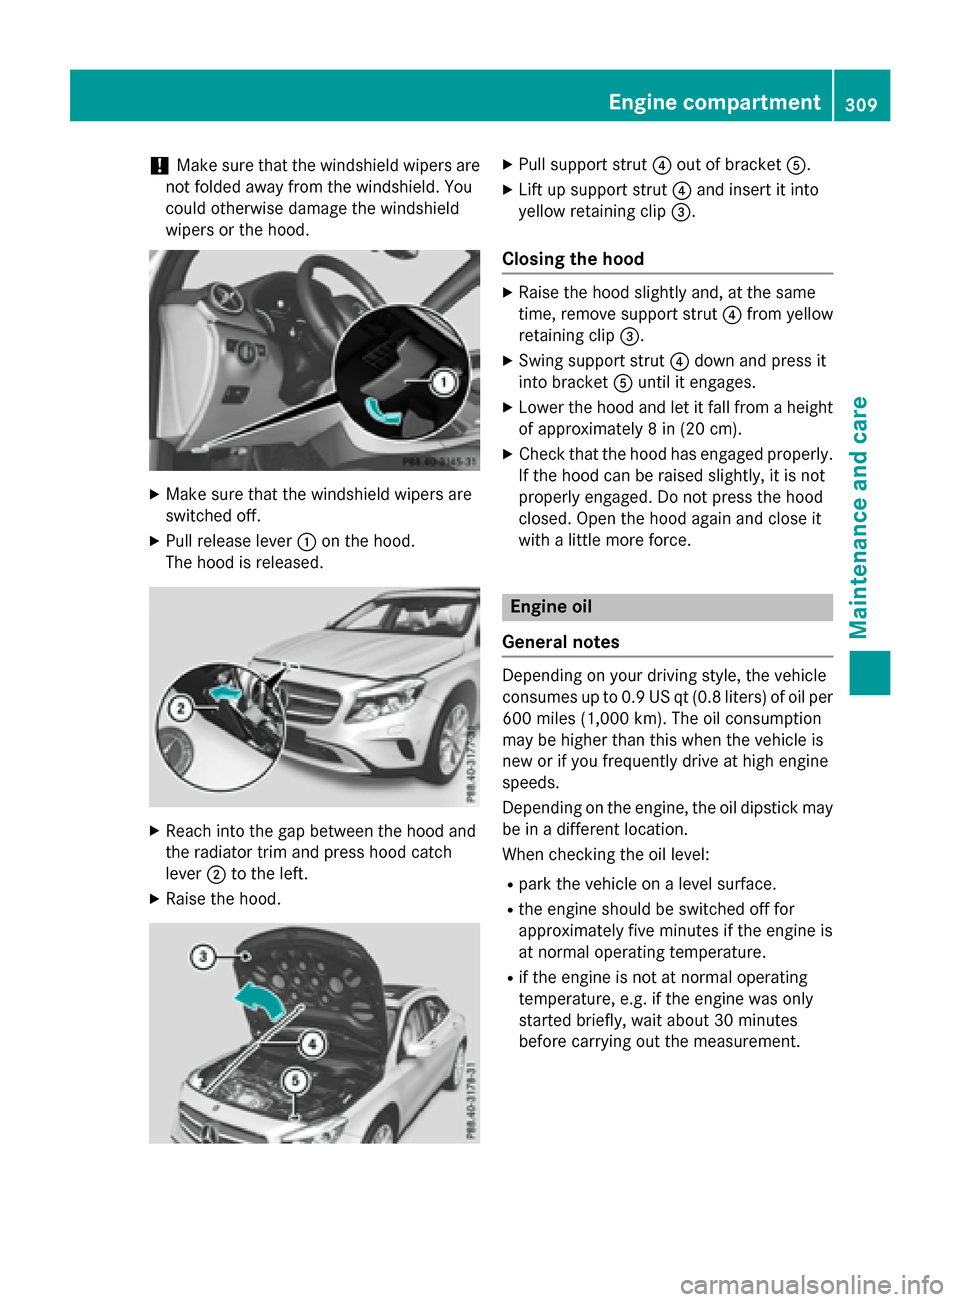
XMake sure that the windshield wipers are
switched off.
XPull release lever :on the hood.
The hood is released.
XReach into the gap between the hood and
the radiator trim and press hood catch
lever ;to the left.
XRaise the hood.
XPull support strut ?out of bracket A.
XLift up support strut ?and insert it into
yellow retaining clip =.
Closing the hood
XRaise the hood slightly and, at the same
time, remove support strut ?from yellow
retaining clip =.
XSwing support strut ?down and press it
into bracket Auntil it engages.
XLower the hood and let it fall from a height
of approximately 8 in (20 cm).
XCheck that the hood has engaged properly.
If the hood can be raised slightly, it is not
properly engaged. Do not press the hood
closed. Open the hood again and close it
with a little more force.
Engine oil
General notes
Depending on your driving style, the vehicle
consumes up to 0.9 US qt (0.8 liters) of oil per 600 miles (1,000 km). The oil consumption
may be higher than this when the vehicle is
new or if you frequently drive at high engine
speeds.
Depending on the engine, the oil dipstick may
be in a different location.
When checking the oil level:
Rpark the vehicle on a level surface.
Rthe engine should be switched off for
approximately five minutes if the engine is
at normal operating temperature.
Rif the engine is not at normal operating
temperature, e.g. if the engine was only
started briefly, wait about 30 minutes
before carrying out the measurement.
Engine compartment309
Maintenance and care
Z
Page 314 of 390
Working in the engine compartment poses a
risk of injury.
Where possible, let the engine cool down andtouch only the components described in the
following.
GWARNING
Windshield washer concentrate could ignite if it comes into contact with hot engine compo-
nents or the exhaust system. There is a risk of
fire and injury.
Make sure that no windshield washer con-
centrate is spilled next to the filler neck.
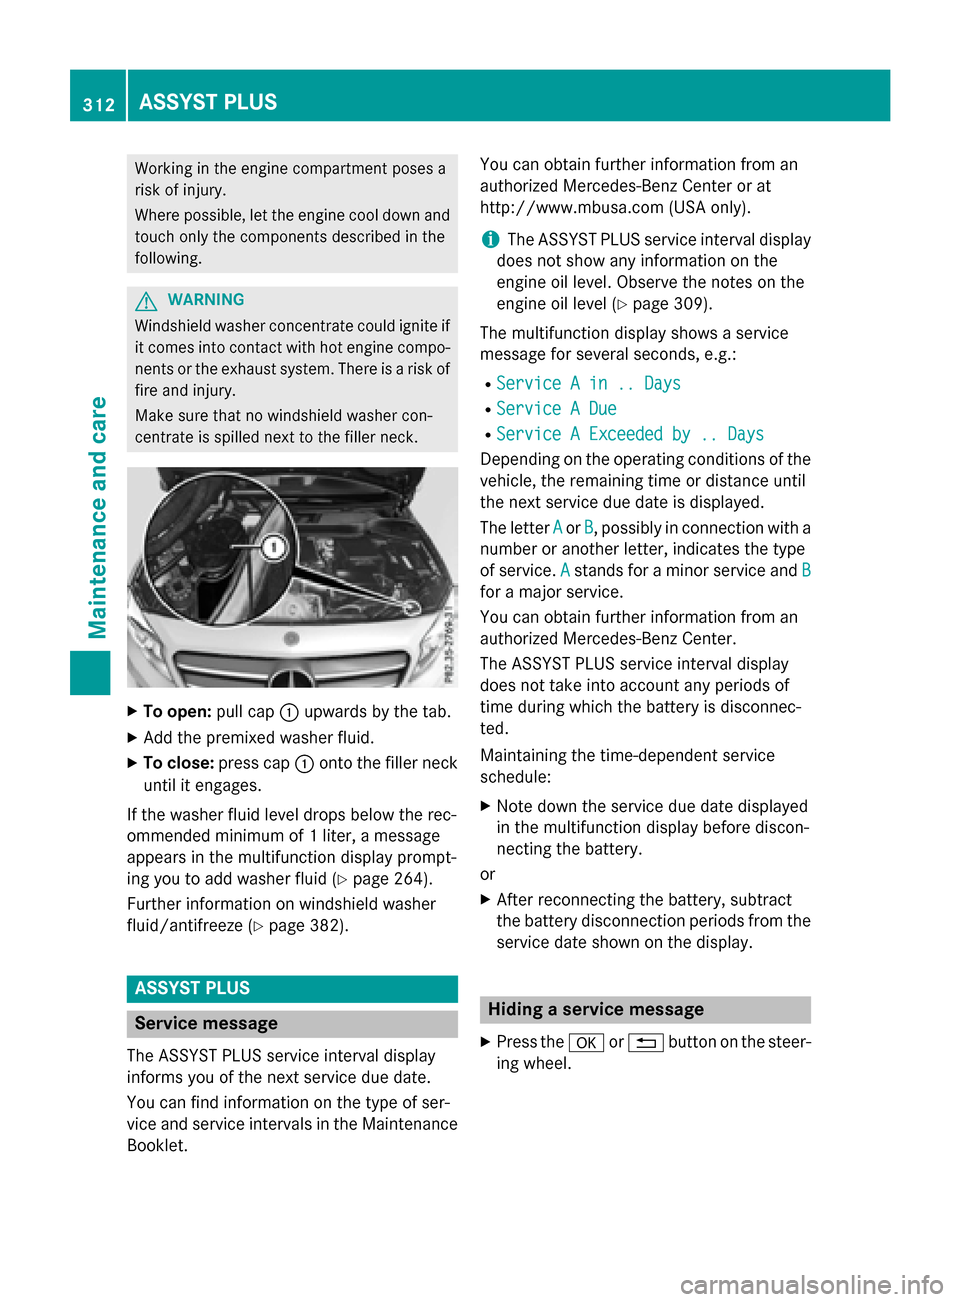
XTo open: pull cap:upwards by the tab.
XAdd the premixed washer fluid.
XTo close: press cap :onto the filler neck
until it engages.
If the washer fluid level drops below the rec-
ommended minimum of 1 liter, a message
appears in the multifunction display prompt-
ing you to add washer fluid (
Ypage 264).
Further information on windshield washer
fluid/antifreeze (
Ypage 382).
ASSYST PLUS
Service message
The ASSYST PLUS service interval display
informs you of the next service due date.
You can find information on the type of ser-
vice and service intervals in the Maintenance
Booklet. You can obtain further information from an
authorized Mercedes-Benz Center or at
http://www.mbusa.com (USA only).
iThe ASSYST PLUS service interval display
does not show any information on the
engine oil level. Observe the notes on the
engine oil level (
Ypage 309).
The multifunction display shows a service
message for several seconds, e.g.:
RService A in .. Days
RService A Due
RService A Exceeded by .. Days
Depending on the operating conditions of the
vehicle, the remaining time or distance until
the next service due date is displayed.
The letter A
orB, possibly in connection with a
number or another letter, indicates the type
of service. A
stands for a minor service and B
for a major service.
You can obtain further information from an
authorized Mercedes-Benz Center.
The ASSYST PLUS service interval display
does not take into account any periods of
time during which the battery is disconnec-
ted.
Maintaining the time-dependent service
schedule:
XNote down the service due date displayed
in the multifunction display before discon-
necting the battery.
or
XAfter reconnecting the battery, subtract
the battery disconnection periods from the service date shown on the display.
Hiding a service message
XPress the aor% button on the steer-
ing wheel.
312ASSYST PLUS
Maintenance and care
Page 321 of 390
come loose in the event of air bag deploy-
ment. There is a risk of injury.
Do not use any care products and cleaning
agents to clean the cockpit.
!Do not affix the following to plastic surfa-
ces:
Rstickers
Rfilms
Rscented oil bottles or similar items
You can otherwise damage the plastic.
!Do not allow cosmetics, insect repellent
or sunscreen to come into contact with the
plastic trim. This maintains the high-quality
look of the surfaces.
XWipe the plastic trim with a damp, lint-free
cloth, e.g. a microfiber cloth.
XHeavy soiling: use care and cleaning prod-
ucts recommended and approved by
Mercedes-Benz.
The surface may change color temporarily.
Wait until the surface is dry again.
Cleaning the steering wheel and gear or
selector lever
XThoroughly wipe with a damp cloth or use
leather care agents that have been recom-
mended and approved by Mercedes-Benz.
Cleaning genuine wood and trim ele-
ments
!Do not use solvent-based cleaning agents
such as tar remover, wheel cleaners, pol-
ishes or waxes. There is otherwise a risk of damaging the surface.
!Do not use chrome polish on trim pieces.
The trim pieces have a chrome look but are
mostly made of anodized aluminum and
can lose their shine if chrome polish is
used. Use a damp, lint-free cloth instead
when cleaning the trim pieces.
If the chrome-plated trim pieces are very
dirty, you can use a chrome polish. If you are unsure as to whether the trim pieces
are chrome-plated or not, consult an
authorized Mercedes-Benz Center.
XWipe the wooden trim and trim pieces with
a damp, lint-free cloth, e.g. a microfiber
cloth.
XHeavy soiling: use care and cleaning prod-
ucts recommended and approved by
Mercedes-Benz.
Cleaning the seat covers
General notes
!Do not use a microfiber cloth to clean
covers made out of real leather, artificial
leather or DINAMICA. If used often, these
can damage the cover.
Note that regular care is essential to ensure
that the appearance and comfort of the cov-
ers is retained over time.
Genuine leather seat covers
!To retain the natural appearance of the
leather, observe the following cleaning
instructions:
RClean genuine leather covers carefully
with a damp cloth and then wipe the cov-
ers down with a dry cloth.
RMake sure that the leather does not
become soaked. It may otherwise
become rough and cracked.
ROnly use leather care agents that have
been tested and approved by Mercedes-
Benz. You can obtain these from a quali-
fied specialist workshop.
Leather is a natural product.
It exhibits natural surface characteristics, for
example:
Rdifferences in the texture
Rmarks caused by growth and injury
Rslight nuances of color
These are characteristics of leather and not
material defects.
Care319
Maintenance and care
Z
Page 324 of 390
Useful information
i
This Operator's Manual describes all
models and all standard and optional equip-
ment of your vehicle available at the time of
publication of the Operator's Manual.
Country-specific differences are possible.
Please note that your vehicle may not be
equipped with all features described. This
also applies to safety-related systems and
functions.
iRead the information on qualified special-
ist workshops (
Ypage 25).
Where will I find...?
Vehicle tool kit
General notes
Vehicles with a TIREFIT kit: the TIREFIT kit is
located in the stowage well under the cargo
compartment floor.
Vehicles with a tire-change tool kit: the tire-
change tool kit is in the stowage well under
the cargo compartment floor.
iApart from certain country-specific varia-
tions, the vehicles are not equipped with a
tire-change tool kit. Some tools for chang-
ing a wheel are specific to the vehicle. For
more information on which tire changing
tools are required and approved to perform
a wheel change on your vehicle, consult a
qualified specialist workshop.
Tools required for changing a wheel may
include, for example:
RJack
RWheel chock
RLug wrench
RAlignment bolt
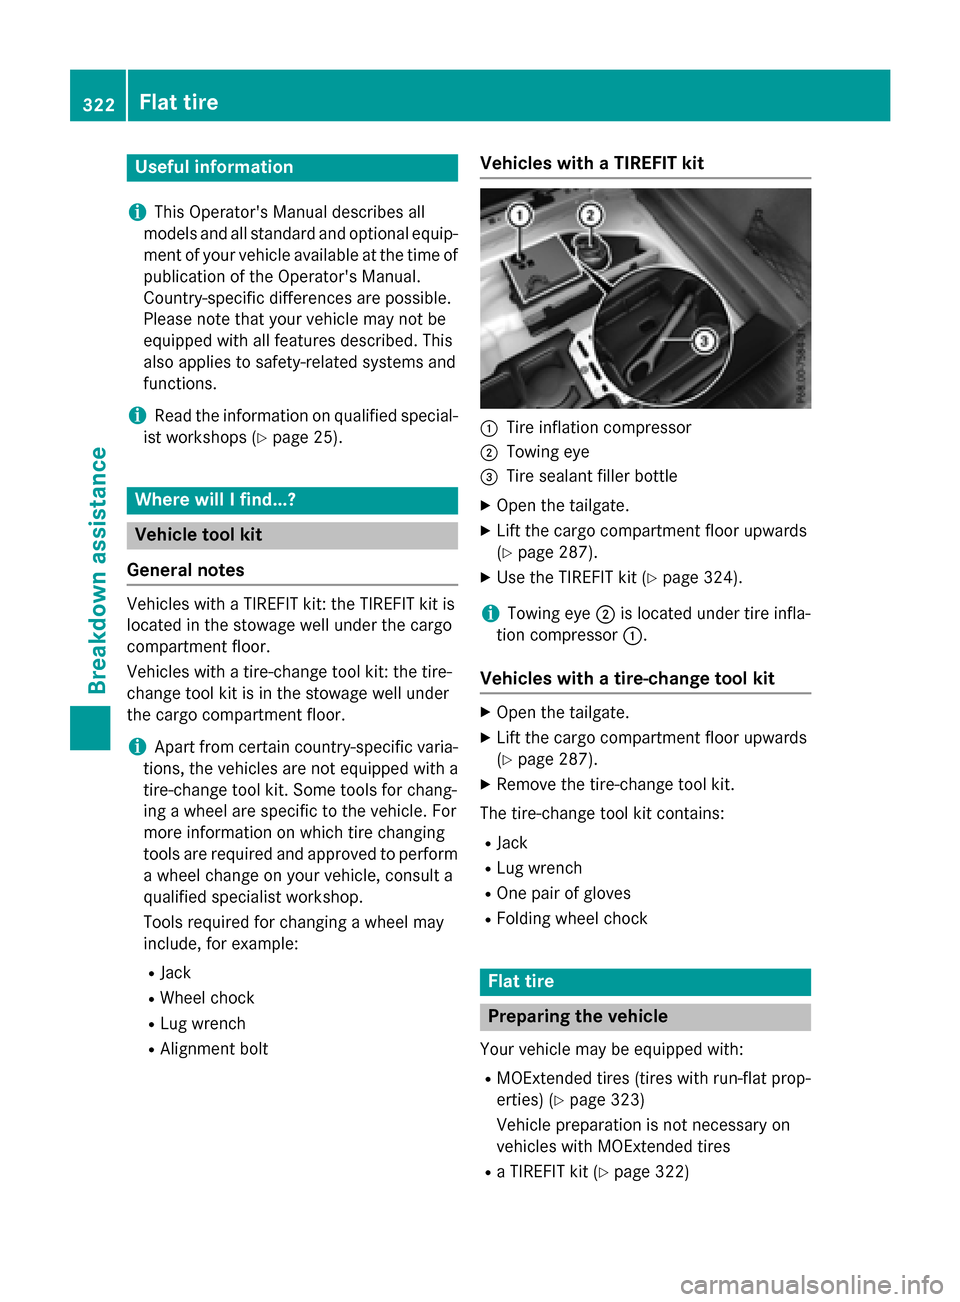
Vehicles with a TIREFIT kit
:Tire inflation compressor
;Towing eye
=Tire sealant filler bottle
XOpen the tailgate.
XLift the cargo compartment floor upwards
(
Ypage 287).
XUse the TIREFIT kit (Ypage 324).
iTowing eye ;is located under tire infla-
tion compressor :.
Vehicles with a tire-change tool kit
XOpen the tailgate.
XLift the cargo compartment floor upwards
(
Ypage 287).
XRemove the tire-change tool kit.
The tire-change tool kit contains:
RJack
RLug wrench
ROne pair of gloves
RFolding wheel chock
Flat tire
Preparing the vehicle
Your vehicle may be equipped with:
RMOExtended tires (tires with run-flat prop-
erties) (
Ypage 323)
Vehicle preparation is not necessary on
vehicles with MOExtended tires
Ra TIREFIT kit (Ypage 322)
322Flat tire
Breakdown assistance
Page 327 of 390
!Do not operate the tire inflation compres-
sor for longer than eight minutes at a time
without a break. It may otherwise overheat.
The tire inflation compressor can be oper-
ated again once it has cooled down.
Comply with the manufacturer’s safety
instructions on the sticker on the tire inflation
compressor.
Using the TIREFIT kit
XDo not remove any foreign objects which
have penetrated the tire, e.g. screws or
nails.
XRemove the tire sealant bottle, the accom-
panying TIREFIT sticker and the tire infla-
tion compressor from the stowage well
underneath the cargo compartment floor
(
Ypage 322).
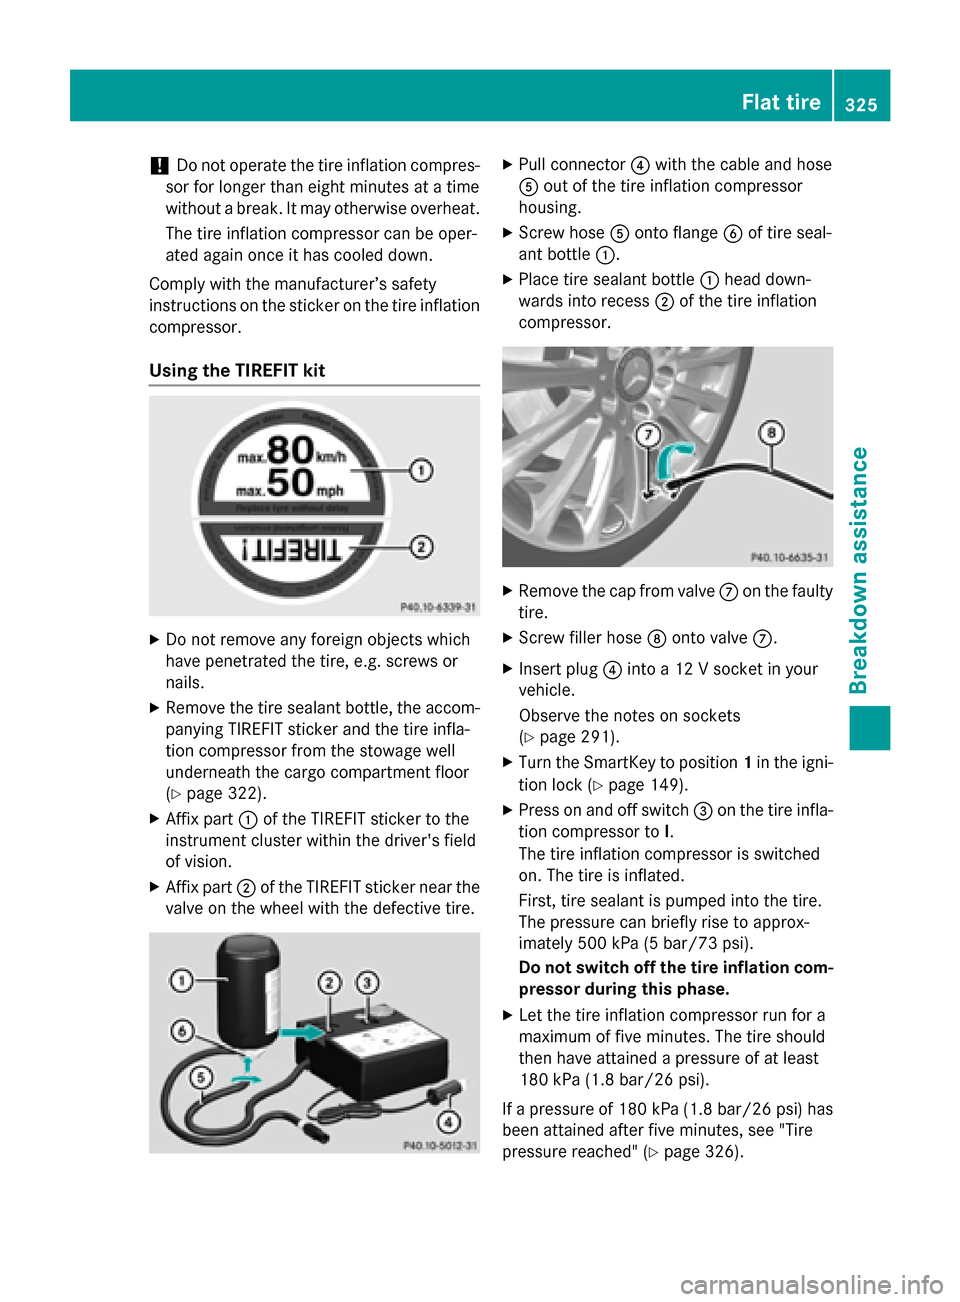
XAffix part :of the TIREFIT sticker to the
instrument cluster within the driver's field
of vision.
XAffix part ;of the TIREFIT sticker near the
valve on the wheel with the defective tire.
XPull connector ?with the cable and hose
A out of the tire inflation compressor
housing.
XScrew hose Aonto flange Bof tire seal-
ant bottle :.
XPlace tire sealant bottle :head down-
wards into recess ;of the tire inflation
compressor.
XRemove the cap from valve Con the faulty
tire.
XScrew filler hose Donto valve C.
XInsert plug ?into a 12 V socket in your
vehicle.
Observe the notes on sockets
(
Ypage 291).
XTurn the SmartKey to position 1in the igni-
tion lock (
Ypage 149).
XPress on and off switch =on the tire infla-
tion compressor to I.
The tire inflation compressor is switched
on. The tire is inflated.
First, tire sealant is pumped into the tire.
The pressure can briefly rise to approx-
imately 500 kPa (5 bar/73 psi).
Do not switch off the tire inflation com-
pressor during this phase.
XLet the tire inflation compressor run for a
maximum of five minutes. The tire should
then have attained a pressure of at least
180 kPa (1.8 bar/26 psi).
If a pressure of 180 kPa (1.8 bar/26 psi) has
been attained after five minutes, see "Tire
pressure reached" (
Ypage 326).
Flat tire325
Breakdown assistance
Z
Page 328 of 390
If a tire pressure of 180 kPa (1.8 bar/26 psi)
has not been attained after five minutes, see
"Tire pressure not reached" (
Ypage 326).
If tire sealant has escaped, clean it off affec-
ted areas as quickly as possible. Use plain
water if possible.
If your clothes are soiled with tire sealant,
have them cleaned with perchloroethylene at
a dry cleaner as soon as possible.
Tire pressure not reached
If a pressure of 180 kPa (1.8 bar/26 psi) has
not been attained after five minutes:
XSwitch off the tire inflation compressor.
XUnscrew the filler hose from the valve of
the faulty tire.
Note that tire sealant may escape when you
unscrew the filler hose.
XVery slowly drive forwards or reverse
approximately 30 ft (10 m).
XPump up the tire again.
After a maximum of five minutes the tire
pressure must be at least 180 kPa (1.8 bar/ 26 psi).
GWARNING
If the required tire pressure is not reached
after the specified time, the tire is too badly
damaged. The tire sealant cannot repair the
tire in this instance. Damaged tires and a tire
pressure that is too low can significantly
impair the vehicle's braking and driving char-
acteristics. There is a risk of accident.
Do not continue driving. Contact a qualified
specialist workshop.
Tire pressure reached
GWARNING
A tire temporarily sealed with tire sealant
impairs the driving characteristics and is not
suitable for higher speeds. There is a risk of
accident.
You should therefore adapt your driving style
accordingly and drive carefully. Do not exceed
the specified maximum speed with a tire that
has been repaired using tire sealant.
The maximum permissible speed for a tire
sealed with tire sealant is 50 mph (80 km/h).
The upper part of the TIREFIT sticker must be affixed to the instrument cluster in the driv-
er's field of vision.
!Residue from the tire sealant may come
out of the filler hose after use. This could
cause stains.
Therefore, place the filler hose in the plastic
bag which contained the TIREFIT kit.
HEnvironmental note
Have the used tire sealant bottle disposed of
professionally, e.g. at a qualified specialist
workshop.
If a tire pressure of 180 kPa (1.8 bar/26 psi)
has been attained after five minutes:
XSwitch off the tire inflation compressor.
XUnscrew the filler hose from the valve of
the faulty tire.
XStow the tire sealant bottle and the tire
inflation compressor.
XPull away immediately.
XStop after driving for approximately ten
minutes and check the tire pressure with
the tire inflation compressor.
The tire pressure must now be at least
130 kPa (1.3 bar/19 psi).
GWARNING
If the required tire pressure is not reached
after driving for a short period, the tire is too
badly damaged. The tire sealant cannot repair
the tire in this instance. Damaged tires and a
tire pressure that is too low can significantly
impair the vehicle's braking and driving char-
acteristics. There is a risk of accident.
Do not continue driving. Contact a qualified
specialist workshop.
iIn cases such as the one mentioned
above, contact an authorized Mercedes-
326Flat tire
Breakdown assistance
Page 331 of 390
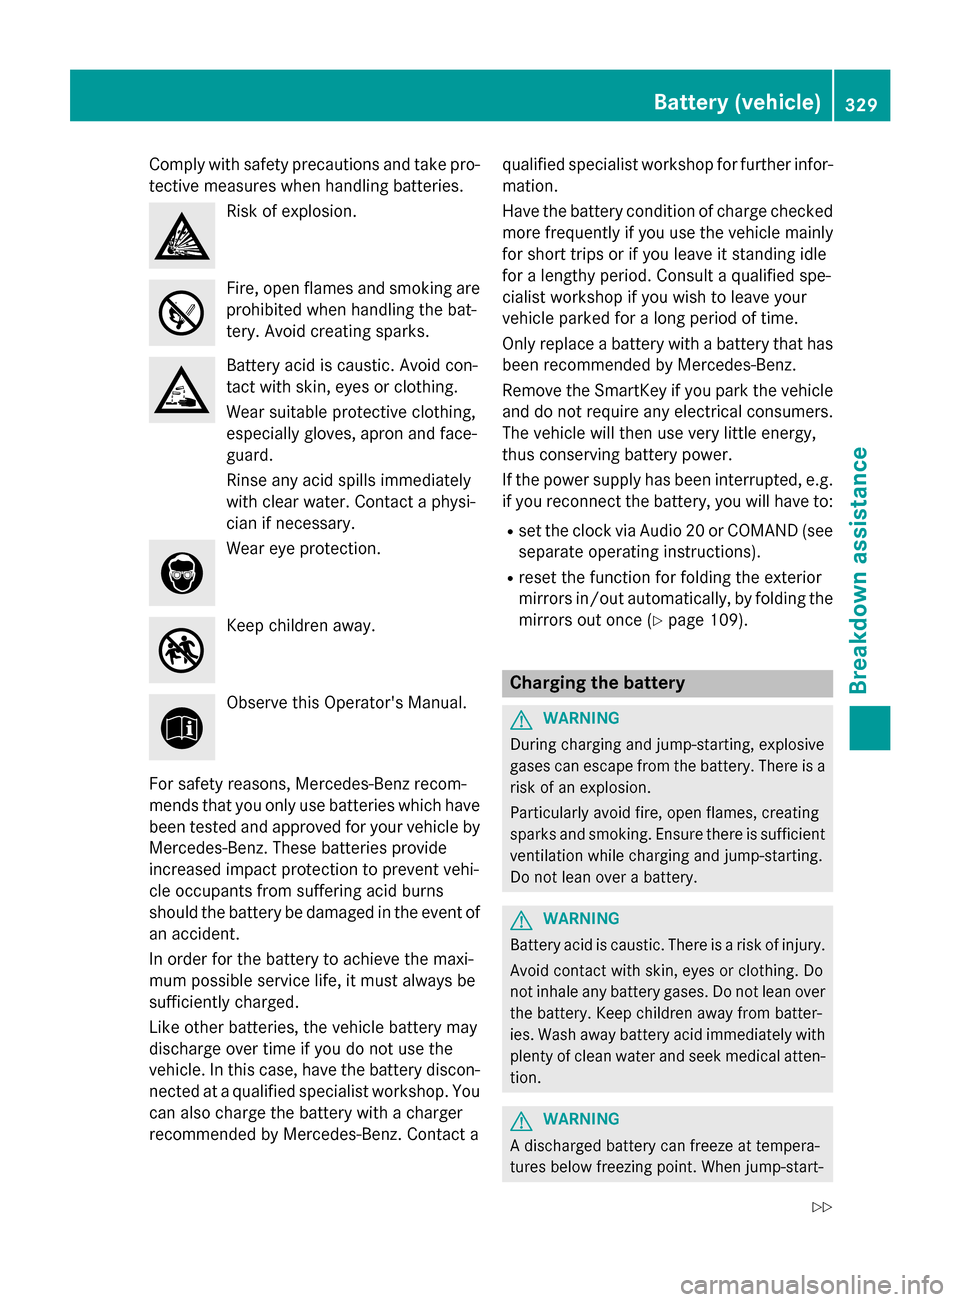
Comply with safety precautions and take pro-
tective measures when handlin g batteries.
Riskof explosion.
Fire, open flames and smoking are
prohibited when handling the bat-
tery. Avoid creating sparks.
Battery acid iscaustic. Avoid con-
tact with skin, eyes or clothing.
Wear suitable protective clothing,
especial lygloves, apron and face-
guard.
Rins e any acid spills immediately
wit h clear water. Contact a physi-
cian if necessary.
Wear eye protection.
Keep children away.
Observe th isOperator's Manual.
For safety reasons, Mercedes-Benz recom-
men dsthat you only use batteries which have
been tested and approved for your vehicle by
Mercedes-Benz. These batteries pro vide
increased impact protection to prevent veh i-
cle occupants from suffering acid burns
should the battery bedamaged inthe event of
an acc ident.
In order for the battery to achieve the max i-
mum possible service life, it must always be
suff iciently charge d.
Like other batteries, the vehicle battery may
disc harge over time if you donot use the
veh icle.In this case, have the battery discon-
nected at a qualified specialist workshop. You
can also charge the battery with a charger
recommended byMercedes-Benz. Contact a qualif
ied specialist workshop for further infor-
mation.
Have the battery condition of charge checked
more frequently ifyou use the vehicle main ly
for short trips or ifyou leave itstanding idle
for a lengthy period. Consult aqualified spe-
cialist workshop ifyou wish to leave your
vehicle parked for a long period of time.
Only replace a battery with a battery that has
been recommended byMercedes-Benz.
Remo vethe SmartKey ifyou park the vehicle
and donot require any electrical consumers.
The vehicle willthen use very lit
tle energy,
thus conserving battery power.
If the power supply has been interrupted, e.g.
if you reconnect the battery, you willhave to:
Rset the clock via Aud io20 or COMAND (see
separate operating instructions).
Rreset the function for folding the exterior
mirrors in/out automatically, byfolding the
mirrors out once (
Ypage 109).
Charging the battery
GWARNIN G
During charging and jump-starting ,explosive
gase scan escape from th ebattery. Ther eis a
ris kof an explosion .
Particularly avoi dfire, open flames, creating
sparks and smoking. Ensure there is sufficien t
ventilation while charging and jump-starting .
Do no tlean ove r abattery.
GWARNIN G
Battery acid is caustic .Ther eis aris kof injury.
Avoid contact wit hskin, eyes or clothing .Do
no tinhale any battery gases. Do no tlean ove r
th ebattery. Kee pchildren away from batter-
ies. Wash away battery acid immediately wit h
plenty of clean wate rand seek medical atten -
tion.
GWARNIN G
A discharged battery can freez eat tempera-
tures below freezing point. When jump-start -
Battery (vehicle)329
Breakdown assistance
Z
Page 335 of 390
XStart the engine of the donor vehicle and run it at idling speed.
XConnect negative terminal?of donor battery Bto ground point Aof your vehicle using
the jumper cable, connecting the jumper cable to battery of other vehicle Bfirst.
XIf the battery is fully discharged, leave the battery that is being used to jump-start connected
for a few minutes before attempting to start. This charges the battery slightly.
XStart the engine.
XBefore disconnecting the jumper cables, let the engine run for several minutes.
XFirst, remove the jumper cables from ground point Aand negative terminal ?, then from
positive clamp ;and positive terminal =. Begin each time at the contacts on your own
vehicle first.
XClose cover :of positive terminal ;after removing the jumper cables.
XClose the hood.
XHave the battery checked at a qualified specialist workshop.
iJump-starting is not considered to be a normal operating condition.
iJumper cables and further information regarding jump-starting can be obtained at any
qualified specialist workshop.
Towing and tow-starting
Important safety notes
GWARNING
Functions relevant to safety are restricted or
no longer available if:
Rthe engine is not running.
Rthe brake system or the power steering is
malfunctioning.
Rthere is a malfunction in the voltage supply or the vehicle's electrical system.
If your vehicle is being towed, much more
force may be necessary to steer or brake.
There is a risk of an accident.
In such cases, use a tow bar. Before towing,
make sure that the steering moves freely.
GWARNING
You can no longer steer the vehicle if the
steering wheel lock has been engaged. There
is a risk of an accident.
Always switch off the ignition when towing the
vehicle with a tow cable or a tow bar.
GWARNING
When towing or tow-starting another vehicle
and its weight is greater than the permissible
gross weight of your vehicle, the:
Rthe towing eye could detach itself
Rthe vehicle/trailer combination could roll-
over.
There is a risk of an accident.
When towing or tow-starting another vehicle,
its weight should not be greater than the per- missible gross weight of your vehicle.
Details on the permissible gross vehicle
weight of your vehicle can be found on the
vehicle identification plate (
Ypage 376).
!When COLLISION PREVENTION ASSIST
PLUS, DISTRONIC PLUS or the HOLD func-
tion is activated, the vehicle brakes auto-
matically in certain situations. To avoid
damage to the vehicle, deactivate these
systems in the following or similar situa-
tions:
Rwhen towing the vehicle
Rin the car wash
Towing and tow-starting333
Breakdown assistance
Z
Page 342 of 390
Useful information
i
This Operator's Manual describes all
models and all standard and optional equip-
ment of your vehicle available at the time of
publication of the Operator's Manual.
Country-specific differences are possible.
Please note that your vehicle may not be
equipped with all features described. This
also applies to safety-related systems and
functions.
iRead the information on qualified special-
ist workshops (
Ypage 25).
Important safety notes
GWARNING
If wheels and tires of the wrong size are used, the wheel brakes or suspension components
may be damaged. There is a risk of an acci-
dent.
Always replace wheels and tires with those
that fulfill the specifications of the original
part.
When replacing wheels, make sure to use the
correct:
Rdesignation
Rmodel
When replacing tires, make sure to use the
correct:
Rdesignation
Rmanufacturer
Rmodel
GWARNING
A flat tire severely impairs the driving, steer-
ing and braking characteristics of the vehicle.
There is a risk of accident.
Tires without run-flat characteristics:
Rdo not drive with a flat tire.
Rimmediately replace the flat tire with your
emergency spare wheel or spare wheel, or
consult a qualified specialist workshop.
Tires with run-flat characteristics:
Rpay attention to the information and warn-
ing notices on MOExtended tires (tires with
run-flat characteristics).
Accessories that are not approved for your
vehicle by Mercedes-Benz or are not being
used correctly can impair the operating
safety.
Before purchasing and using non-approved
accessories, visit a qualified specialist work-
shop and inquire about:
Rsuitability
Rlegal stipulations
Rfactory recommendations
Information on the sizes and types of wheels
and tires for your vehicle can be found under "Wheel/tire combinations" (
Ypage 367).
Information on tire pressure can be found:
Ron the Tire and Loading Information placard
on the B-pillar on the driver's side
(
Ypage 351)
Rin the tire pressure table in the fuel filler flap
(
Ypage 170)
Runder "Tire pressure" (Ypage 343)
Operation
Information on driving
Check the tire pressure when the vehicle is
heavily laden and adjust prior to a trip.
While driving, pay attention to vibrations,
noises and unusual handling characteristics,
e.g. pulling to one side. This may indicate that
the wheels or tires are damaged. If you sus-
pect that a tire is defective, reduce your
speed immediately. Stop the vehicle as soon
as possible to check the wheels and tires for
damage. Hidden tire damage could also be
causing the unusual handling characteristics.
If you find no signs of damage, have the tires
and wheels checked at a qualified specialist
workshop.
340Operation
Wheels and tires
Page 349 of 390
Checking tire pressures manually
To determine and set the correct tire pres-
sure, proceed as follows:
XRemove the valve cap of the tire that is to
be checked.
XPress the tire pressure gauge securely onto
the valve.
XRead the tire pressure and compare it to
the recommended value on the Tire and
Loading Information placard or the tire
pressure table (
Ypage 343).
XIf the tire pressure is too low, increase the
tire pressure to the recommended value.
XIf the tire pressure is too high, release air.
To do so, press down the metal pin in the
valve, using the tip of a pen for example.
Then check the tire pressure again using
the tire pressure checker.
XScrew the valve cap onto the valve.
XRepeat these steps for the other tires.
Tire pressure loss warning system
(Canada only)
General notes
While the vehicle is in motion, the tire pres-
sure loss warning system monitors the set
tire pressure using the rotational speed of the
wheels. This enables the system to detect
significant pressure loss in a tire. If the speed
of rotation of a wheel changes as a result of a
loss of pressure, a corresponding warning
message will appear in the multifunction dis-
play.
You can recognize the tire pressure loss warn-
ing by the Run Flat Indicator Active
Press 'OK' to Restartmessage in the
multifunction display in the Serv.
menu.
Information on the message display can be
found in the "Restarting the tire pressure loss
warning system" section (
Ypage 347).
Important safety notes
The tire pressure warning system does not
warn you of an incorrectly set tire pressure.
Observe the notes on the recommended tire
pressure (
Ypage 343).
The tire pressure loss warning does not
replace the need to regularly check the tire
pressure. An even loss of pressure on several tires at the same time cannot be detected by
the tire pressure loss warning system.
The tire pressure monitor is not able to warn
you of a sudden loss of pressure, e.g. if the
tire is penetrated by a foreign object. In the
event of a sudden loss of pressure, bring the
vehicle to a halt by braking carefully. Avoid
abrupt steering movements.
The function of the tire pressure loss warning
system is limited or delayed if:
Rsnow chains are mounted on your vehicle's
tires.
Rroad conditions are wintry.
Ryou are driving on sand or gravel.
Ryou adopt a very sporty driving style (cor-
nering at high speeds or driving with high
rates of acceleration).
Ryou are driving with a heavy load (in the
vehicle or on the roof).
Restarting the tire pressure loss warn-
ing system
Restart the tire pressure loss warning system
if you have:
Rchanged the tire pressure
Rchanged the wheels or tires
Rmounted new wheels or tires
XBefore restarting, make sure that the tire
pressures are set properly on all four tires
for the respective operating conditions.
The recommended tire pressure can be
found on the Tire and Loading Information
placard on the B-pillar. Additionally, a tire
pressure table is attached to the fuel filler
flap. The tire pressure loss warning system can only give reliable warnings if you have
Tire pressure347
Wheels and tires
Z