key battery MERCEDES-BENZ GLA-Class 2017 X156 Owner's Manual
[x] Cancel search | Manufacturer: MERCEDES-BENZ, Model Year: 2017, Model line: GLA-Class, Model: MERCEDES-BENZ GLA-Class 2017 X156Pages: 390, PDF Size: 8.37 MB
Page 7 of 390
ATA (Anti-Theft Alarm system)Activating/deactivating .................. .73
Function ........................................... 73
Switching off the alarm .................... 73
ATTENTION ASSIST
Activating/deactivating .................2 28
Display message ............................ 253
Function/notes .............................2 11
Audio 20
Driving dynamics display ............... 200
Audio menu (on-board computer) .... 225
Audio system
see separate operating instructions
Authorized Mercedes-Benz Center
see Qualified specialist workshop
Authorized workshop
see Qualified specialist workshop
AUTO lights
Display message ............................ 250
see Lights
Automatic car wash (care) ............... 314
Automatic engine start (ECO start/
stop function) .................................... 154
Automatic engine switch-off (ECO
start/stop function) .......................... 154
Automatic headlamp mode .............. 116
Automatic transmission
Accelerator pedal position ............. 163
Changing gear ............................... 163
DIRECT SELECT lever ..................... 159
Drive program ................................ 164
Drive program display .................... 159
Driving tips .................................... 163
DYNAMIC SELECT button (all vehi-
cles except Mercedes-AMG vehi-
cles) ............................................... 157
DYNAMIC SELECT controller
(Mercedes-AMG vehicles) .............. 158
Emergency running mode .............. 169
Engaging drive position .................. 161
Engaging neutral ............................ 160
Engaging park position
(Mercedes-AMG vehicles) .............. 162
Engaging park position automati-
cally ............................................... 160
Engaging reverse gear ................... 160
Engaging the park position ............ 159 Holding the vehicle stationary on
uphill gradients .............................. 163
Kickd
own ....................................... 163
Ma
nual shifting .............................. 166
Oil temperature (on-board com-
puter, Mercedes-AMG vehicles) ..... 231
Overview ........................................ 159
Problem (malfunction) ................... 169
Pulling away ................................... 152
Selector lever ................................ 161
Starting the engine ........................ 151
Steering wheel paddle shifters ...... 166
Transmission position display ........ 161
Transmission position display
(DIRECT SELECT lever) ................... 159
Transmission positions .................. 162
Automatic transmission emer-
gency mode ....................................... 169
B
Backup lamp
Display message ............................ 249
Bag hook ............................................ 286
BAS (Brake Assist System) ................. 66
Basic settings
see Settings
Battery (SmartKey)
Checking .......................................... 80
Important safety notes .................... 79
Replacing ......................................... 80
Battery (vehicle)
Charging ........................................ 329
Display message ............................ 252
Important safety notes .................. 327
Jump starting ................................. 331
Belt
see Seat belts
Blind Spot Assist
Activating/deactivating (on-
board computer) ............................ 228
Display message ............................ 254
Notes/function .............................. 213
Blower
see Climate control
Brake Assist
see BAS (Brake Assist System)
Index5
Page 19 of 390
Coolant (engine) ............................ 381
Engine oil .......................................379
Fuel ................................................ 377
Important safety notes .................. 377
Refrigerant (air-conditioning sys-
tem) ............................................... 382
Washer fluid ................................... 382
Setting a speed
see Cruise control
Setting the air distribution ...............140
Setting the airflow ............................ 140
Settings
Factory (on-board computer) ......... 231
On-board computer ....................... 229
SETUP (on-board computer) ............. 232
Side impact air bag .............................5 0
Side marker lamp (display mes-
sage) ................................................... 250
Side windows
Cleaning ......................................... 316
Convenience closing feature ............ 92
Convenience opening feature ..........9 1
Important safety information ........... 90
Opening/closing .............................. 91
Problem (malfunction) .....................9 4
Resettin g........................................ .93
Reversin gfeature ............................ .90
Sliding sunroof
see Panorama roof with power
tilt/sliding panel
SmartKey
Changing the battery ....................... 80
Changing the programming .............7 8
Checking the battery ...................... .80
Convenience closing feature ............ 92
Convenience opening feature .......... 91
Dis play message ............................ 265
Door c
entral locking/unlocking ...... .76
Important safety notes .................... 76
KEYLESS-GO start function .............. 78
Loss .................................................8 1
Mechanical key ................................ 79
Positions (ignition lock) ................. 149
Problem (malfunction) ..................... 81
Starting the engine ........................ 151
SmartKey positions (ignition lock) .. 149
Snow chains ...................................... 343 Sockets
Center console .............................. 291
General notes ................................ 291
Luggage compartment ...................2 92
Rear compartment ......................... 292
Special seat belt retractor .................. 59
Specialist workshop ............................ 25
Speed, controlling
see Cruise control
Speedometer
Activating/deactivating the addi-
tional speedometer ........................ 229
Digital ............................................ 223
In the Instrument cluster ................. 31
Segments ...................................... 218
Selecting the display unit ...............2 29
SPORT handling mode
Deactivating/activating
(Mercedes-AMG vehicles) ................ 70
Warning lamp ................................. 272
Standing lamps
Display message ............................ 249
Switching on/off ........................... 118
Start-off assist
Activating ....................................... 194
Important safety notes .................. 194
Start/Stop button
Removing ....................................... 150
Starting the engine ........................ 152
Start/stop function
see ECO start/stop function
Starting (engine) ................................ 151
STEER CONTROL .................................. 73
Steering
Display message ............................ 264
Steering assistant STEER CON-
TROL
see STEER CONTROL
Steering wheel
Adjusting (manually) ...................... 108
Button overvi ew ............................... 33
Bu
ttons (on-board computer) ......... 219
Cleaning ......................................... 319
Important safety notes .................. 108
Paddle shifters ............................... 166
Steering wheel paddle shifters ........ 166
Stopwatch (RACETIMER) ................... 232
Index17
Page 75 of 390
ADAPTIVE BRAKE
ADAPTIVEBRAKE enhance sbraking safet y
and offers increased braking comfort .In addi-
tion to th ebraking function ,ADAPTIV EBRAKE
also has th eHOLD function (
Ypage 193) and
hill start assist (
Ypage 153).
STEER CONTROL
Gene ral inform ation
STEERCONT ROLhelpsyou by transmitting a
noticeable steering force to th esteering
whee lin th edirection require dfor vehicl e
stabilization .
This steering assistanc eis provide din partic-
ular if:
Rbot hright wheels or bot hlef twheels are on
a wet or slippery road surfac ewhen you
brake.
Rth evehicl estart sto skid.
Import ant safety notes
iObserveth e"Importan tsafet ynotes" sec -
tion (
Ypage 65).
No steering assistanc eis provide dfrom
STEE RCONTROL, if:
RES P®is malfunctioning .
Rthelighting is faulty.
If ES P
®is malfunctioning ,you will be assisted
further by th eelectrical power steering .
Protectionagainst theft
Imm obilizer
The immobilize rprevents your vehicl efrom
bein gstarted without th ecorrec tSmartKey.
XTo act ivate wit hth eSmartKey :remove
th eSmartKey from th eignition lock.
XTo act ivate wit hKEYLESS-GO start-
fu nction or KEYLESS-GO: switch theigni-
tion off and open th edriver' sdoor .
XTo deacti vate:switch on th eignition .
When leaving th evehicle, always tak eth e
SmartKey wit hyou and loc kth evehicle. Any-
on ecan start th eengin eif avalid SmartKey
has been lef tinside th evehicle.
iThe immobilize ris always deactivated
when you start theengine.
In th eevent that th eengin ecanno tbe star-
te d(yet th evehicle's battery is charged),
th esystem is no toperational. Contac tan
authorize dMercedes-Benz Cente ror call
1-800-FOR-MERCedes (in th eUSA) or
1-800-387-0100 (in Canada).
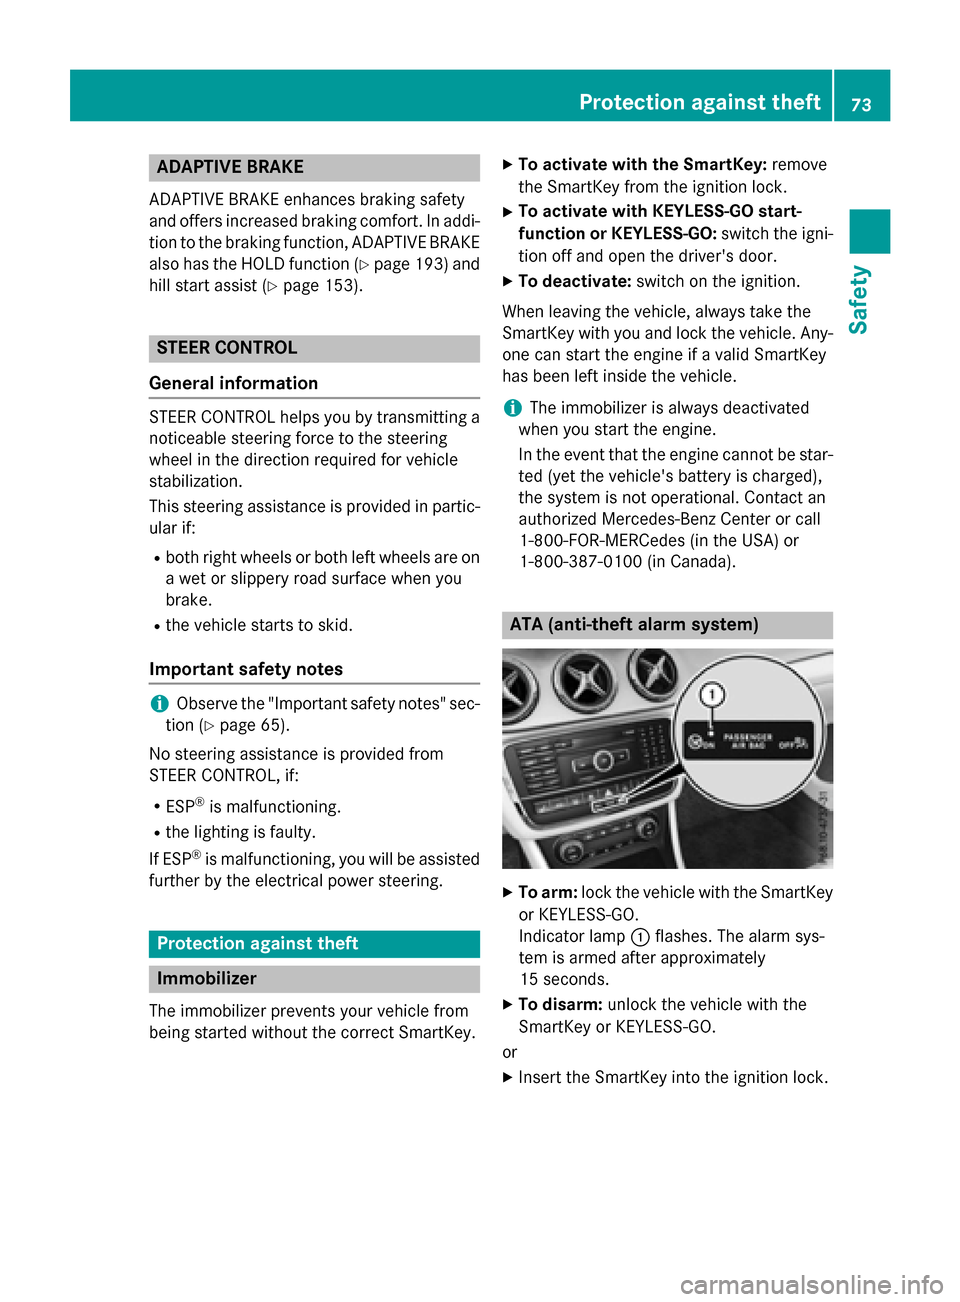
ATA (anti-theft ala rmsystem)
XTo arm: lockth evehicl ewit hth eSmartKey
or KE YLESS-GO .
Indicato rlamp :flashes .The alarm sys-
te m is armed after approximately
15 seconds.
XTo disarm: unlockth evehicl ewit hth e
SmartKey or KEYLESS-GO .
or
XInser tth eSmartKey int oth eignition lock.
Protection against theft73
Safety
Z
Page 80 of 390
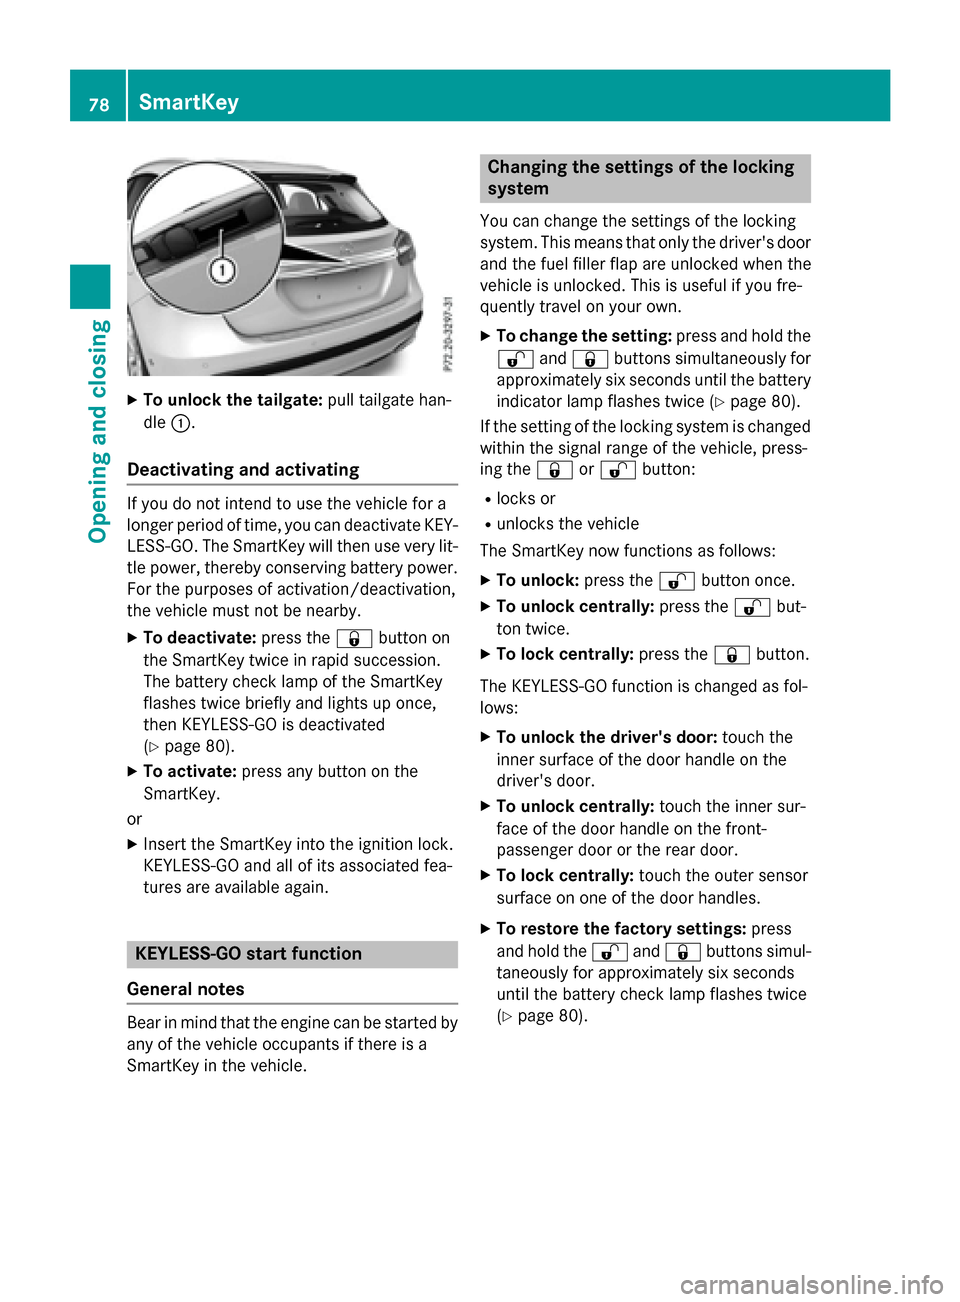
XTo unlock the tailgate:pull tailgate han-
dle :.
Deactivating and activating
If you do not intend to use the vehicle for a
longer period of time, you can deactivate KEY-
LESS-GO. The SmartKey will then use very lit-
tle power, thereby conserving battery power.
For the purposes of activation/deactivation,
the vehicle must not be nearby.
XTo deactivate: press the&button on
the SmartKey twice in rapid succession.
The battery check lamp of the SmartKey
flashes twice briefly and lights up once,
then KEYLESS-GO is deactivated
(
Ypage 80).
XTo activate: press any button on the
SmartKey.
or
XInsert the SmartKey into the ignition lock.
KEYLESS-GO and all of its associated fea-
tures are available again.
KEYLESS-GO start function
General notes
Bear in mind that the engine can be started by
any of the vehicle occupants if there is a
SmartKey in the vehicle.
Changing the settings of the locking
system
You can change the settings of the locking
system. This means that only the driver's door
and the fuel filler flap are unlocked when the
vehicle is unlocked. This is useful if you fre-
quently travel on your own.
XTo change the setting: press and hold the
% and& buttons simultaneously for
approximately six seconds until the battery
indicator lamp flashes twice (
Ypage 80).
If the setting of the locking system is changed
within the signal range of the vehicle, press-
ing the &or% button:
Rlocks or
Runlocks the vehicle
The SmartKey now functions as follows:
XTo unlock: press the%button once.
XTo unlock centrally: press the%but-
ton twice.
XTo lock centrally: press the&button.
The KEYLESS-GO function is changed as fol-
lows:
XTo unlock the driver's door: touch the
inner surface of the door handle on the
driver's door.
XTo unlock centrally: touch the inner sur-
face of the door handle on the front-
passenger door or the rear door.
XTo lock centrally: touch the outer sensor
surface on one of the door handles.
XTo restore the factory settings: press
and hold the %and& buttons simul-
taneously for app
roximately six seconds
until the battery check lamp flashes twice
(
Ypage 80).
78SmartKey
Opening and closing
Page 81 of 390
Mechanical key
General notes
If the vehicle can no longer be locked or
unlocked with the SmartKey or KEYLESS-GO,
use the mechanical key.
If you use the mechanical key to unlock and
open the driver's door or the trunk lid, the
anti-theft alarm system will be triggered
(
Ypage 73).
There are several ways to turn off the alarm:
XTo deactivate the alarm with the key:
press the %or& button on the key.
or
XInsert the SmartKey into the ignition lock.
or
XTo deactivate the alarm with KEYLESS-
GO: press the Start/Stop button in the igni-
tion lock. The SmartKey must be in the
vehicle.
or
XLock or unlock the vehicle using KEYLESS-
GO. The SmartKey must be outside the
vehicle.
If you unlock the vehicle using the mechanical
key, the fuel filler flap will not be unlocked
automatically.
XTo unlock the fuel filler flap: insert the
SmartKey into the ignition lock.
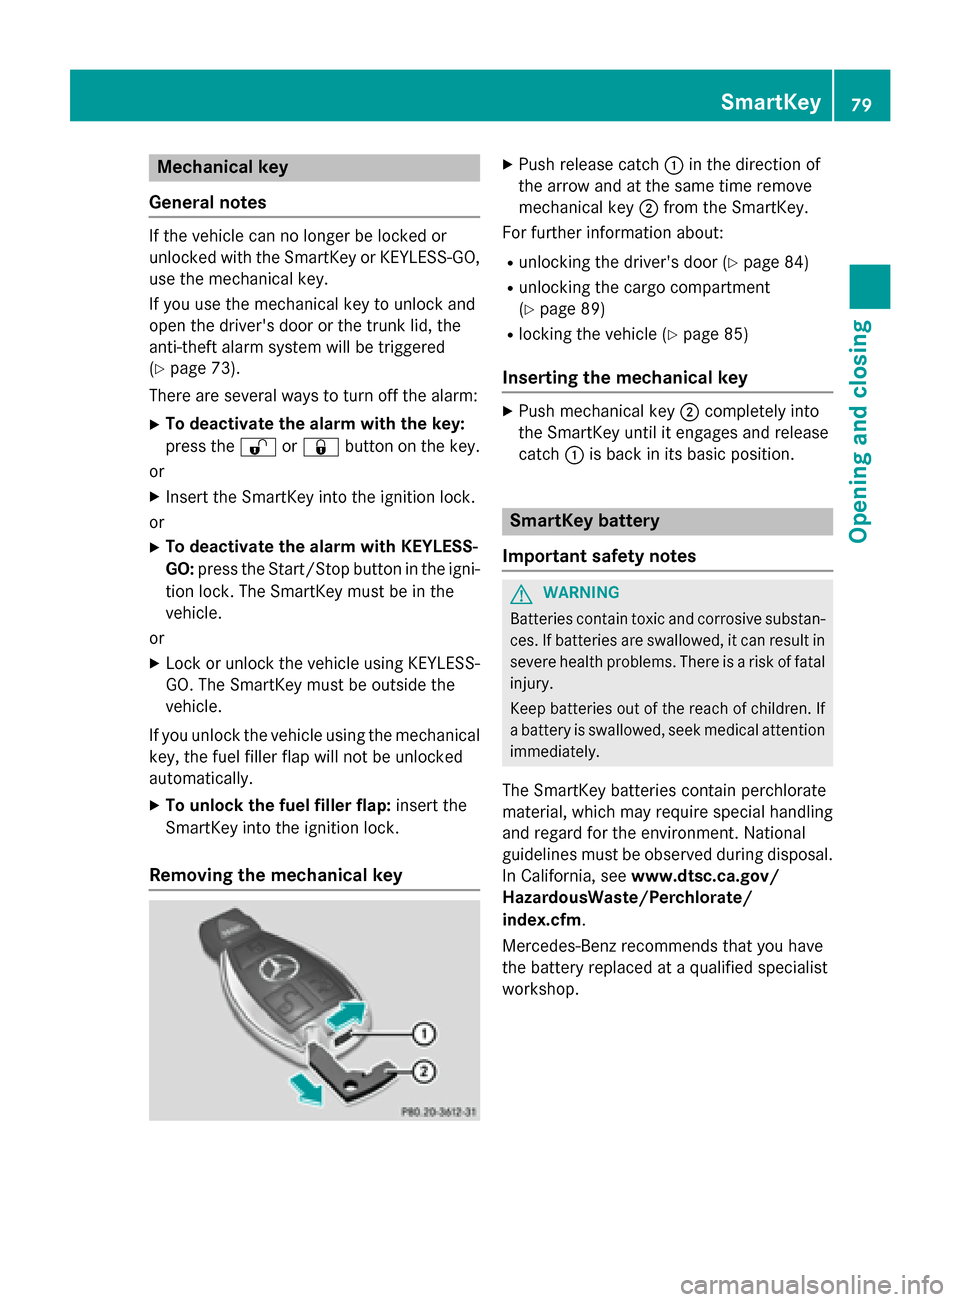
Removing the mechanical key
XPush release catch :in the direction of
the arrow and at the same time remove
mechanical key ;from the SmartKey.
For further information about:
Runlocking the driver's door (Ypage 84)
Runlocking the cargo compartment
(
Ypage 89)
Rlocking the vehicle (Ypage 85)
Inserting the mechanical key
XPush mechanical key ;completely into
the SmartKey until it engages and release
catch :is back in its basic position.
SmartKey battery
Important safety notes
GWARNING
Batteries contain toxic and corrosive substan- ces. If batteries are swallowed, it can result in
severe health problems. There is a risk of fatalinjury.
Keep batteries out of the reach of children. If
a battery is swallowed, seek medical attention immediately.
The SmartKey batteries contain perchlorate
material, which may require special handling
and regard for the environment. National
guidelines must be observed during disposal.
In California, see www.dtsc.ca.gov/
HazardousWaste/Perchlorate/
index.cfm.
Mercedes-Benz recommends that you have
the battery replaced at a qualified specialist
workshop.
SmartKey79
Opening and closing
Z
Page 82 of 390
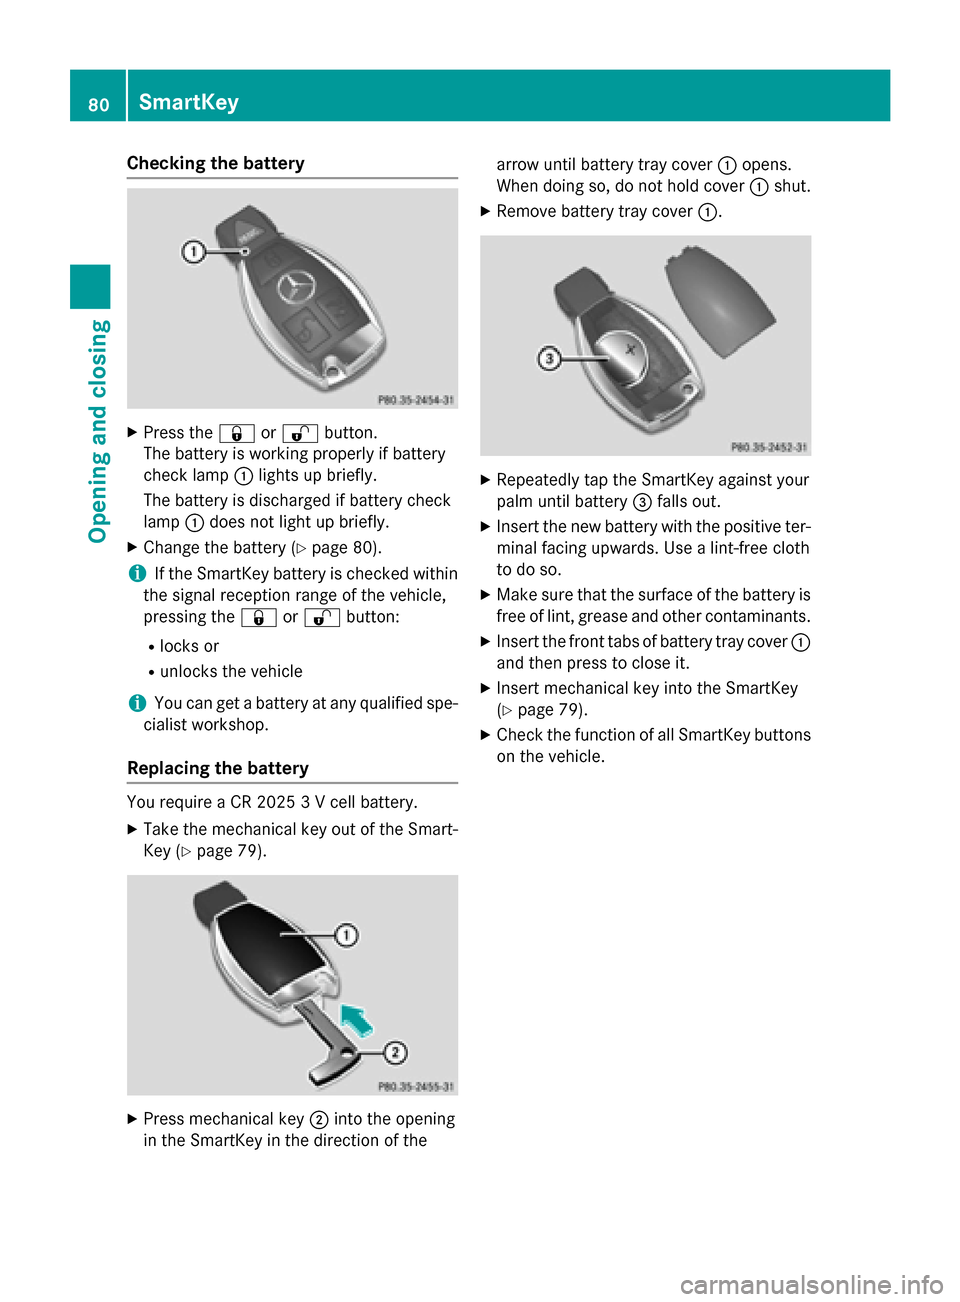
Checking the battery
XPress the&or% button.
The battery is working properly if battery
check lamp :lights up briefly.
The battery is discharged if battery check
lamp :does not light up briefly.
XChange the battery (Ypage 80).
iIf the SmartKey battery is checked within
the signal reception range of the vehicle,
pressing the &or% button:
Rlocks or
Runlocks the vehicle
iYou can get a battery at any qualified spe-
cialist workshop.
Replacing the battery
You require a CR 2025 3 V cell battery.
XTake the mechanical key out of the Smart-
Key (
Ypage 79).
XPress mechanical key ;into the opening
in the SmartKey in the direction of the arrow until battery tray cover
:opens.
When doing so, do not hold cover :shut.
XRemove battery tray cover :.
XRepeatedly tap the SmartKey against your
palm until battery=falls out.
XInsert the new battery with the positive ter-
minal facing upwards. Use a lint-free cloth
to do so.
XMake sure that the surface of the battery is
free of lint, grease and other contaminants.
XInsert the front tabs of battery tray cover :
and then press to close it.
XInsert mechanical key into the SmartKey
(
Ypage 79).
XCheck the function of all SmartKey buttons on the vehicle.
80SmartKey
Opening and closing
Page 83 of 390
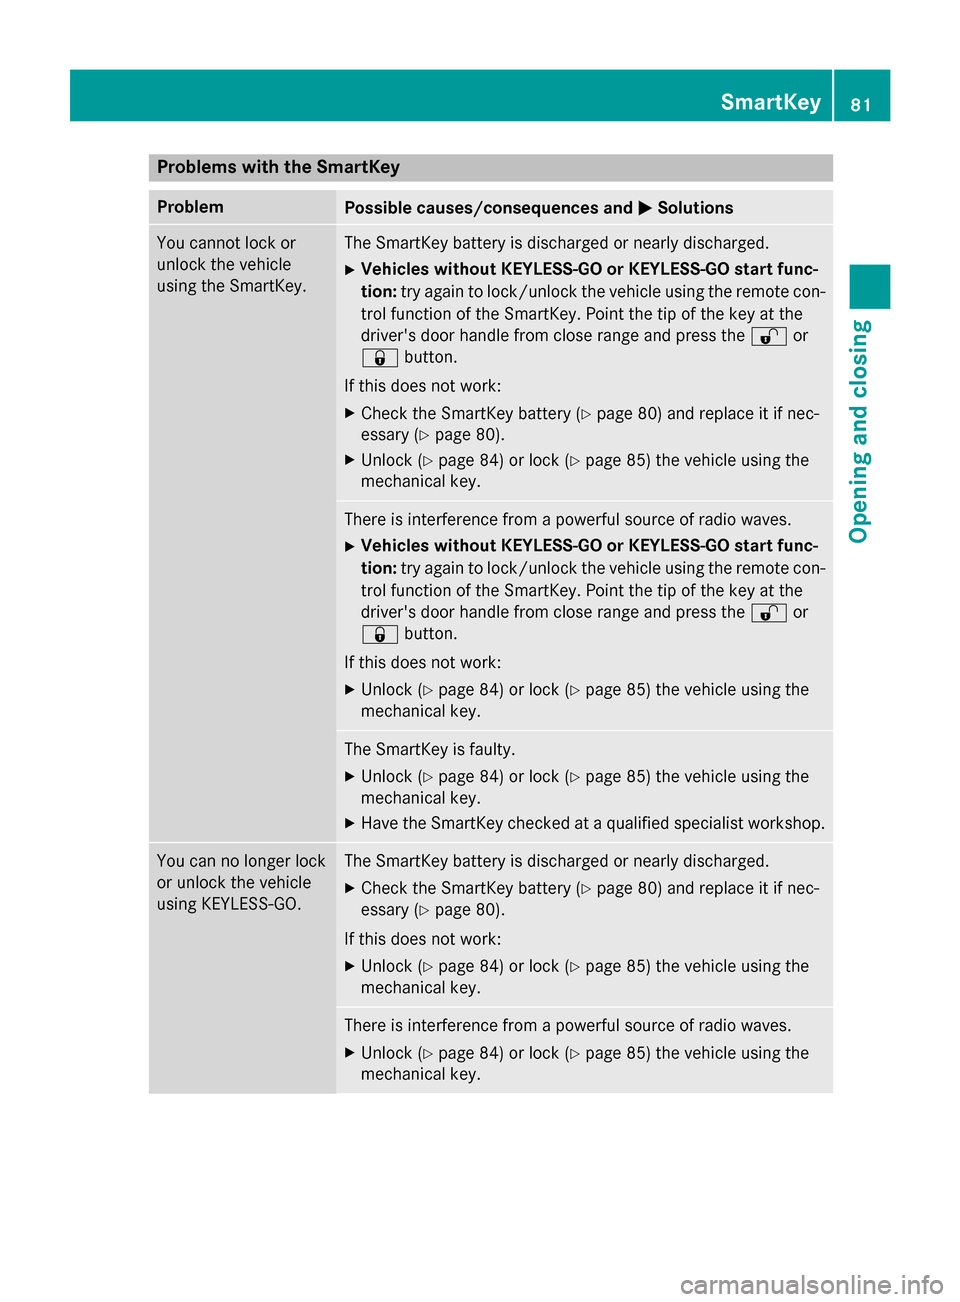
Problems with the SmartKey
ProblemPossible causes/consequences andMSolutions
You cannot lock or
unlock the vehicle
using the SmartKey.The SmartKey battery is discharged or nearly discharged.
XVehicles without KEYLESS-GO or KEYLESS-GO start func-
tion:try again to lock/unlock the vehicle using the remote con-
trol function of the SmartKey. Point the tip of the key at the
driver's door handle from close range and press the %or
& button.
If this does not work:
XCheck the SmartKey battery (Ypage 80) and replace it if nec-
essary (
Ypage 80).
XUnlock (Ypage 84) or lock (Ypage 85) the vehicle using the
mechanical key.
There is interference from a powerful source of radio waves.
XVehicles without KEYLESS-GO or KEYLESS-GO start func-
tion: try again to lock/unlock the vehicle using the remote con-
trol function of the SmartKey. Point the tip of the key at the
driver's door handle from close range and press the %or
& button.
If this does not work:
XUnlock (Ypage 84) or lock (Ypage 85) the vehicle using the
mechanical key.
The SmartKey is faulty.
XUnlock (Ypage 84) or lock (Ypage 85) the vehicle using the
mechanical key.
XHave the SmartKey checked at a qualified specialist workshop.
You can no longer lock
or unlock the vehicle
using KEYLESS-GO.The SmartKey battery is discharged or nearly discharged.
XCheck the SmartKey battery (Ypage 80) and replace it if nec-
essary (
Ypage 80).
If this does not work:
XUnlock (Ypage 84) or lock (Ypage 85) the vehicle using the
mechanical key.
There is interference from a powerful source of radio waves.
XUnlock (Ypage 84) or lock (Ypage 85) the vehicle using the
mechanical key.
SmartKey81
Opening and closing
Z
Page 84 of 390
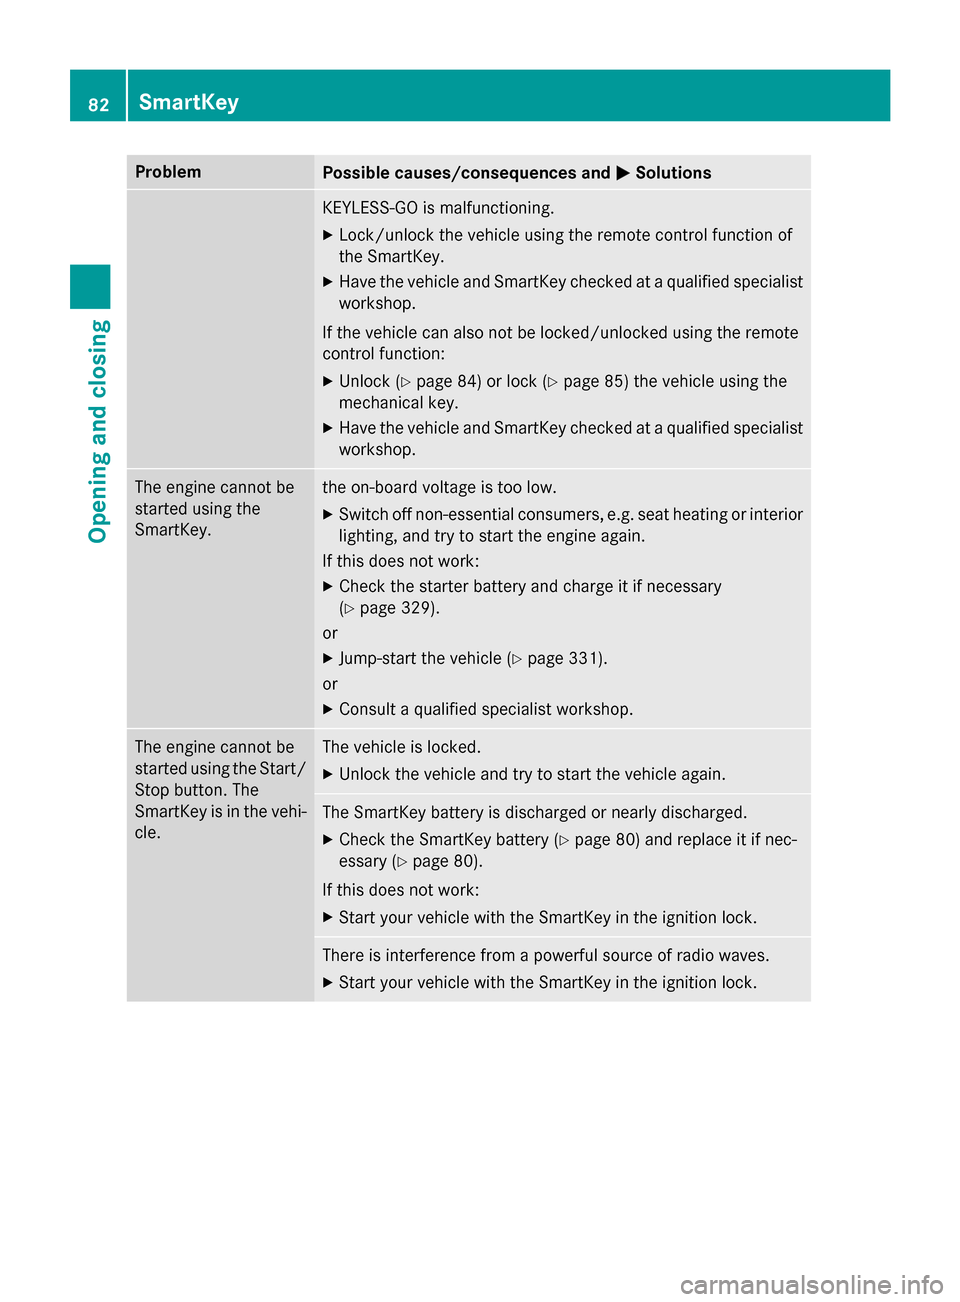
ProblemPossible causes/consequences andMSolutions
KEYLESS-GO is malfunctioning.
XLock/unlock the vehicle using the remote control function of
the SmartKey.
XHave the vehicle and SmartKey checked at a qualified specialist
workshop.
If the vehicle can also not be locked/unlocked using the remote
control function:
XUnlock (Ypage 84) or lock (Ypage 85) the vehicle using the
mechanical key.
XHave the vehicle and SmartKey checked at a qualified specialist
workshop.
The engine cannot be
started using the
SmartKey.the on-board voltage is too low.
XSwitch off non-essential consumers, e.g. seat heating or interior
lighting, and try to start the engine again.
If this does not work:
XCheck the starter battery and charge it if necessary
(
Ypage 329).
or
XJump-start the vehicle (Ypage 331).
or
XConsult a qualified specialist workshop.
The engine cannot be
started using the Start/
Stop button. The
SmartKey is in the vehi-
cle.The vehicle is locked.
XUnlock the vehicle and try to start the vehicle again.
The SmartKey battery is discharged or nearly discharged.
XCheck the SmartKey battery (Ypage 80) and replace it if nec-
essary (
Ypage 80).
If this does not work:
XStart your vehicle with the SmartKey in the ignition lock.
There is interference from a powerful source of radio waves.
XStart your vehicle with the SmartKey in the ignition lock.
82SmartKey
Opening and closing
Page 109 of 390
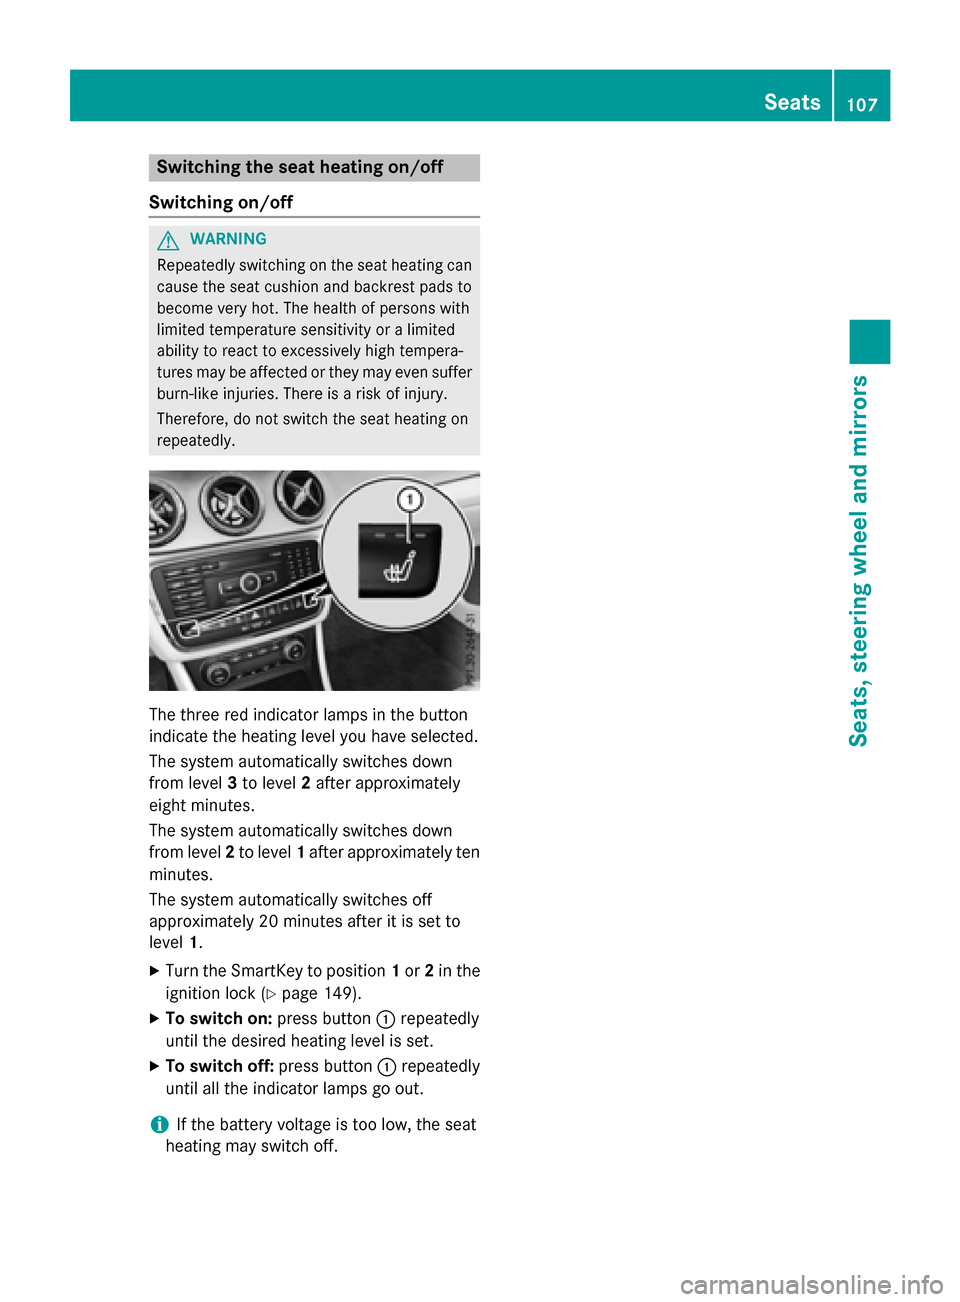
Switching the seat heating on/off
Switching on/off
GWARNING
Repeatedly switching on the seat heating can
cause the seat cushion and backrest pads to
become very hot. The health of persons with
limited temperature sensitivity or a limited
ability to react to excessively high tempera-
tures may be affected or they may even suffer
burn-like injuries. There is a risk of injury.
Therefore, do not switch the seat heating on
repeatedly.
The three red indicator lamps in the button
indicate the heating level you have selected.
The system automatically switches down
from level 3to level 2after approximately
eight minutes.
The system automatically switches down
from level 2to level 1after approximately ten
minutes.
The system automatically switches off
approximately 20 minutes after it is set to
level 1.
XTurn the SmartKey to position 1or 2in the
ignition lock (
Ypage 149).
XTo switch on: press button:repeatedly
until the desired heating level is set.
XTo switch off: press button:repeatedly
until all the indicator lamps go out.
iIf the battery voltage is too low, the seat
heating may switch off.
Seats107
Seats, steering wheel and mirrors
Z
Page 110 of 390
Problems with the seat heating
ProblemPossible causes/consequences andMSolutions
The seat heating has
switched off prema-
turely or cannot be
switched on.The on-board voltage is too low because too many electrical con-
sumers are switched on.
XSwitch off electrical consumers that you do not need, such as
the rear window defroster or interior lighting.
Once the battery is sufficiently charged, the seat heating will
switch back on automatically.
Steering wheel
Important safety notes
GWARNING
You could lose control of your vehicle if you do the following while driving:
Radjust the driver's seat, head restraint,
steering wheel or mirrors
Rfasten the seat belt
There is a risk of an accident.
Adjust the driver's seat, head restraint, steer-
ing wheel and mirror and fasten your seat belt before starting the engine.
GWARNING
Children could injure themselves if they
adjust the steering wheel. There is a risk of
injury.
When leaving the vehicle, always take the
SmartKey with you and lock the vehicle. Never
leave children unsupervised in the vehicle.
Adjusting the steering wheel
GWARNING
If the steering wheel is unlocked while the
vehicle is in motion, it could change position
unexpectedly. This could cause you to lose
control of the vehicle. There is a risk of an
accident.
Before starting off, make sure the steering
wheel is locked. Never unlock the steering
wheel while the vehicle is in motion.
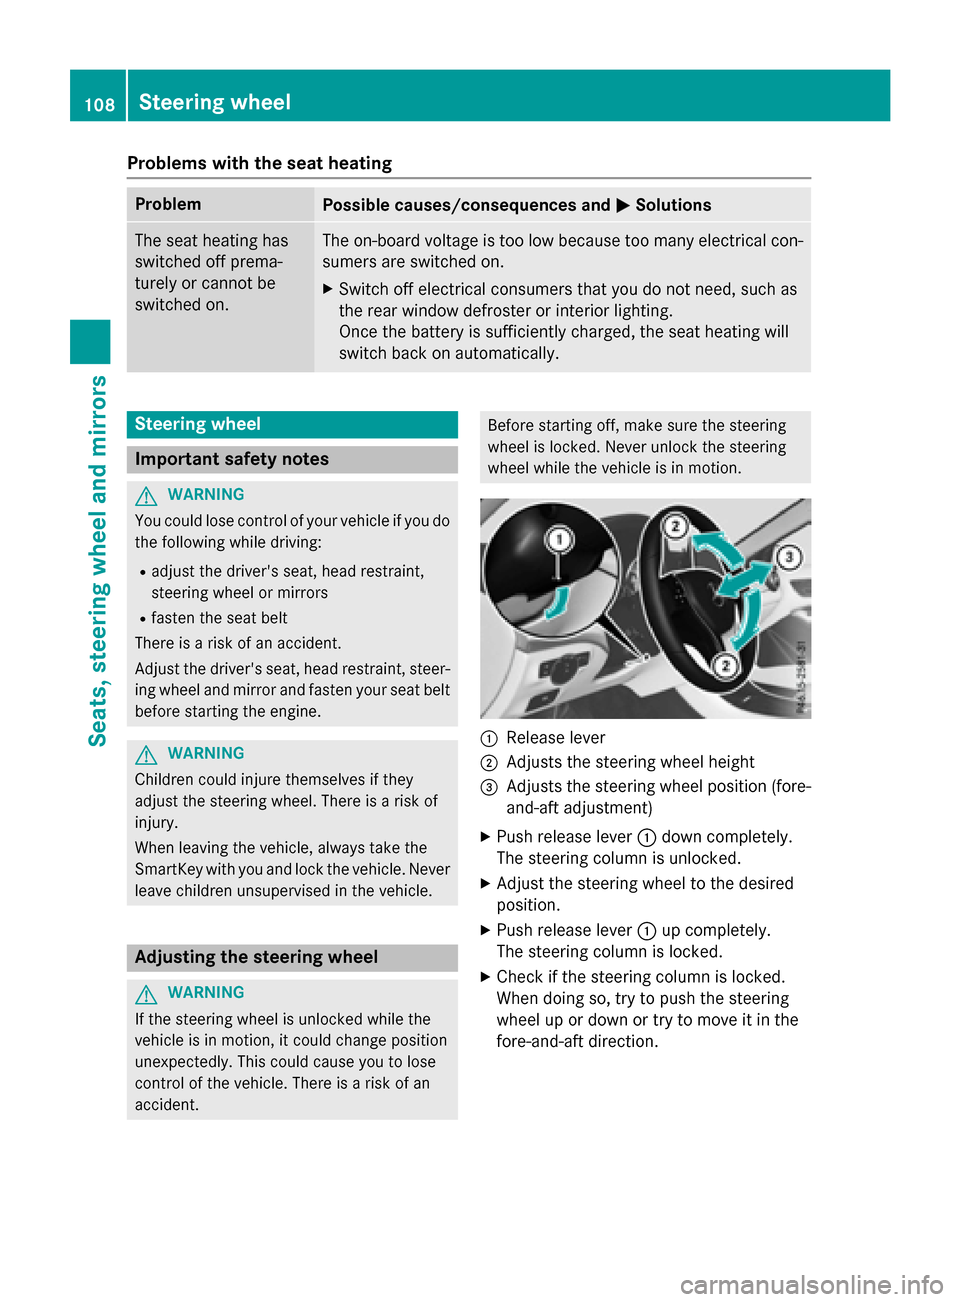
:Release lever
;Adjusts the steering wheel height
=Adjusts the steering wheel position (fore-
and-aft adjustment)
XPush release lever :down completely.
The steering column is unlocked.
XAdjust the steering wheel to the desired
position.
XPush release lever :up completely.
The steering column is locked.
XCheck if the steering column is locked.
When doing so, try to push the steering
wheel up or down or try to move it in the
fore-and-aft direction.
108Steering wheel
Seats, steering wheel and mirrors