brake fluid MERCEDES-BENZ GLA SUV 2013 Owners Manual
[x] Cancel search | Manufacturer: MERCEDES-BENZ, Model Year: 2013, Model line: GLA SUV, Model: MERCEDES-BENZ GLA SUV 2013Pages: 401, PDF Size: 11.9 MB
Page 9 of 401
BAS (Brake Assist System)
................. 73
Battery (key)
Checking .......................................... 88
Important safety notes .................... 88
Replacing ......................................... 89
Battery (vehicle)
Charging ........................................ 340
Display message ............................ 273
Important safety notes .................. 338
Jump starting ................................. 342
Belt
see Seat belts
Belt tensioner
Activation ......................................... 57
Blind Spot Assist
Activating/deactivating ................. 245
Display message ............................ 276
Notes/function .............................. 222
Trailer towing ................................. 224
Bonnet
Active bonnet (pedestrian protec-tion) ............................................... 316
Closing ........................................... 318
Display message ............................ 285
Important safety notes .................. 316
Opening ......................................... 317
Boot
see Tailgate
Boot load (maximum) ........................ 391
Brake Assist
see BAS (Brake Assist System)
Brake fluid
Display message ............................ 261
Notes ............................................. 390
Brake lamps
Adaptive ........................................... 76
Changing bulb s.............................. 131
Display message ............................ 269
Brakes
ABS .................................................. 72
Adaptive Brake Assist ...................... 74
BAS .................................................. 73
Brake fluid (notes) ......................... 390
Display message ............................ 255
Driving tips .................................... 183
HOLD function ............................... 201
Important safety notes .................. 183
Parking brake ................................ 180 Warning lamp ................................. 289
Breakdown
see Flat tyre
see Towing away/tow-starting
Bulbs
see Replacing bulbs C
Calling up a fault see Display messages
Capacities (technical data) ............... 384
Car
see Vehicle
Car wash (care) ................................. 323
Care
Automatic car wash ....................... 323
Carpets .......................................... 329
Display ........................................... 328
Exhaust pipe .................................. 327
Exterior lighting ............................. 326
Gear or selector lever .................... 328
High-pressure cleaner .................... 324
Interior ........................................... 328
Matt paintwork .............................. 325
Notes ............................................. 323
Paint .............................................. 325
Plastic trim .................................... 328
Reversing camera .......................... 327
Roof lining ...................................... 329
Seat belt ........................................ 329
Seat cove r..................................... 328
Sensors ......................................... 326
Steering wheel ............................... 328
Trim pieces .................................... 328
Washing by hand ........................... 324
Wheels ........................................... 324
Windows ........................................ 325
Wiper blades .................................. 326
Wooden trim .................................. 328
Central locking
Automatic locking (on-board com-
puter) ............................................. 249
Locking/unlocking (key) .................. 87
Centre console
Lower section .................................. 37
Upper section .................................. 36 6
Index
Page 20 of 401
Roller sunblind
Opening/closing ............................ 104
Panorama sliding sunroof .............. 103
Roof carrier ........................................ 307
Roof lining and carpets (cleaning
instructions) ...................................... 329
Roof load (maximum) ........................ 391
Route (navigation)
see Route guidance (navigation)
Route guidance (navigation) ............ 239S
Safety Automatic front-passenger front
airbag deactivation system .............. 51
Child restraint systems .................... 60
Children in the vehicle ..................... 59
Safety system
see Driving safety systems
Seat
Adjusting (Performance Seat) ........ 113
Seat belt
Correct usage .................................. 46
Switching belt adjustment on/off
(on-board computer) ...................... 250
Seat belts
Adjusting the driver's and front-
passenger seat bel t......................... 47
Adjusting the height ......................... 46
Cleaning ......................................... 329
Display message ............................ 263
Fastening ......................................... 46
Important safety guidelines ............. 44
Introduction ..................................... 44
Rear seat belt status indicator ......... 48
Releasing ......................................... 47
Warning lamp ................................. 288
Warning lamp (function) ................... 47
Seats
Adjusting (electrically) ................... 110
Adjusting (manually) ...................... 110
Adjusting the 4-way lumbar sup-
port ................................................ 112
Adjusting the head restraint .......... 111
Cleaning the cover ......................... 328
Correct driver's seat position ........ 108
Important safety notes .................. 109 Seat heating problem .................... 114
Storing settings (memory func-
tion) ............................................... 117
Switching seat heating on/of
f....... 113
Sensors (cleaning instructions) ....... 326
Service
see ASSYST PLUS
Service Centre
see Qualified specialist workshop
Service menu (on-board com-
puter) .................................................. 245
Service products
Brake fluid ..................................... 390
Coolant (engine) ............................ 390
Engine oil ....................................... 388
Fuel ................................................ 385
Important safety notes .................. 384
Washer fluid ................................... 391
Setting the air distribution ............... 145
Setting the airflow ............................ 145
Settings
Factory (on-board computer) ......... 251
On-board compute r....................... 245
SETUP (on-board computer) ............. 251
Shifting to neutral (manual trans-
mission) ............................................. 167
Side lamps
Switching on/of f........................... 122
Side windows
Convenience closing ........................ 99
Convenience opening ...................... 99
Important safety notes .................... 98
Opening/closing .............................. 98
Problem (malfunction) ................... 101
Resetting ....................................... 100
Sidebag ................................................ 50
Sliding sunroof
see Panorama sliding sunroof
Snow chains ...................................... 355
Socket
Luggage compartment ................... 312
Points to observe before use ......... 311
Sockets
Centre console .............................. 311
Rear compartment ......................... 311
Specialist workshop ............................ 25
Spectacles compartment ................. 301 Index
17
Page 29 of 401
Implied warranty
! Follow the instructions in this manual
about the proper operation of your vehicle
as well as about possible vehicle damage.
Damage to your vehicle that arises from
culpable contraventions against these
instructions are not covered either by
Mercedes-Benz implied warranty or by the
New or Used-Vehicle Warranty. Data stored in the vehicle
A wide range of electronic components in
your vehicle contain data memories.
These data memories temporarily or perma-
nently store technical information about:
R the vehicle's operating state
R events
R faults
In general, this technical information docu-
ments the state of a component, a module, a
system or the surroundings.
These include, for example:
R operating conditions of system compo-
nents, e.g. fluid levels
R the vehicle's status messages and those of
its individual components, e.g. number of
wheel revolutions/speed, deceleration in
movement, lateral acceleration, accelera-
tor pedal position
R malfunctions and defects in important sys-
tem components, e.g. lights, brakes
R vehicle reactions and operating conditions
in special driving situations, e.g. airbag
deployment, intervention of stability con-
trol systems
R ambient conditions, e.g. outside tempera-
ture This data is of an exclusively technical nature
and can be used to:
R assist in recognising and rectifying faults
and defects
R analyse vehicle functions, e.g. after an acci-
dent
R optimise vehicle functions
The data cannot be used to trace the vehicle's movements.
When your vehicle is serviced, technical infor-
mation can be read from the event data mem- ory and fault data memory.
Services include, for example:
R repair services
R service processes
R warranty events
R quality assurance
It is read by employees of the service network (including manufacturers) using special diag-
nostic testers. More detailed information is
obtained from it, if required.
After a fault has been rectified, the informa-
tion is deleted from the fault memory or is
continually overwritten.
When operating the vehicle, situations are
conceivable in which this technical data, in
connection with other information (if neces-
sary, under consultation with an authorised
expert), could be traced to a person.
Examples include:
R accident reports
R damage to the vehicle
R witness statements
Further additional functions that have been
contractually agreed upon with the customer
allow certain vehicle data to be conveyed by
the vehicle as well. The additional functions
include, for example, vehicle location in case of an emergency. 26
Introduction
Page 135 of 401

X
Remove screws =using a screwdriver.
X Remove the bulb holder from the lamp clus-
ter. Bulb holder
?
Turn signals
A Brake lamp
X Turn signal lamp: lightly press the bulb
into the bulb holder, turn it anti-clockwise
and remove it from the bulb holder.
X Insert the new bulb into the bulb holder and
turn it clockwise.
X Brake lamp: remove the corresponding
bulb from the bulb holder.
X Insert the new bulb into the bulb holder.
X Insert the bulb holder into the lamp cluster
and screw it firmly into place using screws =.
X Insert the lamp cluster into the vehicle.
X Tighten wing nut ;and re-establish con-
tact with connector :.
X Close the side trim panel (Y page 131).
Reversing lamp and rear foglamp
Due to their location, have the bulbs in the
reversing lamp and rear foglamp in the tail-
gate (vehicles with halogen headlamps)
changed at a qualified specialist workshop. Windscreen wipers
Switching the windscreen wipers on/
off
! Do not operate the windscreen wipers
when the windscreen is dry, as this could
damage the wiper blades. Moreover, dust
that has collected on the windscreen can
scratch the glass if wiping takes place when the windscreen is dry.
If it is necessary to switch on the wind-
screen wipers in dry weather conditions,
always operate them using washer fluid.
! If the windscreen wipers leave smears on
the windscreen after the vehicle has been
washed in an automatic car wash, this may
be due to wax or other residue. Clean the
windscreen with washer fluid after an auto- matic car wash. Combination switch
1 $ Windscreen wipers off
2 Ä Intermittent wipe, low (rain sensor
set to low sensitivity)
3 Å Intermittent wipe, high (rain sensor
set to high sensitivity)
4 ° Continuous wipe, slow
5 ¯ Continuous wipe, fast
B í Single wipe/ îto wipe the wind-
screen using washer fluid
X Turn the key to position 1or 2in the ignition
lock (Y page 159).
X Turn the combination switch to the corre-
sponding position. 132
Windscreen wipersLights and windscreen wipers
Page 163 of 401
Carry out regular checks to make sure that
there are no flammable foreign materials in
the engine compartment or in the exhaust
system.
! Do not depress the accelerator when
starting the engine.
i Vehicles with a petrol engine:
the
engine runs at a higher engine speed during the cold start procedure so that the cata-
lytic converter can reach operating tem-
perature more quickly. The sound of the
engine may change as a result.
Manual transmission X
Depress the brake pedal and keep it
depressed.
X Depress the clutch pedal fully.
X Shift to neutral N.
i You can only start the engine when the
clutch pedal is fully depressed.
Automatic transmission X
Shift the transmission to position P.
Transmission position display Pis shown in
the multifunction display.
i When the transmission is in position
N,
you can also start the engine with the brake pedal depressed.
Starting procedure X
To start a petrol engine: turn the key to
position 3in the ignition lock (Y page 159)
and release it as soon as the engine is run-
ning.
X To start a diesel engine: turn the key to
position 2(Y page 159) in the ignition lock.
The % preglow indicator lamp in the
instrument cluster lights up.
X When the %preglow indicator lamp
goes out, turn the key to position
3 (Y page 159) and release it as soon as the
engine is running. i
You can start the engine without preglow
if the engine is warm. Pulling away
Manual transmission !
Change gear in good time and avoid spin-
ning the wheels. Otherwise, you could dam- age the vehicle.
X Depress the brake pedal and keep it
depressed.
X Depress the clutch pedal fully.
X Shift to either first gear or reverse gear R.
X Release the electric parking brake
(Y page 180).
X Release the brake pedal.
X Slowly release the clutch pedal and gently
depress the accelerator pedal.
i Follow the shift recommendations in the
multifunction display for an economical
driving style (Y page 167).
i The vehicle locks centrally once you have
pulled away. The locking knobs in the doors
drop down.
You can open the doors from the inside at
any time.
You can also deactivate the automatic lock- ing feature (Y page 249).
Automatic transmission i
It is only possible to shift the transmission
from position Pto the desired position if
you depress the brake pedal. Only then can
the parking lock be deactivated. If you do
not depress the brake pedal, the DIRECT
SELECT lever can still be moved but the
parking lock remains engaged.
i At transmission fluid temperatures below
Ò20 †, you can only shift out of position P
into another transmission position when
the engine is running. 160
DrivingDriving and parking
Page 171 of 401
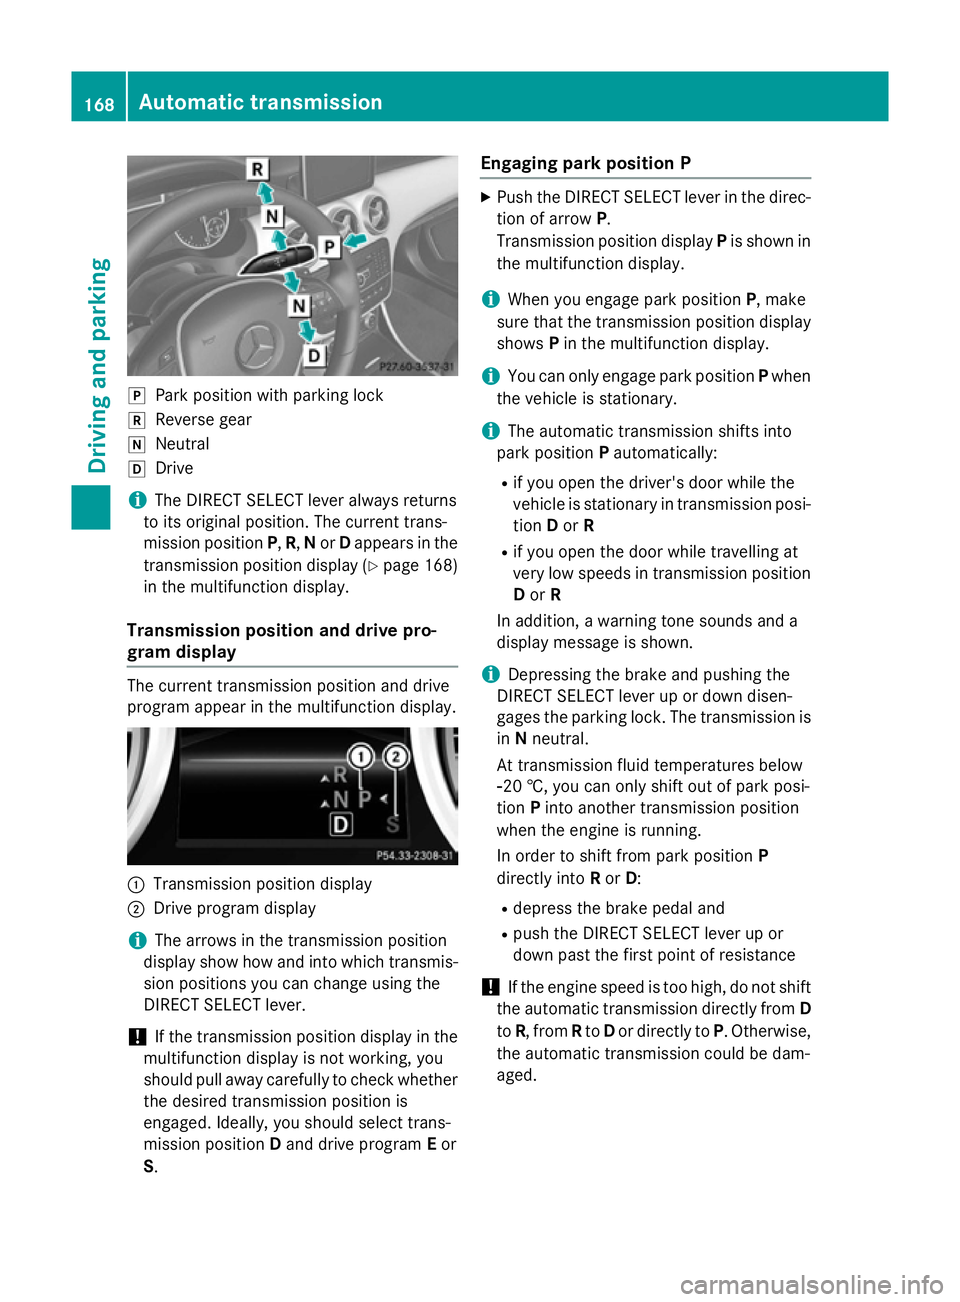
j
Park position with parking lock
k Reverse gear
i Neutral
h Drive
i The DIRECT SELECT lever always returns
to its original position. The current trans-
mission position P,R, Nor Dappears in the
transmission position display (Y page 168)
in the multifunction display.
Transmission position and drive pro-
gram display The current transmission position and drive
program appear in the multifunction display.
:
Transmission position display
; Drive program display
i The arrows in the transmission position
display show how and into which transmis-
sion positions you can change using the
DIRECT SELECT lever.
! If the transmission position display in the
multifunction display is not working, you
should pull away carefully to check whether the desired transmission position is
engaged. Ideally, you should select trans-
mission position Dand drive program Eor
S. Engaging park position P X
Push the DIRECT SELECT lever in the direc-
tion of arrow P.
Transmission position display Pis shown in
the multifunction display.
i When you engage park position
P, make
sure that the transmission position display shows Pin the multifunction display.
i You can only engage park position
Pwhen
the vehicle is stationary.
i The automatic transmission shifts into
park position Pautomatically:
R if you open the driver's door while the
vehicle is stationary in transmission posi-
tion Dor R
R if you open the door while travelling at
very low speeds in transmission position
D or R
In addition, a warning tone sounds and a
display message is shown.
i Depressing the brake and pushing the
DIRECT SELECT lever up or down disen-
gages the parking lock. The transmission is
in Nneutral.
At transmission fluid temperatures below
Ò20 †, you can only shift out of park posi-
tion Pinto another transmission position
when the engine is running.
In order to shift from park position P
directly into Ror D:
R depress the brake pedal and
R push the DIRECT SELECT lever up or
down past the first point of resistance
! If the engine speed is too high, do not shift
the automatic transmission directly from D
to R, from Rto Dor directly to P. Otherwise,
the automatic transmission could be dam-
aged. 168
Automatic transmissionDriving and parking
Page 264 of 401
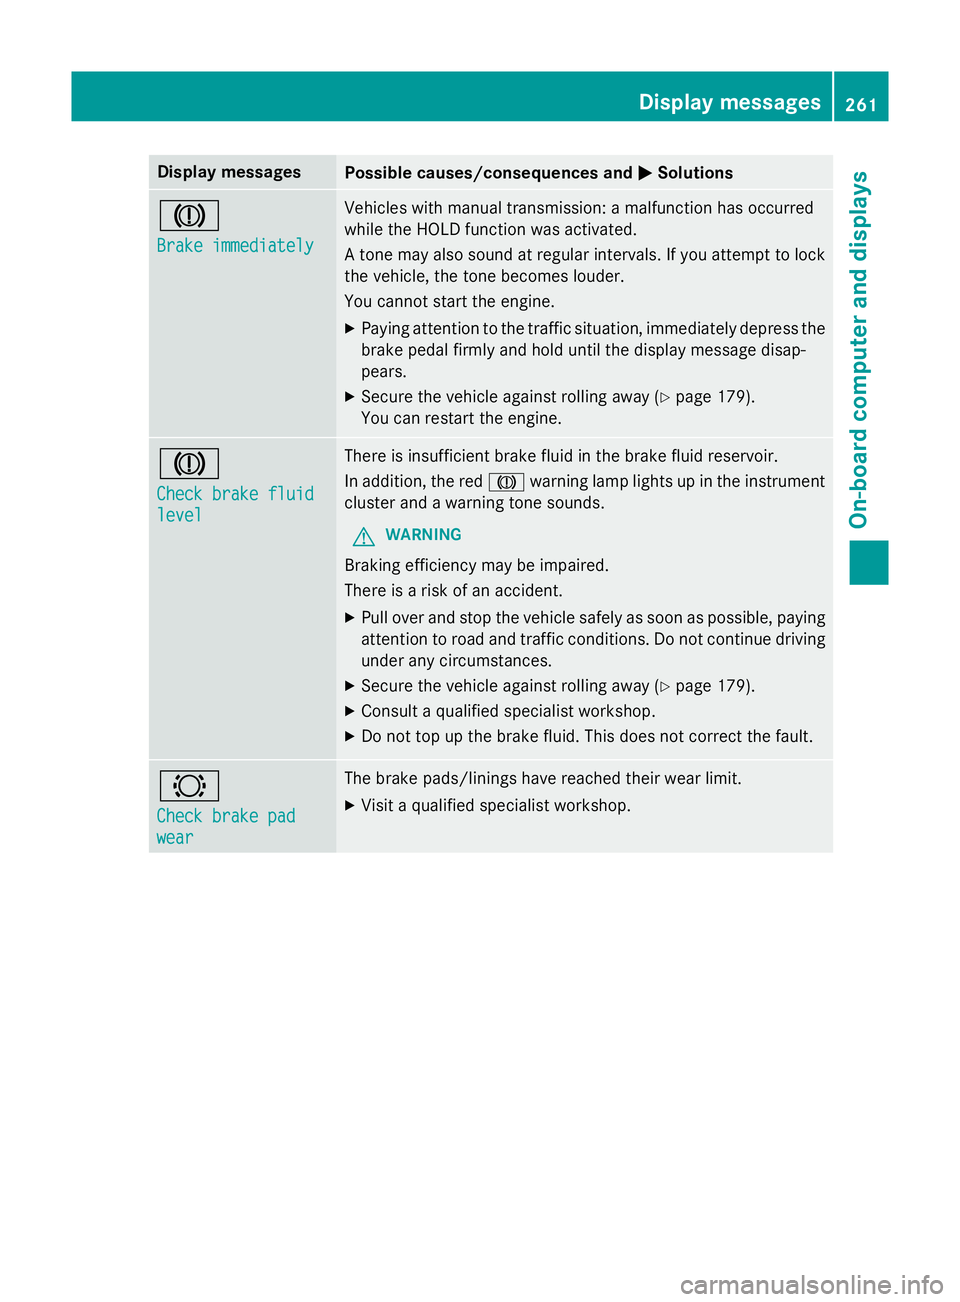
Display messages
Possible causes/consequences and
M
MSolutions J
Brake immediately Brake immediately Vehicles with manual transmission: a malfunction has occurred
while the HOLD function was activated.
A tone may also sound at regular intervals. If you attempt to lock the vehicle, the tone becomes louder.
You cannot start the engine.
X Paying attention to the traffic situation, immediately depress the
brake pedal firmly and hold until the display message disap-
pears.
X Secure the vehicle against rolling away (Y page 179).
You can restart the engine. J
Check brake fluid Check brake fluid
level level There is insufficient brake fluid in the brake fluid reservoir.
In addition, the red Jwarning lamp lights up in the instrument
cluster and a warning tone sounds.
G WARNING
Braking efficiency may be impaired.
There is a risk of an accident. X Pull over and stop the vehicle safely as soon as possible, paying
attention to road and traffic conditions. Do not continue driving
under any circumstances.
X Secure the vehicle against rolling away (Y page 179).
X Consult a qualified specialist workshop.
X Do not top up the brake fluid. This does not correct the fault. #
Check brake pad Check brake pad
wear wear The brake pads/linings have reached their wear limit.
X Visit a qualified specialist workshop. Display
messages
261On-board computer and displays Z
Page 286 of 401
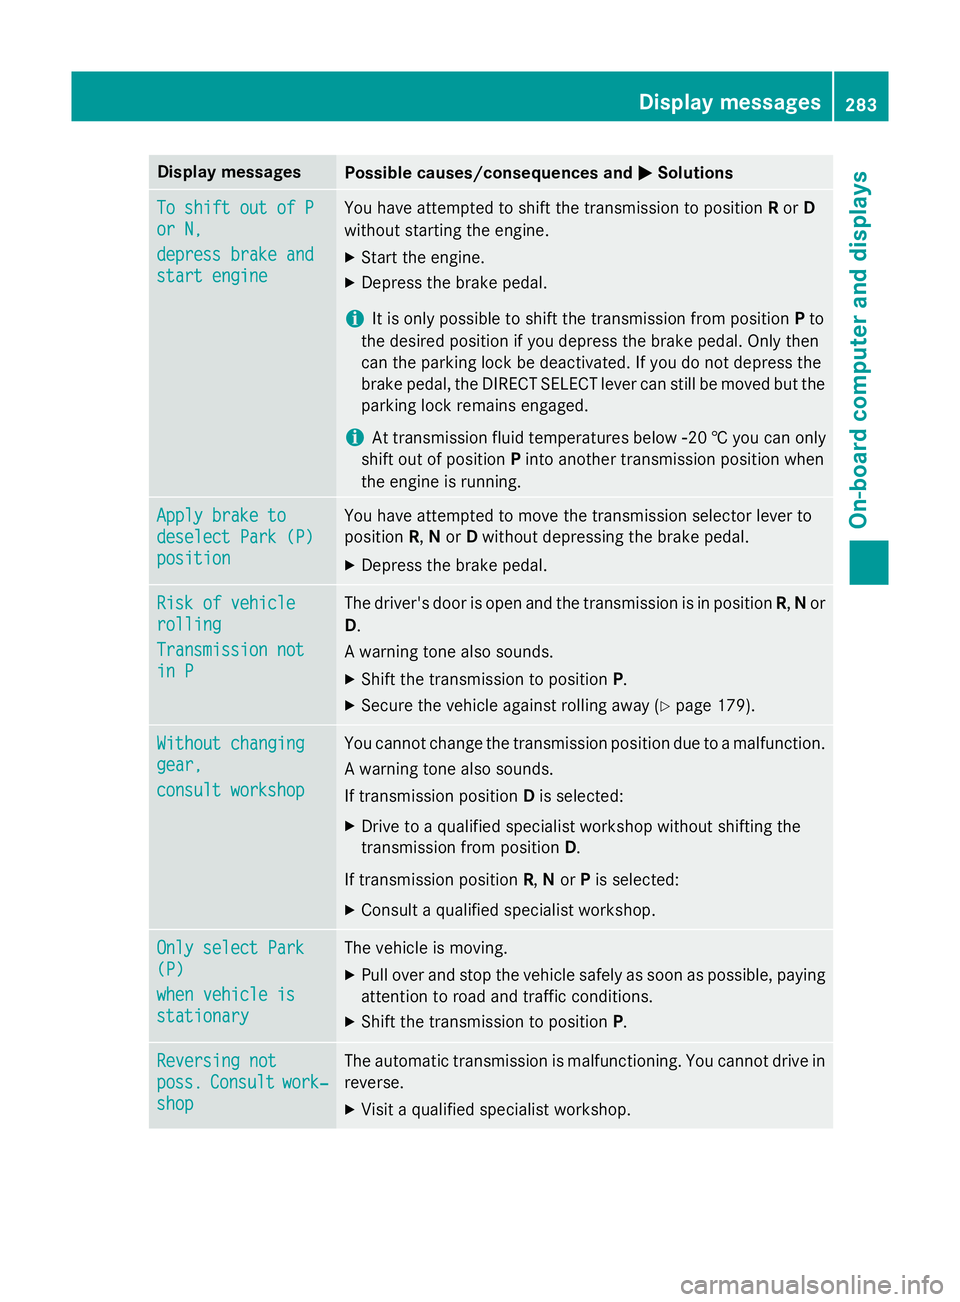
Display messages
Possible causes/consequences and
M
MSolutions To shift out of P
To shift out of P
or N, or N,
depress brake and depress brake and
start engine start engine You have attempted to shift the transmission to position
Ror D
without starting the engine.
X Start the engine.
X Depress the brake pedal.
i It is only possible to shift the transmission from position
Pto
the desired position if you depress the brake pedal. Only then
can the parking lock be deactivated. If you do not depress the
brake pedal, the DIRECT SELECT lever can still be moved but the parking lock remains engaged.
i At transmission fluid temperatures below
Ò20 † you can only
shift out of position Pinto another transmission position when
the engine is running. Apply brake to Apply brake to
deselect Park (P) deselect Park (P)
position position You have attempted to move the transmission selector lever to
position
R,Nor Dwithout depressing the brake pedal.
X Depress the brake pedal. Risk of vehicle Risk of vehicle
rolling rolling
Transmission not Transmission not
in P in P The driver's door is open and the transmission is in position
R,Nor
D.
A warning tone also sounds. X Shift the transmission to position P.
X Secure the vehicle against rolling away (Y page 179).Without changing
Without changing
gear, gear,
consult workshop consult workshop You cannot change the transmission position due to a malfunction.
A warning tone also sounds.
If transmission position Dis selected:
X Drive to a qualified specialist workshop without shifting the
transmission from position D.
If transmission position R,Nor Pis selected:
X Consult a qualified specialist workshop. Only select Park Only select Park
(P) (P)
when vehicle is when vehicle is
stationary stationary The vehicle is moving.
X
Pull over and stop the vehicle safely as soon as possible, paying
attention to road and traffic conditions.
X Shift the transmission to position P.Reversing not Reversing not
poss. poss.
Consult
Consult work‐
work‐
shop
shop The automatic transmission is malfunctioning. You cannot drive in
reverse.
X Visit a qualified specialist workshop. Display
messages
283On-board computer and displays Z
Page 292 of 401
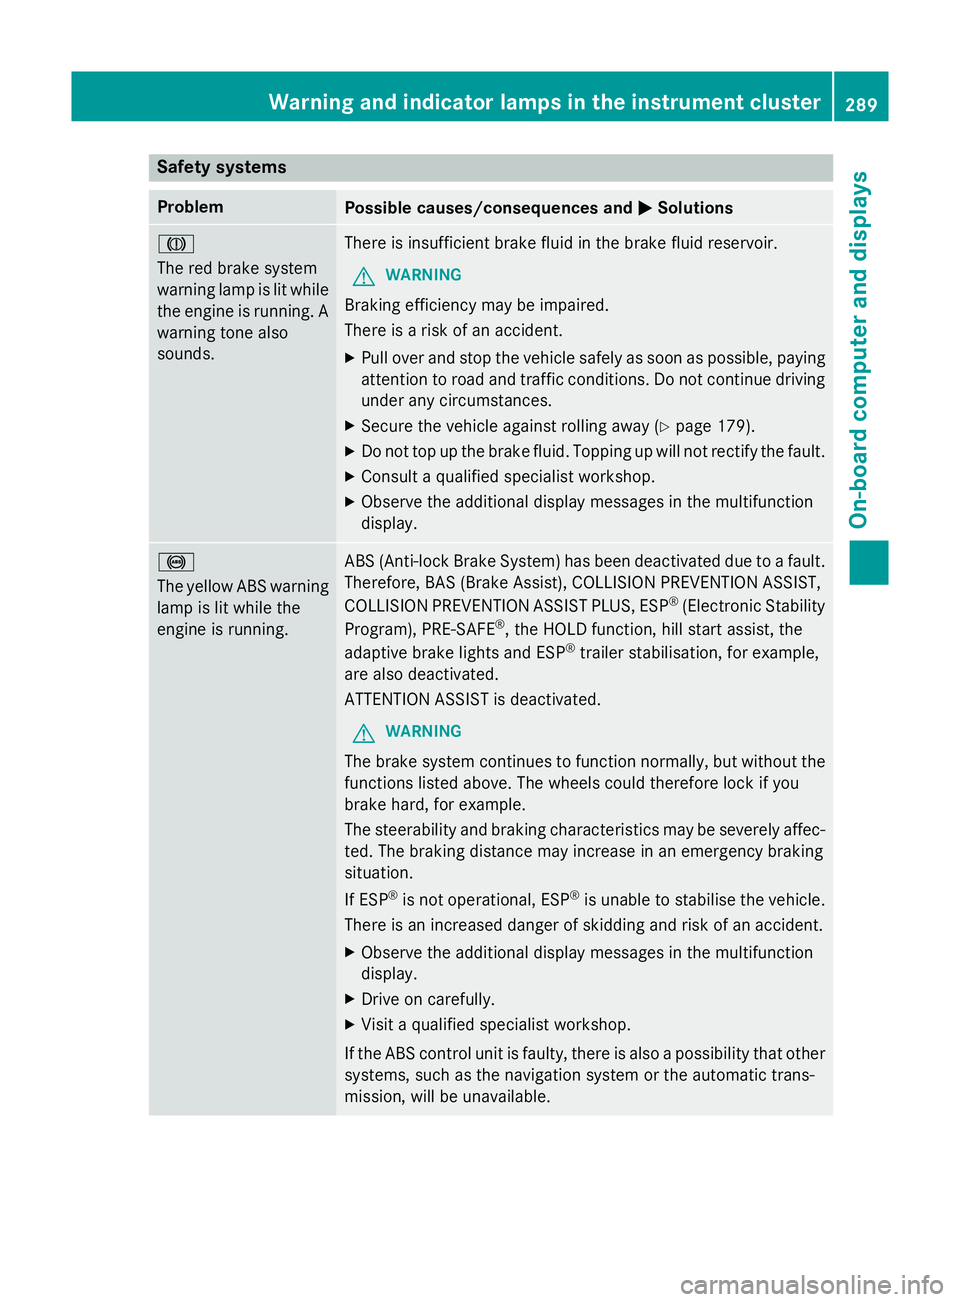
Safety systems
Problem
Possible causes/consequences and
M
MSolutions J
The red brake system
warning lamp is lit while
the engine is running. A
warning tone also
sounds. There is insufficient brake fluid in the brake fluid reservoir.
G WARNING
Braking efficiency may be impaired.
There is a risk of an accident. X Pull over and stop the vehicle safely as soon as possible, paying
attention to road and traffic conditions. Do not continue driving
under any circumstances.
X Secure the vehicle against rolling away (Y page 179).
X Do not top up the brake fluid. Topping up will not rectify the fault.
X Consult a qualified specialist workshop.
X Observe the additional display messages in the multifunction
display. !
The yellow ABS warning
lamp is lit while the
engine is running. ABS (Anti-lock Brake System) has been deactivated due to a fault.
Therefore, BAS (Brake Assist), COLLISION PREVENTION ASSIST,
COLLISION PREVENTION ASSIST PLUS, ESP ®
(Electronic Stability
Program), PRE‑ SAFE®
, the HOLD function, hill start assist, the
adaptive brake lights and ESP ®
trailer stabilisation, for example,
are also deactivated.
ATTENTION ASSIST is deactivated.
G WARNING
The brake system continues to function normally, but without the functions listed above. The wheels could therefore lock if you
brake hard, for example.
The steerability and braking characteristics may be severely affec-ted. The braking distance may increase in an emergency braking
situation.
If ESP ®
is not operational, ESP ®
is unable to stabilise the vehicle.
There is an increased danger of skidding and risk of an accident.
X Observe the additional display messages in the multifunction
display.
X Drive on carefully.
X Visit a qualified specialist workshop.
If the ABS control unit is faulty, there is also a possibility that other systems, such as the navigation system or the automatic trans-
mission, will be unavailable. Warning and indicator lamps in the instrument cluster
289On-board computer and displays Z
Page 328 of 401
Cleaning the paintwork
!
Do not affix:
R stickers
R films
R magnetic plates or similar items
to painted surfaces. You could otherwise
damage the paintwork.
X Remove impurities immediately, where
possible, whilst avoiding rubbing too hard.
X Soak insect remains with insect remover
and rinse off the treated areas afterwards.
X Soak bird droppings with water and rinse
off the treated areas afterwards.
X Remove coolant, brake fluid, tree resin,
oils, fuels and greases by rubbing gently
with a cloth soaked in petroleum ether or
lighter fluid.
X Use tar remover to remove tar stains.
X Use silicone remover to remove wax.
The following cannot always be completely
repaired:
R scratches
R corrosive deposits
R areas affected by corrosion
R damage caused by inadequate care
In such cases, visit a qualified specialist work-
shop.
Care and treatment of matt paintwork !
Never polish the vehicle or the light alloy
wheels. Polishing makes the paintwork
shiny.
! The following may cause the paint to
become shiny and thus reduce the matt
effect:
R Vigorous rubbing with unsuitable mate-
rials.
R Frequent use of car washes.
R Washing the vehicle in direct sunlight.
! Never use paint cleaner, buffing or pol-
ishing products, or gloss preserver, e.g. wax. These products are only suitable for
high-gloss surfaces. Their use on vehicles
with matt finish leads to considerable sur-
face damage (shiny, spotted areas).
Always have paintwork repairs carried out
at a qualified specialist workshop.
! Do not use wash programs with a hot wax
treatment under any circumstances.
Observe these notes if your vehicle has a
clear matt finish. This will help you to avoid
damage to the paintwork due to incorrect
treatment.
These notes also apply to light-alloy wheels
with a clear matt finish.
i The vehicle should preferably be washed
by hand using a soft sponge, car shampoo
and plenty of water.
i Use only insect remover and car shampoo
from the range of recommended and
approved Mercedes-Benz care products.
Cleaning the windows G
WARNING
If the windscreen wipers are set in motion
when cleaning the windscreen or wiper
blades, you could become trapped. There is a danger of injury.
Always switch off the windscreen wipers and
the ignition before cleaning the windscreen orwiper blades.
! Only fold the windscreen wipers away
from the windscreen when vertical. Other-
wise, you will damage the bonnet.
! Do not use dry cloths, abrasive products,
solvents or cleaning agents containing sol- vents to clean the inside of the windows. Do
not touch the insides of the windows with
hard objects, e.g. an ice scraper or ring.
There is otherwise a risk of damaging the
windows.
! Clean the water drainage channels of the
windscreen and the rear window at regular Care
325Maintenance and care Z