load capacity MERCEDES-BENZ GLA SUV 2018 Owner's Manual
[x] Cancel search | Manufacturer: MERCEDES-BENZ, Model Year: 2018, Model line: GLA SUV, Model: MERCEDES-BENZ GLA SUV 2018Pages: 338, PDF Size: 5.59 MB
Page 23 of 338
 ....... 318
MOExtended tires .......................... 301
Optional equipment weight (defi-
nition) .....................")
Maximum tire load .........................316
Maximum tire load (definition) ....... 318
MOExtended tires .......................... 301
Optional equipment weight (defi-
nition) ............................................ 319
PSI (pounds per square inch) (def-
inition) ...........................................3 19
Replacing ....................................... 319
Service life ..................................... 300
Sidewall (definition) ....................... 319
Speed rating (definition) ................ 318
Storing ...........................................3 20
Structure and characteristics
(definition) ..................................... 317
Summer tires ................................. 301
Temperature .................................. 314
TIN (Tire Identification Number)
(definition) ..................................... 319
Tire bead (definition) ......................3 19
Tire pressure (definition) ................ 319
Tire pressures (recommended) ...... 318
Tire size (data) ............................... 323
Tire size designation, load-bearing
capacity, speed rating .................... 314
Tire tread ....................................... 300
Tire tread (definition) ..................... 319
Total load limit (definition) ............. 319
Traction ......................................... 313
Traction (definition) ....................... 319
Tread wear ..................................... 313
Uniform Tire Quality Grading
Standards ...................................... 313
Uniform Tire Quality Grading
Standards (definition) .................... 318
Wear indicator (definition) ............. 319
Wheel rim (definition) .................... 318
see Flat tire
Tool
see Vehicle tool kit
Top Tether ............................................ 56
Tow-starting
Emergency engine starting ............ 297
Important safety notes .................. 294
Installing the towing eye ................ 295
Removing the towing eye ............... 295
Towing a trailer
ESP
®(Electronic Stability Pro-
gram) ............................................... 66 To
wing away
Important safety guidelines ........... 294
Installing the towing eye ................ 295
Notes for 4MATIC vehicles ............ 296
Removing the towing eye ............... 295
Transporting the vehicle ................ 296
With both axles on the ground ....... 296
With the front axle raised ............... 295
Towing eye ......................................... 283
Traction system
see ETS/4ETS (Electronic Trac-
tion System)
Traffic reports
see also Digital Operator's Man-
ual .................................................. 239
Transmission
see Automatic transmission
Transmission position display
(DIRECT SELECT lever) ...................... 132
Transporting the vehicle .................. 296
Traveling uphill
Brow of hill ..................................... 154
Driving downhill ............................. 154
Maximum gradient-climbing capa-
bility ............................................... 154
Trim pieces (cleaning instruc-
tions) .................................................. 280
Trip computer (on-board com-
puter) .................................................. 189
Trip odometer
Calling up ....................................... 189
Resetting (on-board computer) ...... 190
Trunk
Emergency release button ............... 83
Opening (from outside the vehi-
cle, HANDS-FREE ACCESS) .............. 80
Trunk lid
see Tailgate
Turn signals
Display message ............................ 211
Replacing bulbs (front) ................... 107
Switching on/off ........................... 103
Two-way radio
Frequencies ................................... 326
Installation ..................................... 326
Transmission output (maximum) .... 326
Index21
Page 249 of 338

Loading guidelines
GWARNING
If objects, luggage or loads are not secured or
not secured sufficiently, they could slip, tip
over or be flung around and thereby hit vehicle
occupants. There is a risk of injury, particu-
larly in the event of sudden braking or a sud-
den change in direction.
Always store objects so that they cannot be
flung around. Secure objects, luggage or
loads against slipping or tipping before the
journey.
GWARNING
Combustion engines emit poisonous exhaust
gases such as carbon monoxide. If the tailgate is open when the engine is running, particu-
larly if the vehicle is moving, exhaust fumes
could enter the passenger compartment.
There is a risk of poisoning.
Turn off the engine before opening the tail-
gate. Never drive with the tailgate open.
GWARNING
The exhaust tail pipe and tail pipe trim can
become very hot. If you come into contact
with these parts of the vehicle, you could burn
yourself. There is a risk of injury.
Always be particularly careful around the
exhaust tail pipe and the tail pipe trim. Allow
these components to cool down before touch-
ing them.
The handling characteristics of a laden vehicle
are dependent on the distribution of the load
within the vehicle.
Observe the following notes when loading and
transporting a load:
RNever exceed the maximum permissible
gross vehicle mass or the gross axle weight
rating for the vehicle (including occupants).
The values are specified on the vehicle iden-
tification plate on the B-pillar of the driver's
door.
RThe cargo compartment is the preferred place
to carry objects.
RPosition heavy loads as far forward as possi-
ble and as low down in the cargo compart-
ment as possible.
RThe load must not protrude above the upper
edge of the seat backrests.
RAlways place the load against the rear or front seat backrests. Make sure that the seat
backrests are securely locked into place.
RAlways place the load behind unoccupied
seats if possible.
RUse the cargo tie-down rings and the parcel
nets to transport loads and luggage.
RUse cargo tie-down rings and fastening mate-
rials appropriate for the weight and size of theload.
RThe maximum load capacity of the stowage
well under the cargo compartment floor is
55 lbs (25 kg).
RSecure the load with sufficiently strong and
wear-resistant tie-downs. Pad sharp edges for
protection.
!Do not position the load on one part of the
folding cargo compartment floor only. The
maximum load capacity of the folding cargo
compartment floor is 220 lbs (100kg). Dis-
tribute the weight evenly to avoid damaging
the cargo compartment floor. Place a solid
board under the load if necessary. Please
note that the load on the cargo compartment floor will be increased when the load is lashed
down.
Stowage areas
Stowage spaces
Important safety notes
GWARNING
If you transport objects in the vehicle interior
and these are not adequately secured, they
could slip or be flung around and thereby
strike vehicle occupants. In addition, cup
holders, open stowage spaces and mobile
phone brackets may not always be able to
hold the objects placed in them in the event of
an accident. There is a risk of injury, particu-
larly in the event of sharp braking or sudden
changes of direction.
Stowage areas247
Stowage and features
Z
Page 251 of 338

Stowage compartment under the armrest
XTo open:on vehicles with movable armrests,
make sure that the armrest is in the rearmost
position.
XPress button :and fold the armrest up.
Depending on the vehicle equipment, the arm-
rest can be moved backwards or forwards in a
longitudinal direction.
Depending on the vehicle's equipment, the fol-
lowing may be in the stowage compartment: a
multimedia connector unit with an SD card slot
and 2 USB ports, e.g. for use with an iPod
®,
iPhone®or MP3 player (see the Digital Opera-
tor's Manual).
Stowage space in the rear passenger
compartment
Stowage compartment in the rear center
console
XTo open: pull down the top of stowage com-
partment :by the edge of the handle.
iDepending on the vehicle's equipment,
there may be an open stowage space above
the stowage compartment.
Parcel nets
Stowage nets are located:
Rin the front-passenger footwell
Ron the back of the driver's and the front-
passenger seat
Ron the left and right-hand side in the cargo
compartment
Observe the loading guidelines (
Ypage 247)
and the safety notes regarding stowage spaces
(
Ypage 247).
Folding backrest on the front-
passenger seat (Canada only)
GWARNING
If the backrest of the front-passenger seat is
folded forward, rear seat passengers can
come in contact with parts of the seat mech-
anism. particularly in the event of an accident, heavy braking or a sudden change of direc-
tion. There is a risk of injury.
If a passenger travels in the vehicle while the
front-passenger seat is folded forward, they
must sit in the rear seat behind the driver.
The backrest of the front-passenger seat can be
folded forwards to increase the cargo compart-
ment capacity.
Once you no longer need the backrest on the
front-passenger side to be used as a load sur-
face, fold the backrest back into place.
XTo fold forward: gently push the backrest
back.
XPull release handle :and fold the backrest
fully onto the seat cushion until it engages.
Stowage areas249
Stowage and features
Z
Page 252 of 338

XTo fold back:gently push the backrest down
and pull release handle :.
XFold the seat backrest back until it engages.
Through-loading facility in the rear
XTo open:fold down seat armrest :.
XPull the center head restraint on the rear
bench seat into the uppermost position
(
Ypage 94).
XSlide locking mechanism =in the direction
of the arrow.
XSwing flap ;fully to the side.
Flap ;is held open by a magnet.
XTo close: swing flap ;in the cargo compart-
ment back until it engages.
XFold armrest :up fully if necessary.
Observe the loading guidelines (
Ypage 247).
Cargo compartment enlargement
Important safety notes
GWARNING
If the rear bench seat/rear seat and seat
backrest are not engaged they could fold for-
wards, e.g. when braking suddenly or in the
event of an accident.
RThe vehicle occupant would thereby be
pushed into the seat belt by the rear bench
seat/rear seat or by the seat backrest. The
seat belt can no longer offer the intended
level of protection and could even cause
injuries.
RObjects or loads in the trunk/cargo com-
partment cannot be restrained by the seat
backrest.
There is an increased risk of injury.
Before every trip, make sure that the seat
backrests and the rear bench seat/rear seat
are engaged.
!Before folding the backrest in the rear com-
partment forwards, make sure that the rear
compartment armrest and the cup holder are
folded in. They may otherwise be damaged.
Observe the loading guidelines (
Ypage 247).
The left-hand and right-hand rear seat backrests
can be folded forwards separately to increase
the cargo compartment capacity.
Notes on using the cargo compartment
Making the best use of your cargo compart-
ment:
RYou can increase the load capacity by adjust-
ing the backrest to the cargo position
(
Ypage 251).
RThe load area can be lengthened by folding
forward the folding backrest of the front-
passenger seat (
Ypage 249) and the corre-
sponding backrest in the rear.
250Stowage areas
Stowag ean d features
Page 255 of 338

striking vehicle occupants. There is a risk of
injury, particularly in the event of sudden
braking or a sudden change in direction.
Always close the cargo compartment floor
before a journey.
!The maximum load capacity of the stowage
well under the cargo compartment floor is
55 lbs (25 kg).
There is a stowage area for TIREFIT, the vehicle
tool kit, a folding box, etc. underneath the cargo
compartment floor.
Opening/closing the cargo compart-
ment floor
XTo open: open the tailgate.
XUnlock the cargo compartment floor.
XHolding ribbing ;, press handle :down-
wards.
Handle :folds up.
XUsing handle :, swing the cargo compart-
ment floor upwards as far as side flaps =,
then overcome the resistance of flaps =.
XPlace the cargo compartment floor on side
flaps=.
Roof carrier
Important safety notes
GWARNING
When you load the roof, the center of gravity
of the vehicle rises and the driving character-
istics change. If you exceed the maximum roof
load, the driving characteristics, as well as
steering and braking, will be greatly impaired.
There is a risk of an accident.
Never exceed the maximum roof load and
adjust your driving style.
!Mercedes-Benz recommends that you only
use roof carriers that have been tested and
approved for Mercedes-Benz vehicles. This
helps to prevent damage to the vehicle.
Position the load on the roof rack in such a
way that the vehicle will not sustain damage
even when it is in motion.
Ensure that, depending on the vehicle's
equipment, you can raise the panorama roof
with power tilt/sliding panel fully and open
the tailgate fully when the roof carrier is
installed.
You will find information on the maximum roof
load in the "Technical data" section
(
Ypage 333).
An incorrectly secured roof carrier or roof load
may become detached from the vehicle. You
must therefore ensure that you observe the roof
carrier manufacturer's installation instructions.
Attaching the roof carrier
XSecure the roof carrier to the roof rails. In
doing so, observe the manufacturer's instal-
lation instructions.
Features
Cup holder
Important safety notes
GWARNING
The cup holder cannot hold a container secure
whilst traveling. If you use a cup holder whilst
Features253
Stowage and features
Z
Page 256 of 338

traveling, the container may be flung around
and liquid may be spilled. The vehicle occu-
pants may come into contact with the liquid
and if it is hot, they may be scalded. You maybe distracted from the traffic conditions and
you could lose control of the vehicle. There is
a risk of an accident and injury.
Only use the cup holder when the vehicle is
stationary. Only use the cup holder for con-
tainers of the right size. Always close the con-tainer, particularly if the liquid is hot.
GWARNING
The heating elements of the cup holder can
become very hot. You could burn yourself on
them.
There is a risk of injury.
Do not touch the hot heating elements of the
cup holder. Always make sure that children
cannot access the hot heating elements of the
cup holder. Never leave children unsuper-
vised in the vehicle.
GWARNING
If you transport objects in the vehicle interior
and these are not adequately secured, they
could slip or be flung around and thereby
strike vehicle occupants. In addition, cup
holders, open stowage spaces and mobile
phone brackets may not always be able to
hold the objects placed in them in the event of
an accident. There is a risk of injury, particu-
larly in the event of sharp braking or sudden
changes of direction.
RAlways stow objects in such a way that they cannot be tossed about in these or similar
situations.
RAlways make sure that objects do not pro-
trude out of the stowage spaces, luggage
nets or stowage nets.
REnsure that closable stowage spaces are
shut before beginning your journey.
RAlways stow and secure heavy, hard, poin-
ted, sharp-edged, fragile or large objects in
the cargo compartment.
!Only use the cup holders for containers of
the right size and which have lids. The drinks could otherwise spill.
Observe the loading guidelines (
Ypage 247).
The stowage compartments in the doors provide
space for bottles:
Rfront: capacity up to 34 fl. oz. (1.0 l)
Rrear: capacity up to 17 fl. oz. (0.5 l)
Cup holder in the front center console
:Cup holder
The cup holder and the rubber mat underneath
can be removed for cleaning. Clean them with
clean, lukewarm water only.
XTo remove: carefully pull in upper sections of
cup holder :on the driver's and front-
passenger sides until they release.
XLift the cup holder upwards ;until it can be
removed.
254Features
Stowag ean d features
Page 287 of 338

You can recognize a MOExtended tire by the
MOExtended marking which appears on the
sidewall of the tire. You will find this marking
next to the tire size designation, the load-bear-
ing capacity and the speed index (
Ypage 314).
MOExtended tires may be used only in conjunc-
tion with an activated tire pressure loss warning
system (Canada only) or tire pressure monitor
(USA only).
If a pressure loss warning message appears
in the multifunction display:
Robserve the instructions in the display mes-
sages (Ypage 220).
Rcheck the tire for damage
Rif driving on, observe the following notes
The driving distance possible in run-flat mode is
approximately 50 miles (80 km) when the vehi-
cle is partially laden. When the vehicle is fully
laden it is approximately 19 miles (30 km).
In addition to the vehicle load, the driving dis-
tance possible depends upon:
Rvehicle speed
Rroad condition
Routside temperature
The driving distance possible in run-flat mode
may be reduced by extreme driving conditions
or maneuvers, or it can be increased through a
moderate style of driving.
The driving distance possible in run-flat mode is
counted from the moment the tire pressure loss
warning appears in the multifunction display.
You must not exceed a maximum speed of
50 mph (80 km/h).
When replacing one or all tires, please observe
the following specifications for your vehicle's
tires:
Rsize
Rtype and
Rthe "MOExtended" marking
If a tire has gone flat and cannot be replaced
with a MOExtended tire, a standard tire may be
used as a temporary measure. Make sure that
you use the proper size and type (summer or
winter tir e).
Vehicles equipped wit
h MOExtended tires are
not equipped with a TIREFIT kit at the factory. It
is therefore recommended that you additionally
equip your vehicle with a TIREFIT kit if you mount
tires that do not feature run-flat properties, e.g.
winter tires. A TIREFIT kit may be obtained from
a qualified specialist workshop.
Important safety notes
GWARNING
When driving in emergency mode, the driving
characteristics deteriorate, e.g. when corner-
ing, accelerating quickly and when braking.
There is a risk of an accident.
Do not exceed the stated maximum speed.
Avoid abrupt steering and driving maneuvers,
and driving over obstacles (curbs, potholes,
off-road). This applies in particular to a laden
vehicle.
Stop driving in emergency mode if:
Ryou hear banging noises.
Rthe vehicle starts to shake.
Ryou see smoke and smell rubber.
RESP®is intervening constantly.
Rthere are tears in the sidewalls of the tire.
After driving in emergency mode, have the
wheel rims checked at a qualified specialist
workshop with regard to their further use. The
defective tire must be replaced in every case.
TIREFIT kit
Important safety notes
TIREFIT is a tire sealant.
For USA only: You can use TIREFIT to seal punc-
tures of up to 0.16 in (4 mm), particularly those
in the tire tread. You can use TIREFIT at outside
temperatures down to Ò4 ‡ (Ò20 †).
GWARNING
In the following situations, the tire sealant is
unable to provide sufficient breakdown assis-
tance, as it is unable to seal the tire properly:
Rthere are cuts or punctures in the tire larger
than those mentioned above.
Rthe wheel rim is damaged.
Ryou have driven at very low tire pressures or on a flat tire.
There is a risk of an accident.
Do not drive the vehicle. Contact a qualified
specialist workshop.
Flat tire285
Breakdown assistance
Z
Page 313 of 338

Maximum permissible gross vehicle
weight rating
XSpecification for maximum gross vehicle
weight:is listed in the Tire and Loading
Information placard: "The combined weight of occupants and cargo should never exceed
XXX kilograms or XXX lbs."
The gross weight of all vehicle occupants, load
and luggage must not exceed the specified
value.
iThe specifications shown on the Tire and
Loading Information placard in the illustration are examples. The maximum permissible
gross vehicle weight rating is vehicle-specific
and may differ from that in the illustration.
You can find the valid maximum permissible
gross vehicle weight rating for your vehicle on
the Tire and Loading Information placard.
Number of seats
Maximum number of seats :indicates the
maximum number of occupants allowed to
travel in the vehicle. This information can be
found on the Tire and Loading Information plac-
ard.
iThe specifications shown on the Tire and
Loading Information placard in the illustration
are examples. The number of seats is vehicle-
specific and can differ from the details shown.
The number of seats in your vehicle can be
found on the Tire and Loading Information
placard.
Determining the correct load limit
Step-by-step instructions
The following steps have been developed as
required of all manufacturers under Title 49,
Code of U.S. Federal Regulations, Part 575 pur-
suant to the "National Traffic and Motor Vehicle
Safety Act of 1966".
XStep 1: Locate the statement "The combined
weight of occupants and cargo should never
exceed XXX kg or XXX lbs." on your vehicle’s
Tire and Loading Information placard.
XStep 2: Determine the combined weight of
the driver and passengers that will be riding in your vehicle.
XStep 3: Subtract the combined weight of the
driver and passengers from XXX kilograms or
XXX lbs.
XStep 4: The resulting figure equals the avail-
able amount of cargo and luggage load capa-
city. For example, if the "XXX" amount equals
1400 lbs and there will be five 150-lb pas-
sengers in your vehicle, the amount of avail-
able cargo and luggage load capacity is
650 lbs (1400 - 750 (5 x 150) = 650 lbs).
XStep 5: Determine the combined weight of
luggage and cargo being loaded on the vehi-
cle. That weight may not safely exceed the
available cargo and luggage load capacity cal- culated in step 4.
Example: steps 1 to 3
The following table shows examples on how to calculate total and cargo load capacities with varying
seating configurations and number and size of occupants. The following examples use a load limit of
Loading the vehicle311
Wheels and tires
Z
Page 316 of 338
. Winter tires can reduce the
braking distance on snow-covered surfaces in
comparison with summer tires. The braking dis-
tance is stil")
Observe the legally required minimum tire tread
depth (Ypage 300). Winter tires can reduce the
braking distance on snow-covered surfaces in
comparison with summer tires. The braking dis-
tance is still much further than on surfaces that
are not icy or covered with snow. Take appro-
priate care when driving.
Further information on winter tires (M+S tires)
(
Ypage 301).
Temperature
GWARNING
The temperature grade for this tire is estab-
lished for a tire that is properly inflated and
not overloaded. Excessive speed, underinfla-
tion, or excessive loading, either separately or
in combination, can cause excessive heat
build-up and possible tire failure.
The temperature grades are A (the highest), B,
and C, representing the tire's resistance to the
generation of heat and its ability to dissipate
heat when tested under controlled conditions
on a specified indoor laboratory test wheel. Sus-
tained high temperature can cause the material
of the tire to degenerate and reduce tire life, and
excessive temperature can lead to sudden tire
failure. The grade C corresponds to a level of
performance which all passenger car tires must
meet under the Federal Motor Vehicle Safety
Standard No. 109. Grades B and A represent
higher levels of performance on the laboratory
test wheel than the minimum required by law.
Tire labeling
Overview
:Uniform Tire Quality Grading Standards
(Ypage 318)
;Department of Transportation, Tire Identifi-
cation Number (Ypage 317)
=Maximum load rating (Ypage 316)
?Maximum tire pressures (Ypage 305)
AManufacturer
BTire material (Ypage 317)
CTire size designation, load-bearing capacity
and speed rating (Ypage 314)
DLoad index (Ypage 316)
ETire name
The markings described above are on the tire in
addition to the tire name (sales designation) and
the manufacturer's name.
iTire data is vehicle-specific and may deviate
from the data in the example.
Tire size designation, load-bearing
capacity and speed rating
GWARNING
Exceeding the stated tire load-bearing capa-
city and the approved maximum speed could
lead to tire damage or the tire bursting. There is a risk of accident.
Therefore, only use tire types and sizes
approved for your vehicle model. Observe the
314All about wheels and tires
Wheels and tires
Page 317 of 338
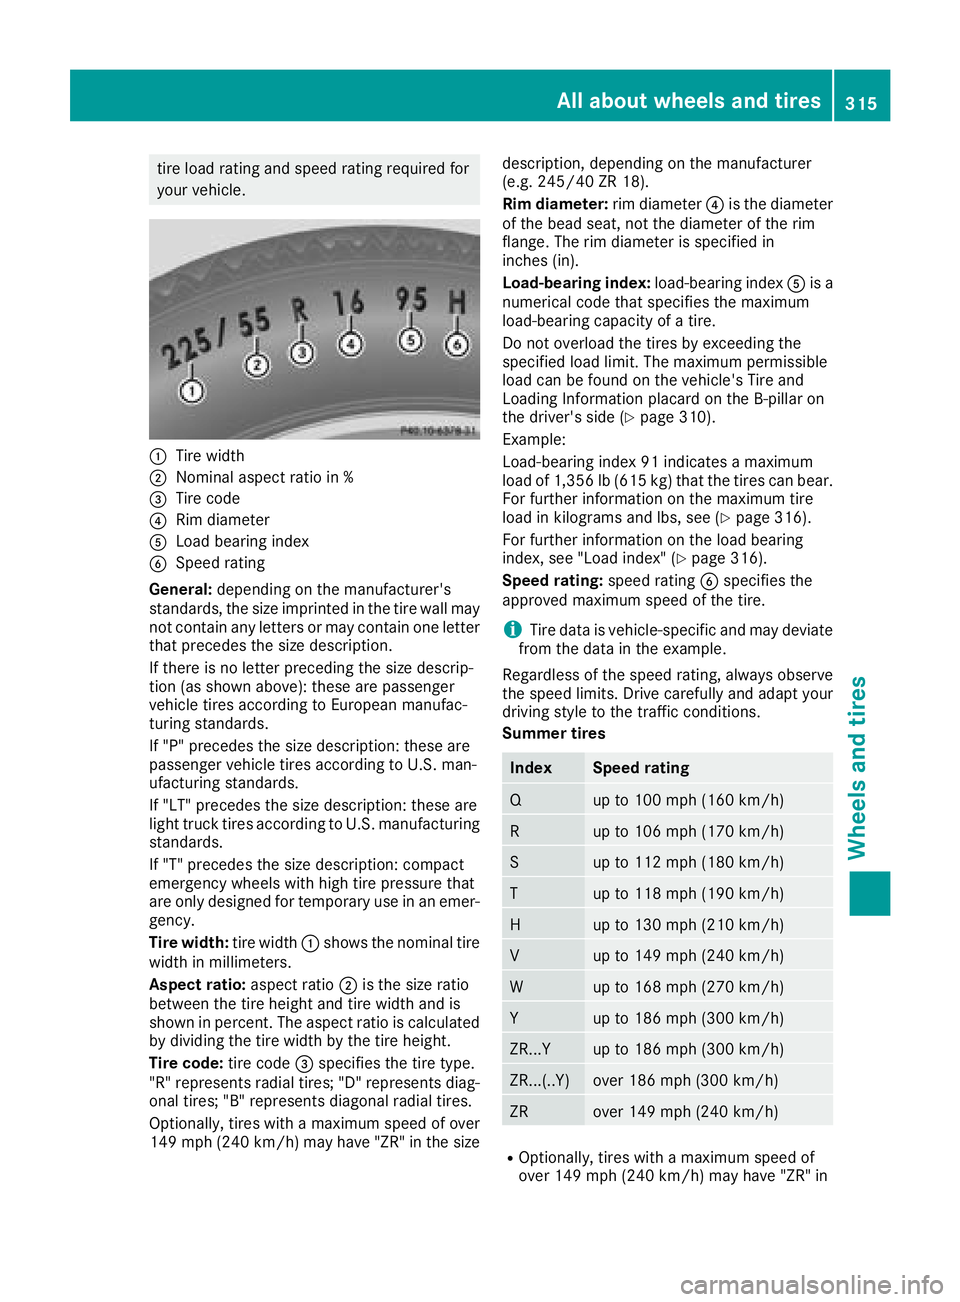
tire load rating and speed rating required for
your vehicle.
:Tire width
;Nominal aspect ratio in %
=Tire code
?Rim diameter
ALoad bearing index
BSpeed rating
General: depending on the manufacturer's
standards, the size imprinted in the tire wall may
not contain any letters or may contain one letter
that precedes the size description.
If there is no letter preceding the size descrip-
tion (as shown above): these are passenger
vehicle tires according to European manufac-
turing standards.
If "P" precedes the size description: these are
passenger vehicle tires according to U.S. man-
ufacturing standards.
If "LT" precedes the size description: these are
light truck tires according to U.S. manufacturing
standards.
If "T" precedes the size description: compact
emergency wheels with high tire pressure that
are only designed for temporary use in an emer-
gency.
Tire width: tire width:shows the nominal tire
width in millimeters.
Aspect ratio: aspect ratio;is the size ratio
between the tire height and tire width and is
shown in percent. The aspect ratio is calculated
by dividing the tire width by the tire height.
Tire code: tire code=specifies the tire type.
"R" represents radial tires; "D" represents diag-
onal tires
; "B" represents diagonal radial tires.
Optionally, tires with a maximum speed of over
149 mph (240 km/h) may have "ZR" in the size description, depending on the manufacturer
(e.g. 245/40 ZR 18).
Rim diameter:
rim diameter?is the diameter
of the bead seat, not the diameter of the rim
flange. The rim diameter is specified in
inches (in).
Load-bearing index: load-bearing indexAis a
numerical code that specifies the maximum
load-bearing capacity of a tire.
Do not overload the tires by exceeding the
specified load limit. The maximum permissible
load can be found on the vehicle's Tire and
Loading Information placard on the B-pillar on
the driver's side (
Ypage 310).
Example:
Load-bearing index 91 indicates a maximum
load of 1,356 lb (615 kg) that the tires can bear.
For further information on the maximum tire
load in kilograms and lbs, see (
Ypage 316).
For further information on the load bearing
index, see "Load index" (
Ypage 316).
Speed rating: speed ratingBspecifies the
approved maximum speed of the tire.
iTire data is vehicle-specific and may deviate
from the data in the example.
Regardles s o
f the speed rating, always observe
the speed limits. Drive carefully and adapt your
driving style to the traffic conditions.
Summer tires
IndexSpeed rating
Qup to 100 mph (160 km/h)
Rup to 106 mph (170 km/h)
Sup to 112 mph (180 km/h)
Tup to 118 mph (190 km/h)
Hup to 130 mph (210 km/h)
Vup to 149 mph (240 km/h)
Wup to 168 mph (270 km/h)
Yup to 186 mph (300 km/h)
ZR...Yup to 186 mph (300 km/h)
ZR...(..Y)over 186 mph (300 km/h)
ZRover 149 mph (240 km/h)
ROptionally, tires with a maximum speed of
over 149 mph (240 km/h) may have "ZR" in
All about wheels an d tires315
Wheels and tires
Z