low oil pressure MERCEDES-BENZ GLA SUV 2018 Owner's Manual
[x] Cancel search | Manufacturer: MERCEDES-BENZ, Model Year: 2018, Model line: GLA SUV, Model: MERCEDES-BENZ GLA SUV 2018Pages: 338, PDF Size: 5.59 MB
Page 138 of 338
Holding the vehicle stationary on uphill
gradients
GWARNING
If the clutch overheats, the electronic man-
agement system is automatically deactivated. This interrupts the power transmission. The
vehicle may, for example, roll backwards on
gradients. There is a risk of an accident.
Never hold the vehicle stationary on uphill
gradients by depressing the accelerator.
The clutch may overheat if you hold the vehicle
stationary on uphill gradients by depressing the
accelerator pedal. If the clutch overheats, a
warning tone sounds.
All vehicles (except Mercedes-AMG vehi-
cles): theStop Vehicle Shift to 'P'
Leave Engine Runningdisplay message
appears in the multifunction display. You will
only be able to continue your journey once the
clutch has cooled down and the display mes-
sage in the multifunction display has disap-
peared.
Mercedes-AMG vehicles: theTrans. Oil
Overheated Drive on with Caredisplay
message appears in the multifunction display.
Do not hold the vehicle stationary on uphill gra-
dients by depressing the accelerator pedal.
Instead, only ever hold the vehicle stationary on uphill gradients by:
Rdepressing the brake pedal
Ractivating the HOLD function
Rengaging the electric parking brake
Kickdown
Use kickdown for maximum acceleration.
XDepress the accelerator pedal beyond the
pressure point.
The automatic transmission shifts to a lower
gear depending on the engine speed.
XEase off the accelerator pedal once the
desired speed is reached.
The automatic transmission shifts back up.
Mercedes-AMG vehicles: it is only possible to
use kickdown in the automatic drive program
and the temporary manual drive program M.
When manual drive program Mis permanently
activated, kickdown is not possible. For further information on kickdown in manual
drive program
M(
Ypage 140).
Rocking the vehicle free
Shifting back and forth between transmission
positions hand kcan help to free up the
vehicle if it gets stuck in mud or snow. The vehi-
cle's engine management system limits the
speed to a maximum of 5 mph (9 km/h) when
shifting back and forth. To shift repeatedly
between transmission positions hand k,
move the DIRECT SELECT lever up and down
past the point of resistance.
Drive programs
All vehicles (except Mercedes-AMG
vehicles)
Drive program C (Comfort)
Drive program Cis characterized by the follow-
ing:
Rthe vehicle delivers comfortable, economical
handling characteristics.
Rthe vehicle pulls away more gently in forward
and reverse gears, unless the accelerator
pedal is depressed fully.
Rthe vehicle has improved driving stability, for
example on slippery road surfaces.
Roptimal fuel consumption resulting from the
automatic transmission shifting up sooner.
The vehicle is driven in the low engine speed
range and the wheels are less likely to spin.
Drive program S (Sport)
Drive program Sis characterized by the follow-
ing:
Rsporty engine settings.
Rthe automatic transmission shifts up later.
The fuel consumption possibly being higher
as a result of the later automatic transmission
shift points.
Drive program I (Individual)
In drive program Ithe following properties of the
drive program can be selected:
Rthe drive (engine and transmission manage-
ment)
Rthe steering
136Automatic transmission
Driving and parking
Page 142 of 338
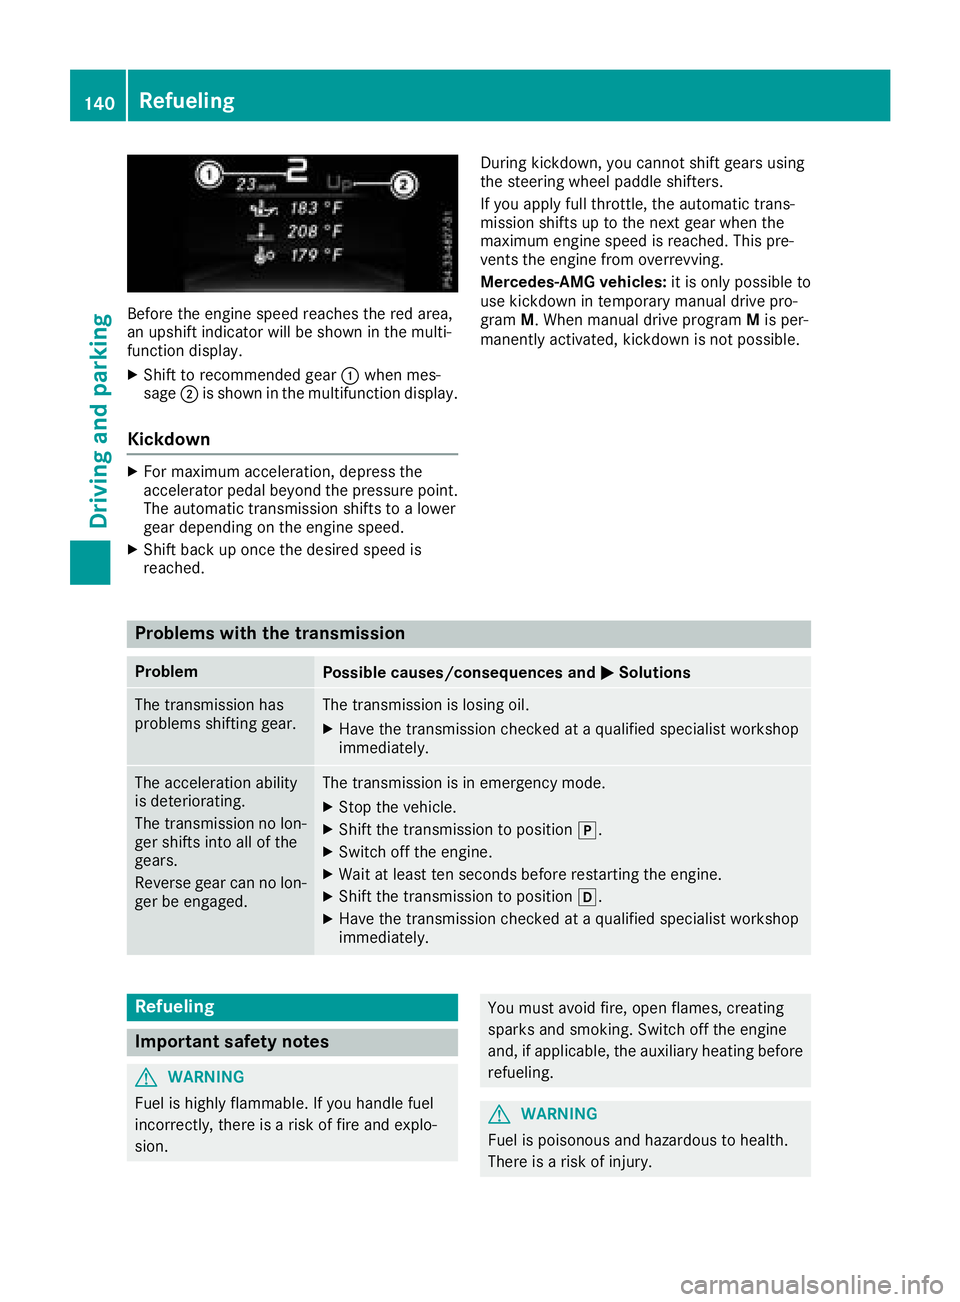
Before the engine speed reaches the red area,
an upshift indicator will be shown in the multi-
function display.
XShift to recommended gear:when mes-
sage ;is shown in the multifunction display.
Kickdown
XFor maximum acceleration, depress the
accelerator pedal beyond the pressure point.
The automatic transmission shifts to a lower
gear depending on the engine speed.
XShift back up once the desired speed is
reached. During kickdown, you cannot shift gears using
the steering wheel paddle shifters.
If you apply full throttle, the automatic trans-
mission shifts up to the next gear when the
maximum engine speed is reached. This pre-
vents the engine from overrevving.
Mercedes-AMG vehicles:
it is only possible to
use kickdown in temporary manual drive pro-
gram M. When manual drive program Mis per-
manently activated, kickdown is not possible.
Problems with the transmission
ProblemPossible causes/consequences and MSolutions
The transmission has
problems shifting gear.The transmission is losing oil.
XHave the transmission checked at a qualified specialist workshop
immediately.
The acceleration ability
is deteriorating.
The transmission no lon-
ger shifts into all of the
gears.
Reverse gear can no lon-
ger be engaged.The transmission is in emergency mode.
XStop the vehicle.
XShift the transmission to positionj.
XSwitch off the engine.
XWait at least ten seconds before restarting the engine.
XShift the transmission to positionh.
XHave the transmission checked at a qualified specialist workshop
immediately.
Refueling
Important safety notes
GWARNING
Fuel is highly flammable. If you handle fuel
incorrectly, there is a risk of fire and explo-
sion.
You must avoid fire, open flames, creating
sparks and smoking. Switch off the engine
and, if applicable, the auxiliary heating before refueling.
GWARNING
Fuel is poisonous and hazardous to health.
There is a risk of injury.
140Refueling
Driving and parking
Page 154 of 338
checked in a qualified specialist workshop as
soon as possible. Adapt your driving style to the
different braking characteristics.
Driving off-road increases the likelihood of dam-
age to the vehicle, which, in turn, can lead to
failure of the mechanical assembly or systems.
Adapt your driving style to suit the terrain con-
ditions. Drive carefully. Have damage to the
vehicle rectified immediately at a qualified spe-
cialist workshop.
Do not shift into transmission position iwhen
driving off-road. You could lose control of the
vehicle if you attempt to brake the vehicle using
the service brake. If the gradient is too steep for
your vehicle, drive back down in reverse gear.
General notes
HEnvironmental note
Protection of the environment is of primary
importance. Treat nature with respect.
Observe all prohibiting signs.
Read this section carefully before driving your
vehicle off-road.
Off-road driving is only possible with the
ON&OFFROAD package.
The following driving systems are specially
adapted for driving over easily negotiable off-
road terrain:
ROff-road program (Ypage 167)
ROff-road ABS (Ypage 60)
ROff-road 4ETS (Ypage 64)
ROff-road ESP®(Ypage 66)
RDSR (Downhill Speed Regulation)
(Ypage 166)
Observe the following notes:
RStop the vehicle before starting to drive along
an off-road route. If necessary, activate the
off-road program (
Ypage 130).
RTo avoid damaging the vehicle, make sure
there is always sufficient ground clearance.
RCheck that items of luggage and loads are
stowed safely and are well secured
(
Ypage 252).
RAlways keep the engine running and in gear
when driving on a downhill gradient. Activate
DSR (
Ypage 166).
RDrive slowly and evenly, if necessary at a
walking pace.
REnsure that the wheels are in contact with the
ground at all times.
RDrive with extreme care on unfamiliar off-road
routes where visibility is poor. For safety rea-
sons, get out of the vehicle first and survey
the off-road route.
RCheck the depth of water before fording rivers
and streams.
RWatch out for obstacles.
RTake care when turning on an uphill or down-
hill slope or when driving across a slope. The
vehicle could otherwise tip over.
RAlways keep the side windows and the pano-
rama roof with power tilt/sliding panel closed
during the journey.
RDo not deviate from marked routes.
RDo not use the HOLD function when driving
off-road, on steep uphill or downhill gradients
or on slippery or loose surfaces. The HOLD
function cannot hold the vehicle on such sur-
faces.
Checklist before driving off-road
XEngine oil level: check the engine oil level
and add oil if necessary.
When driving on steep gradients, the engine
oil level must be sufficiently high to ensure a
correct oil supply in the vehicle.
XWheels and tires: check the tire tread depth
and tire pressure.
XCheck for damage and remove any foreign
objects, e.g. small stones, from the wheels/
tires.
XReplace any missing valve caps.
XReplace dented or damaged wheels.
XRims: dented or bent rims can result in a loss
of tire pressure and damage the tire bead.
Before driving off-road, check the wheels and
replace them if necessary.
Checklist after driving off-road
!If you detect damage to the vehicle after
driving off-road, have the vehicle checked
immediately at a qualified specialist work-
shop.
XDeactivate off-road program (Ypage 130).
XDeactivate DSR (Ypage 166).
XClean the headlamps and rear lights and
check for damage.
152Driving tips
Driving and parking
Page 274 of 338
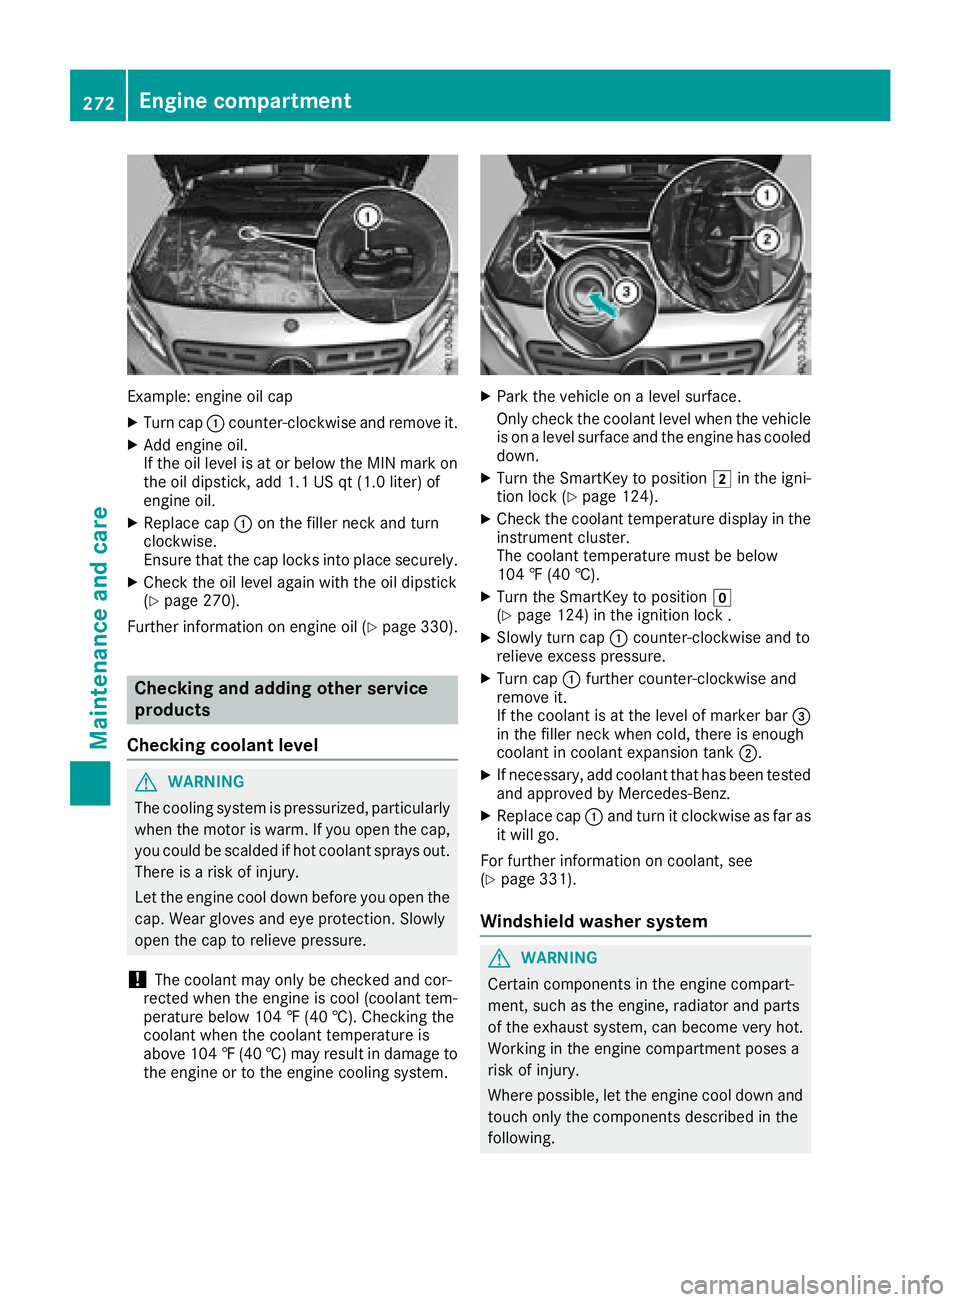
Example: engine oil cap
XTurn cap:counter-clockwise and remove it.
XAdd engine oil.
If the oil level is at or below the MIN mark on
the oil dipstick, add 1.1 US qt (1.0 liter) of
engine oil.
XReplace cap :on the filler neck and turn
clockwise.
Ensure that the cap locks into place securely.
XCheck the oil level again with the oil dipstick
(Ypage 270).
Further information on engine oil (
Ypage 330).
Checking and adding other service
products
Checking coolant level
GWARNING
The cooling system is pressurized, particularly
when the motor is warm. If you open the cap,
you could be scalded if hot coolant sprays out.
There is a risk of injury.
Let the engine cool down before you open the
cap. Wear gloves and eye protection. Slowly
open the cap to relieve pressure.
!The coolant may only be checked and cor-
rected when the engine is cool (coolant tem-
perature below 104 ‡ (40 †). Checking the
coolant when the coolant temperature is
above 104 ‡ (40 †) may result in damage to
the engine or to the engine cooling system.
XPark the vehicle on a level surface.
Only check the coolant level when the vehicle is on a level surface and the engine has cooled
down.
XTurn the SmartKey to position 2in the igni-
tion lock (Ypage 124).
XCheck the coolant temperature display in the
instrument cluster.
The coolant temperature must be below
104 ‡ (40 †).
XTurn the SmartKey to position g
(Ypage 124) in the ignition lock .
XSlowly turn cap :counter-clockwise and to
relieve excess pressure.
XTurn cap :further counter-clockwise and
remove it.
If the coolant is at the level of marker bar =
in the filler neck when cold, there is enough
coolant in coolant expansion tank ;.
XIf necessary, add coolant that has been tested
and approved by Mercedes-Benz.
XReplace cap :and turn it clockwise as far as
it will go.
For further information on coolant, see
(
Ypage 331).
Windshield washer system
GWARNING
Certain components in the engine compart-
ment, such as the engine, radiator and parts
of the exhaust system, can become very hot.
Working in the engine compartment poses a
risk of injury.
Where possible, let the engine cool down and touch only the components described in the
following.
272Engine compartment
Maintenance and care
Page 277 of 338
To avoid damage to the vehicle, deactivate
Distance Pilot DISTRONIC and the HOLD
function in the following or similar situations:
Rwhen towing the vehicle
Rin the car wash
!Never clean your vehicle in a Touchless
Automatic Car Wash as these use special
cleaning agents. These cleaning agents can
damage the paintwork or plastic parts.
!Make sure that the automatic transmission
is in transmission position iwhen washing
your vehicle in a tow-through car wash. The
vehicle may be damaged in another transmis-
sion position.
!Make sure that:
Rthe side windows and sliding sunroof are
closed completely
Rthe blower is switched off
Rthe windshield wiper switch is in position
u
Rthe 360° camera or the rear view camera is
deactivated
The vehicle may otherwise be damaged.
You can clean the vehicle in an automatic car
wash from the very start.
Preferably, you should wash the vehicle in a car
wash that uses fabric washing elements without
brushes. This will prevent fine scratches to the
paintwork or decorative films.
If the vehicle is very dirty, pre-wash it before
cleaning it in an automatic car wash.
After using an automatic car wash, wipe off wax
from the windshield and the wiper blades. This
will prevent smears and reduce wiping noises
caused by residue on the windshield.
iVehicles with decorative films: when using a
car wash, choose a wash program without hot
wax.
Washing by hand
In some countries, washing by hand is only
allowed at specially equipped washing bays.
Observe the legal requirements in each country.
XDo not use hot water and do not wash the
vehicle in direct sunlight.
XUse a soft sponge to clean.
XUse a mild cleaning agent, such as a car
shampoo approved by Mercedes-Benz.
XThoroughly hose down the vehicle with a gen-
tle jet of water.
XDo not point the water jet directly towards the
air inlet or the edges of decorative foils.
XUse plenty of water and rinse out the sponge
frequently.
XRinse the vehicle with clean water and dry
thoroughly with a chamois.
XDo not let the cleaning agent dry on the paint- work or the decorative foils.
Carefully remove all deposits of road salt as
soon as possible when driving in winter.
Power washers
GWARNING
The water jet from a circular jet nozzle (dirt
blasters) can cause invisible exterior damage
to the tires or chassis components. Compo-
nents damaged in this way may fail unexpect-
edly. There is a risk of an accident.
Do not use power washers with circular jet
nozzles to clean the vehicle. Have damaged
tires or chassis components replaced imme-
diately.
!Vehicles with decorative foil: parts of your
vehicle are covered with decorative foil. Main-
tain a distance of at least 27.5 in (70 cm)
between the foil-wrapped parts of the vehicle
and the nozzle of the high pressure cleaner.
Information about the correct distance is
available from the equipment manufacturer.
Move the power washer nozzle around when
cleaning your vehicle.
The water temperature of the high-pressure
cleaner must not exceed 140 °F (60 °C).
!Always maintain a distance of at least
11.8 in (30 cm) between the vehicle and the
power washer nozzle. Information about the
correct distance is available from the equip-
ment manufacturer.
Move the power washer nozzle around when
cleaning your vehicle.
Do not aim directly at any of the following:
Rtires
Rdoor gaps, roof gaps, joints, etc.
Relectrical components
Rbattery
Care275
Maintenance and care
Z
Page 281 of 338
XMake sure that the vehicle is at a standstill
and the SmartKey is in position2in the igni-
tion lock.
XOpen the camera cover for cleaning via the
multimedia system (see Digital Operator's
Manual).
XTo clean the rear view camera: use clear
water and a soft cloth to clean camera
lens :.
Cleaning the exhaust pipes
GWARNING
The exhaust tail pipe and tail pipe trim can
become very hot. If you come into contact
with these parts of the vehicle, you could burn
yourself. There is a risk of injury.
Always be particularly careful around the
exhaust tail pipe and the tail pipe trim. Allow
these components to cool down before touch-
ing them.
!Do not clean the exhaust pipe with acid-
based cleaning agents, such as bathroom
cleaner or wheel cleaner.
!Mercedes-AMG vehicles with black exhaust
pipes: the black-chrome tailpipe finishers
should not be polished with a chrome polish.
They will otherwise lose their black sheen. For
optimal care, the faceplates should be rubbed with a lightly oiled cloth after every car wash.
Commercially available engine and care oils
are suitable for this.
For heavier soiling, you can apply a fine paint-
work polish with a microfiber cloth. Remove
the excess polish residue after polishing.
Impurities combined with the effects of road grit
and corrosive environmental factors may cause
flash rust to form on the surface. You can
restore the original shine of the exhaust pipe by
cleaning it regularly, especially in winter and
after washing.
XClean the exhaust pipe with a care product
tested and approved by Mercedes-Benz.
Interior care
Cleaning the display
!For cleaning, do not use any of the following:
Ralcohol-based thinner or gasoline
Rabrasive cleaning agents
Rcommercially-available household cleaning
agents
These may damage the display surface. Do
not put pressure on the display surface when cleaning. This could lead to irreparable dam-
age to the display.
XBefore cleaning the display, make sure that it
is switched off and has cooled down.
XClean the display surface using a commer-
cially available microfiber cloth and TFT/LCD
display cleaner.
XDry the display surface using a dry microfiber
cloth.
Cleaning the plastic trim
GWARNING
Care products and cleaning agents containing solvents cause surfaces in the cockpit to
become porous. As a result, plastic parts may
come loose in the event of air bag deploy-
ment. There is a risk of injury.
Do not use any care products and cleaning
agents to clean the cockpit.
!Never attach the following to plastic surfa-
ces:
Rstickers
Rfilms
Rperfume oil container or similar
You could otherwise damage the plastic.
!Do not allow cosmetics, insect repellent or
sunscreen to come into contact with the plas-
tic trim. This maintains the high-quality look of
the surfaces.
XWipe the plastic trim with a damp, lint-free
cloth, e.g. a microfiber cloth.
XHeavy soiling: use care and cleaning prod-
ucts recommended and approved by
Mercedes-Benz.
The surface may change color temporarily.
Wait until the surface is dry again.
Care279
Maintenance and care
Z
Page 289 of 338
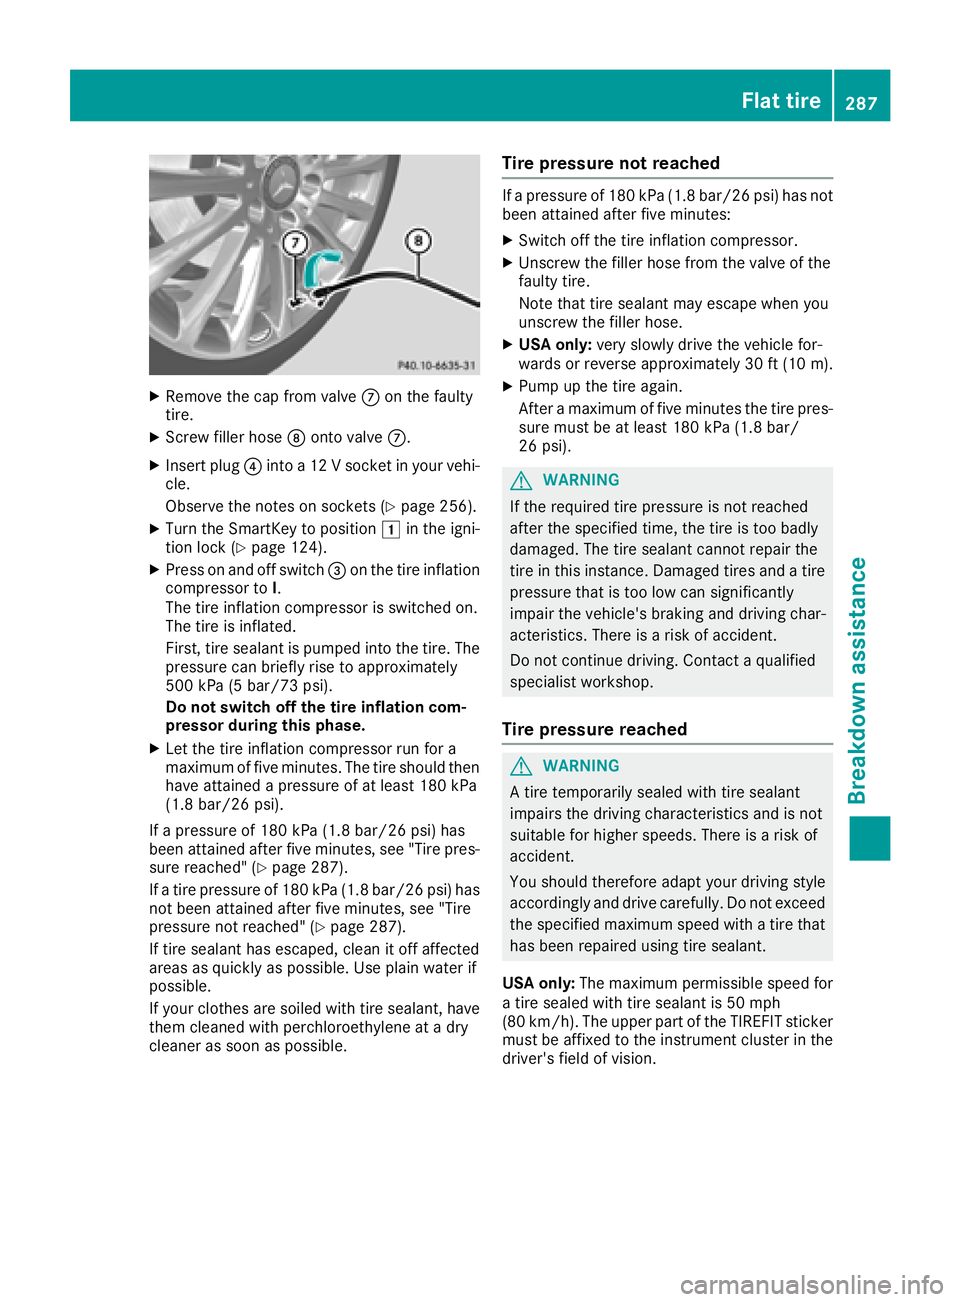
XRemove thecap from valv eC on th efault y
tire.
XScrew filler hos eD onto valv eC.
XInser tplug ?into a 12Vsocke tin your vehi-
cle .
Observ eth enote son sockets (
Ypage 256).
XTurn theSmartKey to position 1in th eigni-
tion loc k (Ypage 124).
XPress on and off switch =on th etire inflation
compressor to I.
The tire inflation compressor is switched on .
The tire is inflated.
First ,tire sealan tis pumped int oth etire. The
pressur ecan briefly ris eto approximately
50 0kP a(5 bar/73 psi) .
Do not switch off th etire inflation com -
pressor during this phase .
XLet thetire inflation compressor run for a
maximum of fiv eminutes. The tire should then
hav eattained apressur eof at least 18 0kP a
(1. 8bar/26 psi) .
If apressur eof 18 0kP a(1.8 ba r/26 psi) ha s
been at tained after five minutes, see "Tire pres-
sure reached" (
Ypage 287).
If a tire pressure of 180 kPa (1.8 bar/26 psi) has
not been attained after five minutes, see "Tire
pressure not reached" (
Ypage 287).
If tire sealant has escaped, clean it off affected
areas as quickly as possible. Use plain water if
possible.
If your clothes ar e s
oiled with tire sealant, have
them cleaned with perchloroethylene at a dry
cleaner as soon as possible.
Tire pressure not reached
If a pressure of 180 kPa (1.8 bar/26 psi) has not
been attained after five minutes:
XSwitch off the tire inflation compressor.
XUnscrew the filler hose from the valve of the
faulty tire.
Note that tire sealant may escape when you
unscrew the filler hose.
XUSA only: very slowly drive the vehicle for-
wards or reverse approximately 30 ft (10 m).
XPump up the tire again.
After a maximum of five minutes the tire pres-
sure must be at least 180 kPa (1.8 bar/
26 psi).
GWARNING
If the required tire pressure is not reached
after the specified time, the tire is too badly
damaged. The tire sealant cannot repair the
tire in this instance. Damaged tires and a tire
pressure that is too low can significantly
impair the vehicle's braking and driving char-
acteristics. There is a risk of accident.
Do not continue driving. Contact a qualified
specialist workshop.
Tire pressure reached
GWARNING
A tire temporarily sealed with tire sealant
impairs the driving characteristics and is not
suitable for higher speeds. There is a risk of
accident.
You should therefore adapt your driving style
accordingly and drive carefully. Do not exceed the specified maximum speed with a tire that
has been repaired using tire sealant.
USA only: The maximum permissible speed for
a tire sealed with tire sealant is 50 mph
(80 km/h). The upper part of the TIREFIT sticker
must be affixed to the instrument cluster in the
driver's field of vision.
Flat tire287
Breakdown assistance
Z
Page 320 of 338
Uniform Tire Quality Grading Standards
A uniform standard to grade the quality of tires
with regards to tread quality, tire traction and
temperature characteristics. The quality grad-
ing assessment is made by the manufacturer
following specifications from the U.S. govern-
ment. The ratings are molded into the sidewall ofthe tire.
Recommended tire pressures
The recommended tire pressure applies to the
tires mounted at the factory.
The Tire and Loading Information placard con-
tains the recommended tire pressures for cold
tires on a fully loaded vehicle and for the maxi-
mum permissible vehicle speed.
The tire pressure table contains the recommen-
ded pressures for cold tires for various operat-
ing conditions, i.e. differing load and speed con-
ditions.
Increased vehicle weight due to optional
equipment
The combined weight of all standard and
optional equipment available for the vehicle,
regardless of whether it is actually installed on
the vehicle or not.
Rim
This is the part of the wheel on which the tire is
mounted.
GAWR (Gross Axle Weight Rating)
The GAWR is the maximum gross axle weight
rating. The actual load on an axle must never
exceed the gross axle weight rating. The gross
axle weight rating can be found on the vehicle
identification plate on the B-pillar on the driver's
side.
Speed rating
The speed rating is part of the tire identification.
It specifies the speed range for which the tire is
approved.
GVW (Gross Vehicle Weight)
The gross vehicle weight includes the weight of
the vehicle including fuel, tools, the spare wheel,
accessories installed, occupants, luggage and
the drawbar noseweight, if applicable. The gross
vehicle weight must not exceed the gross vehi-
cle weight rating GVWR as specified on the vehi-
cle identification plate on the B-pillar on the
driver's side.
GVWR (Gross Vehicle Weight Rating)
The GVWR is the maximum permissible gross
weight of a fully loaded vehicle (the weight of the
vehicle including all accessories, occupants,
fuel, luggage and the drawbar n
oseweight, if
applicable). The gross vehicle weight rating is
specified on the vehicle identification plate on
the B-pillar on the driver's side.
Maximum loaded vehicle weight
The maximum weight is the sum of:
Rthe curb weight of the vehicle
Rthe weight of the accessories
Rthe load limit
Rthe weight of the factory installed optional
equipment
Kilopascal (kPa)
Metric unit for tire pressure. 6.9 kPa corre-
sponds to 1 psi. Another unit for tire pressure is
bar. 100 kilopascals (kPa) are the equivalent of
1 bar.
Load index
In addition to the load-bearing index, the load
index may also be imprinted on the sidewall of
the tire. This specifies the load-bearing capacity
more precisely.
Curb weight
The weight of a vehicle with standard equipment
including the maximum capacity of fuel, oil and
coolant. It also includes the air-conditioning sys-
tem and optional equipment if these are instal-
led in the vehicle, but does not include passen-
gers or luggage.
Maximum load rating
The maximum tire load is the maximum permis-
sible weight in kilograms or lbs for which a tire is
approved.
Maximum permissible tire pressure
Maximum permissible tire pressure for one tire.
Maximum load on one tire
Maximum load on one tire. This is calculated by dividing the maximum axle load of one axle by
two.
318All about wheels and tires
Wheels and tires