spare tire location MERCEDES-BENZ GLA SUV 2018 Owner's Manual
[x] Cancel search | Manufacturer: MERCEDES-BENZ, Model Year: 2018, Model line: GLA SUV, Model: MERCEDES-BENZ GLA SUV 2018Pages: 338, PDF Size: 5.59 MB
Page 13 of 338
Exhaust check.................................. .146
Exhaust pipe
Cleaning ......................................... 279
Exterior lighting
Cleaning ......................................... 278
see Lights
Exterior mirrors
Adjusting ......................................... 97
Dipping (automatic) ......................... 98
Folding in when locking (on-board
computer) ...................................... 197
Folding in/out (automatically) ......... 98
Folding in/out (electrically) ............. 98
Out of position (troubleshooting) ..... 98
Setting ............................................. 98
Storing settings (memory func-
tion) ............................................... 100
Storing the parking position ............. 99
Eyeglasses compartment ................. 248
F
Favorites
Overview ........................................ 241
Filler cap
see Refueling
First-aid kit ......................................... 283
Flat tire
MOExtended tires .......................... 284
Preparing the vehicle ..................... 284
TIREFIT kit ...................................... 285
see Emergency spare wheel
Floormats ........................................... 268
Fog lamps
Switching on/off ........................... 102
Frequencies
Mobile phone ................................. 326
Two-way radio ................................ 326
Front fog lamps
Display message ............................ 212
Switching on/off ........................... 102
Front-passenger seat
Folding the backrest forward/
back ............................................... 249
Fuel
Additives ........................................ 330
Consumption statistics .................. 189 Displaying the current consump-
tion ................................................ 189
Displaying the range ...................... 189
Driving tips .................................... 146
E10 ................................................ 329
Fuel gauge ....................................... 32
Grade (gasoline) ............................ 329
Important safety notes .................. 329
Problem (malfunction) ................... 142
Refueling ........................................ 140
Tank content/reserve fuel ............. 329
Fuel filler flap
Opening ......................................... 141
Fuel level
Calling up the range (on-board
computer) ...................................... 189
Fuel tank
Capacity ........................................ 329
Problem (malfunction) ................... 142
Fuses
Allocation chart ............................. 298
Before changing ............................. 297
Fuse box in the engine compart-
ment .............................................. 297
Fuse box in the front-passenger
footwell .......................................... 298
Important safety notes .................. 297
G
Garage door openerClearing the memory ..................... 267
General notes ................................ 264
Important safety notes .................. 264
Opening/closing the garage doo r..2 66
Problems when programming ........2 66
Programming (button in the rear-
view mirror) ................................... 265
Synchronizing the rolling code ....... 265
Gasoline ............................................. 329
Gear indicator (on-board com-
puter, Mercedes-AMG vehicles) ....... 197
Genuine parts ...................................... 25
Glove box ...........................................2 48
Google™ Local Search
see also Digital Operator's Man-
ual .................................................. 239
Index11
Page 302 of 338
Check wheels and tires for damage at least once
a month. Check wheels and tires afterdriving
off-road or on rough roads. Damaged wheels
can cause a loss of tire pressure. Pay particular
attention to damage such as:
RCuts inthe tires
RPunctures inthe tires
RTears inthe tires
RBulges on tires
RDeformation or severe corrosion on wheels
Regularly check the tire tread depth and the
condition of the tread across the whole width of
the tire (
Ypage 300). Ifnecessary, turn the
front wheels to full lock inorder to inspect the
inner sideof the tire surface.
All wheels must have a valve cap to protect the valve against dirtand moisture. Do not mount
anything onto the valve other than the standard
valve cap or other valve caps approved by
Mercedes-Benz for your veh icle. Do not use any
other valve caps or systems, e.g. tire pressure
monitoring systems.
Regularly check the pressure of all the tires par-
ticularly prior to long tr ips.Adjust the tire pres-
sure as necessary (
Ypage 302).
Observe the notes on the emergency spare
wheel (
Ypage 323).
The service lifeof tires depends, among other
things, on the foll owing factors:
RDrivin g style
RTire pressure
RDistance covered
Notes on tire tread
GWAR NING
In suff icient tire tread willreduce tire traction.
The tire isno longer abletodissipat e water.
This means that on wet road surfaces, the risk
of hydroplaning increases, inparticular where
speed isnot adapted to suit the driving con-
dit ions. There isa risk of acc ident.
If the tire pressure istoo high or too low,tires
may exhibit diff erent levelsof wear at differ-
ent locations on the tire tread. Thus, you
should regularly check the tread depth and
the condition of the tread across the entire
widt h of all tires.
Minimum tire tread depth for:
RSummer tires: âin(3 mm)
RM+S tires: ãin(4 mm)
For safety reasons, replace the tires before
the legally prescribe d limit for the minimum
tire tread depth is reached.
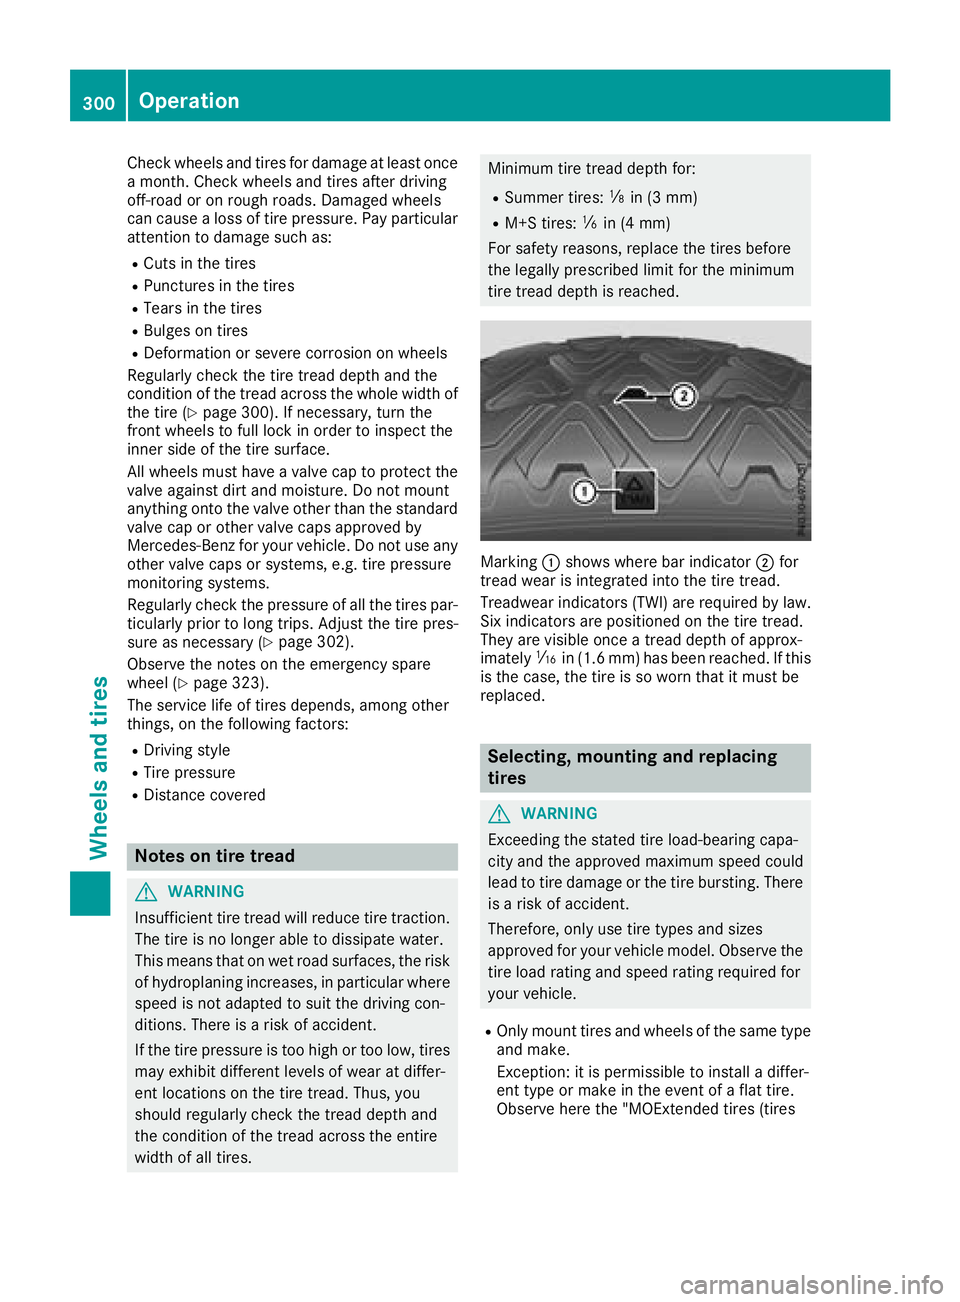
Marking :shows where bar indicator ;for
tread wear is integrated into the tire tread.
Treadwear indicators (TWI) are required bylaw.
Six indicators are positioned on the tire tread.
They are vis ibleonce a tread depth of approx-
imately áin(1.6 mm) has been reached. Ifthis
is the case, the tire isso worn that it must be
replace d.
Selecting, mounting and replacing
tires
GWARNING
Exceeding the stated tire load-bearing capa-
city and the approved maximum speed could
lead to tire damage or the tire bursting. There is a risk of accident.
Therefore, only use tire types and sizes
approved for your vehicle model. Observe the
tire load rating and speed rating required for
your vehicle.
ROnly mount tires and wheels of the same type
and make.
Exception: itis permissible to install a differ-
ent type or make inthe event of a flat tire.
Observe here the "MOExtended tires (tires
300Operation
Wheels and tires
Page 310 of 338
halt by braking carefully. Avoid abrupt steering
movements.
The tire pressure monitor has a yellow warning
lamp in the instrument cluster for indicating
pressure loss or a malfunction. Whether the
warning lamp flashes or lights up indicates
whether a tire pressure is too low or the tire
pressure monitor is malfunctioning:
Rif the warning lamp is lit continuously, the tire
pressure on one or more tires is significantly
too low. The tire pressure monitor is not mal-functioning.
Rif the warning lamp flashes for around a
minute and then remains lit constantly, the
tire pressure monitor is malfunctioning.
In addition to the warning lamp, a message
appears in the multifunction display. Observe
the information on display messages
(
Ypage 220).
It may take up to ten minutes for a malfunction of the tire pressure monitor to be indicated. A
malfunction will be indicated by the tire pres-
sure warning lamp flashing for approximately
one minute and then remaining lit. When the
malfunction has been rectified, the tire pressure
warning lamp goes out after a few minutes of
driving.
The tire pressure values indicated by the on-
board computer may differ from those meas-
ured at a gas station with a pressure gauge. The
tire pressures shown by the on-board computer
refer to those measured at sea level. At high
altitudes, the tire pressure values indicated by a
pressure gauge are higher than those shown by the on-board computer. In this case, do not
reduce the tire pressures.
The operation of the tire pressure monitor can
be affected by interference from radio transmit-
ting equipment (e.g. radio headphones, two-way
radios) that may be being operated in or near the vehicle.
Checking the tire pressure electroni-
cally
XMake sure that the SmartKey is in position 2
in the ignition lock (Ypage 124).
XPress =or; on the steering wheel to
select the Serv.menu.
XPress the9or: button to select
Tire Pressure.
XPress the abutton.
The current tire pressure of each tire is shown
in the multifunction display.
If the vehicle was parked for longer than
20 minutes, the Tire pressure will be
displayed after driving a few minutesmessage is shown.
After a teach-in process, the tire pressure mon-
itor automatically detects new wheels or new
sensors. As long as a clear allocation of the tire
pressure value to the individual wheels is not
possible, theTire
PressureMonitorActivemessage is shown instead of the tire pressure
display. The tire pressures are already being
monitored.
If an emergency spare wheel is mounted, the
system may continue to show the tire pressure
of the wheel that has been removed for a few
minutes. If this occurs, note that the value dis-
played for the position where the spare wheel is
fitted is not the same as the current tire pres-
sure of the emergency spare wheel.
Tire pressure monitor warning mes-
sages
If the tire pressure monitor detects a pressure
loss in one or more tires, a warning message is
shown in the multifunction display. The yellow
tire pressure warning lamp then lights up.
RIf thePlease Correct Tire Pressuremessage appears in the multifunction display,
the tire pressure in at least one tire is too low.
The tire pressure must be corrected when the opportunity arises.
RIf the Check Tire Pressuremessage
appears in the multifunction display, the tire
pressure in one or more tires has dropped
significantly. The tires must be checked.
RIf the TirePressureWarningTireFail‐uremessage appears, the tire pressure in one
or more tires has dropped suddenly. The tires
must be checked.
Observe the instructions and safety notes in the
display messages in the "Tires" section
(
Ypage 220).
If the wheel positions on the vehicle are rotated,
the tire pressures may be displayed for the
wrong positions for a short time. This is rectified after a few minutes of driving, and the tire pres-
sures are displayed for the correct positions.
308Tire pressure
Wheels and tires