check engine light MERCEDES-BENZ GLC 2019 Owners Manual
[x] Cancel search | Manufacturer: MERCEDES-BENZ, Model Year: 2019, Model line: GLC, Model: MERCEDES-BENZ GLC 2019Pages: 370, PDF Size: 19.55 MB
Page 10 of 370
Charge-air pressure (on-board
computer, Mercedes-AMG vehi-
cles).................................................... 223
Child
Restraint system .............................. 60
Child seat
Forward-facing restraint system ...... 63
LATCH-type (ISOFIX) child seat
anchors ............................................ 61
On the front-passenger seat ............ 62
Rearward-facing restraint system .... 63
Top Tether .......................................61
Child-proof locks
Important safety notes .................... 63
Rear doors .......................................64
Children
Special seat belt retractor ...............59
Children in the vehicle
Important safety notes .................... 59
Cigarette lighter................................ 291
Cleaning
Mirror turn signal ...........................309
Trailer tow hitch .............................310
Climate control
Control panel for 3-zone auto-
matic climate control ..................... 120
Control panel for dual-zone auto-
matic climate control ..................... 119
Controlling automatically ...............123
Cooling with air dehumidification .. 122
Cooling with air dehumidification
(multimedia system) ......................273
Defrosting the windows ................. 125
Defrosting the windshield .............. 125
ECO start/stop function ................ 122
General notes ................................ 119
Indicator lamp ................................ 123
Ionization ....................................... 128
Ionization (multimedia system) ...... 273
Notes on using the automatic cli-
mate control .................................. 121
Overview ........................................ 272
Overview of systems ......................119
Perfume atomizer .......................... 127
Perfume atomizer (multimedia
system) .......................................... 273
Problem with the rear window
defroster ........................................ 126
Problems with cooling with air
dehumidification ............................ 123
Rear control panel ......................... 120
Refrigerant ..................................... 362
Refrigerant filling capacity ............. 363
Setting the air distribution ............. 124
Setting the air vents ......................128
Setting the airflow ......................... 124
Setting the climate mode ...............123
Setting the climate mode (multi-
media system) ............................... 273
Setting the temperature ................ 123
Switching air-recirculation mode
on/off ............................................ 126
Switching on/off ........................... 122
Switching residual heat on/off ...... 126
Switching the rear window
defroster on/off ............................ 125
Switching the synchronization
function on and off ........................ 124
Synchronization function (multi-
media system) ............................... 273
Climate control settings
Multimedia system ........................ 272
Climate control system
Climate control .............................. 122
Coat hooks......................................... 286
Cockpit
Overview .......................................... 35
Code for Apps
see QR code
COMAND display
Cleaning ......................................... 310
Combination switch.......................... 110
Connecting a USB device
see also Digital Operator's Man-
ual ..................................................268
Consumption statistics (on-board
computer).......................................... 213
Controller...........................................269
Controlling a speed
see Active Distance Assist DISTRONIC
Convenience closing feature.............. 91
Convenience opening feature............ 91
Coolant (engine)
Checking the level ......................... 303
Display message ............................ 240
8Index
Page 13 of 370
Automatic engine switch-off .......... 136
Deactivating/activating ................. 137
General information ....................... 136
Important safety notes.................. 135
Introduction ................................... 135
Electronic brake force distribution
see EBD (electronic brake force
distribution)
Electronic Stability Program
see ESP®(Electronic Stability Program)
Electronic Traction System
see ETS/4ETS (Electronic Trac-
tion System)
Emergency
Automatic measures after an acci-
dent ................................................. 58
Emergency braking
see BAS (Brake Assist System)
Emergency release
Driver's door.................................... 84
Vehicle ............................................. 84
Emergency Tensioning Devices
Activation ......................................... 55
Emergency unlocking
Tailgate ............................................ 89
Emissions control
Service and warranty information .... 28
Engine
Check Engine warning lamp ........... 262
Display message ............................ 240
ECO start/stop function ................ 135
Engine number ............................... 358
Irregular running ............................ 138
Jump-starting ................................. 322
Starting (important safety notes)... 133
Starting problems .......................... 138
Starting the engine with the
SmartKey ....................................... 133
Starting via smartphone ................ 134
Starting with the Start/Stop but-
ton ................................................. 133
Switching off .................................. 153
Tow-starting (vehicle) ..................... 327
Engine electronics
Problem (malfunction) ................... 138
Engine oil
Adding ........................................... 301
Additives ........................................ 361
Checking the oil level ..................... 300
Checking the oil level using the
dipstick .......................................... 301
Checking the oil level using the
on-board computer........................ 301
Display message ............................ 242
Filling capacity ............................... 361
General notes ................................ 360
Notes about oil grades ................... 360
Notes on oil level/consumption .... 300
Temperature (on-board computer,
Mercedes-AMG vehicles) ............... 223
Engine oil additives
see Additives (engine oil)
Entering an address
see also Digital Operator's Man-
ual .................................................. 268
ESC (Electronic Stability Control)
see ESP®(Electronic Stability Program)
ESP®(Electronic Stability Pro-
gram)
AMG menu (on-board computer) ... 224
Characteristics ................................. 69
Crosswind Assist ............................. 71
Deactivating/activating (button
in Mercedes-AMG vehicles) ............. 70
Deactivating/activating (notes,
except Mercedes-AMG vehicles) ...... 69
Display message ............................ 228
Function/notes................................ 68
General notes .................................. 68
Important safety information ........... 68
Trailer stabilization ........................... 71
Warning lamp ................................. 259
ETS/4ETS (Electronic Traction Sys-
tem)...................................................... 68
Exhaust
see Exhaust pipe
Exhaust check................................... 156
Exhaust pipe
Cleaning ......................................... 309
Exterior lighting
Cleaning ......................................... 308
Setting options .............................. 109
see Lights
Exterior mirrors
Adjusting ....................................... 104
Index11
Page 46 of 370
Restraint system warning lamp
The functions of the restraint system arechecked after the ignition is switched on and atregular intervals while the engine is running.Therefore, malfunctions can be detected ingood time.
The�urestraint system warning lamp on theinstrument cluster lights up when the ignition isswitched on. It goes out no later than a few sec-onds after the vehicle is started. The compo-nents of the restraint system are in operationalreadiness.
A malfunction has occurred if the�urestraintsystem warning lamp:
Rdoes not light up after the ignition is switchedon
Rdoes not go out after a few seconds with theengine running
Rlights up again while the engine is running
GWARNING
If the restraint system is malfunctioning,
restraint system components may be trig-
gered unintentionally or may not deploy as
intended during an accident. This can affect
for example the Emergency Tensioning
Device or the air bag. This poses an increased
risk of injury or even fatal injury.
Have the restraint system checked and
repaired in a qualified specialist workshop as
soon as possible.
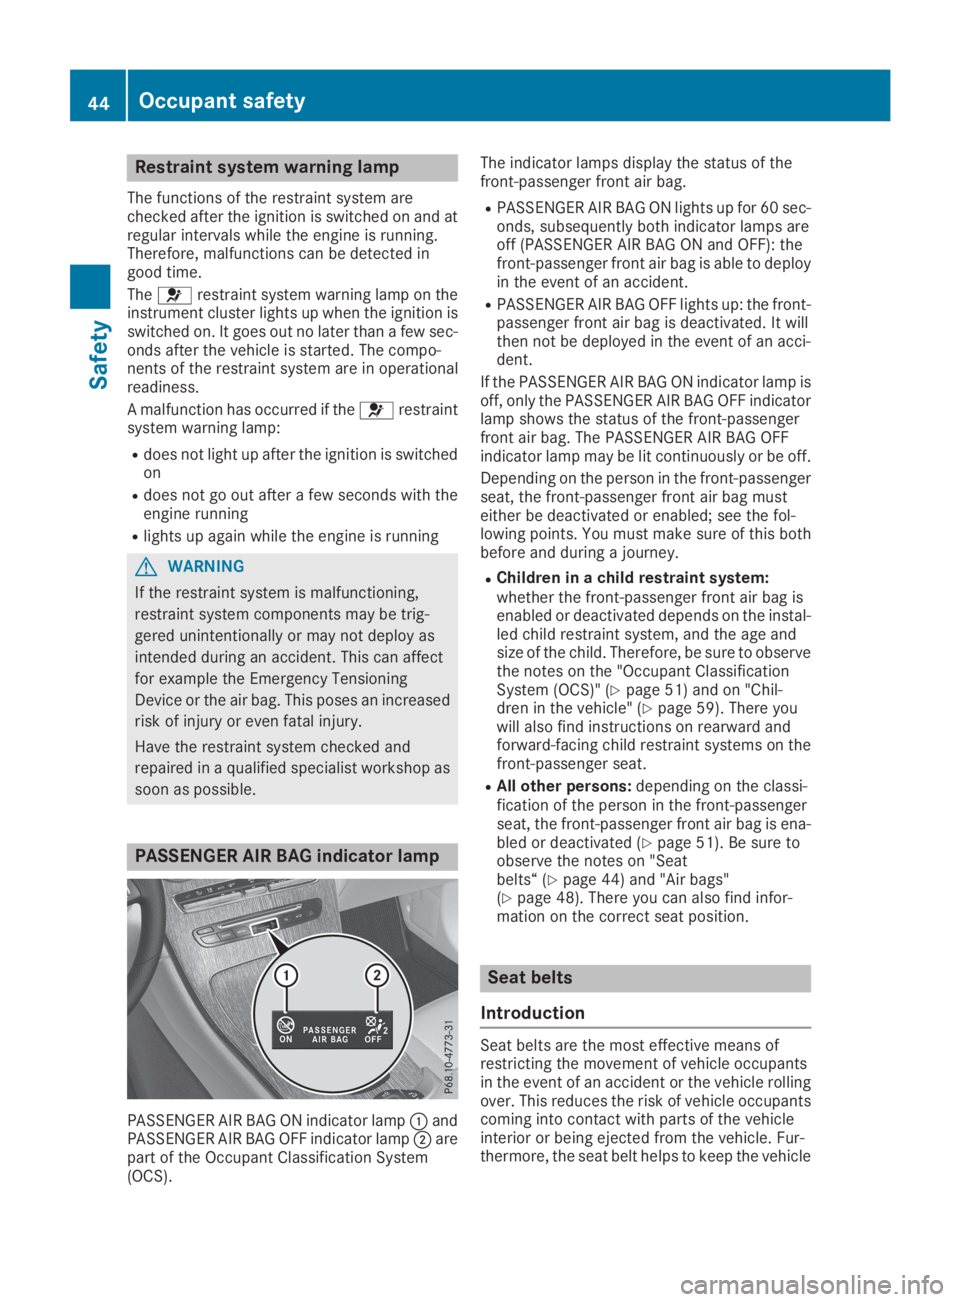
PASSENGER AIR BAG indicator lamp
PASSENGER AIR BAG ON indicator lamp�CandPASSENGER AIR BAG OFF indicator lamp�Darepart of the Occupant Classification System(OCS).
The indicator lamps display the status of thefront-passenger front air bag.
RPASSENGER AIR BAG ON lights up for 60 sec-onds, subsequently both indicator lamps areoff (PASSENGER AIR BAG ON and OFF): thefront-passenger front air bag is able to deployin the event of an accident.
RPASSENGER AIR BAG OFF lights up: the front-passenger front air bag is deactivated. It willthen not be deployed in the event of an acci-dent.
If the PASSENGER AIR BAG ON indicator lamp isoff, only the PASSENGER AIR BAG OFF indicatorlamp shows the status of the front-passengerfront air bag. The PASSENGER AIR BAG OFFindicator lamp may be lit continuously or be off.
Depending on the person in the front-passengerseat, the front-passenger front air bag musteither be deactivated or enabled; see the fol-lowing points. You must make sure of this bothbefore and during a journey.
RChildren in a child restraint system:whether the front-passenger front air bag isenabled or deactivated depends on the instal-led child restraint system, and the age andsize of the child. Therefore, be sure to observethe notes on the "Occupant ClassificationSystem (OCS)" (Ypage 51) and on "Chil-dren in the vehicle" (Ypage 59). There youwill also find instructions on rearward andforward-facing child restraint systems on thefront-passenger seat.
RAll other persons:depending on the classi-fication of the person in the front-passengerseat, the front-passenger front air bag is ena-bled or deactivated (Ypage 51). Be sure toobserve the notes on "Seatbelts“ (Ypage 44) and "Air bags"(Ypage 48). There you can also find infor-mation on the correct seat position.
Seat belts
Introduction
Seat belts are the most effective means ofrestricting the movement of vehicle occupantsin the event of an accident or the vehicle rollingover. This reduces the risk of vehicle occupantscoming into contact with parts of the vehicleinterior or being ejected from the vehicle. Fur-thermore, the seat belt helps to keep the vehicle
44Occupant safety
Safety
Page 67 of 370
Driving safety systems
Overview of driving safety systems
In this section, you will find information aboutthe following driving safety systems:
RABS (Anti-lockBrakingSystem)(Ypage 65)
RBAS (BrakeAssistSystem) (Ypage 66)
RActive Brake Assist (Ypage 66)
RESP®(ElectronicStabilityProgram)(Ypage 68)
REBD (ElectronicBrake forceDistribution)(Ypage 72)
RADAPTIVE BRAKE (Ypage 72)
RActive Brake Assist with cross-traffic function(Ypage 72)
RSTEER CONTROL (Ypage 75)
Important safety notes
If you fail to adapt your driving style or if you areinattentive, the driving safety systems can nei-ther reduce the risk of an accident nor overridethe laws of physics. Driving safety systems aremerely aids designed to assist driving. You areresponsible for maintaining the distance to thevehicle in front, for vehicle speed, for braking ingood time, and for staying in lane. Always adaptyour driving style to suit the prevailing road andweather conditions and maintain a safe distancefrom the vehicle in front. Drive carefully.
The driving safety systems described only workas effectively as possible when there is ade-quate contact between the tires and the roadsurface. Pay particular attention to the informa-tion regarding tires, recommended minimumtire tread depths etc. in the "Wheels and tires"section (Ypage 330).
In wintry driving conditions, always use wintertires (M+S tires)and if necessary, snow chains.Only in this way will the driving safety systemsdescribed in this section work as effectively aspossible.
ABS (Anti-lock Braking System)
General information
ABS regulates brake pressure in such a way thatthe wheels do not lock when you brake. Thisallows you to continue steering the vehicle whenbraking.
The�%ABS warning lamp in the instrumentcluster lights up when the ignition is switchedon. It goes out when the engine is running.
ABS works from a speed of about 5 mph(8 km/h), regardless of road-surface conditions.ABS works on slippery surfaces, even when youonly brake gently.
Important safety notes
iObserve the "Important safety notes" sec-tion (Ypage 65).
GWARNING
If ABS is faulty, the wheels could lock when
braking. The steerability and braking charac-
teristics may be severely impaired. Addition-
ally, further driving safety systems are deac-
tivated. There is an increased danger of skid-
ding and accidents.
Drive on carefully. Have ABS checked imme-
diately at a qualified specialist workshop.
When ABS is malfunctioning, other systems,including driving safety systems, will alsobecome inoperative. Observe the informationon the ABS warning lamp (Ypage 259) and dis-play messages which may be shown in theinstrument cluster (Ypage 228).
Braking
XIf ABS intervenes:continue to depress thebrake pedal vigorously until the braking sit-uation is over.
XTo make a full brake application:depressthe brake pedal with full force.
If ABS intervenes when braking, you will feel apulsing in the brake pedal.
The pulsating brake pedal can be an indicationof hazardous road conditions, and functions as areminder to take extra care while driving.
Driving safety systems65
Safety
Z
Page 80 of 370
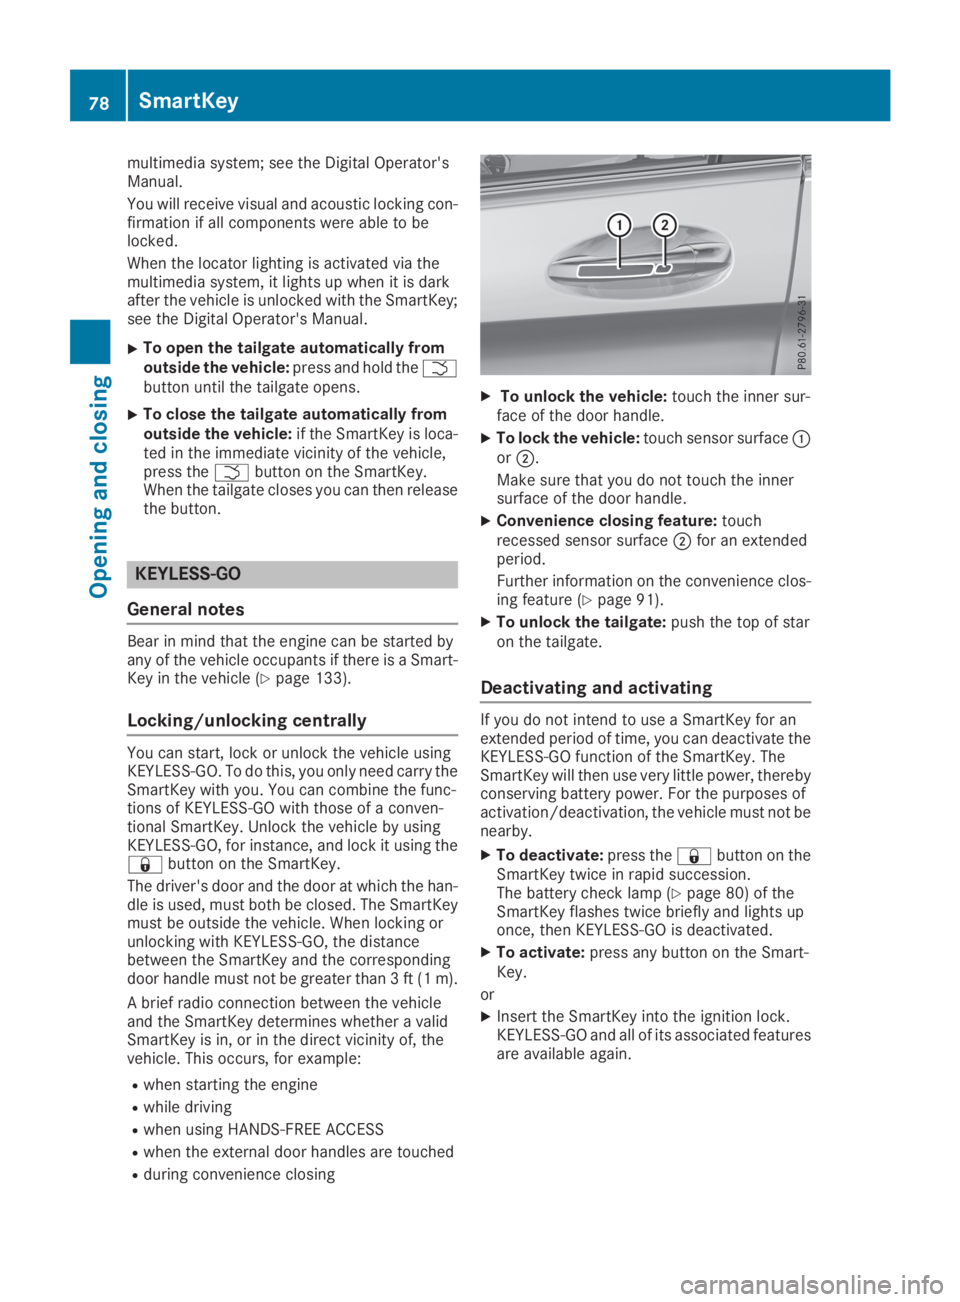
multimedia system; see the Digital Operator'sManual.
You will receive visual and acoustic locking con-firmation if all components were able to belocked.
When the locator lighting is activated via themultimedia system, it lights up when it is darkafter the vehicle is unlocked with the SmartKey;see the Digital Operator's Manual.
XTo open the tailgate automatically fromoutside the vehicle:press and hold the�Tbutton until the tailgate opens.
XTo close the tailgate automatically fromoutside the vehicle:if the SmartKey is loca-ted in the immediate vicinity of the vehicle,press the�Tbutton on the SmartKey.When the tailgate closes you can then releasethe button.
KEYLESS-GO
General notes
Bear in mind that the engine can be started byany of the vehicle occupants if there is a Smart-Key in the vehicle (Ypage 133).
Locking/unlocking centrally
You can start, lock or unlock the vehicle usingKEYLESS-GO. To do this, you only need carry theSmartKey with you. You can combine the func-tions of KEYLESS-GO with those of a conven-tional SmartKey. Unlock the vehicle by usingKEYLESS-GO, for instance, and lock it using the�7button on the SmartKey.
The driver's door and the door at which the han-dle is used, must both be closed. The SmartKeymust be outside the vehicle. When locking orunlocking with KEYLESS-GO, the distancebetween the SmartKey and the correspondingdoor handle must not be greater than 3 ft (1 m).
A brief radio connection between the vehicleand the SmartKey determines whether a validSmartKey is in, or in the direct vicinity of, thevehicle. This occurs, for example:
Rwhen starting the engine
Rwhile driving
Rwhen using HANDS-FREE ACCESS
Rwhen the external door handles are touched
Rduring convenience closing
XTo unlock the vehicle:touch the inner sur-face of the door handle.
XTo lock the vehicle:touch sensor surface�Cor�D.
Make sure that you do not touch the innersurface of the door handle.
XConvenience closing feature:touchrecessed sensor surface�Dfor an extendedperiod.
Further information on the convenience clos-ing feature (Ypage 91).
XTo unlock the tailgate:push the top of staron the tailgate.
Deactivating and activating
If you do not intend to use a SmartKey for anextended period of time, you can deactivate theKEYLESS-GO function of the SmartKey. TheSmartKey will then use very little power, therebyconserving battery power. For the purposes ofactivation/deactivation, the vehicle must not benearby.
XTo deactivate:press the�7button on theSmartKey twice in rapid succession.The battery check lamp (Ypage 80) of theSmartKey flashes twice briefly and lights uponce, then KEYLESS-GO is deactivated.
XTo activate:press any button on the Smart-Key.
or
XInsert the SmartKey into the ignition lock.KEYLESS-GO and all of its associated featuresare available again.
78SmartKey
Opening and closing
Page 84 of 370
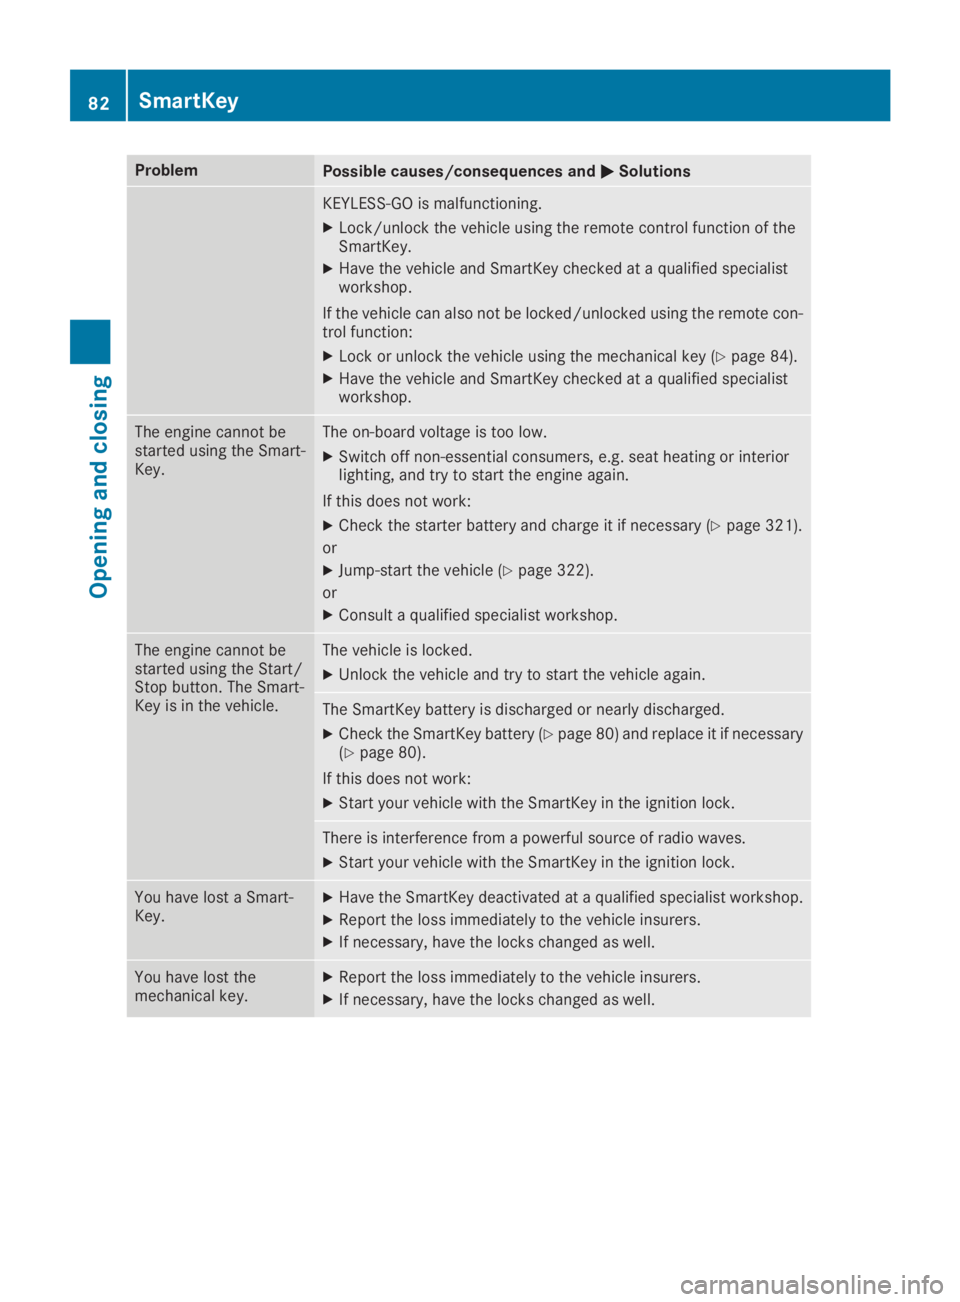
ProblemPossible causes/consequences and�P�PSolutions
KEYLESS-GO is malfunctioning.
XLock/unlock the vehicle using the remote control function of theSmartKey.
XHave the vehicle and SmartKey checked at a qualified specialistworkshop.
If the vehicle can also not be locked/unlocked using the remote con-trol function:
XLock or unlock the vehicle using the mechanical key (Ypage 84).
XHave the vehicle and SmartKey checked at a qualified specialistworkshop.
The engine cannot bestarted using the Smart-Key.
The on-board voltage is too low.
XSwitch off non-essential consumers, e.g. seat heating or interiorlighting, and try to start the engine again.
If this does not work:
XCheck the starter battery and charge it if necessary (Ypage 321).
or
XJump-start the vehicle (Ypage 322).
or
XConsult a qualified specialist workshop.
The engine cannot bestarted using the Start/Stop button. The Smart-Key is in the vehicle.
The vehicle is locked.
XUnlock the vehicle and try to start the vehicle again.
The SmartKey battery is discharged or nearly discharged.
XCheck the SmartKey battery (Ypage 80) and replace it if necessary(Ypage 80).
If this does not work:
XStart your vehicle with the SmartKey in the ignition lock.
There is interference from a powerful source of radio waves.
XStart your vehicle with the SmartKey in the ignition lock.
You have lost a Smart-Key.XHave the SmartKey deactivated at a qualified specialist workshop.
XReport the loss immediately to the vehicle insurers.
XIf necessary, have the locks changed as well.
You have lost themechanical key.XReport the loss immediately to the vehicle insurers.
XIf necessary, have the locks changed as well.
82SmartKey
Opening and closing
Page 135 of 370
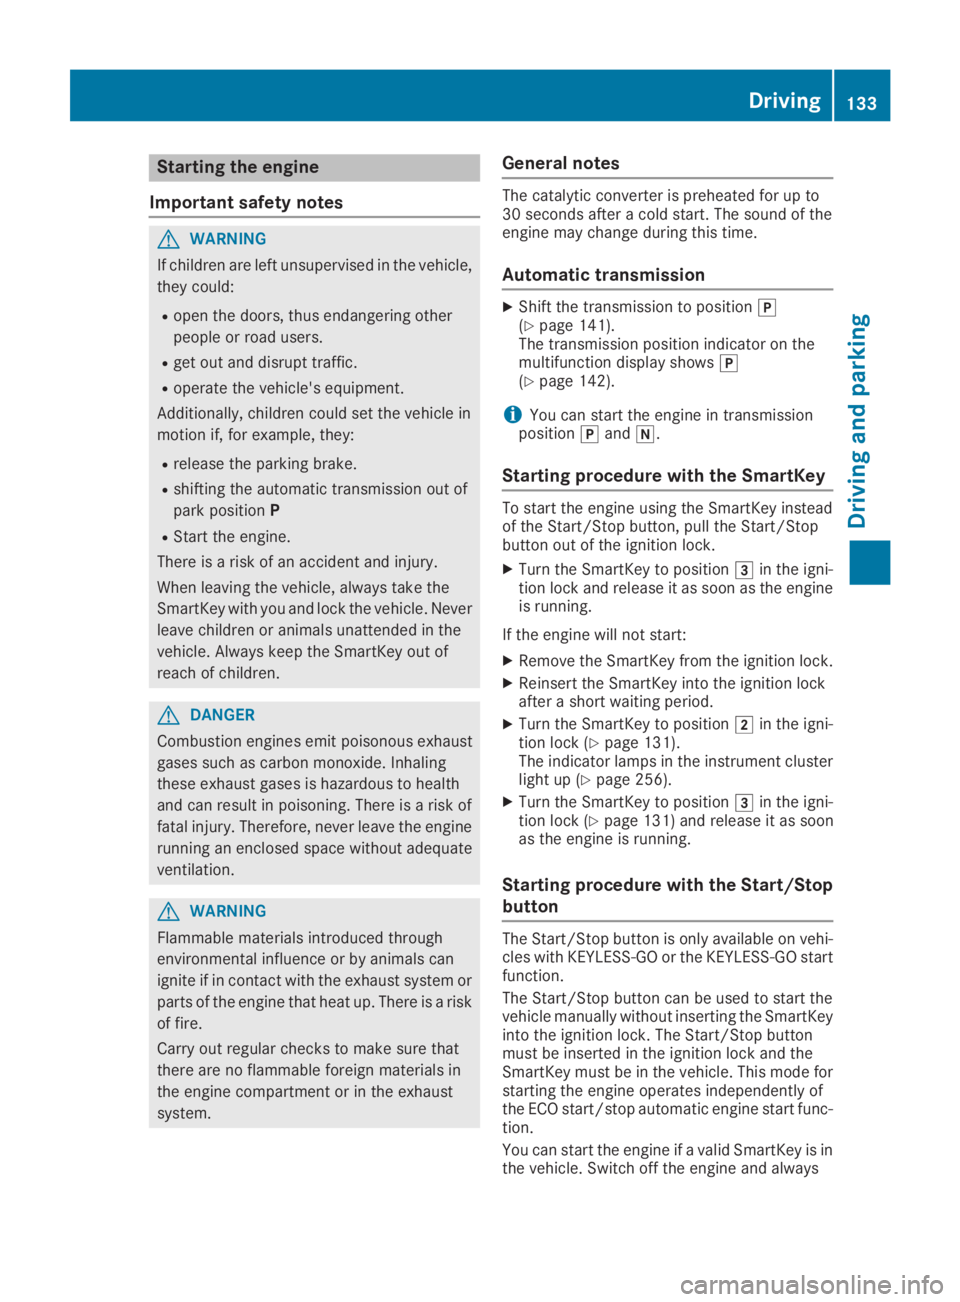
Starting the engine
Important safety notes
GWARNING
If children are left unsupervised in the vehicle,
they could:
Ropen the doors, thus endangering other
people or road users.
Rget out and disrupt traffic.
Roperate the vehicle's equipment.
Additionally, children could set the vehicle in
motion if, for example, they:
Rrelease the parking brake.
Rshifting the automatic transmission out of
park positionP
RStart the engine.
There is a risk of an accident and injury.
When leaving the vehicle, always take the
SmartKey with you and lock the vehicle. Never
leave children or animals unattended in the
vehicle. Always keep the SmartKey out of
reach of children.
GDANGER
Combustion engines emit poisonous exhaust
gases such as carbon monoxide. Inhaling
these exhaust gases is hazardous to health
and can result in poisoning. There is a risk of
fatal injury. Therefore, never leave the engine
running an enclosed space without adequate
ventilation.
GWARNING
Flammable materials introduced through
environmental influence or by animals can
ignite if in contact with the exhaust system or
parts of the engine that heat up. There is a risk
of fire.
Carry out regular checks to make sure that
there are no flammable foreign materials in
the engine compartment or in the exhaust
system.
General notes
The catalytic converter is preheated for up to30 seconds after a cold start. The sound of theengine may change during this time.
Automatic transmission
XShift the transmission to position�](Ypage 141).The transmission position indicator on themultifunction display shows�](Ypage 142).
iYou can start the engine in transmissionposition�]and�\\.
Starting procedure with the SmartKey
To start the engine using the SmartKey insteadof the Start/Stop button, pull the Start/Stopbutton out of the ignition lock.
XTurn the SmartKey to position�Iin the igni-tion lock and release it as soon as the engineis running.
If the engine will not start:
XRemove the SmartKey from the ignition lock.
XReinsert the SmartKey into the ignition lockafter a short waiting period.
XTurn the SmartKey to position�Hin the igni-tion lock (Ypage 131).The indicator lamps in the instrument clusterlight up (Ypage 256).
XTurn the SmartKey to position�Iin the igni-tion lock (Ypage 131) and release it as soonas the engine is running.
Starting procedure with the Start/Stop
button
The Start/Stop button is only available on vehi-cles with KEYLESS-GO or the KEYLESS-GO startfunction.
The Start/Stop button can be used to start thevehicle manually without inserting the SmartKeyinto the ignition lock. The Start/Stop buttonmust be inserted in the ignition lock and theSmartKey must be in the vehicle. This mode forstarting the engine operates independently ofthe ECO start/stop automatic engine start func-tion.
You can start the engine if a valid SmartKey is inthe vehicle. Switch off the engine and always
Driving133
Driving and parking
Z
Page 141 of 370
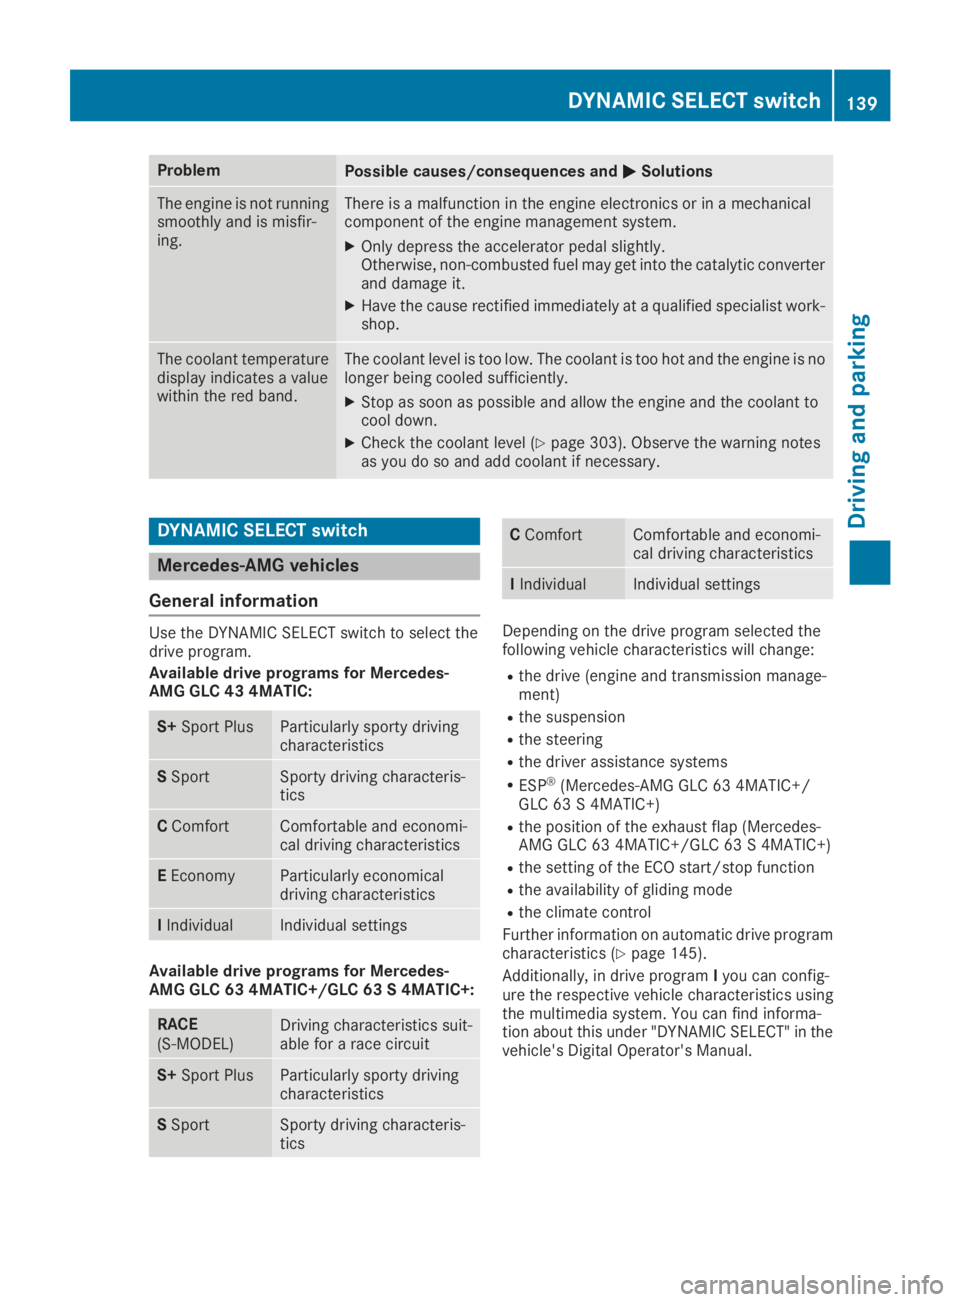
ProblemPossible causes/consequences and�P�PSolutions
The engine is not runningsmoothly and is misfir-ing.
There is a malfunction in the engine electronics or in a mechanicalcomponent of the engine management system.
XOnly depress the accelerator pedal slightly.Otherwise, non-combusted fuel may get into the catalytic converterand damage it.
XHave the cause rectified immediately at a qualified specialist work-shop.
The coolant temperaturedisplay indicates a valuewithin the red band.
The coolant level is too low. The coolant is too hot and the engine is nolonger being cooled sufficiently.
XStop as soon as possible and allow the engine and the coolant tocool down.
XCheck the coolant level (Ypage 303). Observe the warning notesas you do so and add coolant if necessary.
DYNAMIC SELECT switch
Mercedes-AMG vehicles
General information
Use the DYNAMIC SELECT switch to select thedrive program.
Available drive programs for Mercedes-AMG GLC 43 4MATIC:
S+Sport PlusParticularly sporty drivingcharacteristics
SSportSporty driving characteris-tics
CComfortComfortable and economi-cal driving characteristics
EEconomyParticularly economicaldriving characteristics
IIndividualIndividual settings
Available drive programs for Mercedes-AMG GLC 63 4MATIC+/GLC 63 S 4MATIC+:
RACE(S‑MODEL)Driving characteristics suit-able for a race circuit
S+Sport PlusParticularly sporty drivingcharacteristics
SSportSporty driving characteris-tics
CComfortComfortable and economi-cal driving characteristics
IIndividualIndividual settings
Depending on the drive program selected thefollowing vehicle characteristics will change:
Rthe drive (engine and transmission manage-ment)
Rthe suspension
Rthe steering
Rthe driver assistance systems
RESP®(Mercedes-AMG GLC 63 4MATIC+/GLC 63 S 4MATIC+)
Rthe position of the exhaust flap (Mercedes-AMG GLC 63 4MATIC+/GLC 63 S 4MATIC+)
Rthe setting of the ECO start/stop function
Rthe availability of gliding mode
Rthe climate control
Further information on automatic drive programcharacteristics (Ypage 145).
Additionally, in drive programIyou can config-ure the respective vehicle characteristics usingthe multimedia system. You can find informa-tion about this under "DYNAMIC SELECT" in thevehicle's Digital Operator's Manual.
DYNAMIC SELECT switch139
Driving and parking
Z
Page 160 of 370
This helps you to avoid overheating thebrakes and wearing them out excessively.
When you take advantage of engine braking, adrive wheel may not turn for some time, e.g.on a slippery road surface. This could causedamage to the drive train. This type of damageis not covered by the Mercedes-Benz war-ranty.
Heavy and light loads
GWARNING
If you rest your foot on the brake pedal while
driving, the braking system can overheat. This
increases the stopping distance and can even
cause the braking system to fail. There is a
risk of an accident.
Never use the brake pedal as a footrest. Never
depress the brake pedal and the accelerator
pedal at the same time.
!Depressing the brake pedal constantlyresults in excessive and premature wear tothe brake pads.
If the brakes have been subjected to a heavyload, do not stop the vehicle immediately. Driveon for a short while. This allows the airflow tocool the brakes more quickly.
Wet roads
If you have driven for a long time in heavy rainwithout braking, there may be a delayed reac-tion from the brakes when braking for the firsttime. This may also occur after the vehicle hasbeen washed or driven through deep water.
You have to depress the brake pedal morefirmly. Maintain a greater distance from thevehicle in front.
After driving on a wet road or having the vehiclewashed, brake firmly while paying attention tothe traffic conditions. This will warm up thebrake discs, thereby drying them more quicklyand protecting them against corrosion.
Limited braking performance on salt-
treated roads
If you drive on salted roads, a layer of salt resi-due may form on the brake discs and brakepads. This can result in a significantly longerbraking distance.
RIn order to prevent any salt build-up, apply thebrakes occasionally while paying attention tothe traffic conditions.
RCarefully depress the brake pedal and thebeginning and end of a journey.
RMaintain a greater distance to the vehicleahead.
Servicing the brakes
!The brake fluid level may be too low, if:
Rif the red brake warning lamp lights up inthe instrument cluster and
Ryou hear a warning tone while the engine isrunning
Observe additional warning messages in themultifunction display.
The brake fluid level may be too low due tobrake pad wear or leaking brake lines.
Have the brake system checked immediately.Consult a qualified specialist workshop toarrange this.
!Vehicles with 4MATIC:function or per-formance tests may only be carried out on a 2-axle dynamometer. If you wish to operate thevehicle on such a dynamometer, please con-sult a qualified specialist workshop inadvance. You could otherwise damage thedrive train or the brake system.
!Vehicles with 4MATIC:the ESP®systemoperates automatically. If the electric parkingbrake is tested on a brake dynamometer, theengine and ignition must be switched off: turnthe SmartKey in the ignition lock to position�
Page 185 of 370
Rif there is a sudden change in temperature,e.g. when driving into a heated garage in win-ter
Rif the camera lens is dirty or obstructed.Observe the notes on cleaning(Ypage 309)
Rif the rear of your vehicle is damaged. In thiscase, have the camera position and settingchecked at a qualified specialist workshop
The field of vision and other functions of the rearview camera may be restricted due to additionalaccessories on the rear of the vehicle (e.g.license plate holder, rear bicycle rack).
The rear view camera is protected from rain-drops and dust by means of a flap. When the rearview camera is activated, this flap opens.
The flap closes again when:
Ryou have finished the maneuvering process
Ryou switch off the engine
Ryou open the cargo compartment
Observe the notes on cleaning (Ypage 309).
For technical reasons, the flap may remain openbriefly after the rear view camera has beendeactivated.
Activating/deactivating the rear view
camera
XTo activate:make sure that theActiva‐Activa‐
tion by R geartion by R gearfunction is selected in themultimedia system (see the Digital Operator'sManual).
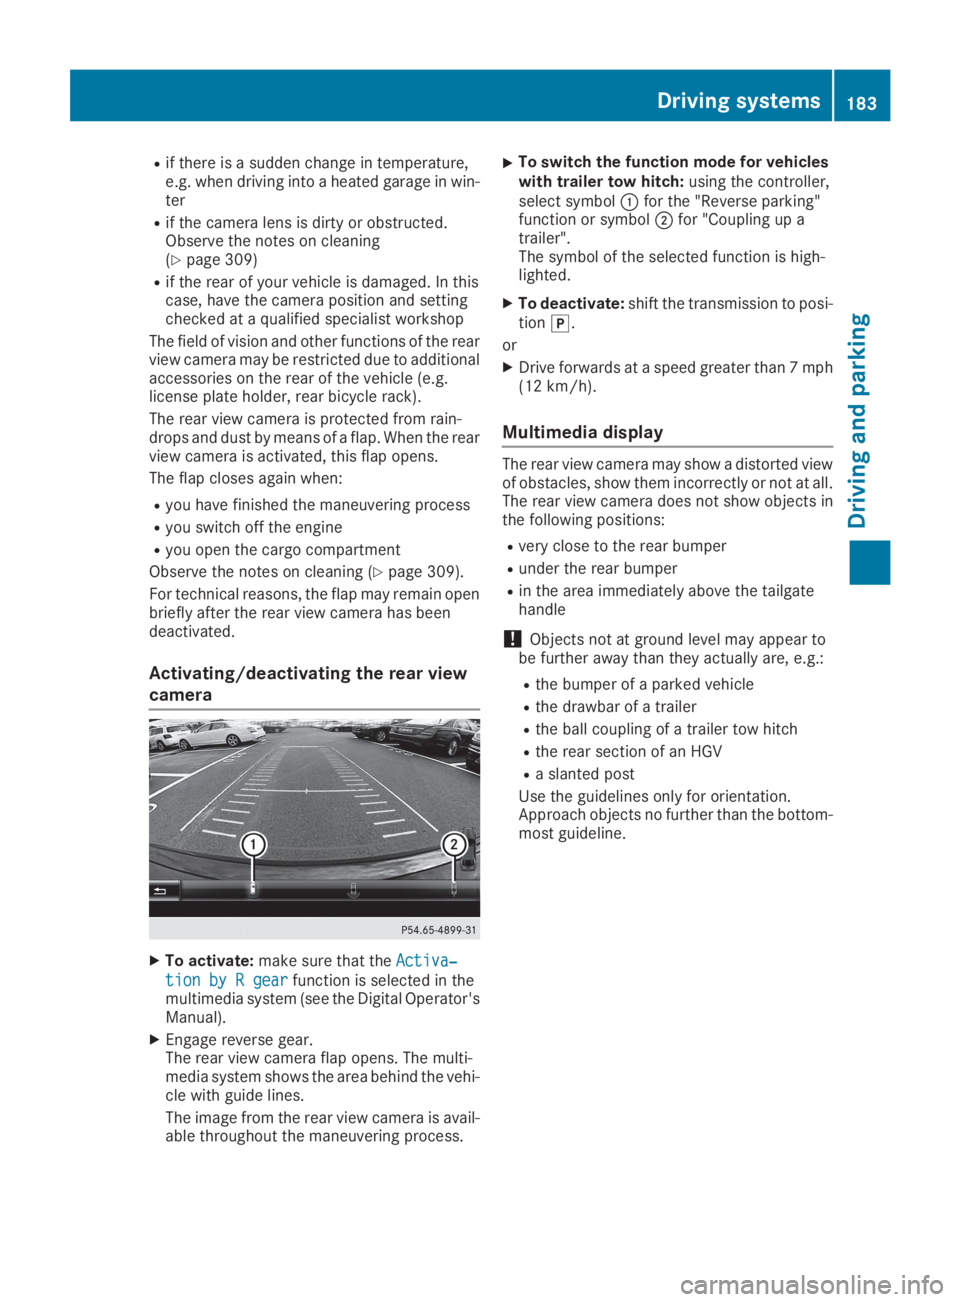
XEngage reverse gear.The rear view camera flap opens. The multi-media system shows the area behind the vehi-cle with guide lines.
The image from the rear view camera is avail-able throughout the maneuvering process.
XTo switch the function mode for vehicleswith trailer tow hitch:using the controller,select symbol�Cfor the "Reverse parking"function or symbol�Dfor "Coupling up atrailer".The symbol of the selected function is high-lighted.
XTo deactivate:shift the transmission to posi-tion�].
or
XDrive forwards at a speed greater than 7 mph(12 km/h).
Multimedia display
The rear view camera may show a distorted viewof obstacles, show them incorrectly or not at all.The rear view camera does not show objects inthe following positions:
Rvery close to the rear bumper
Runder the rear bumper
Rin the area immediately above the tailgatehandle
!Objects not at ground level may appear tobe further away than they actually are, e.g.:
Rthe bumper of a parked vehicle
Rthe drawbar of a trailer
Rthe ball coupling of a trailer tow hitch
Rthe rear section of an HGV
Ra slanted post
Use the guidelines only for orientation.Approach objects no further than the bottom-most guideline.
Driving systems183
Driving and parking
Z