TIREFIT kit MERCEDES-BENZ GLC-Class 2016 X253 Owner's Manual
[x] Cancel search | Manufacturer: MERCEDES-BENZ, Model Year: 2016, Model line: GLC-Class, Model: MERCEDES-BENZ GLC-Class 2016 X253Pages: 418, PDF Size: 9.23 MB
Page 12 of 418
Starting the engine with the
SmartKey ....................................... 155
Starting via smartphone ................ 156
Starting with the Start/Stop but-
ton ................................................. 156
Switching off .................................. 173
Tow-starting (vehicle) ..................... 370
Engine electronics
Problem (malfunction) ................... 160
Engine oil
Adding ........................................... 340
Additives ........................................ 412
Checking the oil level ..................... 339
Checking the oil level using the
dipstick .......................................... 339
Display message ............................ 278
Filling capacity ............................... 412
General notes ................................ 411
Notes about oil grades ................... 411
Notes on oil level/consumption .... 339
Viscosity ........................................ 412
ESP
®(Electronic Stability Pro-
gram)
Characteristics ................................. 73
Crosswind Assist ............................. 75
Deactivating/activating ................... 74
Display message ............................ 258
Function/notes ................................ 73
General notes .................................. 73
Important safety information ........... 73
Trailer stabilization ........................... 75
Warning lamp ................................. 296
ETS/4ETS (Electronic Traction Sys-
tem) ...................................................... 73
Exhaust
see Exhaust pipe
Exhaust check ................................... 176
Exhaust pipe
Cleaning ......................................... 349
Exterior lighting
Cleaning ......................................... 348
see Lights
Exterior mirrors
Adjusting ....................................... 119
Dipping (automatic) ....................... 120
Folding in/out (automatically) ....... 119
Folding in/out (electrically) ........... 119 Out of position (troubleshooting) ... 120
Setting ........................................... 119
Storing settings (memory func-
tion) ............................................... 122
Storing the parking position .......... 120
Eyeglasses compartment ................. 307
F
Features............................................. 318
Filler cap
see Refueling
Flat tire
Changing a wheel/mounting the
spare wheel ................................... 395
MOExtended tires .......................... 357
Preparing the vehicle ..................... 356
TIREFIT kit ...................................... 358
Floormats ........................................... 335
Frequencies
Mobile phone ................................. 406
Two-way radio ................................ 406
Fuel
Additives ........................................ 411
Consumption information .............. 411
Consumption statistics .................. 245
Displaying the current consump-
tion ................................................ 244
Displaying the range ...................... 244
Driving tips .................................... 176
E10 ................................................ 410
Fuel gauge ....................................... 33
Grade (gasoline) ............................ 410
Important safety notes .................. 409
Problem (malfunction) ................... 172
Refueling ........................................ 169
Tank content/reserve fuel ............. 410
Fuel filler flap
Opening ......................................... 170
Fuel level
Calling up the range (on-board
computer) ...................................... 244
Fuel tank
Capacity ........................................ 410
Problem (malfunction) ................... 172
Fuses
Allocation chart ............................. 372
Before changing ............................. 370
10Index
Page 20 of 418
Stowage compartmentsArmrest (under) ............................. 308
Center console .............................. 307
Cup holders ................................... 318
Door ............................................... 308
Eyeglasses compartment ............... 307
Glove box ....................................... 307
Important safety information ......... 306
Map pockets ..................................3 08
Rear ............................................... 308
Stowage net ................................... 308
see Stowage areas
Stowage net ....................................... 308
Summer tires
In winter ........................................ 376
Sun visor ............................................ 319
Suspension settings
AIR BODY CONTROL ......................1 96
SUV
(Sport Utility Vehicle) ....................... 25
Switching air-recirculation mode
on/off ................................................. 147
T
Tachometer ........................................ 239
Tail lamps
see Lights
Tailgate
Display message ............................ 288
Emergency unlocking ....................... 97
Limiting the opening angle ...............9 7
Obstruction detection ......................9 2
Opening dimensions ......................4 15
Opening/closing .............................. 92
Opening/closing (automatically
from inside) ...................................... 96
Opening/closing (automatically
from outside) ................................... 93
Opening/closing (manually from
outside) ............................................ 93
Tank content
Fuel gauge ....................................... 33
Technical data
Capacities ...................................... 409
Information ....................................4 06
Tires/wheels ................................. 399
Trailer loads ................................... 416 Vehicle data ................................... 415
Telephone
Accepting a call (multifunction
steering wheel) .............................. 250
Display message ............................ 289
Introduction ................................... 250
Menu (on-board computer) ............ 250
Number from the phone book ........2 51
Redialing ........................................ 251
Rejecting/ending a call ................. 250
Temperature
Coolant (display in the instrument
cluster) .......................................... 239
Outside temperature ......................2 39
Setting (climate control) ................ 145
Tire pressure
Calling up (on-board computer) ..... 381
Checking manually ........................ 381
Display message ............................ 285
Maximum ....................................... 380
Not reached (TIREFIT) .................... 359
Notes ............................................. 379
Reached (TIREFIT) .......................... 359
Recommended ............................... 377
Tire pressure monitor
Checking the tire pressure elec-
tronically ........................................ 383
Function/notes .............................3 81
G
eneral notes ................................ 381
Important safety notes .................. 381
Radio type approval for the tire
pressure monitor ........................... 384
Restarting ...................................... 383
Warning lamp ................................. 302
Warning message .......................... 383
Tire-change tool kit ........................... 356
TIREFIT kit .......................................... 358
Tire pressure not reached .............. 359
Tire pressure reached .................... 359
Tires
Aspect ratio (definition) ................. 394
Average weight of the vehicle
occupants (definition) .................... 393
Bar (definition) ............................... 392
Changing a wheel .......................... 395
Characteristics .............................. 392
Checking ........................................ 375
Curb weight (definition) ................. 394
18Index
Page 357 of 418
life span also depends on use, care, stor-
age, etc.
RThe reflective safety jackets should be dis-posed of and replaced with new ones:
-after 15 washes, and/or
-if the reflective strips have become
scratched, and/or
-if the backing material and/or reflective
strips have become soiled and cannot becleaned off, and/or
-the fluorescence of a reflective safety
vest has faded e.g. due to the effects of
sunlight
RDispose of reflective safety jackets in an
environmentally responsible manner. To do
so, contact your local waste disposal com- pany.
Vehicle tool kit
General notes
The towing eye is located in the left-hand
stowage well under the cargo compartment
floor.
Apart from certain country-specific varia-
tions, the vehicles are not equipped with a
tire-change tool kit.
Some tools for changing a wheel are specific
to the vehicle. For more information on which tire changing tools are required and approved
to perform a wheel change on your vehicle,
consult a qualified specialist workshop.
Tools required for changing a wheel may
include, for example:
RJack
RWheel chock
RLug wrench
RRatchet wrench
RAlignment bolt
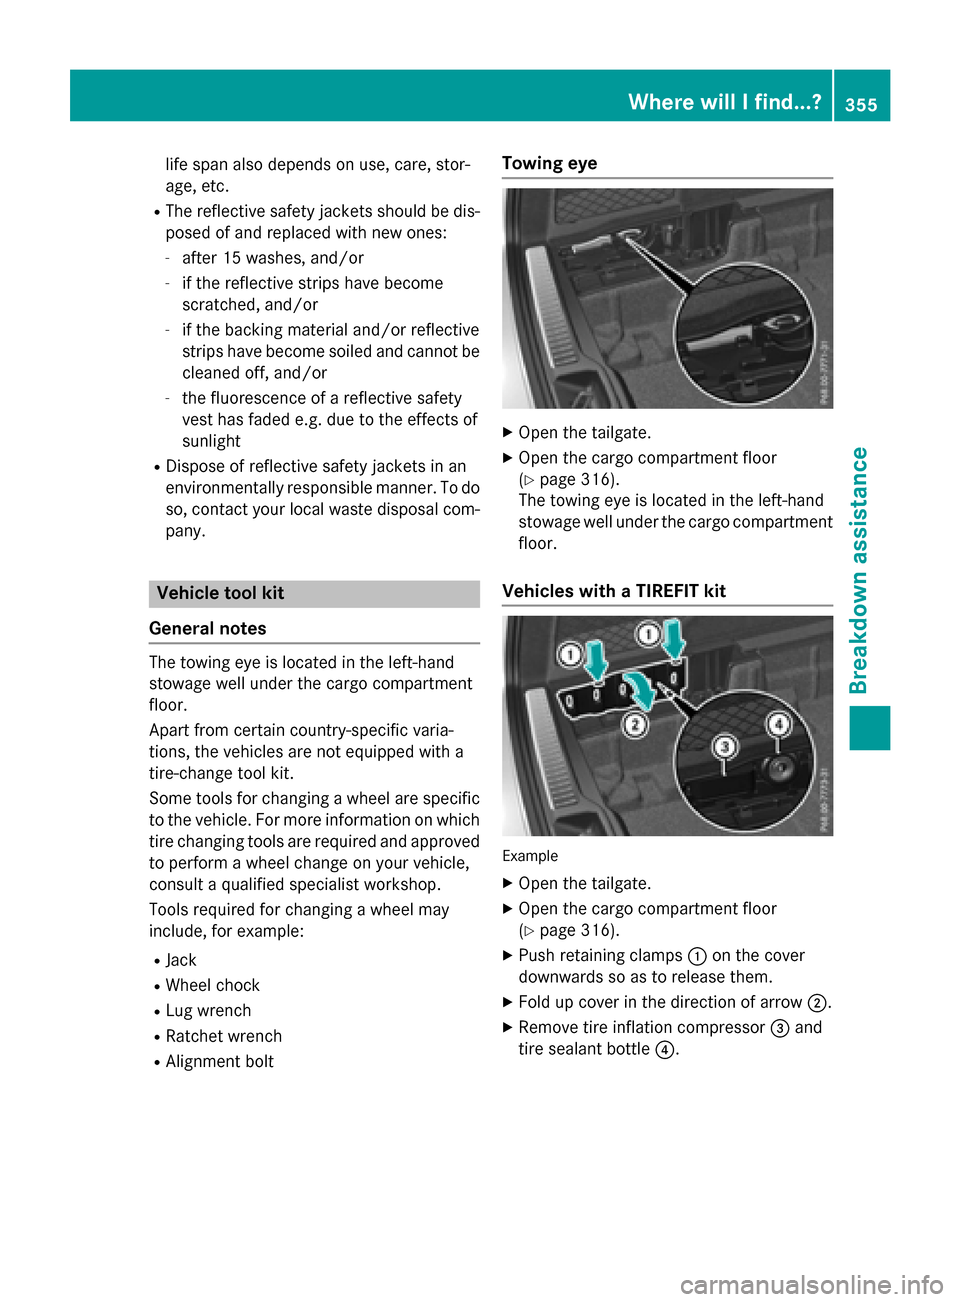
Towing eye
XOpen the tailgate.
XOpen the cargo compartment floor
(
Ypage 316).
The towing eye is located in the left-hand
stowage well under the cargo compartment
floor.
Vehicles with a TIREFIT kit
Example
XOpen the tailgate.
XOpen the cargo compartment floor
(
Ypage 316).
XPush retaining clamps :on the cover
downwards so as to release them.
XFold up cover in the direction of arrow ;.
XRemove tire inflation compressor=and
tire sealant bottle ?.
Where will I find...?355
Breakdown assistance
Page 358 of 418
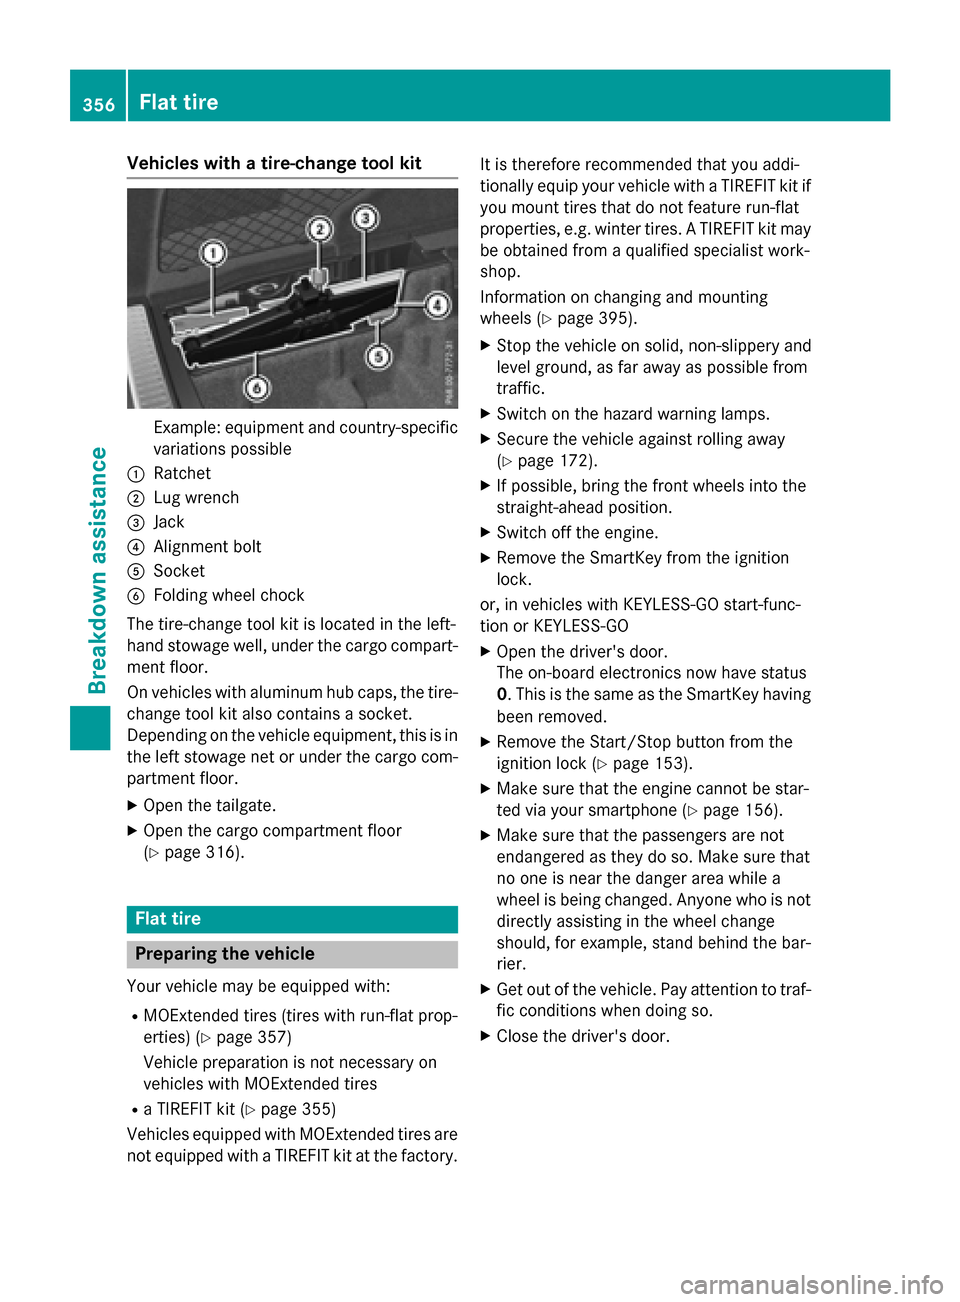
Vehicles with a tire-change tool kit
Example: equipment and country-specificvariations possible
:Ratchet
;Lug wrench
=Jack
?Alignment bolt
ASocket
BFolding wheel chock
The tire-change tool kit is located in the left-
hand stowage well, under the cargo compart-
ment floor.
On vehicles with aluminum hub caps, the tire-
change tool kit also contains a socket.
Depending on the vehicle equipment, this is in
the left stowage net or under the cargo com-
partment floor.
XOpen the tailgate.
XOpen the cargo compartment floor
(
Ypage 316).
Flat tire
Preparing the vehicle
Your vehicle may be equipped with:
RMOExtended tires (tires with run-flat prop-
erties) (
Ypage 357)
Vehicle preparation is not necessary on
vehicles with MOExtended tires
Ra TIREFIT kit (Ypage 355)
Vehicles equipped with MOExtended tires are
not equipped with a TIREFIT kit at the factory. It is therefore recommended that you addi-
tionally equip your vehicle with a TIREFIT kit if
you mount tires that do not feature run-flat
properties, e.g. winter tires. A TIREFIT kit may
be obtained from a qualified specialist work-
shop.
Information on changing and mounting
wheels (
Ypage 395).
XStop the vehicle on solid, non-slippery and
level ground, as far away as possible from
traffic.
XSwitch on the hazard warning lamps.
XSecure the vehicle against rolling away
(
Ypage 172).
XIf possible, bring the front wheels into the
straight-ahead position.
XSwitch off the engine.
XRemove the SmartKey from the ignition
lock.
or, in vehicles with KEYLESS-GO start-func-
tion or KEYLESS ‑GO
XOpen the driver's door.
The on-board electronics now have status
0. This is the same as the SmartKey having
been removed.
XRemove the Start/Stop button from the
ignition lock (
Ypage 153).
XMake sure that the engine cannot be star-
ted via your smartphone (
Ypage 156).
XMake sure that the passengers are not
endangered as they do so. Make sure that
no one is near the danger area while a
wheel is being changed. Anyone who is not
directly assisting in the wheel change
should, for example, stand behind the bar-
rier.
XGet out of the vehicle. Pay attention to traf-
fic conditions when doing so.
XClose the driver's door.
356Flat tire
Breakdo wn assis tance
Page 359 of 418
MOExtended tires (tires with run-flat
properties)
General notes
With MOExtended tires (tires with run flat
characteristics), you can continue to drive
your vehicle even if there is a total loss of
pressure in one or more tires. The affected
tire must not show any clearly visible damage.
You can recognize MOExtended tires by the
MOExtended marking which appears on the
sidewall of the tire. You will find this marking next to the tire size designation, the load-
bearing capacity and the speed index
(
Ypage 389).
MOExtended tires may only be used in con-
junction with an active tire pressure monitor.
If a pressure loss warning message
appears in the multifunction display:
Robserve the instructions in the display mes-
sages (
Ypage 285).
Rcheck the tire for damage.
Rif driving on, observe the following notes.
The driving distance possible in run-flat mode
is approximately 50 miles (80 km) when the
vehicle is partially laden. When the vehicle is
fully laden it is approximately 19 miles
(30 km).
In addition to the vehicle load, the driving dis-
tance possible depends upon:
Rvehicle speed
Rroad condition
Routside temperature
The driving distance possible in run-flat mode
may be reduced by extreme driving condi-
tions or maneuvers, or it can be increased
through a moderate style of driving.
The driving distance possible in run-flat mode
is counted from the moment the tire pressure
loss warning appears in the multifunction dis-
play.
You must not exceed a maximum speed of
50 mph (80 km/h). When replacing one or all tires, please
observe the following specifications for your
vehicle's tires:
Rsize
Rthe type and
Rthe "MOExtended" mark
If a tire has gone flat and cannot be replaced
with a MOExtended tire, a standard tire may
be used as a temporary measure. Make sure
tha
t you use the proper size and type (sum-
mer or winter tire).
Vehicles equipped with MOExtended tires are
not equipped with a TIREFIT kit at the factory.
It is therefore recommended that you addi-
tionally equip your vehicle with a TIREFIT kit if you mount tires that do not feature run-flat
properties, e.g. winter tires. A TIREFIT kit may
be obtained from a qualified specialist work-
shop.
Important safety notes
GWARNING
When driving in emergency mode, the driving
characteristics deteriorate, e.g. when corner-
ing, accelerating quickly and when braking.
There is a risk of an accident.
Do not exceed the stated maximum speed.
Avoid abrupt steering and driving maneuvers,
and driving over obstacles (curbs, potholes,
off-road). This applies in particular to a laden
vehicle.
Stop driving in emergency mode if:
Ryou hear banging noises.
Rthe vehicle starts to shake.
Ryou see smoke and smell rubber.
RESP®is intervening constantly.
Rthere are tears in the sidewalls of the tire.
After driving in emergency mode, have the
wheel rims checked at a qualified specialist
workshop with regard to their further use. The
defective tire must be replaced in every case.
Flat tire357
Breakdown assistance
Z
Page 360 of 418
TIREFIT kit
Important safety notes
TIREFIT is a tire sealant.
You can use TIREFIT to seal punctures of up to
0.16 in (4 mm), particularly those in the tire
tread. You can use TIREFIT at outside tem-
peratures down to Ò4 ‡ (Ò20 †).
GWARNING
In the following situations, the tire sealant is
unable to provide sufficient breakdown assis-
tance, as it is unable to seal the tire properly:
Rthere are cuts or punctures in the tire larger
than those mentioned above.
Rthe wheel rim is damaged.
Ryou have driven at very low tire pressures or on a flat tire.
There is a risk of an accident.
Do not drive the vehicle. Contact a qualified
specialist workshop.
GWARNING
The tire sealant is harmful and causes irrita-
tion. It must not come into contact with your
skin, eyes or clothing or be swallowed. Do not inhale TIREFIT fumes. Keep tire sealant away
from children. There is a risk of injury.
If you come into contact with the tire sealant,
observe the following:
RRinse off the tire sealant from your skin
immediately with water.
RIf the tire sealant comes into contact with
your eyes, immediately rinse them thor-
oughly with clean water.
RIf tire sealant is swallowed, immediately
rinse your mouth out thoroughly and drink
plenty of water. Do not induce vomiting,
and seek medical attention immediately.
RImmediately change out of clothing which
has come into contact with tire sealant.
RIf an allergic reaction occurs, seek medical
attention immediately.
!Do not operate the tire inflation compres-
sor for longer than eight minutes at a time
without a break. It may otherwise overheat.
The tire inflation compressor can be oper-
ated again once it has cooled down.
Comply with the manufacturer’s safety
instructions on the sticker on the tire inflation
compressor.
Using the TIREFIT kit
XDo not remove any foreign objects which
have penetrated the tire, e.g. screws or
nails.
XRemove the tire sealant bottle, the accom-
panying TIREFIT sticker and the tire infla-
tion compressor from the stowage well
underneath the cargo compartment floor
(
Ypage 355).
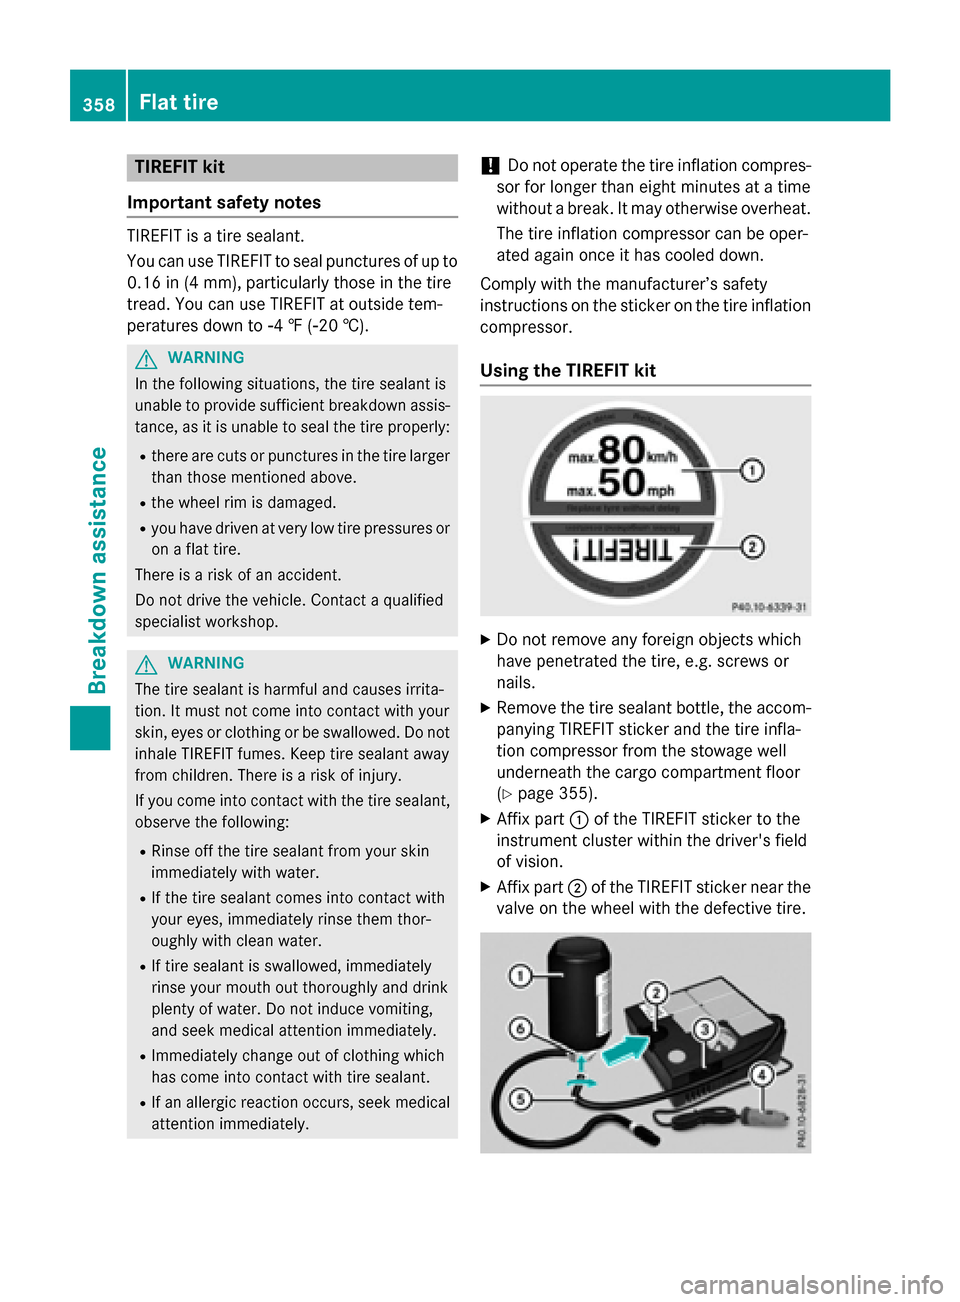
XAffix part :of the TIREFIT sticker to the
instrument cluster within the driver's field
of vision.
XAffix part ;of the TIREFIT sticker near the
valve on the wheel with the defective tire.
358Flat tire
Breakdown assistance
Page 362 of 418
suitable for higher speeds. There is a risk of
accident.
You should therefore adapt your driving style
accordingly and drive carefully. Do not exceedthe specified maximum speed with a tire that
has been repaired using tire sealant.
The maximum permissible speed for a tire
sealed with tire sealant is 50 mph (80 km/h). The upper part of the TIREFIT sticker must be
affixed to the instrument cluster in the driv-
er's field of vision.
!After use, excess tire sealant may run out
of the filler hose. This could cause stains.
Therefore, place the tire sealant bottle with
filler hose in the plastic bag which is con-
tained in the TIREFIT kit.
HEnvironmental note
Have the used tire sealant bottle disposed of
professionally, e.g. at a qualified specialist
workshop.
If a tire pressure of 180 kPa (1.8 bar/26 psi)
has been attained after five minutes:
XSwitch off the tire inflation compressor.
XUnscrew the filler hose from the valve of
the faulty tire.
XStow the tire sealant bottle and the tire
inflation compressor.
XPull away immediately.
XStop after driving for approximately ten
minutes and check the tire pressure with
the tire inflation compressor.
The tire pressure must now be at least
130 kPa (1.3 bar/19 psi).
GWARNING
If the required tire pressure is not reached
after driving for a short period, the tire is too
badly damaged. The tire sealant cannot repair
the tire in this instance. Damaged tires and a
tire pressure that is too low can significantly
impair the vehicle's braking and driving char-
acteristics. There is a risk of accident.
Do not continue driving. Contact a qualified
specialist workshop.
iIn cases such as the one mentioned
above, contact an authorized Mercedes-
Benz Center. Or call 1-800-FOR-MERCedes (in the USA) or 1-800-387-0100 (in Can-
ada).
XCorrect the tire pressure if it is still at least
130 kPa (1.3 bar/19 psi). See the Tire andLoading Information placard on the driver's
side B-pillar or the tire pressure table in the
fuel filler flap for values.
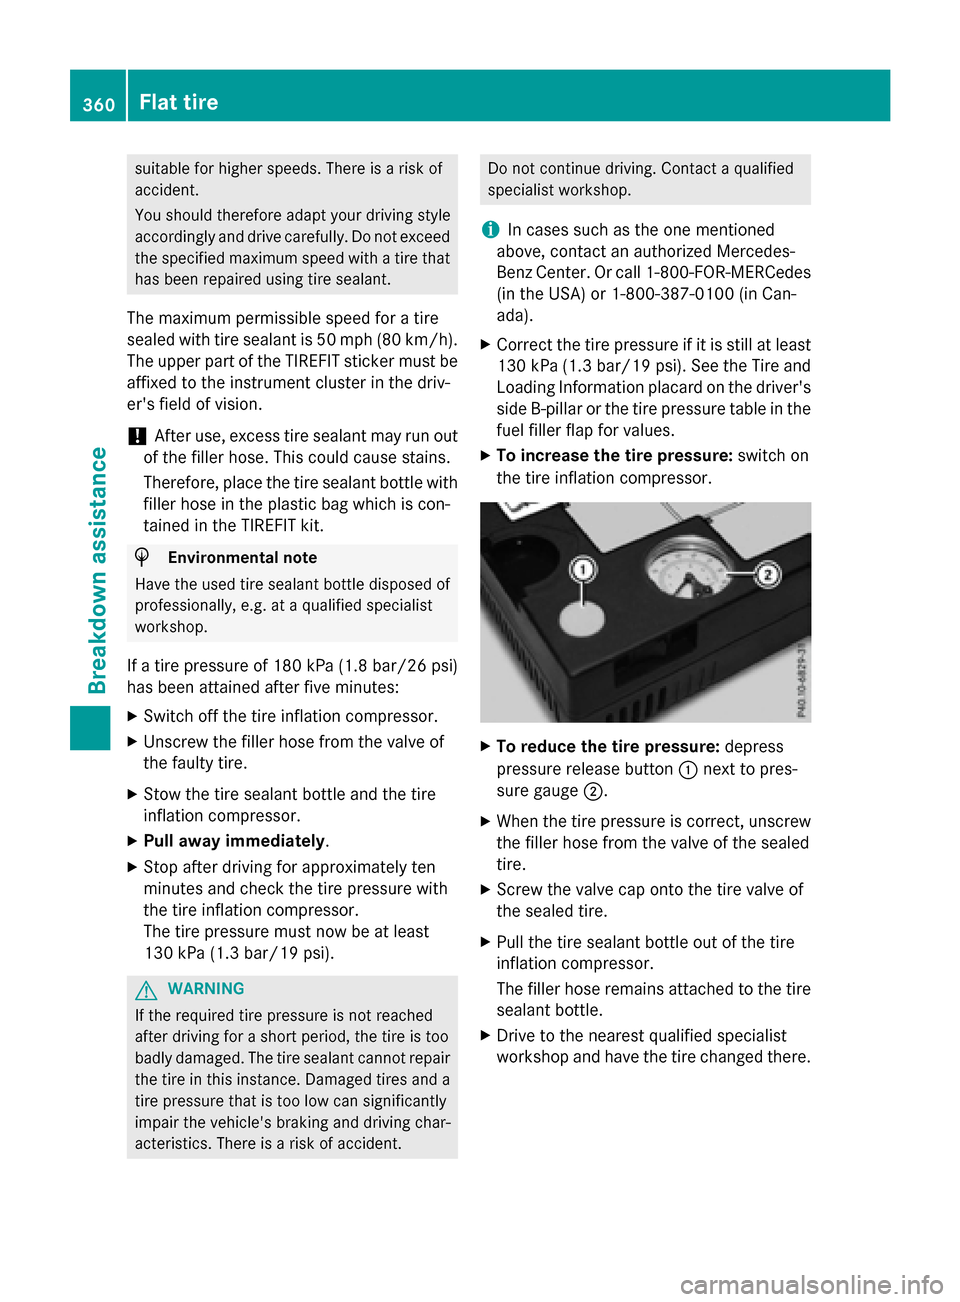
XTo increase the tire pressure: switch on
the tire inflation compressor.
XTo reduce the tire pressure: depress
pressure release button :next to pres-
sure gauge ;.
XWhen the tire pressure is correct, unscrew
the filler hose from the valve of the sealed
tire.
XScrew the valve cap onto the tire valve of
the sealed tire.
XPull the tire sealant bottle out of the tire
inflation compressor.
The filler hose remains attached to the tire
sealant bottle.
XDrive to the nearest qualified specialist
workshop and have the tire changed there.
360Flat tire
Breakdown assistance
Page 378 of 418
approximatelyáin(1.6 mm )ha sbeen
re ached. If this is the case, the tire is so worn
that it must be replaced.
Selecting, mounting and replacing
tires
ROnly mount tires and wheels of the same
type and make.
Exception: it is permissible to install a dif-
ferent type or make in the event of a flat
tire. Observe the "MOExtended tires (tires
with run-flat characteristics" section
(
Ypage 357).
ROnly mount tires of the correct size onto
the wheels.
RBreak in new tires at moderate speeds for
the first 60 miles (100 km). They only reach
their full performance after this distance.
RDo not drive with tires which have too little
tread depth, as this significantly reduces
the traction on wet roads (hydroplaning).
RReplace the tires after six years at the lat-
est, regardless of wear.
MOExtended tires (tires with run-flat
properties)
With MOExtended tires (tires with run flat
characteristics), you can continue to drive
your vehicle even if there is a total loss of
pressure in one or more tires.
MOExtended tires may only be used in con-
junction with an active tire pressure monitor
and only on wheels specifically tested by
Mercedes-Benz.
Notes on driving with MOExtended tires with
a flat tire (
Ypage 357).
Vehicles equipped with MOExtended tires are
not equipped with a TIREFIT kit at the factory.
It is therefore recommended that you addi-
tionally equip your vehicle with a TIREFIT kit if you mount tires that do not feature run-flat
properties, e.g. winter tires. A TIREFIT kit can be obtained from a qualified specialist work-
shop.
Winter operation
General notes
Have your vehicle winter-proofed at a quali-
fied specialist workshop at the onset of win-
ter.
Observe the notes in the "Changing a wheel"
section (
Ypage 395).
Driving with summer tires
At temperatures below 45
‡(+7 †), summer
tires lose elasticity and therefore traction and
braking power. Change the tires on your vehi-
cle to M+S tires. Using summer tires at very
cold temperatures could cause cracks to
form, thereby damaging the tires perma-
nently. Mercedes-Benz cannot accept
responsibility for this type of damage.
GWARNING
Damaged tires can cause tire inflation pres-
sure loss. As a result, you could lose control of
your vehicle. There is a risk of accident.
Check the tires regularly for signs of damage
and replace any damaged tires immediately.
M+S tires
GWARNING
M+S tires with a tire tread depth of less than
ã in (4 mm) are not suitable for use in winter
and do not provide sufficient traction. There is
a risk of an accident.
M+S tires with a tread depth of less than ãin
(4 mm) must be replaced immediately.
At temperatures below 45 ‡(+7 †), use win-
ter tires or all-season tires. Both types of tire
are identified by the M+S marking.
Only winter tires bearing the isnowflake
symbol in addition to the M+S marking pro-
376Winter operation
Wheels and tires
Page 402 of 418
Overview of abbreviations used in the follow-
ing tire tables:
RBA: both axles
RFA: front axle
RRA: rear axle
The recommended pressures for various
operating conditions can be found:
Ron the Tire and Loading Information placard on the B-pillar on the driver's side
Rin the tire pressure table in the fuel filler flap
Observe the notes on recommended tire
pressures under various operating conditions
(
Ypage 377).
Check tire pressures regularly, and only when
the tires are cold. Comply with the mainte-
nance recommendations of the tire manufac-
turer in the vehicle document wallet.
Notes on the vehicle equipment – always
equip the vehicle with:
Rwith tires of the same size on a given axle
(left and right)
Rthe same type of tires at a given time (sum-
mer tires, winter tires, MOExtended tires)
Exception: it is permissible to install a dif-
ferent type or make in the event of a flat
tire. Observe the "MOExtended tires (tires
with run-flat characteristics" section
(
Ypage 357).
Vehicles equipped with MOExtended tires are
not equipped with a TIREFIT kit at the factory.
It is therefore recommended that you addi-
tionally equip your vehicle with a TIREFIT kit if
you mount tires that do not feature run-flat
properties, e.g. winter tires. A TIREFIT kit may
be obtained from a qualified specialist work-
shop.
iNot all wheel and tire combinations are
available at the factory for all countries.
iThe following pages contain information
on approved wheel rims and tire sizes for
equipping your vehicle with winter tires.
Winter tires are not available at the factory
as standard equipment or optional extras. If you want to equip your vehicle with
approved winter tires, it may be necessary
to obtain wheel rims in the corresponding
size. The size of the approved winter tires
may differ from the standard tires. This is
dependent on the model and the equip-
ment installed at the factory.
The tires and wheel rims, as well as further
information, can be obtained at a qualified
specialist workshop.
400Wheel and tire combinations
Wheels and tires