service interval MERCEDES-BENZ GLC-Class 2016 X253 Owner's Manual
[x] Cancel search | Manufacturer: MERCEDES-BENZ, Model Year: 2016, Model line: GLC-Class, Model: MERCEDES-BENZ GLC-Class 2016 X253Pages: 418, PDF Size: 9.23 MB
Page 7 of 418
Driving abroad ............................... 343
Hiding a service message .............. 342
Resetting the service interval dis-
play ................................................ 343
Service message ............................ 342
Special service requirements ......... 343
ATA (Anti-Theft Alarm system)
Activating/deactivating ................... 78
Function ........................................... 78
Switching off the alarm .................... 78
ATTENTION ASSIST
Activating/deactivating ................. 253
Display message ............................ 279
Function/notes ............................. 214
Authorized Mercedes-Benz Center
see Qualified specialist workshop
AUTO lights
Display message ............................ 275
see Lights
Automatic car wash (care) ............... 344
Automatic engine start (ECO start/
stop function) .................................... 159
Automatic engine switch-off (ECO
start/stop function) .......................... 158
Automatic headlamp mode .............. 124
Automatic transmission
Accelerator pedal position ............. 165
Changing gear ............................... 165
DIRECT SELECT lever ..................... 162
Display message ............................ 287
Double-clutch function .................. 165
Drive program ................................ 166
Drive program display .................... 163
Driving tips .................................... 165
DYNAMIC SELECT switch .............. 161
Emergency running mode .............. 169
Engaging drive position .................. 163
Engaging neutral ............................ 163
Engaging park position automati-
cally ............................................... 162
Engaging reverse gear ................... 162
Engaging the park position ............ 162
Kickdown ....................................... 165
Manual shifting .............................. 167
Overview ........................................ 161
Problem (malfunction) ................... 169
Pulling away ................................... 157
Rocking the vehicle free ................ 165 Starting the engine
........................ 155
Ste
ering wheel paddle shifters ...... 167
Trailer towing ................................. 165
Transmission position display
(DIRECT SELECT lever) ................... 163
Transmission positions .................. 164
Automatic transmission emer-
gency mode ....................................... 169
Axle load, permissible (trailer tow-
ing) ...................................................... 416
B
Backup lamp
Changing bulbs .............................. 132
Bag hook ............................................ 313
Ball coupling
Installing ........................................ 230
Removing ....................................... 234
BAS (Brake Assist System) ................. 68
BAS PLUS with Cross-Traffic Assist
(Brake Assist PLUS with Cross-
Traffic Assist)
Function/notes ................................ 68
Important safety notes .................... 68
Battery (SmartKey)
Checking .......................................... 86
Important safety notes .................... 85
Replacing ......................................... 86
Battery (vehicle)
Charging ........................................ 363
Display message ............................ 277
Important safety notes .................. 361
Jump starting ................................. 365
Blind Spot Assist
Activating/deactivating (on-
board computer) ............................ 253
Display message ............................ 281
Notes/function .............................. 217
see Active Blind Spot Assist
Brake fluid
Display message ............................ 264
Notes ............................................. 412
Brake force distribution
see EBD (electronic brake force
distribution)
Brake lamps
Display message ............................ 273
Index5
Page 24 of 418
Protection of the environment
General notes
HEnvironmental note
Daimler's declared policy is one of compre-
hensive environmental protection.
The objectives are for the natural resources
that form the basis of our existence on this
planet to be used sparingly and in a manner
that takes the requirements of both nature
and humanity into account.
You too can help to protect the environment
by operating your vehicle in an environmen-
tally responsible manner.
Fuel consumption and the rate of engine,
transmission, brake and tire wear are affected by these factors:
Roperating conditions of your vehicle
Ryour personal driving style
You can influence both factors. You should
bear the following in mind:
Operating conditions:
Ravoid short trips as these increase fuel con-
sumption.
Ralways make sure that the tire pressures
are correct.
Rdo not carry any unnecessary weight.
Rremove roof racks once you no longer need
them.
Ra regularly serviced vehicle will contribute
to environmental protection. You should
therefore adhere to the service intervals.
Ralways have service work carried out at a
qualified specialist workshop.
Personal driving style:
Rdo not depress the accelerator pedal when
starting the engine.
Rdo not warm up the engine when the vehicle
is stationary.
Rdrive carefully and maintain a safe distance
from the vehicle in front.
Ravoid frequent, sudden acceleration and
braking.
Rchange gear in good time and use each gear
only up to Ôof its maximum engine speed.
Rswitch off the engine in stationary traffic.
Rkeep an eye on the vehicle's fuel consump-
tion.
Environmental concerns and recom-
mendations
Wherever the operating instructions require
you to dispose of materials, first try to regen-
erate or re-use them. Observe the relevant
environmental rules and regulations when
disposing of materials. In this way you will
help to protect the environment.
Genuine Mercedes-Benz parts
HEnvironmental note
Daimler AG also supplies reconditioned major
assemblies and parts which are of the same
quality as new parts. They are covered by the
same Limited Warranty entitlements as new
parts.
!Air bags and Emergency Tensioning Devi-
ces, as well as control units and sensors for these restraint systems, may be installed in
the following areas of your vehicle:
Rdoors
Rdoor pillars
Rdoor sills
Rseats
Rcockpit
Rinstrument cluster
Rcenter console
Do not install accessories such as audio
systems in these areas. Do not carry out
repairs or welding. You could impair the
operating efficiency of the restraint sys-
tems.
Have aftermarket accessories installed at a qualified specialist workshop.
22Introduction
Page 26 of 418
Information for customers in Califor-
nia
UnderCalifornia law you may beentitled to a
replacement of your vehicle or a refund of the
purchase price or lease price, ifafter a rea-
sonable number of repair attempts
Mercedes-Benz USA, LLC and/or its author-
iz ed repair or service facilities fail to fix one or
more substantial defects or malfunctions in
the vehicle that are covered by its express
warranty. During the period of 18 months
from original delivery of the vehicle or the
accumulation of 18,000 miles (approximately
29,000 km) on the odometer of the vehicle,
whic hever occurs first, a reasonable number
of repair attempts ispresumed for a retail
buyer or lessee ifone or more of the fol lowing
occurs:
(1) the same substantial defect or malfunc- tion results ina condition that islikely to
cause death or serious bodily injury ifthe
vehicle is driven, that defect or malfunc-
tion has been subject to repair two or
more times, and you have direct lynoti-
fied Mercedes-Benz USA, LLC in writing
of the need for its repair,
(2) the same substantial defect or malfunc- tion of a less serious nature than cate-
gory (1) has been subject to repair four or
more times and you hav
e directly notified
us in writ ing of the need for its repair, or
(3) the vehicle isout of service by reason of
repair of the same or different substantial
defects or malfunctions for a cumulative
total of more than 30 calendar days.
Please send your written notice to:
Mercedes-Benz USA, LLC
Customer Assistance Center
One Mercedes Drive
Montvale, NJ 07645-0350
Maintenance
The Service and Warranty Booklet describes
all the necessary maintenance work which
should bedone at regular intervals.
Always have the Service and Warranty Book-
let with you when you bring the vehicle to an
authorized Mercedes-Benz Center. The ser-
vice advisor willrecord every servic e for you
in the Service and Warranty Booklet.
Roadside Assistance
The Mercedes-Benz Roadside Assistance
Program offers technical help inthe event of a
breakdown. Calls to the toll-free Roadside
Assistance Hotline are answered byour
agents 24 hours a day, 365 days a year.
1-8 00-FOR-MERCedes(1-800-367-6372 )
(USA)
1-8 00-387-0100 (Canada)
For additional information, refer to the
Mercedes-Benz Roadside Assistance Pro-
gram brochure (USA) or the "Roadside Assis-
tance" section inthe Service and Warranty
booklet (Canada). You willfind both inyour
vehicle literature portfolio.
Change of address or change of own-
ership
In the event of a change of address, please
send us the "Notific ation of Address Change"
in the Service and Guarantee booklet or sim-
ply call the Mercedes-Benz Customer Assis-
tance Center (USA) at the hotline number
1-800-FOR-MERCedes(1-800-367-6372) or
Customer Service Center (Canada) at
1-800-387-0100. This will assist us in con-
tacting you in a timely manner should the
need arise.
If you sell your Mercedes, please leave the
entire literature in the vehicle so that it is
available to the next owner.
If you have purchased a used car, please send
us the "Notification of Used Car Purchase" in
24Introduction
Page 178 of 418
Parking the vehicle for a long period
If you leave the vehicle parked for longer than
four weeks, the battery may be damaged by
exhaustive discharging.
If you leave the vehicle parked for longer thansix weeks, the vehicle may suffer damage as a
result of lack of use.
XVisit a qualified specialist workshop and
seek advice.
iYou can obtain information about trickle
chargers from a qualified specialist work-
shop.
Driving tips
General driving tips
Important safety notes
GWARNING
If you switch off the ignition while driving,
safety-relevant functions are only available
with limitations, or not at all. This could affect, for example, the power steering and the brake
boosting effect. You will require considerably
more effort to steer and brake. There is a risk
of an accident.
Do not switch off the ignition while driving.
GWARNING
If you operate mobile communication equip-
ment while driving, you will be distracted from traffic conditions. You could also lose control
of the vehicle. There is a risk of an accident.
Only operate this equipment when the vehicle
is stationary.
Observe the legal requirements for the coun-
try in which you are driving. Some jurisdic-
tions prohibit the driver from using a mobile
phone while driving a vehicle.
If you make a call while driving, always use
hands-free mode. Only operate the telephone
when the traffic situation permits. If you are unsure, pull over to a safe location and stop
before operating the telephone.
Bear in mind that at a speed of only 30 mph
(approximately 50 km/h), the vehicle covers
a distance of 44 ft (approximately 14 m) per
second.
Drive sensibly – save fuel
Observe the following tips to save fuel:
XThe tires should always be inflated to the
recommended tire pressure.
XRemove unnecessary loads.
XRemove roof racks when they are not nee-
ded.
XWarm up the engine at low engine speeds.
XAvoid frequent acceleration or braking.
XHave all maintenance work carried out as
indicated by the service intervals in the
Maintenance Booklet or by the service
interval display.
Fuel consumption also increases when driv-
ing in cold weather, in stop-start traffic and in
hilly terrain.
Drinking and driving
GWARNING
Drinking and driving and/or taking drugs and driving are very dangerous combinations.
Even a small amount of alcohol or drugs can
affect your reflexes, perceptions and judg-
ment.
The possibility of a serious or even fatal acci-
dent is greatly increased when you drink or
take drugs and drive.
Do not drink or take drugs and drive or allow
anyone to drive who has been drinking or tak-
ing drugs.
Emission control
GWARNING
Combustion engines emit poisonous exhaust
gases such as carbon monoxide. Inhaling
these exhaust gases leads to poisoning. There
176Driving tips
Driving and parking
Page 179 of 418
is a risk of fatal injury. Therefore never leave
the engine running in enclosed spaces with-
out sufficient ventilation.
Certain engine systems are designed to keep
the level of poisonous components in exhaust
fumes within legal limits.
These systems only work at peak efficiency if
they are serviced exactly in accordance with
the manufacturer's specifications. For this
reason, all work on the engine must be carried
out by qualified and authorized Mercedes-
Benz technicians.
The engine settings must not be changed
under any circumstances. Furthermore, all
specific service work must be carried out at
regular intervals and in accordance with the
Mercedes-Benz service requirements. Details
can be found in the Maintenance Booklet.
ECO display
The ECO display shows you how economical
your driving style is. The ECO display assists
you in achieving the most economical driving
style for the selected settings and prevailing
conditions. Your driving style can significantly
influence the vehicle's consumption.
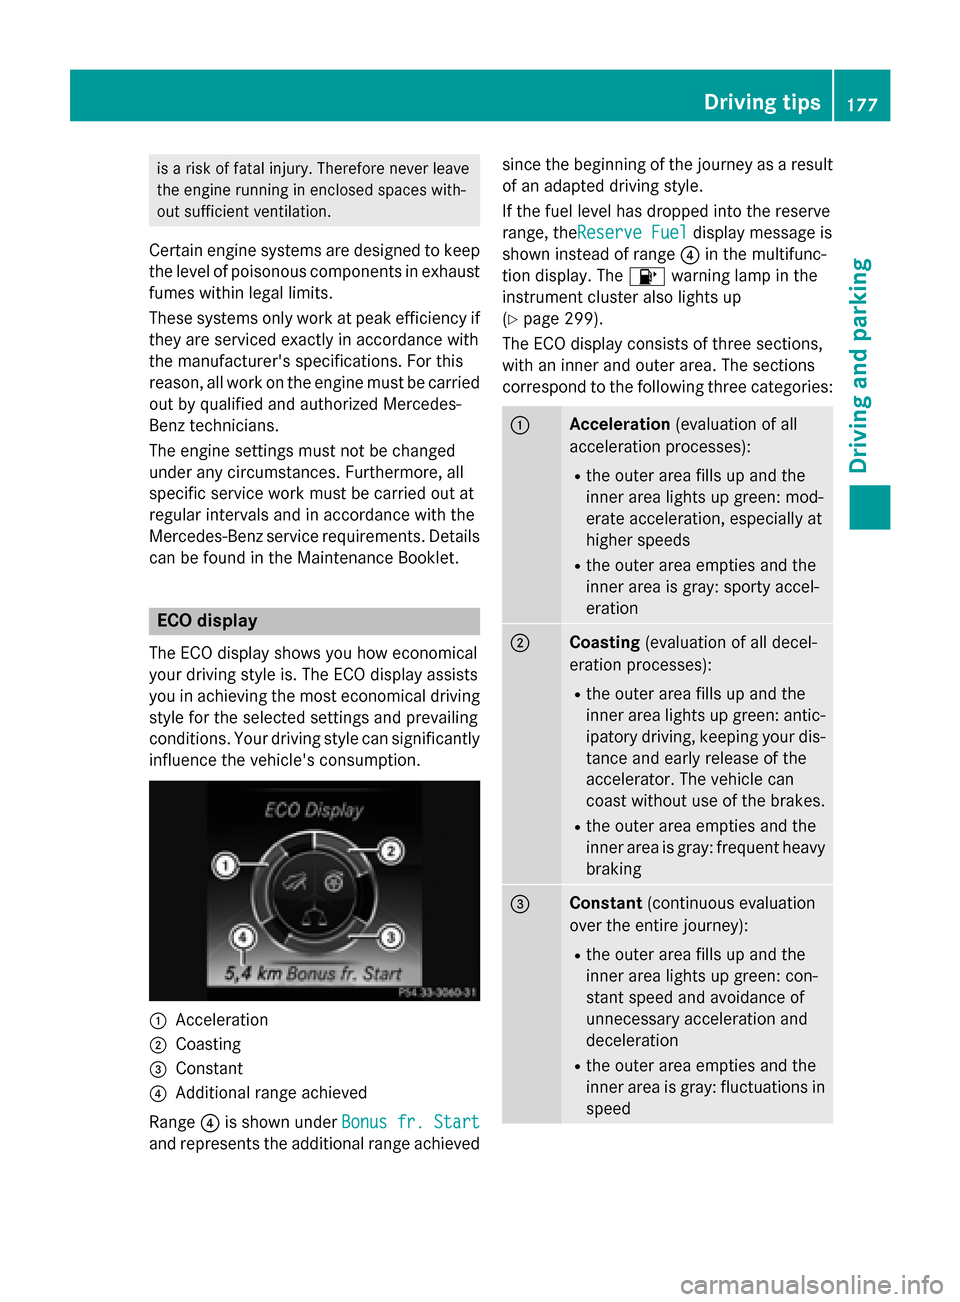
:Acceleration
;Coasting
=Constant
?Additional range achieved
Range ?is shown under Bonus fr. Start
and represents the additional range achieved since the beginning of the journey as a result
of an adapted driving style.
If the fuel level has dropped into the reserve
range, the
Reserve Fuel
display message is
shown instead of range ?in the multifunc-
tion display. The 8warning lamp in the
instrument cluster also lights up
(
Ypage 299).
The ECO display consists of three sections,
with an inner and outer area. The sections
correspond to the following three categories:
:Acceleration (evaluation of all
acceleration processes):
Rthe outer area fills up and the
inner area lights up green: mod-
erate acceleration, especially at
higher speeds
Rthe outer area empties and the
inner area is gray: sporty accel-
eration
;Coasting (evaluation of all decel-
eration processes):
Rthe outer area fills up and the
inner area lights up green: antic-
ipatory driving, keeping your dis-
tance and early release of the
accelerator. The vehicle can
coast without use of the brakes.
Rthe outer area empties and the
inner area is gray: frequent heavy
braking
=Constant (continuous evaluation
over the entire journey):
Rthe outer area fills up and the
inner area lights up green: con-
stant speed and avoidance of
unnecessary acceleration and
deceleration
Rthe outer area empties and the
inner area is gray: fluctuations in
speed
Driving tips177
Driving and parking
Z
Page 257 of 418
Setting the brightness
The brightness of the head-up display is auto-
matically adjusted to the surrounding ambi-
ent light. You can also individually adjust the
brightness of the head-up display.
XSwitch on the head-up display
(
Ypage 242).
XPress theòbutton on the steering
wheel to open the menu list.
XPress the :or9 button on the steer-
ing wheel to select the Settings
menu.
XConfirm by pressingaon the steering
wheel.
XUse : or9 to select the Head-up
Displaysubmenu.
XPressato confirm.
XUsing :or9, select the Bright‐
nessfunction.
XPress theabutton to save the setting.
XPress the :or9 button to adjust the
brightness to a level from Level
+5(bright)
to Level -5
(dark).
XPress the aor% button to save the
setting.
Light submenu
Switching the daytime running lamps on/
off
This function is not available in Canada.
XPress the òbutton on the steering
wheel to open the menu list.
XPress the :or9 button on the steer-
ing wheel to select the Settings
menu.
XConfirm by pressingaon the steering
wheel.
XUse : or9 to select the Lights
submenu.
XPressato confirm.
XPress the :or9 button to select the
Daytime Running Lights
function.
If the Daytime Running Lights
function
has been switched on, the cone of light and the
W symbol in the multifunction dis-
play are shown in white.
XPress the abutton to save the setting.
Further information on daytime running
lamps Daytime Running Lights
(Ypage 124).
Instrument cluster submenu
Selecting the distance unit
TheDisplay
UnitSpeed-/Odometerfunc-
tion allows you to choose whether certain
displays appear in kilometers or miles in the
multifunction display.
XPress the òbutton on the steering
wheel to open the menu list.
XPress the :or9 button on the steer-
ing wheel to select the Settings
menu.
XConfirm by pressingaon the steering
wheel.
XUse : or9 to select the Instru‐
ment Clustersubmenu.
XPressato confirm.
XPress :or9 to select the Display
Unit Speed-/Odometerfunction.
The current setting km
orMilesappears.
XPress the abutton to save the setting.
The selected unit of measurement for dis-
tance applies to:
RDigital speedometer in the Tripmenu
ROdometer and the trip odometer
RTrip computer
RCurrent consumption and the range
RNavigation instructions in the Navimenu
RCruise Control
RDISTRONIC PLUS with Steering Assist and
Stop&Go Pilot
RASSYST PLUS service interval display
Switching the additional speedometer
on/off
The Additional Speedometer [km/h]
function allows you to choose whether the
status area in the multifunction display shows
Menus and submenus255
On-board computer and displays
Z
Page 342 of 418
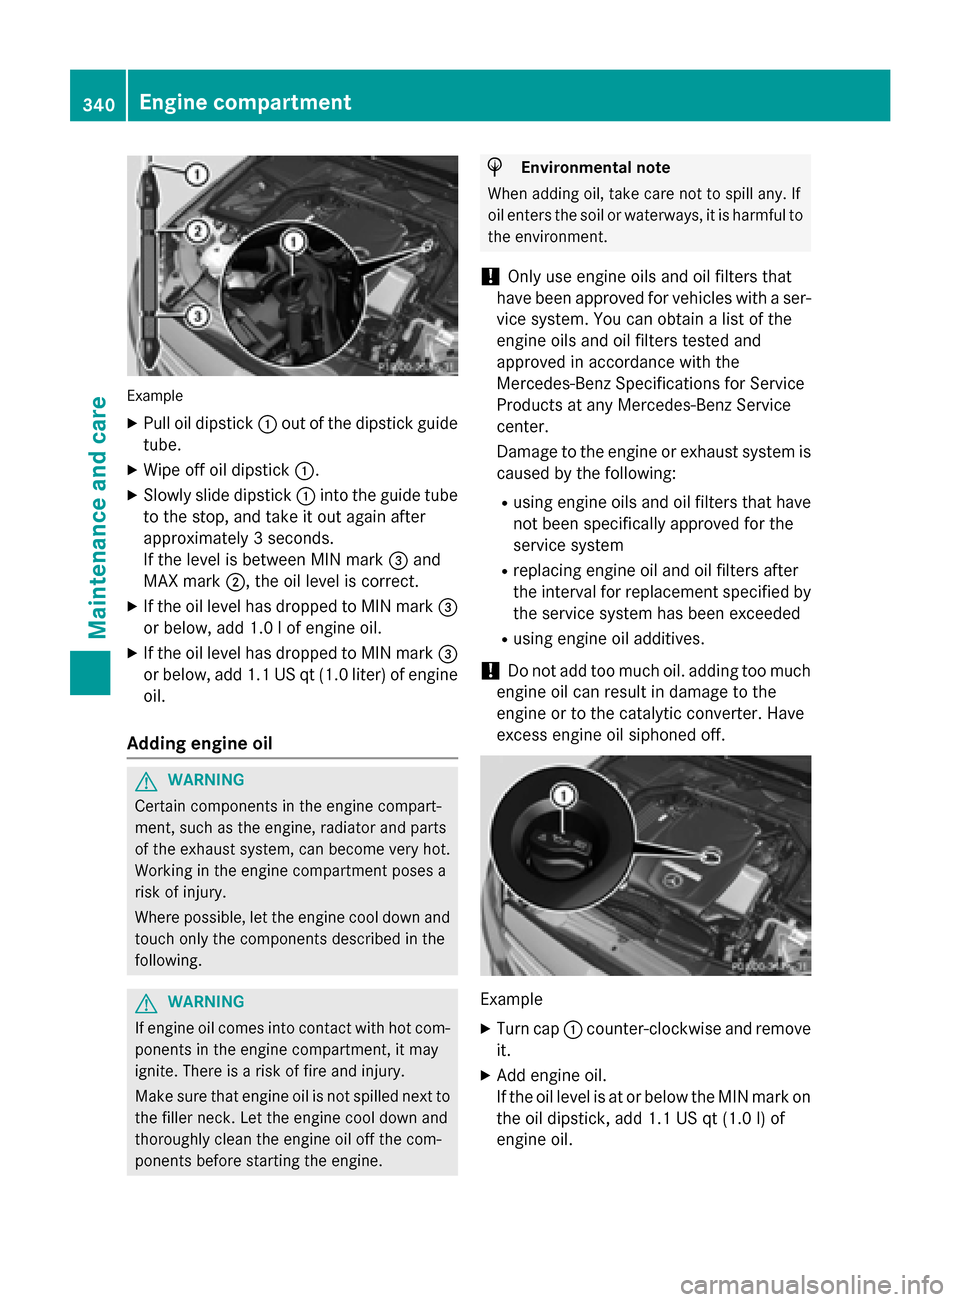
Example
XPull oil dipstick:out of the dipstick guide
tube.
XWipe off oil dipstick :.
XSlowly slide dipstick :into the guide tube
to the stop, and take it out again after
approximately 3 seconds.
If the level is between MIN mark =and
MAX mark ;, the oil level is correct.
XIf the oil level has dropped to MIN mark =
or below, add 1.0 l of engine oil.
XIf the oil level has dropped to MIN mark =
or below, add 1.1 US qt (1.0 liter) of engine
oil.
Adding engine oil
GWARNING
Certain components in the engine compart-
ment, such as the engine, radiator and parts
of the exhaust system, can become very hot.
Working in the engine compartment poses a
risk of injury.
Where possible, let the engine cool down and touch only the components described in the
following.
GWARNING
If engine oil comes into contact with hot com- ponents in the engine compartment, it may
ignite. There is a risk of fire and injury.
Make sure that engine oil is not spilled next to
the filler neck. Let the engine cool down and
thoroughly clean the engine oil off the com-
ponents before starting the engine.
HEnvironmental note
When adding oil, take care not to spill any. If
oil enters the soil or waterways, it is harmful to
the environment.
!Only use engine oils and oil filters that
have been approved for vehicles with a ser-
vice system. You can obtain a list of the
engine oils and oil filters tested and
approved in accordance with the
Mercedes-Benz Specifications for Service
Products at any Mercedes-Benz Service
center.
Damage to the engine or exhaust system is
caused by the following:
Rusing engine oils and oil filters that have
not been specifically approved for the
service system
Rreplacing engine oil and oil filters after
the interval for replacement specified by the service system has been exceeded
Rusing engine oil additives.
!Do not add too much oil. adding too much
engine oil can result in damage to the
engine or to the catalytic converter. Have
excess engine oil siphoned off.
Example
XTurn cap :counter-clockwise and remove
it.
XAdd engine oil.
If the oil level is at or below the MIN mark on
the oil dipstick, add 1.1 US qt (1.0 l)of
engine oil.
340Engine compartment
Maintenance and care
Page 344 of 418
Working in the engine compartment poses a
risk of injury.
Where possible, let the engine cool down andtouch only the components described in the
following.
GWARNING
Windshield washer concentrate could ignite if it comes into contact with hot engine compo-
nents or the exhaust system. There is a risk of
fire and injury.
Make sure that no windshield washer con-
centrate is spilled next to the filler neck.
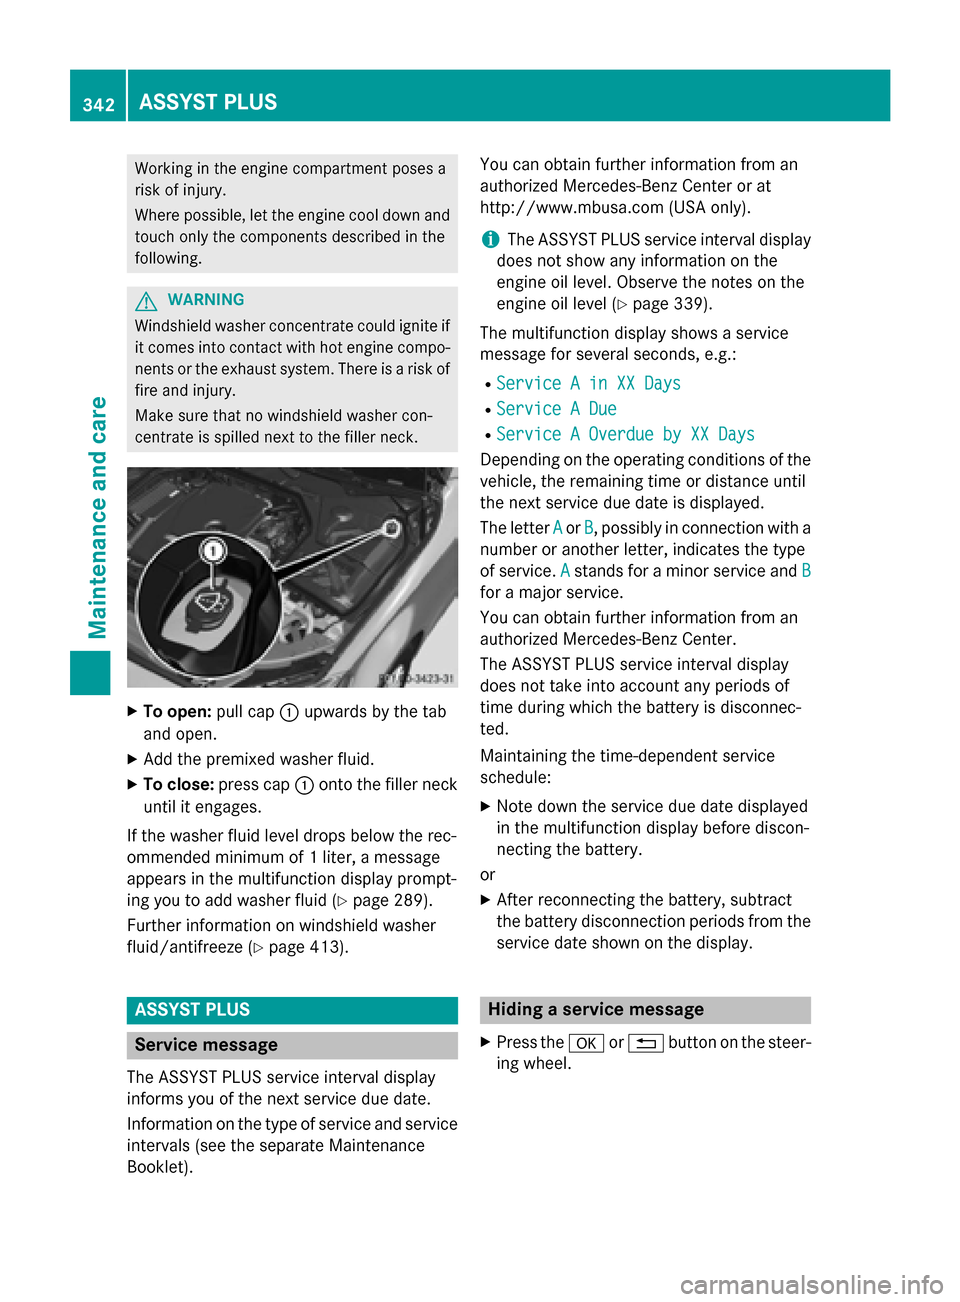
XTo open: pull cap:upwards by the tab
and open.
XAdd the premixed washer fluid.
XTo close: press cap :onto the filler neck
until it engages.
If the washer fluid level drops below the rec-
ommended minimum of 1 liter, a message
appears in the multifunction display prompt-
ing you to add washer fluid (
Ypage 289).
Further information on windshield washer
fluid/antifreeze (
Ypage 413).
ASSYST PLUS
Service message
The ASSYST PLUS service interval display
informs you of the next service due date.
Information on the type of service and service
intervals (see the separate Maintenance
Booklet). You can obtain further information from an
authorized Mercedes-Benz Center or at
http://www.mbusa.com (USA only).
iThe ASSYST PLUS service interval display
does not show any information on the
engine oil level. Observe the notes on the
engine oil level (
Ypage 339).
The multifunction display shows a service
message for several seconds, e.g.:
RService A in XX Days
RService A Due
RService A Overdue by XX Days
Depending on the operating conditions of the
vehicle, the remaining time or distance until
the next service due date is displayed.
The letter A
orB, possibly in connection with a
number or another letter, indicates the type
of service. A
stands for a minor service and B
for a major service.
You can obtain further information from an
authorized Mercedes-Benz Center.
The ASSYST PLUS service interval display
does not take into account any periods of
time during which the battery is disconnec-
ted.
Maintaining the time-dependent service
schedule:
XNote down the service due date displayed
in the multifunction display before discon-
necting the battery.
or
XAfter reconnecting the battery, subtract
the battery disconnection periods from the service date shown on the display.
Hiding a service message
XPress the aor% button on the steer-
ing wheel.
342ASSYST PLUS
Maintenance and care
Page 345 of 418
Displaying service messages
XSwitchon th eignition .
XUseò on thesteerin gwhee lto cal lup
th elist of menus.
XPress 9or: on thesteerin gwhee l
to selec tth eServic e
menuand confirm
wit ha.
XPress 9or: on thesteerin gwhee l
to selec tth eASSYST PLU S
submenuand
confirm wit ha.
The servic edue dat eappears in th emulti-
function display.
Information about Service
Resetting th eASSYS TPLUS service
interva ldisplay
!If th eASSYST PLU Sservic einterval dis -
play has been inadvertentl yreset ,this set -
ting can be correcte dat aqualified special-
ist workshop .
Hav eservic ewor kcarrie dout as described
in th eMaintenance Booklet .Thi smay oth-
erwise lead to increase dwear and damage
to th emajor assemblies or th evehicle.
A qualified specialis tworkshop ,e.g. an
authorized Mercedes-Ben zCenter, will reset
th eASSYST PLU Sservic einterval display
after th eservic ewor khas been carrie dout .
You can also obtain further information on
maintenance work, fo rexample.
Specia lservice requirement s
The specifiedmaintenance interval take sonly
th enormal operation of th evehicle into
account. Under arduous operatin gcondition s
or increase dload on th evehicle, mainte -
nance wor kmus tbe carrie dout more fre-
quently, fo rexample:
Rregular city drivin gwit hfrequent intermedi-
at estops
Rif th evehicle is primarily used to trave l
short distances
Ruse in mountainous terrain or on poo rroad
surfaces
Rif th eengin eis ofte nlef tidlin gfo rlon gperi-
ods
Under these or similar conditions, have, fo r
example, th eair filter, engin eoil and oil filte r
replaced or changed more frequently. Under
arduous operatin gconditions, th etires mus t
be checke dmore often. Further information
can be obtained at aqualified specialist work-
shop, e.g. an authorized Mercedes-Ben zCen -
ter.
Drivin gabroad
An extensive Mercedes-Ben zServic enetwor k
is also available in other countries. You can
obtain further information from any author -
ized Mercedes-Ben zCenter.
Car e
General notes
HEnvironmental not e
Dispose of empty packagin gand cleanin g
cloths in an environmentally responsible man -
ner.
!Fo rcleanin gyour vehicle, do no tuse any
of th efollowing :
Rdry, rough or har dcloths
Rabrasiv ecleanin gagents
Rsolvents
Rcleanin gagents containin gsolvents
Do no tscrub .
Do no ttouch th esurfaces or protective
films wit hhar dobjects ,e.g. arin gor ic e
scraper. You could otherwise scratch or
damage th esurfaces and protective film.
!Do no tpar kth evehicle fo ran extended
period straight after cleanin git,particularly
after havin gcleaned th ewheels wit hwhee l
cleaner. Wheel cleaners could caus e
increase dcorrosion of th ebrake discs and
brake pads/linings. Fo rthis reason ,you
Care343
Maintenance and care
Z
Page 364 of 418
GWARNING
Battery acid is caustic. There is a risk of injury.
Avoid contact with skin, eyes or clothing. Do
not inhale any battery gases. Do not lean over
the battery. Keep children away from batter-
ies. Wash away battery acid immediately with
plenty of clean water and seek medical atten-
tion.
All vehicles:
HEnvironmental note
Batteries contain dangerous
substances. It is against the
law to dispose of them with
the household rubbish. They
must be collected separately and recycled to protect the
environment.
Dispose of batteries in an
environmentally friendly
manner. Take discharged
batteries to a qualified spe-
cialist workshop or a special
collection point for used bat-
teries.
!Have the battery checked regularly at a
qualified specialist workshop.
Observe the service intervals in the Main-
tenance Booklet or contact a qualified spe-
cialist workshop for more information.
!Always have work on the batteries carried
out at a qualified specialist workshop.
Should it, in exceptional circumstances, be
absolutely necessary to disconnect the 12-
volt battery yourself, please observe the
following:
Rsecure the vehicle to prevent it from roll- ing away.
Ryou switch off the engine and remove the
SmartKey. Make sure the ignition is
switched off. Check that all the indicator
lamps in the instrument cluster are off.
Otherwise, electronic components, such
as the alternator, may be damaged.
Ryou first remove the negative terminal
clamp and then the positive terminal
clamp. Never swap the terminal clamps.
Otherwise, the vehicle's electronic sys-
tem may be damaged.
Rthe transmission is locked in position P
after disconnecting the battery. The vehi-
cle is secured against rolling away. You
can then no longer move the vehicle.
The batteries and the covers of the positive
terminal clamps must always be installed
securely during operation.
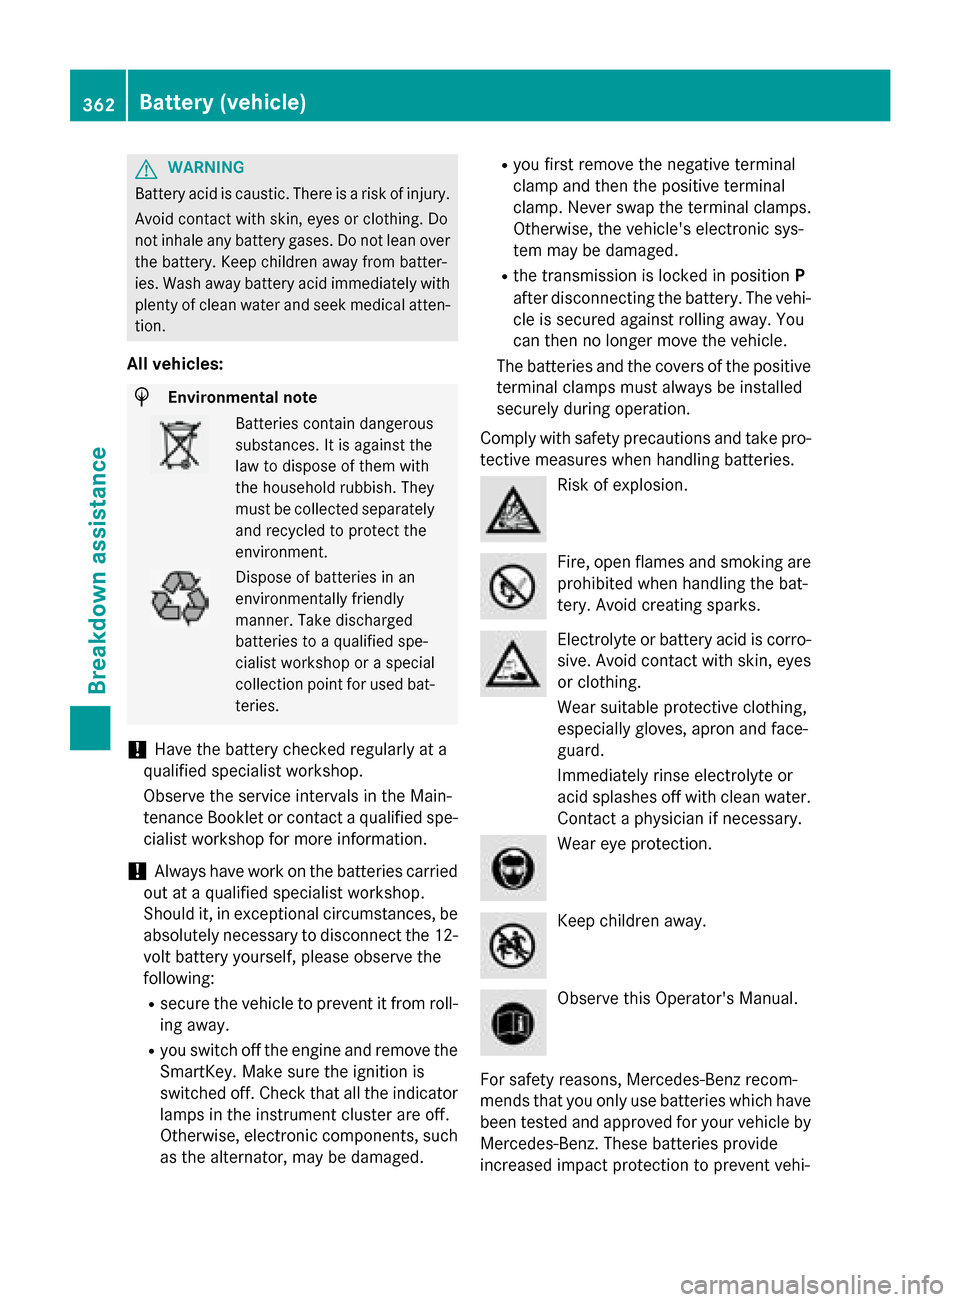
Comply with safety precautions and take pro-
tective measures when handling batteries.
Risk of explosion.
Fire, open flames and smoking are
prohibited when handling the bat-
tery. Avoid creating sparks.
Electrolyte or battery acid is corro-
sive. Avoid contact with skin, eyes
or clothing.
Wear suitable protective clothing,
especially gloves, apron and face-
guard.
Immediately rinse electrolyte or
acid splashes off with clean water. Contact a physician if necessary.
Wear eye protection.
Keep children away.
Observe this Operator's Manual.
For safety reasons, Mercedes-Benz recom-
mends that you only use batteries which have
been tested and approved for your vehicle by
Mercedes-Benz. These batteries provide
increased impact protection to prevent vehi-
362Battery (vehicle)
Breakdown assistance