ECU MERCEDES-BENZ GLC COUPE 2016 Owners Manual
[x] Cancel search | Manufacturer: MERCEDES-BENZ, Model Year: 2016, Model line: GLC COUPE, Model: MERCEDES-BENZ GLC COUPE 2016Pages: 389, PDF Size: 7.34 MB
Page 368 of 389
The wear patterns on the front and rear tyres
differ depending on the operating conditions.
Interchange the wheels before a clear wear pat-
tern has formed on the tyres. Front tyres typi-
cally wear more on the shoulders, while rear
tyres wear more in the centre.
On vehicles that have front and rear wheels of
the same size, you can interchange the wheels
every 5,000 to 10,000 km depending on the
degree of tyre wear. Ensure the direction of
rotation is maintained.
Clean the contact surfaces of the wheel and the
brake disc thoroughly every time a wheel is
interchanged. Check the tyre pressure and, if
necessary, restart the tyre pressure loss warn-
ing system (Y page 361) or the tyre pressure
monitor (Y page 363). Direction of rotation
Tyres with a specified direction of rotation have additional benefits, e.g. if there is a risk of aqua- planing. These advantages can only be gained if
the tyres are fitted corresponding to the direc-
tion of rotation.
An arrow on the sidewall of the tyre indicates its correct direction of rotation. Storing wheels
Store wheels in a cool, dry and preferably dark
place if they are not being used. Protect the
tyres against oil, grease, petrol and diesel. Fitting a wheel
Preparing the vehicle X
Stop the vehicle on solid, non-slippery and
level ground.
X Apply the electric parking brake manually.
X Move the front wheels to the straight-ahead
position.
X Shift the transmission to position P.
X Make sure that the vehicle level is set to "Nor-
mal" on vehicles with AIR BODY CONTROL
(Y page 188).
X Switch off the engine.
X Vehicles without KEYLESS-GO: remove the
key from the ignition lock. X
Vehicles with KEYLESS-GO start-function
or KEYLESS-GO: open the driver's door.
The vehicle electronics now have status 0.
This is the same as the key having been
removed.
X Vehicles with KEYLESS-GO start function
or KEYLESS-GO: remove the Start/Stop but-
ton from the ignition lock (Y page 144).
X If included in the vehicle equipment, remove
the tyre-change tool kit from the vehicle.
X Safeguard the vehicle against rolling away.
i Apart from some country-specific variants,
vehicles are not equipped with tyre-changing
tools. Some tools for changing a tyre are spe- cific to the vehicle. For more information on
which tools are required to perform a wheel
change on your vehicle, consult a qualified
specialist workshop.
Necessary tyre-changing tools may include,
for example:
R Jack
R wheel chock
R Wheel wrench
R Centring pin
Securing the vehicle against rolling
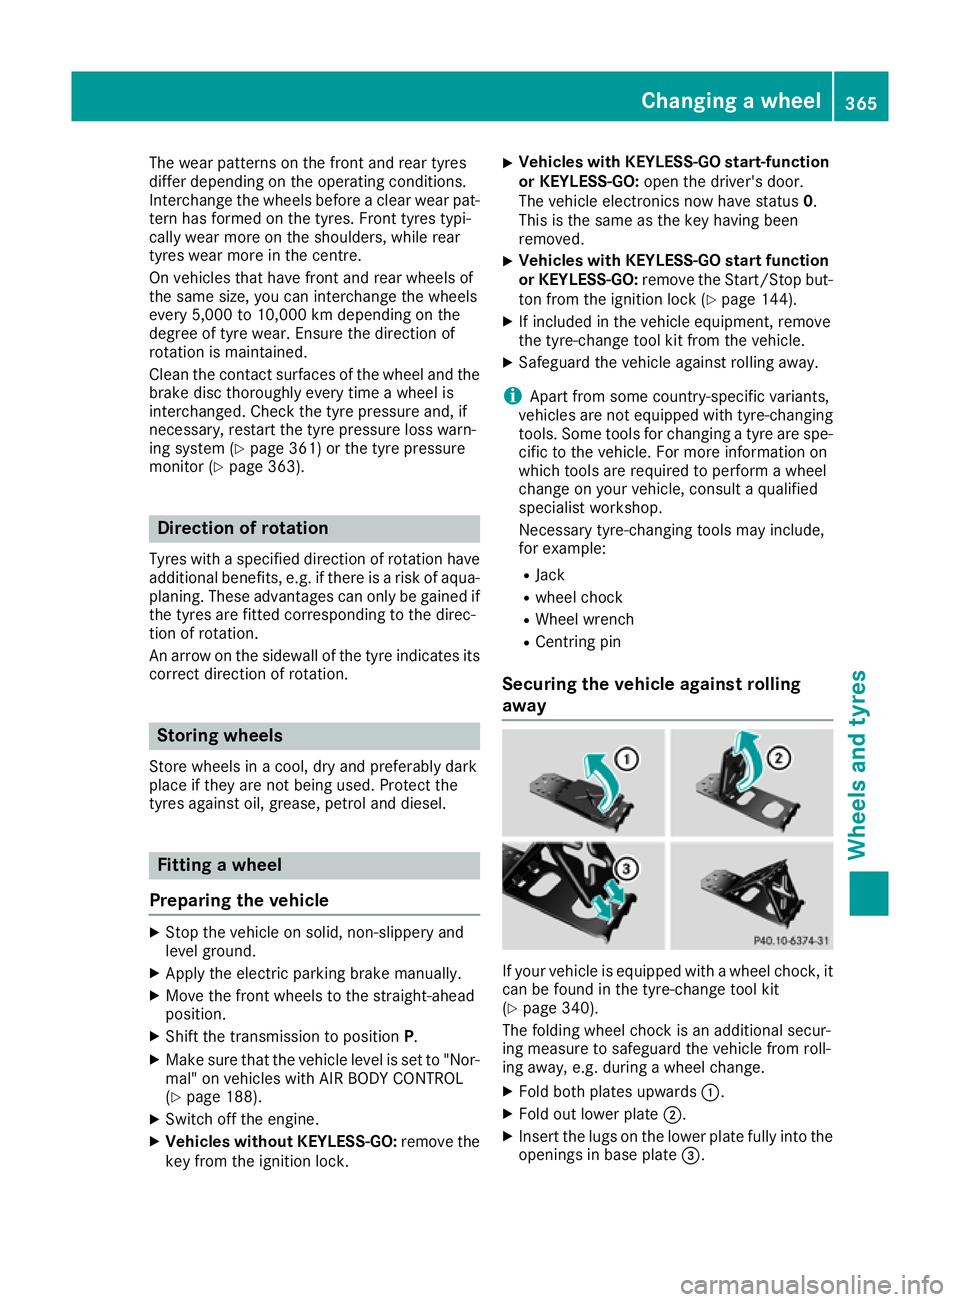
away If your vehicle is equipped with a wheel chock, it
can be found in the tyre-change tool kit
(Y page 340).
The folding wheel chock is an additional secur-
ing measure to safeguard the vehicle from roll-
ing away, e.g. during a wheel change.
X Fold both plates upwards :.
X Fold out lower plate ;.
X Insert the lugs on the lower plate fully into the
openings in base plate =. Changing a wheel
365Wheels and tyres Z
Page 369 of 389
X
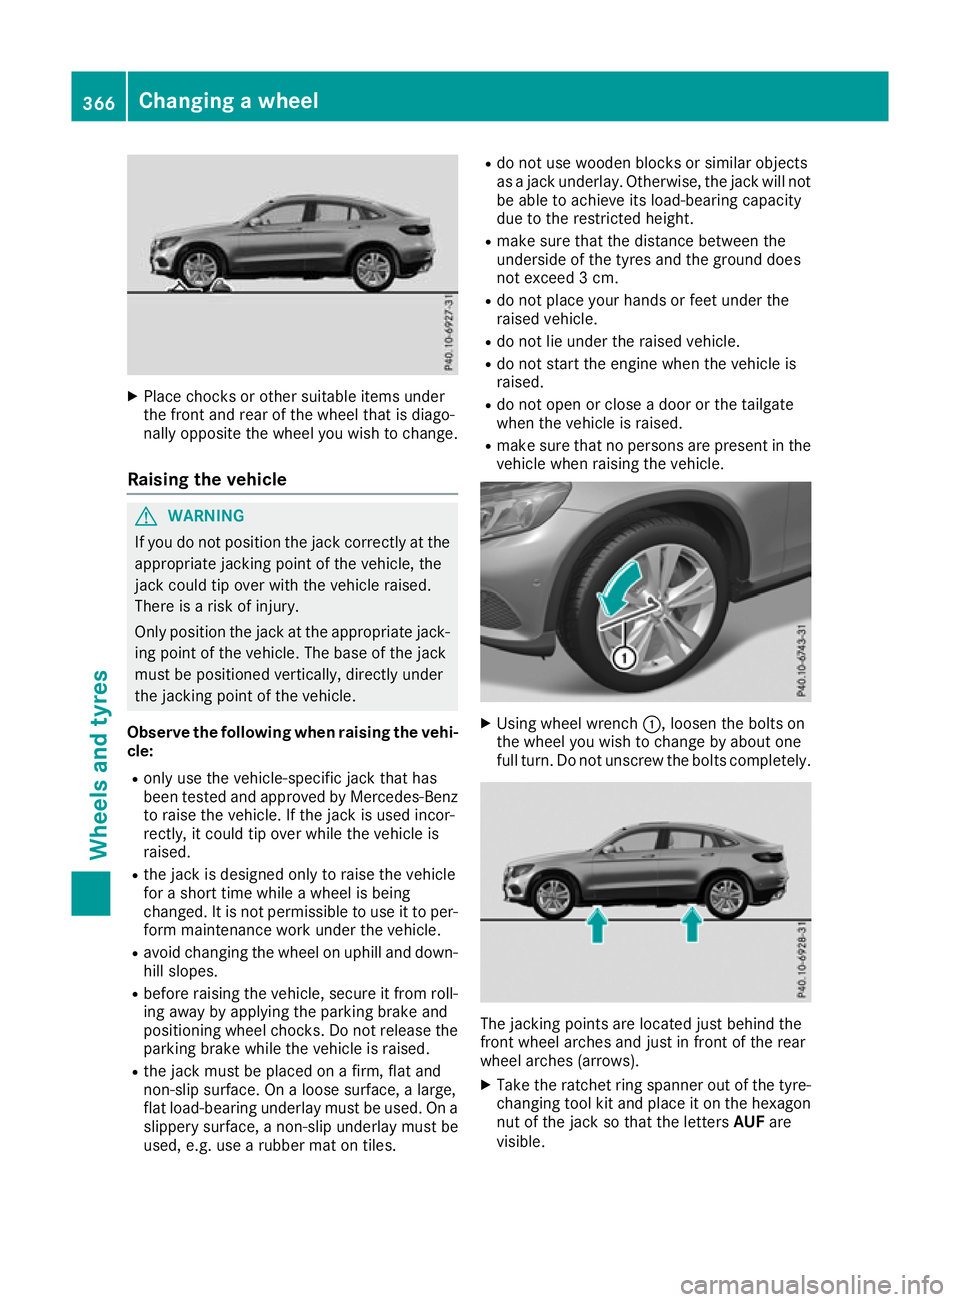
Place chocks or other suitable items under
the front and rear of the wheel that is diago-
nally opposite the wheel you wish to change.
Raising the vehicle G
WARNING
If you do not position the jack correctly at the appropriate jacking point of the vehicle, the
jack could tip over with the vehicle raised.
There is a risk of injury.
Only position the jack at the appropriate jack-
ing point of the vehicle. The base of the jack
must be positioned vertically, directly under
the jacking point of the vehicle.
Observe the following when raising the vehi- cle:
R only use the vehicle-specific jack that has
been tested and approved by Mercedes-Benz
to raise the vehicle. If the jack is used incor-
rectly, it could tip over while the vehicle is
raised.
R the jack is designed only to raise the vehicle
for a short time while a wheel is being
changed. It is not permissible to use it to per- form maintenance work under the vehicle.
R avoid changing the wheel on uphill and down-
hill slopes.
R before raising the vehicle, secure it from roll-
ing away by applying the parking brake and
positioning wheel chocks. Do not release the parking brake while the vehicle is raised.
R the jack must be placed on a firm, flat and
non-slip surface. On a loose surface, a large,
flat load-bearing underlay must be used. On a
slippery surface, a non-slip underlay must be
used, e.g. use a rubber mat on tiles. R
do not use wooden blocks or similar objects
as a jack underlay. Otherwise, the jack will not
be able to achieve its load-bearing capacity
due to the restricted height.
R make sure that the distance between the
underside of the tyres and the ground does
not exceed 3 cm.
R do not place your hands or feet under the
raised vehicle.
R do not lie under the raised vehicle.
R do not start the engine when the vehicle is
raised.
R do not open or close a door or the tailgate
when the vehicle is raised.
R make sure that no persons are present in the
vehicle when raising the vehicle. X
Using wheel wrench :, loosen the bolts on
the wheel you wish to change by about one
full turn. Do not unscrew the bolts completely. The jacking points are located just behind the
front wheel arches and just in front of the rear
wheel arches (arrows).
X
Take the ratchet ring spanner out of the tyre-
changing tool kit and place it on the hexagon
nut of the jack so that the letters AUFare
visible. 366
Changing a wheelWheels and tyres
Page 373 of 389
tem may still display the tyre pressure of the
removed wheel for a few minutes. The value dis- played for the position where the emergency
spare wheel is fitted is not the same as the cur-
rent tyre pressure of the emergency spare
wheel. Removing the emergency spare wheel
The emergency spare wheel is secured in the
emergency spare wheel bag in the luggage com-
partment.
X Open the luggage compartment.
X Detach the securing straps.
X Unhook the spring hooks of the securing
straps from the retainers.
X Remove the emergency spare wheel bag with
the emergency spare wheel.
X Open the emergency spare wheel bag and
remove the emergency spare wheel.
Always pay attention to the instructions and
safety notes under "Changing a wheel"
(Y page 365). 370
Emergency spare
wheelWheels and tyres