wiper blades MERCEDES-BENZ GLC COUPE 2016 Owners Manual
[x] Cancel search | Manufacturer: MERCEDES-BENZ, Model Year: 2016, Model line: GLC COUPE, Model: MERCEDES-BENZ GLC COUPE 2016Pages: 389, PDF Size: 7.34 MB
Page 10 of 389
Important safety notes .................. 171
Parking brake ................................ 168
Warning lamp .................................2
82
Breakdown
Where will I find...? ........................ 338
see Flat tyre
see Towing away
Brightness control (instrument
cluster lighting) ................................... 32
Buttons on the steering column ...... 229C
Calling up a fault see Display messages
Calling up the climate control bar
Multimedia system ........................ 296
Calling up the climate control
menu
Multimedia system ........................ 296
Camera
see 360° camera
see Reversing camera
Car
see Vehicle
Car wash (care) ................................. 331
Care
360° camera ................................. 335
Automatic car wash ....................... 331
Carpets .......................................... 337
Display .......................................... .336
Exhaust pipe .................................. 335
Exterior lighting ............................ .334
General notes ................................ 331
High-pressure cleaner .................... 332
Interior .......................................... .336
Matt paintwork .............................. 333
Paint .............................................. 333
Plastic trim ................................... .336
Reversing camera .......................... 335
Roof lining ...................................... 337
Seat belt ........................................ 337
Seat cover ..................................... 337
Selector lever ................................ 336
Sensors ......................................... 335
Side running board ........................ 335
Steering wheel ............................... 336
Trim pieces ................................... .336 Washing by hand ........................... 332
Wheels ..........................................
.334
Windows ........................................ 334
Wiper blades .................................. 334
Wooden trim .................................. 336
CD
See also Digital Owner's Manual ... 292
CD player (on-board computer) ........237
Central locking
Locking/unlocking (key ).................. 83
Centre console
Lower section .................................. 37
Upper section .................................. 36
Changing the media source ............. 236
Charge-air pressure (on-board
computer, Mercedes-AMG vehi-
cles) .................................................... 245
Child
Restraint system .............................. 57
Child seat
Forward-facing restraint system ...... 61
i-Size ................................................ 58
ISOFIX .............................................. 58
On the front-passenger sea t............ 60
Rearward-facing restraint system .... 61
Recommendations ........................... 65
Suitable positions ............................ 61
Top Tether ....................................... 59
Child-proof locks
Important safety notes .................... 66
Rear doors ....................................... 67
Children in the vehicle
Important safety notes .................... 56
Cigarette lighter ................................ 318
Cleaning
Mirror turn signal ........................... 335
Trailer tow hitch ............................. 336
Climate control
Auxiliary heating/ventilation .......... 137
Control panel for THERMATIC
automatic climate control (2-
zone) .............................................. 127
Controlling automaticall y............... 131
Convenience opening/closing
(air-recirculation mode) ................. 134
Cooling with air dehumidification .. 130
Cooling with air dehumidification
(multimedia system )...................... 297 Index
7
Page 27 of 389
Vehicle identification plate
.............. 372
Vehicle level
AIR BODY CONTROL ...................... 188
Display message ............................ 266
Video
Operating the DVD ......................... 237
See also Digital Owner's Manua l... 292
VIN
Seat ............................................... 373
Type plate ...................................... 372 W
Warning and indicator lamps ABS ................................................ 283
Brakes ........................................... 282
Distance warning signal ................. 289
ESP ®
.............................................. 283
ESP ®
OFF ....................................... 285
Fuel tank ........................................ 286
General notes ................................ 280
LIM (cruise control) ........................ 174
LIM (DISTRONIC PLUS) .................. 179
LIM (variable SPEEDTRONIC) ......... 176
Overview .......................................... 34
Parking brake ................................ 286
PASSENGER AIR BAG ...................... 42
Reserve fue l................................... 286
Seat belt ........................................ 280
Steering ......................................... 291
Tyre pressure monitor ................... 290
Warning triangle ................................ 339
Washer fluid
Display message ............................ 279
Weather display (COMAND Online)
See also Digital Owner's Manua l... 292
Wheel and tyre combinations
Tyres .............................................. 368
Wheel bolt tightening torque ........... 368
Wheel chock ...................................... 365
Wheels
Changing a whee l.......................... 364
Changing/replacing ....................... 364
Checking ........................................ 356
Cleaning ......................................... 334
Emergency spare whee l................. 369
Fitting a new wheel ........................ 367
Fitting a wheel ............................... 365 Important safety notes .................. 356
Information on driving .................... 356
Removing a whee l.......................... 367
Snow chains .................................. 359
Storing ........................................... 365
Tightening torque ........................... 368
Wheel size/tyre size ...................... 368
Windowbag
Display message ............................ 258
Operation ......................................... 48
Windows
Cleaning ......................................... 334
see Side windows
Windscreen
Demisting ...................................... 132
Windscreen washer fluid
see Windscreen washer system
Windscreen washer system
Important safety notes .................. 378
Topping up ..................................... 329
Windscreen wipers
Problem (malfunction) ................... 126
Replacing the wiper blades ............ 124
Switching on/of f........................... 123
Winter operation
Important safety notes .................. 358
Radiator cover ............................... 326
Slippery road surfaces ................... 173
Snow chains .................................. 359
Summer tyres ................................ 358
Winter tyres
Limiting the speed (on-board com-
puter) ............................................. 244
M+S tyres ...................................... 358
Wiper blades
Cleaning ......................................... 334
Important safety notes .................. 124
Replacing ....................................... 124
Wooden trim (cleaning instruc-
tions) .................................................. 336
Workshop
see Qualified specialist workshop 24
Index
Page 126 of 389
X
Insert new bulb into bulb holder ;.
X Insert bulb holder ;into groove with lug at
top.
X Push bulb holder ;down until it engages
audibly.
X Press on housing cover :and turn it clock-
wise.
Turn signals X
Remove the cover in the front wheel arch
(Y page 123).
X Turn bulb holder :anti-clockwise using grip
under headlamp casing and remove it down-
wards with bulb.
X Turn defective bulb anti-clockwise and pull it
out of bulb holder :.
X Insert new bulb into bulb holder :.
X Insert bulb holder :, turn it clockwise and
lock.
X Replace the cover in the front wheel arch
(Y page 123).
Fitting/removing the cover on the front wheel arch You must remove the cover in the front wheel
arch before you can change the front turn signal
lamp. X
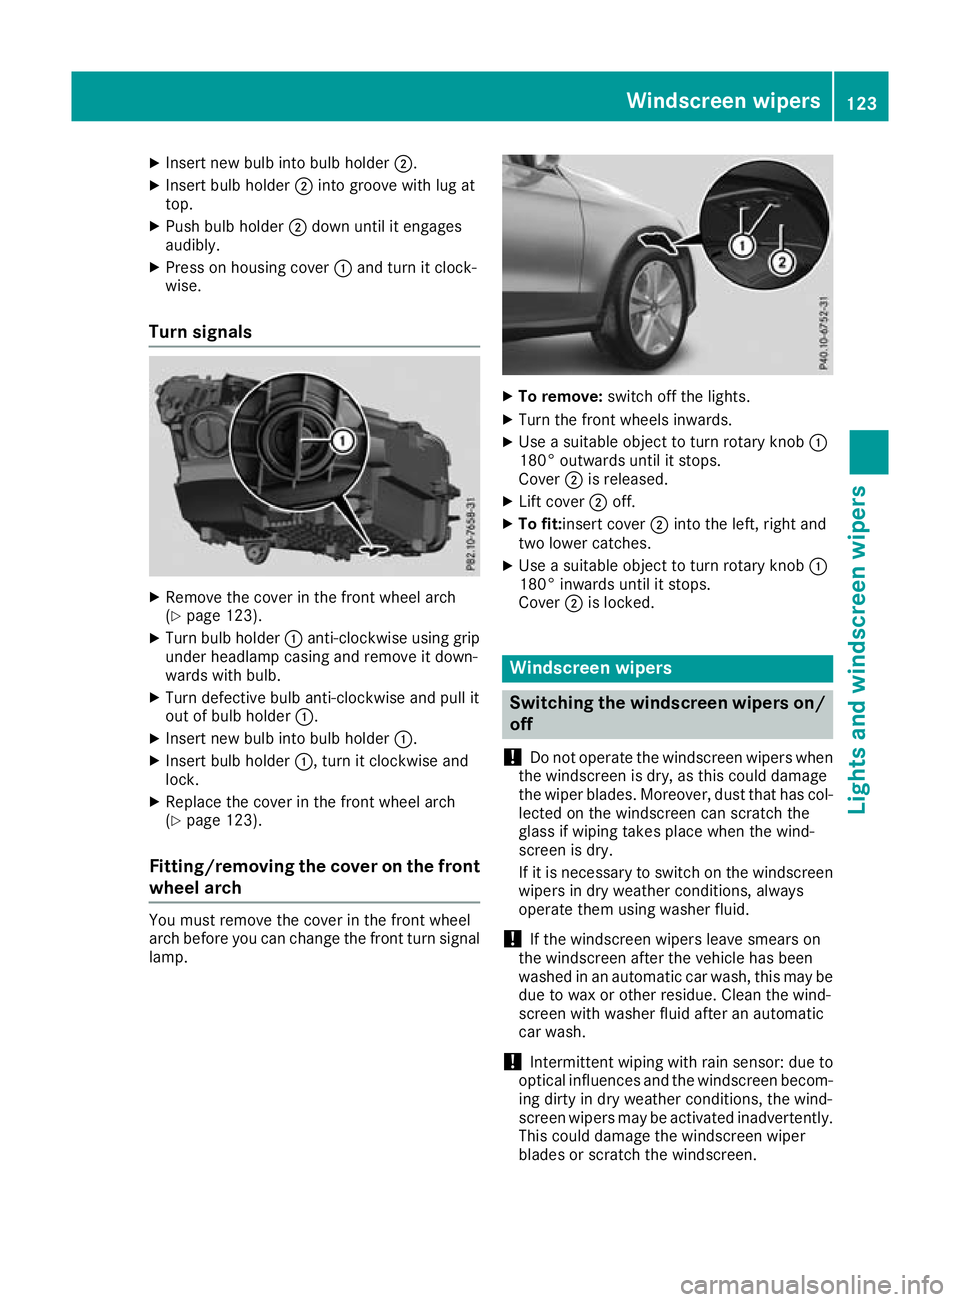
To remove: switch off the lights.
X Turn the front wheels inwards.
X Use a suitable object to turn rotary knob :
180° outwards until it stops.
Cover ;is released.
X Lift cover ;off.
X To fit:insert cover ;into the left, right and
two lower catches.
X Use a suitable object to turn rotary knob :
180° inwards until it stops.
Cover ;is locked. Windscreen wipers
Switching the windscreen wipers on/
off
! Do not operate the windscreen wipers when
the windscreen is dry, as this could damage
the wiper blades. Moreover, dust that has col-
lected on the windscreen can scratch the
glass if wiping takes place when the wind-
screen is dry.
If it is necessary to switch on the windscreen wipers in dry weather conditions, always
operate them using washer fluid.
! If the windscreen wipers leave smears on
the windscreen after the vehicle has been
washed in an automatic car wash, this may be
due to wax or other residue. Clean the wind-
screen with washer fluid after an automatic
car wash.
! Intermittent wiping with rain sensor: due to
optical influences and the windscreen becom-
ing dirty in dry weather conditions, the wind-
screen wipers may be activated inadvertently. This could damage the windscreen wiper
blades or scratch the windscreen. Windscreen wipers
123Lights and windscreen wipers Z
Page 127 of 389
For this reason, you should always switch off
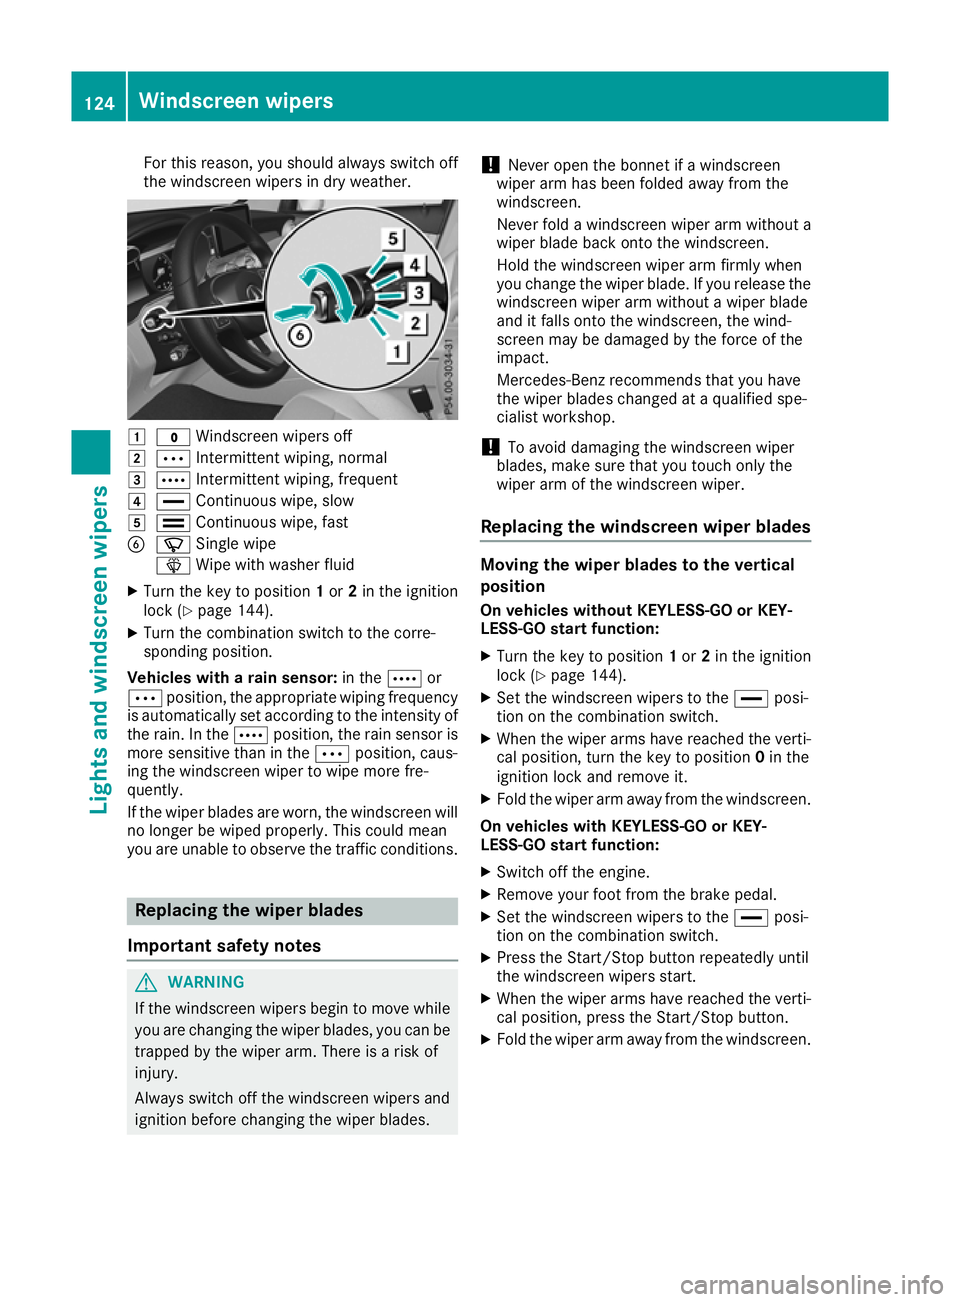
the windscreen wipers in dry weather. 1
$ Windscreen wipers off
2 Ä Intermittent wiping, normal
3 Å Intermittent wiping, frequent
4 ° Continuous wipe, slow
5 ¯ Continuous wipe, fast
B í Single wipe
î Wipe with washer fluid
X Turn the key to position 1or 2in the ignition
lock (Y page 144).
X Turn the combination switch to the corre-
sponding position.
Vehicles with a rain sensor: in theÅor
Ä position, the appropriate wiping frequency
is automatically set according to the intensity of
the rain. In the Åposition, the rain sensor is
more sensitive than in the Äposition, caus-
ing the windscreen wiper to wipe more fre-
quently.
If the wiper blades are worn, the windscreen will no longer be wiped properly. This could mean
you are unable to observe the traffic conditions. Replacing the wiper blades
Important safety notes G
WARNING
If the windscreen wipers begin to move while
you are changing the wiper blades, you can be trapped by the wiper arm. There is a risk of
injury.
Always switch off the windscreen wipers and
ignition before changing the wiper blades. !
Never open the bonnet if a windscreen
wiper arm has been folded away from the
windscreen.
Never fold a windscreen wiper arm without a
wiper blade back onto the windscreen.
Hold the windscreen wiper arm firmly when
you change the wiper blade. If you release the
windscreen wiper arm without a wiper blade
and it falls onto the windscreen, the wind-
screen may be damaged by the force of the
impact.
Mercedes-Benz recommends that you have
the wiper blades changed at a qualified spe-
cialist workshop.
! To avoid damaging the windscreen wiper
blades, make sure that you touch only the
wiper arm of the windscreen wiper.
Replacing the windscreen wiper blades Moving the wiper blades to the vertical
position
On vehicles without KEYLESS-GO or KEY-
LESS‑GO start function:
X Turn the key to position 1or 2in the ignition
lock (Y page 144).
X Set the windscreen wipers to the °posi-
tion on the combination switch.
X When the wiper arms have reached the verti-
cal position, turn the key to position 0in the
ignition lock and remove it.
X Fold the wiper arm away from the windscreen.
On vehicles with KEYLESS-GO or KEY-
LESS‑GO start function:
X Switch off the engine.
X Remove your foot from the brake pedal.
X Set the windscreen wipers to the °posi-
tion on the combination switch.
X Press the Start/Stop button repeatedly until
the windscreen wipers start.
X When the wiper arms have reached the verti-
cal position, press the Start/Stop button.
X Fold the wiper arm away from the windscreen. 124
Windscreen wipersLights and windscreen wipers
Page 128 of 389
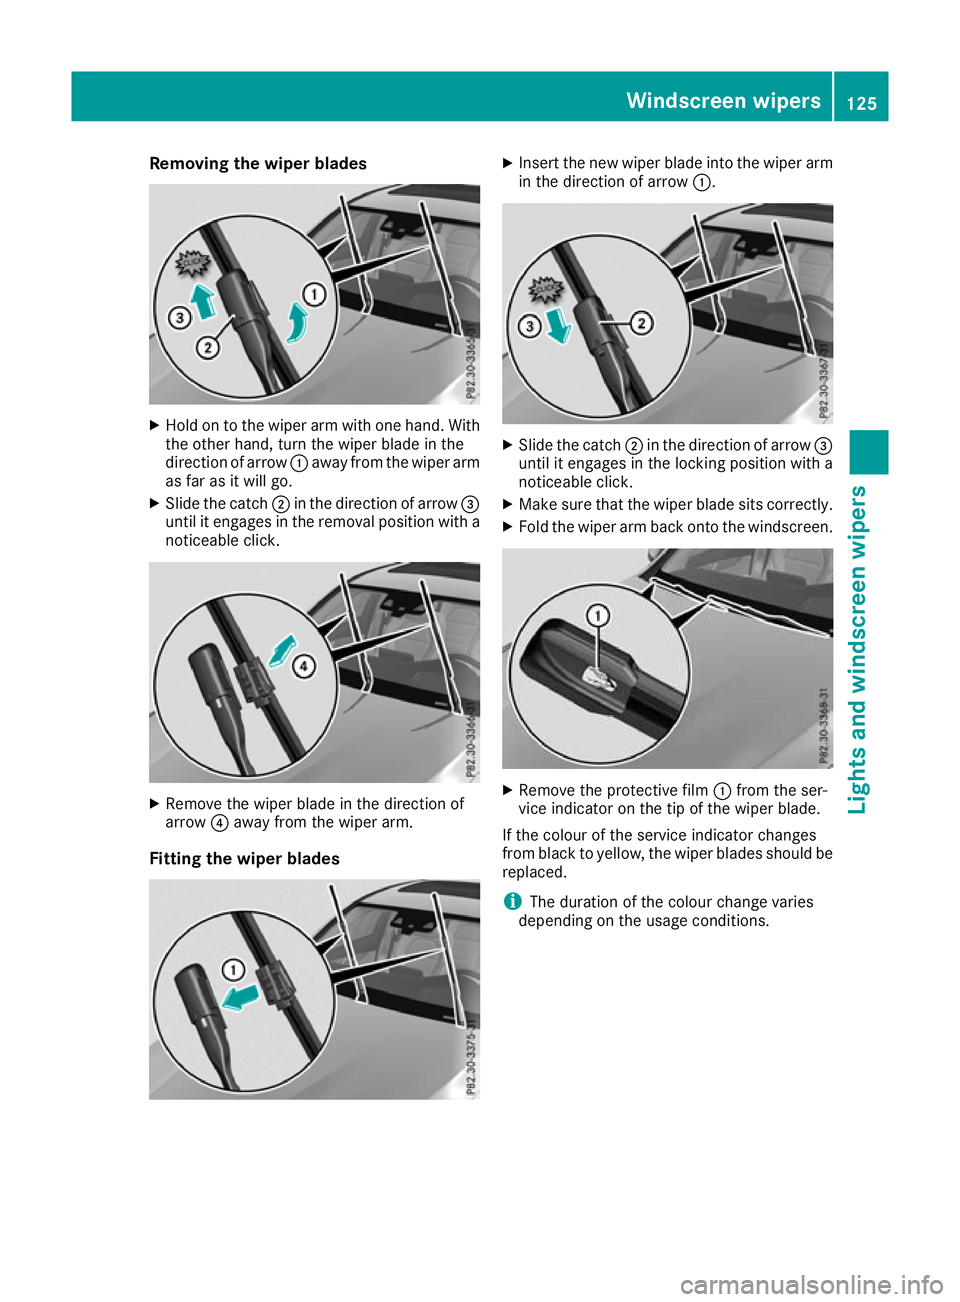
Removing the wiper blades
X
Hold on to the wiper arm with one hand. With
the other hand, turn the wiper blade in the
direction of arrow :away from the wiper arm
as far as it will go.
X Slide the catch ;in the direction of arrow =
until it engages in the removal position with a noticeable click. X
Remove the wiper blade in the direction of
arrow ?away from the wiper arm.
Fitting the wiper blades X
Insert the new wiper blade into the wiper arm
in the direction of arrow :. X
Slide the catch ;in the direction of arrow =
until it engages in the locking position with a
noticeable click.
X Make sure that the wiper blade sits correctly.
X Fold the wiper arm back onto the windscreen. X
Remove the protective film :from the ser-
vice indicator on the tip of the wiper blade.
If the colour of the service indicator changes
from black to yellow, the wiper blades should be replaced.
i The duration of the colour change varies
depending on the usage conditions. Windscreen wipers
125Lights and windscreen wipers Z
Page 335 of 389
!
If the key is within the rear detection range
of KEYLESS-GO, the following situations, for
example, could lead to the unintentional
opening of the tailgate:
R using a car wash
R using a high-pressure cleaner
Make sure that the key is at least 3 m away
from the vehicle.
! Make sure that the automatic transmission
is in neutral position Nwhen washing your
vehicle in a tow-through car wash. The vehicle may otherwise be damaged.
R Operating with the key:
Do not remove the key from the ignition
lock. Do not open the driver's door when
the engine is switched off or at very low
speeds. Otherwise, when in transmission
position Dor Rthe automatic transmission
will automatically switch to park position P
and block the wheels.
R Operating with the Start/Stop button:
Do not open the driver's door when the
engine is switched off or at very low
speeds. Otherwise, when in transmission
position Dor Rthe automatic transmission
will automatically switch to park position P
and block the wheels.
Observe the following to make sure that the
automatic transmission stays in neutral position N:
Operating with the key and Start/Stop button:
X Make sure that the ignition is switched on.
X Make sure that the vehicle is stationary.
X Depress the brake pedal and keep it
depressed.
Operating with the Start/Stop button only: X Engage parking position P.
X Release the brake pedal.
X Remove the Start/Stop button from the igni-
tion lock (Y page 144).
X Insert the key into the ignition lock.
X Switch on the ignition.
X Depress the brake pedal and keep it
depressed.
Operating with the key and Start/Stop button:
X Engage neutral N.
X Release the brake pedal. X
Release the electric parking brake, if neces-
sary.
X Switch off the ignition and leave the key in the
ignition lock.
You can wash the vehicle in an automatic car
wash from the very start.
If the vehicle is very dirty, wash off excess dirt
before cleaning the vehicle in an automatic car
wash.
After using an automatic car wash, wipe off the
wax from the windscreen and the windscreen
wiper blades. This will prevent smears and
reduce wiping noises caused by residue on the
windscreen.
Washing by hand In some countries, washing by hand is only
allowed at specially equipped washing bays.
Observe the legal requirements for each indi-
vidual country.
X Do not use hot water and do not wash the
vehicle in direct sunlight.
X Use a soft sponge to clean.
X Use a mild cleaning agent, such as a car
shampoo approved by Mercedes-Benz.
X Thoroughly hose down the vehicle with a gen-
tle jet of water.
X Do not point the water jet directly towards the
air inlet.
X Use plenty of water and rinse out the sponge
frequently.
X Rinse the vehicle with clean water and dry
thoroughly with a chamois.
X Do not let the cleaning agent dry on the paint-
work.
When using the vehicle in winter, remove all
traces of road salt deposits carefully and as
soon as possible.
High-pressure cleaning equipment G
WARNING
The water jet of circular-jet nozzles (dirt grind- ers) can cause damage not visible from the
outside to tyres or chassis components. Com-
ponents damaged in this way can unexpect-
edly fail. There is a risk of an accident.
Do not use high-pressure cleaners with circu-
lar-jet nozzles to clean the vehicle. Have dam- 332
CareMaintenance and care
Page 337 of 389
Cleaning vehicle parts
Cleaning the wheels G
WARNING
The water jet of circular-jet nozzles (dirt grind- ers) can cause damage not visible from the
outside to tyres or chassis components. Com-
ponents damaged in this way can unexpect-
edly fail. There is a risk of an accident.
Do not use high-pressure cleaners with circu-
lar-jet nozzles to clean the vehicle. Have dam- aged tyres or chassis components replaced
immediately.
! Do not use acidic wheel cleaning products
to remove brake dust. This could damage
wheel bolts and brake components.
! Do not park up your vehicle for a long period
of time immediately after cleaning, particu-
larly after cleaning the wheel rim with wheel
cleaner. Wheel cleaner may lead to increased corrosion of the brake discs and pads. You
should therefore drive for a few minutes after
cleaning. By heating up the brakes, the brake
discs and pads dry. The vehicle can then be
parked up for a long period of time.
Cleaning the windows G
WARNING
If the windscreen wipers are set in motion
when cleaning the windscreen or wiper
blades, you could become trapped. There is a danger of injury.
Always switch off the windscreen wipers and
the ignition before cleaning the windscreen or wiper blades.
! Do not use dry cloths, abrasive cleaning
agents, solvents or solvent-based cleaning
agents to clean the inside of the windows/
windscreen. Do not touch the inside of the
windows/windscreen with hard items such
as an ice scraper or a ring. Otherwise, the
windows/windscreen could be damaged.
! Clean the water drainage channels of the
windscreen and the rear window at regular
intervals. Deposits such as leaves, petals and
pollen may under certain circumstances pre- vent water from draining away. This can lead
to corrosion damage and damage to elec-
tronic components.
X Clean the inside and outside of the windows
with a damp cloth and a cleaning agent that is
recommended and approved by Mercedes-
Benz.
Cleaning the wiper blades G
WARNING
If the windscreen wipers are set in motion
when cleaning the windscreen or wiper
blades, you could become trapped. There is a danger of injury.
Always switch off the windscreen wipers and
the ignition before cleaning the windscreen orwiper blades.
! Do not pull on the wiper blade. Otherwise,
the wiper blade could be damaged.
! Do not clean wiper blades too often and do
not rub them too hard. Otherwise, the graph-
ite coating could be damaged. This could
cause wiper noise.
! Hold the wiper arm securely when folding
back. The windscreen could be damaged if
the wiper arm hits against it suddenly.
X Fold the wiper arms away from the wind-
screen (Y page 124).
X Clean the wiper blades carefully using a damp
cloth.
X Fold the windscreen wipers back again before
switching on the ignition.
Cleaning the exterior lighting !
Only use cleaning agents or cleaning cloths
that are suitable for plastic lenses. Unsuitable
cleaning agents or cleaning cloths could
scratch or damage the plastic lenses of the
exterior lighting.
X Clean the plastic lenses of the exterior light-
ing using a wet sponge and a mild cleaning
agent, e.g. Mercedes-Benz car shampoo or
cleaning cloths. 334
CareMaintenance and care