tow MERCEDES-BENZ GLC COUPE 2016 Owners Manual
[x] Cancel search | Manufacturer: MERCEDES-BENZ, Model Year: 2016, Model line: GLC COUPE, Model: MERCEDES-BENZ GLC COUPE 2016Pages: 389, PDF Size: 7.34 MB
Page 335 of 389
!
If the key is within the rear detection range
of KEYLESS-GO, the following situations, for
example, could lead to the unintentional
opening of the tailgate:
R using a car wash
R using a high-pressure cleaner
Make sure that the key is at least 3 m away
from the vehicle.
! Make sure that the automatic transmission
is in neutral position Nwhen washing your
vehicle in a tow-through car wash. The vehicle may otherwise be damaged.
R Operating with the key:
Do not remove the key from the ignition
lock. Do not open the driver's door when
the engine is switched off or at very low
speeds. Otherwise, when in transmission
position Dor Rthe automatic transmission
will automatically switch to park position P
and block the wheels.
R Operating with the Start/Stop button:
Do not open the driver's door when the
engine is switched off or at very low
speeds. Otherwise, when in transmission
position Dor Rthe automatic transmission
will automatically switch to park position P
and block the wheels.
Observe the following to make sure that the
automatic transmission stays in neutral position N:
Operating with the key and Start/Stop button:
X Make sure that the ignition is switched on.
X Make sure that the vehicle is stationary.
X Depress the brake pedal and keep it
depressed.
Operating with the Start/Stop button only: X Engage parking position P.
X Release the brake pedal.
X Remove the Start/Stop button from the igni-
tion lock (Y page 144).
X Insert the key into the ignition lock.
X Switch on the ignition.
X Depress the brake pedal and keep it
depressed.
Operating with the key and Start/Stop button:
X Engage neutral N.
X Release the brake pedal. X
Release the electric parking brake, if neces-
sary.
X Switch off the ignition and leave the key in the
ignition lock.
You can wash the vehicle in an automatic car
wash from the very start.
If the vehicle is very dirty, wash off excess dirt
before cleaning the vehicle in an automatic car
wash.
After using an automatic car wash, wipe off the
wax from the windscreen and the windscreen
wiper blades. This will prevent smears and
reduce wiping noises caused by residue on the
windscreen.
Washing by hand In some countries, washing by hand is only
allowed at specially equipped washing bays.
Observe the legal requirements for each indi-
vidual country.
X Do not use hot water and do not wash the
vehicle in direct sunlight.
X Use a soft sponge to clean.
X Use a mild cleaning agent, such as a car
shampoo approved by Mercedes-Benz.
X Thoroughly hose down the vehicle with a gen-
tle jet of water.
X Do not point the water jet directly towards the
air inlet.
X Use plenty of water and rinse out the sponge
frequently.
X Rinse the vehicle with clean water and dry
thoroughly with a chamois.
X Do not let the cleaning agent dry on the paint-
work.
When using the vehicle in winter, remove all
traces of road salt deposits carefully and as
soon as possible.
High-pressure cleaning equipment G
WARNING
The water jet of circular-jet nozzles (dirt grind- ers) can cause damage not visible from the
outside to tyres or chassis components. Com-
ponents damaged in this way can unexpect-
edly fail. There is a risk of an accident.
Do not use high-pressure cleaners with circu-
lar-jet nozzles to clean the vehicle. Have dam- 332
CareMaintenance and care
Page 339 of 389
flash rust to form on the surface. You can
restore the original shine of the exhaust pipe by cleaning it regularly, especially in winter and
after washing the vehicle.
X Clean the exhaust pipe with a care product
tested and approved by Mercedes-Benz.
Cleaning the trailer tow hitch H
Environmental note
Dispose of oily and greasy cloths in an envi-
ronmentally-responsible manner.
! Do not clean the ball coupling with a high-
pressure cleaner. Do not use solvents.
The ball coupling must be cleaned if it becomes
dirty or corroded.
X Remove rust on the ball, e.g. with a wire
brush.
X Remove dirt with a clean, lint-free cloth or a
brush.
X After cleaning, lightly oil or grease the ball
coupling.
X Check that the vehicle's trailer tow hitch is
working properly.
You can also have the maintenance work on the
ball coupling and the trailer tow hitch carried out
by a qualified specialist workshop. Interior care
Cleaning the display !
For cleaning, do not use any of the following:
R alcohol-based thinner or petrol
R abrasive cleaning agents
R commercially-available household cleaning
agents
These may damage the display surface. Do
not put pressure on the display surface when cleaning. This could lead to irreparable dam-
age to the display.
X Before cleaning the display, make sure that it
is switched off and has cooled down.
X Clean the display surface using a commer-
cially available microfibre cloth and TFT/LCD
display cleaner.
X Dry the display surface using a dry microfibre
cloth. Cleaning the plastic trim G
WARNING
Care products and cleaning agents containing solvents can cause surfaces in the cockpit to
become porous. This could result in plastic
parts breaking away when the airbags are
deployed. There is a danger of injury.
Do not use care products and cleaning agents containing solvents to clean the cockpit.
! Never attach the following to plastic surfa-
ces:
R stickers
R films
R perfume oil container or similar
You could otherwise damage the plastic.
! Do not allow cosmetics, insect repellent or
sunscreen to come in contact with the plastic trim. This maintains the high-quality look of
the surfaces.
X Wipe the plastic trim with a damp, lint-free
cloth, e.g. a microfibre cloth.
X Heavy soiling: use care and cleaning prod-
ucts recommended and approved by
Mercedes-Benz.
The surface may change colour temporarily.
Wait until the surface is dry again.
Cleaning the steering wheel and selec-
tor lever X
Thoroughly wipe with a damp cloth or use
leather care agents that have been recom-
mended and approved by Mercedes-Benz.
Cleaning wood trim and trim elements !
Do not use solvent-based cleaning agents
such as tar remover, wheel cleaners, polishes
or waxes. There is otherwise a risk of damag- ing the surface. 336
CareMaintenance and care
Page 341 of 389
Where will I find...?
Reflective safety jacket
Removing and stowing the reflective
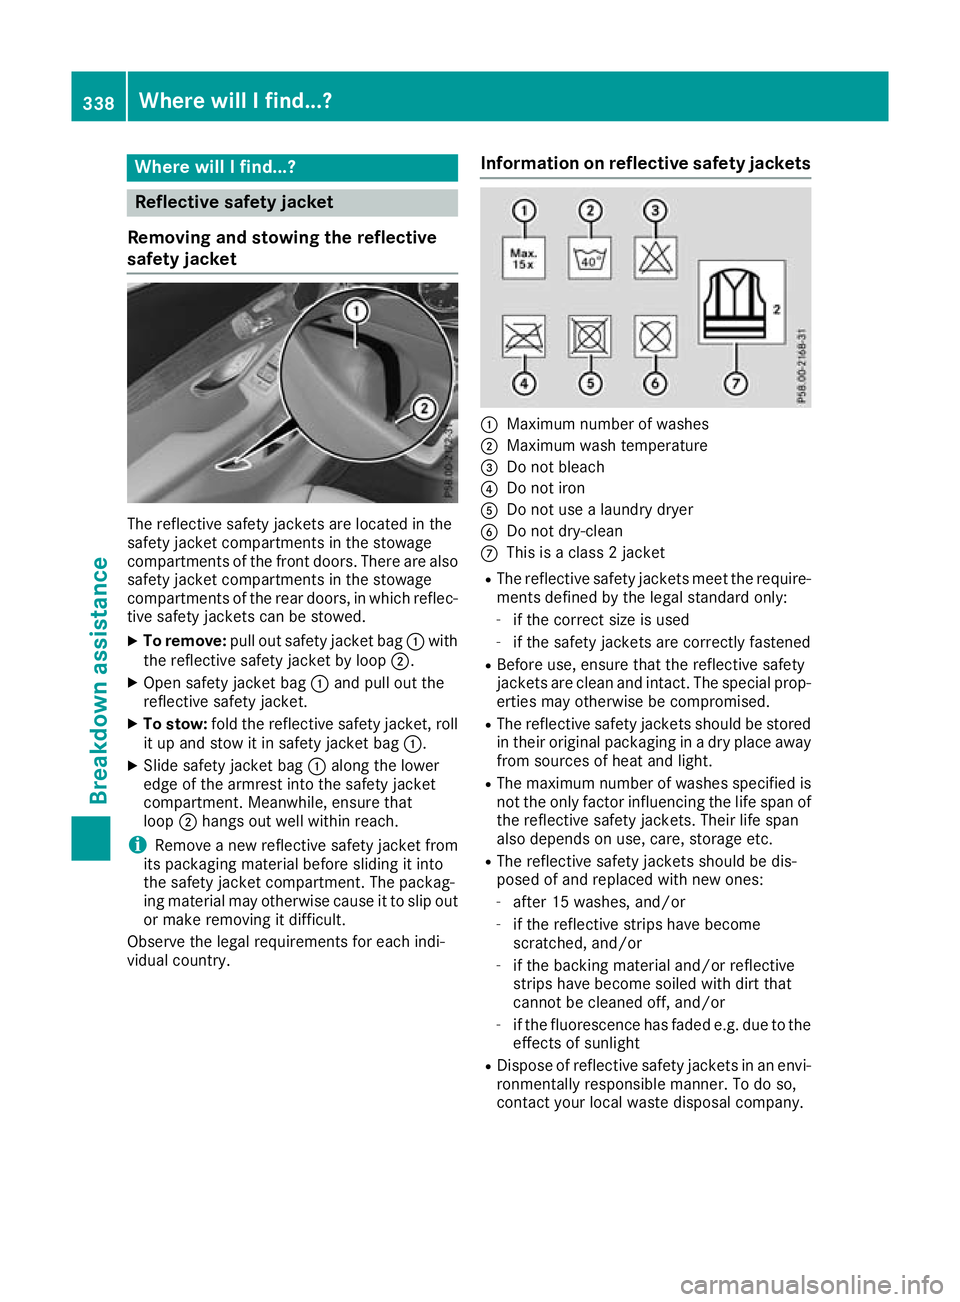
safety jacket The reflective safety jackets are located in the
safety jacket compartments in the stowage
compartments of the front doors. There are also safety jacket compartments in the stowage
compartments of the rear doors, in which reflec-
tive safety jackets can be stowed.
X To remove: pull out safety jacket bag :with
the reflective safety jacket by loop ;.
X Open safety jacket bag :and pull out the
reflective safety jacket.
X To stow: fold the reflective safety jacket, roll
it up and stow it in safety jacket bag :.
X Slide safety jacket bag :along the lower
edge of the armrest into the safety jacket
compartment. Meanwhile, ensure that
loop ;hangs out well within reach.
i Remove a new reflective safety jacket from
its packaging material before sliding it into
the safety jacket compartment. The packag-
ing material may otherwise cause it to slip out
or make removing it difficult.
Observe the legal requirements for each indi-
vidual country. Information on reflective safety jackets :
Maximum number of washes
; Maximum wash temperature
= Do not bleach
? Do not iron
A Do not use a laundry dryer
B Do not dry-clean
C This is a class 2 jacket
R The reflective safety jackets meet the require-
ments defined by the legal standard only:
- if the correct size is used
- if the safety jackets are correctly fastened
R Before use, ensure that the reflective safety
jackets are clean and intact. The special prop-
erties may otherwise be compromised.
R The reflective safety jackets should be stored
in their original packaging in a dry place away
from sources of heat and light.
R The maximum number of washes specified is
not the only factor influencing the life span of
the reflective safety jackets. Their life span
also depends on use, care, storage etc.
R The reflective safety jackets should be dis-
posed of and replaced with new ones:
- after 15 washes, and/or
- if the reflective strips have become
scratched, and/or
- if the backing material and/or reflective
strips have become soiled with dirt that
cannot be cleaned off, and/or
- if the fluorescence has faded e.g. due to the
effects of sunlight
R Dispose of reflective safety jackets in an envi-
ronmentally responsible manner. To do so,
contact your local waste disposal company. 338
Where will I find...?Breakdown assistance
Page 342 of 389
Warning triangle
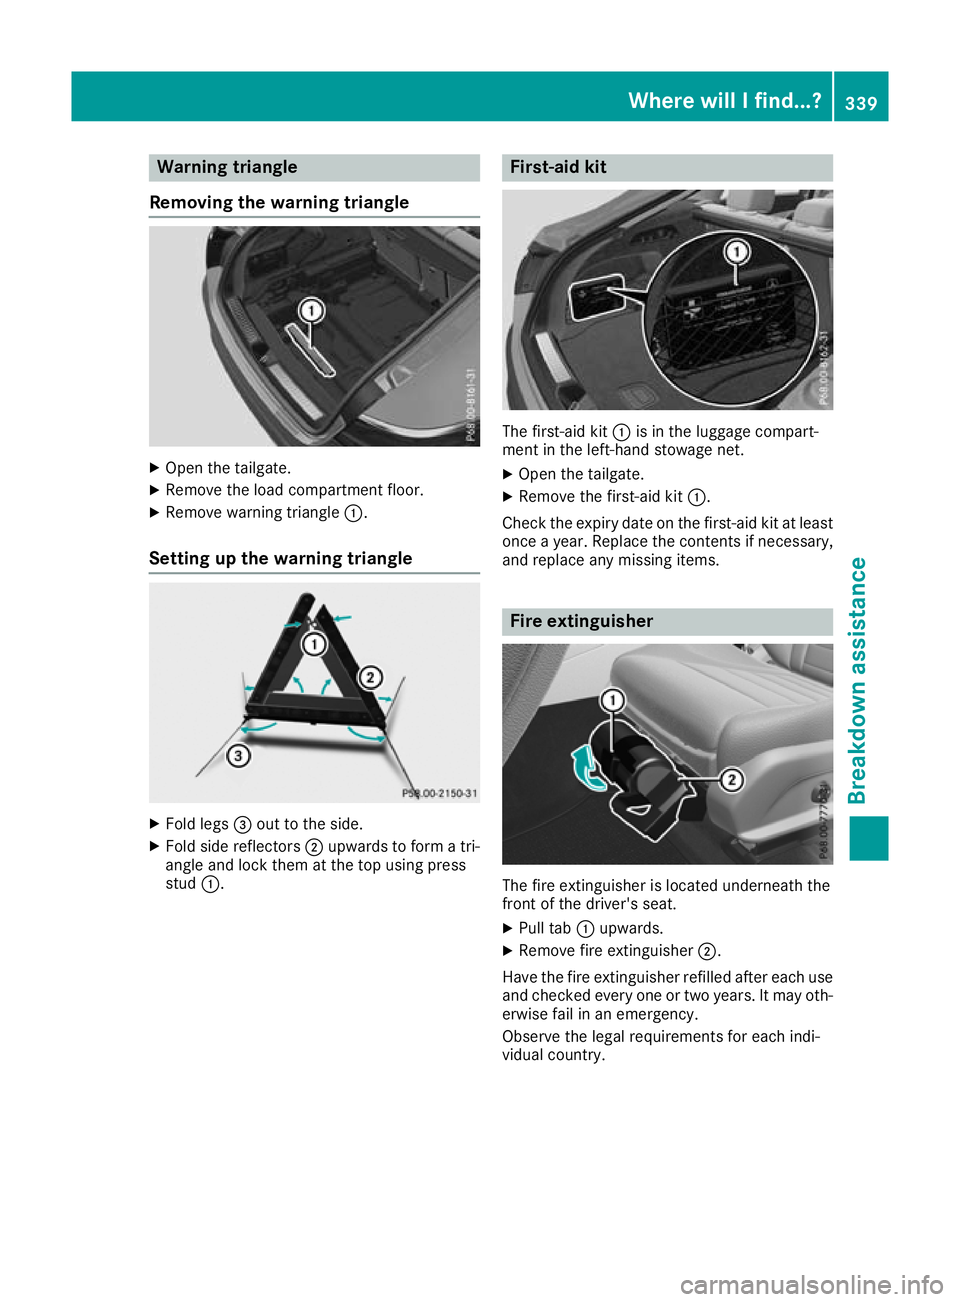
Removing the warning triangle X
Open the tailgate.
X Remove the load compartment floor.
X Remove warning triangle :.
Setting up the warning triangle X
Fold legs =out to the side.
X Fold side reflectors ;upwards to form a tri-
angle and lock them at the top using press
stud :. First-aid kit
The first-aid kit
:is in the luggage compart-
ment in the left-hand stowage net.
X Open the tailgate.
X Remove the first-aid kit :.
Check the expiry date on the first-aid kit at least once a year. Replace the contents if necessary,and replace any missing items. Fire extinguisher
The fire extinguisher is located underneath the
front of the driver's seat.
X Pull tab :upwards.
X Remove fire extinguisher ;.
Have the fire extinguisher refilled after each use and checked every one or two years. It may oth-
erwise fail in an emergency.
Observe the legal requirements for each indi-
vidual country. Where will I find...?
339Breakdown assistance
Page 343 of 389

Towing eye
Removing the towing eye The towing eye
:is located in the left-side
stowage space under the luggage compartment
floor.
X To remove: open the tailgate.
X Open the luggage compartment floor
(Y page 314).
X Remove towing eye :.Vehicles with a TIREFFIT kit
General notes i
Depending on the power category (LK), the
tyre inflation compressor weighs as follows:
R LK1 – 12 V/10 A, 120 W: 0.8 kg
R LK2 – 12 V/15 A, 180 W:0.9 kg
You can find information on the power cate-
gory and/or electrical details on the back of
the tyre inflation compressor.
The tyre inflation compressor is maintenance-
free. In case of a malfunction, please contact
a qualified specialist workshop. Removing the TIREFIT kit The TIREFIT kit is located in the left-hand stow-
age compartment.
X To remove: open the tailgate.
X Open the luggage compartment floor
(Y page 314).
X Push retaining clamps :on the cover down-
wards to release them.
X Fold up the cover in the direction of arrow ;.
X Remove tyre inflation compressor =and tyre
sealant bottle ?.
X Use the TIREFIT kit (Y page 342). Vehicles with a tyre-change tool kit
General notes Apart from some country-specific variants, vehi-
cles are not equipped with tyre-changing tools.
Some tools for changing a tyre are specific to
the vehicle. For more information on which tyre- changing tools are required and approved for
performing a tyre change on your vehicle, con-
sult a qualified specialist workshop.
Necessary tyre-changing tools may include, for
example:
R Jack
R Wheel chock
R Wheel wrench
R Centring pin
i The jack weighs approximately 3.4 kg.
The maximum load-bearing capacity of the
jack can be found on the adhesive label on the jack.
The jack is maintenance-free. In case of a
malfunction, please contact a qualified spe-
cialist workshop. 340
Where will I find...?Breakdown assistance
Page 344 of 389
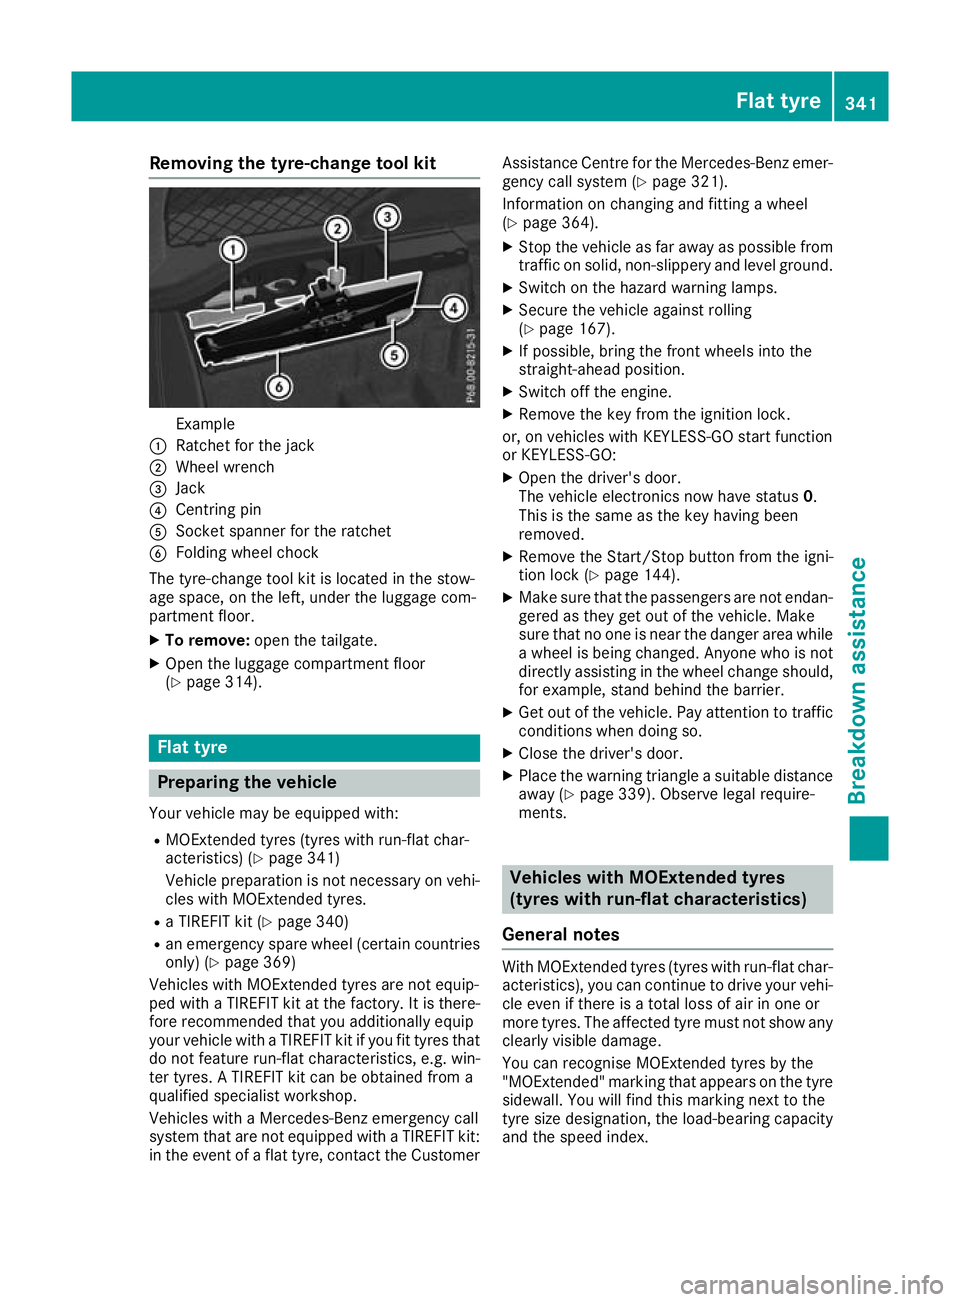
Removing the tyre-change tool kit
Example
: Ratchet for the jack
; Wheel wrench
= Jack
? Centring pin
A Socket spanner for the ratchet
B Folding wheel chock
The tyre-change tool kit is located in the stow-
age space, on the left, under the luggage com-
partment floor.
X To remove: open the tailgate.
X Open the luggage compartment floor
(Y page 314). Flat tyre
Preparing the vehicle
Your vehicle may be equipped with: R MOExtended tyres (tyres with run-flat char-
acteristics) (Y page 341)
Vehicle preparation is not necessary on vehi- cles with MOExtended tyres.
R a TIREFIT kit (Y page 340)
R an emergency spare wheel (certain countries
only) (Y page 369)
Vehicles with MOExtended tyres are not equip-
ped with a TIREFIT kit at the factory. It is there-
fore recommended that you additionally equip
your vehicle with a TIREFIT kit if you fit tyres that do not feature run-flat characteristics, e.g. win-
ter tyres. A TIREFIT kit can be obtained from a
qualified specialist workshop.
Vehicles with a Mercedes-Benz emergency call
system that are not equipped with a TIREFIT kit:
in the event of a flat tyre, contact the Customer Assistance Centre for the Mercedes-Benz emer-
gency call system (Y page 321).
Information on changing and fitting a wheel
(Y page 364).
X Stop the vehicle as far away as possible from
traffic on solid, non-slippery and level ground.
X Switch on the hazard warning lamps.
X Secure the vehicle against rolling
(Y page 167).
X If possible, bring the front wheels into the
straight-ahead position.
X Switch off the engine.
X Remove the key from the ignition lock.
or, on vehicles with KEYLESS-GO start function
or KEYLESS ‑GO:
X Open the driver's door.
The vehicle electronics now have status 0.
This is the same as the key having been
removed.
X Remove the Start/Stop button from the igni-
tion lock (Y page 144).
X Make sure that the passengers are not endan-
gered as they get out of the vehicle. Make
sure that no one is near the danger area while a wheel is being changed. Anyone who is notdirectly assisting in the wheel change should,
for example, stand behind the barrier.
X Get out of the vehicle. Pay attention to traffic
conditions when doing so.
X Close the driver's door.
X Place the warning triangle a suitable distance
away (Y page 339). Observe legal require-
ments. Vehicles with MOExtended tyres
(tyres with run-flat characteristics)
General notes With MOExtended tyres (tyres with run-flat char-
acteristics), you can continue to drive your vehi-
cle even if there is a total loss of air in one or
more tyres. The affected tyre must not show any clearly visible damage.
You can recognise MOExtended tyres by the
"MOExtended" marking that appears on the tyre
sidewall. You will find this marking next to the
tyre size designation, the load-bearing capacity
and the speed index. Flat tyre
341Breakdown assistance
Page 346 of 389

inhale TIREFIT fumes. Keep tyre sealant away
from children. There is a risk of injury.
If you come into contact with the tyre sealant,
observe the following:
R Rinse off the tyre sealant from your skin
immediately with water.
R If the tyre sealant comes into contact with
your eyes, immediately rinse them thor-
oughly with clean water.
R If tyre sealant is swallowed, immediately
rinse your mouth out thoroughly and drink
plenty of water. Do not induce vomiting,
and seek medical attention immediately.
R Immediately change out of clothing which
has come into contact with tyre sealant.
R If an allergic reaction occurs, seek medical
attention immediately.
! After use, excess tyre sealant may run out of
the filler hose. This could cause stains.
Therefore, place the tyre sealant bottle with
filler hose in the plastic bag which is con-
tained the TIREFIT kit. H
Environmental note
Have the used tyre sealant bottle disposed of
professionally, e.g. at a qualified specialist
workshop.
! Do not operate the tyre inflation compres-
sor for longer than ten minutes at a time with- out a break. It may otherwise overheat.
The tyre inflation compressor can be oper-
ated again once it has cooled down.
Comply with the manufacturer's safety instruc-
tions on the sticker on the tyre inflation com-
pressor.
Using the TIREFIT kit X
Do not remove any foreign objects that have
penetrated the tyre, e.g. screws or nails.
X Remove the tyre sealant bottle, the accom-
panying TIREFIT sticker and the tyre inflation
compressor from the stowage well under-
neath the luggage compartment floor
(Y page 340). X
Affix part :of the TIREFIT sticker to the
instrument cluster within the driver's field of
vision.
X Affix part ;of the TIREFIT sticker near the
valve on the wheel with the defective tyre. X
Pull connector ?with cable and hose Aout
of the tyre inflation compressor housing.
X Push connector on hose Ainto flange Bon
tyre sealant bottle :until the connector
engages.
X Place tyre sealant bottle :head downwards
into recess ;of the tyre inflation compres-
sor. X
Remove cap from valve Con faulty tyre.
X Screw filler hose Donto valve C. Flat tyre
343Breakdown assistance Z
Page 347 of 389
X
Insert connector ?into cigarette lighter
socket (Y page 318) or into another 12 V
socket in your vehicle (Y page 318).
X Turn the key to position 1in the ignition lock
(Y page 144).
X Press on/off switch =on tyre inflation com-
pressor.
The tyre inflation compressor is switched on.
The tyre is inflated.
First, tyre sealant is pumped into the tyre. The pressure may briefly rise to approximately
500 kPa (5 bar/73 psi).
Do not switch off the tyre inflation com-
pressor during this phase.
X Let the tyre inflation compressor run for a
maximum of ten minutes. The tyre should
then have reached a pressure of at least
200 kPa (2.0 bar/29 psi).
If a pressure of 200 kPa (2.0 bar/29 psi) has
been attained after ten minutes, see "Tyre pres- sure reached" (Y page 344).
If a tyre pressure of 200 kPa (2.0 bar/29 psi) has
not been attained after ten minutes, see "Tyre
pressure not reached" (Y page 344).
If tyre sealant leaks out, make sure you clean the affected area as quickly as possible. It is pref-
erable to use clear water.
If you get tyre sealant on your clothing, have it
cleaned as soon as possible with perchloroethy-
lene.
Tyre pressure not reached If a tyre pressure of 200 kPa (2.0 bar/29 psi) has
not been reached after ten minutes:
X Switch off the tyre inflation compressor.
X Unscrew the filler hose from the valve of the
faulty tyre.
Tyre sealant may leak out when the filler hose
is unscrewed.
X Very slowly drive forwards or reverse approx-
imately 10 m.
X Pump up the tyre again.
After a maximum of ten minutes, the tyre
pressure must be at least 200 kPa (2.0 bar/
29 psi). G
WARNING
If the required tyre pressure is not reached
after the specified time, the tyre is too badly
damaged. The tyre sealant cannot repair the tyre in this instance. Damaged tyres and a tyre
pressure that is too low can significantly
impair the vehicle's braking and driving char-
acteristics. There is a risk of accident.
Do not continue driving. Contact a qualified
specialist workshop.
Countries with Mercedes-Benz Service24h:
you will find a sticker with the telephone number on the B-pillar on the driver's side, for example.
Tyre pressure reached G
WARNING
A tyre temporarily sealed with tyre sealant
impairs the driving characteristics and is not
suitable for higher speeds. There is a risk of
accident.
You should therefore adapt your driving style
accordingly and drive carefully. Do not exceed the specified maximum speed with a tyre that
has been repaired using tyre sealant.
The maximum permissible speed for a tyre
sealed with tyre sealant is 80 km/h. The upper
part of the TIREFIT sticker must be affixed to the
instrument cluster where it will be easily seen by
the driver.
If a tyre pressure of 200 kPa (2.0 bar/29 psi) has been reached after ten minutes:
X Switch off the tyre inflation compressor.
X Unscrew the filler hose from the valve of the
faulty tyre.
Tyre sealant may leak out when the filler hose
is unscrewed.
X Stow the tyre sealant bottle, the tyre inflation
compressor and the warning triangle.
X Pull away immediately.
X Stop after driving for approximately ten
minutes and check the tyre pressure with the
tyre inflation compressor.
The tyre pressure must now be at least
130 kPa (1.3 bar/19 psi). G
WARNING
If the required tyre pressure is not reached
after driving for a short period, the tyre is too badly damaged. The tyre sealant cannot
repair the tyre in this instance. Damaged tyres 344
Flat tyreBreakdown assistance
Page 353 of 389
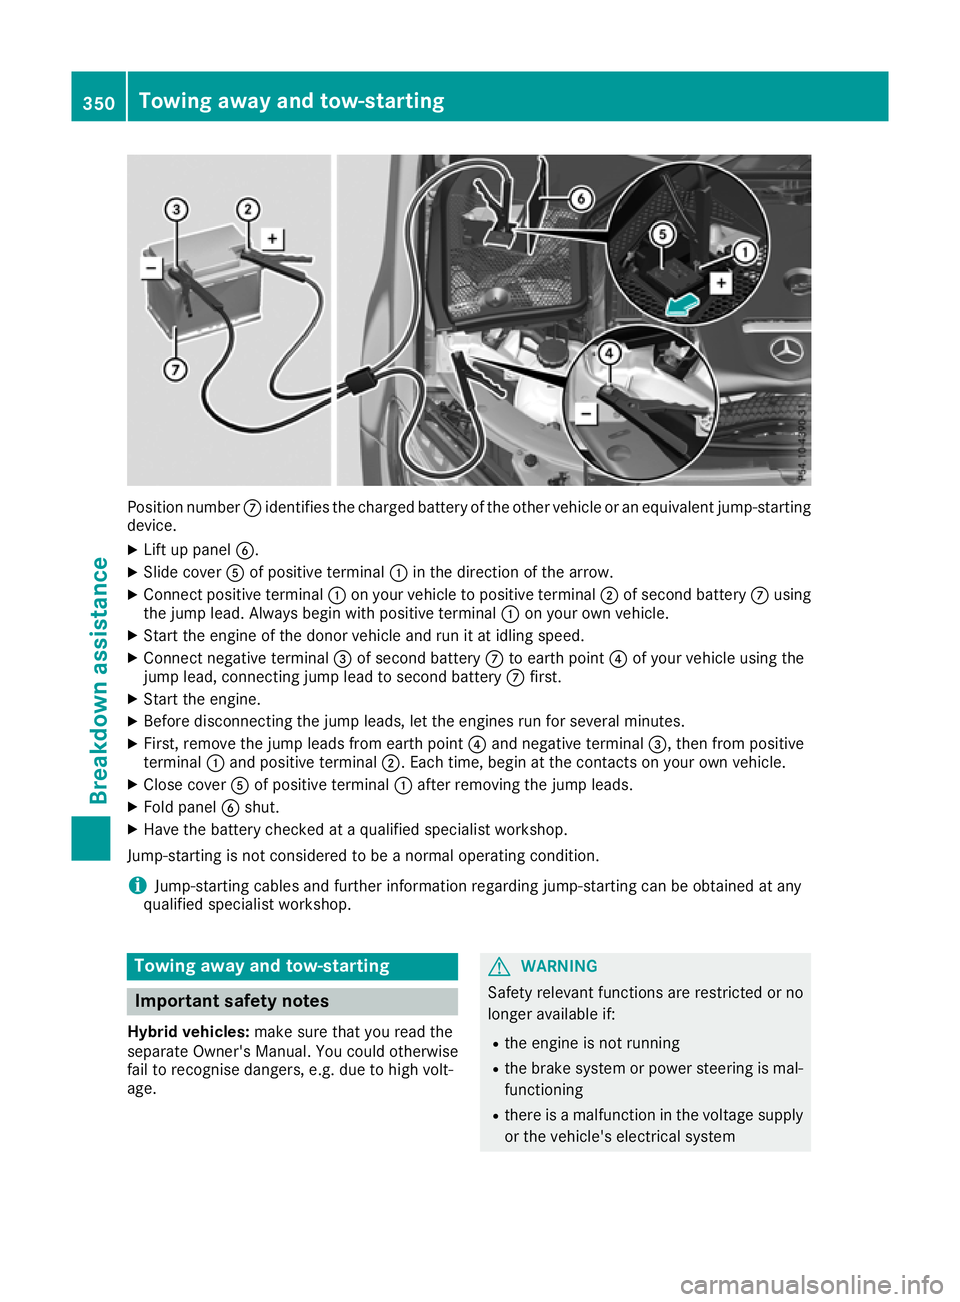
Position number
Cidentifies the charged battery of the other vehicle or an equivalent jump-starting
device.
X Lift up panel B.
X Slide cover Aof positive terminal :in the direction of the arrow.
X Connect positive terminal :on your vehicle to positive terminal ;of second battery Cusing
the jump lead. Always begin with positive terminal :on your own vehicle.
X Start the engine of the donor vehicle and run it at idling speed.
X Connect negative terminal =of second battery Cto earth point ?of your vehicle using the
jump lead, connecting jump lead to second battery Cfirst.
X Start the engine.
X Before disconnecting the jump leads, let the engines run for several minutes.
X First, remove the jump leads from earth point ?and negative terminal =, then from positive
terminal :and positive terminal ;. Each time, begin at the contacts on your own vehicle.
X Close cover Aof positive terminal :after removing the jump leads.
X Fold panel Bshut.
X Have the battery checked at a qualified specialist workshop.
Jump-starting is not considered to be a normal operating condition.
i Jump-starting cables and further information regarding jump-starting can be obtained at any
qualified specialist workshop. Towing away and tow-starting
Important safety notes
Hybrid vehicles: make sure that you read the
separate Owner's Manual. You could otherwise
fail to recognise dangers, e.g. due to high volt-
age. G
WARNING
Safety relevant functions are restricted or no
longer available if:
R the engine is not running
R the brake system or power steering is mal-
functioning
R there is a malfunction in the voltage supply
or the vehicle's electrical system 350
Towing away and tow-startingBreakdown assistance
Page 354 of 389
When your vehicle is towed away or towed
started, you may require considerably more
effort to steer and brake. There is a risk of an
accident.
In such cases use a rigid towing bar. Before
being towed away or tow started, make sure
the steering moves freely. G
WARNING
If the steering wheel lock is engaged, the vehi- cle can no longer be steered. There is a risk of
an accident.
Always switch on the ignition when towing
with a tow rope or a towing bar. G
WARNING
When towing or tow-starting another vehicle
and its weight is greater than the permissible gross weight of your vehicle, the:
R towing eye may be torn off
R car/trailer combination may swerve or
even overturn
There is a risk of an accident.
When towing or tow-starting another vehicle,
its weight should not be greater than the per- missible gross weight of your vehicle.
Details on the permissible gross vehicle weight
of your vehicle can be found on the vehicle iden-
tification plate (Y page 372).
! When Active Brake Assist, Distance Pilot
DISTRONIC or the HOLD function is activated, the vehicle brakes automatically in certain
situations.
To avoid damage to the vehicle, deactivate
these systems in the following or similar sit-
uations:
R when towing away
R in a car wash
! Make sure that the electric parking brake is
released. If the electric parking brake is faulty, visit a qualified specialist workshop.
! Only secure the tow cable or tow bar to the
towing eyes or, if available, to the trailer tow
hitch. You could otherwise damage the vehi-
cle. !
Observe the following points when towing
with a tow rope:
R Secure the tow rope on the same side on
both vehicles.
R Make sure that the tow rope is not longer
than legally permitted. Mark the tow rope in
the middle, e.g. with a white cloth
(30 x 30 cm). This will make other road
users aware that a vehicle is being towed.
R Only secure the tow cable to the towing
eyes or, if available, to the trailer tow hitch.
R Observe the brake lamps of the towing
vehicle while driving. Always maintain a dis-
tance a distance so that the tow rope does not sag.
R Do not use steel cables or chains to tow
your vehicle. You could otherwise damage
the vehicle.
! Do not use the trailer tow hitch for recovery
or towing. Do not use the towing eye for
recovery. This could damage the vehicle. If in
doubt, have the vehicle recovered using a
crane.
! When towing, pull away slowly and
smoothly. If the tractive power is too high, the
vehicles could be damaged.
! Shift the automatic transmission to
Nand
do not open the driver's or front passenger's
door during towing. The automatic transmis-
sion may otherwise shift to position P, which
could damage the transmission.
! You may tow the vehicle for a maximum of
50km. A towing speed of 50 km/h must not
be exceeded.
For towing distances over 50 km, the entire
vehicle must be lifted up and transported.
Observe the legal requirements in each individ-
ual country when towing.
It is better to have the vehicle transported than
to have it towed.
If the vehicle has suffered transmission damage, have it transported on a transporter or trailer.
The automatic transmission must be in position
N when the vehicle is being towed. If the auto-
matic transmission cannot be shifted to position
N, have the vehicle transported on a transporter
or trailer. Towing away and tow-starting
351Breakdown assistance Z