oil MERCEDES-BENZ GLC COUPE 2016 User Guide
[x] Cancel search | Manufacturer: MERCEDES-BENZ, Model Year: 2016, Model line: GLC COUPE, Model: MERCEDES-BENZ GLC COUPE 2016Pages: 389, PDF Size: 7.34 MB
Page 168 of 389
When the AdBlue
®
supply drops to a minimum,
the Refill AdBlue No start in ... mi
Refill AdBlue No start in ... mi
message is shown on the multifunction display.
When the Refill
Refill AdBlue
AdBlueNo
Nostart
start in
in...
...
mi
mi message is shown on the multifunction dis-
play, you can still drive the vehicle over the dis-
tance shown. If AdBlue ®
is not topped up, you
will subsequently be unable to start the
engine. If the Refill AdBlue Start not
Refill AdBlue Start not
possible
possible message appears on the multifunc-
tion display and the engine does not start, you
must top up AdBlue ®
.
X Add at least 3.5 l of AdBlue ®
.
X Switch on the ignition for at least 60 seconds.
X Start the engine.
i You can also have the AdBlue ®
tank refilled
at a qualified specialist workshop.
Before driving your vehicle outside Europe, have
the AdBlue ®
supply checked at a qualified spe-
cialist workshop.
Further information about BlueTEC exhaust gas
aftertreatment and about AdBlue ®
can
be obtained from any Mercedes-Benz Service
Centre.
Important safety notes AdBlue
®
is a water-soluble fluid for the exhaust
gas aftertreatment of diesel engines. It is:
R non-toxic
R colourless and odourless
R non-flammable
If you open the AdBlue ®
tank, small amounts of
ammonia vapour may be released.
Ammonia vapours have a pungent odour and are
particularly irritating to the skin, mucous mem-
branes and eyes. You may experience a burning sensation in your eyes, nose and throat. You
may also experience coughing and watery eyes.
Do not inhale any ammonia vapours that may be
released. Fill the AdBlue ®
tank only in well-ven-
tilated areas.
Do not swallow AdBlue ®
or let it come into con-
tact with your skin, eyes or clothing. Keep
AdBlue ®
away from children. If you or others come into contact with AdBlue
®
,
observe the following:
R immediately rinse AdBlue ®
off your skin with
soap and water.
R if AdBlue ®
comes into contact with your eyes,
immediately rinse them thoroughly with clean water. Seek medical attention immediately.
R if AdBlue ®
is swallowed, immediately rinse
your mouth out thoroughly. Drink plenty of
water. Seek medical attention immediately.
R change immediately out of clothing that has
come into contact with AdBlue ®
.
! Only use AdBlue ®
in accordance with
ISO 22241. Do not mix any additives with
AdBlue ®
, and do not dilute AdBlue ®
with
water. This may destroy the BlueTEC exhaust
gas aftertreatment system.
! In order to fill the AdBlue ®
tank, the vehicle
must be parked on a level surface. The
AdBlue ®
tank can only be filled as intended
with the vehicle parked on a level surface.
Fluctuations in capacity will thus be avoided.
Filling a vehicle standing on an uneven sur-
face is not permitted. There is a danger of
overfilling, which can cause damage to Blue-
TEC exhaust gas aftertreatment components.
! Surfaces which have come into contact with
AdBlue ®
while refilling should be rinsed
immediately with water, or remove AdBlue ®
with a moist cloth and cold water. If AdBlue ®
has already crystallised, use a sponge and
cold water to clean the area. AdBlue ®
residue
crystallises after a certain amount of time and
soils the affected surfaces.
! AdBlue ®
is not a fuel additive and must not
be added to the fuel tank. If AdBlue ®
is added
to the fuel tank, this can lead to engine dam- age.
Have the AdBlue ®
tank refilled at a qualified
specialist workshop. However, you can also top
up the AdBlue ®
tank:
R at a filling station with an AdBlue ®
filling pump
R with AdBlue ®
refill bottles
R with an AdBlue ®
refill canister
When the pump nozzle switches off automati-
cally during filling at a filling pump, the AdBlue ®
tank has been completely filled. Do not fill the Refuelling
165Driving and parking Z
Page 248 of 389
X
Confirm by pressing aon the steering
wheel.
X Press :or9 to select the Vehicle
Vehicle
submenu.
X Press ato confirm.
X Press :or9 to select the Limit
Limit
speed (winter tyres)
speed (winter tyres) function.
The current setting appears.
X Press ato confirm.
X Press :or9 to set permanent SPEED-
TRONIC in increments of ten (160 km/h 160 km/hto
240 km/h
240 km/h). The Off
Off setting switches perma-
nent SPEEDTRONIC off.
X Press the abutton to store the entry.
Further information on permanent SPEED-
TRONIC (Y page 177).
Restoring the factory settings X
Press the òbutton on the steering wheel
to open the menu list.
X Press :or9 on the steering wheel to
select the Settings Settings menu.
X Confirm by pressing aon the steering
wheel.
X Press :or9 to select the Factory
Factory
settings
settings submenu.
X Press ato confirm.
The Reset all settings?
Reset all settings? function
appears.
X Press :or9 to select No
NoorYes
Yes .
X Press the abutton to confirm the selec-
tion.
If you have selected Yes Yes, the multifunction
display shows a confirmation message.
For safety reasons, not all functions will be
reset: the Limit speed (winter tyres)
Limit speed (winter tyres) per-
manent SPEEDTRONIC function can only be set
in the Vehicle
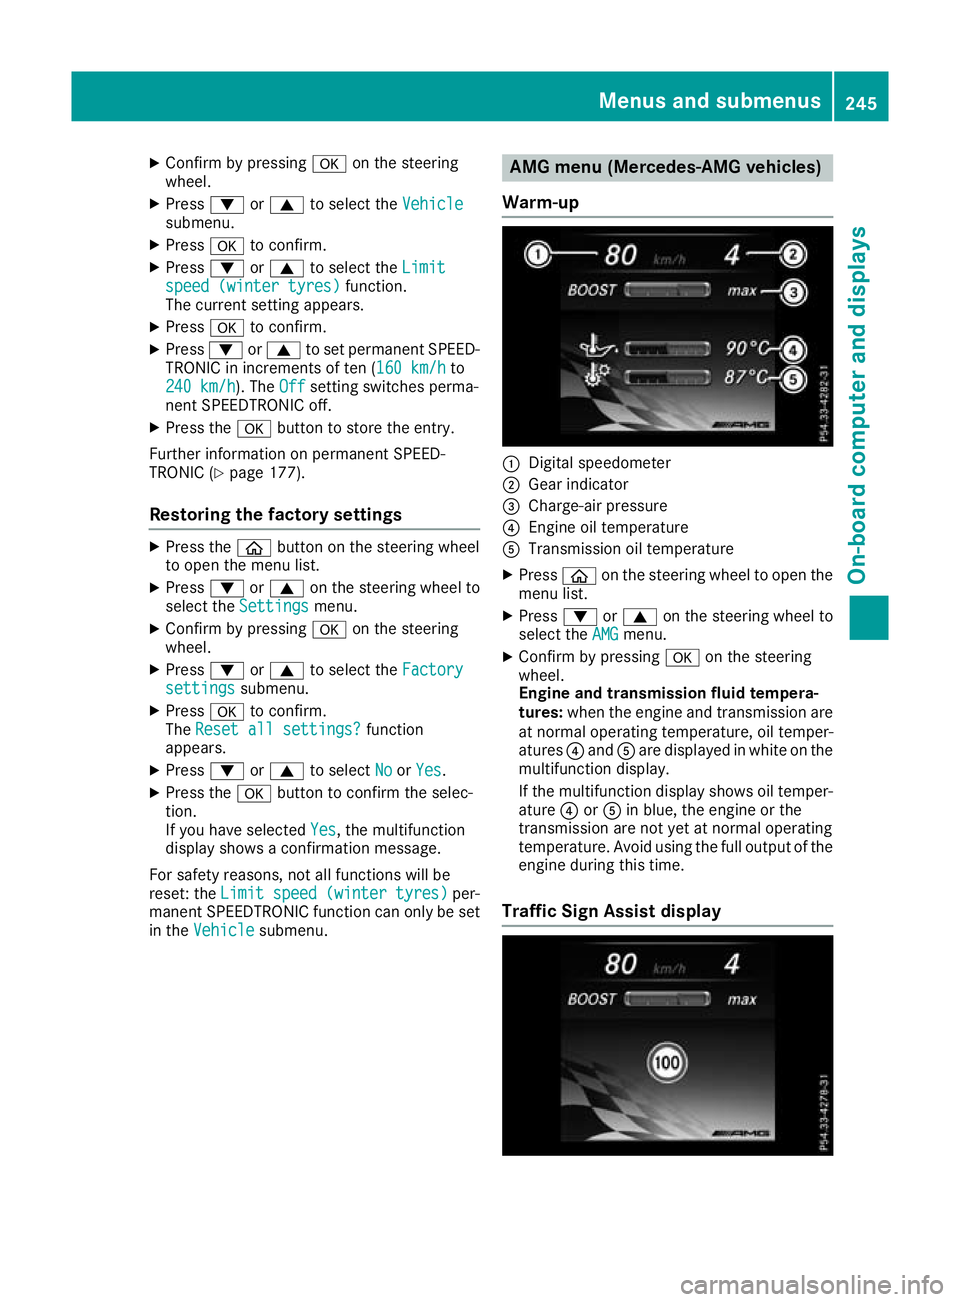
Vehicle submenu. AMG menu (Mercedes-AMG vehicles)
Warm-up :
Digital speedometer
; Gear indicator
= Charge-air pressure
? Engine oil temperature
A Transmission oil temperature
X Press òon the steering wheel to open the
menu list.
X Press :or9 on the steering wheel to
select the AMG
AMG menu.
X Confirm by pressing aon the steering
wheel.
Engine and transmission fluid tempera-
tures: when the engine and transmission are
at normal operating temperature, oil temper-
atures ?and Aare displayed in white on the
multifunction display.
If the multifunction display shows oil temper- ature ?orA in blue, the engine or the
transmission are not yet at normal operating
temperature. Avoid using the full output of the
engine during this time.
Traffic Sign Assist display Menus and submenus
245On-board computer and displays Z
Page 268 of 389
Display messages
Possible causes/consequences and
M
MSolutions 4
Check Check
eng.
eng.oil
oillev.
lev.
when
when next
nextrefuelling
refuelling The engine oil level has dropped to the minimum level.
A warning tone also sounds.
! Avoid long journeys when there is too little coolant in the cooling
system. Otherwise the engine will be damaged.
X Check the engine oil level when next refuelling, at the latest
(Y page 327).
X If necessary, top up the engine oil (Y page 328).
If you have to top up the engine oil frequently:
X Contact a qualified specialist workshop and have the engine
checked.
Information on approved engine oils can be obtained from a qualified specialist workshop or on the internet at http://bevo.mercedes-
benz.com. 8
Reserve fuel level Reserve fuel level The fuel level has dropped into the reserve range.
Operation of the auxiliary heating is deactivated if the fuel level drops
into the reserve range.
X Refuel at the nearest filling station. C There is very little fuel in the fuel tank.
Operation of the auxiliary heating is deactivated.
X You must refuel at the nearest filling station. ¸
Replace air cleaner Replace air cleaner Vehicles with a diesel engine:
The engine air filter is dirty and must be replaced.
X Consult a qualified specialist workshop. !
Clean the fuel fil‐ Clean the fuel fil‐
ter ter Vehicles with a diesel engine:
There is water in the fuel filter. The water must be drained off.
X Consult a qualified specialist workshop. Refill AdBlue See Refill AdBlue See
Owner’s Manual Owner’s Manual
The AdBlue
®
level has fallen below the reserve range. A warning tone
also sounds.
X Refill AdBlue ®
as soon as possible (Y page 164).Refill AdBlue No Refill AdBlue No
start in ... mi start in ... mi
The AdBlue
®
level is sufficient only for the indicated distance. A warn-
ing tone also sounds.
X Refill AdBlue ®
immediately (Y page 164).
i If you drive the vehicle at speeds greater than 15 km/h, the
Refill
Refill AdBlue
AdBlueNo
Nostart
start in
in...
... mi
mimessage disappears after
approximately one minute. Display
messages
265On-board computer and displays Z
Page 330 of 389
Engine oil
Important safety notes G
WARNING
Certain components in the engine compart-
ment could be very hot, e.g. the engine, the
radiator and parts of the exhaust system.
There is a risk of injury when accessing the
engine compartment.
As far as possible, allow the engine to cool
down and only touch the components descri- bed in the following. G
WARNING
There are moving components in the engine
compartment. Certain components may con-
tinue to move or suddenly move again even
after the ignition has been switched off, e.g.
the radiator fan. There is a risk of injury.
If you have to carry out work in the engine
compartment:
R switch off the ignition
R never touch the dangerous areas surround-
ing moving components, e.g. the rotation
area of the fan
R remove jewellery and watches
R keep items of clothing and hair, for exam-
ple, away from moving parts. G
WARNING
If engine oil comes into contact with hot com- ponents in the engine compartment, it may
ignite. There is a risk of fire and injury.
Make sure that engine oil does not spill out
over the filler neck. Allow the engine to cool
down and thoroughly clean the components
that have come into contact with engine oil
before you start the engine. G
WARNING
If you open the bonnet while the engine is
overheating or while there is a fire in the
engine compartment, you could come into
contact with hot gases or other leaking ser-
vice products. There is a danger of injury. Allow an overheating engine to cool down
before opening the bonnet. If there is a fire in
the engine compartment, leave the bonnet
closed and notify the fire brigade.
Hybrid vehicles: make sure that you read the
separate Owner's Manual. You could otherwise
fail to recognise dangers, e.g. due to high volt-
age.
General notes Depending on your driving style, the vehicle
consumes up to 0.8 l of oil per 1000 km. The oil
consumption may be higher than this when the
vehicle is new or if you frequently drive at high
engine speeds.
Depending on the engine, the oil dipstick may be installed at different locations.
To check the oil level:
R park the vehicle on a level surface
R The engine should be switched off for approx-
imately five minutes if the engine is at normal
operating temperature
R If the engine is not at normal operating tem-
perature, e.g. if the engine was only started
briefly, wait approximately 30 minute sbefore
carrying out the measurement
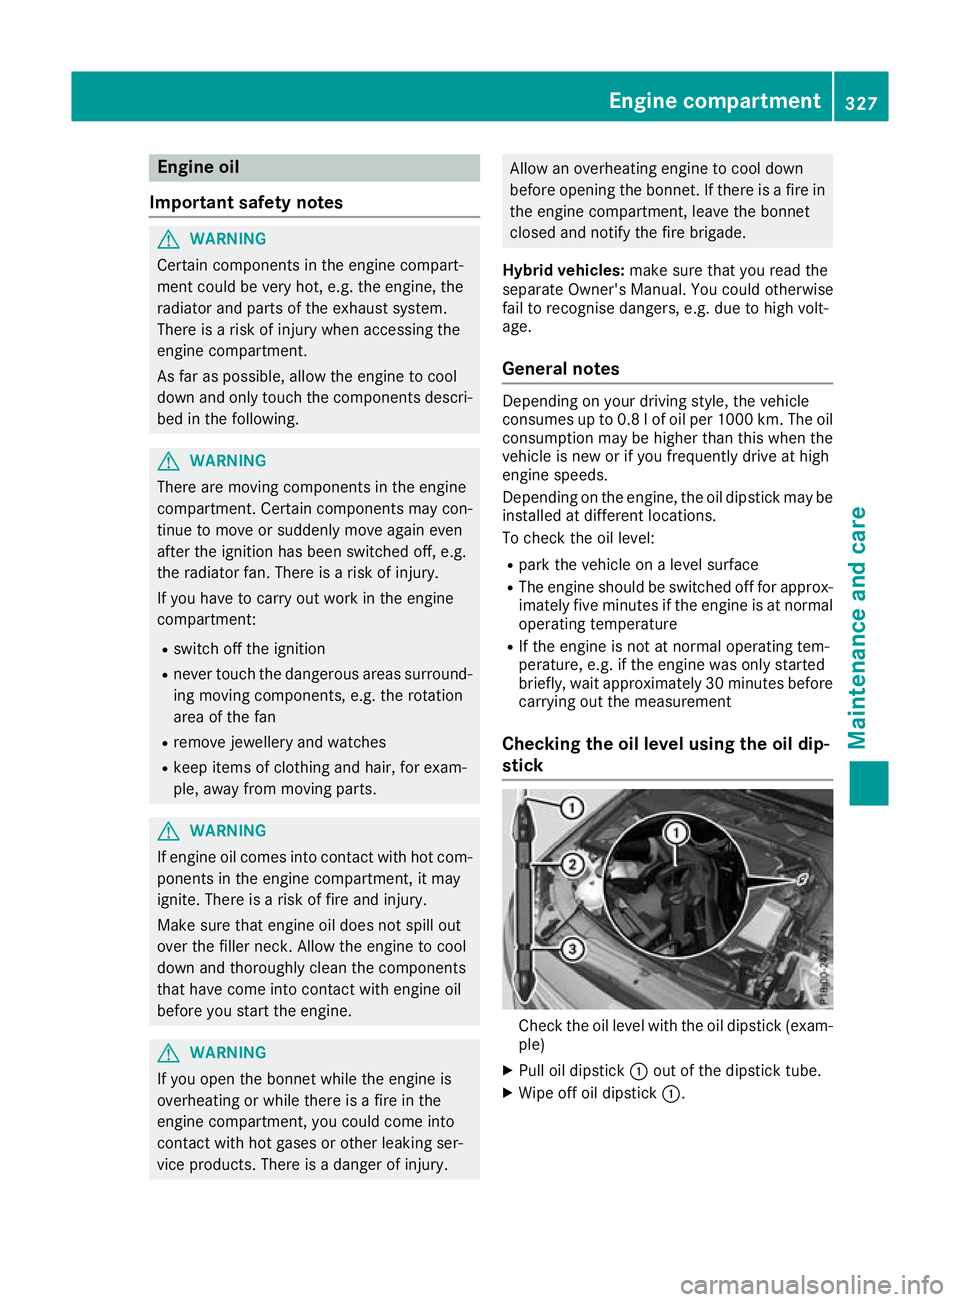
Checking the oil level using the oil dip-
stick Check the oil level with the oil dipstick (exam-
ple)
X Pull oil dipstick :out of the dipstick tube.
X Wipe off oil dipstick :. Engine compartment
327Maintenance and care Z
Page 331 of 389
X
Slowly slide oil dipstick :into the guide tube
to the stop and take it out again after approx- imately three seconds.
If the level is between MIN mark =and MAX
mark ;, the oil level is correct.
X If the oil level has dropped to MIN mark =or
below, top up with 1.0 lof engine oil.
Topping up engine oil H
Environmental note
When topping up the oil, take care not to spill any. If oil enters the soil or waterways, it is
harmful to the environment.
! Use only engine oils and oil filters that are
approved for vehicles with a service system. A list of the engine oils and oil filters that have
been tested and approved in accordance with
Mercedes-Benz Specifications for Service
Products is available at any Mercedes-Benz
Service Centre.
The following cause engine failure or damage
to the exhaust system:
R Use of engine oils and oil filters that have
not been expressly approved for the service system
R Replacement of engine oil and oil filter after
the replacement interval specified by the
service system has expired
R Use of engine oil additives
! Do not add too much oil. Topping up with too
much engine oil can result in damage to the
engine or to the catalytic converter. Have
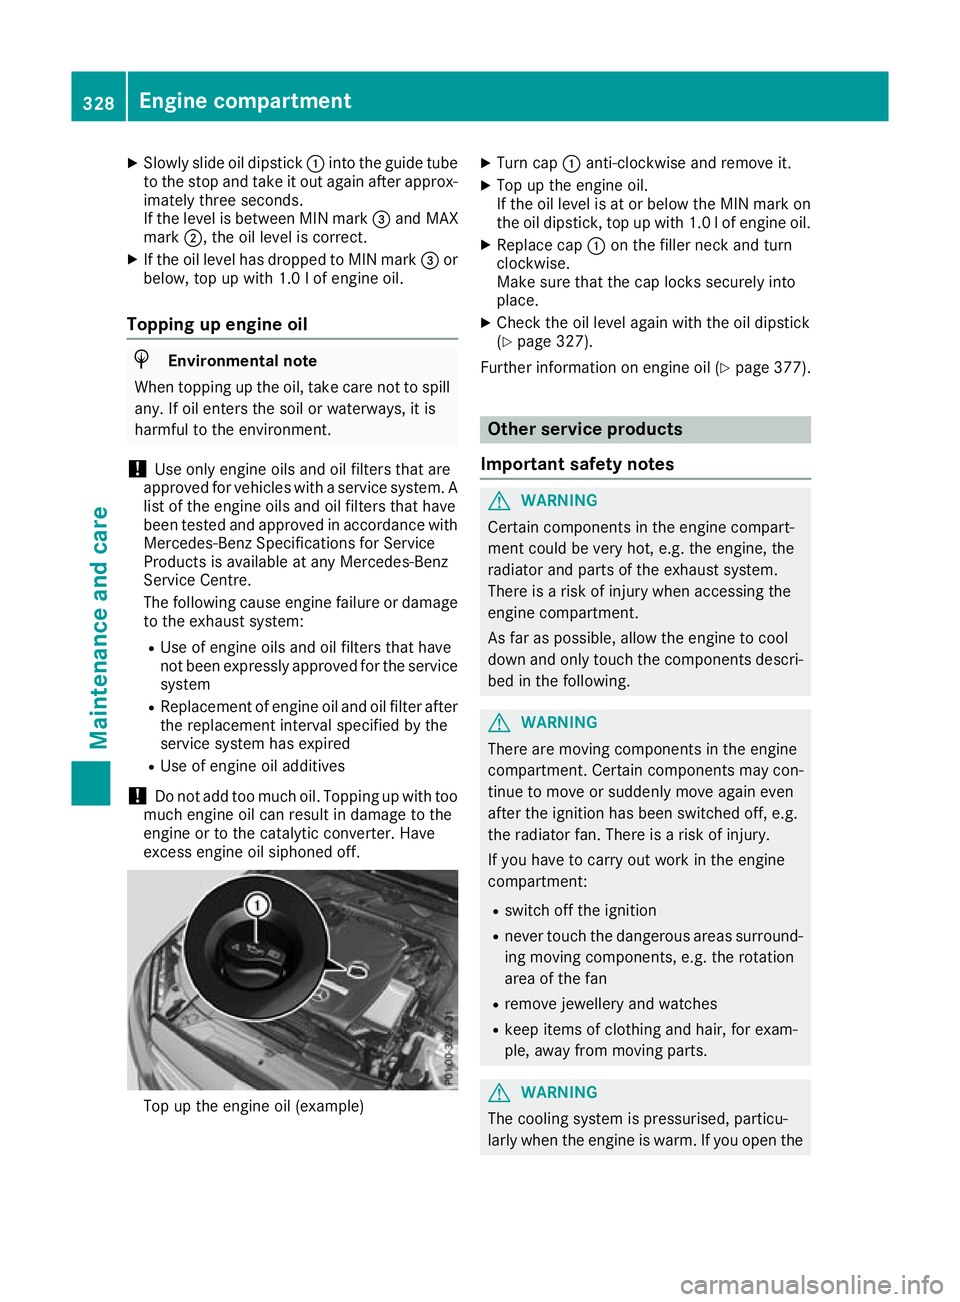
excess engine oil siphoned off. Top up the engine oil (example) X
Turn cap :anti-clockwise and remove it.
X Top up the engine oil.
If the oil level is at or below the MIN mark on
the oil dipstick, top up with 1.0 l of engine oil.
X Replace cap :on the filler neck and turn
clockwise.
Make sure that the cap locks securely into
place.
X Check the oil level again with the oil dipstick
(Y page 327).
Further information on engine oil (Y page 377). Other service products
Important safety notes G
WARNING
Certain components in the engine compart-
ment could be very hot, e.g. the engine, the
radiator and parts of the exhaust system.
There is a risk of injury when accessing the
engine compartment.
As far as possible, allow the engine to cool
down and only touch the components descri- bed in the following. G
WARNING
There are moving components in the engine
compartment. Certain components may con-
tinue to move or suddenly move again even
after the ignition has been switched off, e.g.
the radiator fan. There is a risk of injury.
If you have to carry out work in the engine
compartment:
R switch off the ignition
R never touch the dangerous areas surround-
ing moving components, e.g. the rotation
area of the fan
R remove jewellery and watches
R keep items of clothing and hair, for exam-
ple, away from moving parts. G
WARNING
The cooling system is pressurised, particu-
larly when the engine is warm. If you open the 328
Engine compartmentMaintenance and care
Page 333 of 389
X
To open: pull cap:upwards by the tab and
open.
X Top up with the premixed washer fluid.
X To close: press cap :onto the filler neck
until it engages.
If the washer fluid level drops below the recom- mended minimum of 1.0 l, a message appears
on the multifunction display prompting you to
top up the washer fluid (Y page 279).
Further information on washer fluid
(Y page 378). ASSYST PLUS
Service message
The ASSYST PLUS service interval display
informs you of the next service due date.
Information on the type of service and service
intervals (see the separate Service Booklet).
Further information can be obtained at a quali-
fied specialist workshop, e.g. a Mercedes-Benz
Service Centre.
i The ASSYST PLUS service interval display
does not show any information on the engine oil level. Observe the notes on the engine oil
level (Y page 327).
The multifunction display shows a service mes-
sage for a few seconds, e.g.:
R Service A in XX days
Service A in XX days
R Service A due Service A due
R Service A overdue by XX days
Service A overdue by XX days
Depending on the operating conditions of the
vehicle, the remaining time or distance until the next service due date is displayed.
The letter indicates which service is due. A
A
stands for a minor service and B Bfor a major ser-
vice. A number or another letter may be dis-
played after the letter.
For certain countries only: the position after the
letter A Aor B
Bindicates any necessary additional
maintenance work. If you notify a qualified spe-
cialist workshop of this display, you will receive a statement on the associated costs.
The ASSYST PLUS service interval display does
not take into account any periods of time during
which the battery is disconnected. Maintaining the time-dependent service sched-
ule:
X Note down the service due date displayed in
the multifunction display before disconnect-
ing the battery.
or X After reconnecting the battery, subtract the
battery disconnection periods from the ser-
vice date shown on the display. Hiding service messages
X Press the aor% button on the steering
wheel. Displaying service messages
X Switch the ignition on.
X Use ò on the steering wheel to call up the
list of menus.
X Press 9or: on the steering wheel to
select the Service Servicemenu and confirm with
a.
X Press 9or: on the steering wheel to
select the ASSYST PLUS
ASSYST PLUS submenu and con-
firm with a.
The service due date appears in the multi-
function display. Information about service
Resetting the ASSYST PLUS service
interval display !
If the ASSYST PLUS service interval display
has been inadvertently reset, this setting can
be corrected at a qualified specialist work-
shop.
Have service work carried out as described in the Service Booklet. This may otherwise lead
to increased wear and damage to the major
assemblies or the vehicle.
A qualified specialist workshop, e.g. a
Mercedes-Benz Service Centre, will reset the
ASSYST PLUS service interval display after the
service work has been carried out. You can also
obtain further information on maintenance
work, for example. 330
ASSYST PLUSMaintenance and care
Page 334 of 389
Special service requirements
The prescribed service interval is based on nor-
mal operation of the vehicle. Service work will
need to be performed more often if the vehicle is
operated under arduous conditions or increased loads, for example:
R Regular city driving with frequent intermedi-
ate stops
R If the vehicle is primarily used to travel short
distances
R For frequent use in mountainous terrain or on
poor road surfaces
R If the engine is often left idling for long periods
In these or similar operating conditions, have
the air filter, engine oil and oil filter, for example, changed more frequently. The tyres must be
checked more frequently if the vehicle is oper-
ated under increased loads. Further informationcan be obtained at a qualified specialist work-
shop, e.g. a Mercedes-Benz Service Centre.
Driving abroad An extensive Mercedes-Benz Service network is
also available in other countries. You can obtain further information from any Mercedes-Benz
Service Centre. Care
General notes
! For cleaning your vehicle, do not use any of
the following:
R dry, rough or hard cloths
R abrasive cleaning agents
R solvents
R cleaning agents containing solvents
Do not scrub.
Do not touch the surfaces or protective films
with hard objects, e.g. a ring or ice scraper.
You could otherwise scratch or damage the
surfaces and protective film.
! Do not park up your vehicle for a long period
of time immediately after cleaning, particu-
larly after cleaning the wheel rim with wheel
cleaner. Wheel cleaner may lead to increased corrosion of the brake discs and pads. You
should therefore drive for a few minutes after
cleaning. By heating up the brakes, the brake discs and pads dry. The vehicle can then be
parked up for a long period of time. H
Environmental note
Dispose of empty packaging and cleaning
cloths in an environmentally responsible man-
ner.
Regular care of your vehicle is a condition for
retaining quality in the long term.
Use care products and cleaning agents recom-
mended and approved by Mercedes-Benz. Washing the vehicle and cleaning the
paintwork
Automatic car wash G
WARNING
Braking efficiency is reduced after the vehicle has been washed. There is a risk of an acci-
dent.
After washing the vehicle, brake carefully
while paying attention to the traffic conditions in order to restore full braking efficiency.
! When DISTRONIC PLUS or the HOLD func-
tion is activated, the vehicle brakes automat- ically in certain situations.
To avoid damage to the vehicle, deactivate
DISTRONIC PLUS and the HOLD function in
the following or similar situations:
R when towing away
R in a car wash
! Make sure:
R the side windows and sliding sunroof are
closed completely.
R the blower is switched off
R the windscreen wiper switch is at position
0
R the 360° camera or the reversing camera is
switched off.
The vehicle could otherwise be damaged. Care
331Maintenance and care Z
Page 336 of 389
aged tyres or chassis components replaced
immediately.
! Always maintain a distance of at least 30 cm
between the vehicle and the high-pressure
cleaner nozzle. Information about the correct
distance is available from the equipment
manufacturer.
Move the high-pressure cleaner nozzle
around when cleaning your vehicle.
Do not aim directly at any of the following:
R tyres
R door gaps, roof gaps, joints etc.
R electrical components
R battery
R plug connectors
R lamps
R seals
R trim elements
R ventilation slots
Damage to seals or electrical components
can lead to leaks or failures.
! Vehicles with decorative film: parts of your
vehicle are covered with a decorative film.
Maintain a distance of at least 70 cm between the parts of the vehicle covered with the film
and the nozzle of the high pressure cleaner.
Information about the correct distance is
available from the equipment manufacturer.
Move the high-pressure cleaner nozzle
around whilst cleaning.
! If the key is within the rear detection range
of KEYLESS-GO, the following situations, for
example, could lead to the unintentional
opening of the tailgate:
R using a car wash
R using a high-pressure cleaner
Make sure that the key is at least 3 m away
from the vehicle.
Cleaning the paintwork !
Do not affix:
R stickers
R films
R magnetic plates or similar items
to painted surfaces. You could otherwise
damage the paintwork. Scratches, corrosive deposits, areas affected by
corrosion and damage caused by inadequate
care cannot always be completely repaired. In
such cases, visit a qualified specialist workshop.
X Remove impurities immediately, where pos-
sible, whilst avoiding rubbing too hard.
X Soak insect remains with insect remover and
rinse off the treated areas afterwards.
X Soak bird droppings with water and rinse off
the treated areas afterwards.
X Remove coolant, brake fluid, tree resins, oils,
fuels and greases by rubbing gently with a
cloth soaked in petroleum ether or lighter
fluid.
X Use tar remover to remove tar stains.
X Use silicone remover to remove wax.
Care and treatment of matt paintwork !
Never polish the vehicle or the light alloy
wheels. Polishing makes the paintwork shiny.
! The following may cause the paint to
become shiny and thus reduce the matt
effect:
R vigorous rubbing with unsuitable materials
R frequent use of car washes
R washing the vehicle in direct sunlight
! Never use paint cleaner, buffing or polishing
products, or gloss preserver, e.g. wax, for the purpose of paintwork care. These products
are only suitable for high-gloss surfaces. Their
use on vehicles with matt paintwork leads to
considerable surface damage or, more spe-
cifically, to shiny, spotted areas.
Always have paintwork repairs carried out at a
qualified specialist workshop.
! Do not use wash programs with a hot wax
treatment under any circumstances.
Observe these notes if your vehicle has a clear, matt finish. This will help you to avoid damage to the paintwork due to incorrect treatment.
These notes also apply to light-alloy wheels with
a clear matt finish.
The vehicle should preferably be washed by
hand using a soft sponge, car shampoo and
plenty of water.
Use only insect remover and car shampoo from the range of approved Mercedes-Benz care
products. Care
333Maintenance and care Z
Page 339 of 389
flash rust to form on the surface. You can
restore the original shine of the exhaust pipe by cleaning it regularly, especially in winter and
after washing the vehicle.
X Clean the exhaust pipe with a care product
tested and approved by Mercedes-Benz.
Cleaning the trailer tow hitch H
Environmental note
Dispose of oily and greasy cloths in an envi-
ronmentally-responsible manner.
! Do not clean the ball coupling with a high-
pressure cleaner. Do not use solvents.
The ball coupling must be cleaned if it becomes
dirty or corroded.
X Remove rust on the ball, e.g. with a wire
brush.
X Remove dirt with a clean, lint-free cloth or a
brush.
X After cleaning, lightly oil or grease the ball
coupling.
X Check that the vehicle's trailer tow hitch is
working properly.
You can also have the maintenance work on the
ball coupling and the trailer tow hitch carried out
by a qualified specialist workshop. Interior care
Cleaning the display !
For cleaning, do not use any of the following:
R alcohol-based thinner or petrol
R abrasive cleaning agents
R commercially-available household cleaning
agents
These may damage the display surface. Do
not put pressure on the display surface when cleaning. This could lead to irreparable dam-
age to the display.
X Before cleaning the display, make sure that it
is switched off and has cooled down.
X Clean the display surface using a commer-
cially available microfibre cloth and TFT/LCD
display cleaner.
X Dry the display surface using a dry microfibre
cloth. Cleaning the plastic trim G
WARNING
Care products and cleaning agents containing solvents can cause surfaces in the cockpit to
become porous. This could result in plastic
parts breaking away when the airbags are
deployed. There is a danger of injury.
Do not use care products and cleaning agents containing solvents to clean the cockpit.
! Never attach the following to plastic surfa-
ces:
R stickers
R films
R perfume oil container or similar
You could otherwise damage the plastic.
! Do not allow cosmetics, insect repellent or
sunscreen to come in contact with the plastic trim. This maintains the high-quality look of
the surfaces.
X Wipe the plastic trim with a damp, lint-free
cloth, e.g. a microfibre cloth.
X Heavy soiling: use care and cleaning prod-
ucts recommended and approved by
Mercedes-Benz.
The surface may change colour temporarily.
Wait until the surface is dry again.
Cleaning the steering wheel and selec-
tor lever X
Thoroughly wipe with a damp cloth or use
leather care agents that have been recom-
mended and approved by Mercedes-Benz.
Cleaning wood trim and trim elements !
Do not use solvent-based cleaning agents
such as tar remover, wheel cleaners, polishes
or waxes. There is otherwise a risk of damag- ing the surface. 336
CareMaintenance and care
Page 340 of 389

X
Wipe the wood trim and trim elements with a
damp, lint-free cloth, e.g. a microfibre cloth.
X Trim elements with piano black finish:
wipe with a soft, damp cotton cloth. Use clean
water.
X Heavy soiling: use care and cleaning prod-
ucts recommended and approved by
Mercedes-Benz.
Cleaning the seat covers General notes
! Do not use a microfibre cloth to clean covers
made out of real leather, artificial leather or
DINAMICA. If used frequently, this can dam-
age the cover.
Note that regular care is essential to make sure
that the appearance and comfort of the covers
are retained over time.
Genuine leather seat covers
! To retain the natural appearance of the
leather, observe the following cleaning
instructions:
R Clean genuine leather covers carefully with
a damp cloth and then wipe the covers
down with a dry cloth.
R Make sure that the leather does not
become soaked. It may otherwise become
rough and cracked.
R Only use leather care agents that have
been tested and approved by Mercedes-
Benz. You can obtain these from a qualified
specialist workshop.
Leather is a natural product.
It has natural surface properties, e.g.:
R unevenness in structure
R marks caused by growth and injury
R subtle colour differences
These are characteristics of leather and not
material faults.
Seat covers from other materials
! Observe the following when cleaning:
R clean artificial leather covers with a cloth
moistened with a solution containing 1%
detergent (e.g. washing-up liquid).
R clean cloth covers with a microfibre cloth
moistened with a solution containing 1%
detergent (e.g. washing-up liquid). Rub carefully, and always wipe entire seat sec-
tions to avoid leaving visible lines. Leave
the seat to dry afterwards. Cleaning results
depend on the type of dirt and how long it
has been there.
R Clean DINAMICA covers with a damp cloth.
Make sure that you wipe entire seat sec-
tions to avoid leaving visible lines.
Cleaning the seat belts G
WARNING
Seat belts may be severely weakened if
bleached or coloured. This may lead to the
seat belts, for example, tearing or failing in an accident. There is an increased risk of injury,
possibly even fatal.
Never bleach or colour seat belts.
! Do not clean the seat belts using chemical
cleaning agents. Do not dry the seat belts at
temperatures above 80 † or in direct sun-
light.
X Use clean, lukewarm water and soap solution.
Cleaning the roof lining and carpets X
Roof lining: if it is very dirty, use a soft brush
or dry shampoo.
X Carpets: use the carpet and textile cleaning
agents recommended and approved by
Mercedes-Benz. Care
337Maintenance and care Z