tailgate MERCEDES-BENZ GLC COUPE 2016 User Guide
[x] Cancel search | Manufacturer: MERCEDES-BENZ, Model Year: 2016, Model line: GLC COUPE, Model: MERCEDES-BENZ GLC COUPE 2016Pages: 389, PDF Size: 7.34 MB
Page 95 of 389
Opening automatically
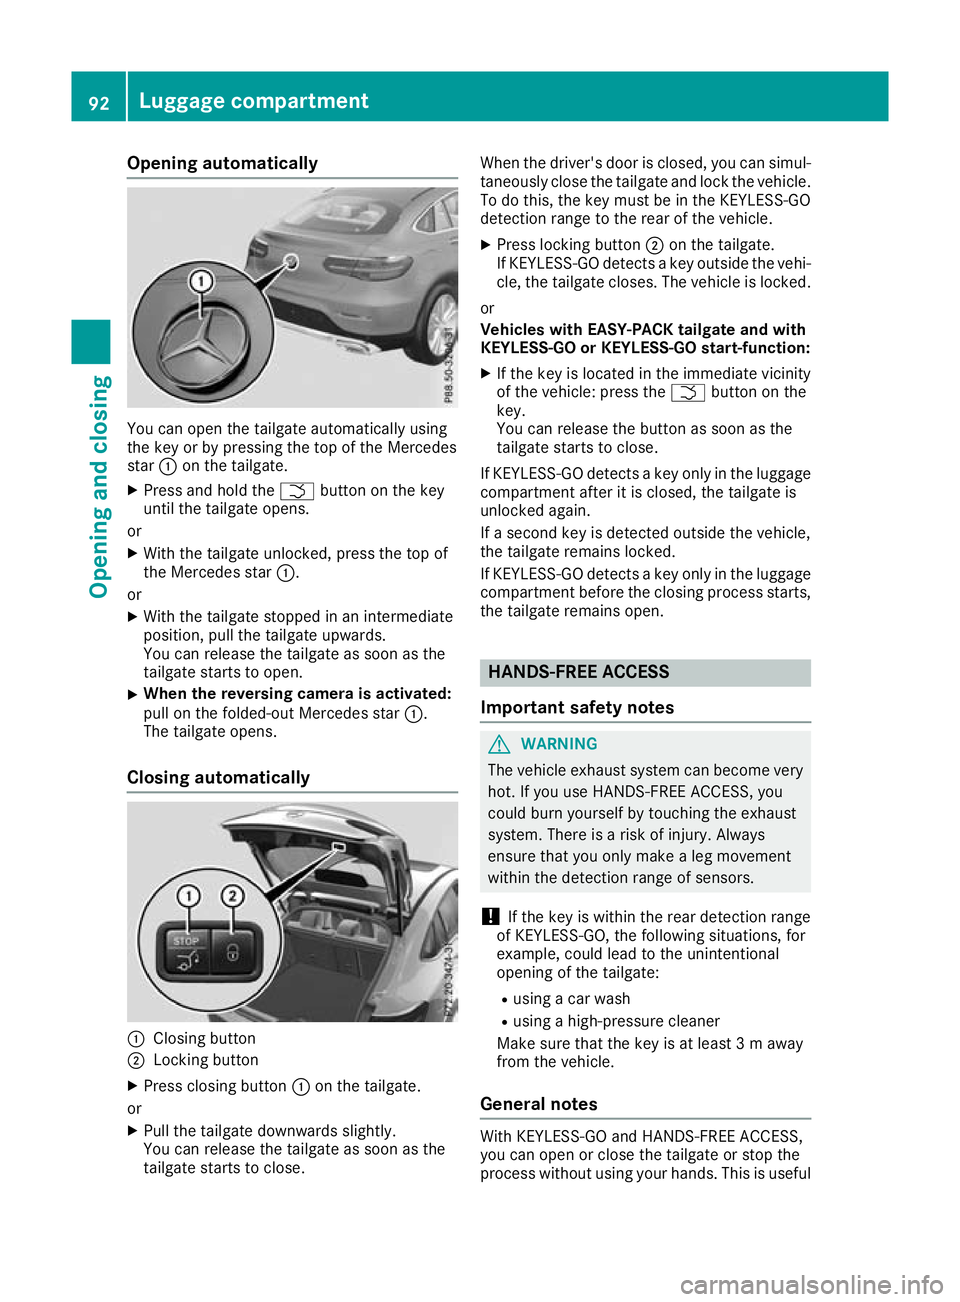
You can open the tailgate automatically using
the key or by pressing the top of the Mercedes
star
:on the tailgate.
X Press and hold the Fbutton on the key
until the tailgate opens.
or X With the tailgate unlocked, press the top of
the Mercedes star :.
or X With the tailgate stopped in an intermediate
position, pull the tailgate upwards.
You can release the tailgate as soon as the
tailgate starts to open.
X When the reversing camera is activated:
pull on the folded-out Mercedes star
:.
The tailgate opens.
Closing automatically :
Closing button
; Locking button
X Press closing button :on the tailgate.
or
X Pull the tailgate downwards slightly.
You can release the tailgate as soon as the
tailgate starts to close. When the driver's door is closed, you can simul-
taneously close the tailgate and lock the vehicle.
To do this, the key must be in the KEYLESS-GO
detection range to the rear of the vehicle.
X Press locking button ;on the tailgate.
If KEYLESS-GO detects a key outside the vehi- cle, the tailgate closes. The vehicle is locked.
or
Vehicles with EASY-PACK tailgate and with
KEYLESS-GO or KEYLESS-GO start-function:
X If the key is located in the immediate vicinity
of the vehicle: press the Fbutton on the
key.
You can release the button as soon as the
tailgate starts to close.
If KEYLESS-GO detects a key only in the luggage
compartment after it is closed, the tailgate is
unlocked again.
If a second key is detected outside the vehicle,
the tailgate remains locked.
If KEYLESS-GO detects a key only in the luggage compartment before the closing process starts,
the tailgate remains open. HANDS-FREE ACCESS
Important safety notes G
WARNING
The vehicle exhaust system can become very
hot. If you use HANDS-FREE ACCESS, you
could burn yourself by touching the exhaust
system. There is a risk of injury. Always
ensure that you only make a leg movement
within the detection range of sensors.
! If the key is within the rear detection range
of KEYLESS-GO, the following situations, for
example, could lead to the unintentional
opening of the tailgate:
R using a car wash
R using a high-pressure cleaner
Make sure that the key is at least 3 m away
from the vehicle.
General notes With KEYLESS-GO and HANDS-FREE ACCESS,
you can open or close the tailgate or stop the
process without using your hands. This is useful92
Luggage compartmentOpening and closing
Page 96 of 389
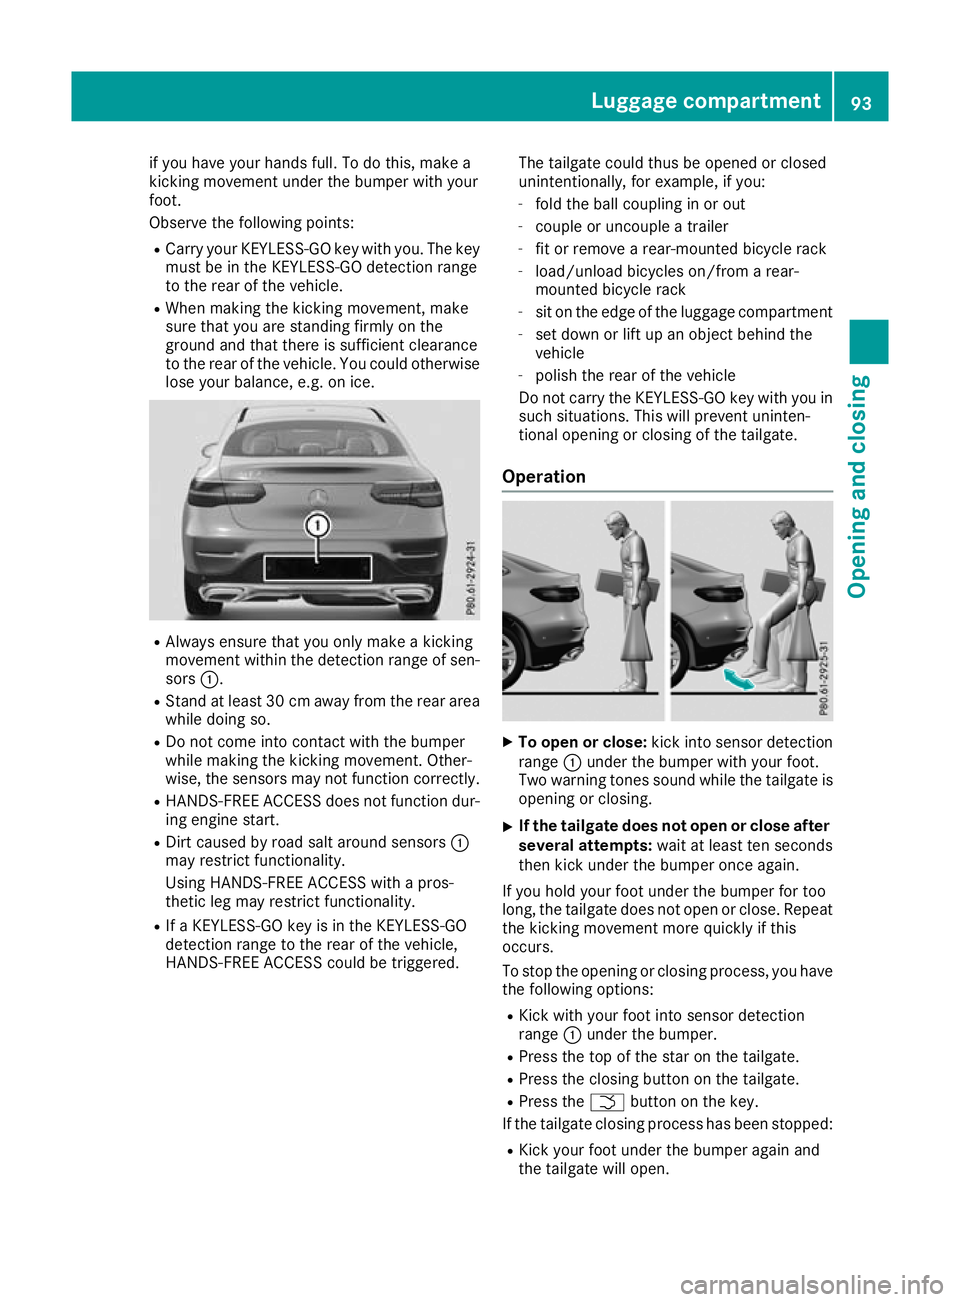
if you have your hands full. To do this, make a
kicking movement under the bumper with your
foot.
Observe the following points:
R Carry your KEYLESS-GO key with you. The key
must be in the KEYLESS-GO detection range
to the rear of the vehicle.
R When making the kicking movement, make
sure that you are standing firmly on the
ground and that there is sufficient clearance
to the rear of the vehicle. You could otherwise lose your balance, e.g. on ice. R
Always ensure that you only make a kicking
movement within the detection range of sen- sors :.
R Stand at least 30 cm away from the rear area
while doing so.
R Do not come into contact with the bumper
while making the kicking movement. Other-
wise, the sensors may not function correctly.
R HANDS-FREE ACCESS does not function dur-
ing engine start.
R Dirt caused by road salt around sensors :
may restrict functionality.
Using HANDS-FREE ACCESS with a pros-
thetic leg may restrict functionality.
R If a KEYLESS-GO key is in the KEYLESS-GO
detection range to the rear of the vehicle,
HANDS-FREE ACCESS could be triggered. The tailgate could thus be opened or closed
unintentionally, for example, if you:
- fold the ball coupling in or out
- couple or uncouple a trailer
- fit or remove a rear-mounted bicycle rack
- load/unload bicycles on/from a rear-
mounted bicycle rack
- sit on the edge of the luggage compartment
- set down or lift up an object behind the
vehicle
- polish the rear of the vehicle
Do not carry the KEYLESS-GO key with you in such situations. This will prevent uninten-
tional opening or closing of the tailgate.
Operation X
To open or close: kick into sensor detection
range :under the bumper with your foot.
Two warning tones sound while the tailgate is opening or closing.
X If the tailgate does not open or close after
several attempts: wait at least ten seconds
then kick under the bumper once again.
If you hold your foot under the bumper for too
long, the tailgate does not open or close. Repeat
the kicking movement more quickly if this
occurs.
To stop the opening or closing process, you have the following options:
R Kick with your foot into sensor detection
range :under the bumper.
R Press the top of the star on the tailgate.
R Press the closing button on the tailgate.
R Press the Fbutton on the key.
If the tailgate closing process has been stopped:
R Kick your foot under the bumper again and
the tailgate will open. Luggage compartment
93Opening and closing Z
Page 97 of 389
If the tailgate opening process has been stop-
ped:
R Kick your foot under the bumper again and
the tailgate will close. Opening and closing automatically
from the inside
Important safety notes G
WARNING
Combustion engines emit poisonous exhaust
gases such as carbon monoxide. If the tailgate is open when the engine is running, particu-
larly if the vehicle is moving, exhaust fumes
could enter the passenger compartment.
There is a risk of poisoning.
Turn off the engine before opening the tail-
gate. Never drive with the tailgate open. G
WARNING
Parts of the body could become trapped dur-
ing automatic closing of the tailgate. In addi-
tion, people may be standing in the closing
area or may enter the closing area, e.g. chil-
dren, during the closing procedure. There is a risk of injury.
Make sure that nobody is in the vicinity of theclosing area during the closing process.
Release the remote operating switch imme-
diately if somebody becomes trapped. To re-
open the tailgate pull on the remote operating
switch.
Vehicles with HANDS-FREE ACCESS:
It is also possible to stop the closing process by performing a kicking movement under the rear
bumper.
! The tailgate swings upwards and to the rear
when opened. Therefore, make sure that
there is sufficient clearance above and behind
the tailgate.
Two warning tones sound while the tailgate is
opening or closing.
The opening dimensions of the tailgate can be
found in the "Vehicle data" section
(Y page 379). Opening and closing
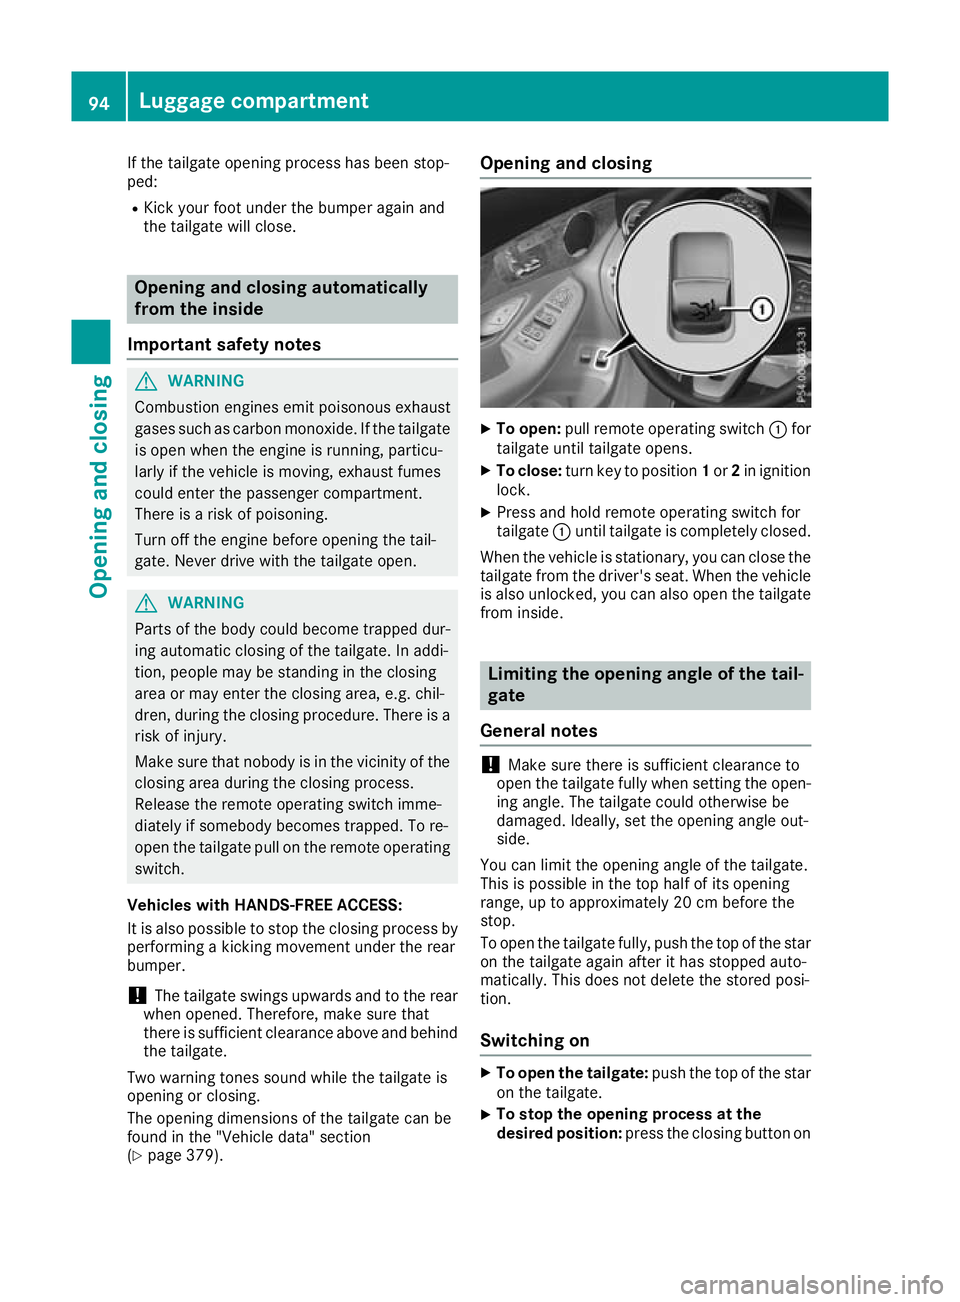
X
To open: pull remote operating switch :for
tailgate until tailgate opens.
X To close: turn key to position 1or 2in ignition
lock.
X Press and hold remote operating switch for
tailgate :until tailgate is completely closed.
When the vehicle is stationary, you can close the tailgate from the driver's seat. When the vehicle
is also unlocked, you can also open the tailgate
from inside. Limiting the opening angle of the tail-
gate
General notes !
Make sure there is sufficient clearance to
open the tailgate fully when setting the open- ing angle. The tailgate could otherwise be
damaged. Ideally, set the opening angle out-
side.
You can limit the opening angle of the tailgate.
This is possible in the top half of its opening
range, up to approximately 20 cm before the
stop.
To open the tailgate fully, push the top of the star on the tailgate again after it has stopped auto-
matically. This does not delete the stored posi-
tion.
Switching on X
To open the tailgate: push the top of the star
on the tailgate.
X To stop the opening process at the
desired position:
press the closing button on94
Luggage compartmentOpening and closing
Page 98 of 389
the tailgate or push the top of the star on the
tailgate again.
X To store the position: press and hold the
closing button on the tailgate until you hear a short tone.
The opening angle limiter is activated. The
tailgate then stops in the stored position
when opened.
Switching off X
Press and hold the closing button on the tail-
gate until two short tones sound. Unlocking the tailgate using the emer-
gency key element
General notes Use the emergency key element if the tailgate
can no longer be unlocked:
R using the key
R using HANDS-FREE ACCESS
R using the remote operating switch on the door
control panel
! The tailgate swings upwards and to the rear
when opened. Therefore, make sure that
there is sufficient clearance above and behind
the tailgate.
You will find details on the tailgate opening
dimensions in the "Vehicle data" section
(Y page 379).
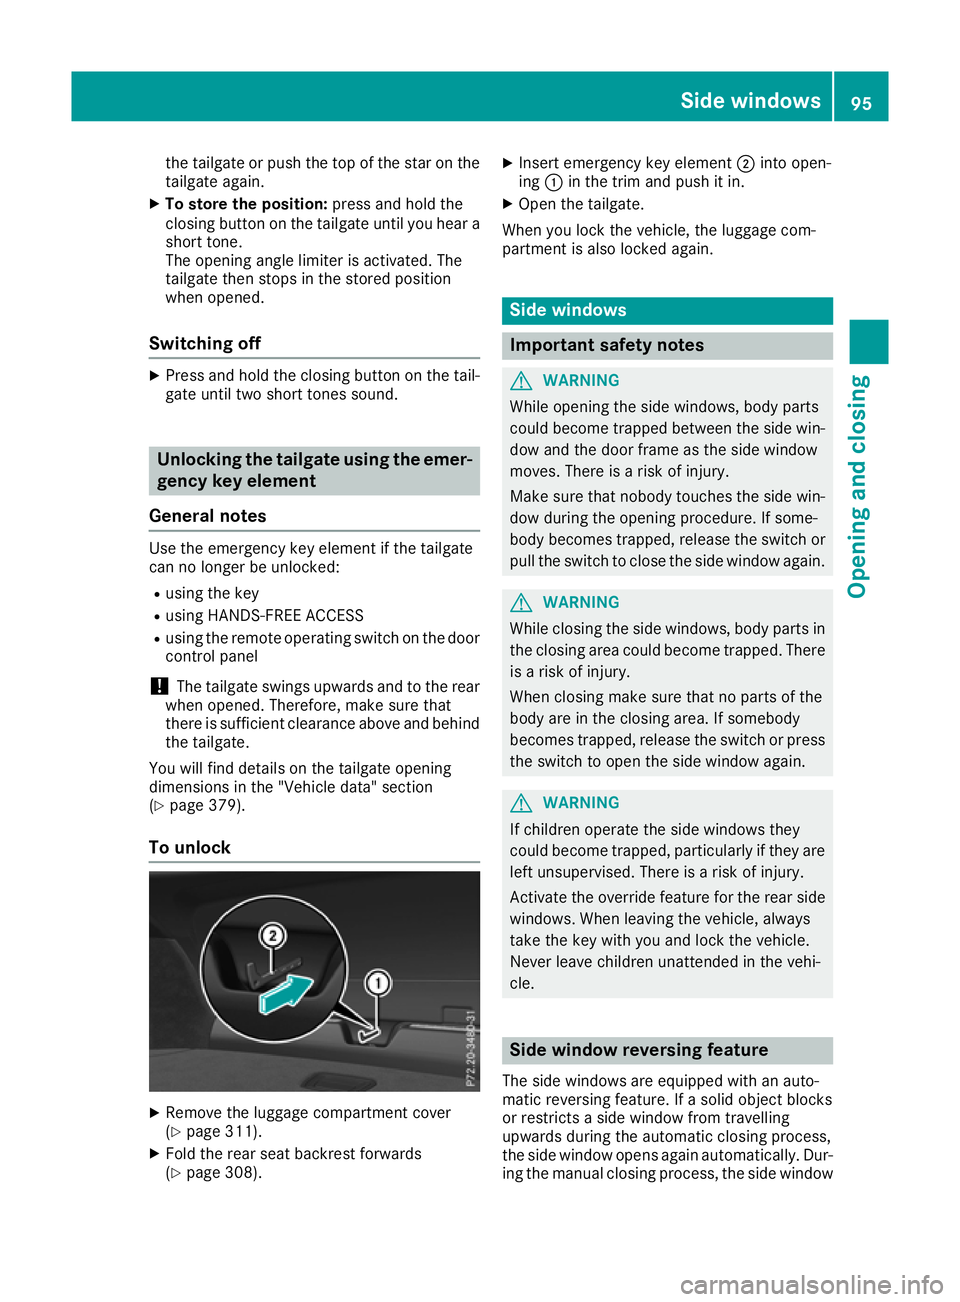
To unlock X
Remove the luggage compartment cover
(Y page 311).
X Fold the rear seat backrest forwards
(Y page 308). X
Insert emergency key element ;into open-
ing :in the trim and push it in.
X Open the tailgate.
When you lock the vehicle, the luggage com-
partment is also locked again. Side windows
Important safety notes
G
WARNING
While opening the side windows, body parts
could become trapped between the side win- dow and the door frame as the side window
moves. There is a risk of injury.
Make sure that nobody touches the side win-
dow during the opening procedure. If some-
body becomes trapped, release the switch or pull the switch to close the side window again. G
WARNING
While closing the side windows, body parts in the closing area could become trapped. There is a risk of injury.
When closing make sure that no parts of the
body are in the closing area. If somebody
becomes trapped, release the switch or press
the switch to open the side window again. G
WARNING
If children operate the side windows they
could become trapped, particularly if they are left unsupervised. There is a risk of injury.
Activate the override feature for the rear side
windows. When leaving the vehicle, always
take the key with you and lock the vehicle.
Never leave children unattended in the vehi-
cle. Side window reversing feature
The side windows are equipped with an auto-
matic reversing feature. If a solid object blocks
or restricts a side window from travelling
upwards during the automatic closing process,
the side window opens again automatically. Dur-
ing the manual closing process, the side window Side
windows
95Opening an d closing Z
Page 172 of 389
X
If this is the case, park the vehicle only on
level ground and secure it to prevent it from
rolling away.
X Shift the automatic transmission to position
P.
It may not be possible to release an applied
parking brake if the on-board voltage is low or if there is a malfunction in the system. Contact a
qualified specialist workshop.
The electric parking brake carries out a function
check at regular intervals when the engine is
switched off. Noises that occur are normal.
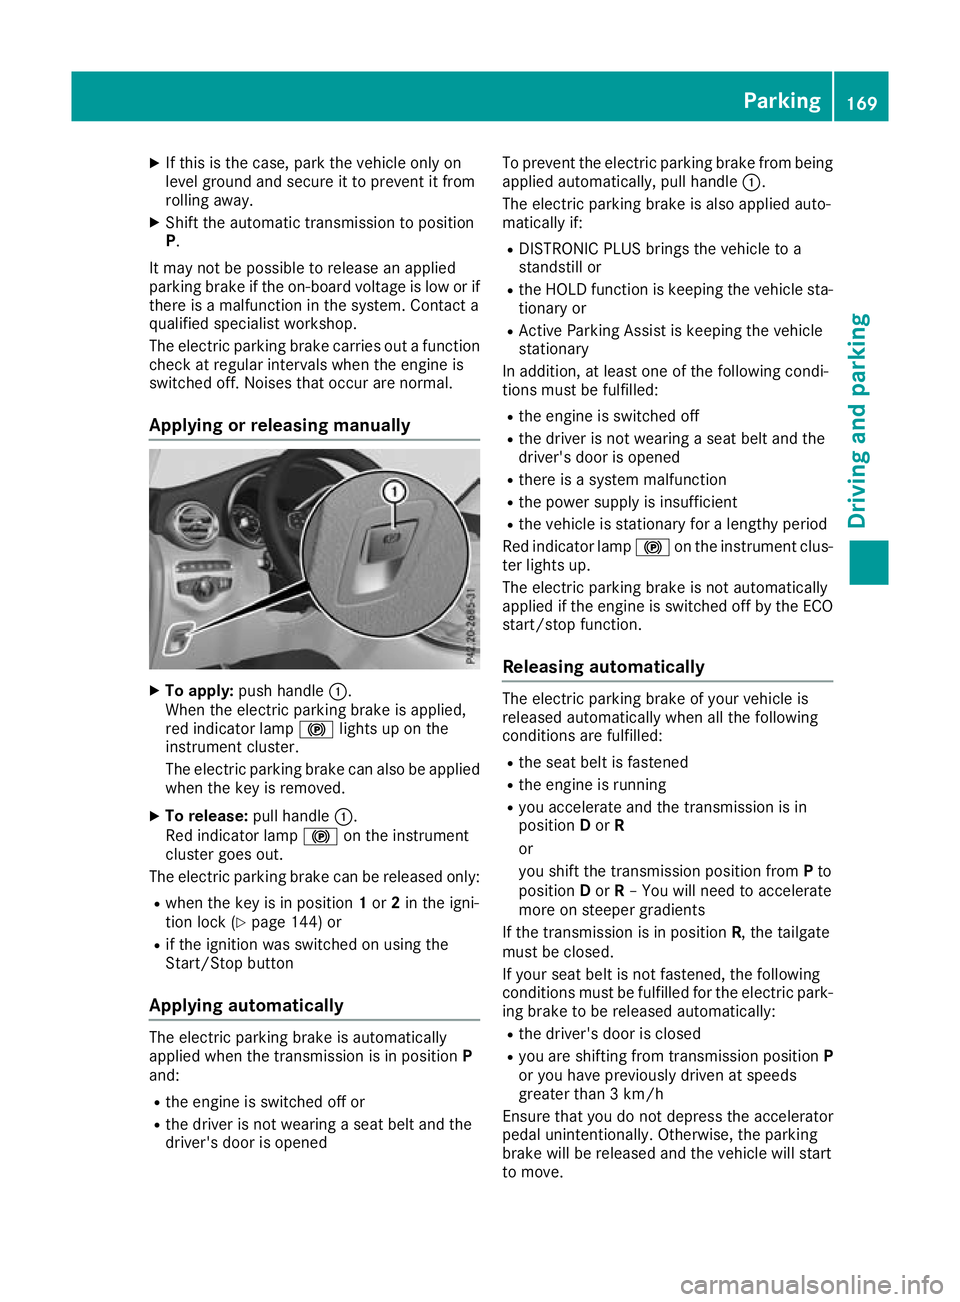
Applying or releasing manually X
To apply: push handle :.
When the electric parking brake is applied,
red indicator lamp !lights up on the
instrument cluster.
The electric parking brake can also be applied when the key is removed.
X To release: pull handle:.
Red indicator lamp !on the instrument
cluster goes out.
The electric parking brake can be released only:
R when the key is in position 1or 2in the igni-
tion lock (Y page 144) or
R if the ignition was switched on using the
Start/Stop button
Applying automatically The electric parking brake is automatically
applied when the transmission is in position P
and:
R the engine is switched off or
R the driver is not wearing a seat belt and the
driver's door is opened To prevent the electric parking brake from being
applied automatically, pull handle :.
The electric parking brake is also applied auto-
matically if:
R DISTRONIC PLUS brings the vehicle to a
standstill or
R the HOLD function is keeping the vehicle sta-
tionary or
R Active Parking Assist is keeping the vehicle
stationary
In addition, at least one of the following condi-
tions must be fulfilled:
R the engine is switched off
R the driver is not wearing a seat belt and the
driver's door is opened
R there is a system malfunction
R the power supply is insufficient
R the vehicle is stationary for a lengthy period
Red indicator lamp !on the instrument clus-
ter lights up.
The electric parking brake is not automatically
applied if the engine is switched off by the ECO
start/stop function.
Releasing automatically The electric parking brake of your vehicle is
released automatically when all the following
conditions are fulfilled:
R the seat belt is fastened
R the engine is running
R you accelerate and the transmission is in
position Dor R
or
you shift the transmission position from Pto
position Dor R– You will need to accelerate
more on steeper gradients
If the transmission is in position R, the tailgate
must be closed.
If your seat belt is not fastened, the following
conditions must be fulfilled for the electric park- ing brake to be released automatically:
R the driver's door is closed
R you are shifting from transmission position P
or you have previously driven at speeds
greater than 3 km/h
Ensure that you do not depress the accelerator
pedal unintentionally. Otherwise, the parking
brake will be released and the vehicle will start
to move. Parking
169Driving and parking Z
Page 201 of 389
A warning tone sounds. The parking symbol dis-
appears and the multifunction display shows the
Park Assist cancelled
Park Assist cancelled message.
When Active Parking Assist is cancelled, you
must steer and brake again yourself.
If a system malfunction occurs, the vehicle is
braked to a standstill. To drive on, depress the
accelerator pedal again. Reversing camera
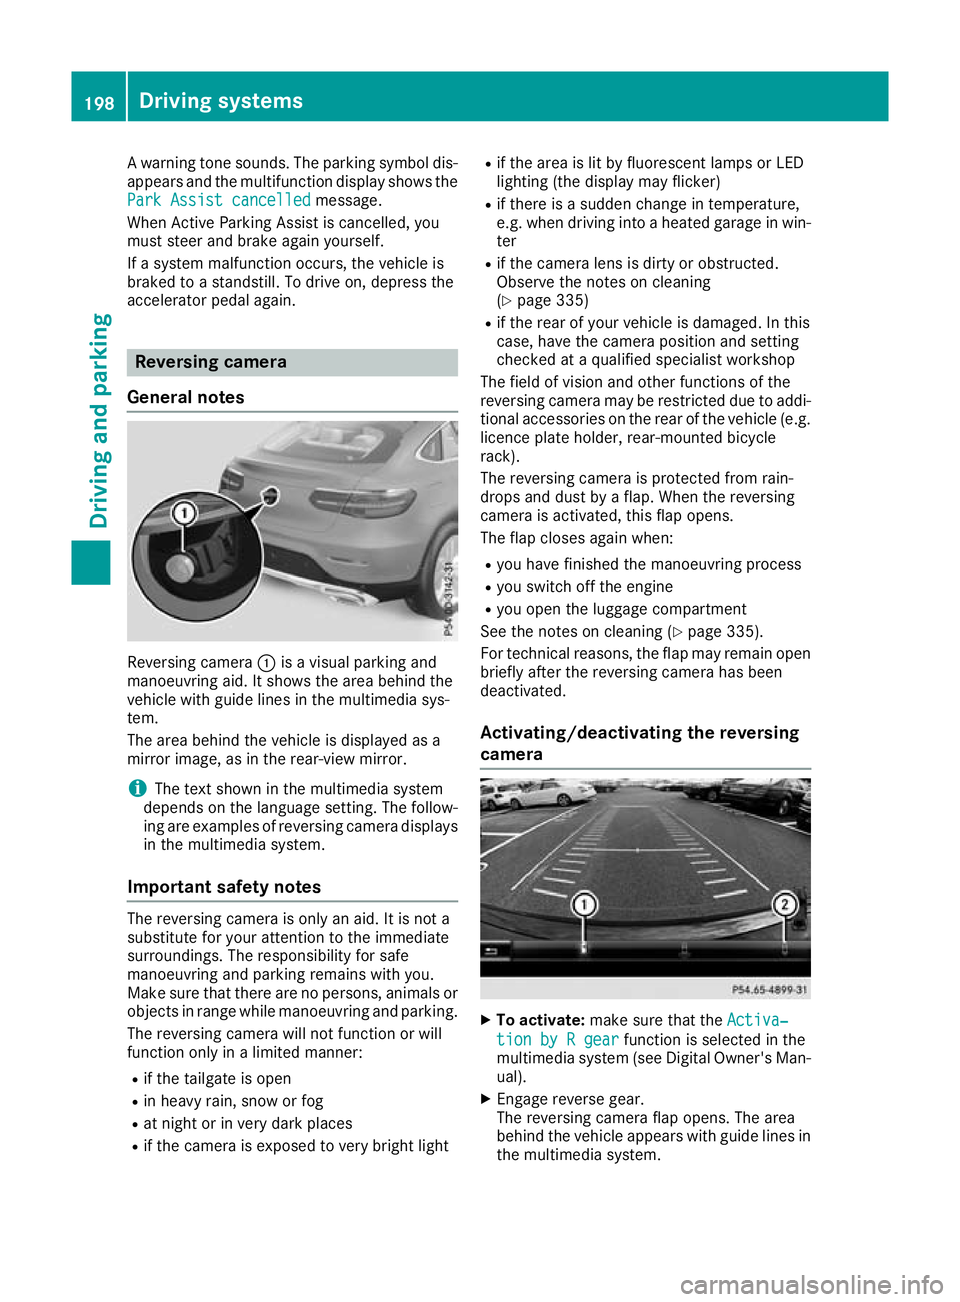
General notes Reversing camera
:is a visual parking and
manoeuvring aid. It shows the area behind the
vehicle with guide lines in the multimedia sys-
tem.
The area behind the vehicle is displayed as a
mirror image, as in the rear-view mirror.
i The text shown in the multimedia system
depends on the language setting. The follow- ing are examples of reversing camera displays
in the multimedia system.
Important safety notes The reversing camera is only an aid. It is not a
substitute for your attention to the immediate
surroundings. The responsibility for safe
manoeuvring and parking remains with you.
Make sure that there are no persons, animals or
objects in range while manoeuvring and parking.
The reversing camera will not function or will
function only in a limited manner:
R if the tailgate is open
R in heavy rain, snow or fog
R at night or in very dark places
R if the camera is exposed to very bright light R
if the area is lit by fluorescent lamps or LED
lighting (the display may flicker)
R if there is a sudden change in temperature,
e.g. when driving into a heated garage in win-
ter
R if the camera lens is dirty or obstructed.
Observe the notes on cleaning
(Y page 335)
R if the rear of your vehicle is damaged. In this
case, have the camera position and setting
checked at a qualified specialist workshop
The field of vision and other functions of the
reversing camera may be restricted due to addi-
tional accessories on the rear of the vehicle (e.g. licence plate holder, rear-mounted bicycle
rack).
The reversing camera is protected from rain-
drops and dust by a flap. When the reversing
camera is activated, this flap opens.
The flap closes again when:
R you have finished the manoeuvring process
R you switch off the engine
R you open the luggage compartment
See the notes on cleaning (Y page 335).
For technical reasons, the flap may remain open
briefly after the reversing camera has been
deactivated.
Activating/deactivating the reversing
camera X
To activate: make sure that the Activa‐ Activa‐
tion by R gear
tion by R gear function is selected in the
multimedia system (see Digital Owner's Man-
ual).
X Engage reverse gear.
The reversing camera flap opens. The area
behind the vehicle appears with guide lines in the multimedia system. 198
Driving systemsDriving an
d parking
Page 202 of 389
The image from the reversing camera is avail-
able throughout the manoeuvring process.
X To switch the function mode for vehicles
with trailer tow hitch:using the controller,
select symbol :for the "Reverse parking"
function or symbol ;for "Coupling up a
trailer".
The symbol of the selected function is high-
lighted.
X To deactivate: shift transmission to position
P.
or X Drive forwards at a speed greater than
12 km/h.
Multimedia system display The reversing camera may show a distorted view
of obstacles, show them incorrectly or not at all.
Obstacles are not shown by the reversing cam-
era in the following locations:
R very close to the rear bumper
R under the rear bumper
R in the area immediately above the recessed
tailgate handle
! Objects not at ground level may appear to
be further away than they actually are, e.g.:
R the bumper of a parked vehicle
R the drawbar of a trailer
R the ball coupling of a trailer tow hitch
R the rear section of an HGV
R a slanted post
Use the guidelines only for orientation.
Approach objects no further than the bottom- most guideline. :
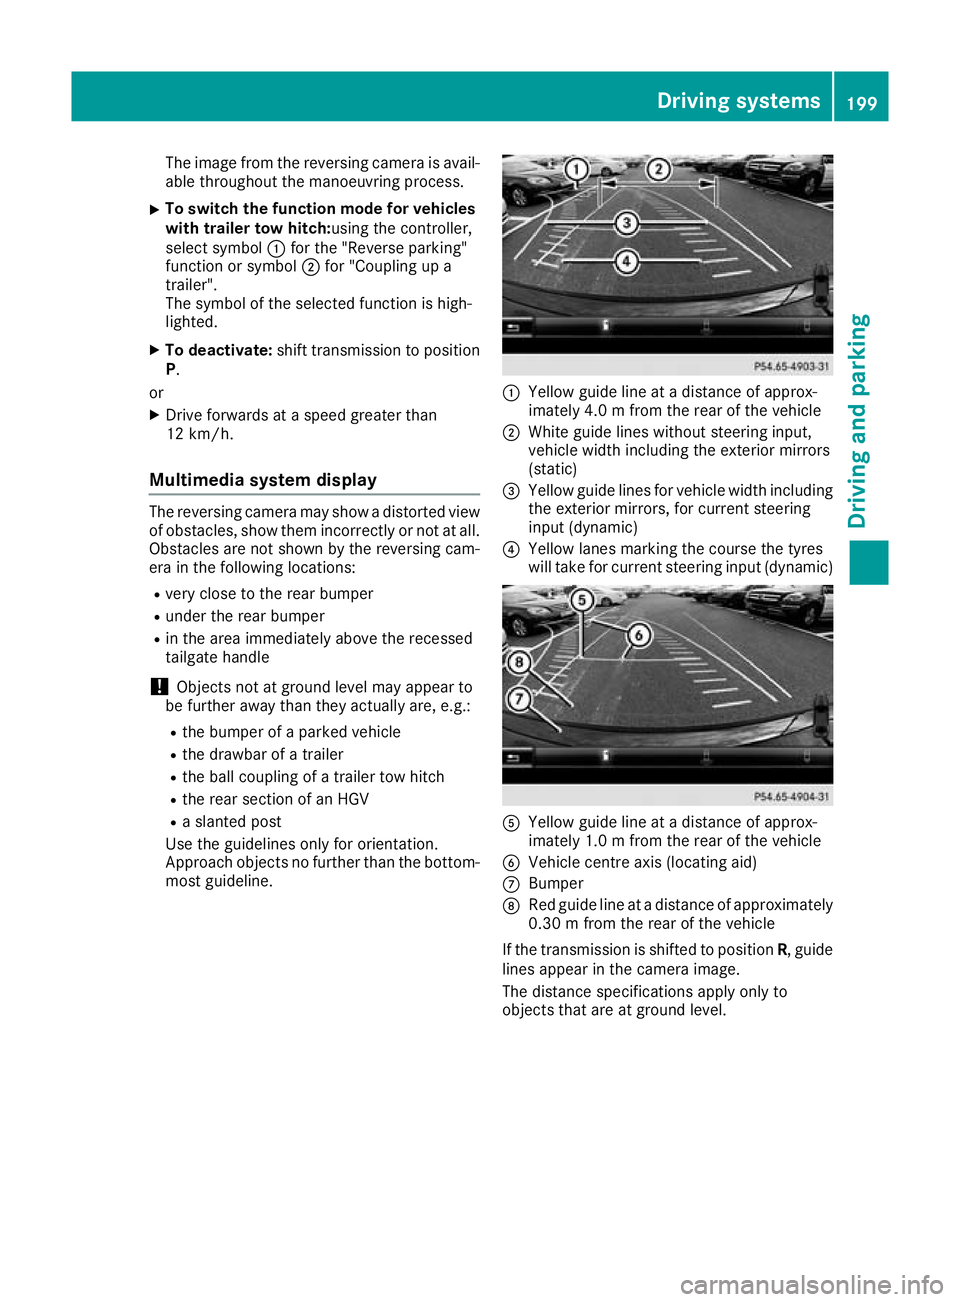
Yellow guide line at a distance of approx-
imately 4.0 m from the rear of the vehicle
; White guide lines without steering input,
vehicle width including the exterior mirrors
(static)
= Yellow guide lines for vehicle width including
the exterior mirrors, for current steering
input (dynamic)
? Yellow lanes marking the course the tyres
will take for current steering input (dynamic) A
Yellow guide line at a distance of approx-
imately 1.0 m from the rear of the vehicle
B Vehicle centre axis (locating aid)
C Bumper
D Red guide line at a distance of approximately
0.30 m from the rear of the vehicle
If the transmission is shifted to position R, guide
lines appear in the camera image.
The distance specifications apply only to
objects that are at ground level. Driving systems
199Driving and parking Z
Page 206 of 389
The line thickness and colour of the brackets
show how far the vehicle is from an object.
R yellow brackets with thin lines: PARKTRONIC
is active
R yellow brackets with normal lines: an object is
present in close range of the vehicle
R red line: an object is present in the immediate
close range of the vehicle
Important safety notes The 360° camera is only an aid and may show a
distorted view of obstacles, show them incor-
rectly or not show them at all. The 360° camera
is not a substitute for attentive driving.
The responsibility for safe manoeuvring and
parking remains with you. Make sure that there are no persons, animals or objects in range
while manoeuvring and parking.
You are responsible for safety at all times and
must always pay attention to your immediate
surroundings when parking and manoeuvring.
This applies to the areas behind, in front of and
beside the vehicle. You could otherwise endan-
ger yourself and others.
The 360° camera will not function or will func-
tion only to a limited extent:
R if the doors are open
R if the exterior mirrors are folded in
R if the tailgate is open
R in heavy rain, snow or fog
R at night or in very dark places
R if the cameras are exposed to very bright light
R if the area is lit by fluorescent lamps or LED
lighting (the display may flicker)
R if the camera lenses mist up, e.g. when you
drive into a heated garage in winter, causing a
rapid change in temperature
R if the camera lenses are dirty or covered
R if the vehicle components in which the cam-
eras are fitted are damaged. In this case, have
the camera position and setting checked at a qualified specialist workshop
Do not use the 360° camera under such cir-
cumstances. You could otherwise injure others
or damage objects when parking the vehicle.
The guide lines on the multimedia system dis-
play show the distances to your vehicle. The
distances apply only at road level.
In trailer mode, the guide lines are shown at the
level of the trailer tow hitch. The camera in the rear area is protected by a
flap. This flap opens when the 360° camera is
activated. See the notes on cleaning
(Y page 335). For technical reasons, the flap
may remain open briefly after the 360° camera
has been deactivated.
The field of vision and other functions of the
camera system may be restricted due to addi-
tional attachments (e.g. licence plate holder,
rear bicycle carrier).
On vehicles with height-adjustable suspension,
due to the technical conditions, leaving the
standard height can result in the following:
R inaccuracies in the guide lines
R inaccuracies in the display of generated
images (top view)
Activation conditions The image from the 360° camera appears when
R the multimedia system is switched on
R the 360° camera 360° camera function is switched on
If you are driving at more than a moderate speed
and switch on the 360° camera, a warning mes- sage appears.
The warning message disappears in the follow-
ing situations:
R you are again driving at a moderate speed.
The 360° camera is then activated
R the message is confirmed with the %but-
ton
Switching the 360° camera on/off with
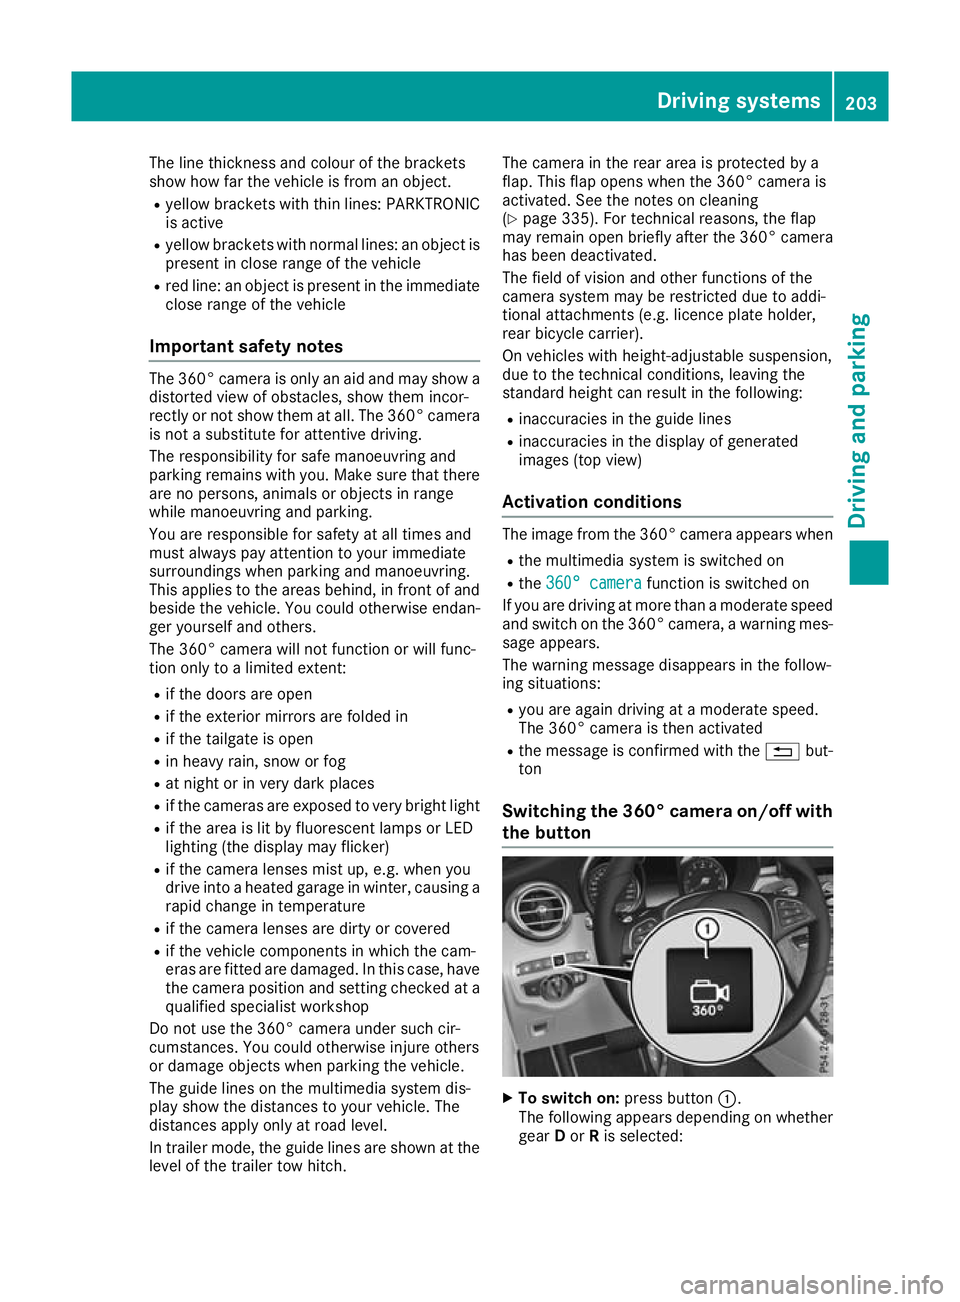
the button X
To switch on: press button:.
The following appears depending on whether gear Dor Ris selected: Driving systems
203Driving and parking Z
Page 207 of 389
R
a split screen with top view and the image
from the front camera or
R a split screen with top view and the image
from the rear view camera
X To switch off: press button:again.
Switching on the 360° camera using
reverse gear You can show images from the 360° camera
automatically by engaging reverse gear.
X Make sure that the Activation by R gear
Activation by R gear
function is selected in the multimedia system (see Digital Owner's Manual).
X To show the 360° camera image: engage
reverse gear.
The multimedia system shows the area
behind the vehicle in split-screen mode. You
see the top view of the vehicle and the image
from the reversing camera.
You cannot stop the 360° camera display if
reverse gear is engaged.
Selecting the split-screen view or full-
screen mode Switching between split screen views:
X To switch to the line with the vehicle icons:
slide 5the controller.
X To select a vehicle icon: turn the controller.
Switching to full-screen mode:
X Turn and press 180° 180°view
viewwith the controller.
The full-screen option is available only in the fol- lowing views:
R top view with image from the reversing cam-
era
R top view with image from the front camera
Multimedia system display Important safety notes
The camera system may show a distorted view
of obstacles, show them incorrectly or not show them at all. Obstacles in the following locations
are not shown by the system:
R under the front and rear bumpers
R very close to the front and rear bumpers
R in the area immediately above the recessed
tailgate handle R
very close to the exterior mirrors
R in the transitional areas between the various
cameras in the virtual top view
! Objects not at ground level may appear to
be further away than they actually are, e.g.:
R the bumper of a parked vehicle
R the drawbar of a trailer
R the ball coupling of a trailer tow hitch
R the rear section of an HGV
R a slanted post
Use the guidelines only for orientation.
Approach objects no further than the bottom- most guideline.
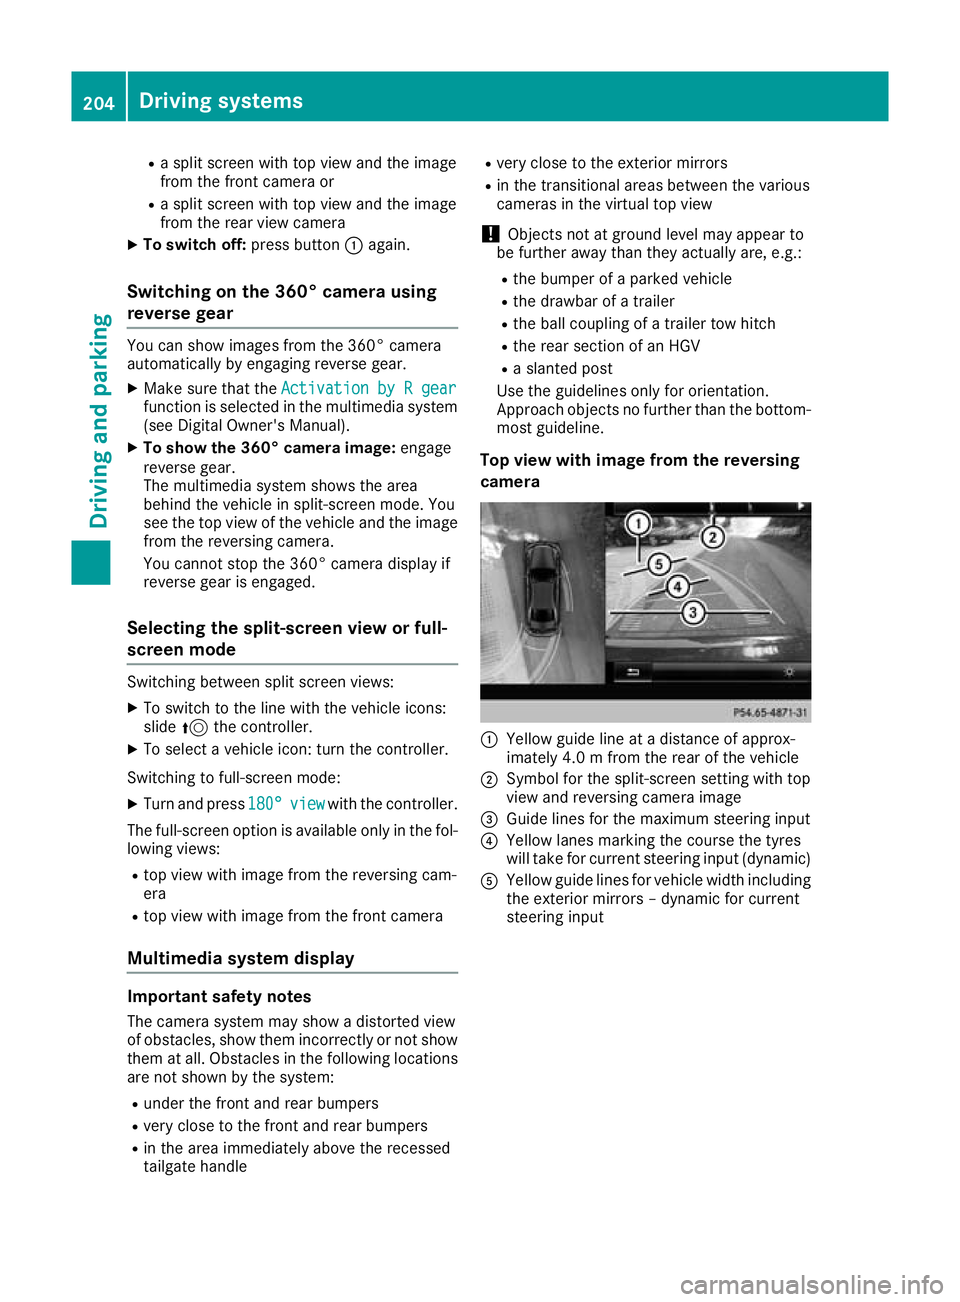
Top view with image from the reversing
camera :
Yellow guide line at a distance of approx-
imately 4.0 m from the rear of the vehicle
; Symbol for the split-screen setting with top
view and reversing camera image
= Guide lines for the maximum steering input
? Yellow lanes marking the course the tyres
will take for current steering input (dynamic)
A Yellow guide lines for vehicle width including
the exterior mirrors – dynamic for current
steering input 204
Driving systemsDriving and parking
Page 223 of 389
This will use the braking effect of the engine, so
less braking will be required to maintain the
vehicle speed. This relieves the load on the
brake system and prevents the brakes from
overheating and wearing too quickly. If you need additional braking, depress the brake pedal
repeatedly rather than continuously.
Driving tips R
Maintain a greater distance to the vehicle in
front than when driving without a trailer.
R Avoid braking abruptly. If possible, brake gen-
tly at first to allow the trailer to run on. Then,
increase the braking force rapidly.
R The values given for gradient-climbing capa-
bilities from a standstill refer to sea level.
When driving in mountainous areas, note that
the power output of the engine, and conse-
quently the vehicle's gradient-climbing capa-
bility from a standstill, decrease with increas- ing altitude.
If the trailer swings from side to side:
X Do not accelerate under any circumstances.
X Do not countersteer.
X Brake, if necessary. Swivelling the ball coupling in/out
Important safety notes G
WARNING
If the ball coupling is not engaged, the trailer
may come loose. There is a risk of an accident.
Make sure that the ball coupling is securely
engaged and locked in position.
! Do not attempt to speed the up the swing-
out procedure by applying additional pressure
with your foot. The system could otherwise be
mechanically damaged.
In order to tow a trailer with the vehicle, you
must swivel the ball coupling out.
You can swivel the ball coupling out by means of the switch on the driver's door or the tailgate.
The trailer socket is integrated in the ball cou-
pling and swivels out with it.
Swivel the ball coupling in or out only when the
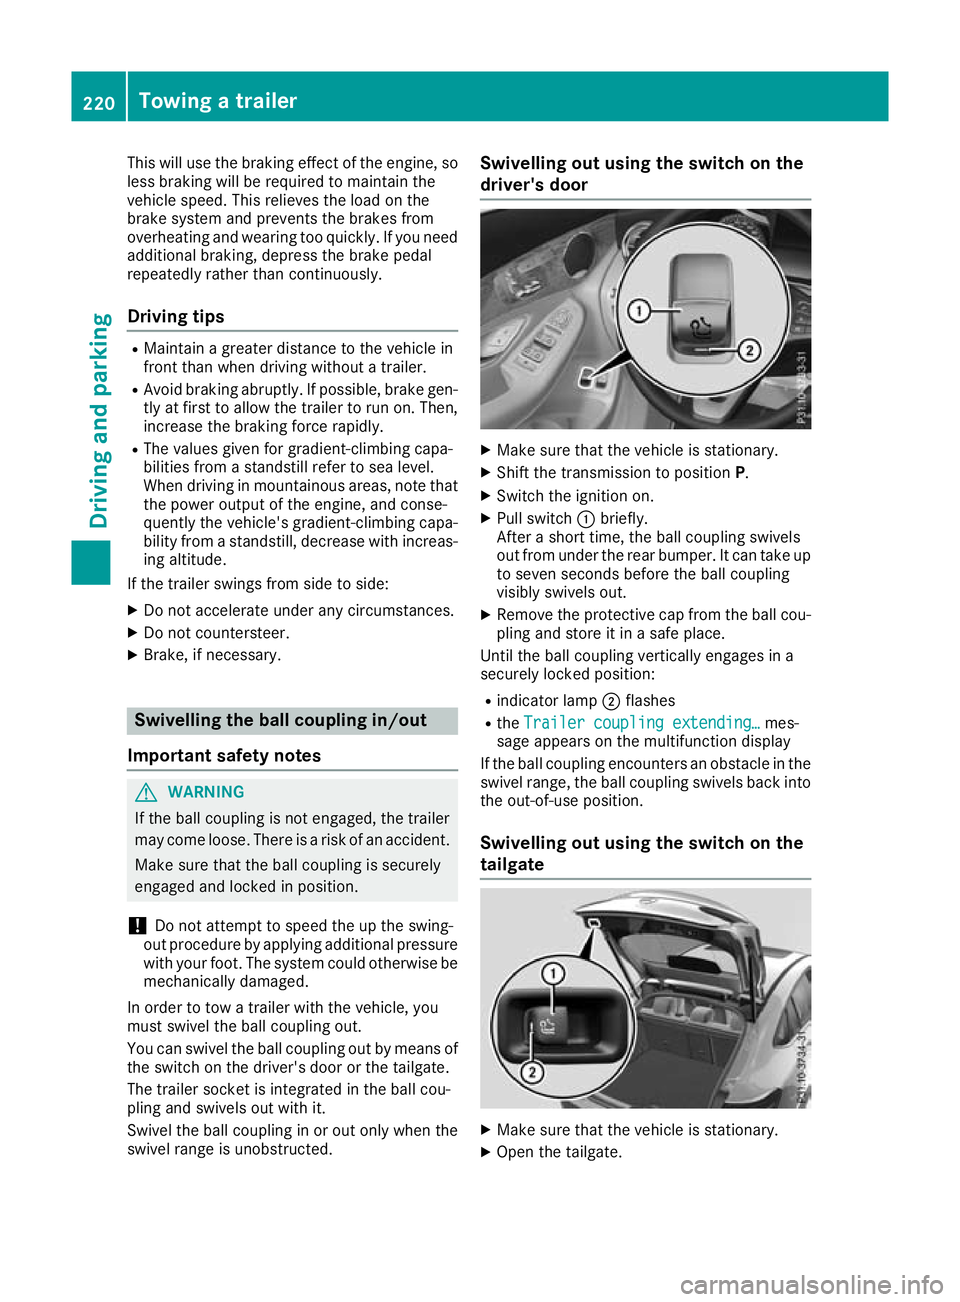
swivel range is unobstructed. Swivelling out using the switch on the
driver's door
X
Make sure that the vehicle is stationary.
X Shift the transmission to position P.
X Switch the ignition on.
X Pull switch :briefly.
After a short time, the ball coupling swivels
out from under the rear bumper. It can take up to seven seconds before the ball coupling
visibly swivels out.
X Remove the protective cap from the ball cou-
pling and store it in a safe place.
Until the ball coupling vertically engages in a
securely locked position:
R indicator lamp ;flashes
R the Trailer coupling extending…
Trailer coupling extending… mes-
sage appears on the multifunction display
If the ball coupling encounters an obstacle in the
swivel range, the ball coupling swivels back into
the out-of-use position.
Swivelling out using the switch on the
tailgate X
Make sure that the vehicle is stationary.
X Open the tailgate. 220
Towing a trailerDriving and parking